Snapdat Guide
 Updated 3 months ago
by
Caleb Kotey
Updated 3 months ago
by
Caleb Kotey
Snapdat a mobile application built for real-time networking, where conversations happen fast and details are easily lost. This guide walks you through the full in-app experience, from setting up your profile to capturing leads and managing follow-ups.
Use this article to understand how Snapdat is structured, where to find key features, and how each part of the app supports your lead capture workflow.
Snapdat overview
Snapdat is a mobile lead-capture app that helps you collect and organize contact information from people you meet at events. With Snapdat, you can:
- Scan business cards or badges
- Create and share your digital business card
- Store and manage leads
- Add notes and tags to contacts
- Organize follow-ups
This helps turn conversations into structured contacts you can act on later.
Installing the Snapdat app
The Snapdat app is available on the Apple App Store on iOS and iPadOS devices and Google play store. Tap Install, then tap Open once installed.
Account setup
When you launch the Snapdat app for the first time, you’ll complete a quick setup to activate your account and prepare your profile for lead capture. To do this, Tap Get Started.
When you tap Get Started, the Snapdat app guides you through a short on-boarding process to create your account and generate your digital business card.
You will be asked to provide the following details in order:
- Your full name
- Job title
- Company name
- Phone number
- Email address
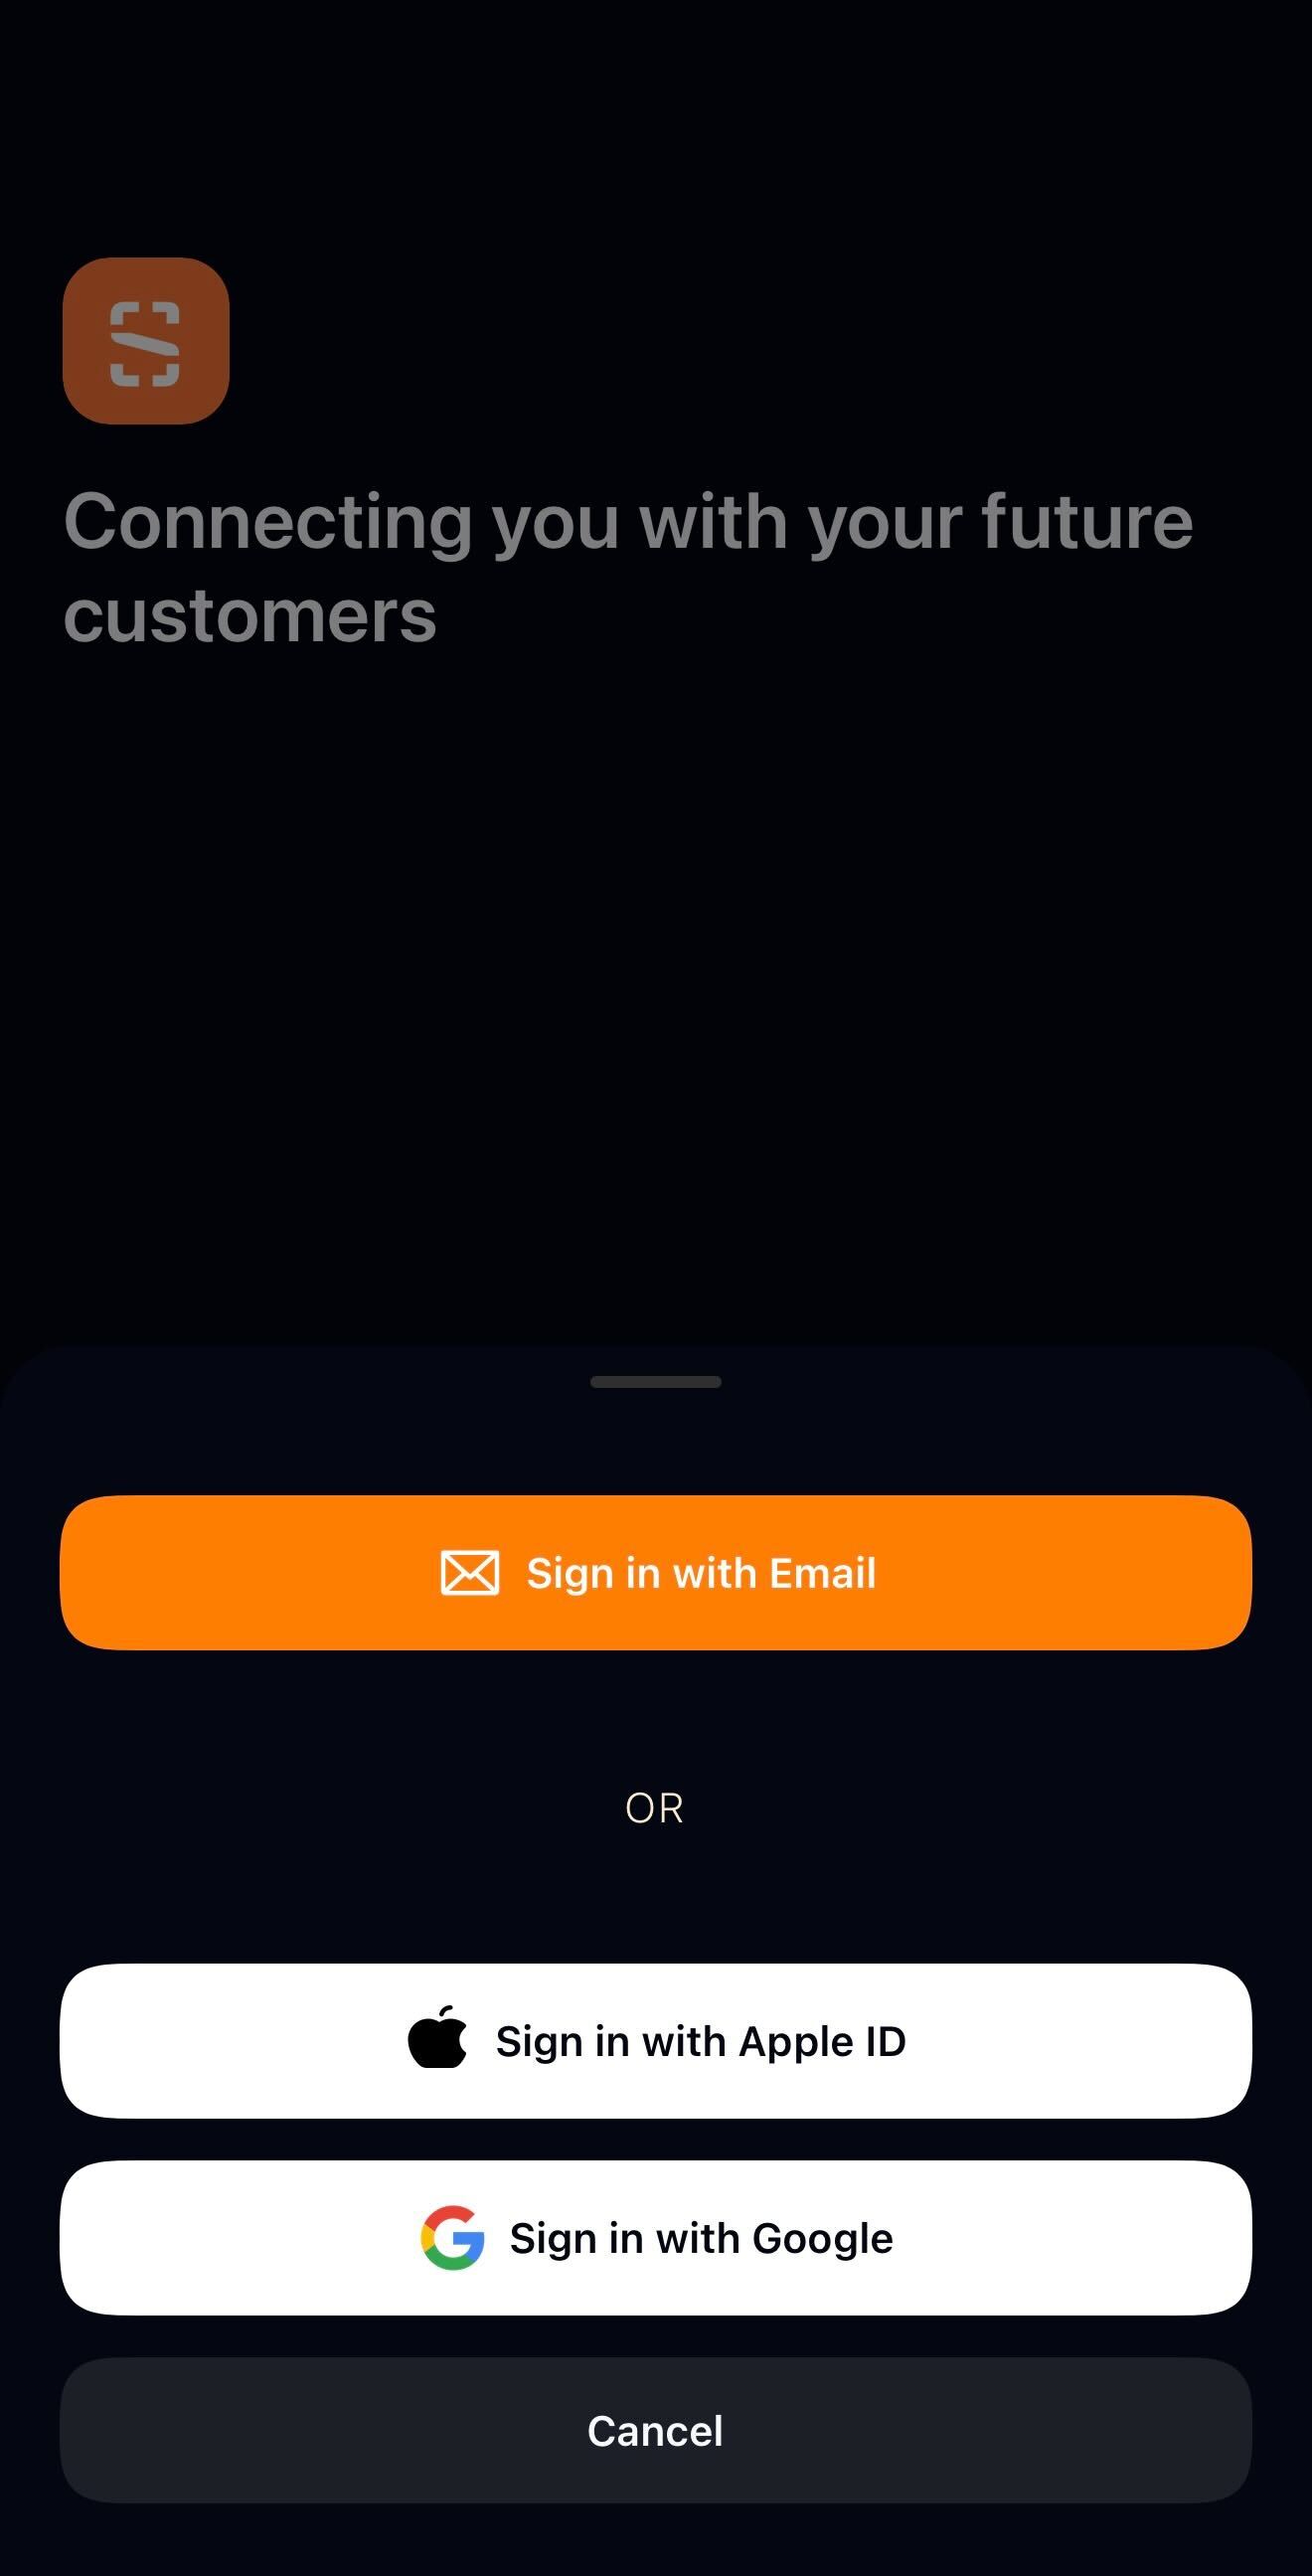
You can then choose how to continue via:
- Sign up using your Apple ID, or
- Continue with your Google (Gmail) account
- Add a profile photo
After completing registration, you’ll be signed in automatically and taken to the Cards page. Your digital business card will be created using the information you entered during setup.
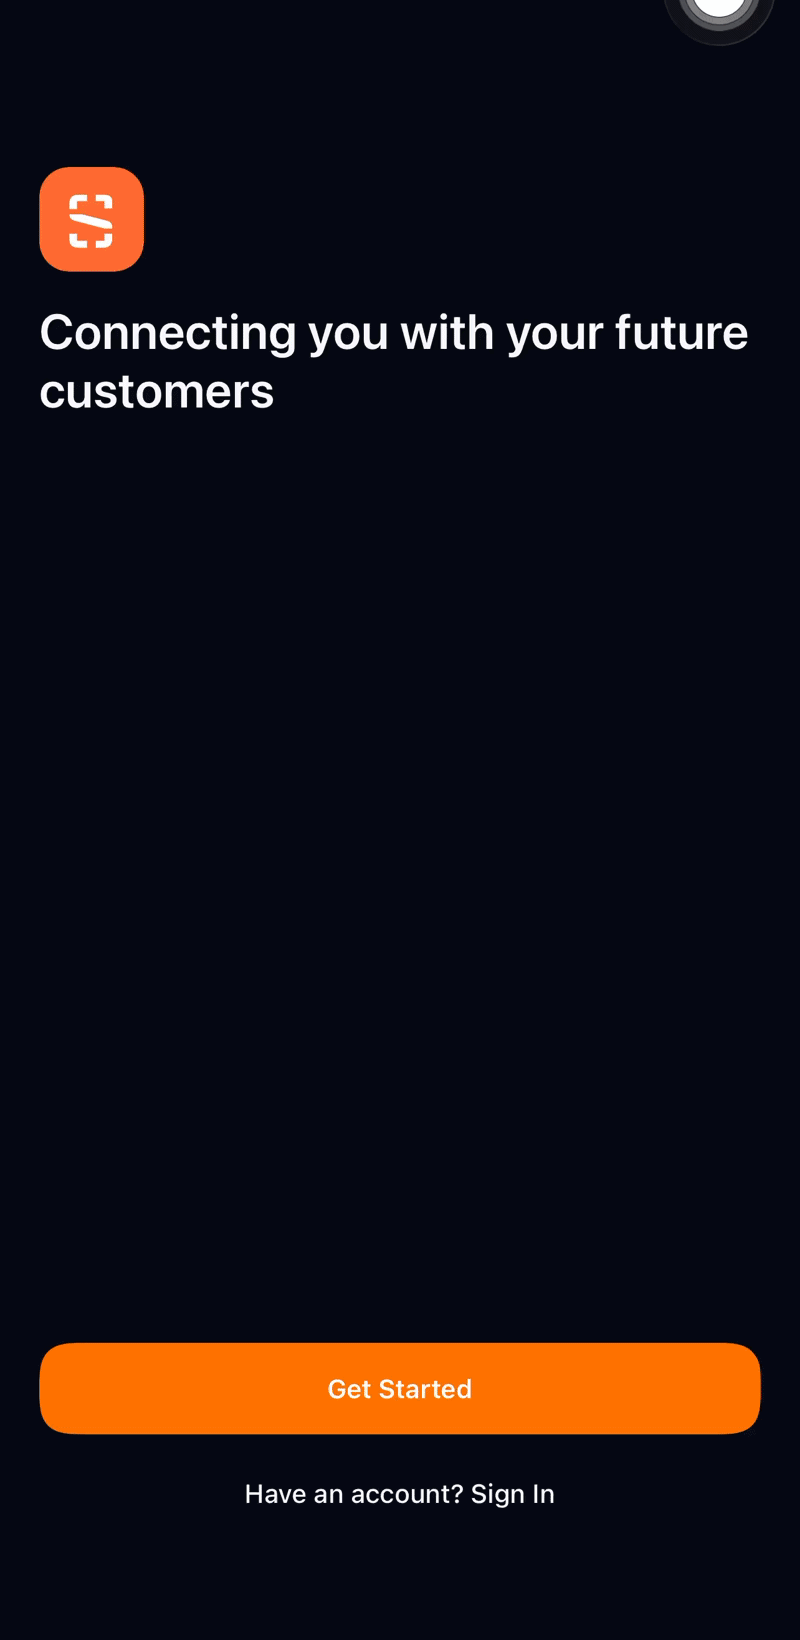
If you already have an account, simply click on the Sign in button. You can sign in with your email, Apple ID or Google.
Account settings & profile information
To access your account details in Snapdat, tap the Settings icon in the top-left corner of the Cards page. This opens the Settings page, where you can view and manage your profile, subscription, and support options.
The Account settings and profile area is organized into five sections, each serving a different purpose:
- Account: This section displays your core profile information, including your account type, company name, and role or job title. It provides a quick overview of your identity and how your profile appears on your digital business cards.
- Uploads: Here, you can view and manage your card uploads. This includes images or assets used for your digital cards, allowing you to review or manage what has been uploaded to your profile.
- Subscription: This section shows your current plan and provides the option to upgrade your subscription. It helps you review your plan details, understand your feature access, and make changes if needed.
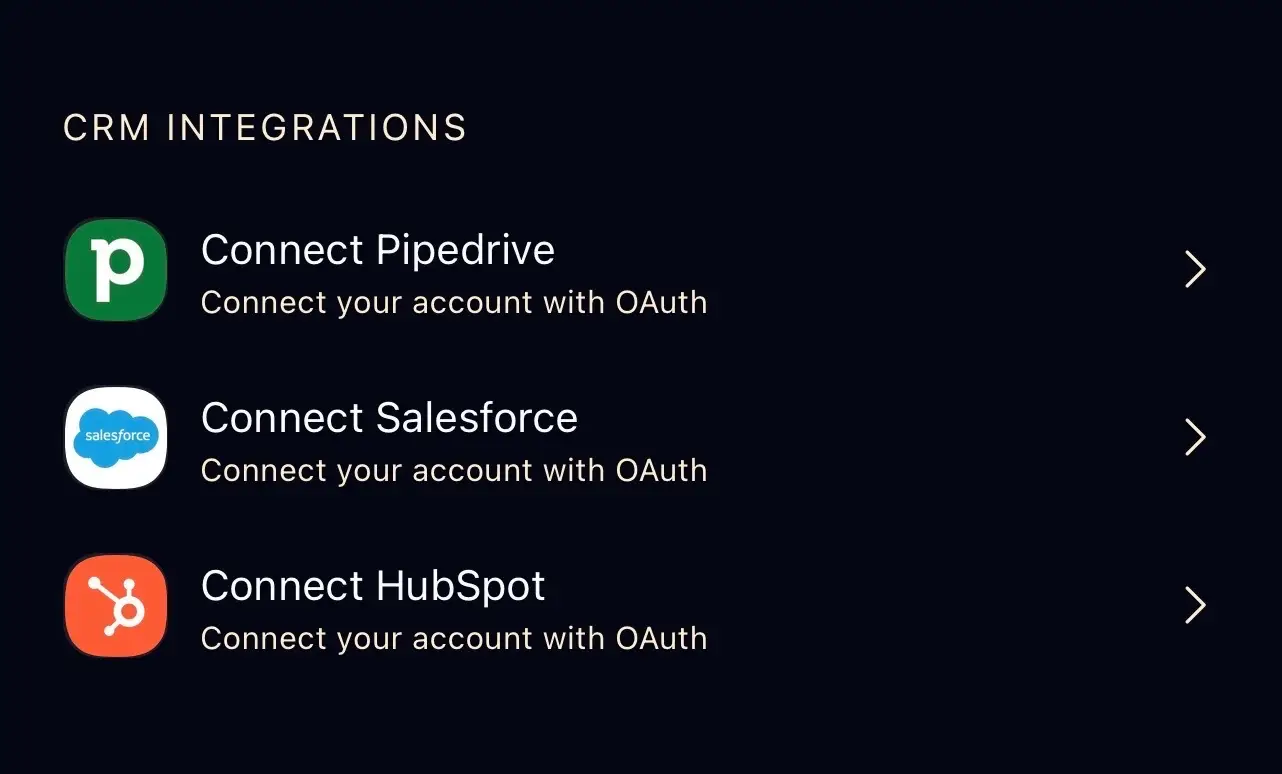
- CRM integrations: This section lets you connect your account to CRM platforms like Pipedrive, Salesforce, and HubSpot to sync and manage your leads
- Support: The Support section gives you access to assistance and important information, including the Help Centre, Contact Support, and the Privacy Policy. Use this area if you need guidance, want to reach the support team, or review how your data is handled.
- Log out: This option allows you to securely sign out of your account on the device you are using.

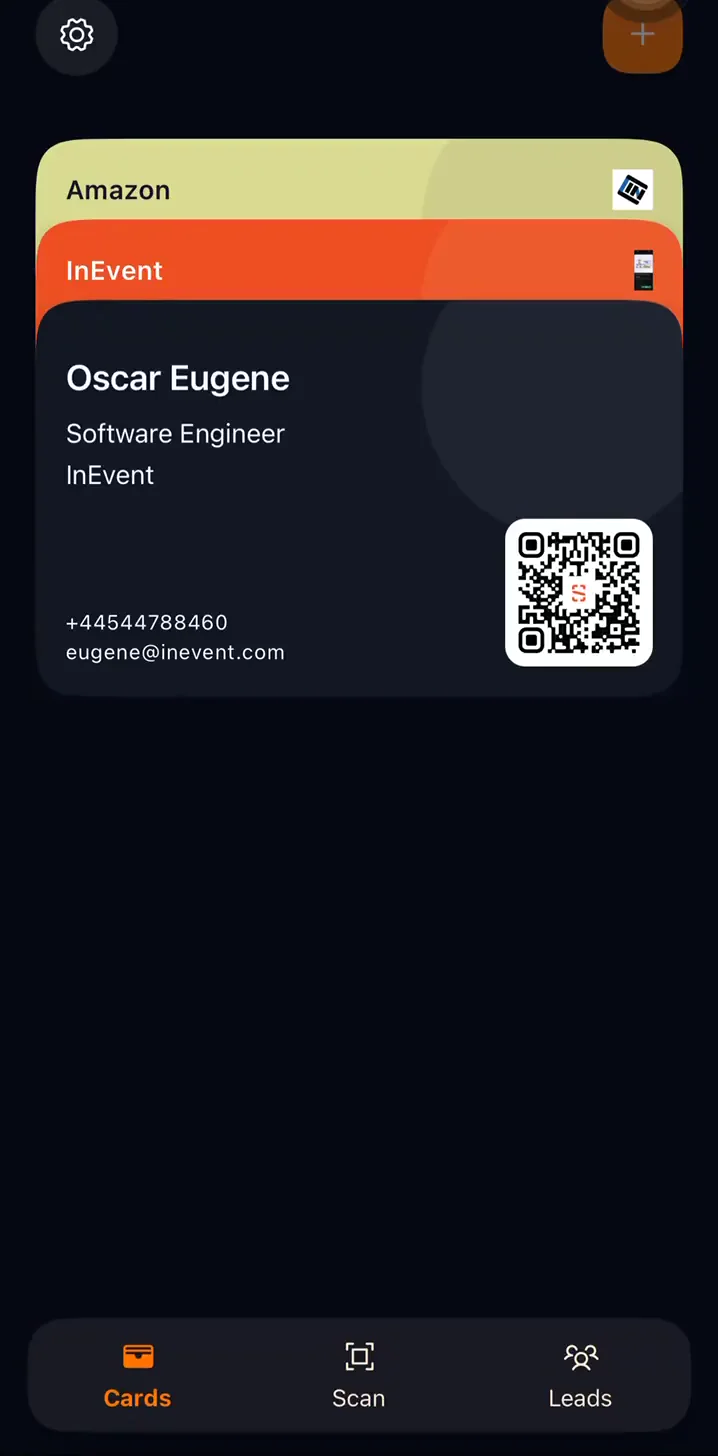
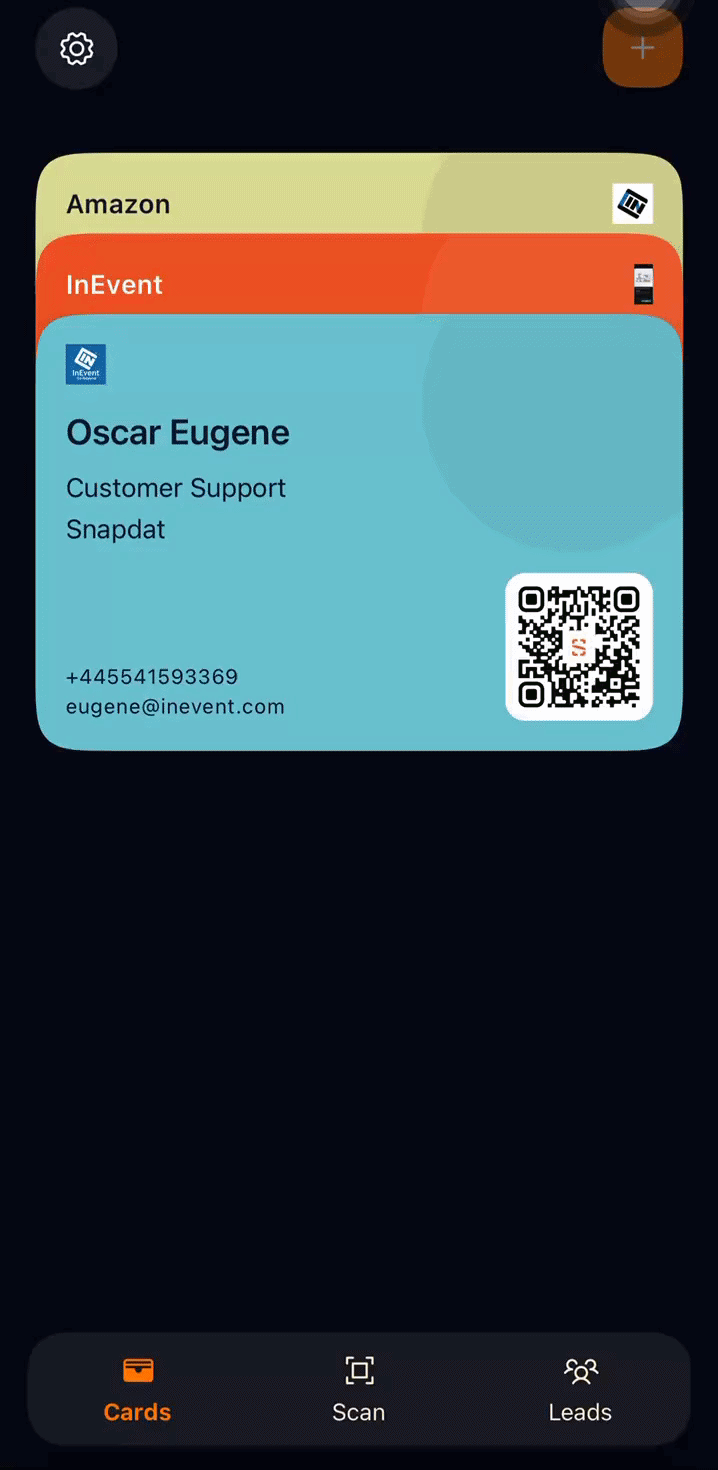
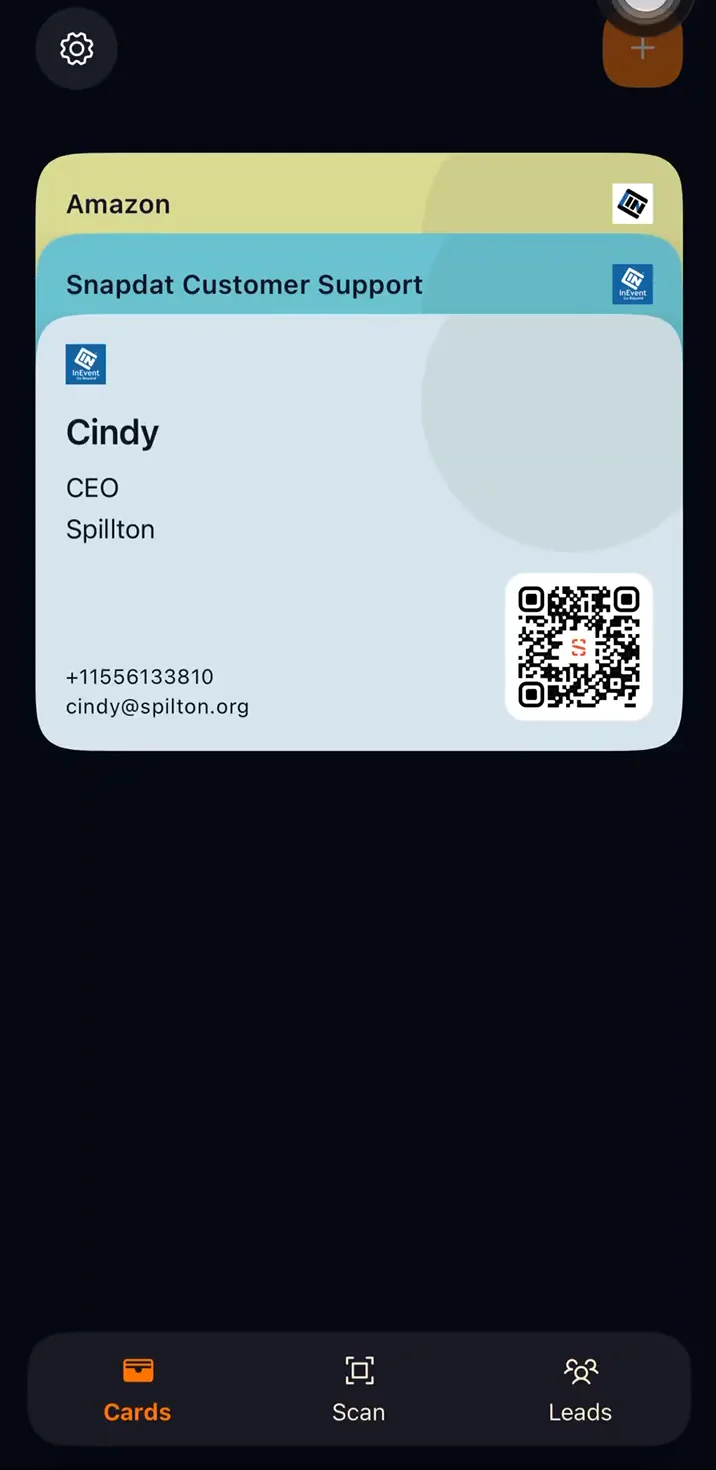
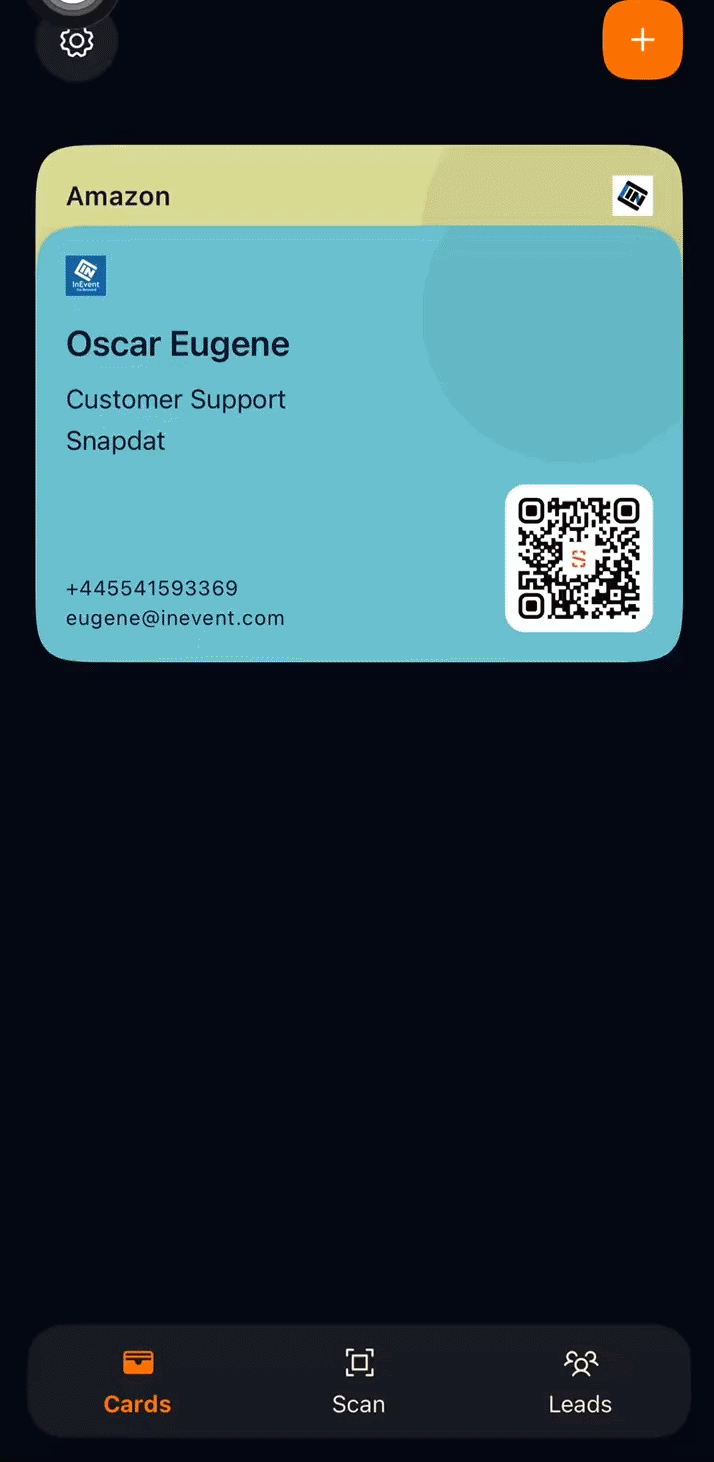
Cards
You can create and manage your digital business card with Snapdat. Snapdat lets you create multiple business cards (depending on your subscription plan) with different details. To create a card, follow the steps below:
- Navigate to the Cards page
- Click on the plus + sign at the top left corner of your screen
- Select a card color
- Enter a card name
- Fill in your business details in their respective fields
- Upload a cover image, profile image, and logo
- Click the save icon in the top right corner to create your card.
After you save your card, it will appear on the cards page along with any other cards you have created in Snapdat.
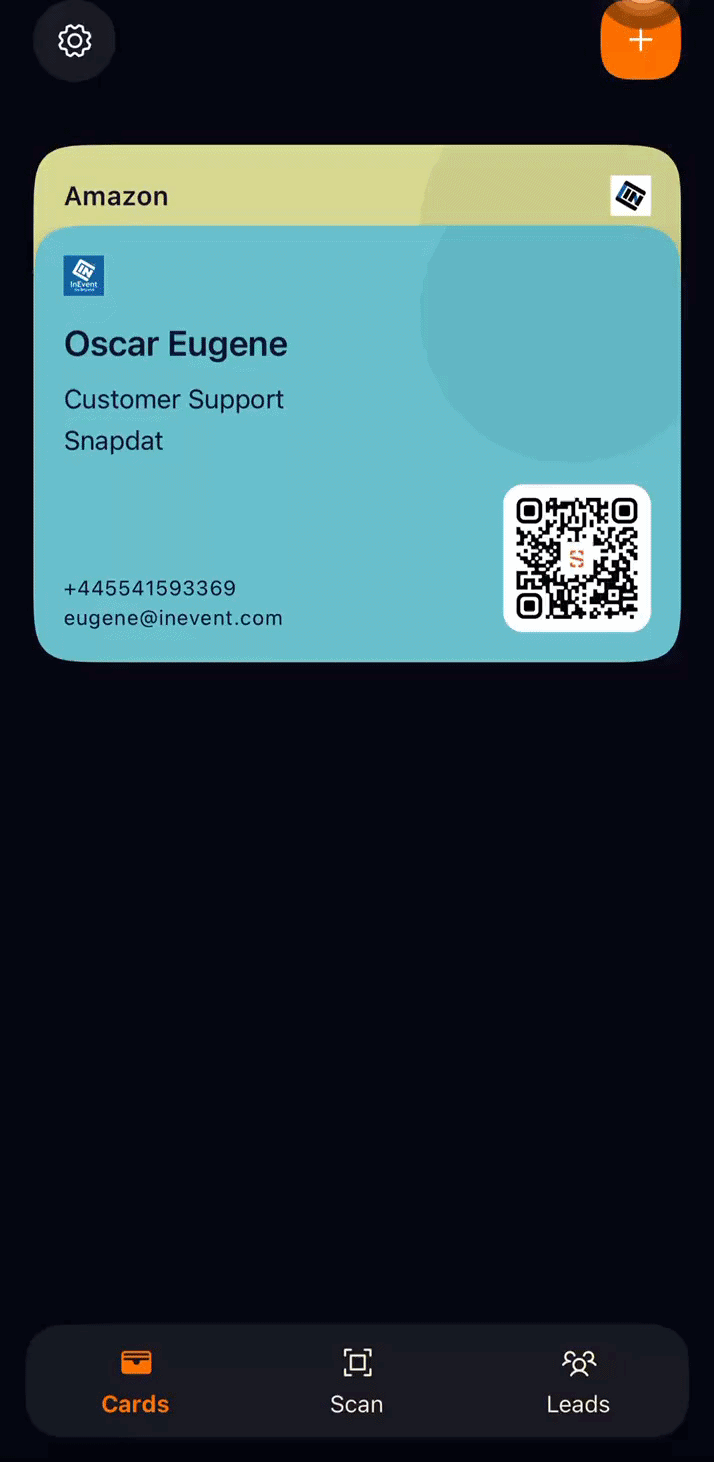
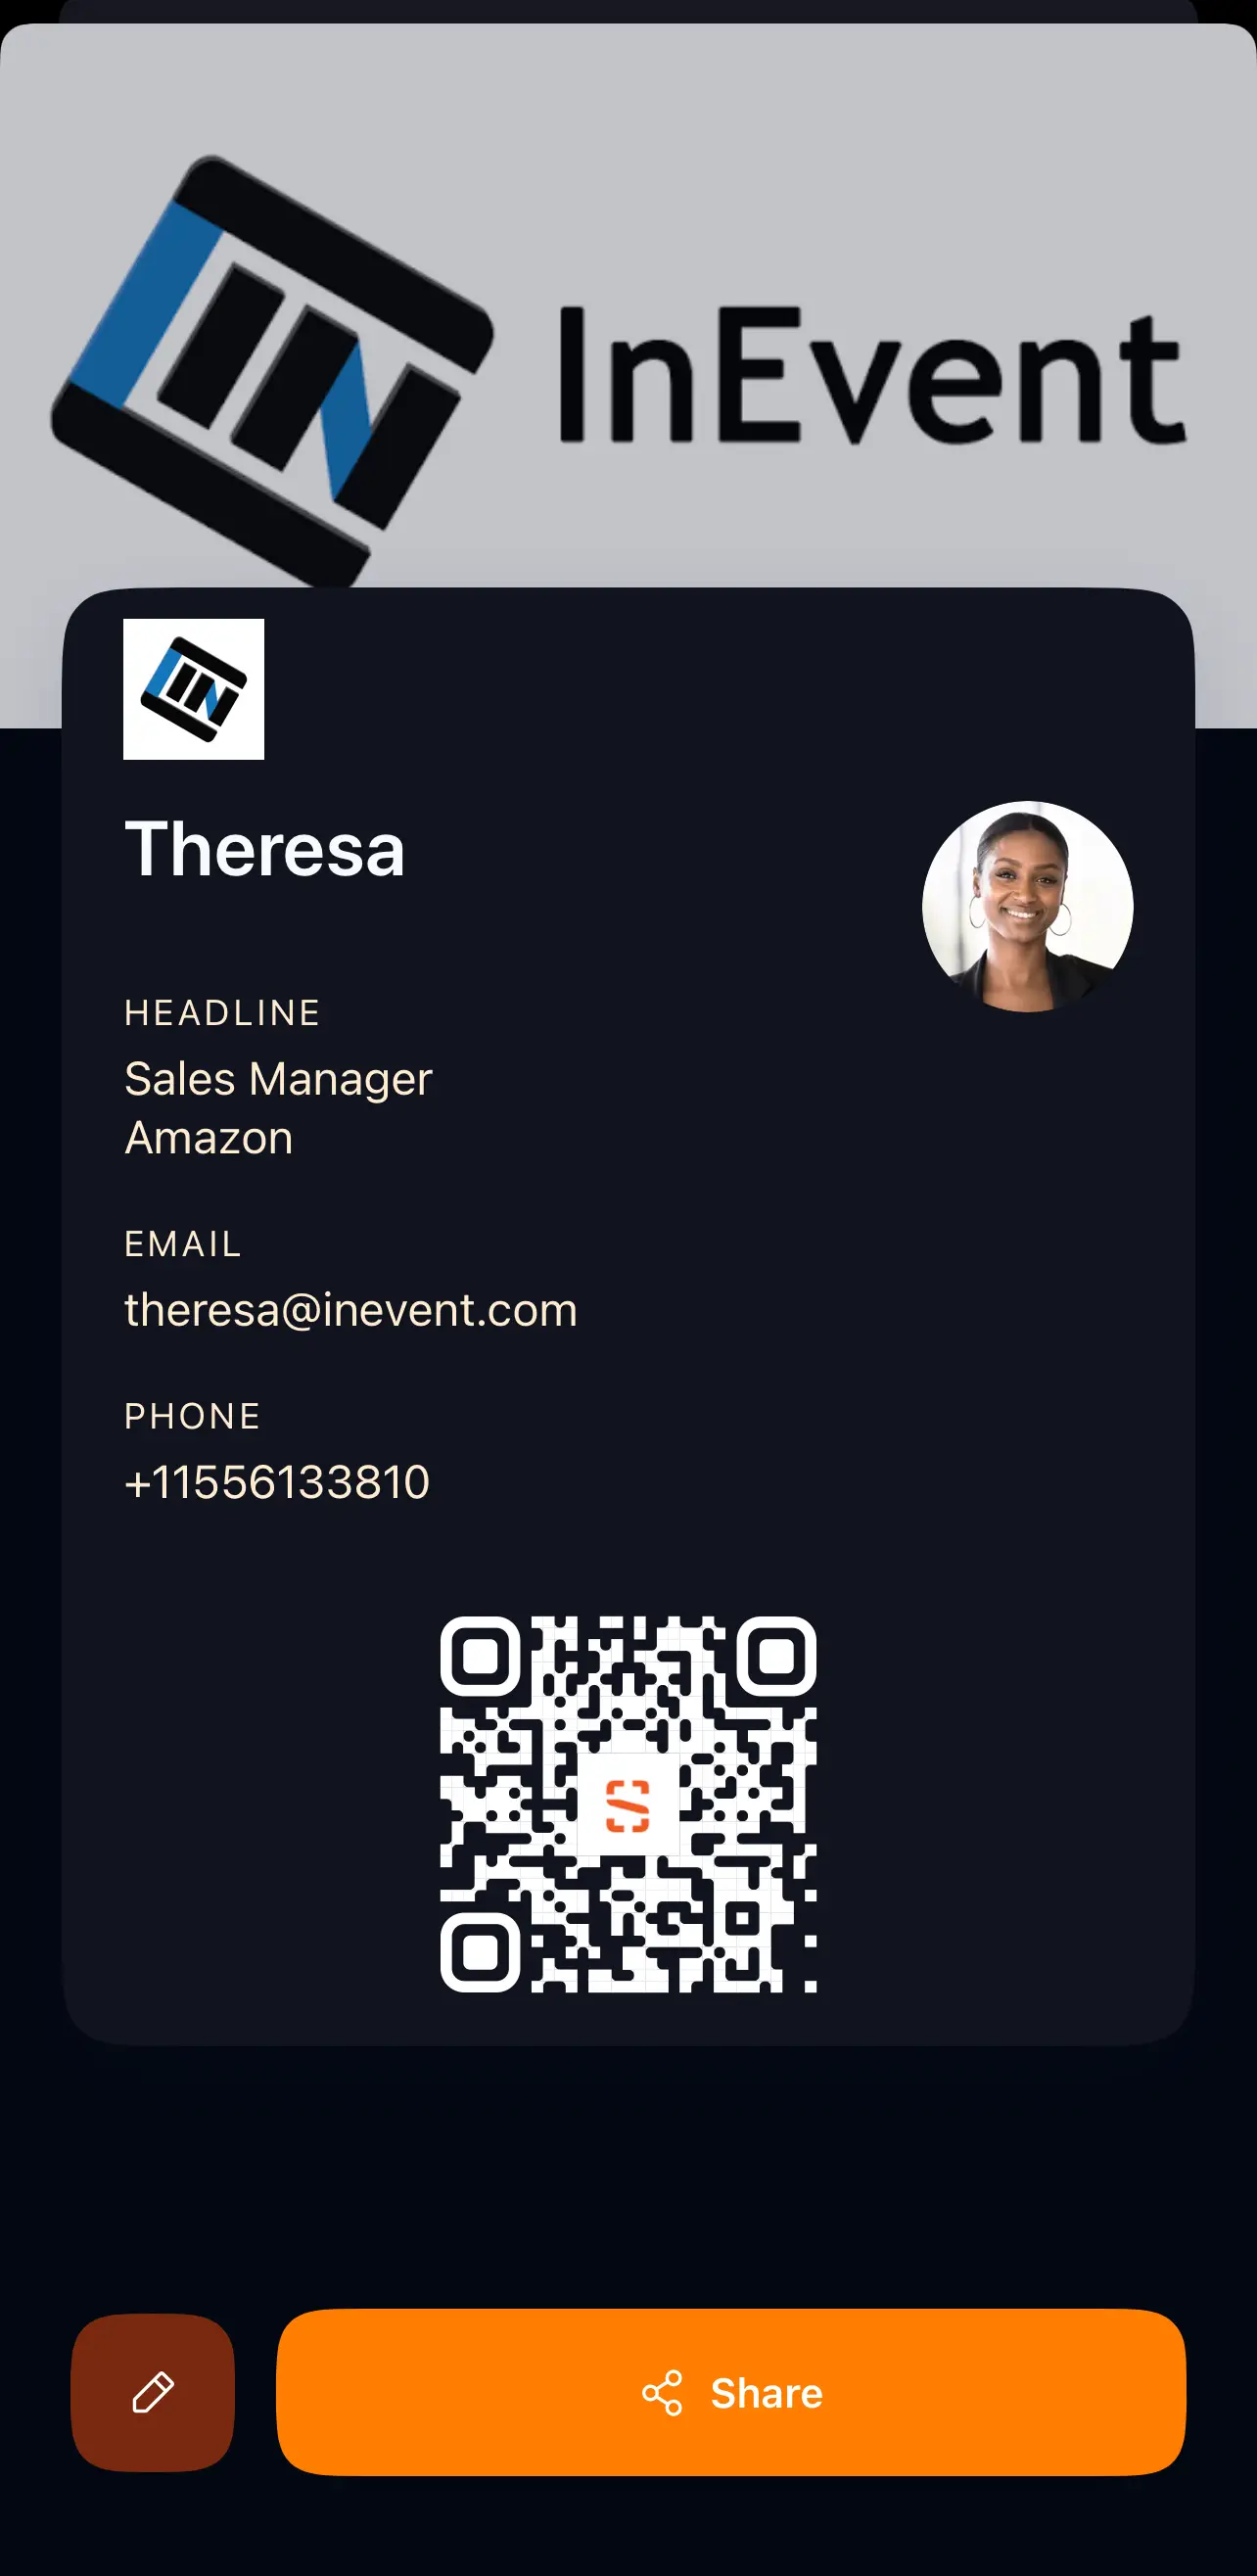
To view your card details, including the cover image, profile image, logo, and contact information, simply tap on the card from the Cards page
Editing card details
You can update your digital card at any time in Snapdat. This allows you to keep your contact information, branding, and images current.
To edit a card:
- Go to the Cards page.
- Tap the card you want to edit.
This opens the Card details page.
- Tap the Edit pen icon at the bottom-left corner.
- The Edit Card screen will open.
From here, you can update:
- Card name
- Card color. Click the +icon to select more custom colors.
- Business details and contact information
- Profile image
- Cover image
- Company logo
- After making your changes, press the save button at the top-right to apply the updates.
Sharing your digital business card
You can share your digital business card directly from the Cards section in Snapdat. This allows prospects to instantly receive and save your contact information in the format that works best for them. To share a card, follow the steps below:
- Go to the Cards page.
- Tap the card you want to share.
- Select Share.
- Choose how you want to send your card.
- Tap Share to complete the action.
Available sharing formats include:
- Snapdat Profile (Smart Link)
A dynamic link that opens your digital profile with full contact details. - Text Card
A simple, plain-text version of your contact information. - Image
A visual version of your digital card that can be saved or shared like a picture. - vCard
A downloadable contact file that can be saved directly to a phone’s address book.
Choose the format that best fits how you want to share your details and how the recipient prefers to receive them.
Deleting cards
You can remove a digital card from Snapdat at any time if it is no longer needed.
To delete a card:
- Go to the Cards page.
- Tap the card you want to delete. This opens the Card Details page.
- Tap the Edit button (bottom-left corner).
- On the Edit Card page, scroll down.
- Tap Remove Card to delete it.
Once removed, the card will no longer appear on your Cards page.
Scanning Leads
The scanning feature in Snapdat lets you capture and enrich contact information instantly using your device camera or an existing image. Whether you’re at an event or meeting, you can quickly scan business cards, badges, or LinkedIn QR codes to build your leads database.
Snapdat supports two scanning modes:
- Normal mode: Processes and enriches data immediately after each scan.
- Fast mode: Captures scans instantly and processes them in the background, allowing you to scan multiple items quickly without waiting.
Snapdat also supports offline scanning. If you are not connected to the internet, your scans will be saved locally and automatically processed once your connection is restored.
To scan a lead:
- Tap the Scan option from the bottom navigation.
You will be taken to the scanning screen.
- Choose the type of item you want to scan:
- Paper business card
- Event badge
- LinkedIn QR code
- Position the item within the camera frame and capture it.
Alternatively, select an image from your device that contains a business card, event badge, or QR code. Snapdat will automatically analyze the scan or image and extract the necessary contact details.
- Review the captured information.
- Add notes about your interaction (optional).
- Create or assign tags to categorize the lead (optional).
- Select Done to save the lead.

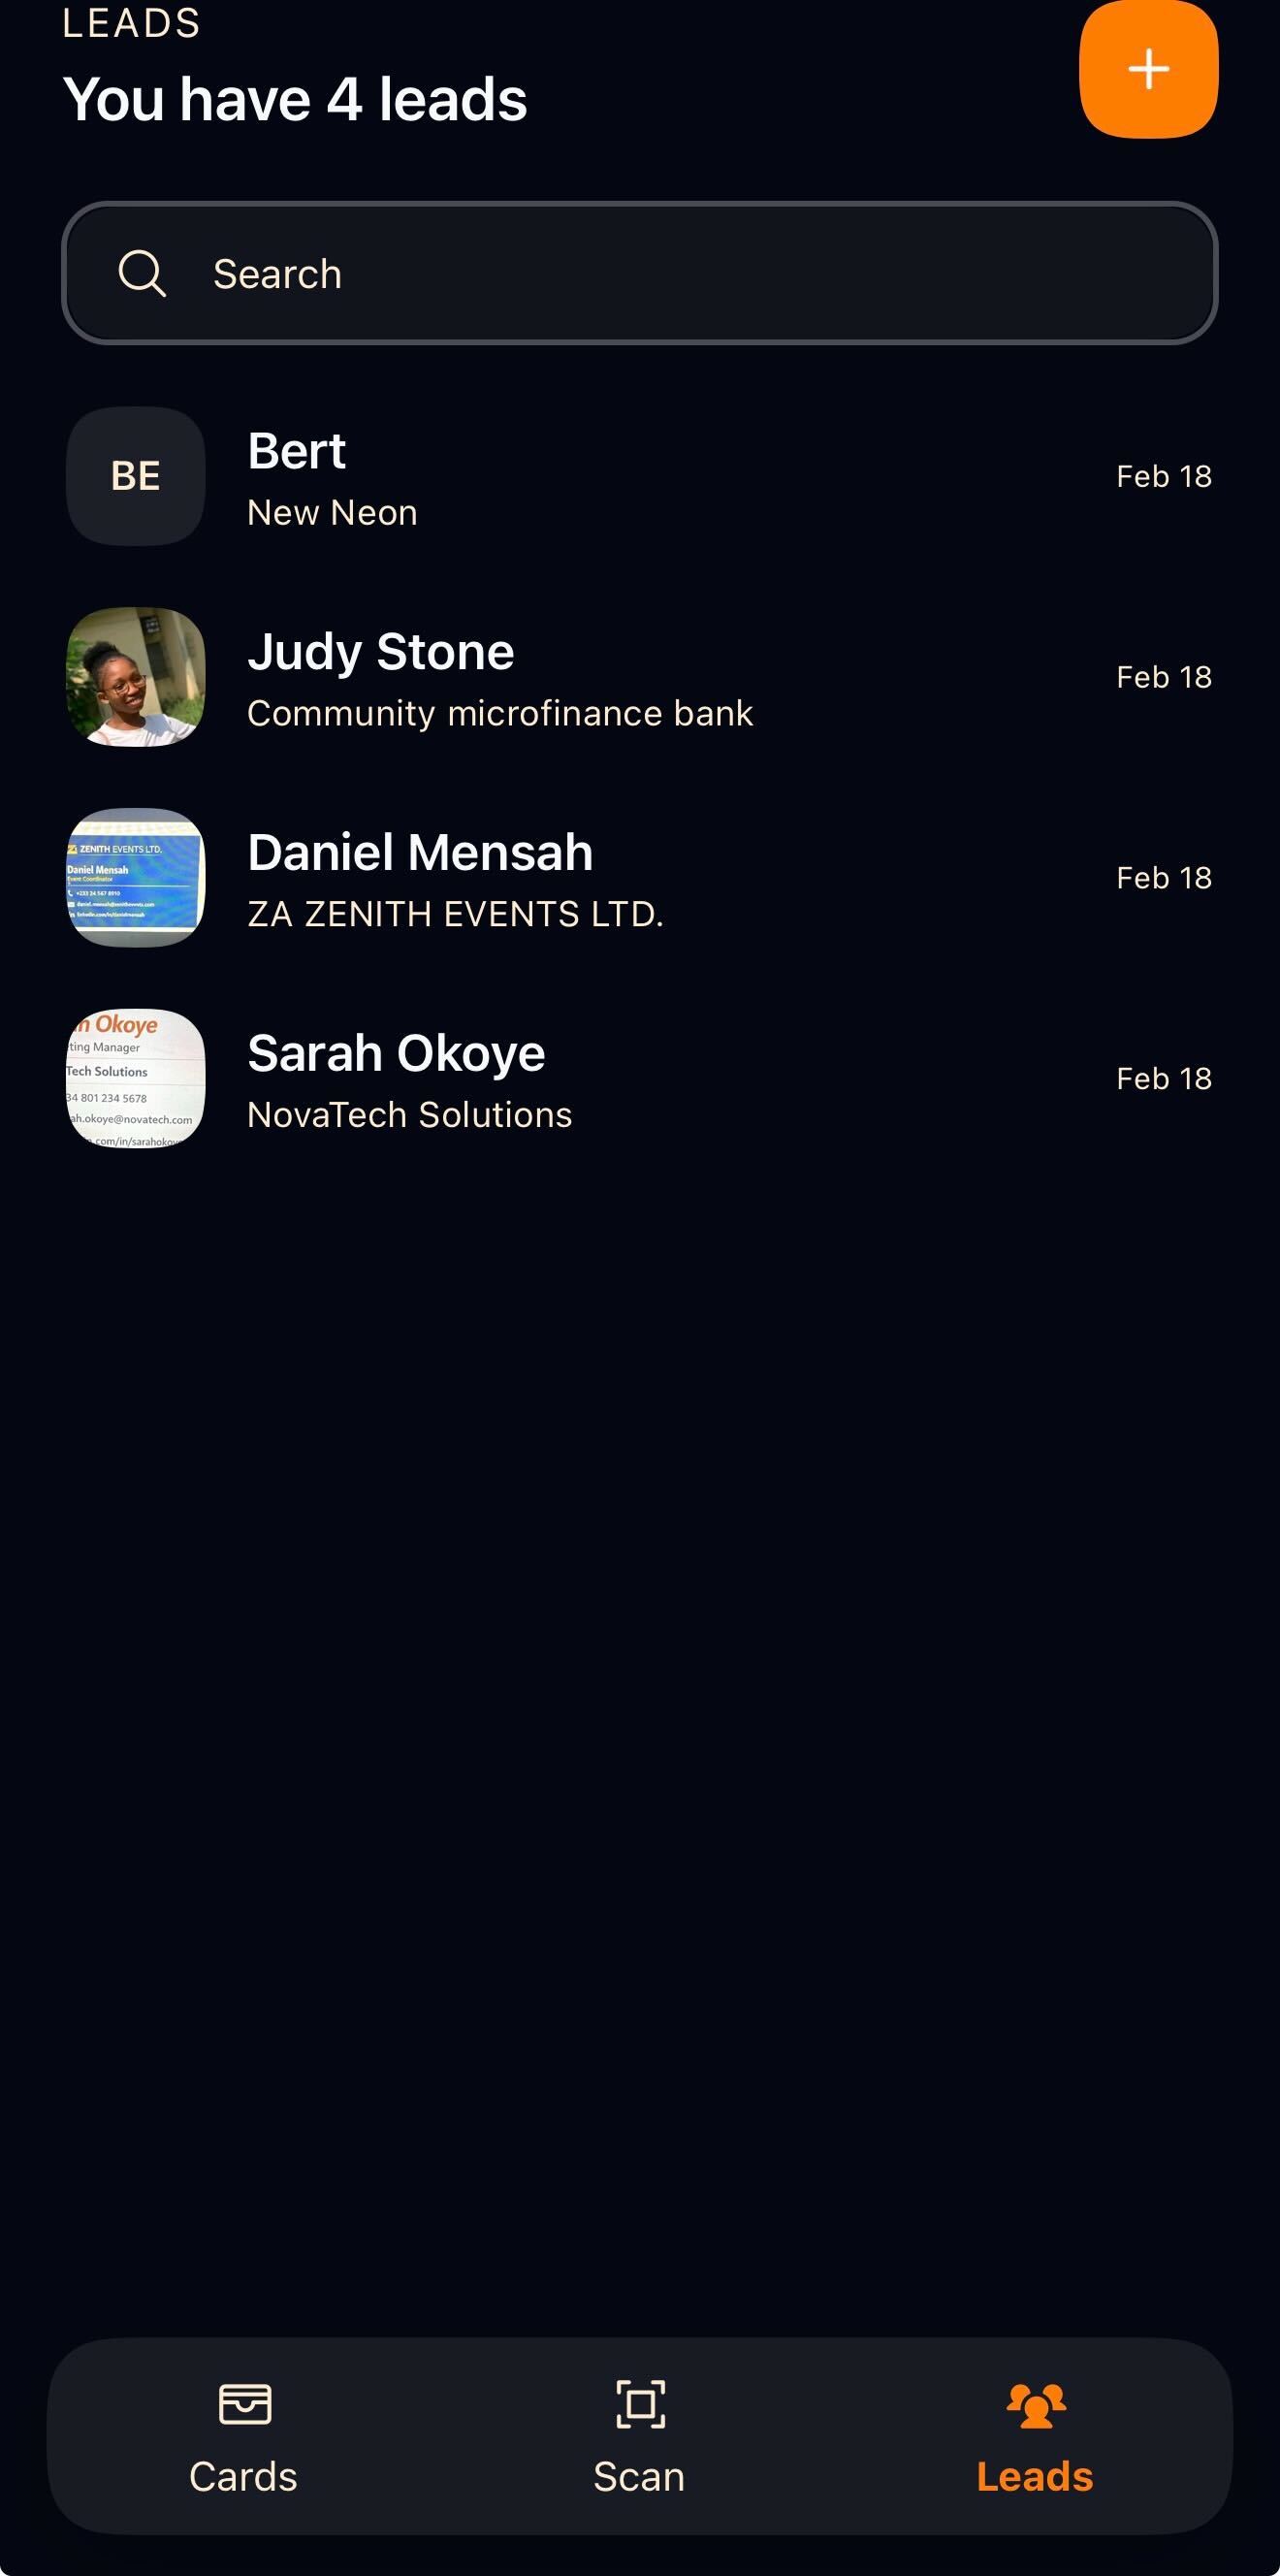
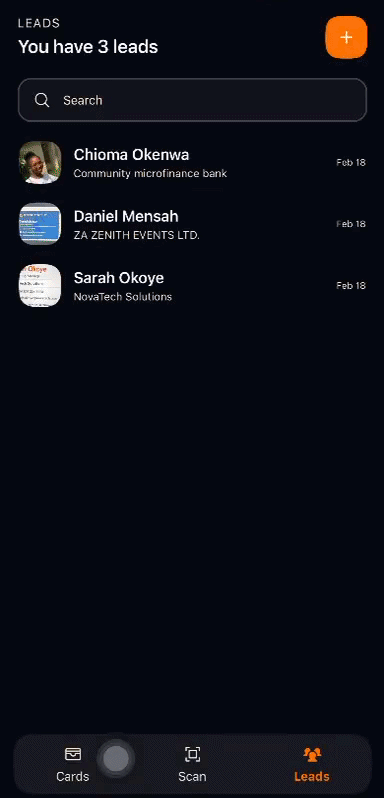
Leads Management
In Snapdat, all captured contact information, whether from scanned business cards, event badges, LinkedIn QR codes, images from your device, or manually entered details, is stored in the Leads section, which serves as your central contact database where you can view your total leads, search by name or company, review individual profiles, and add new leads manually.
Adding a lead manually
If you want to add a contact without scanning, you can create a lead manually.
To add a lead:
- Go to the Leads page.
- Tap the + icon in the top-right corner.
- Enter the contact details, such as:
- Name
- Phone number
- Company
- Job title
- Website: must follow the format: https://www.example.com
- Address
- Add tags by clicking the Tag icon. You can create a new tag or select an existing one.
- Enter any relevant notes about the lead at the top of the page.
- Tap the Save icon to store the lead.
The contact will then appear in your Leads list for future reference and follow-up.
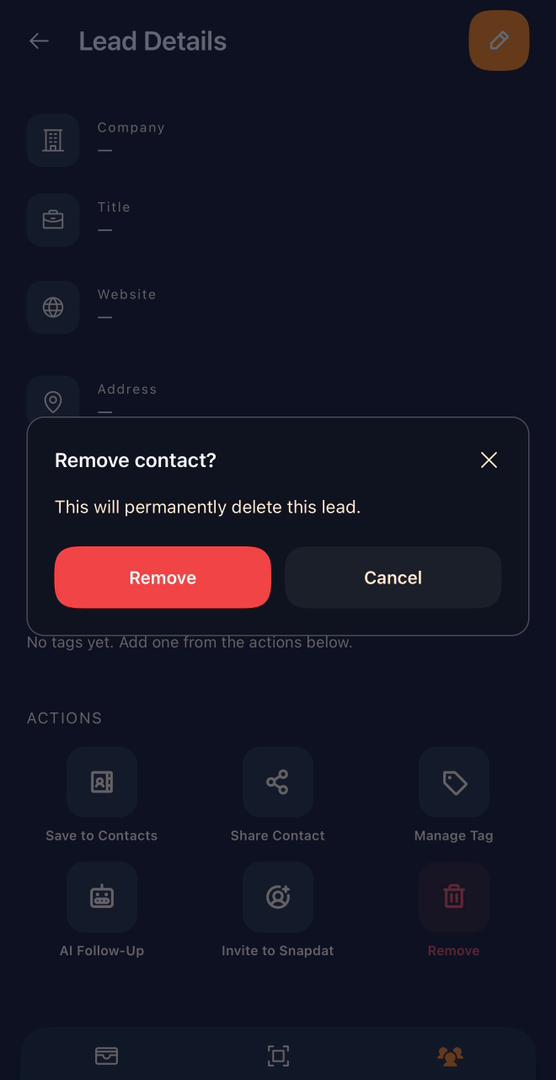
Editing and removing leads
All leads can be edited at any time.
To edit a lead:
- Click on the lead you wish to update.
- Tap the pencil icon at the top-right corner of the page.
- Make the necessary changes to the contact information.
At the bottom of the lead details page, you will see additional Actions available:
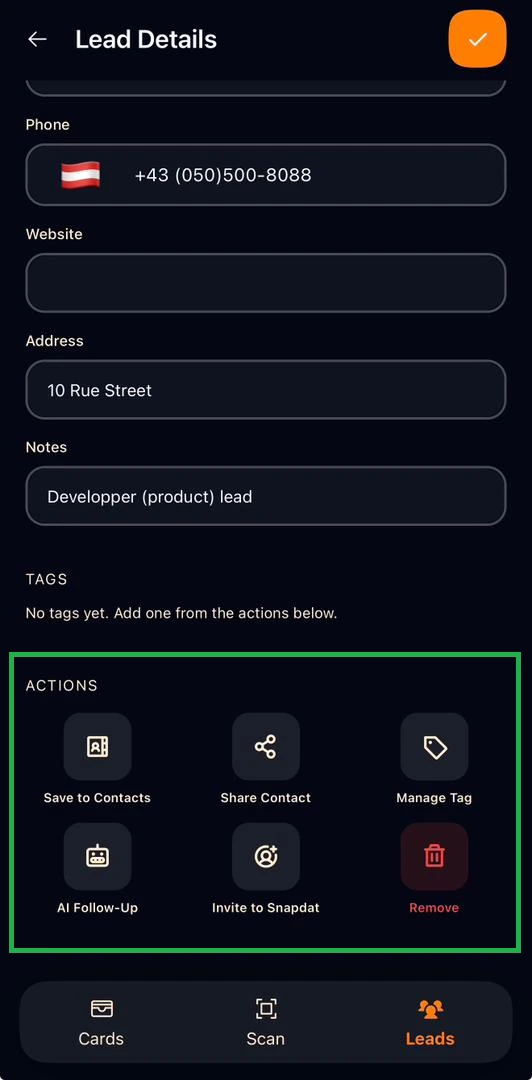
- Save to Contacts: Save the lead directly to your phone contacts. A notification will appear requesting access to your contacts. Click Continue to grant permission.
- Share Contact: Share the lead’s details via messages, email, notes, files, Dropbox, and other available apps.
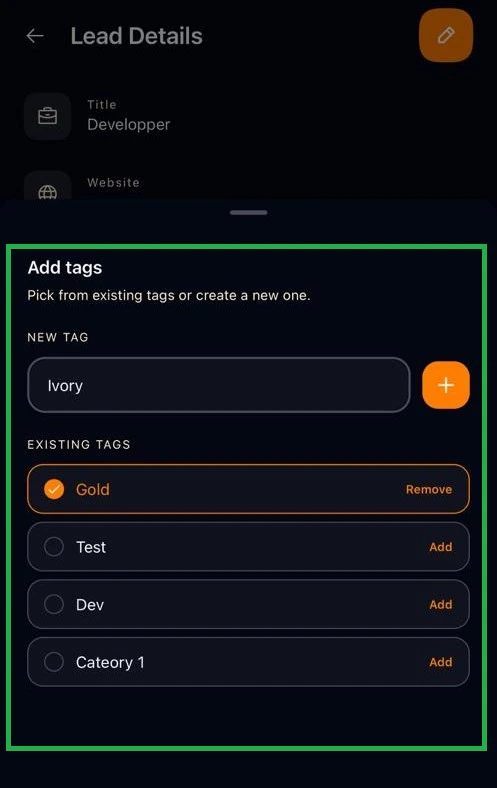
- Manage Tag: Add or remove tags from the lead’s profile.
- Click Manage Tag.
- Tick the checkbox next to an existing tag to add it.
- Untick the checkbox to remove it.
- To create a new tag, enter the tag name in the New Tag field and click the + button. The new tag will automatically be selected.
- AI Follow-up: Follow up on leads(x)
- Invite to Snapdat: Invite leads and users to Snapdat
- Remove: Tap the Remove button to remove the lead contact. A confirmation notice will be displayed. Select Remove again to confirm your actions.
Exporting Leads
To export your leads in Snapdat, follow the steps below:
- Tap the Leads tab to navigate to the Leads screen.
- On the Leads page, tap the Share icon located at the top-right corner.
- This will take you to the Exports page. Click Generate Export.
- In the export options, you can:
- Filter leads by tags or date
- Connect to a CRM to export leads directly
- Once configured, click Generate Export to finalize.
Your export will then be processed based on the selected criteria.
Notes
Snapdat lets you record context from your interactions as notes, such as what you discussed, follow-up actions, and important personal details to remember. This helps you maintain meaningful and personalized relationships after events.
You can add notes in two main ways:
- When scanning a lead: After scanning a business card, badge, or QR code, you have the option to add notes before completing the process. This allows you to immediately capture context while the conversation is still fresh.
- When adding a lead manually: From the Leads page, when creating a new lead manually, you can include notes during the lead creation process.
In short, whether you add a lead through scanning or manual entry, you have the opportunity to attach notes to ensure important details are not lost.

Tags
Tags in Snapdat let you organize and categorize leads using custom labels such as Prospect, Partner, VIP, Marketing, or Follow-up Needed. This makes it easier to filter, group, and prioritize your contacts.
Adding tags:
- When creating a lead: tap the tag icon at the bottom right corner when scanning a lead or manually adding one from the Leads page. Choose an existing tag or create a new one.
- After adding a lead: If a lead was added without a tag, go to the Leads page, select the lead, scroll to the Actions section, and tap Manage Tags. The Add Tags pop-up will appear, allowing you to add or update tags.

Consistently using tags keeps your leads organized and easy to manage.
Plans and subscriptions
After completing account setup in Snapdat, you’ll be prompted to choose a subscription plan. Your selected plan determines not only how many digital business cards you can create, but also the features available to support your networking and lead management.
Depending on the plan, features may include unlimited card scanning with automation and sync, Snapdat AI, custom lead capture forms, one-tap contact saving, branded push notifications, lifetime analytics, unlimited device management, priority support, the ability to capture others’ contact information, paper and digital card scanning, and integrations with CRM systems. Higher-tier plans provide expanded access to these capabilities along with increased card limits. At the moment, there are two paid plans available:
- Premium Monthly and
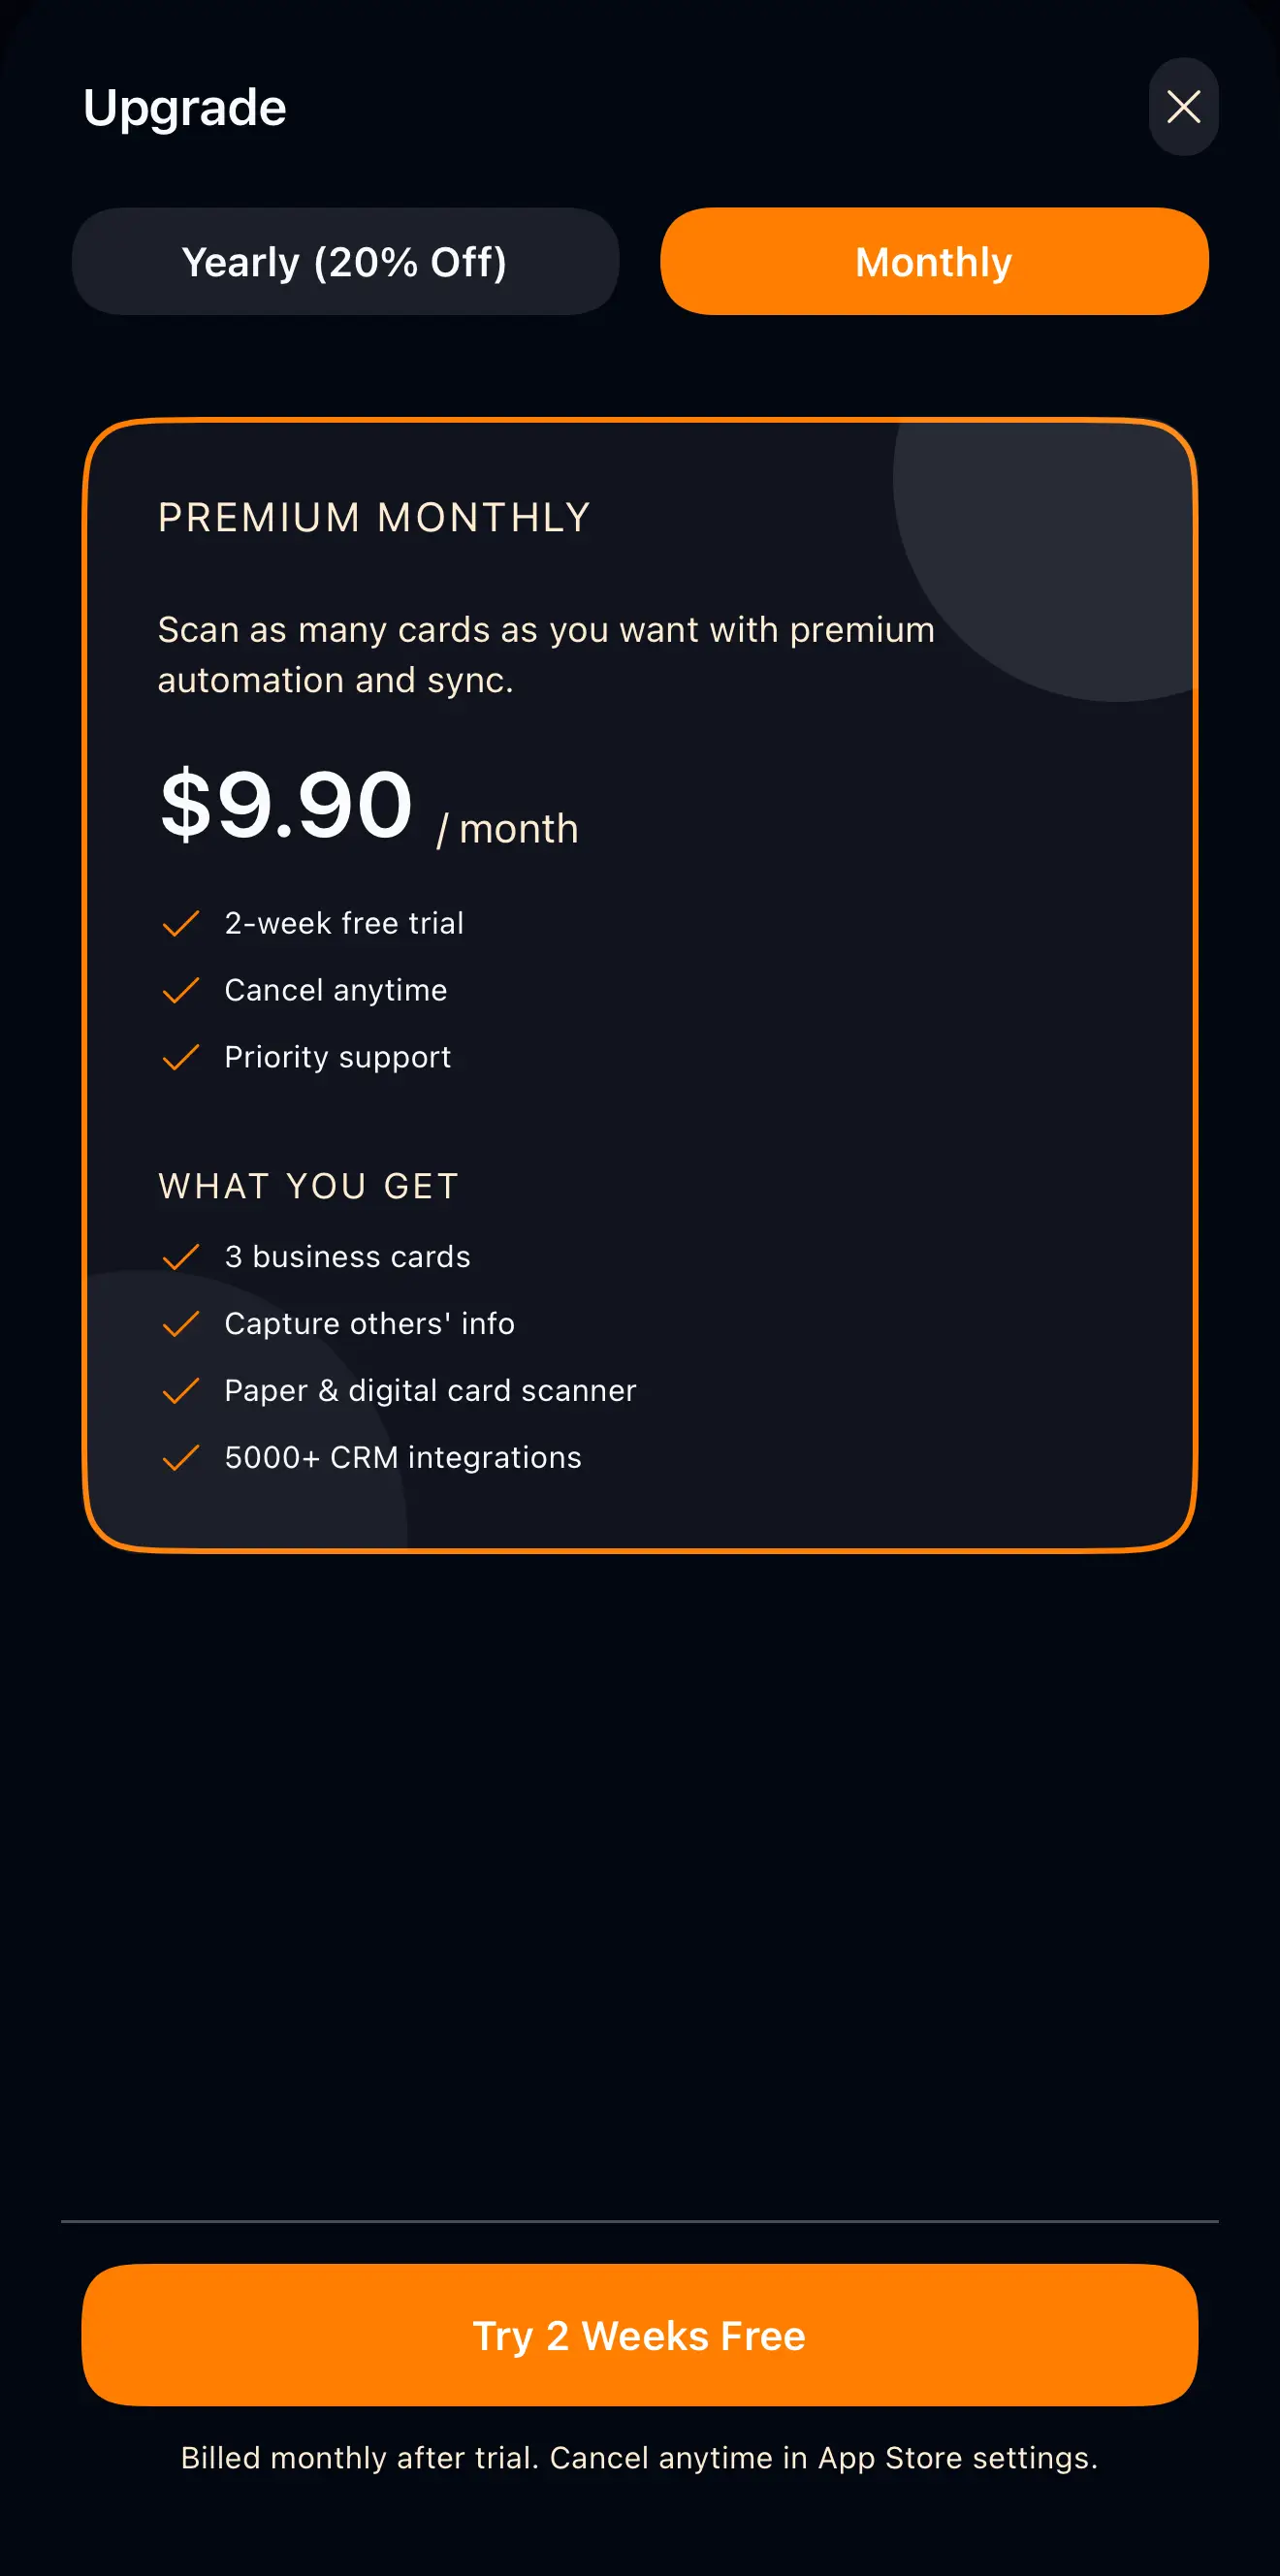
- Premium Yearly.
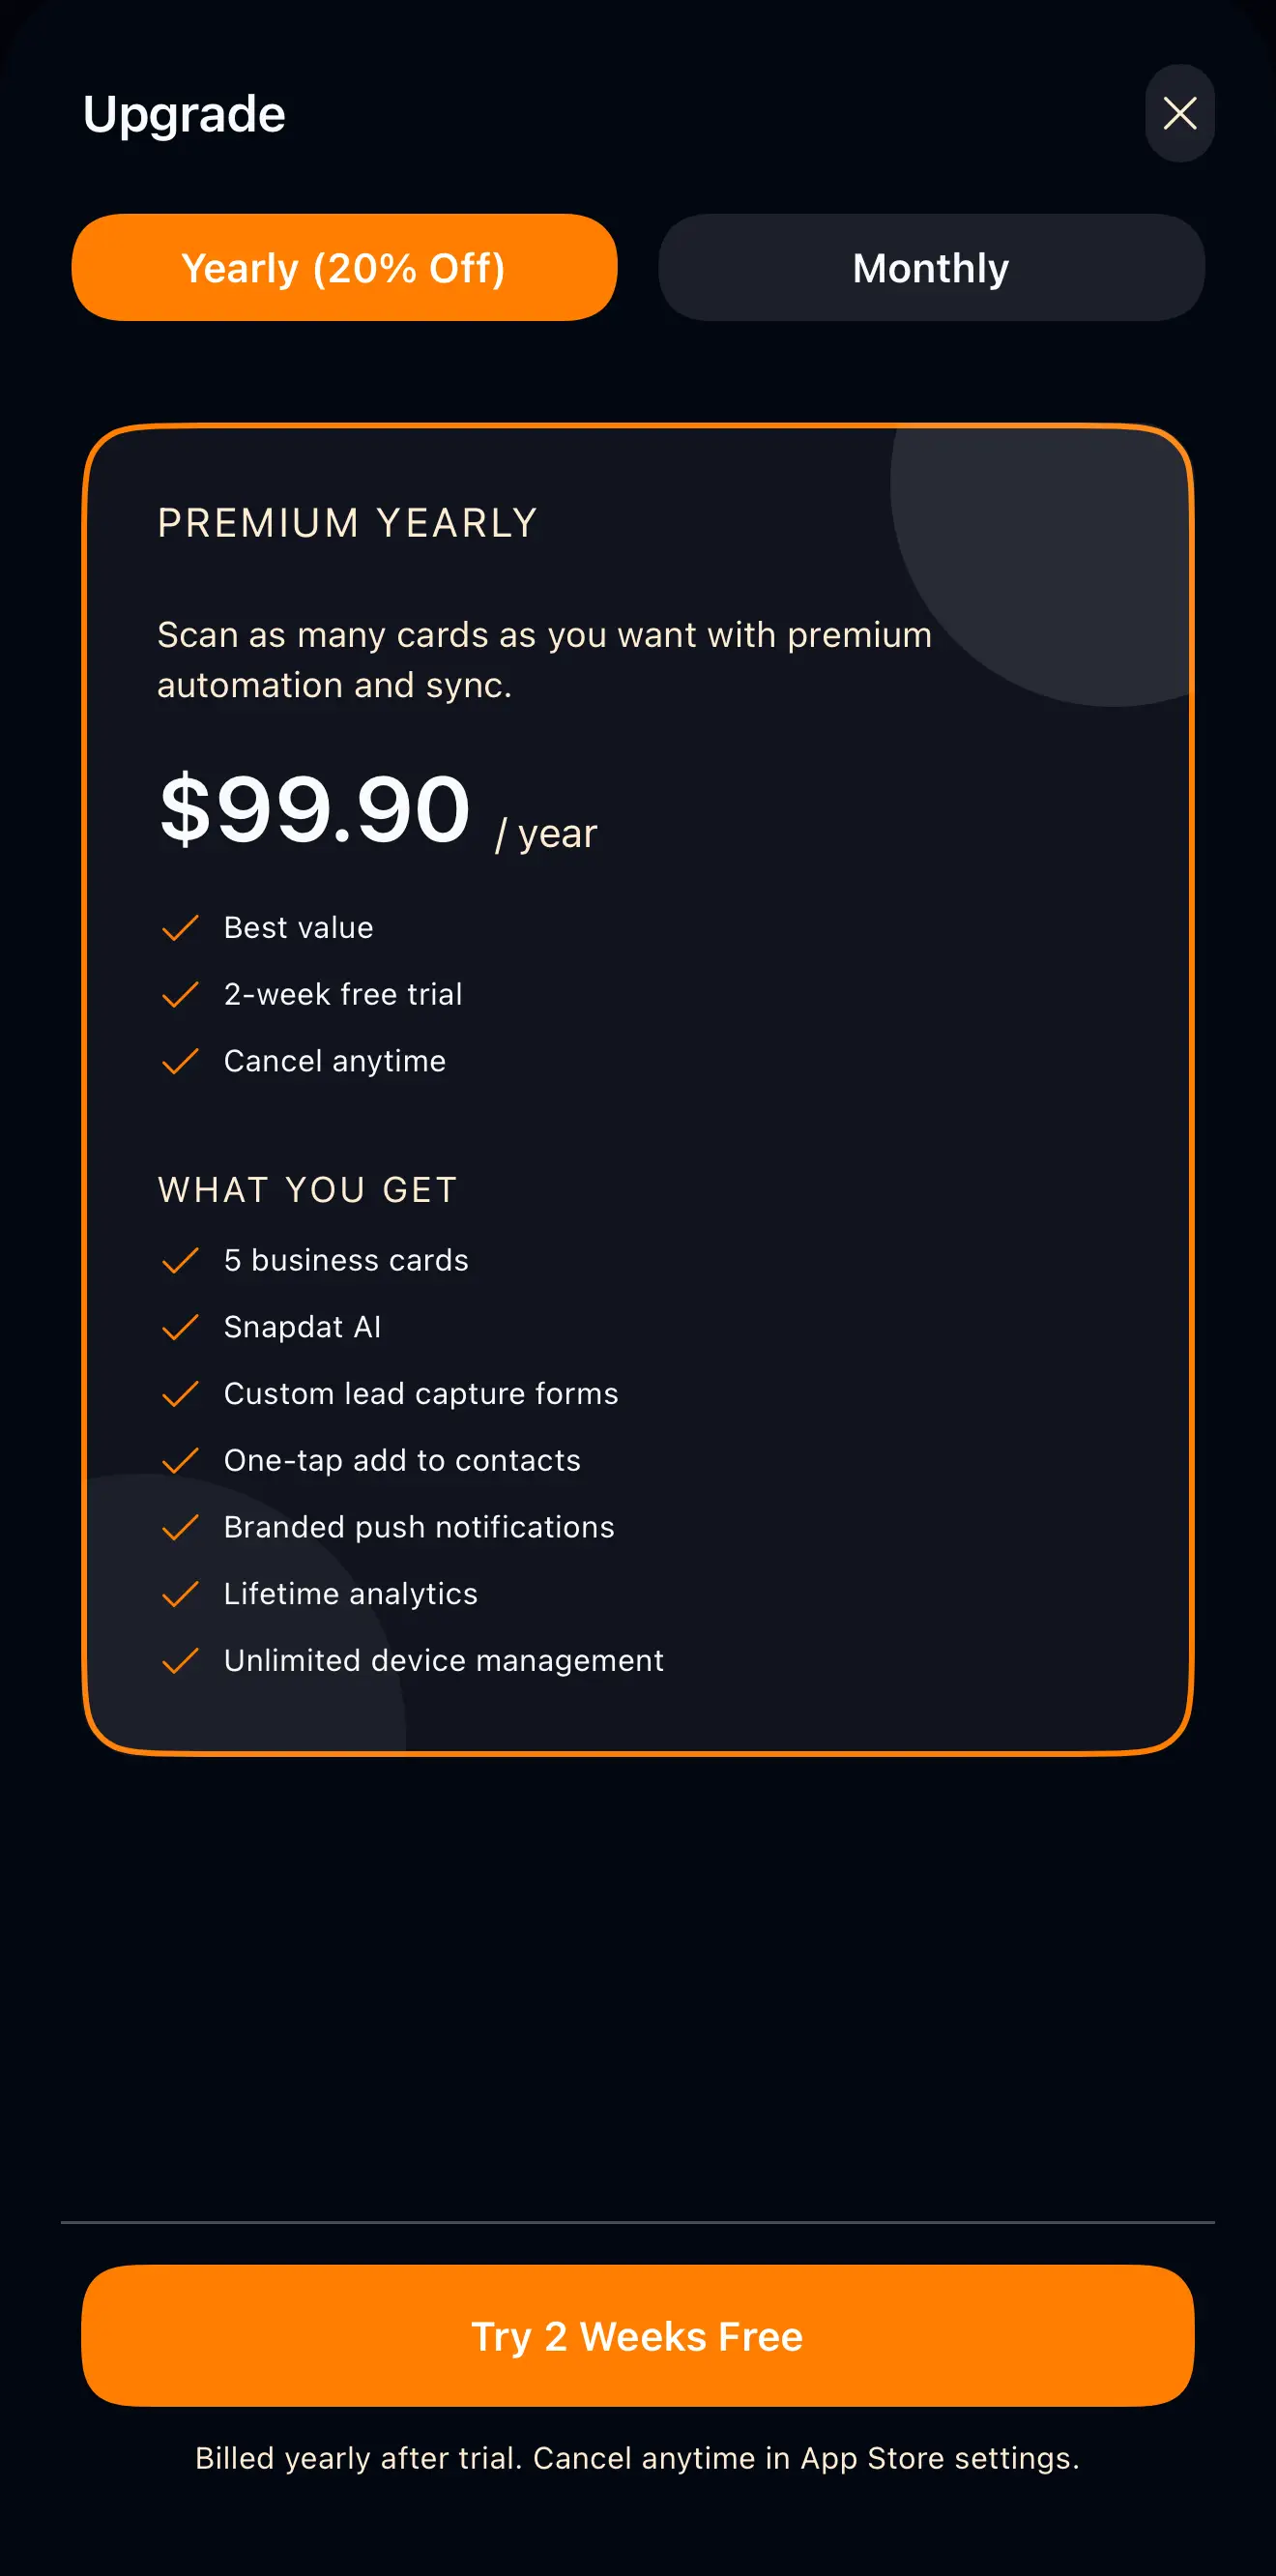
You can upgrade, downgrade, or manage your subscription at any time from your account settings and billing section, where your current plan and billing details are displayed.
Why use Snapdat?
Snapdat is ideal for any event where you meet multiple people, such as conferences, trade shows, networking events, exhibitions, business meetings, or recruitment sessions. Snapdat allows you to capture contacts instantly, record conversation context, organize leads automatically, and maintain structured contact records, reducing lost information