Single Sign-On
 Updated 1 month ago
by
Amalia
Updated 1 month ago
by
Amalia
- Configuring SSO integration with InEvent
- Adding your domain to the approved list
- Configuring SAML 2.0 SSO integration
- Configuring Azure Active Directory SSO integration
- Configuring OpenID Connect SSO integration
- Login experience
- Redirect users after logging out
- SSO Login button display options
- Use custom domain for redirect
- SSO login session duration
- Mapped fields upon SSO authentication
- Multiple SSO integrations
- Mandatory SSO Auth
- Allow non-SSO login
- Auto register with SSO
- Company administrator SSO login selection panel
Single sign-on (SSO) is an authentication method that allows users to securely log in to multiple related software systems using a single ID (or username) and password. This allows users to log in once to be able to access services without re-authenticating.
InEvent supports integration with the SSO methods listed below.
This article will take you through the steps of configuring SSO integration to handle user sign-in process.
Configuring SSO integration with InEvent
This section will guide you to configure SSO integration with SAML 2.0, Azure Active Directory (OIDC), and OpenID Connect.
Adding your domain to the approved list
Before starting to configure SSO integration, it is necessary to first add your domain(s) to the approved list. To add your domain(s) to the approved list, contact InEvent by submitting an email to support@inevent.com.
Once your domain has been approved, it will appear under Approved domains on the Company details page, as seen below.
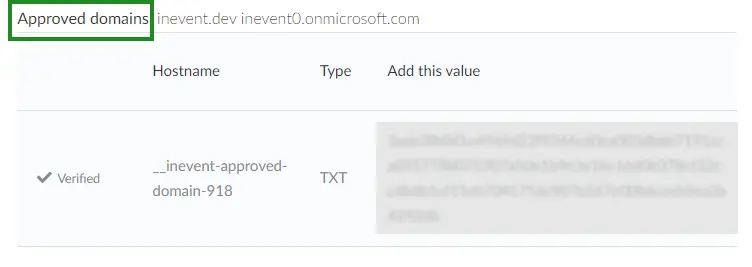
InEvent will generate a DNS setting which you need to add to your domain for verification purposes. Once this step has been completed, your domain status will change from Not verified to Verified, and you can proceed to configure SSO integration.
Configuring SAML 2.0 SSO integration
This section describes how you can integrate SAML 2.0 SSO to InEvent with OneLogin as an example.
Setting up SAML 2.0 SSO with OneLogin
Check out the video linked below to set up SAML 2.0 SSO with OneLogin.
Preparing OneLogin SSO with SAML 2.0 Protocol
This section will guide you on how to set up OneLogin SSO with SAML 2.0 protocol with OneLogin as the SAML initiator. Follow the steps below.
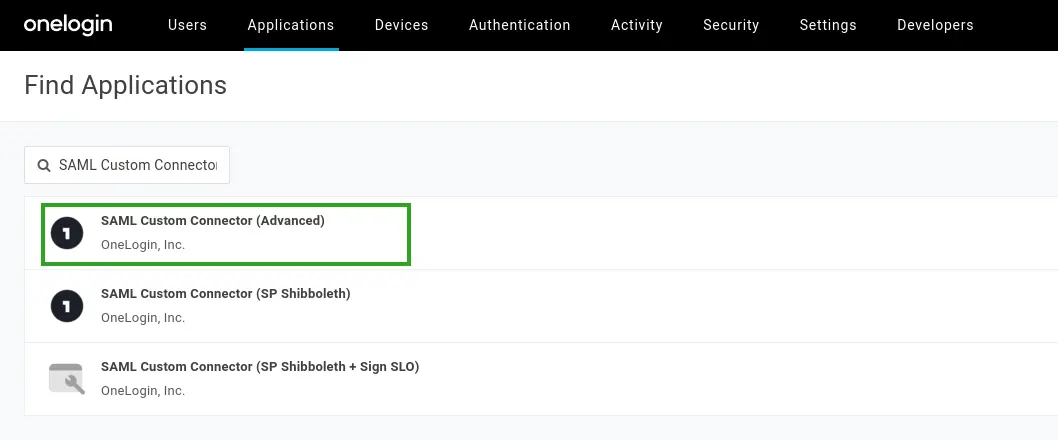
- Navigate to Applications > Applications from your OneLogin administrator dashboard.
- Select the SAML Custom Connector (Advanced) from the list of available applications.
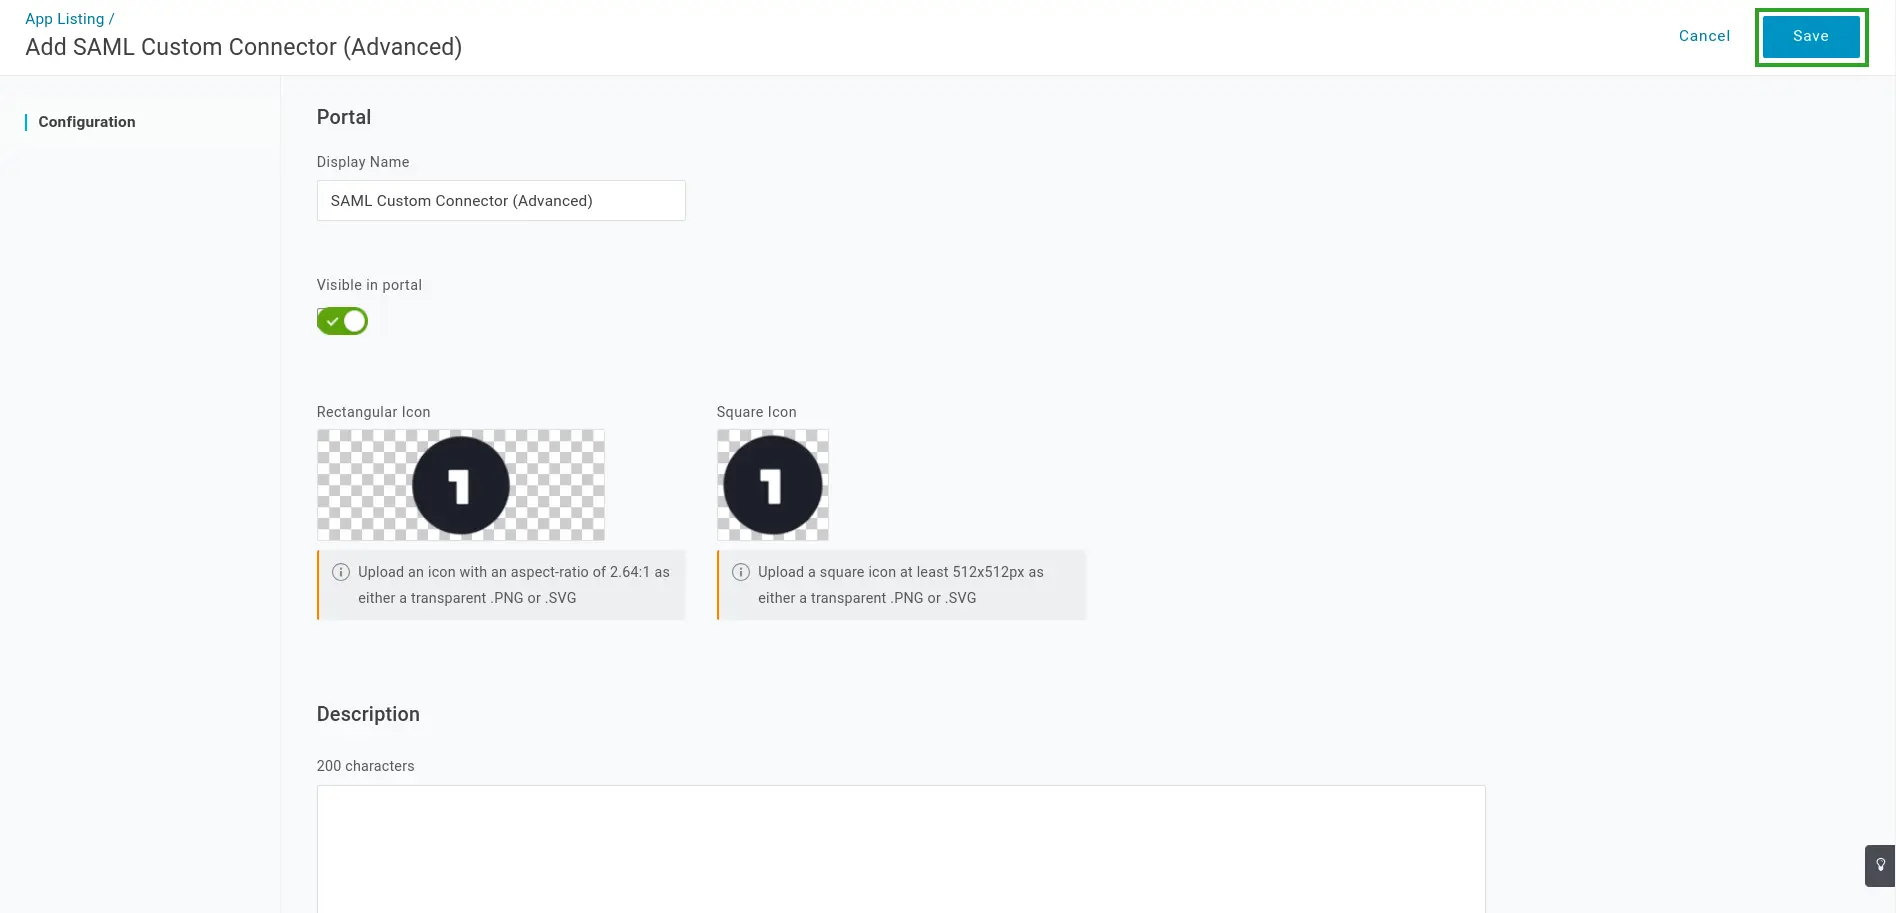
- Enter your portal name, icon, and description details as needed.
- Click Save. You will be taken to the information page of your newly created app.
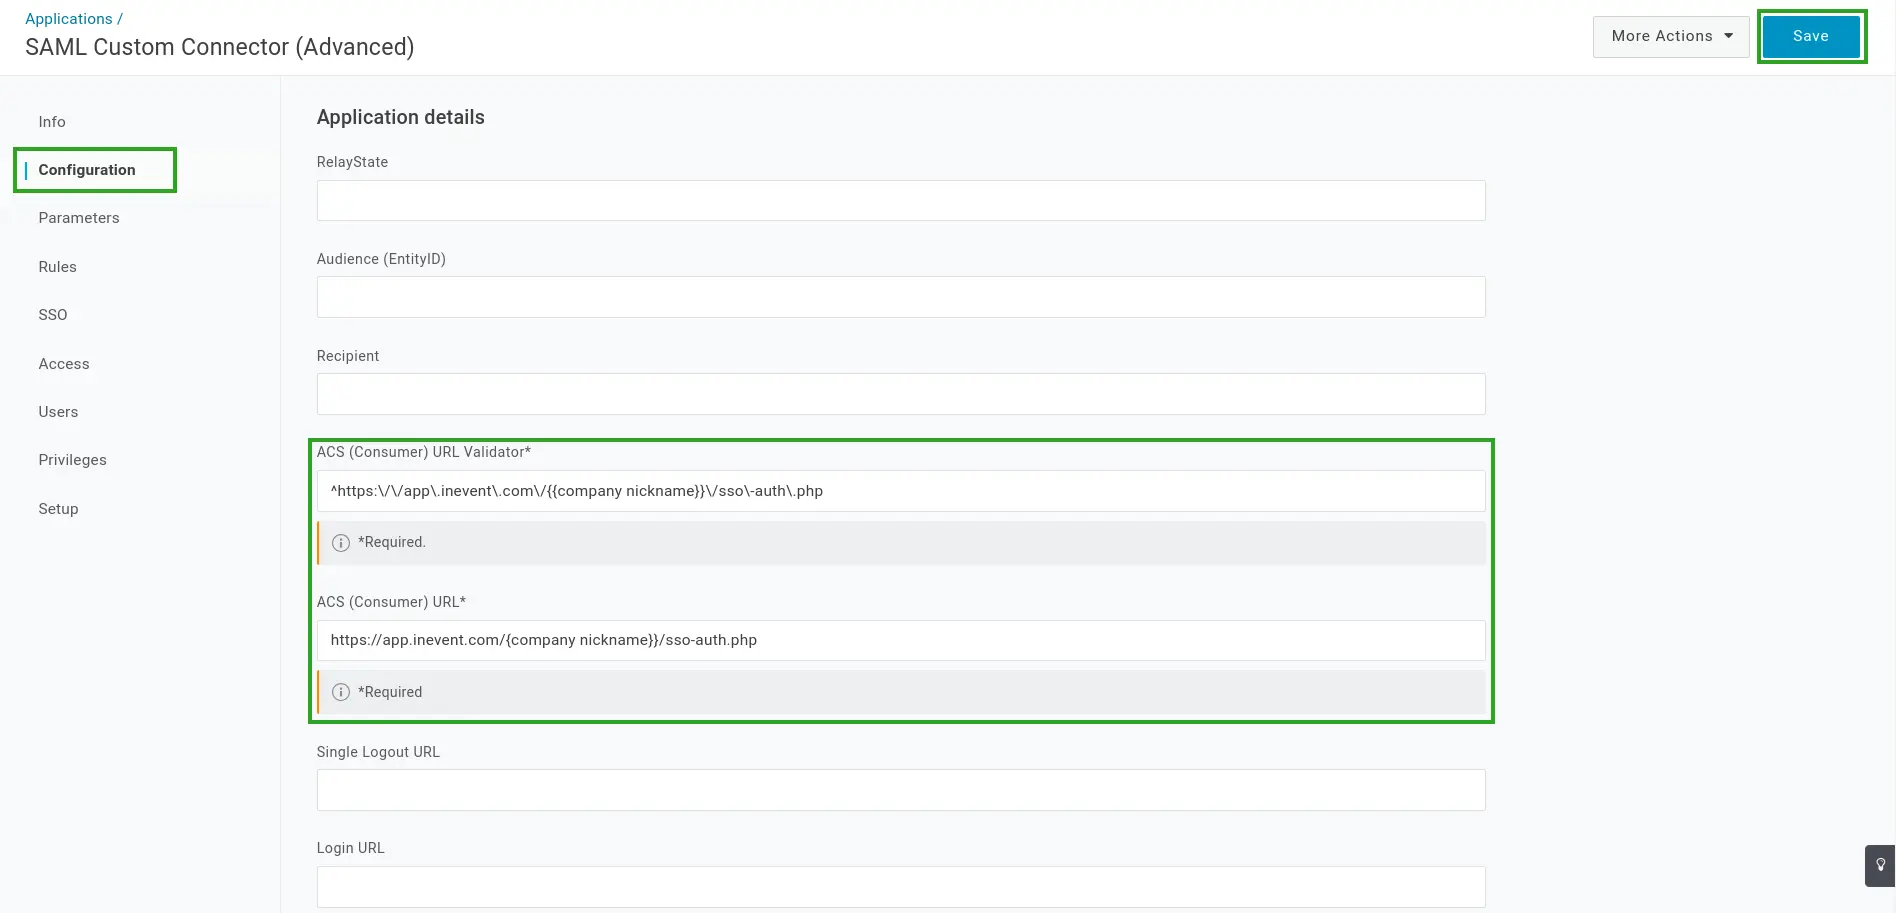
- Navigate to the Configuration tab.
- Enter the details below into the corresponding fields, along with other fields if applicable.
- ACS (Consumer) URL Validator:
^https:\/\/app\.inevent\.com\/{{company nickname}}\/sso\-auth\.php
{{company nickname}} with your company nickname at InEvent. Your company nickname can be found in the Company Details.-), ensure that the dash is preceded with a backslash (\) for the URL to be validated properly. For example, if your company nickname is MyCompany-442834837, replace {{company nickname}} with MyCompany\-442834837.- ACS (Consumer) URL:
https://app.inevent.com/{{company nickname}}/sso-auth.php
- Click Save.
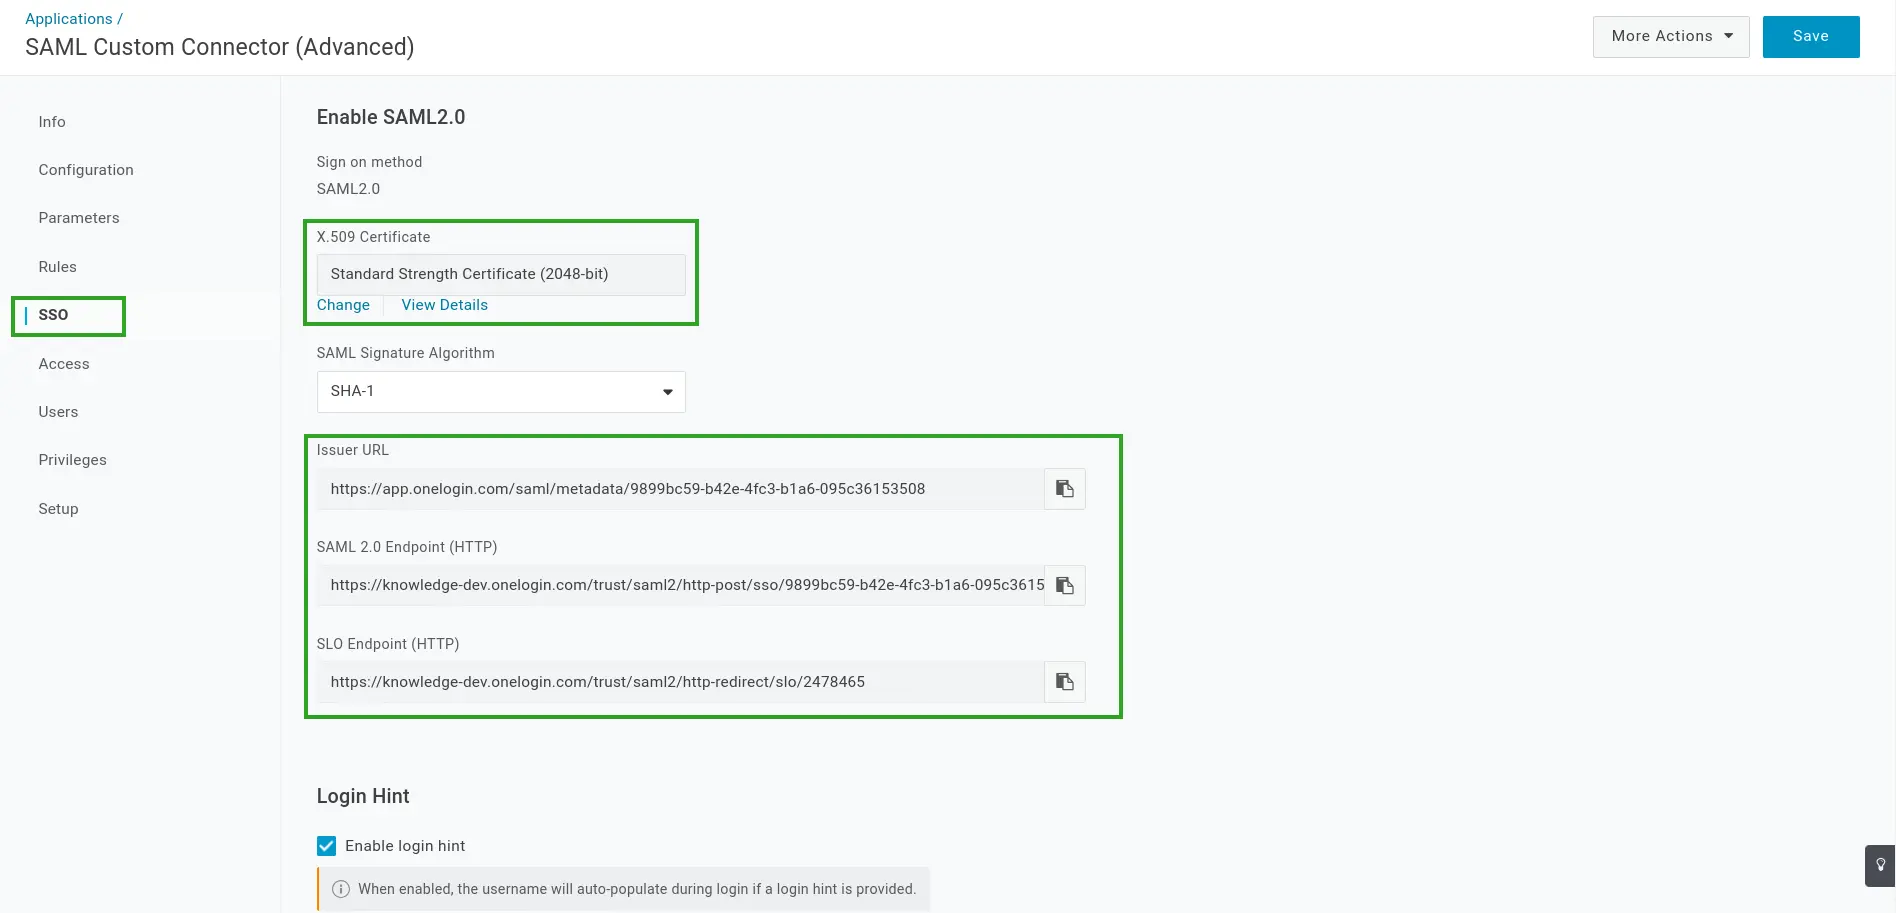
- Navigate to the SSO tab.
- Locate and copy the X.509 Certificate, Issuer URL, SAML 2.0 Endpoint (HTTP), and SLO Endpoint (HTTP) details. These details will be entered at the InEvent platform at the next step.
Integrating OneLogin SSO to InEvent with SAML 2.0 protocol
Once you have finished configuring the SSO integration at OneLogin and collected the necessary details, you can proceed to integrate it to the InEvent platform by completing the following steps.
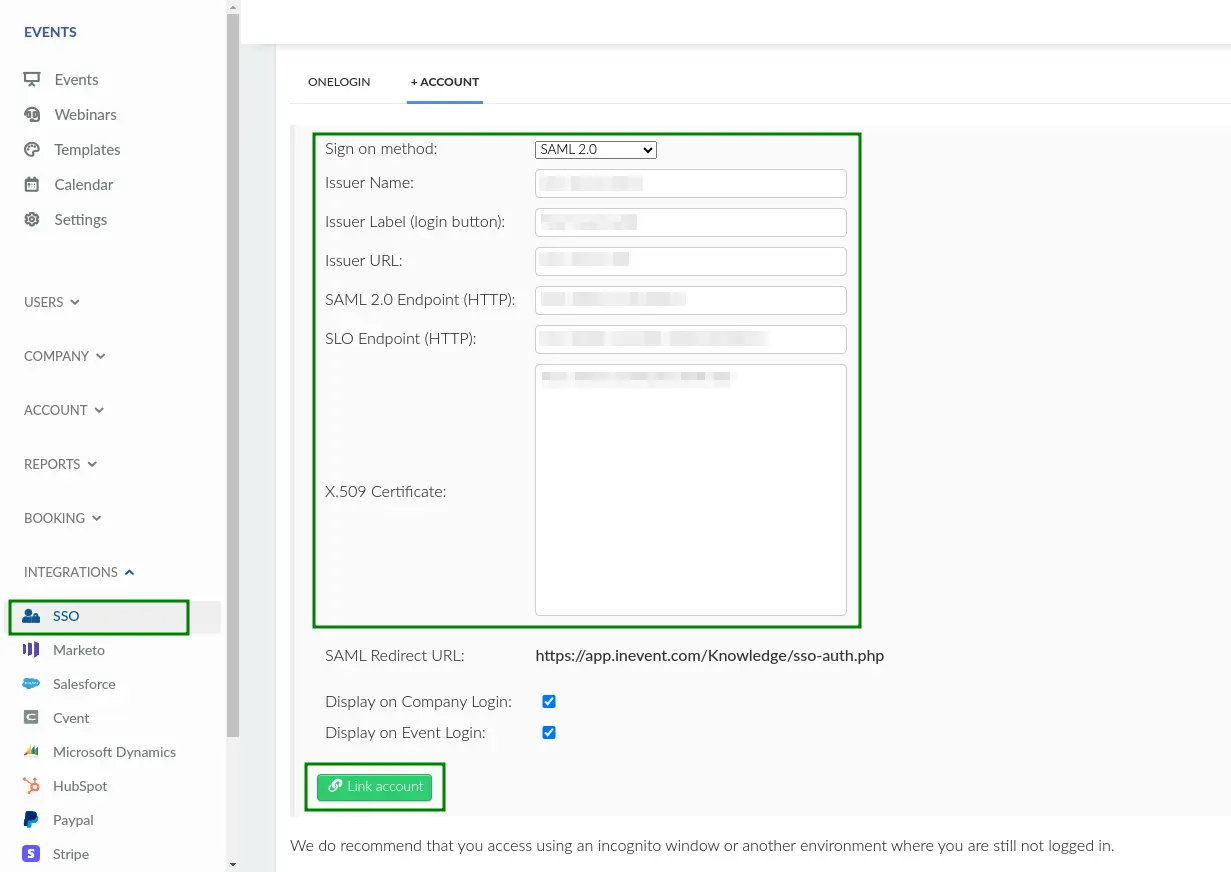
- Navigate to Integrations > SSO from the Company level.
- Choose SAML 2.0 entry in the Sign on method drop-down box.
- Insert the parameters below into the corresponding fields.
- Issuer Name:
OneLogin - Issuer Label (login button):
Login with OneLogin, or the desired label to be displayed on the login screen - Issuer URL (previously copied from OneLogin)
- SAML 2.0 Endpoint (HTTP) (previously copied from OneLogin)
- SLO Endpoint (HTTP) (previously copied from OneLogin)
- X-509 Certificate (previously copied from OneLogin)
- Press the green Link account button to finish the configuration.
Configuring Azure Active Directory SSO integration
This section will guide you to configure SSO integration with Microsoft Azure Active Directory. This integration uses the Open ID Connect (OIDC) authentication protocol. After completing these steps, user log-ins will be handled by Azure Active Directory.
Preparing Azure Active Directory SSO integration within InEvent
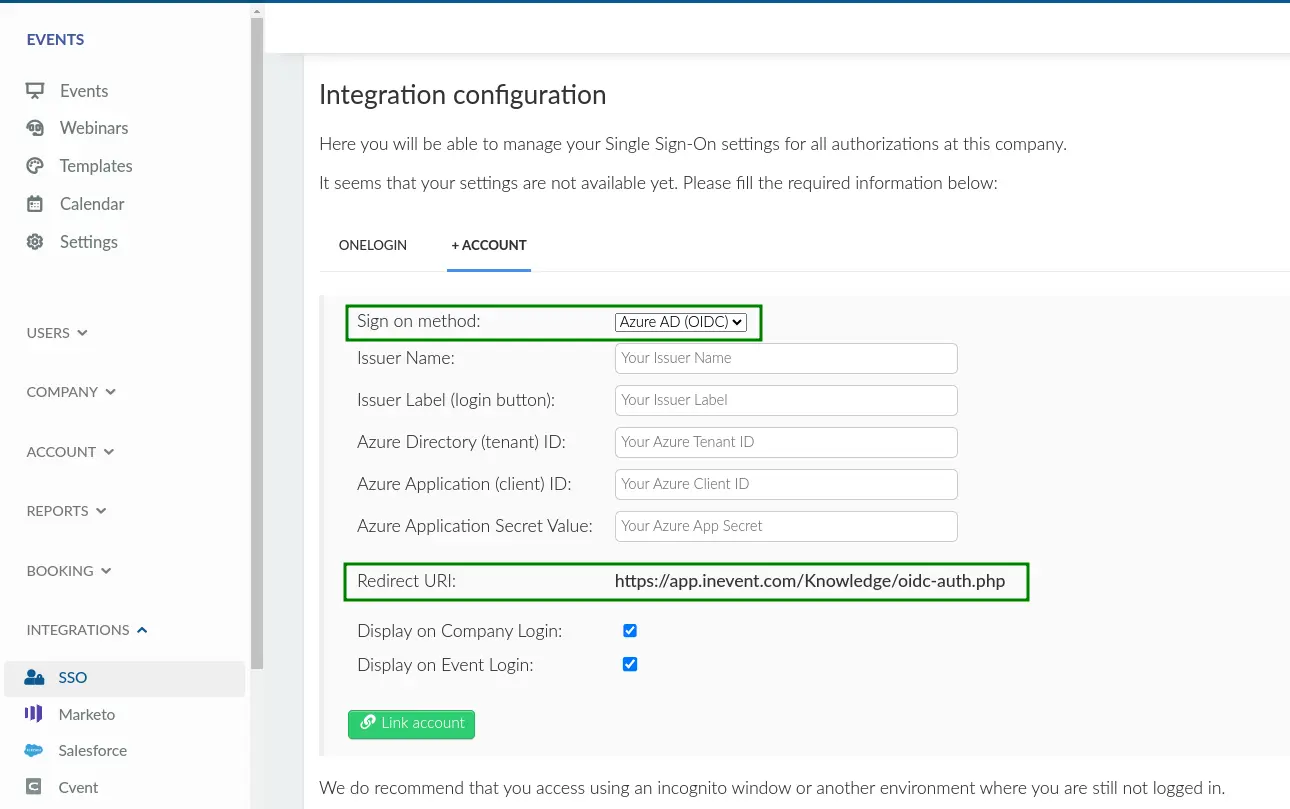
- Navigate to Integrations > SSO from the Company level.
- Select Azure ID (OIDC) in the Sign on method drop down box.
- Locate and copy Redirect URI within the page. This URI is necessary for setting up your app in Azure Active Directory.
Setting up your app in Azure Active Directory
- Log in to Microsoft Azure Portal.
- Navigate to Active Directory under Azure services within the Azure Management Portal.
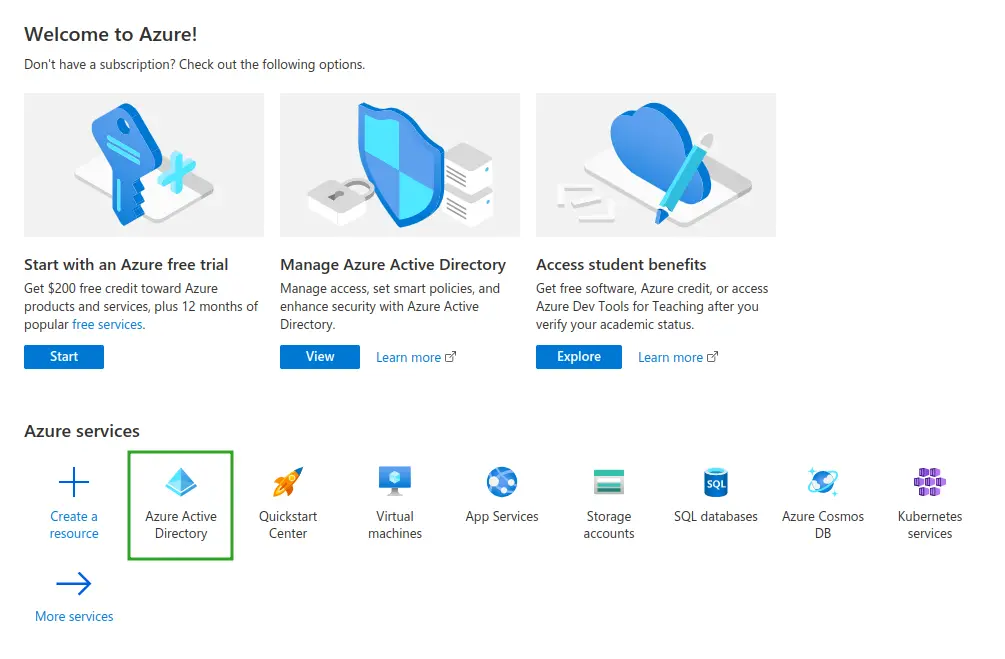
- Click App registrations from the left panel.
- Click New registration.
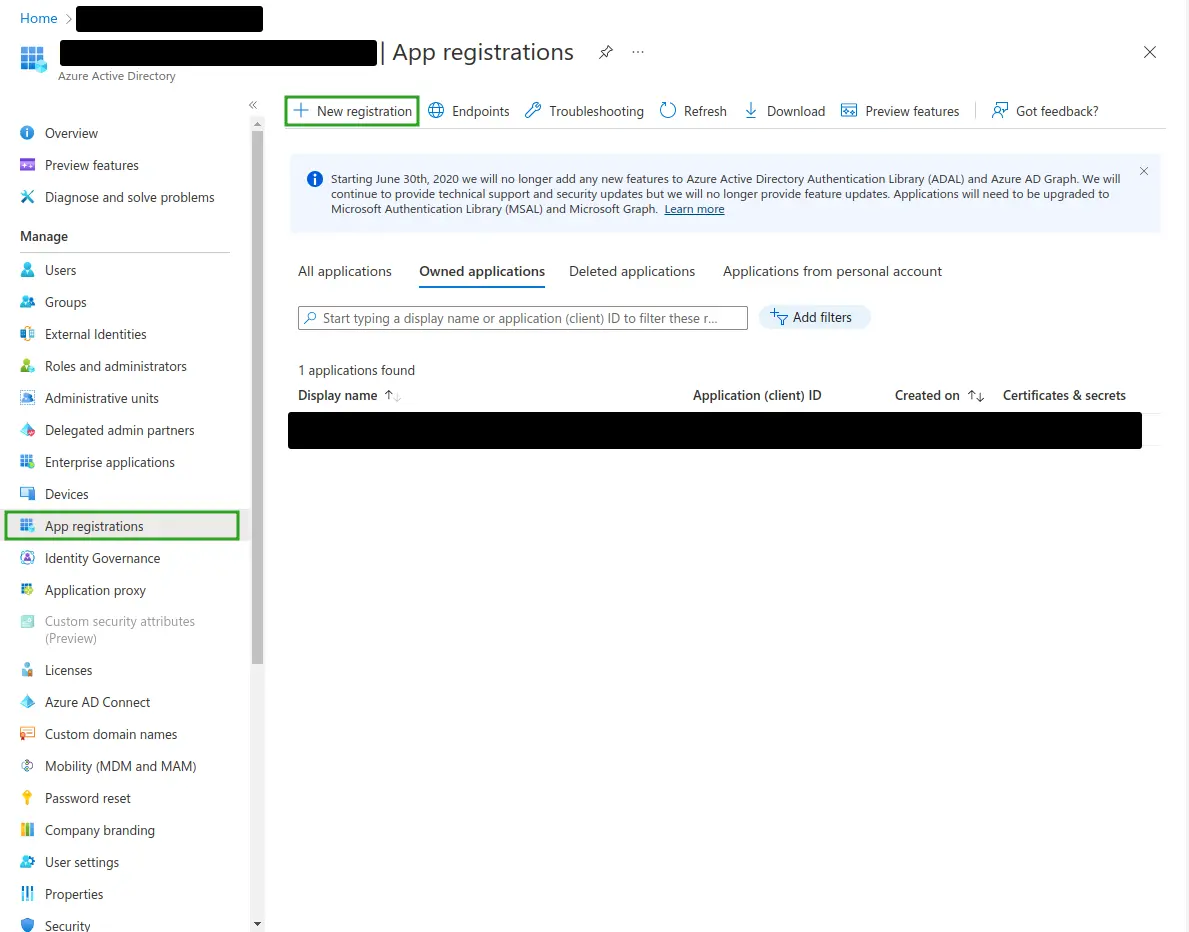
- Enter the necessary details below.
- Name: An identifier for the application at Azure.
- Supported account types (required): Group of user accounts to be permitted to log in. Select as needed.
- Redirect URI: Azure will return authentication responses to this URI after authenticating users successfully. This URI is found by navigating to the Company level in the InEvent platform > Integrations > SSO > Sign on method: Azure ID (OIDC) > Redirect URI.
Once you have entered the required information, you will be redirected to the Overview page of the newly created app.
- Locate Application (client) ID and Directory (tenant) ID within the Essentials section. Copy these IDs as they are needed to configure SSO integration within the InEvent platform.
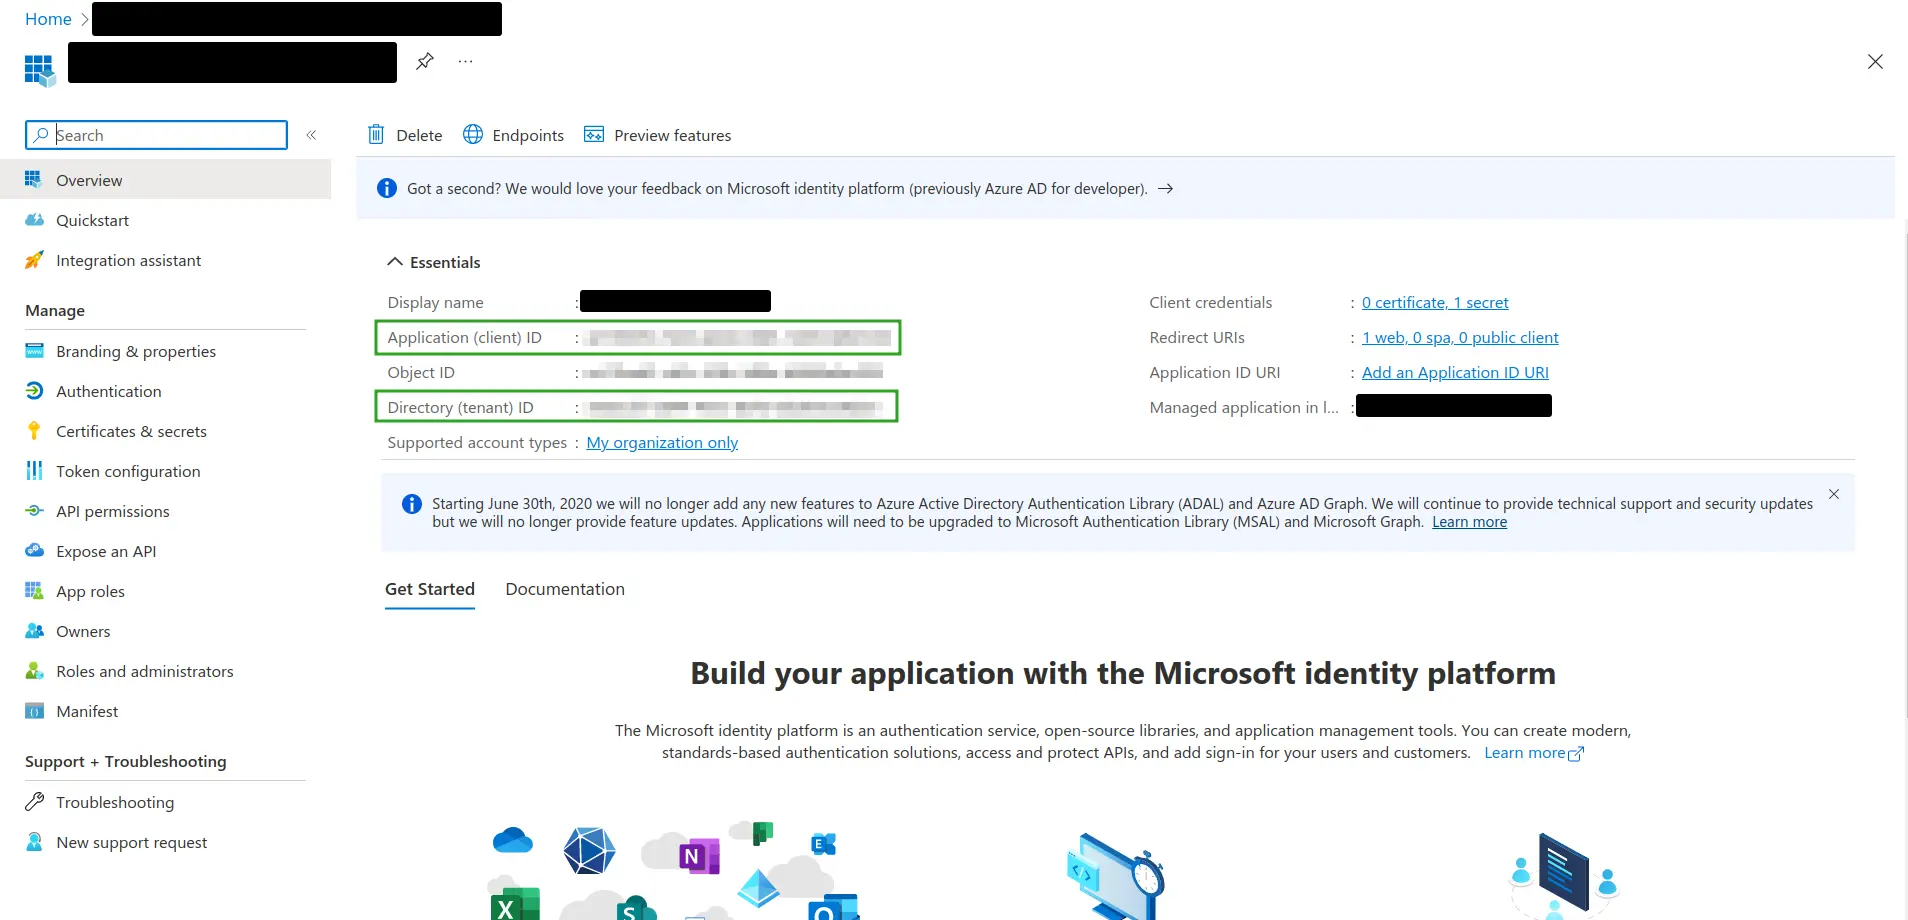
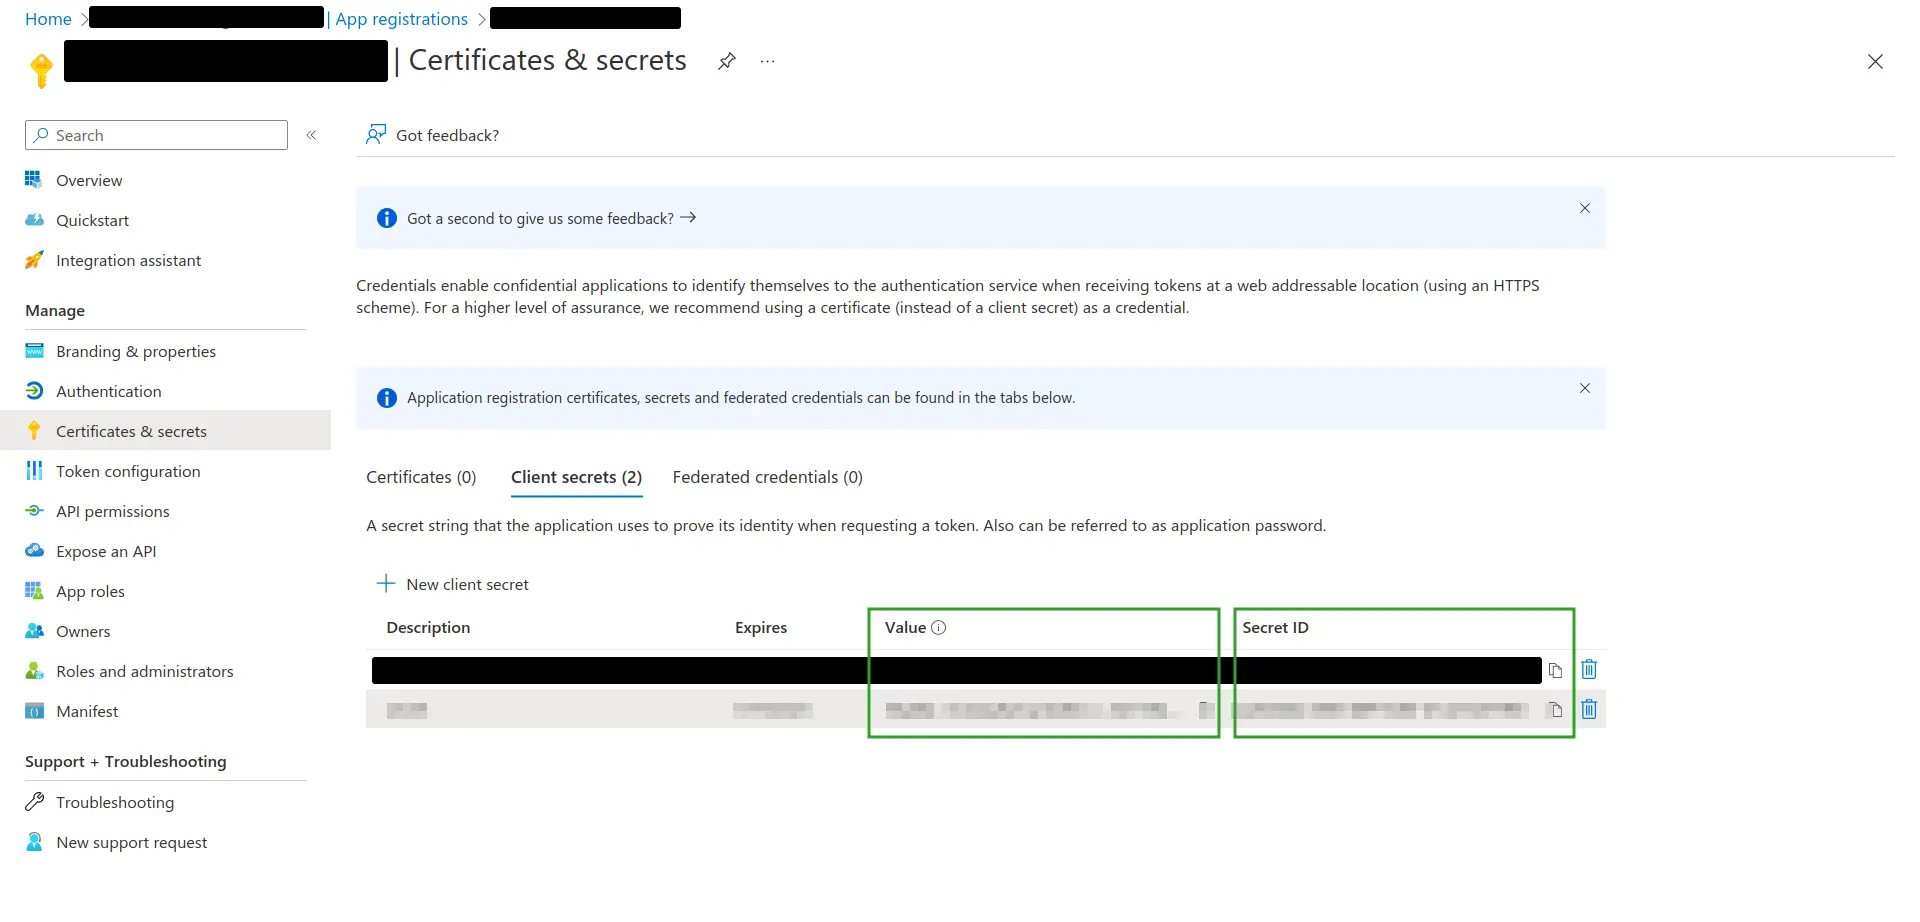
- Navigate to Certificates & Secrets.
- Press New client secret to generate Azure Application Secret Value.
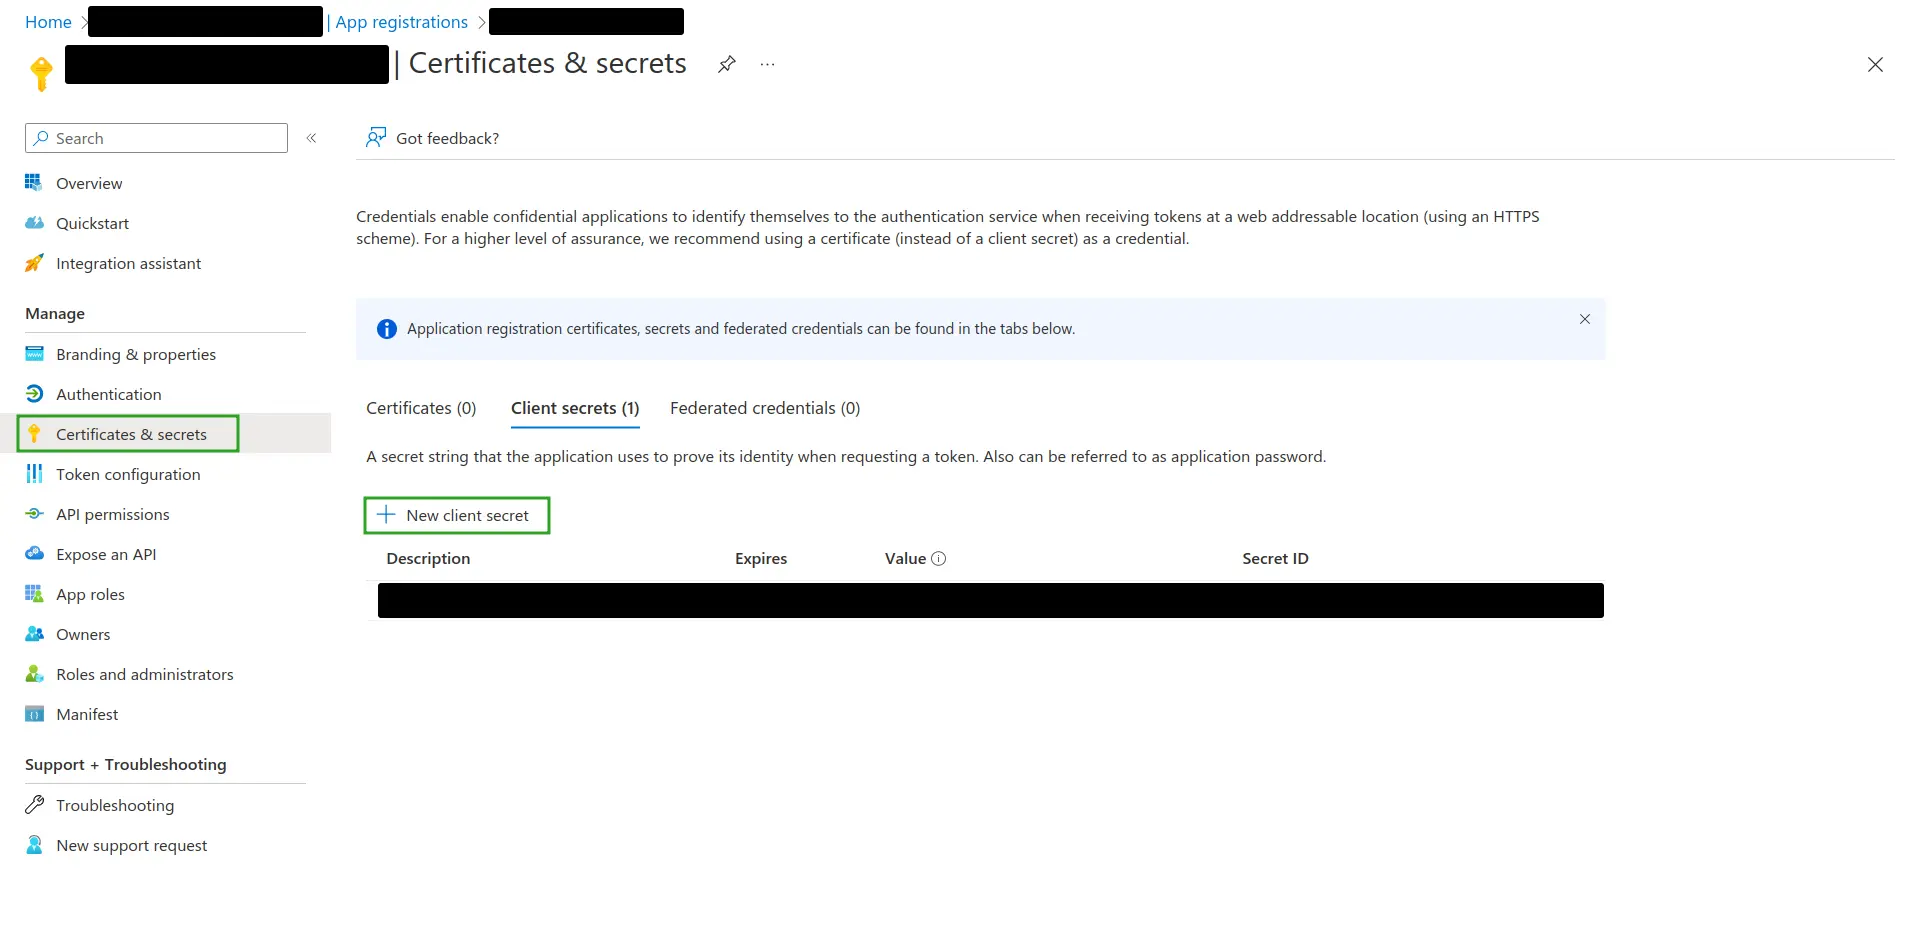
- Enter the client secret description and expiration period as needed. This will generate a Secret Value.
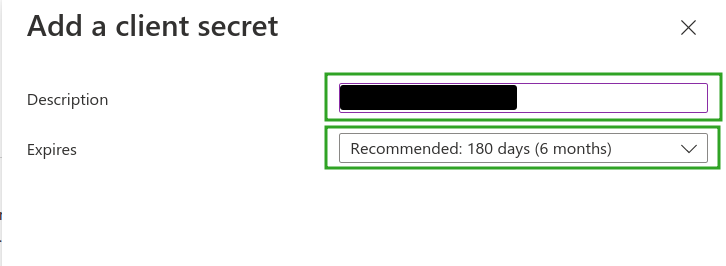
- Locate the newly generated Secret Value. Copy this secret as it is needed to configure SSO integration within the InEvent platform.
Integrating Azure Active Directory SSO to InEvent
Once you have finished setting up your app in Azure Active Directory and collected the necessary details, you can proceed to integrate Azure Active Directory SSO to the InEvent platform by completing the following steps.
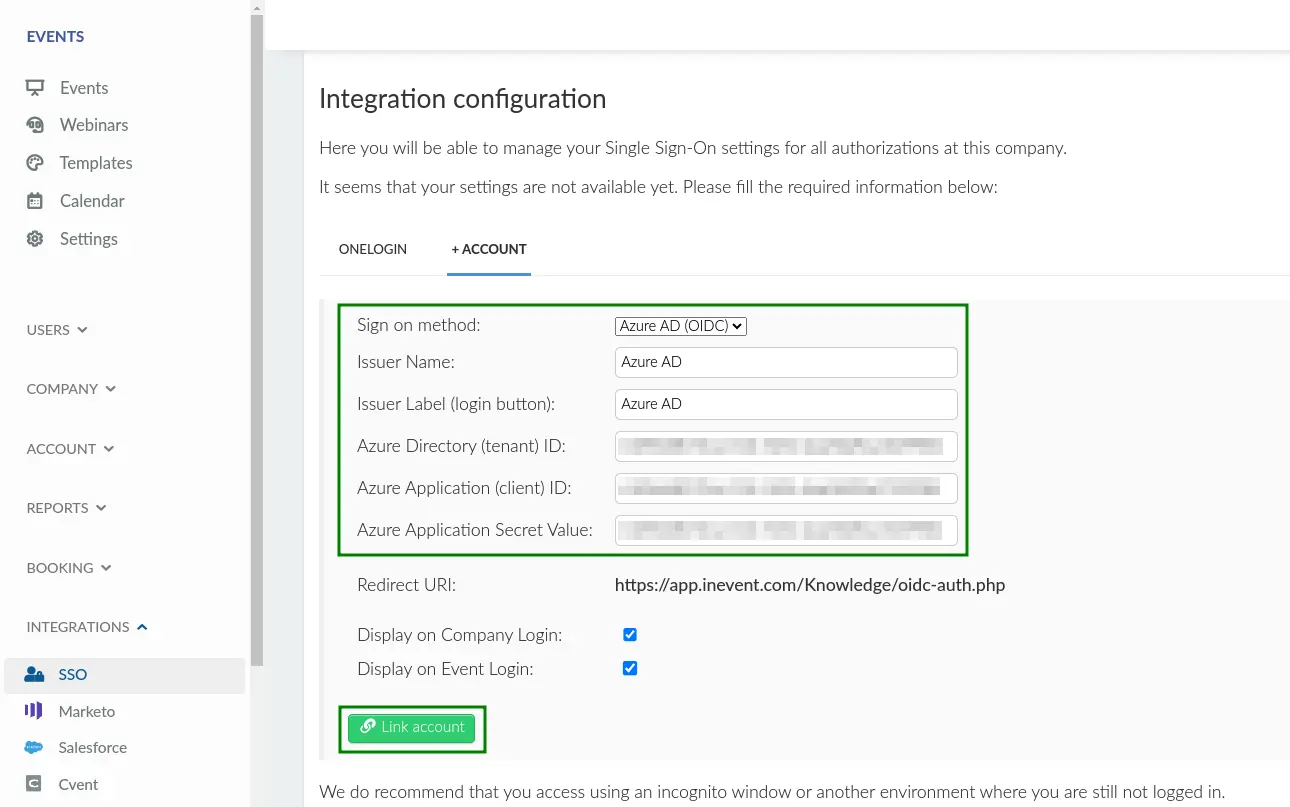
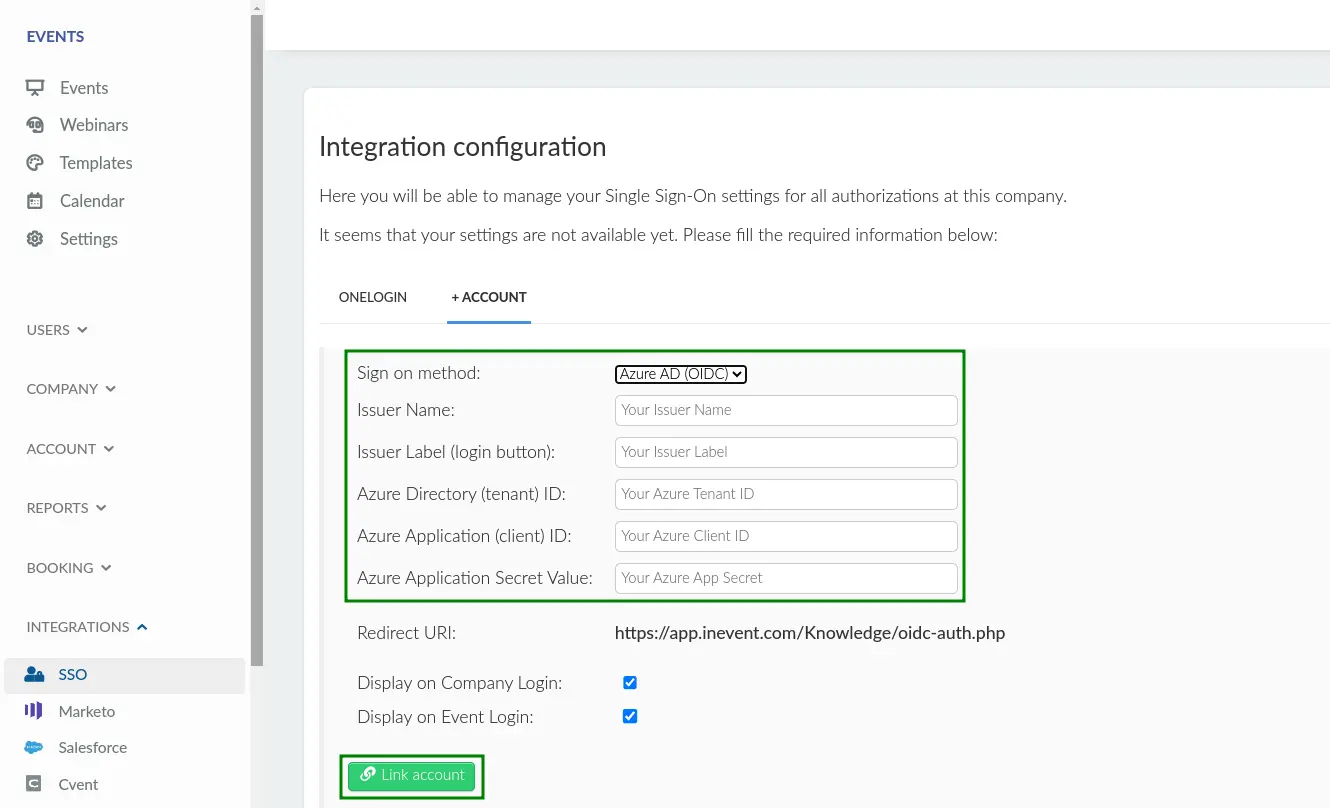
- Navigate to Integrations > SSO from the Company level and select Azure AD (OIDC) in the Sign on method drop down box.
- Insert the parameters below into the corresponding field.
- Issuer Name
- Issuer Label (login button): The label to be displayed on the login screen.
- Azure Directory (tenant) ID (previously copied from your Azure AD account)
- Azure Application (client) ID (previously copied from your Azure AD account)
- Azure Application Secret Value (previously copied from your Azure AD account)
- Press Link account to finish the configuration process.
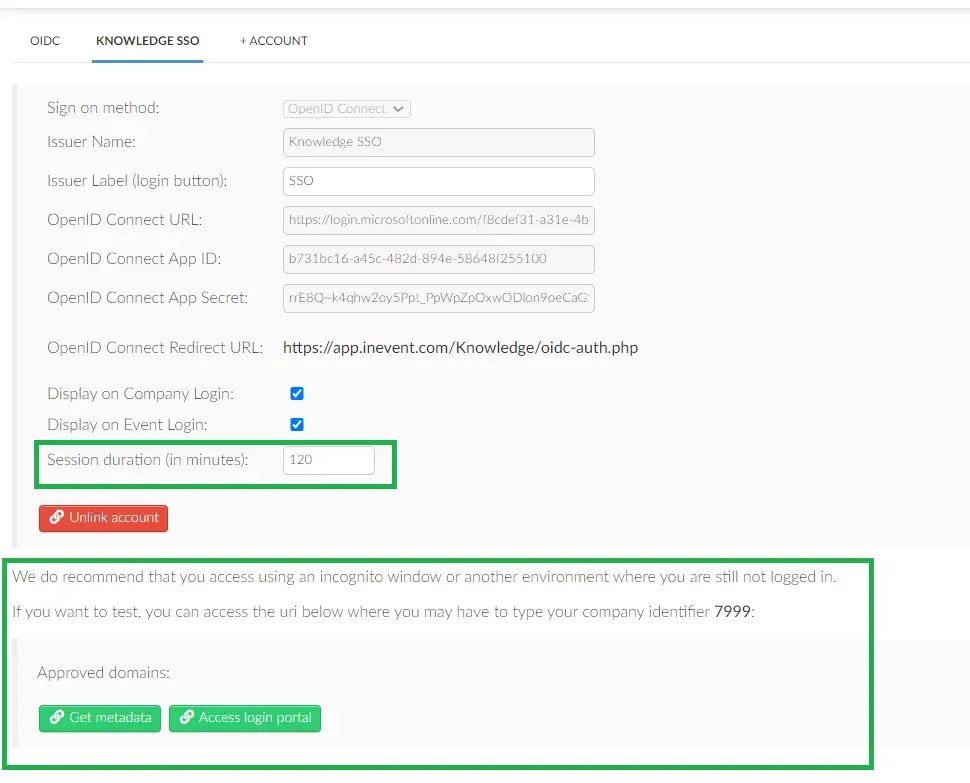
Once the integration is complete, you can set the session duration and also click on the Get metadata and Access login portal.
Configuring OpenID Connect SSO integration
InEvent supports certified SSO OIDC Identity Providers, such as
- OneLogin
- G Suite
- Other Identity Providers that use OAuth 2.0 authentication protocol
Preparing and setting up your app in the OpenID Connect SSO IdP platform
Before integrating an OpenID Connect SSO with InEvent, it is necessary to create a new app or project in your preferred OIDC IdP platform. The steps to create a new app or project may vary, depending on the platform.
When creating a new app, the platform will require OpenID Connect Redirect URI to be entered. The URI can be found by navigating to Integrations > SSO from the Company level and selecting to create a new OpenID Connect SSO integration.
app.inevent.com in the OpenID Connect Redirect URI with the domain name you have set at InEvent.Integrating OpenID Connect SSO with InEvent
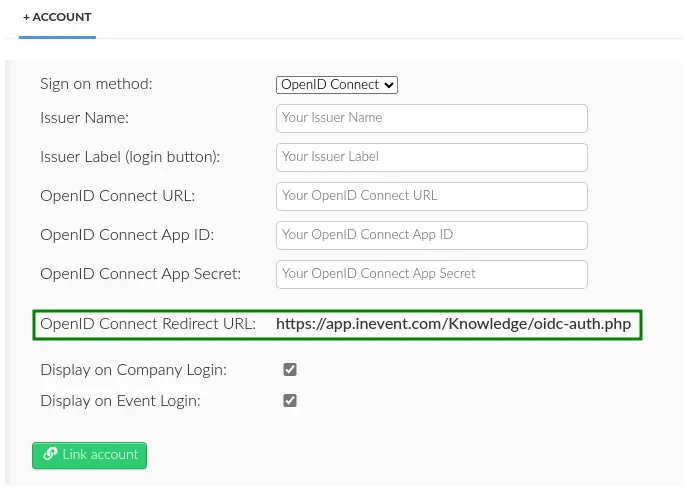
- Navigate to Integrations > SSO from the Company level.
- Select Open ID Connect in the Sign on method drop down box.
- Insert the parameters below into the corresponding field.
- Issuer Name: The name of the SSO Identity Provider (IdP).
- Issuer Label (login button): The label to be displayed on the login screen.
- OpenID Connect URL: The URL that accepts the OpenID Connect request.
- OpenID Connect App ID: OpenID Connect Client ID provided by your IdP.
- OpenID Connect App Secret: OpenID Connect secret provided by your IdP.
- Press Link account to finish the configuration process.
.well-known configuration file ({OpenID Connect URL}/.well-known/openid-configuration).Login experience
After successfully integrating SSO to InEvent, users will undergo a slightly different login process.
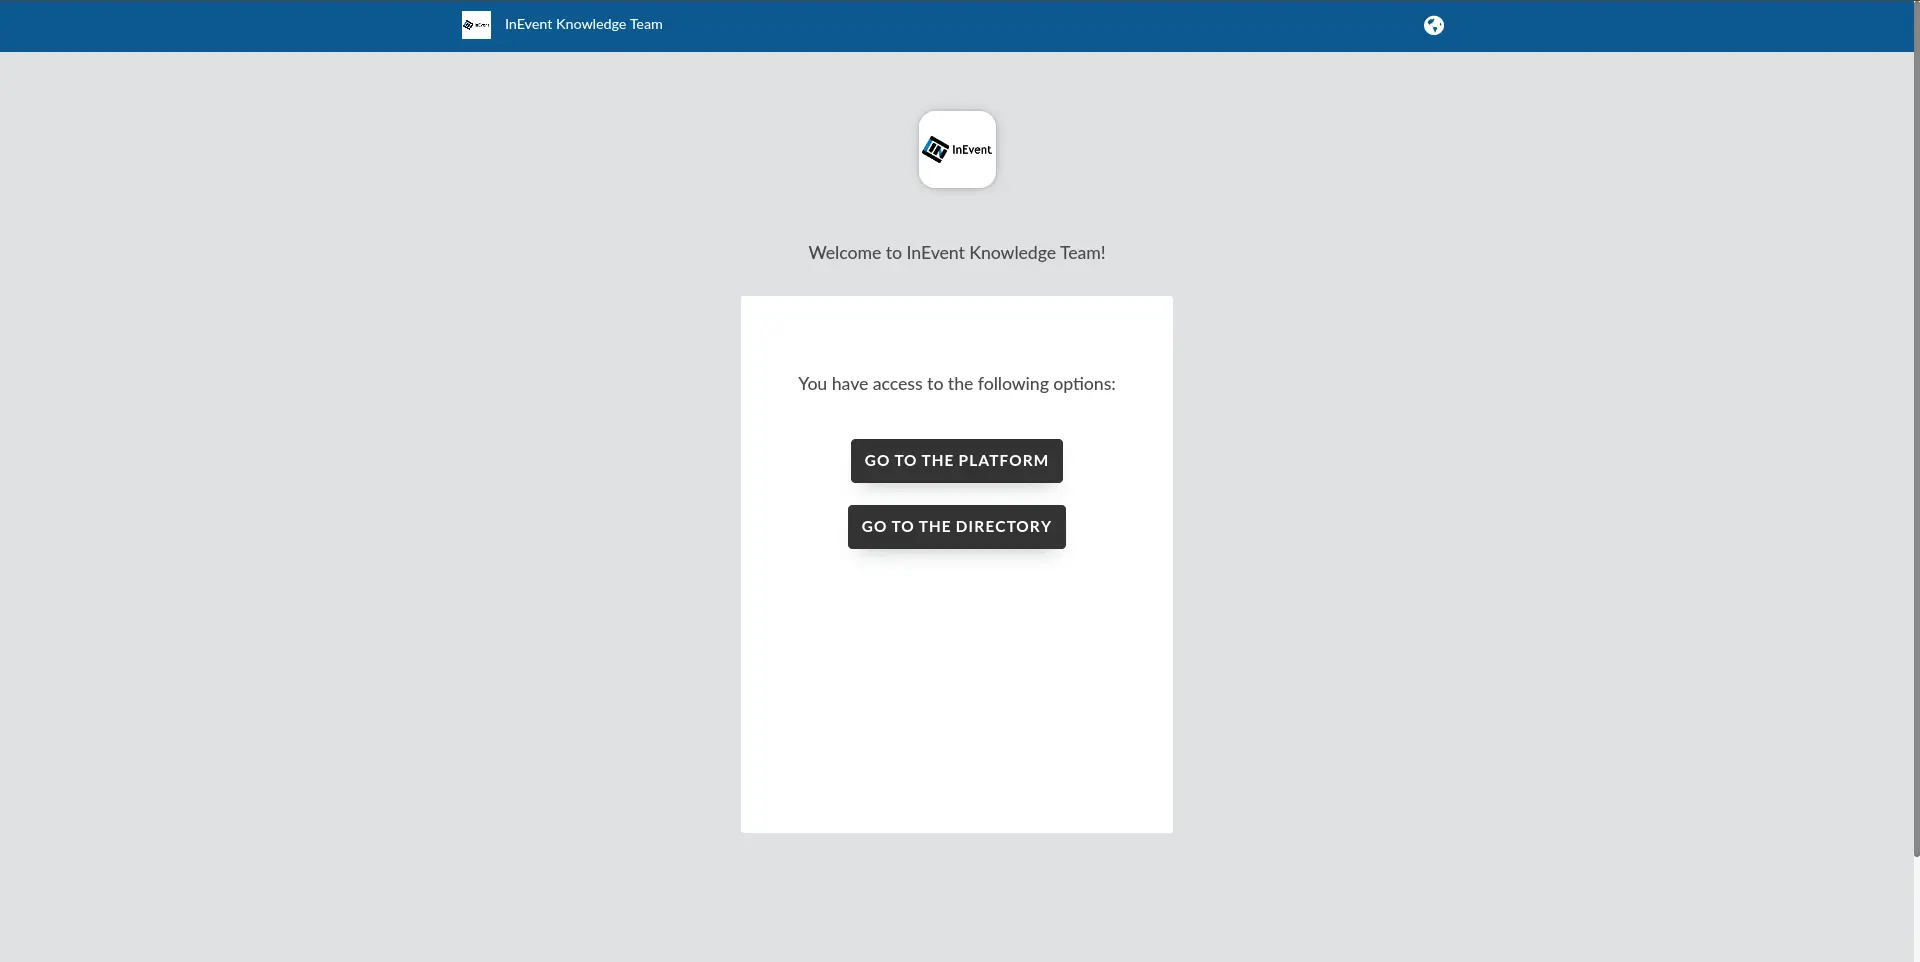
Event organizers
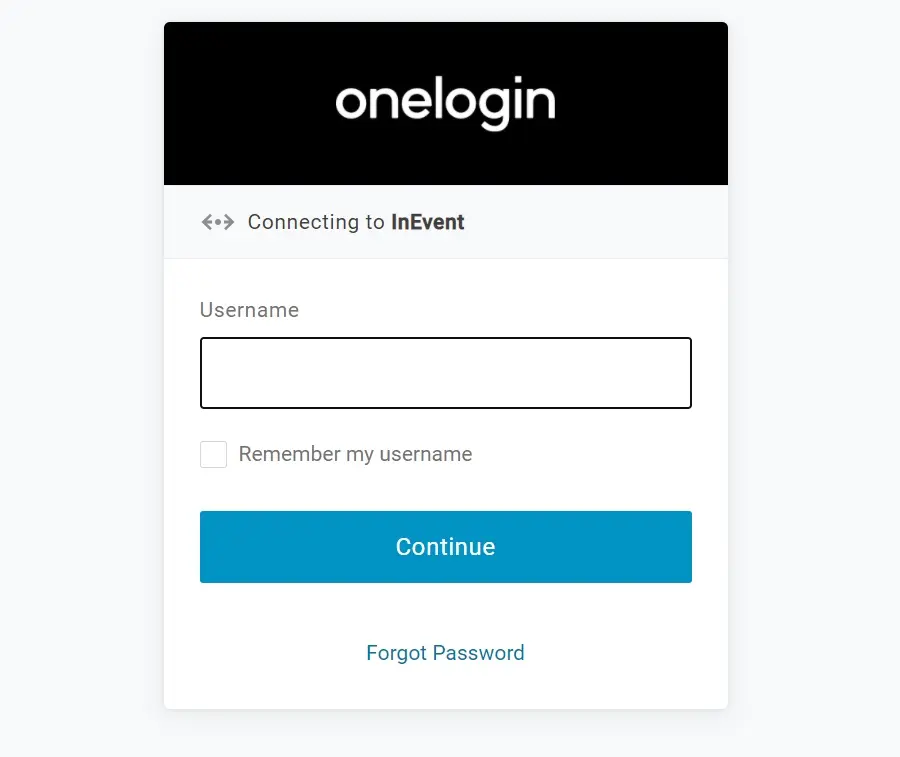
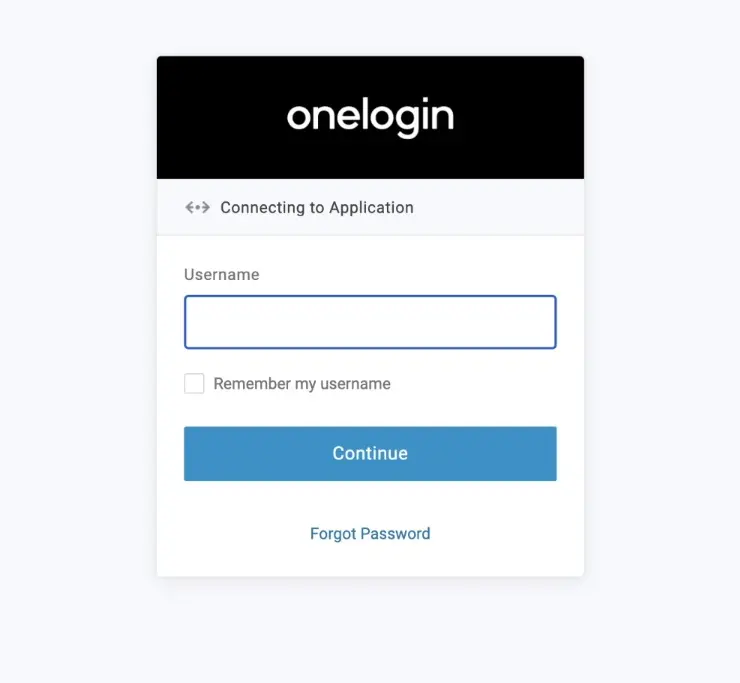
Event organizers with administrator permissions will see the interface below when logging into the platform (with OneLogin as an example).

Upon pressing Login with OneLogin, they will be directed to the SSO portal to enter their user credentials, as shown below (with OneLogin as an example).
Once the login process has been completed, they will be redirected to the InEvent platform.
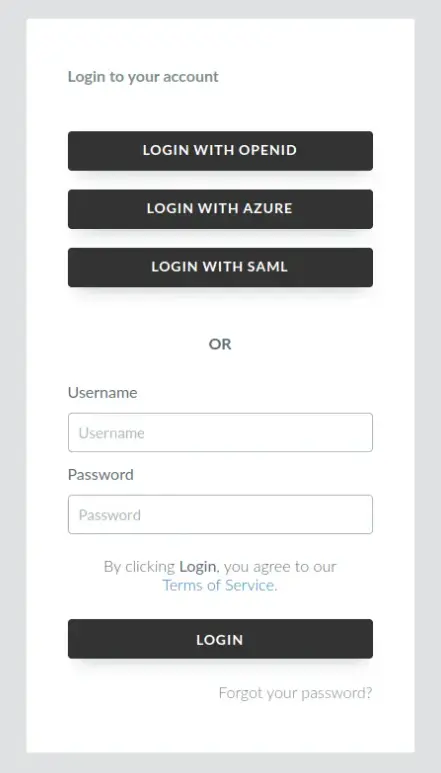
Attendees
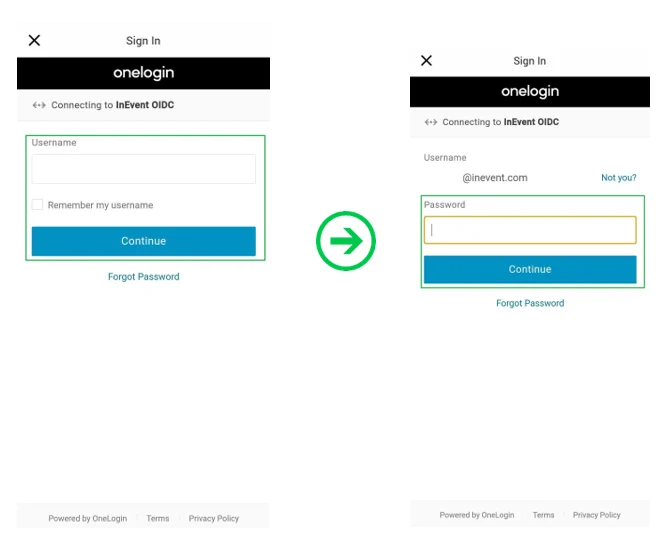
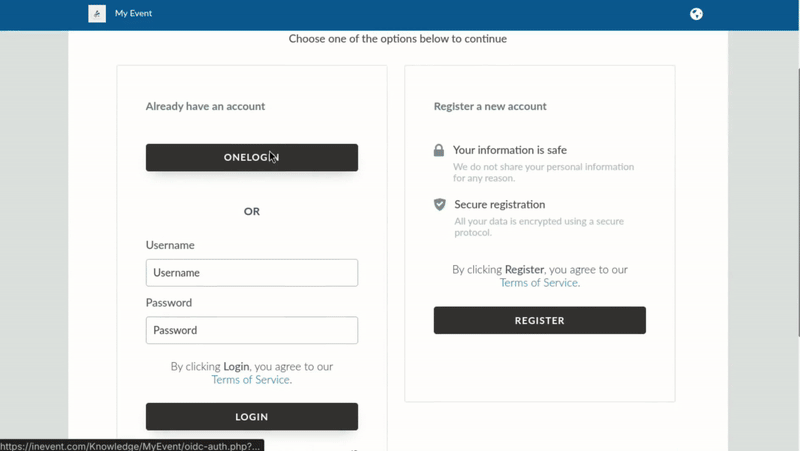
Attendees will see the interface below when logging into the platform, with OneLogin as an example.
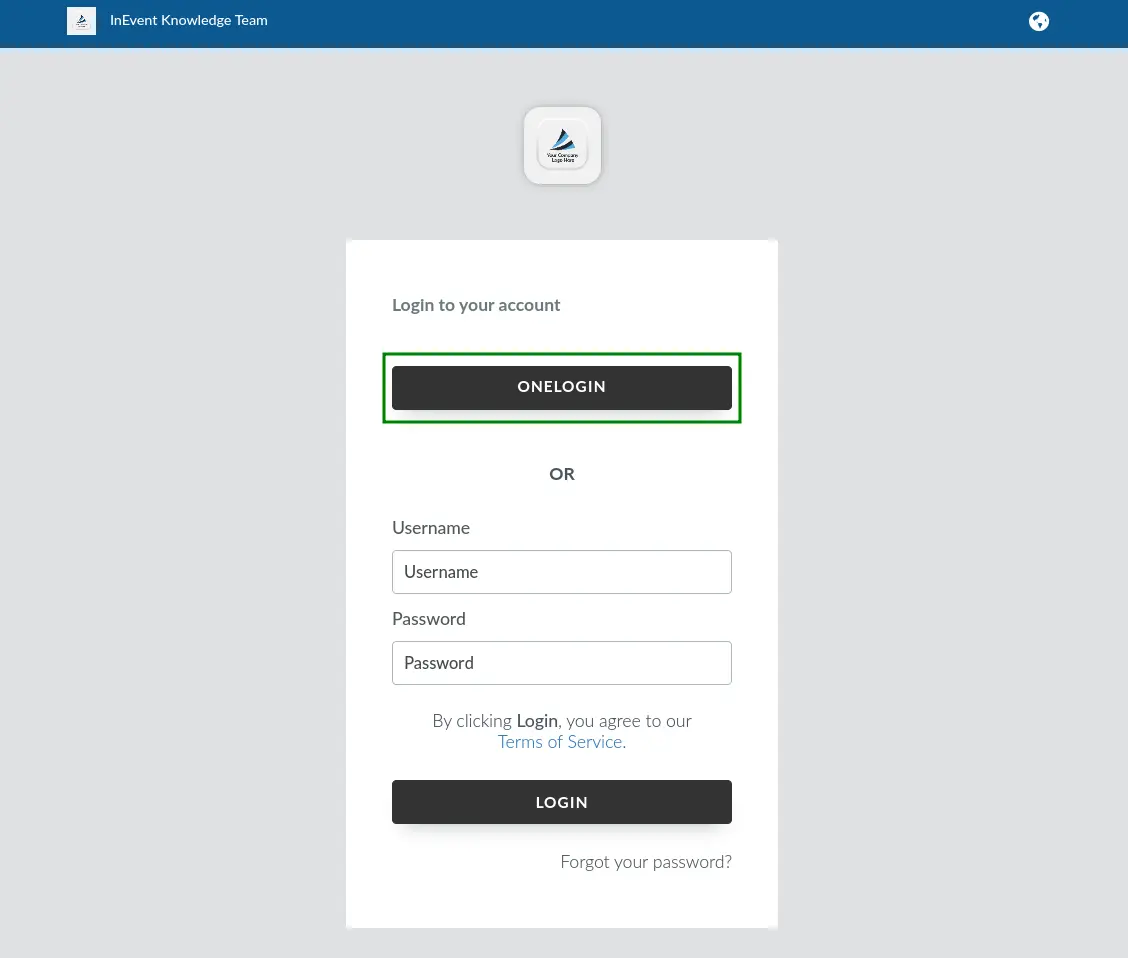
Upon pressing ONELOGIN, using OneLogin as an SSO example, they will be directed to the SSO portal to enter their user credentials, as shown below.
Once the login process has been completed, they will be redirected to the InEvent platform.
Logging in through the app
Attendees logging in using the Android and iOS app can also log in to your events using the integrated SSO.
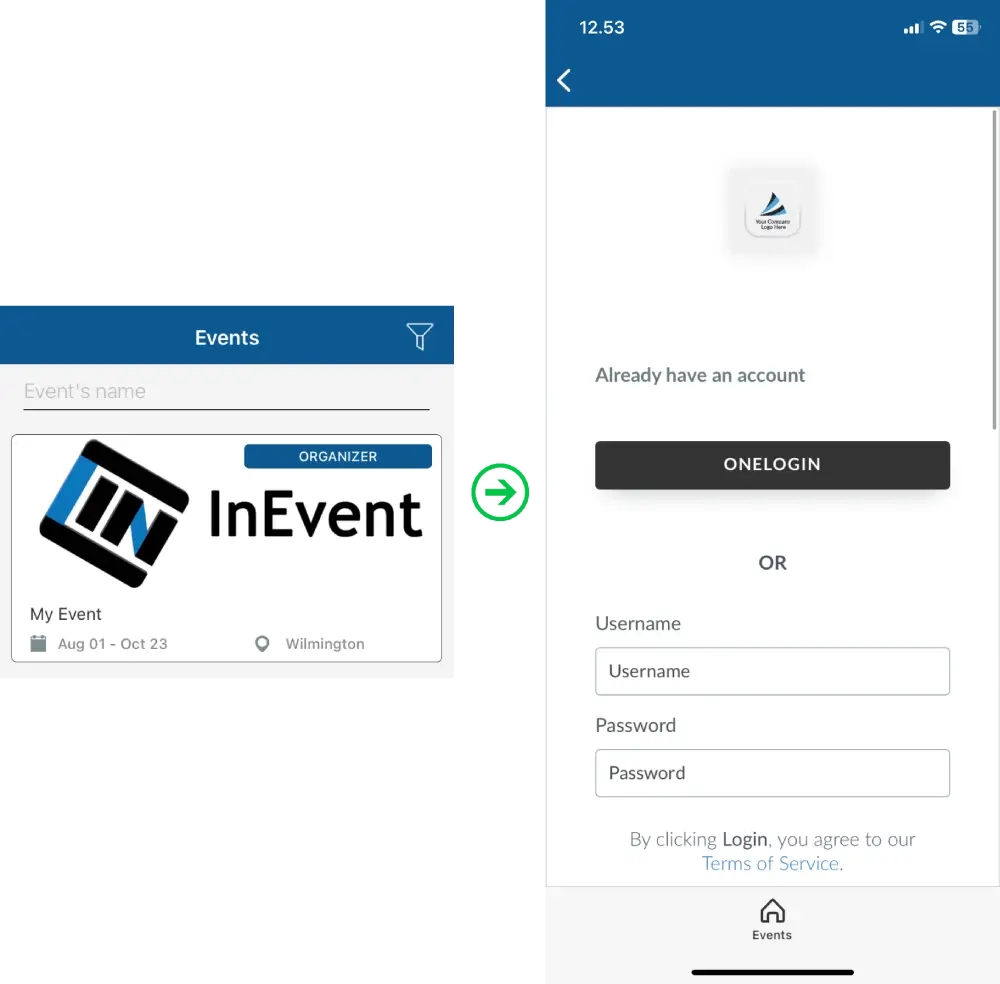
Upon pressing the desired SSO button, they will be directed to the SSO portal to enter their user credentials, as shown below, using OneLogin as an example.
Once the login process is completed, they will be directed to the company's event directory, from where they have to select their target event.
Azure Active Directory log out experience
When Azure Active Directory SSO is integrated with the InEvent platform, users who are logged in using Azure AD SSO benefit from a simplified login and logout experience. When logging out from InEvent, they will also be logged out from Azure Active Directory.
When Azure Active Directory is integrated using SAML 2.0, users are redirected to the SAML logout page before returning to InEvent. When it is integrated using OpenID Connect, users are redirected to the Microsoft logout interface, where manual confirmation is required to complete the logout process.
Redirect users after logging out
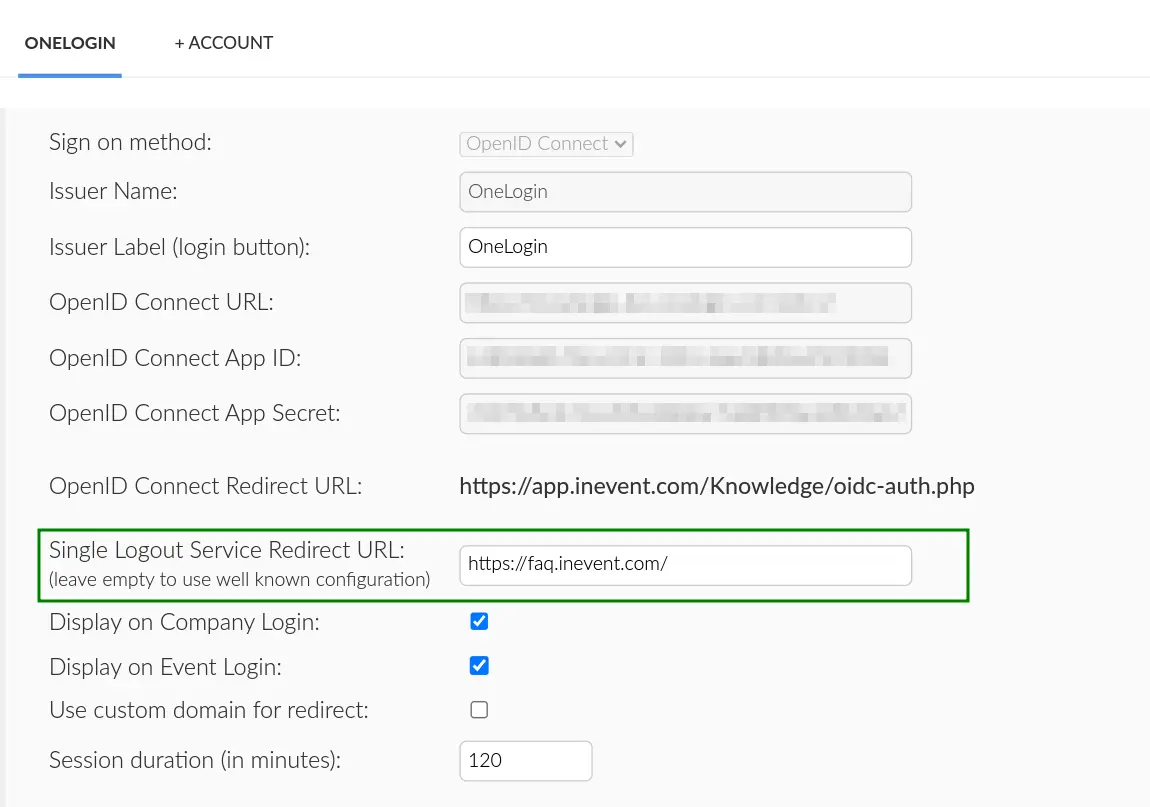
You can configure the target redirect page that will be seen by the attendees after logging out. To do so, enter the URL of the target redirect page in the Single Logout Service Redirect URL and save your changes.
Below is the default logout behavior, which leads to the Website or Landing page of your event, depending on your event's configurations.
Below is the behavior when a redirect page is configured in the Single Logout Service Redirect URL field, using the InEvent FAQ as an example.
SSO Login button display options
After successfully configuring your SSO integration, you can display or hide the SSO Login button for user logins from the Company level, Event level, or both. To do so, press the Edit button and check or uncheck the appropriate boxes.
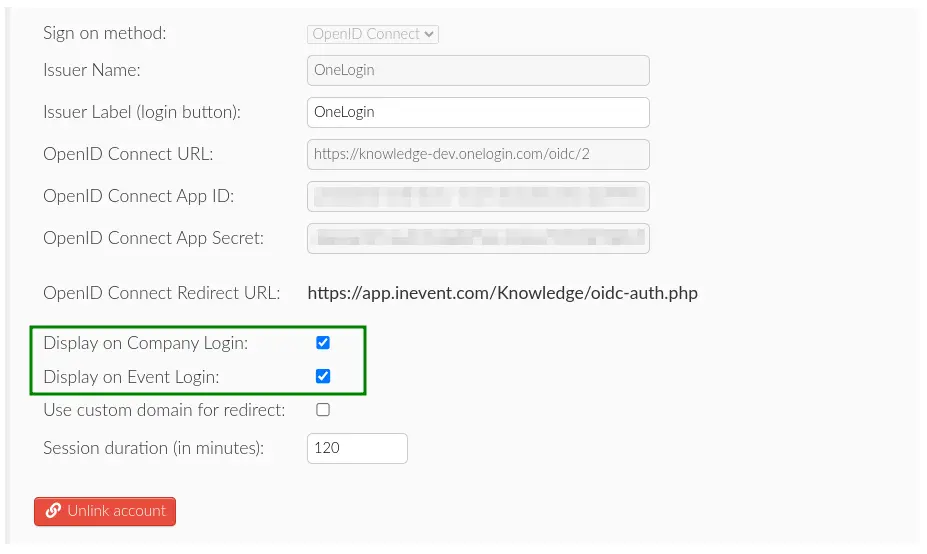
- Display on Company Level: Display the SSO Login button when logging in at the Company level.
- Display on Event Level: Display the SSO Login button when logging in at the Event level.
Then, press the End button to save your changes.
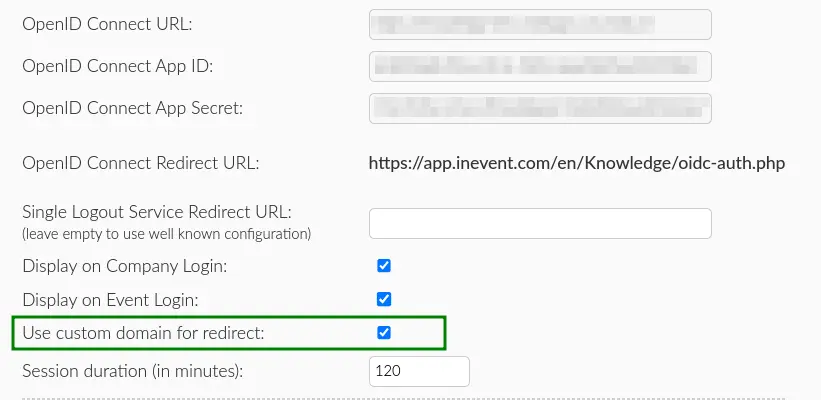
Use custom domain for redirect
When using SSO on a Custom domain-enabled company or event, the domain changes affect SSO redirect URLs. In order to ensure SSO integration is not interrupted by domain changes, click on Edit and check on the Use custom domain for redirect box after configuring your SSO integration.
SSO login session duration
You can determine the duration of a SSO login session directly from the SSO configuration interface. This way, users who log in to the InEvent platform using the target SSO integration will be logged out after the set duration has elapsed since their login, and they will have to log in again. To define the SSO loggin session duration, press the Edit button and enter the desired session duration in minutes.

After entering the desired session duration, press the End to save your changes.
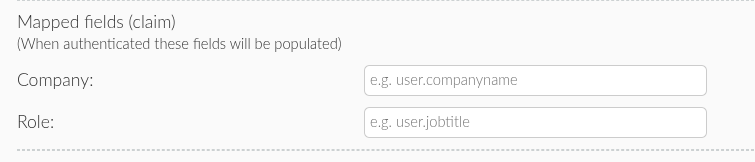
Mapped fields upon SSO authentication
After successfully setting up an SSO integration, administrators can set so that the fields in the user's profile are automatically mapped to the defined value using the Mapped fields (claims) option. InEvent fields that can be automatically mapped upon SSO authentication are as follows.
- Company
- Role
The guide below will use Azure Active Directory as an example.
Creating claims on Azure Active Directory
To configure mapped fields, it is necessary to configure the claims at Azure Active Directory. To do so, follow the instructions below.
- Click on Manage > Enterprise application within the Azure Active Directory Overview page.
- Click on your SSO application.
- Click on Single sign-on on the menu panel.
- Click on the Edit button next to Attributes & Claims.
- Click on Add new claim.
- Enter a unique name for the claim. Ensure to note the exact unique name, as it will be entered at the InEvent platform.
- Select Attribute as the Source.
- Select the appropriate Source attribute using the drop-down menu. To define the Company field entry, select
user.companyname. To define the Role field entry, selectuser.jobtitle. - Click on Save.
Allowing mapped fields within the SSO manifest on Azure Active Directory
After configuring claims, it is necessary to explicitly allow mapped claims on the SSO manifest. To do so, follow the instructions below.
- Click on Manage > App registrations within the Azure Active Directory Overview page.
- Click on your SSO application.
- Click on Manifest on the menu panel.
- Locate the following entry in the text editor within the Microsoft Graph App Manifest (New) tab.
"api": {
	"acceptMappedClaims": null,
	"knownClientApplications": [],
"requestedAccessTokenVersion": null,- Edit the two null values so that they look like the following snippet.
"api": {
	"acceptMappedClaims": true,
	"knownClientApplications": [],
"requestedAccessTokenVersion": 2,- Click on Save.
Entering unique claim names within InEvent
After configuring claims and allowing mapped claims within Azure Active Directory, the claims can be configured at InEvent.
- Navigate to your Azure AD (OIDC) SSO configuration within InEvent.
- Enter the unique name defined for claims under Mapped fields (claim).
- Click on End to save your changes.
After completing the steps above, users who authenticate to InEvent using the configured SSO will have their fields pre-populated as configured.
Multiple SSO integrations
You can use multiple SSO integrations to handle the account authorization process in your company and event on the InEvent platform. To do so, simply integrate more than one SSO integrations from the Company level and set them to be displayed from the desired level (Company level only, Event level only, or both levels).
Below is how the Company level login interface will look like with multiple SSO integrations enabled and displayed.
Below is how the Event level login interface will look like with multiple SSO integrations enabled and displayed.
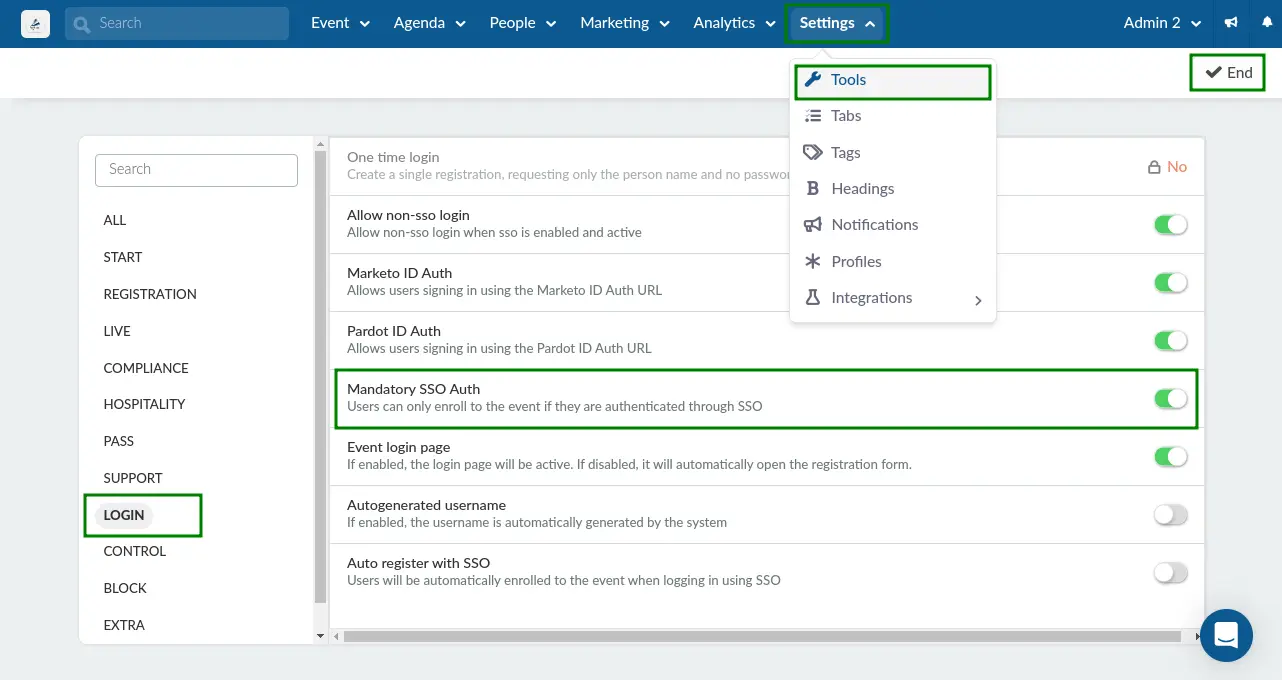
Mandatory SSO Auth
After integrating SSO to InEvent, you can enable the Mandatory SSO Auth tool so that users can only enroll to your event if they are authenticated through the integrated SSO methods.
To enable Mandatory SSO Auth, follow the steps below.
- Navigate to Settings > Tools from the Event level.
- Press the Edit button on the top right corner of the page.
- Locate the Login section.
- Enable Mandatory SSO Auth by checking the corresponding box.
- Press the End button to save your changes.
After completing the steps above, users will see the following login interface when accessing your Registration form, with multiple SSO directories enabled as an example.
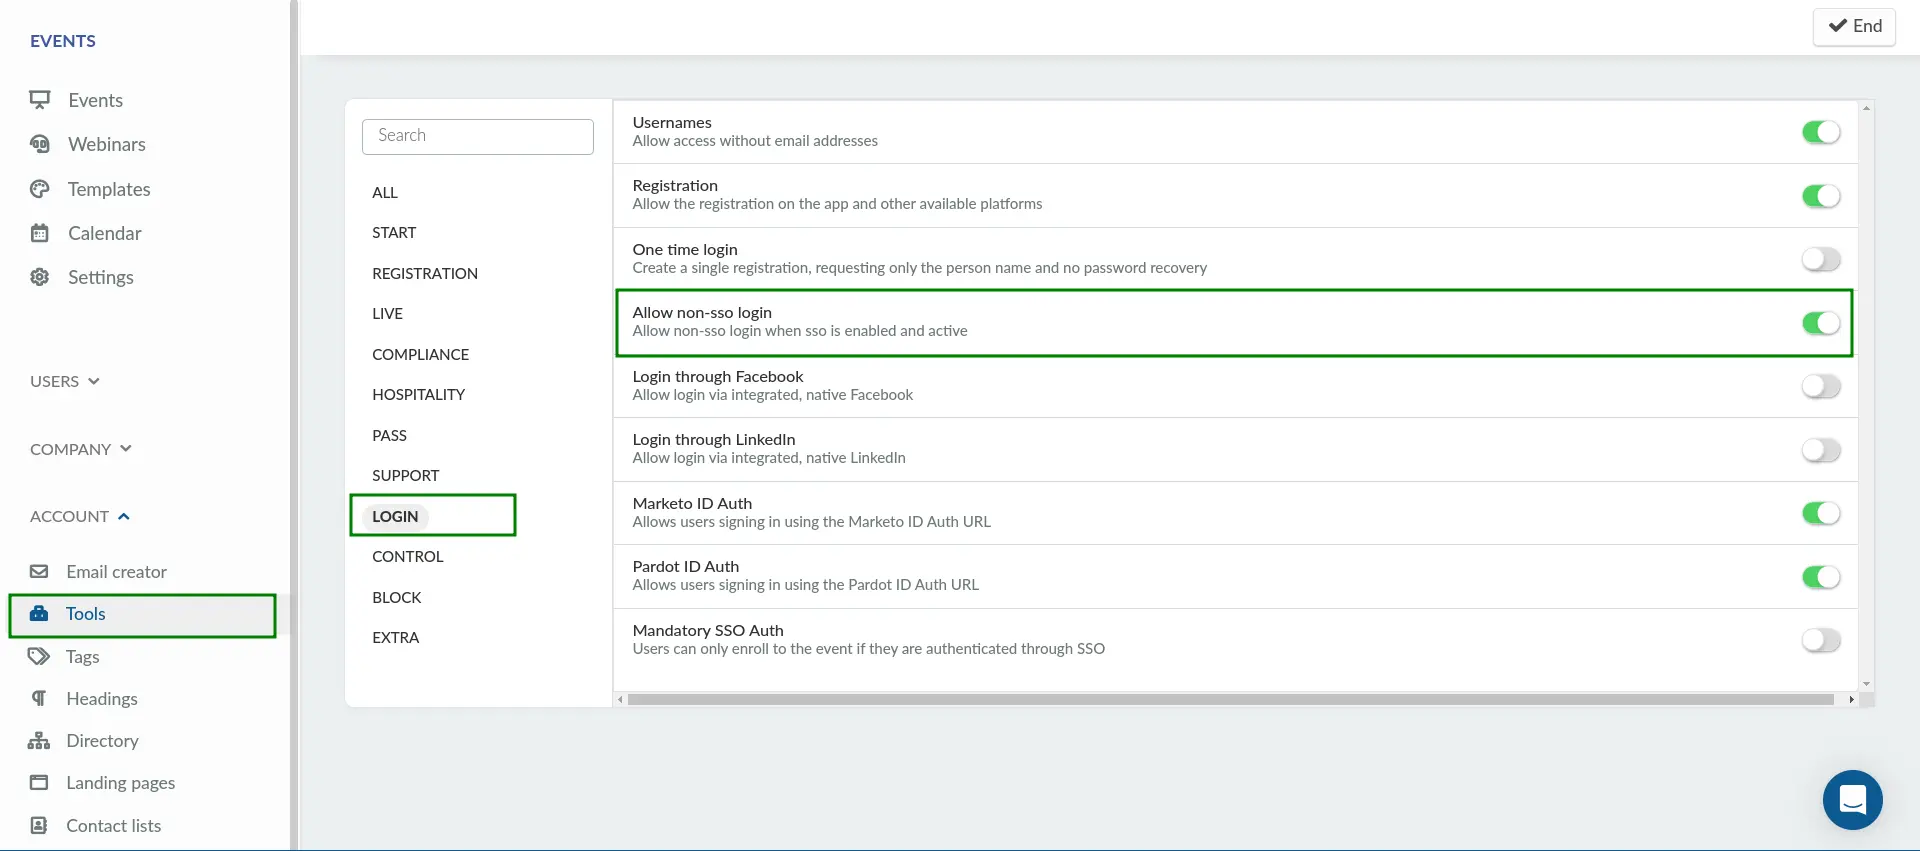
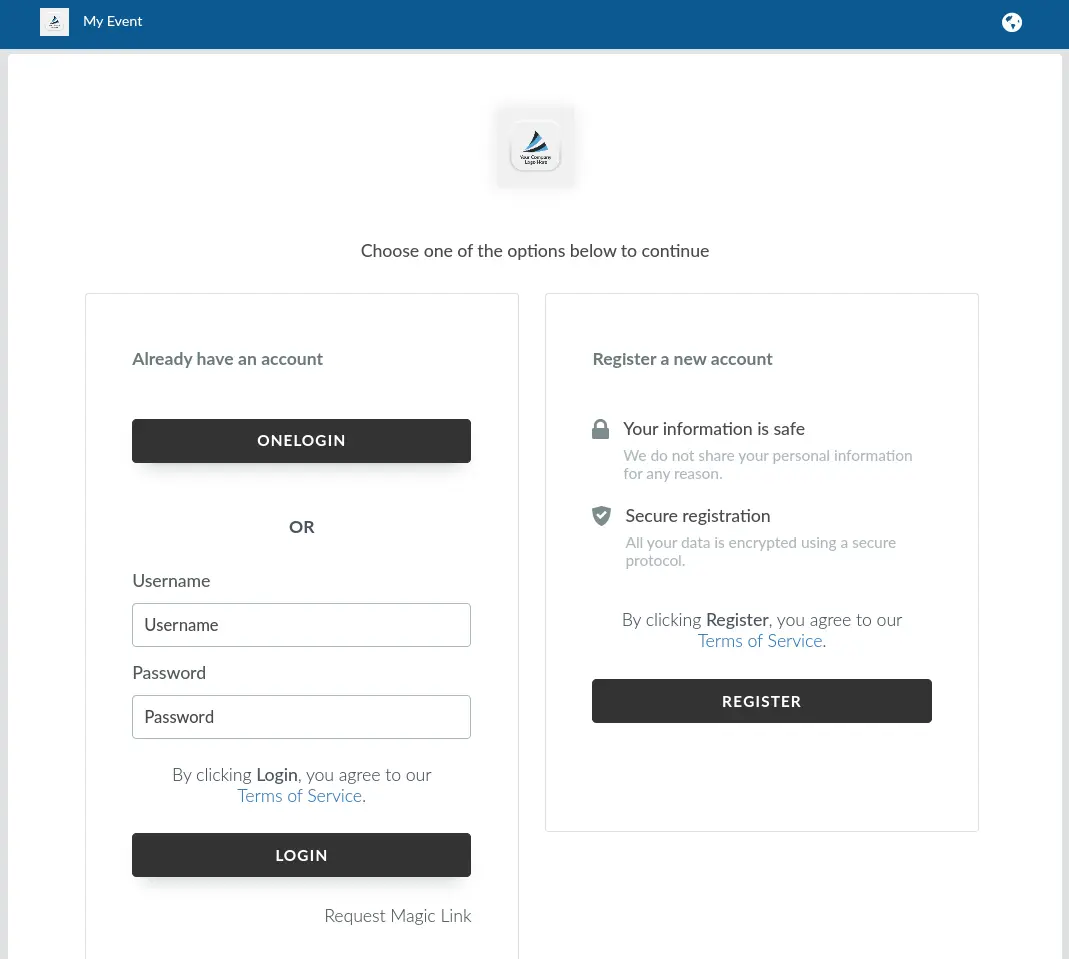
Allow non-SSO login
It is possible to allow non-SSO login when SSO is enabled and activated. In order to allow non-SSO login, follow the steps below.
- Navigate to Account > Tools from the Company level.
- Click Edit.
- Locate Allow non-SSO login under the Login section.
- Check the box to enable the function.
- Press End to save your changes.
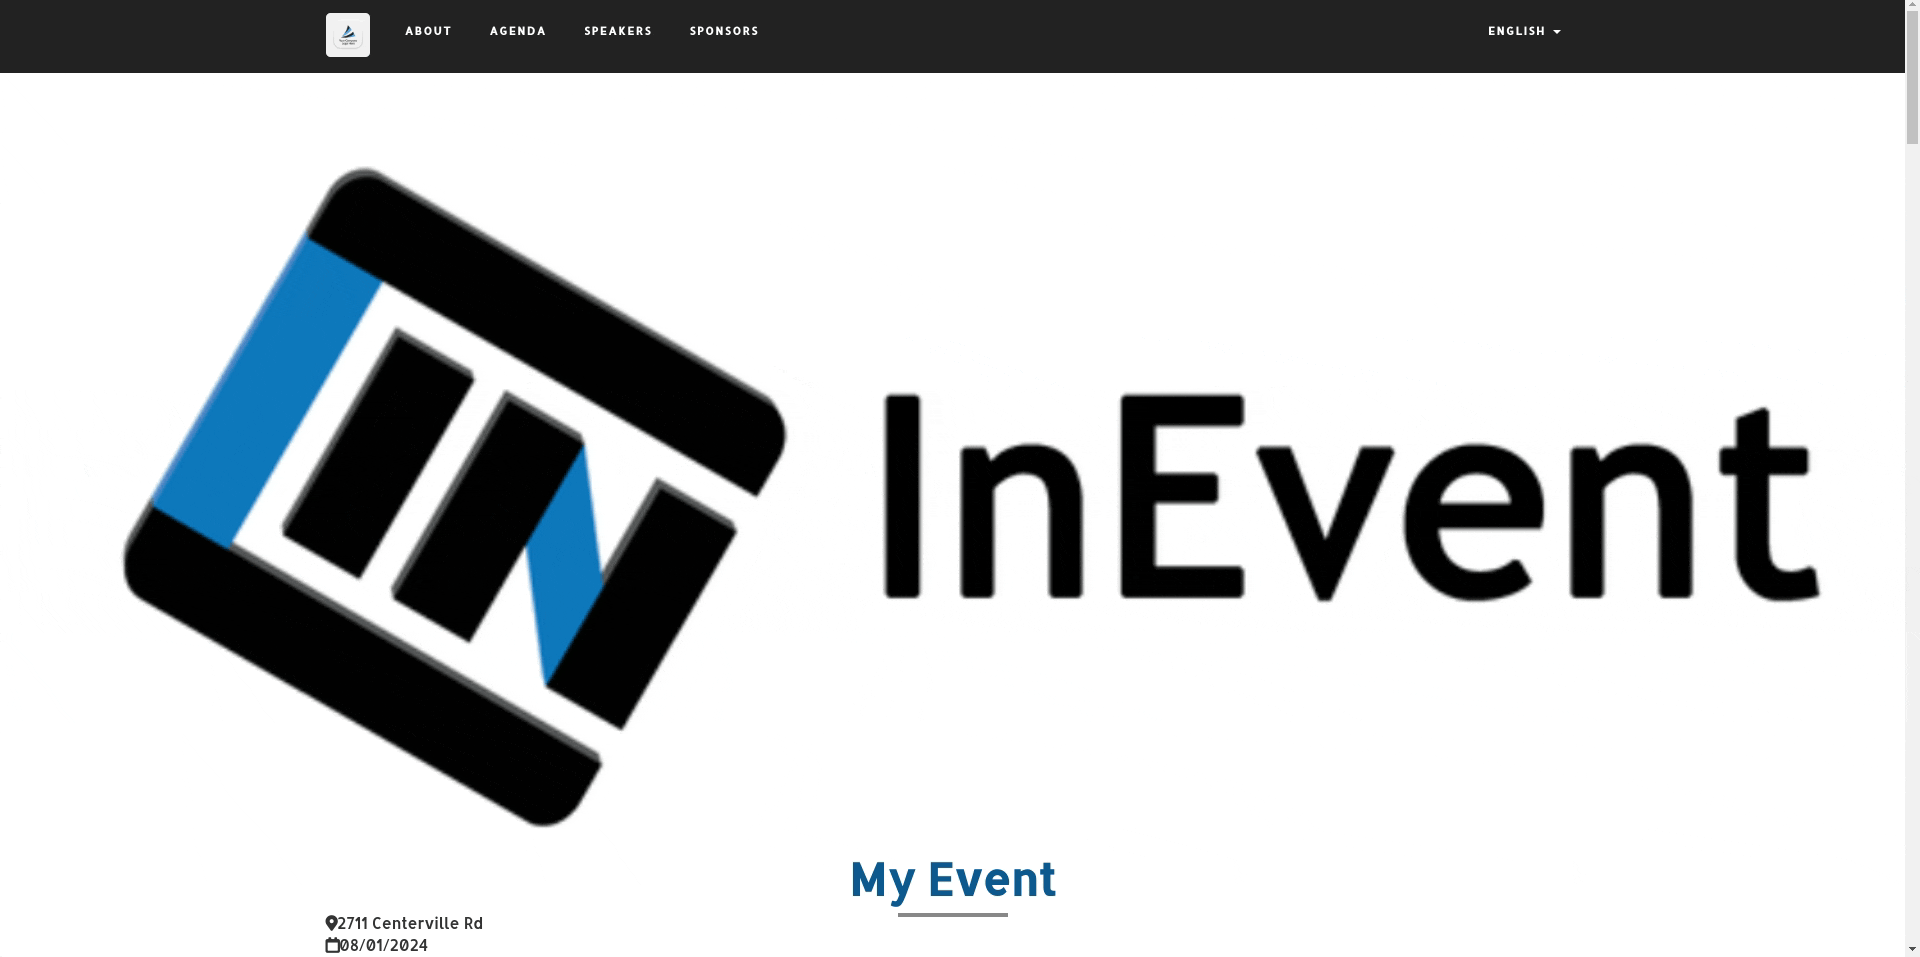
After completing the steps above, attendees will see the following screen when logging in to your event.
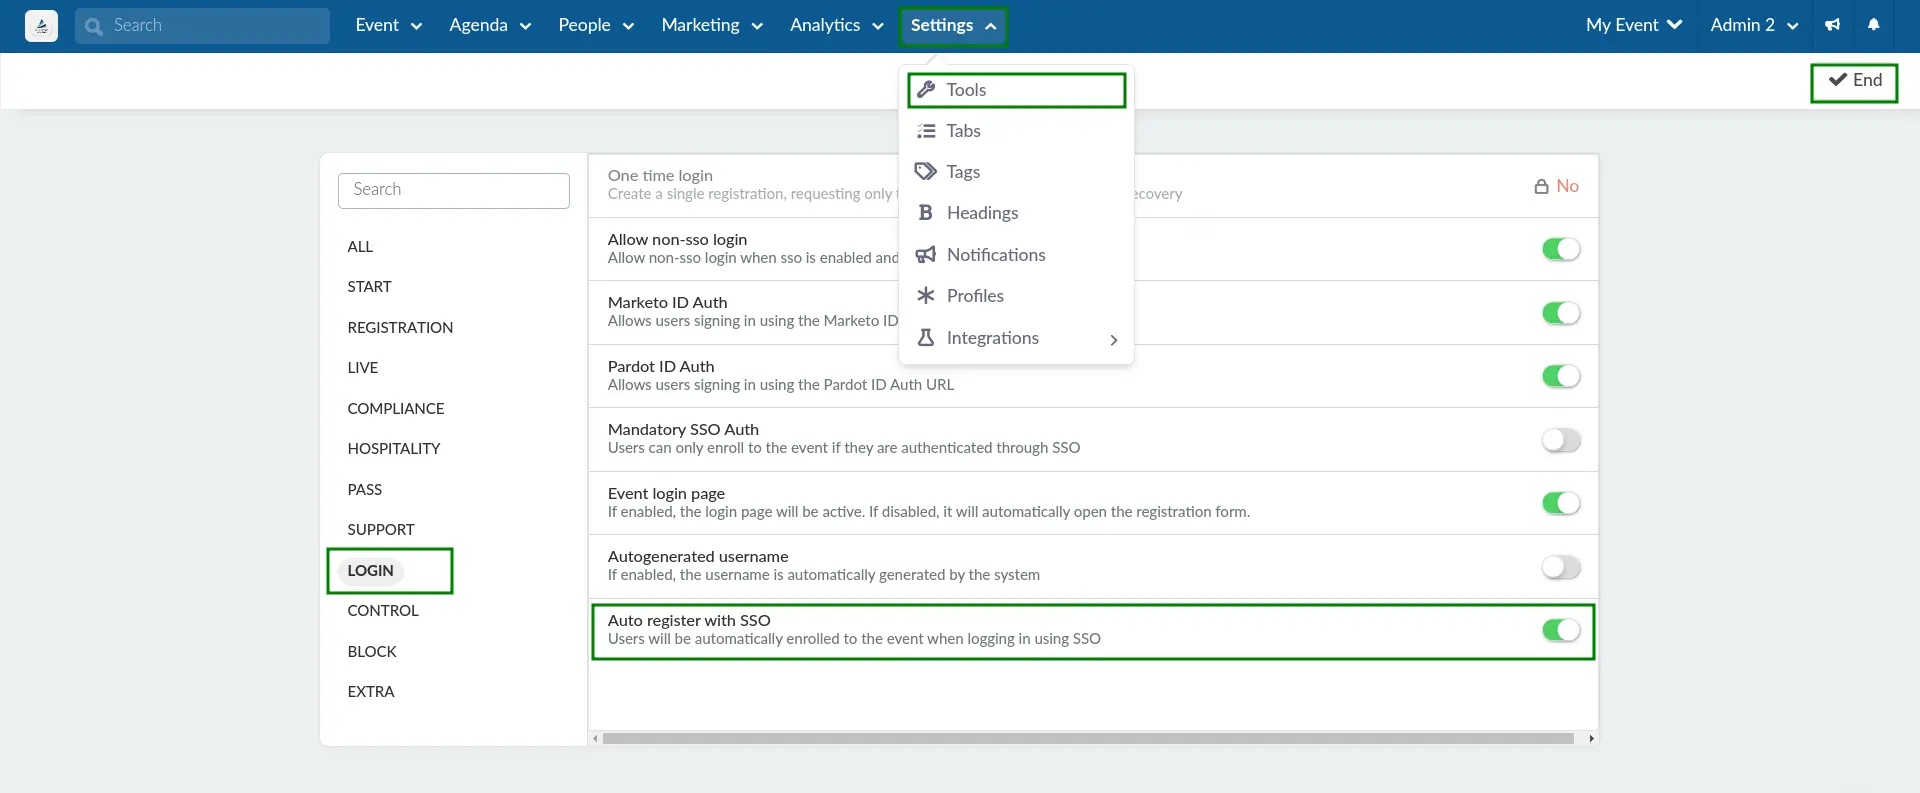
Auto register with SSO
You can allow users who log in using SSO to be automatically registered to your event, even if they were not added to the event's list of attendees.
To allow the automatic registration of users who log in using SSO, follow the steps below.
- Navigate to Settings > Tools from the Event level.
- Click Edit.
- Locate Auto register with SSO under the Login section.
- Check the box to enable the function.
- Press End to save your changes.
After completing the steps above, users who log in using SSO will be automatically registered to your event as an attendee. Therefore, they will be directed to the Virtual Lobby without being prompted to complete the Registration form, even if they were not added to the event's list of attendees.
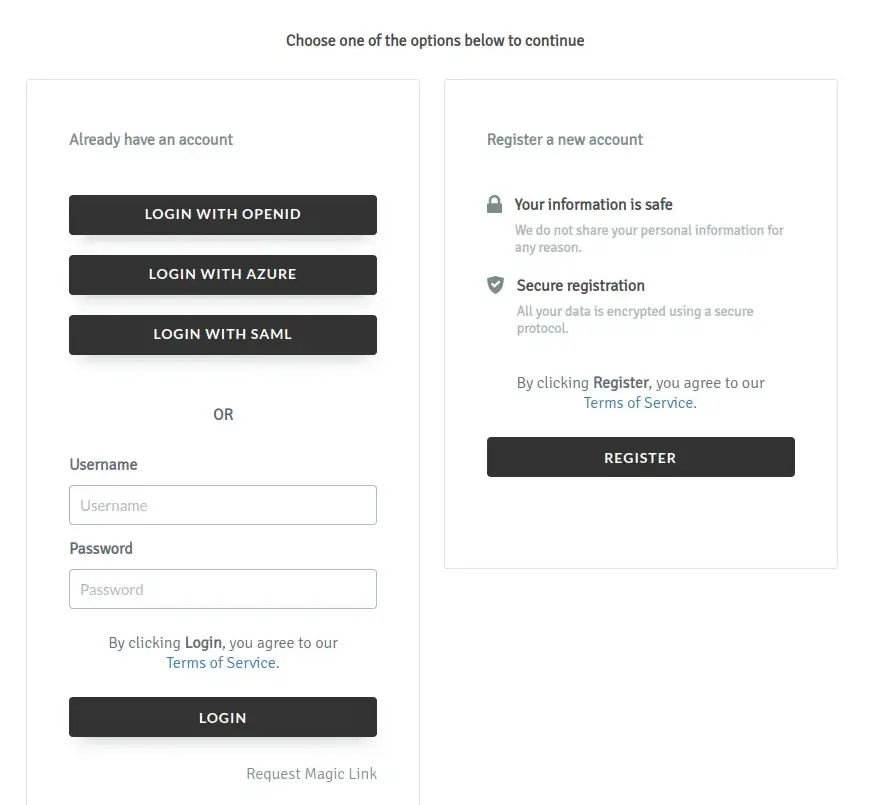
Company administrator SSO login selection panel
When the Enable directory on company login tool is enabled on the Company level, administrators logging in to the Company level using SSO will be presented with the following selection panel after entering their SSO credentials. The administrator can then choose to navigate to the Company level on the platform, or to the company's Events & Webinars Directory.