Calibrating and troubleshooting Brother and Zebra badge printers
 Updated 3 months ago
by
Caleb Kotey
Updated 3 months ago
by
Caleb Kotey
- Brother QL printers
- Troubleshooting Brother printers
- How to reset the printer
- Calibrating a Zebra ZD621 Printer for Badge Printing
This article covers how to set up, configure, and troubleshoot Brother and Zebra printers for badge printing with InEvent.
Brother QL printers
Brother QL printers automatically detect installed DK media and do not require a separate calibration process. Instead, correct setup, loading the right DK roll, allowing the printer to detect it, and confirming your media size — is all that is needed before printing badges.
Supported models and label sizes
InEvent supports the following Brother printer models for badge printing:
- QL-710W
- QL-720NW
- QL-810W
- QL-820NWB
Supported label sizes: 17mm × 54mm, 17mm × 87mm, 23mm × 23mm, 29mm × 42mm, 29mm × 90mm, 38mm × 90mm, 39mm × 48mm, 52mm × 29mm, 62mm × 29mm, 62mm × 100mm, 12mm, 29mm, 38mm, 50mm, 54mm, 62mm, 60mm × 86mm, Black/Red 62mm, 54mm × 29mm, 12mm round, 24mm round, and 58mm round.
Model | Connectivity |
QL-710W | Wi-Fi |
QL-720NW | Wi-Fi, Ethernet Note that the QL-710W and QL-720NW do not support Bluetooth. Ensure that you connect these models via Wi-Fi or Ethernet only. |
QL-810W | Wi-Fi, USB |
QL-820NWB | Wi-Fi, Bluetooth, USB |
Setting up your Brother printer
Before setting up your Brother printer, confirm the following:
- The correct DK roll is installed and matches the label size selected in InEvent.
- The printer is powered on, and the status LED is solid (not blinking with an error).
- For Wi-Fi models, the printer and the tablet or mobile device are connected to the same network.
- For Bluetooth (QL-820NWB only), Bluetooth is enabled on the device you will use to print.
Installing the DK roll
- Press the DK roll compartment release button and open the cover.
- Remove any existing DK roll if present.
- Place the new DK roll into the compartment, ensuring the roll fits into the guides.
- Thread the leading edge of the label through the label output slot.
- Close the DK roll compartment cover until it clicks into place.
- Press the Feed button once. The printer will feed a short length of label to confirm the roll is loaded correctly and to detect the media.
For the official step-by-step roll installation guide from Brother, refer to the Brother QL-820NWB support page.
Connecting to Wi-Fi or Bluetooth
Wi-Fi (QL-710W, QL-720NW, QL-810W, QL-820NWB)
For Wi-Fi connectivity setup and registering the printer with the InEvent collector profile, refer to the Printing Via WIFI or Bluetooth- Brother Label printers article.
Bluetooth (QL-820NWB only)
- Ensure Bluetooth is enabled on your tablet or mobile device.
- Power on the QL-820NWB. The printer will be discoverable automatically.
- On the QL-820NWB, go to Menu > WLAN and confirm Wi-Fi is active, or use the Bluetooth pairing button to initiate pairing.
- On your device, open Bluetooth settings and select the printer from the list of discovered devices.
- Once paired, open the InEvent mobile app and proceed to connect the printer within badge printing > print now > my printers > add printer.
For the full step-by-step guide on registering and pairing your Brother printer with InEvent, refer to the Printing Via WIFI or Bluetooth- Brother Label printers article.
Troubleshooting Brother printers
Labels are jammed or not ejecting correctly
- Power off the printer.
- Open the DK roll compartment and carefully remove any jammed labels.
- Check the label output slot for any adhesive residue or label fragments and clean if necessary.
- Reinstall the DK roll, ensuring it is seated correctly.
- Close the cover and power the printer back on.
- Press Feed once and check that labels eject smoothly.
To prevent jams, ensure the DK roll compartment is fully closed before printing and that labels are not folded or misaligned during loading. For more information, refer to Brother's official documentation on label jams and incorrect ejection.
Print quality is poor, white lines or streaks appear
Poor print quality on Brother QL printers is usually caused by lint or dust on the print head roller.
- Power off the printer.
- Open the DK roll compartment and remove the roll.
- Insert a Brother cleaning sheet (or use a clean, dry cloth) to clean the roller.
- Reinstall the DK roll and close the compartment.
- Power on and print a test badge.
For more information, refer to Brother's official documentation on poor print quality.
Badges are printing incorrectly after setup
If badges are misaligned, cut off, or printed in the wrong position:
- Confirm the correct DK roll is installed.
- Ensure the DK roll compartment cover is fully closed.
- Check that the label output slot is clear of any obstructions.
- Remove and reinstall the DK roll, then press Feed once.
- Verify the label size selected in the InEvent badge settings matches the physical DK roll.
The printer is not detected in the InEvent app
- Confirm the printer and the mobile device are connected to the same Wi-Fi network.
- For Bluetooth (QL-820NWB), confirm the printer is paired with the device and Bluetooth is active.
- Restart the printer and relaunch the InEvent app.
- In the InEvent mobile app, go to Badge Printing > Kiosk mode > Select printer and search again.
If the issue continues, collect the following information before contacting support:
- Printer model
- DK roll size installed
- Badge template and label size configured in InEvent
- Photos of the printed badge
- Description of the issue (e.g., misaligned, blank, streaks)
How to reset the printer
If the printer is not responding or behaving unexpectedly, a reset may resolve the issue.
QL-820NWB: Go to Menu > Administration > Reset on the printer's LCD screen. Three options are available:
- Factory Reset: Resets all settings to factory defaults.
- User Data Reset: Clears user-configured settings only.
- Network Reset: Resets network settings only.
QL-810W: Press and hold the Power button, then press the Cutter button:
- Once: Network reset
- Twice: User data reset
- Three times: Full factory reset
QL-720NW / QL-710W:
- Ensure the printer is powered off.
- Press and hold the Cut button while pressing and holding the ON/OFF button. The Wi-Fi lamp will start flashing, and the Status lamp will light orange.
- While continuing to hold the ON/OFF button, press the Cut button six times.
- The printer will reset. All data transferred from PC/Mac will be deleted, and the printer will return to factory settings.
Refer to the respective model's printed user guide for reset instructions, or visit the Brother support page and search for your model.
For more information on resetting, refer to Brother's official documentation on resetting the printer.
Calibrating a Zebra ZD621 Printer for Badge Printing
Follow the steps below to calibrate your Zebra printer:
Step 1: Load badge media (roll or fanfold)
Depending on the badge stock type, load it correctly before calibration.
- If using Badge rolls:
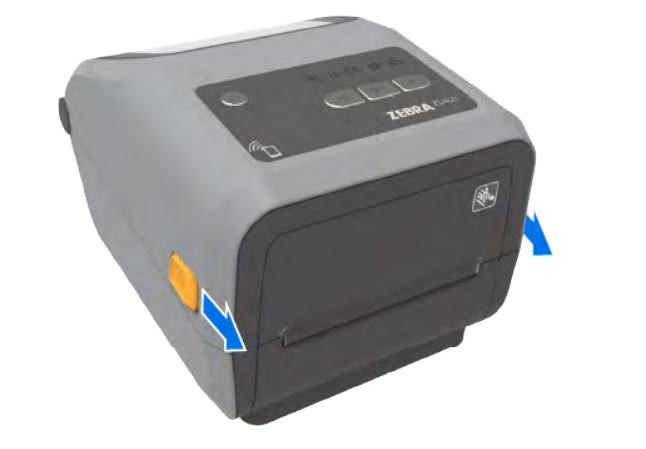
- Open the printer by pulling the yellow tabs/locks and lifting the cover.
- Move one of the yellow media guides aside to make room.
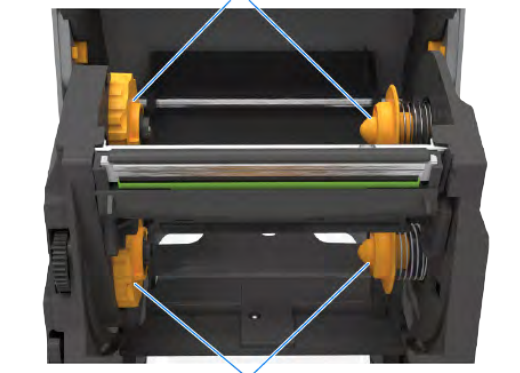
- Place the badge roll on the roll holders so it’s suspended between the guides.
- Feed the leading edge of the badge into the path so about half a badge extends out the front slot.
- If using ribbon (thermal transfer), load the ribbon according to the sticker or inside-printer guidance.
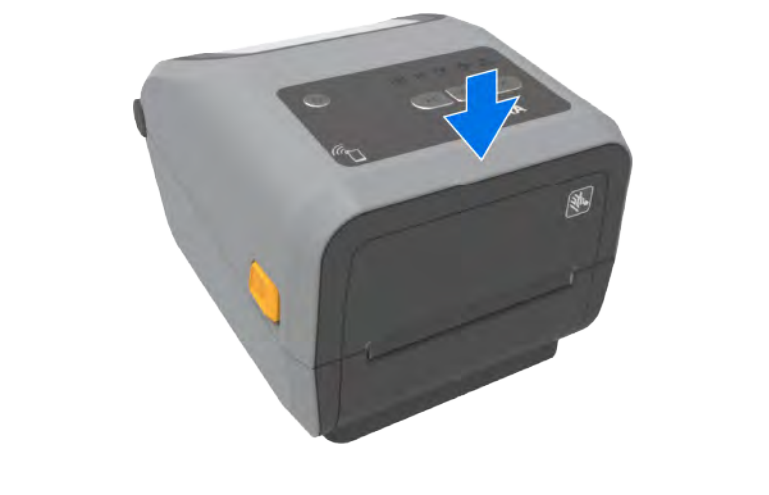
- Close the printer cover firmly.
- If using Fanfold (stacked) badges
- Open the cover as above.
- Insert the badge stack behind the printer, feeding the first badge forward through the slot.
- Adjust the media guides so the badges slide smoothly (not too tight).
- Close the cover fully.
Step 2: Choose the correct sensor mode / media type
On the ZD621 touchscreen:
- Go to Menu > Print > Print Quality > Media Type.
- If your badges have a black mark line on the back, select Mark.
- Otherwise, choose Gap / Notch (for standard media with spaces or notches).
- Set Media Handling:
- For calibration and testing, use Tear Off (to avoid wasting badges).
- After calibration, set it back to Cutter if you’ll be using cutter mode.
Step 3: Run automatic (wizard) calibration
Use the built-in wizard if available:
- Tap Wizards > Print.
- Tap Start Print (or Start Calibration).
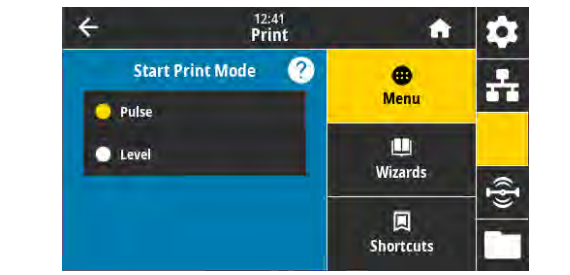
- The printer will feed badges while the sensor detects gaps or marks.
- Once calibration is complete, the printer will return to Ready.
- Optionally, open and close the cover, then press Pause to feed a single badge and check alignment.
If the automatic calibration fails, proceed to manual calibration.
Step 4 Manual calibration (if needed)
If automatic calibration doesn’t work:
- Tap Menu > Print > Sensors > Manual Calibration > Start Calibration.
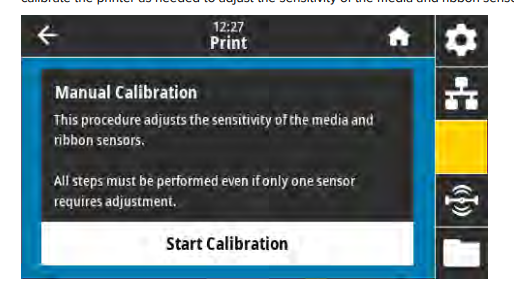
- Follow the on-screen steps (e.g., load blank label-free media, then position a label under the sensor).
- After the first measurement phase, the printer will ask you to reposition the media so a label is above the sensor. Close the cover, then press Pause or Calibrate again.
- The printer will feed several badges to measure length and spacing, then return to Ready.
- Open the cover, pull back the labels that fed through, close again, and press Pause to feed a single label for testing.
- After calibration, set Media Handling back to Cutter (if applicable).
Step 5: Test printing & adjustments
- Print a few test badges using your event system or iPad to confirm alignment.
- If the output is cut too early or too late, adjust Tear Line Offset via Menu > Image Adjust > Tear Line Offset.
- If print is too faint or too dark, adjust Darkness via Menu > Print > Print Quality > Darkness.
- If print is skewed or off-center, adjust Horizontal / Vertical Label Offset under Image Adjust.
Helpful tips
- If calibration still fails, check the back of your badges for black strips along the edges, these help the printer detect gaps during calibration.
- Keep the printer clean and free of dust for consistent results.
Common Troubleshooting Scenario:
In some cases, the InEvent app may connect to the Zebra printer successfully, and all printer settings may appear correct, but the printer does not feed or print badges when you attempt to print.
If this happens, follow these checks shared by the technical team:
- Verify Wi-Fi connection: Ensure the printer is properly connected to the Wi-Fi network. Disconnect and reconnect if necessary.
- Check printer status lights: Observe whether any indicator lights (such as those for the roll or connectivity) are flashing or showing errors.
- Test with the InEvent Kiosk app: If printing fails from the Check-in app, try the InEvent Kiosk app to confirm whether the issue persists.
- Restart the iPad or device: In some instances, restarting the iPad used for printing resolves connection or communication delays between the app and printer.
- Reset the printer: If the issue continues, reset the printer and reattempt calibration and connection.
Zebra ZD621 Connectivity Overview
Zebra ZD621 printers support both wired and wireless networking, giving flexibility for different event setups.
- Each printer includes Ethernet (LAN), USB, and Serial ports by default, allowing direct wired connections to routers or computers.
- Wi-Fi (802.11ac) and Bluetooth 4.1 are available as optional or factory-installed modules.
If you plan to use Wi-Fi printing, confirm that your printer model includes the wireless option before the event. For large setups, it’s recommended to connect no more than five printers per Wi-Fi network or router to maintain stability and reduce interference.
For maximum reliability, especially in large or high-traffic environments, wired Ethernet connections via a network switch are recommended whenever possible.
Configuring and troubleshooting Zebra printers for badge printing
After calibration, configure your Zebra printer to connect to the event network and your InEvent Kiosk. The following guide will assist in configuring Zebra printers, using the ZD620 model as an example.
- Power on the Zebra printer after ensuring it is connected to the appropriate power source. The printer start-up and initializing process may take some time.
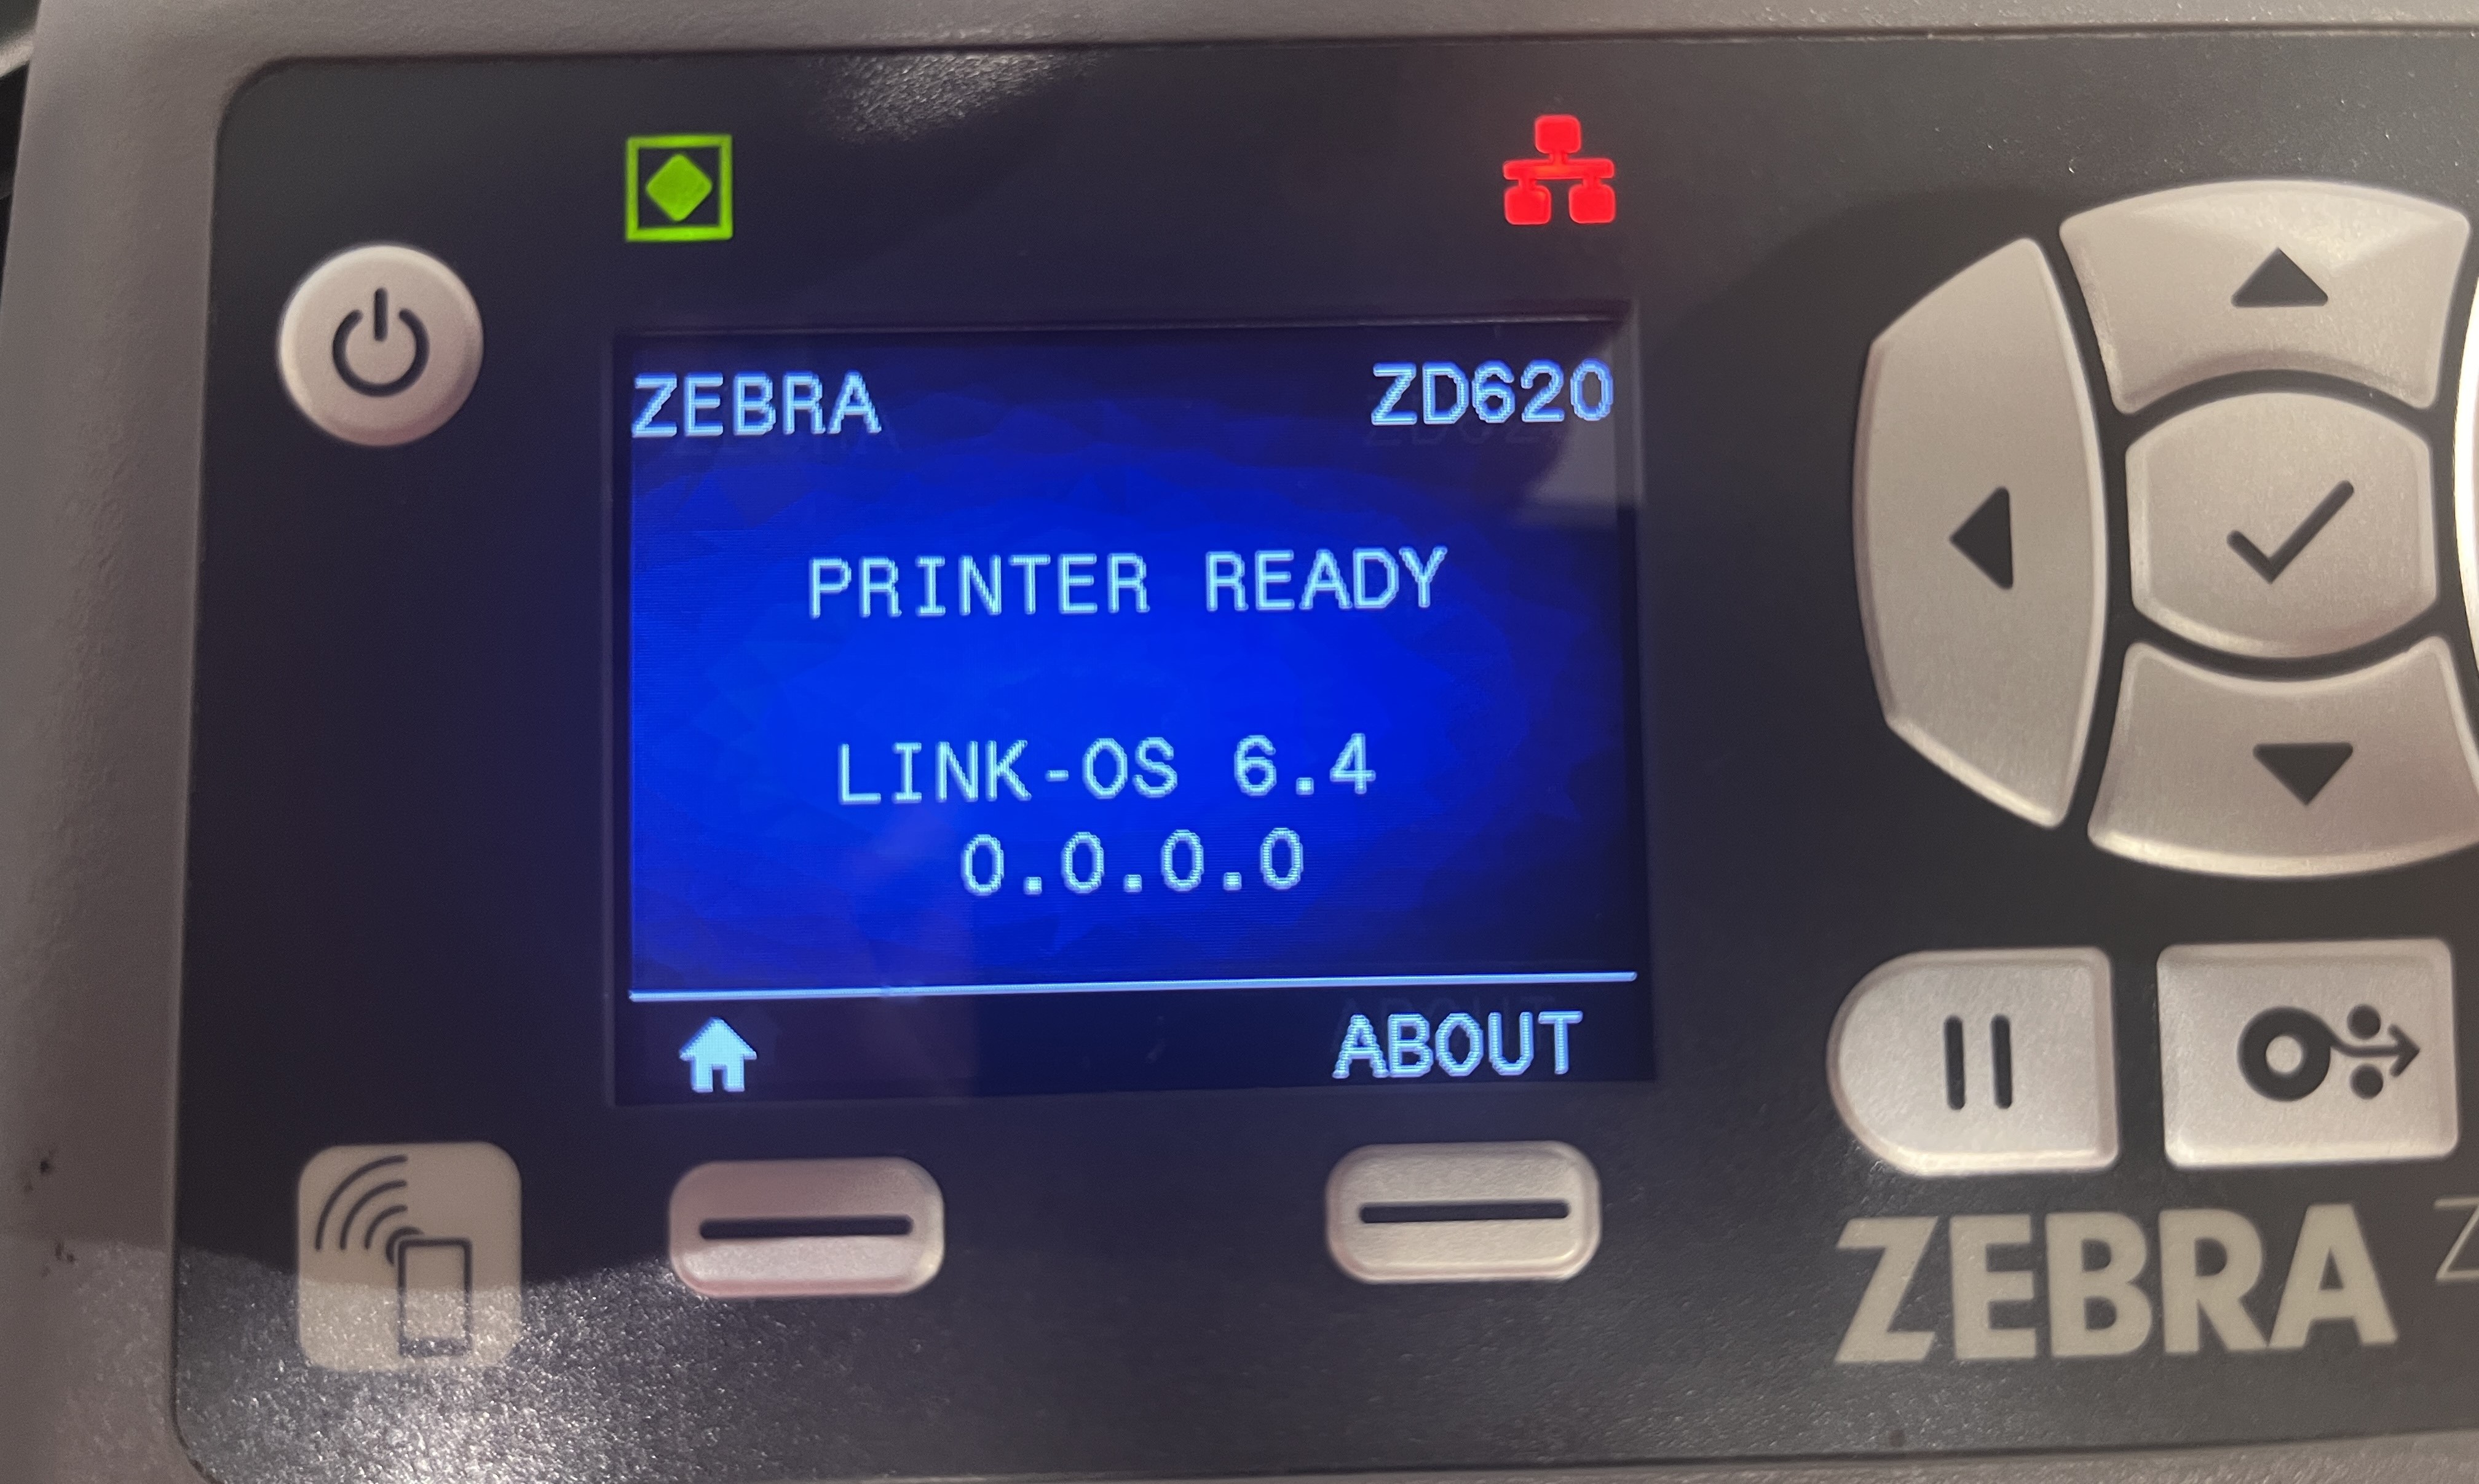
The red connection icon on the top right corner indicates that the printer is not yet connected to any network connection.
- Connect the printer to the event's network connection. If the connection is successful, the printer will display a yellow connection icon on the top right corner, as well as the device's IP address on the local network, as shown in the example below.
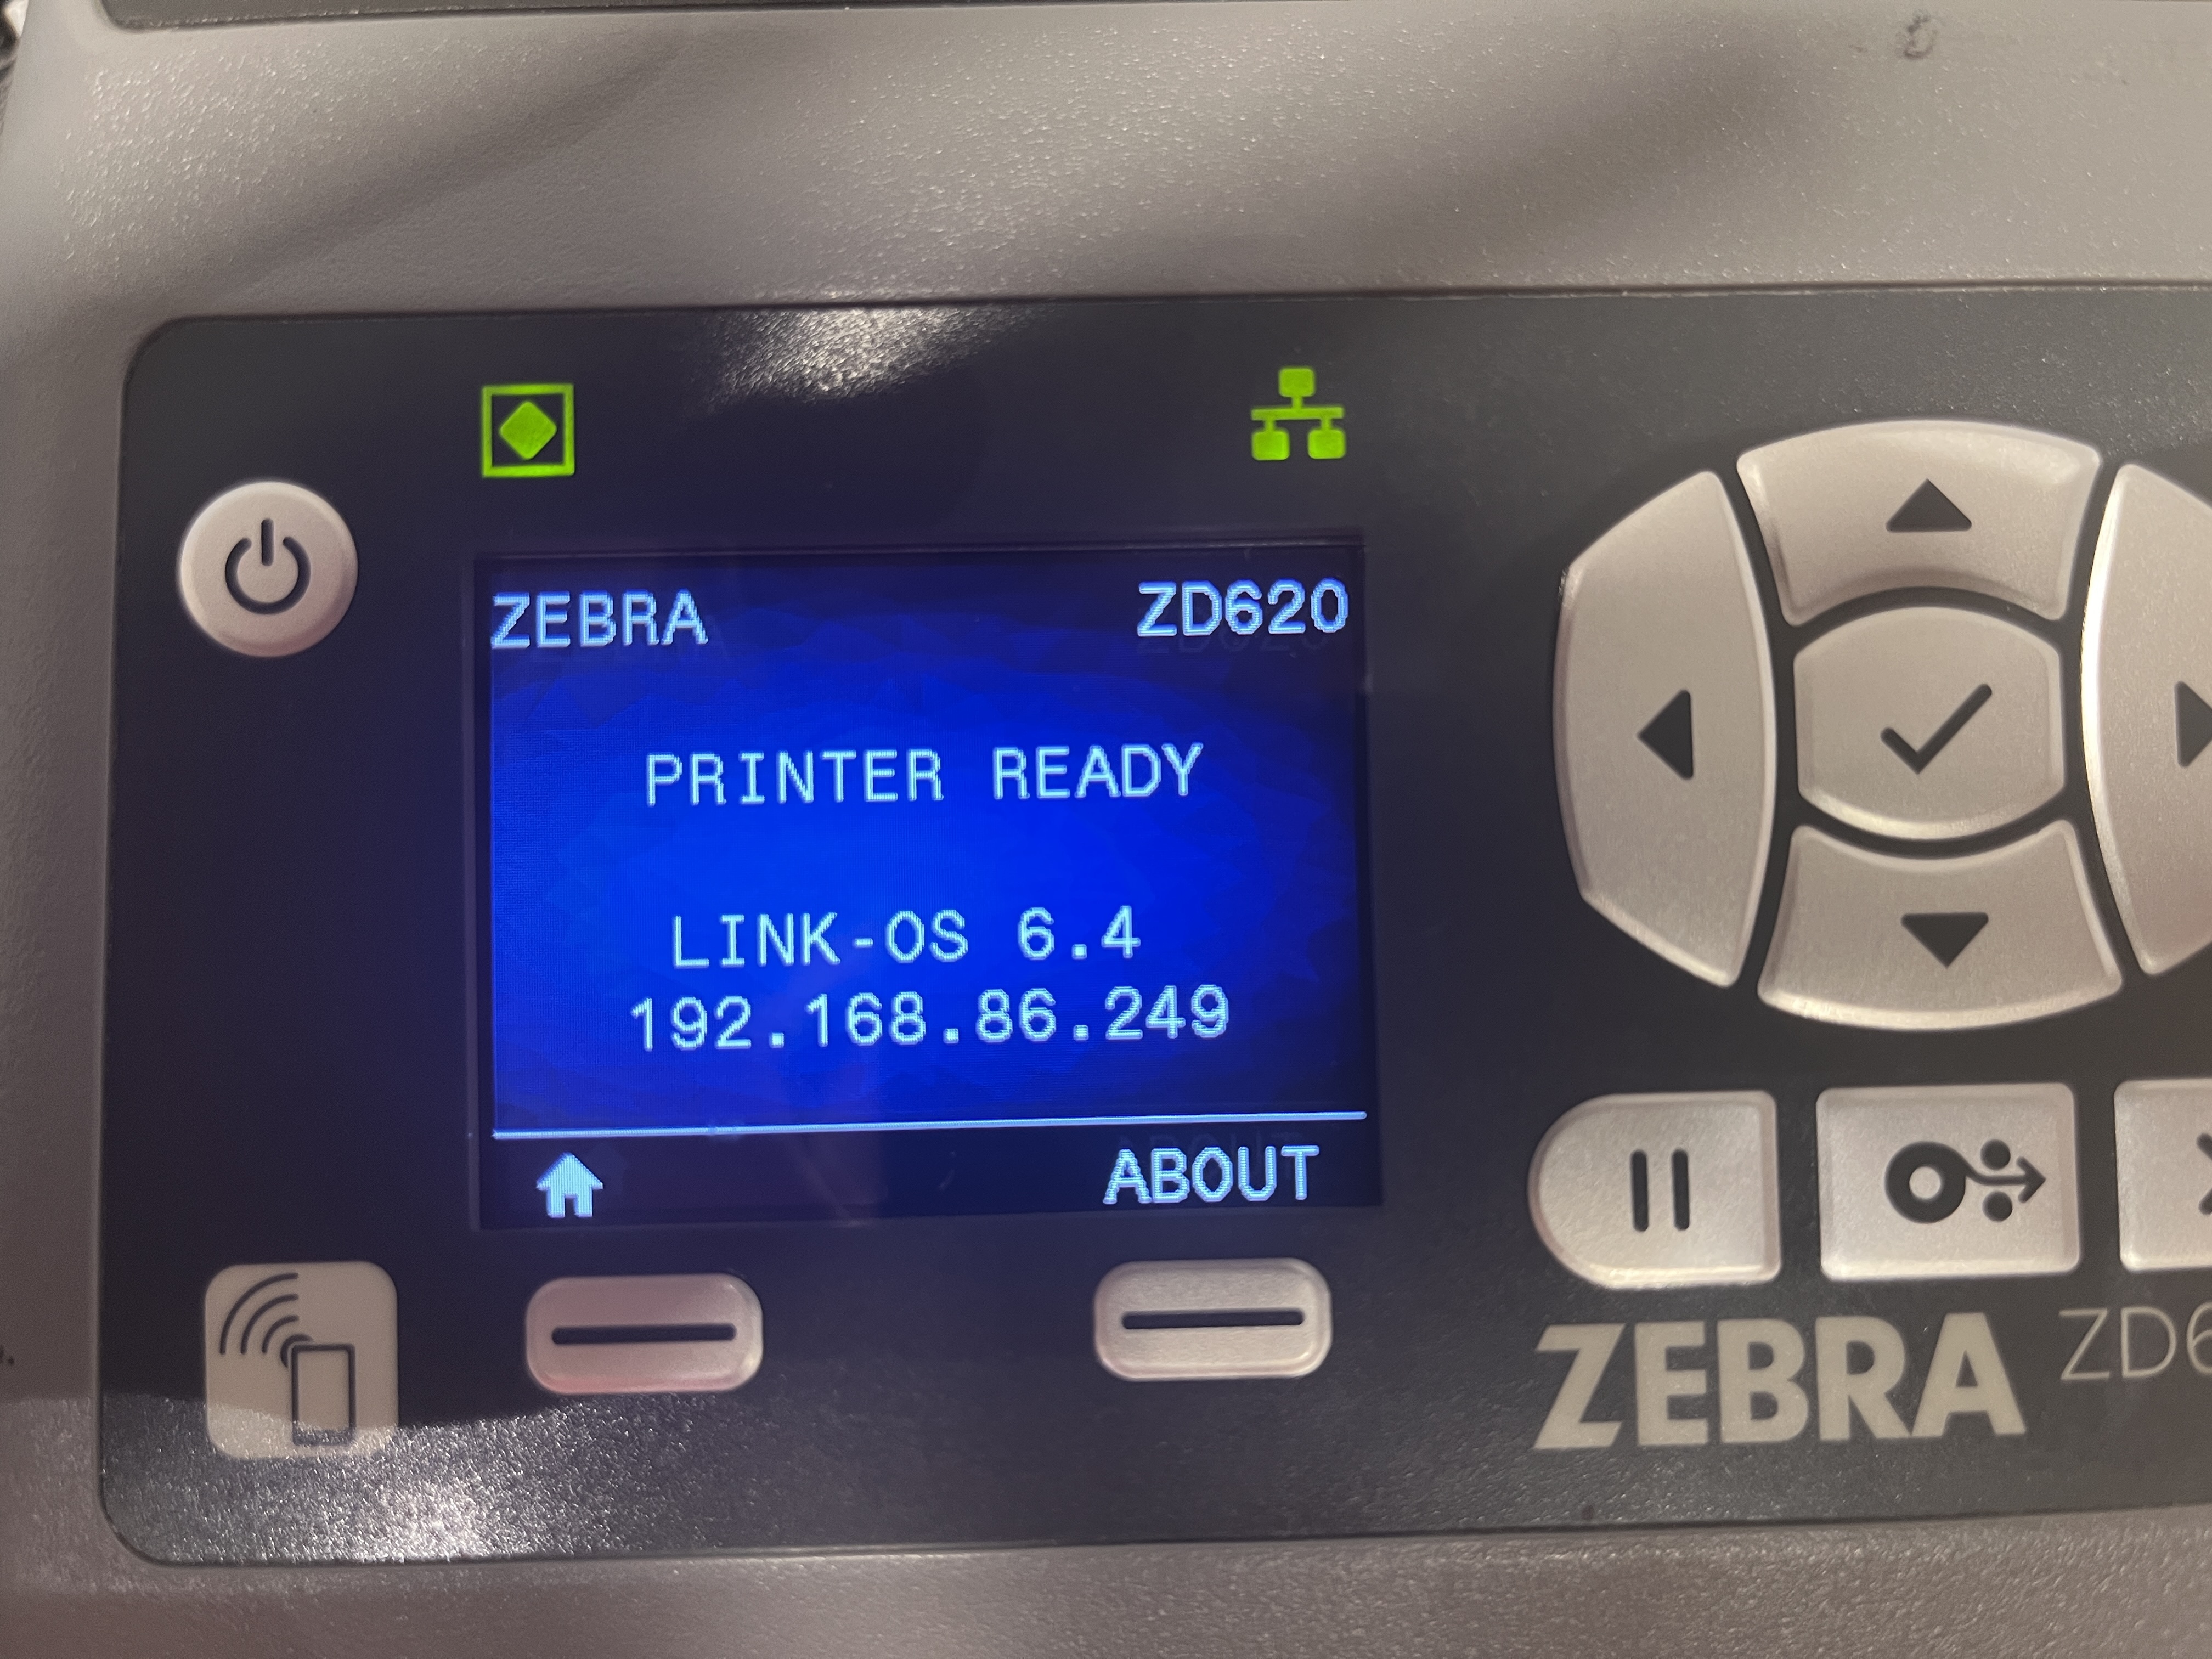
After the printer connects, ensure that the IP address shown on the printer matches the IP address within the Kiosk settings on the InEvent mobile app.
If Printer fails connecting to the network
If the printer fails to connect to the event network, continue following the steps below.
- Navigate to the printer's Home Menu > Network.
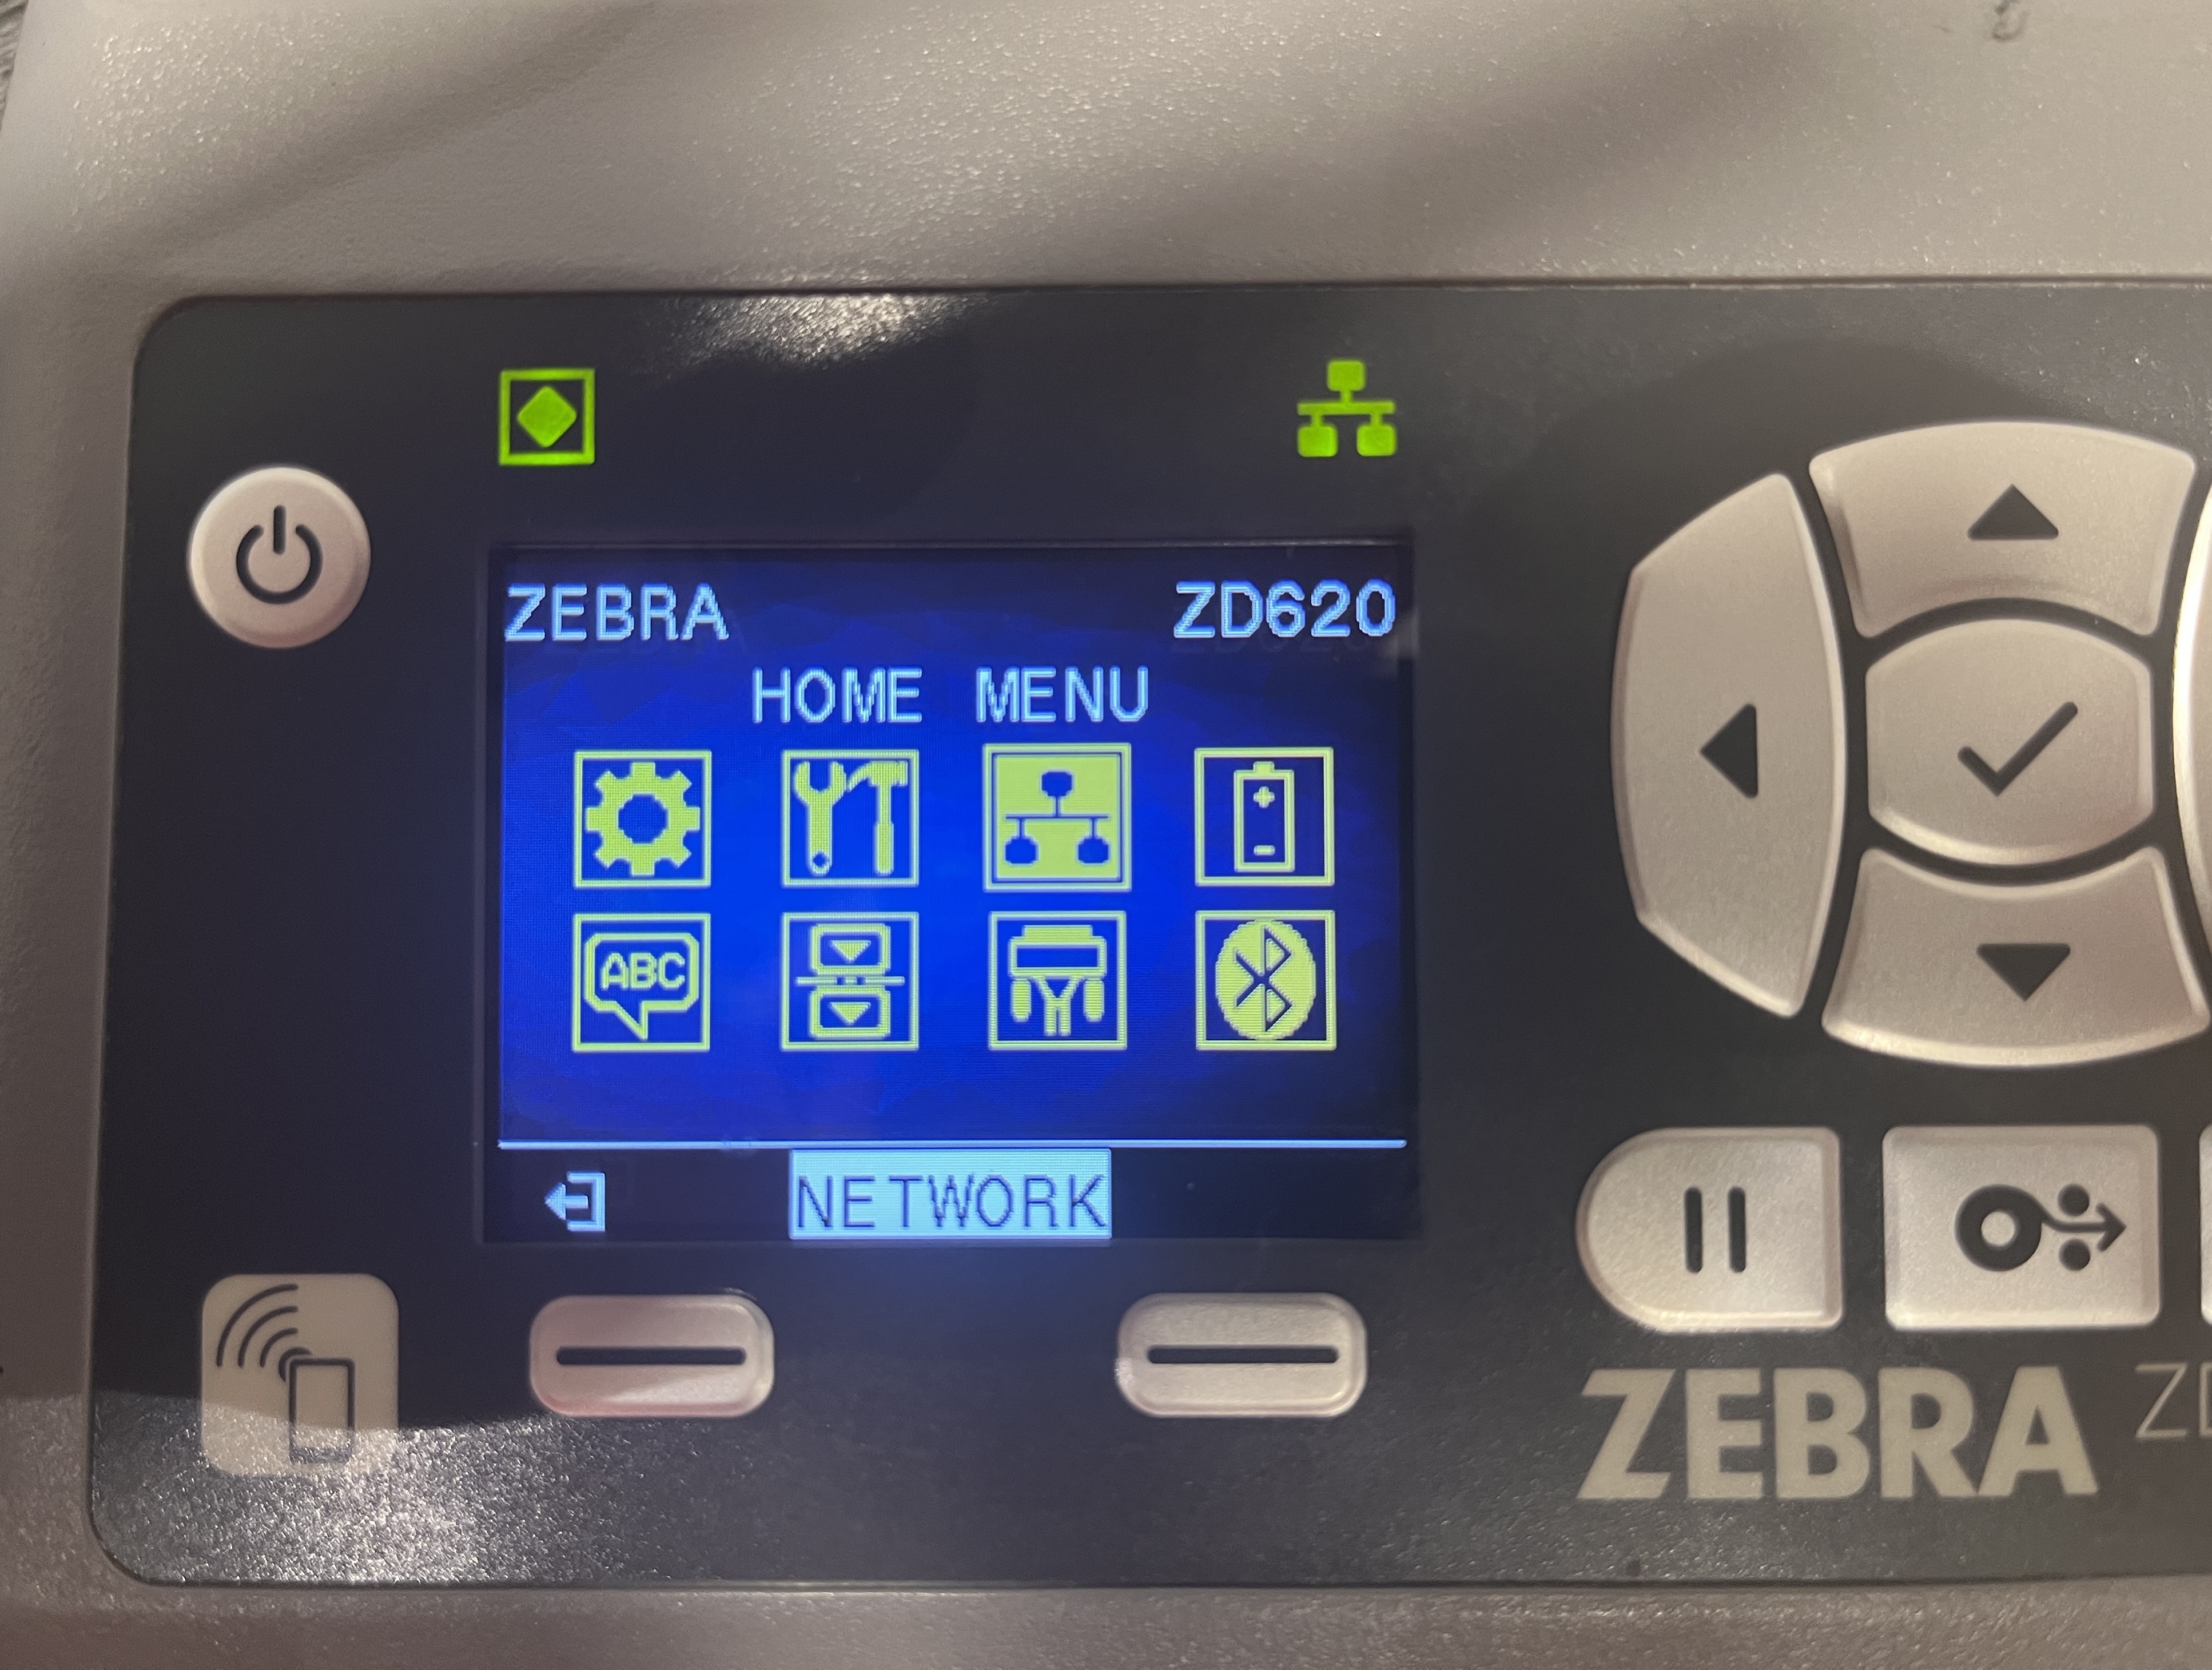
- Ensure that the PRIMARY NETWORK mode corresponds to the preferred connection mode. The available options are WIRED and WIRELESS.
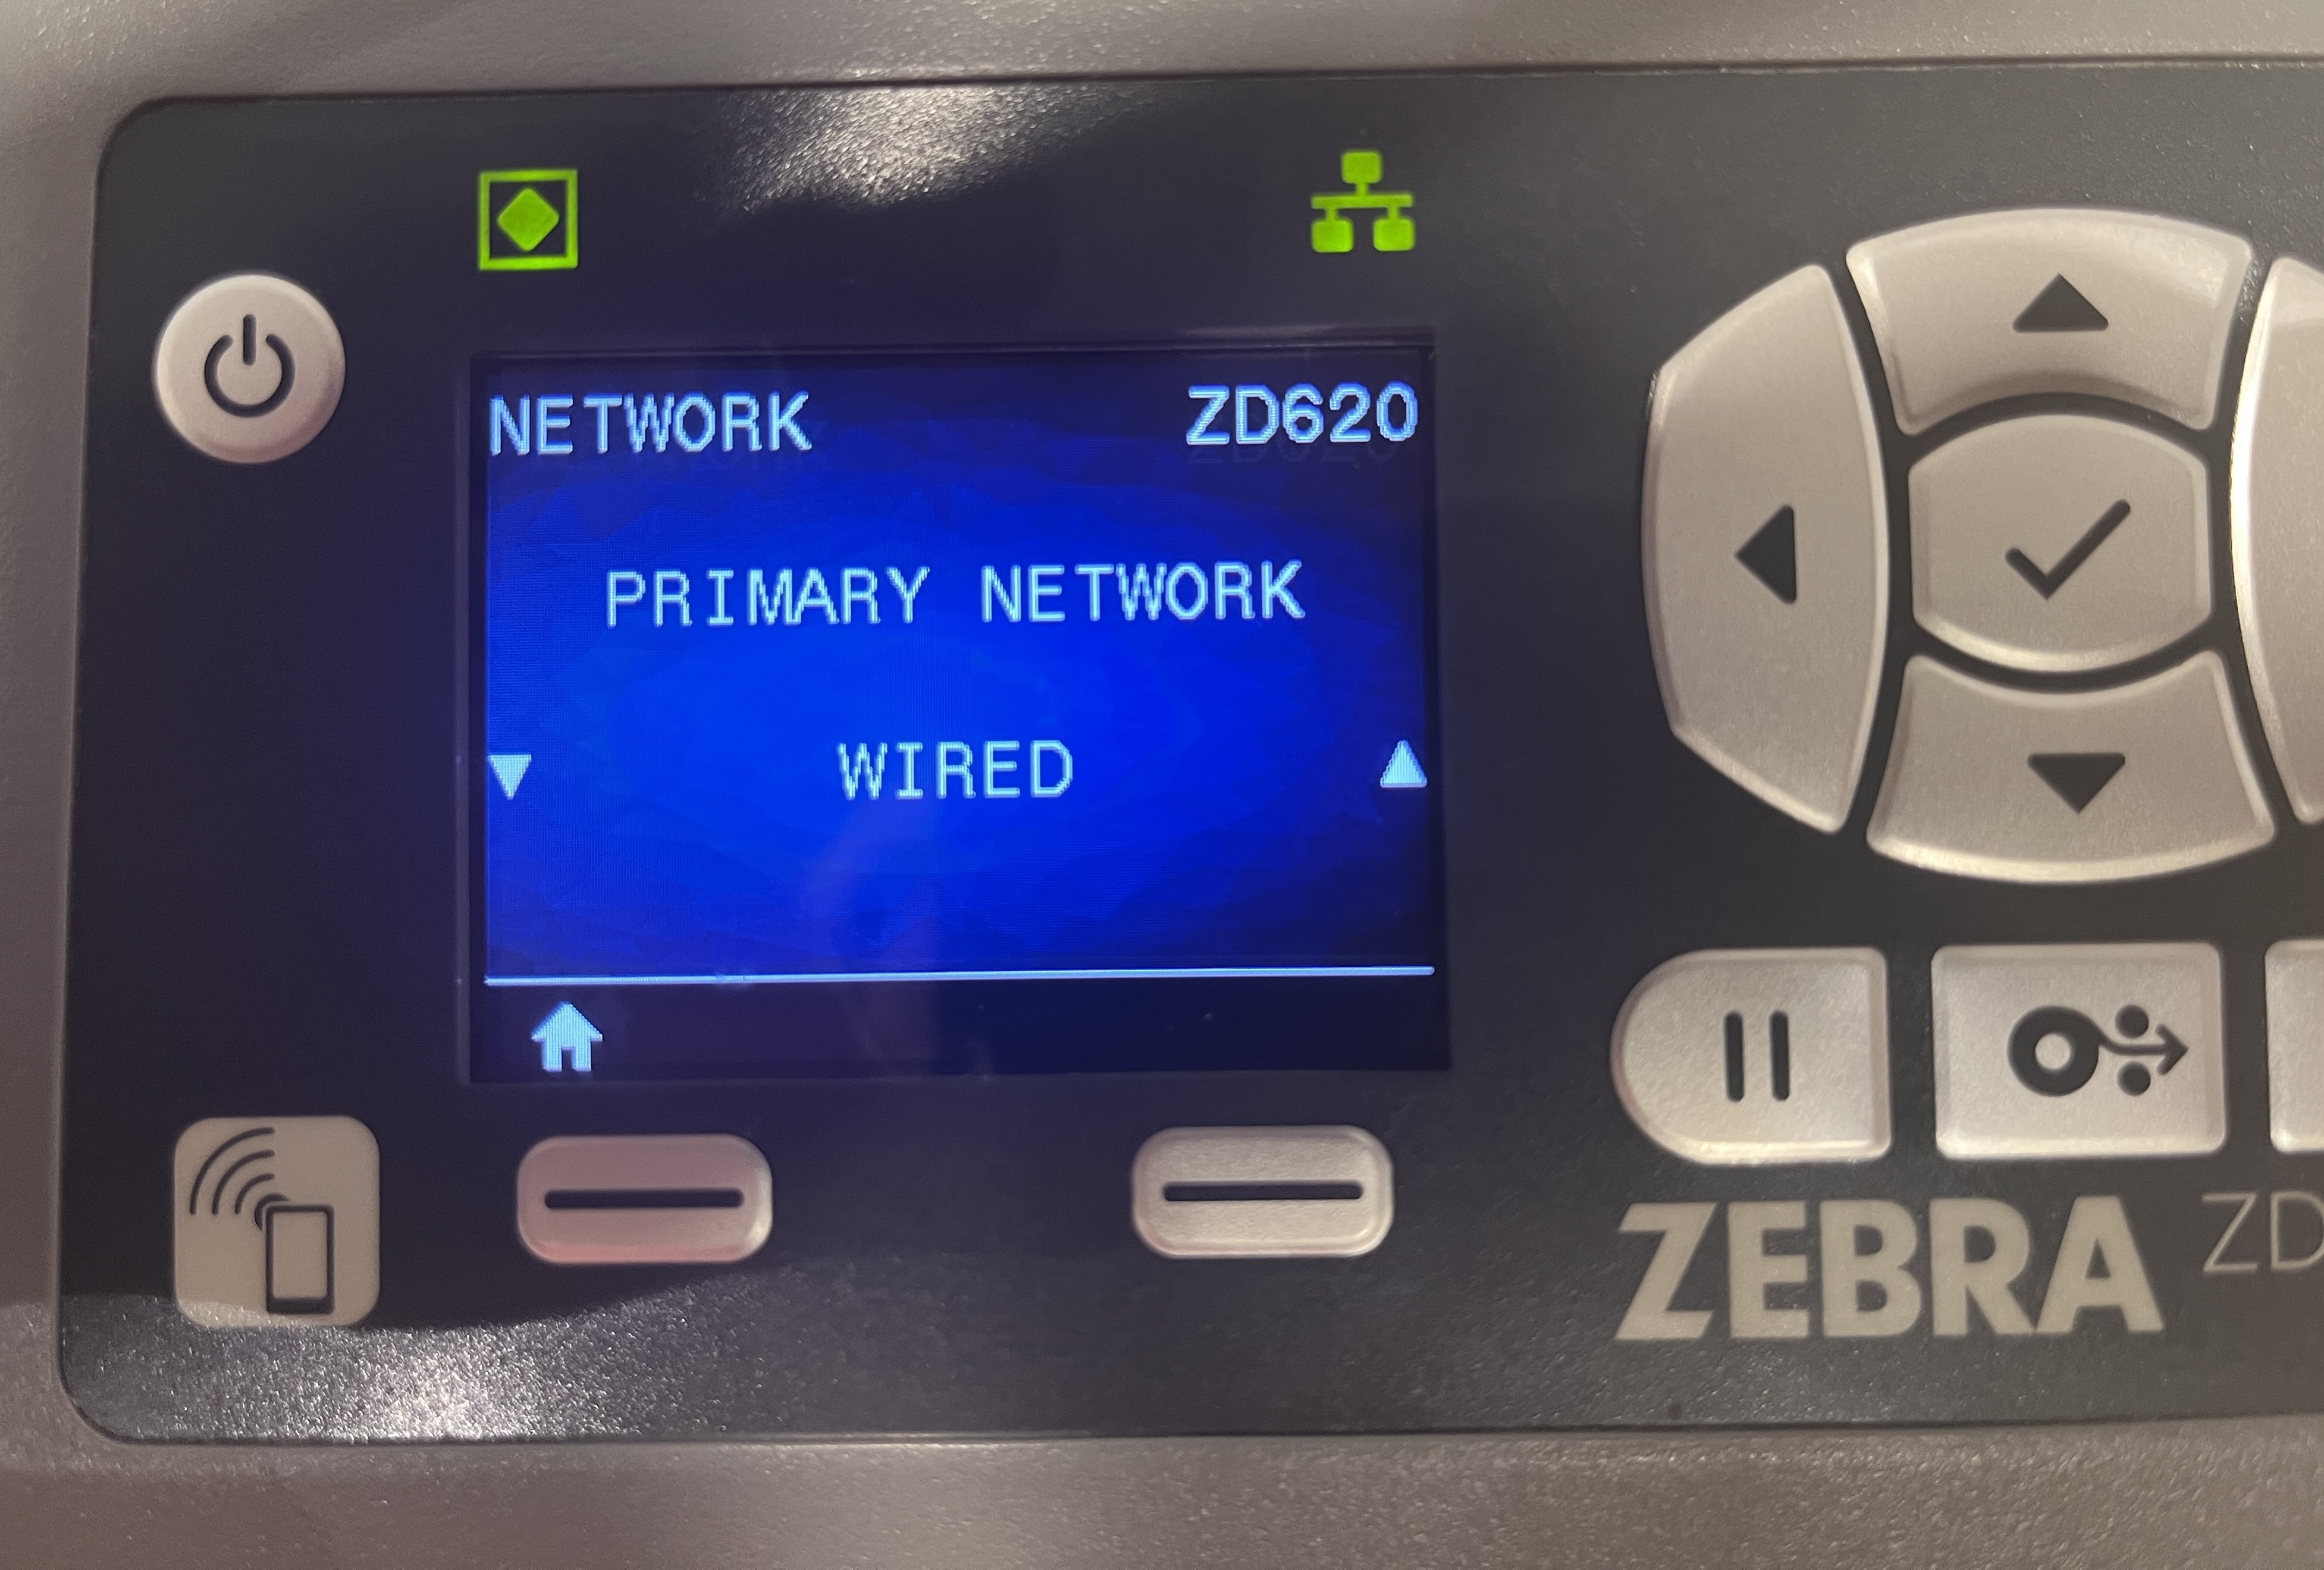
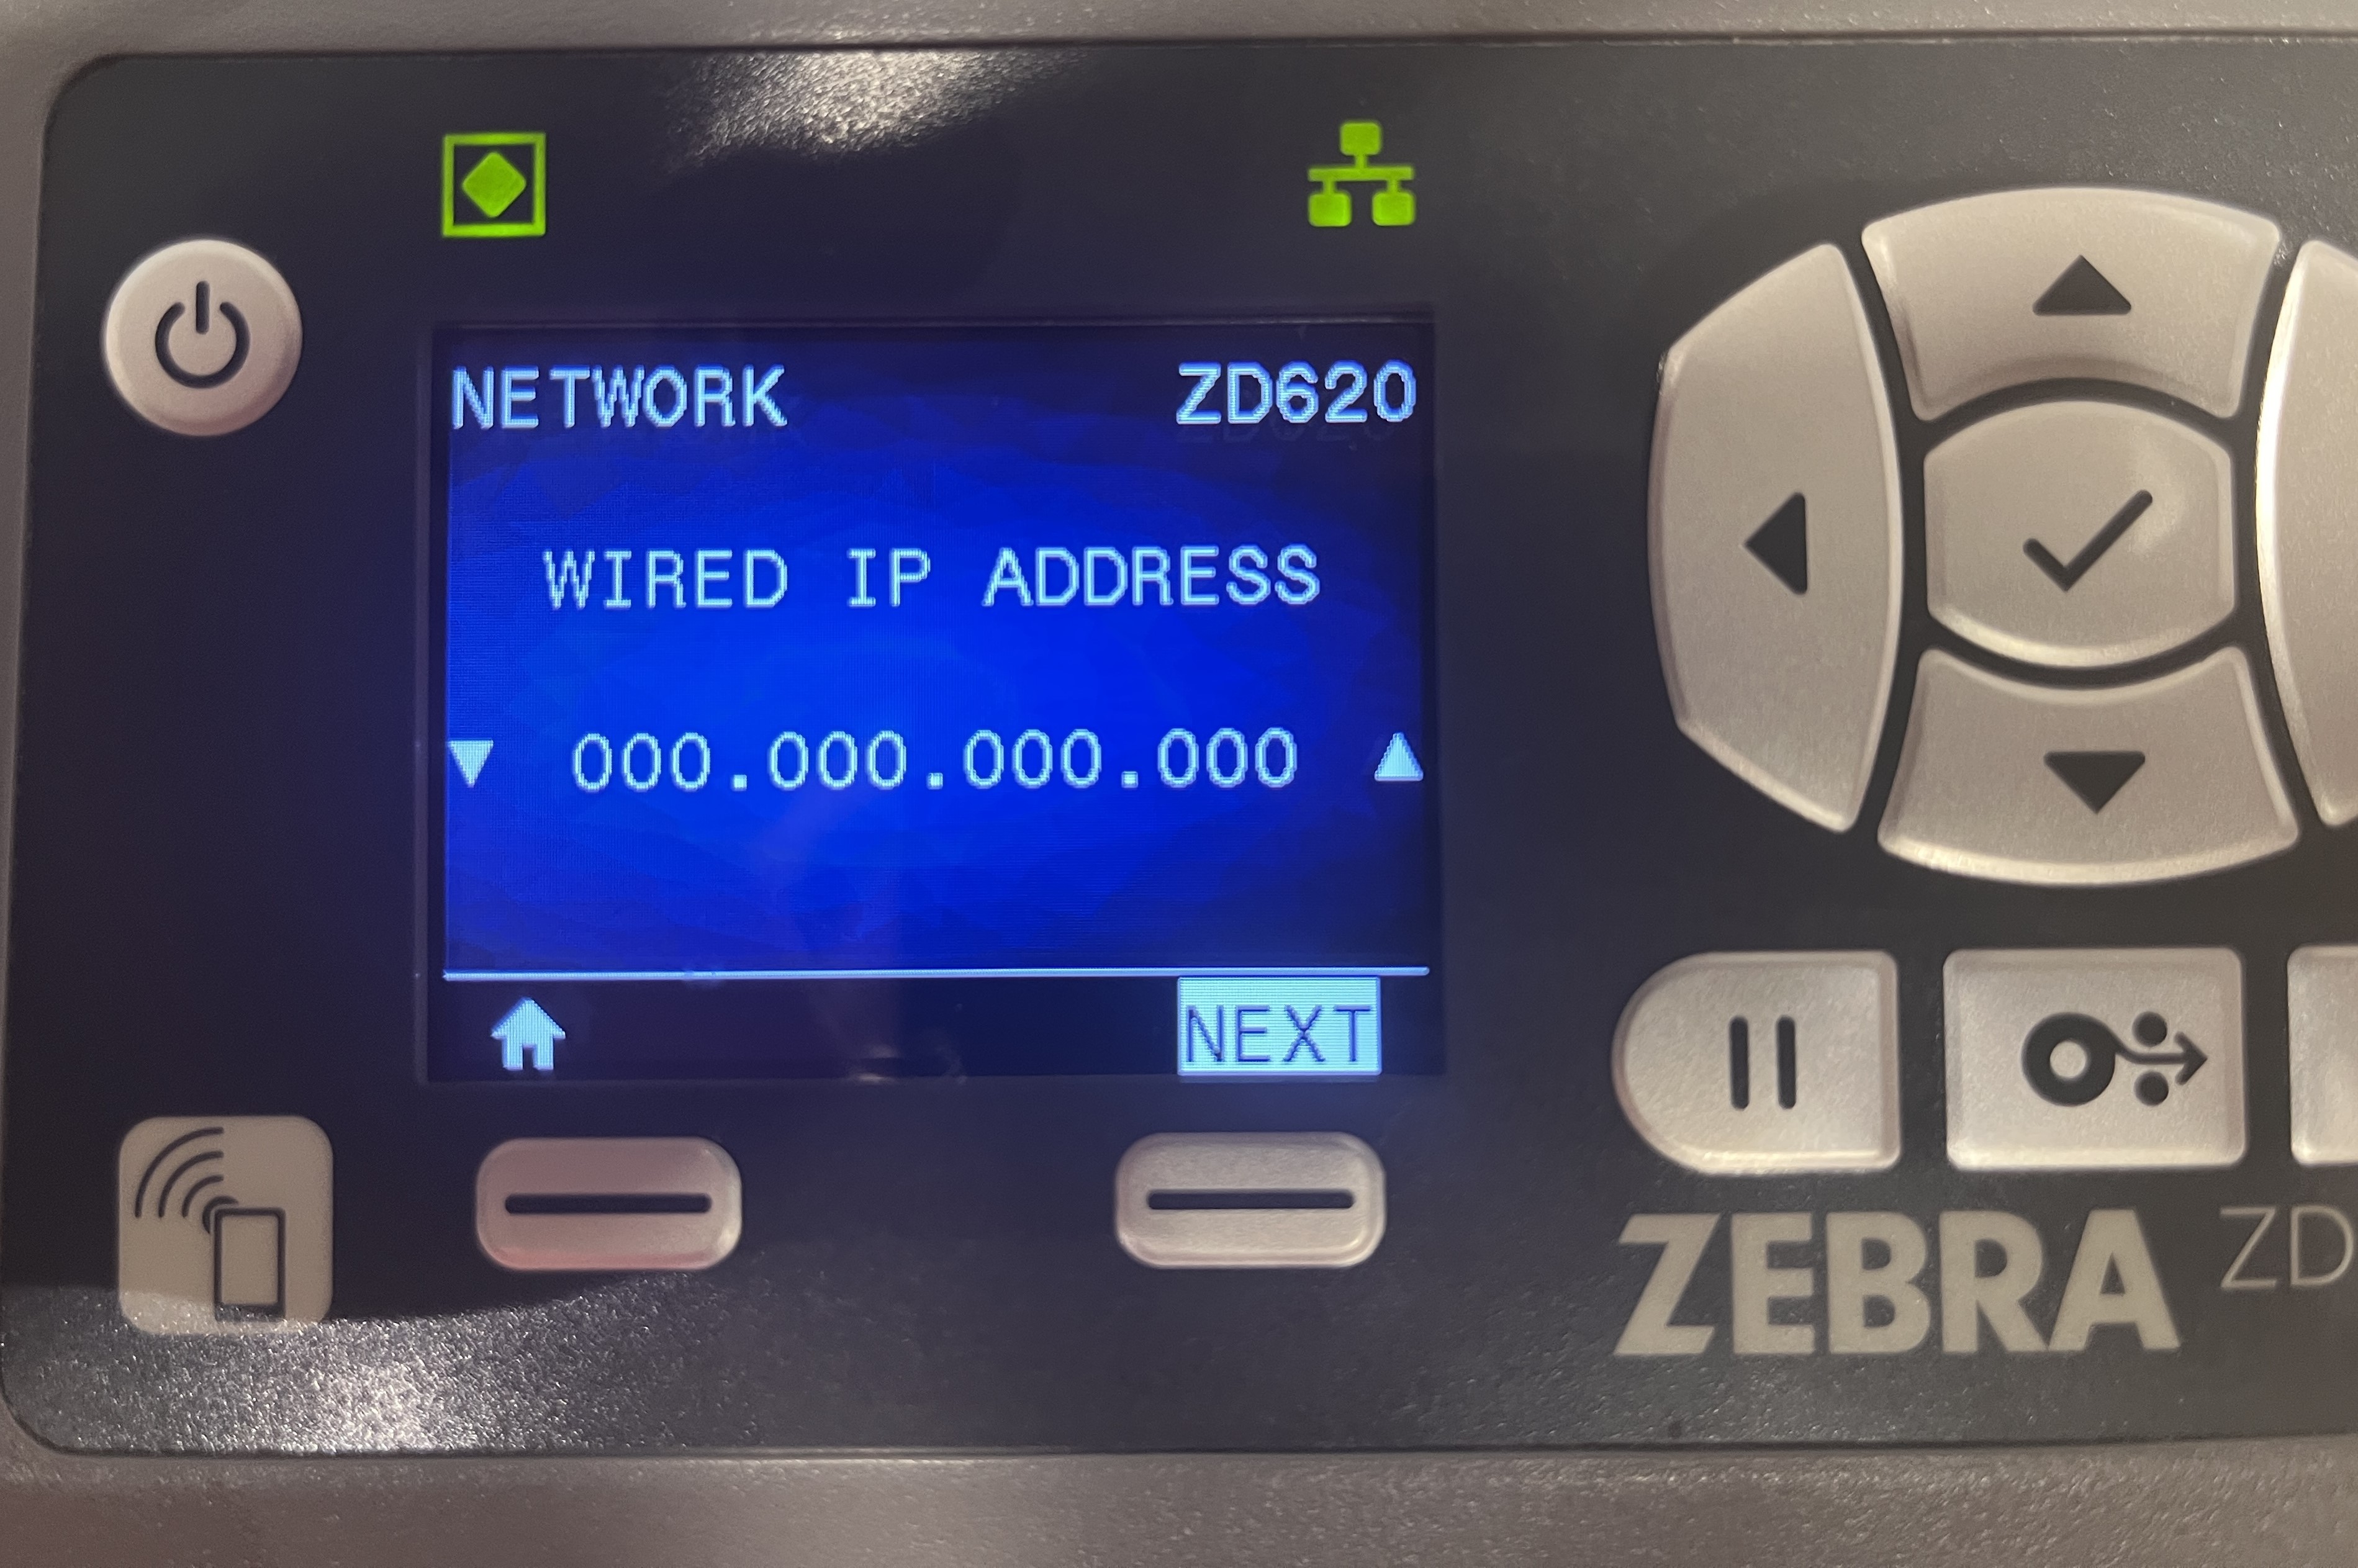
When WIRED is selected for wired (Ethernet) connection, the device's WIRED IP ADDRESS must display all zeroes (0000.0000.0000.0000) due to automatic detection.
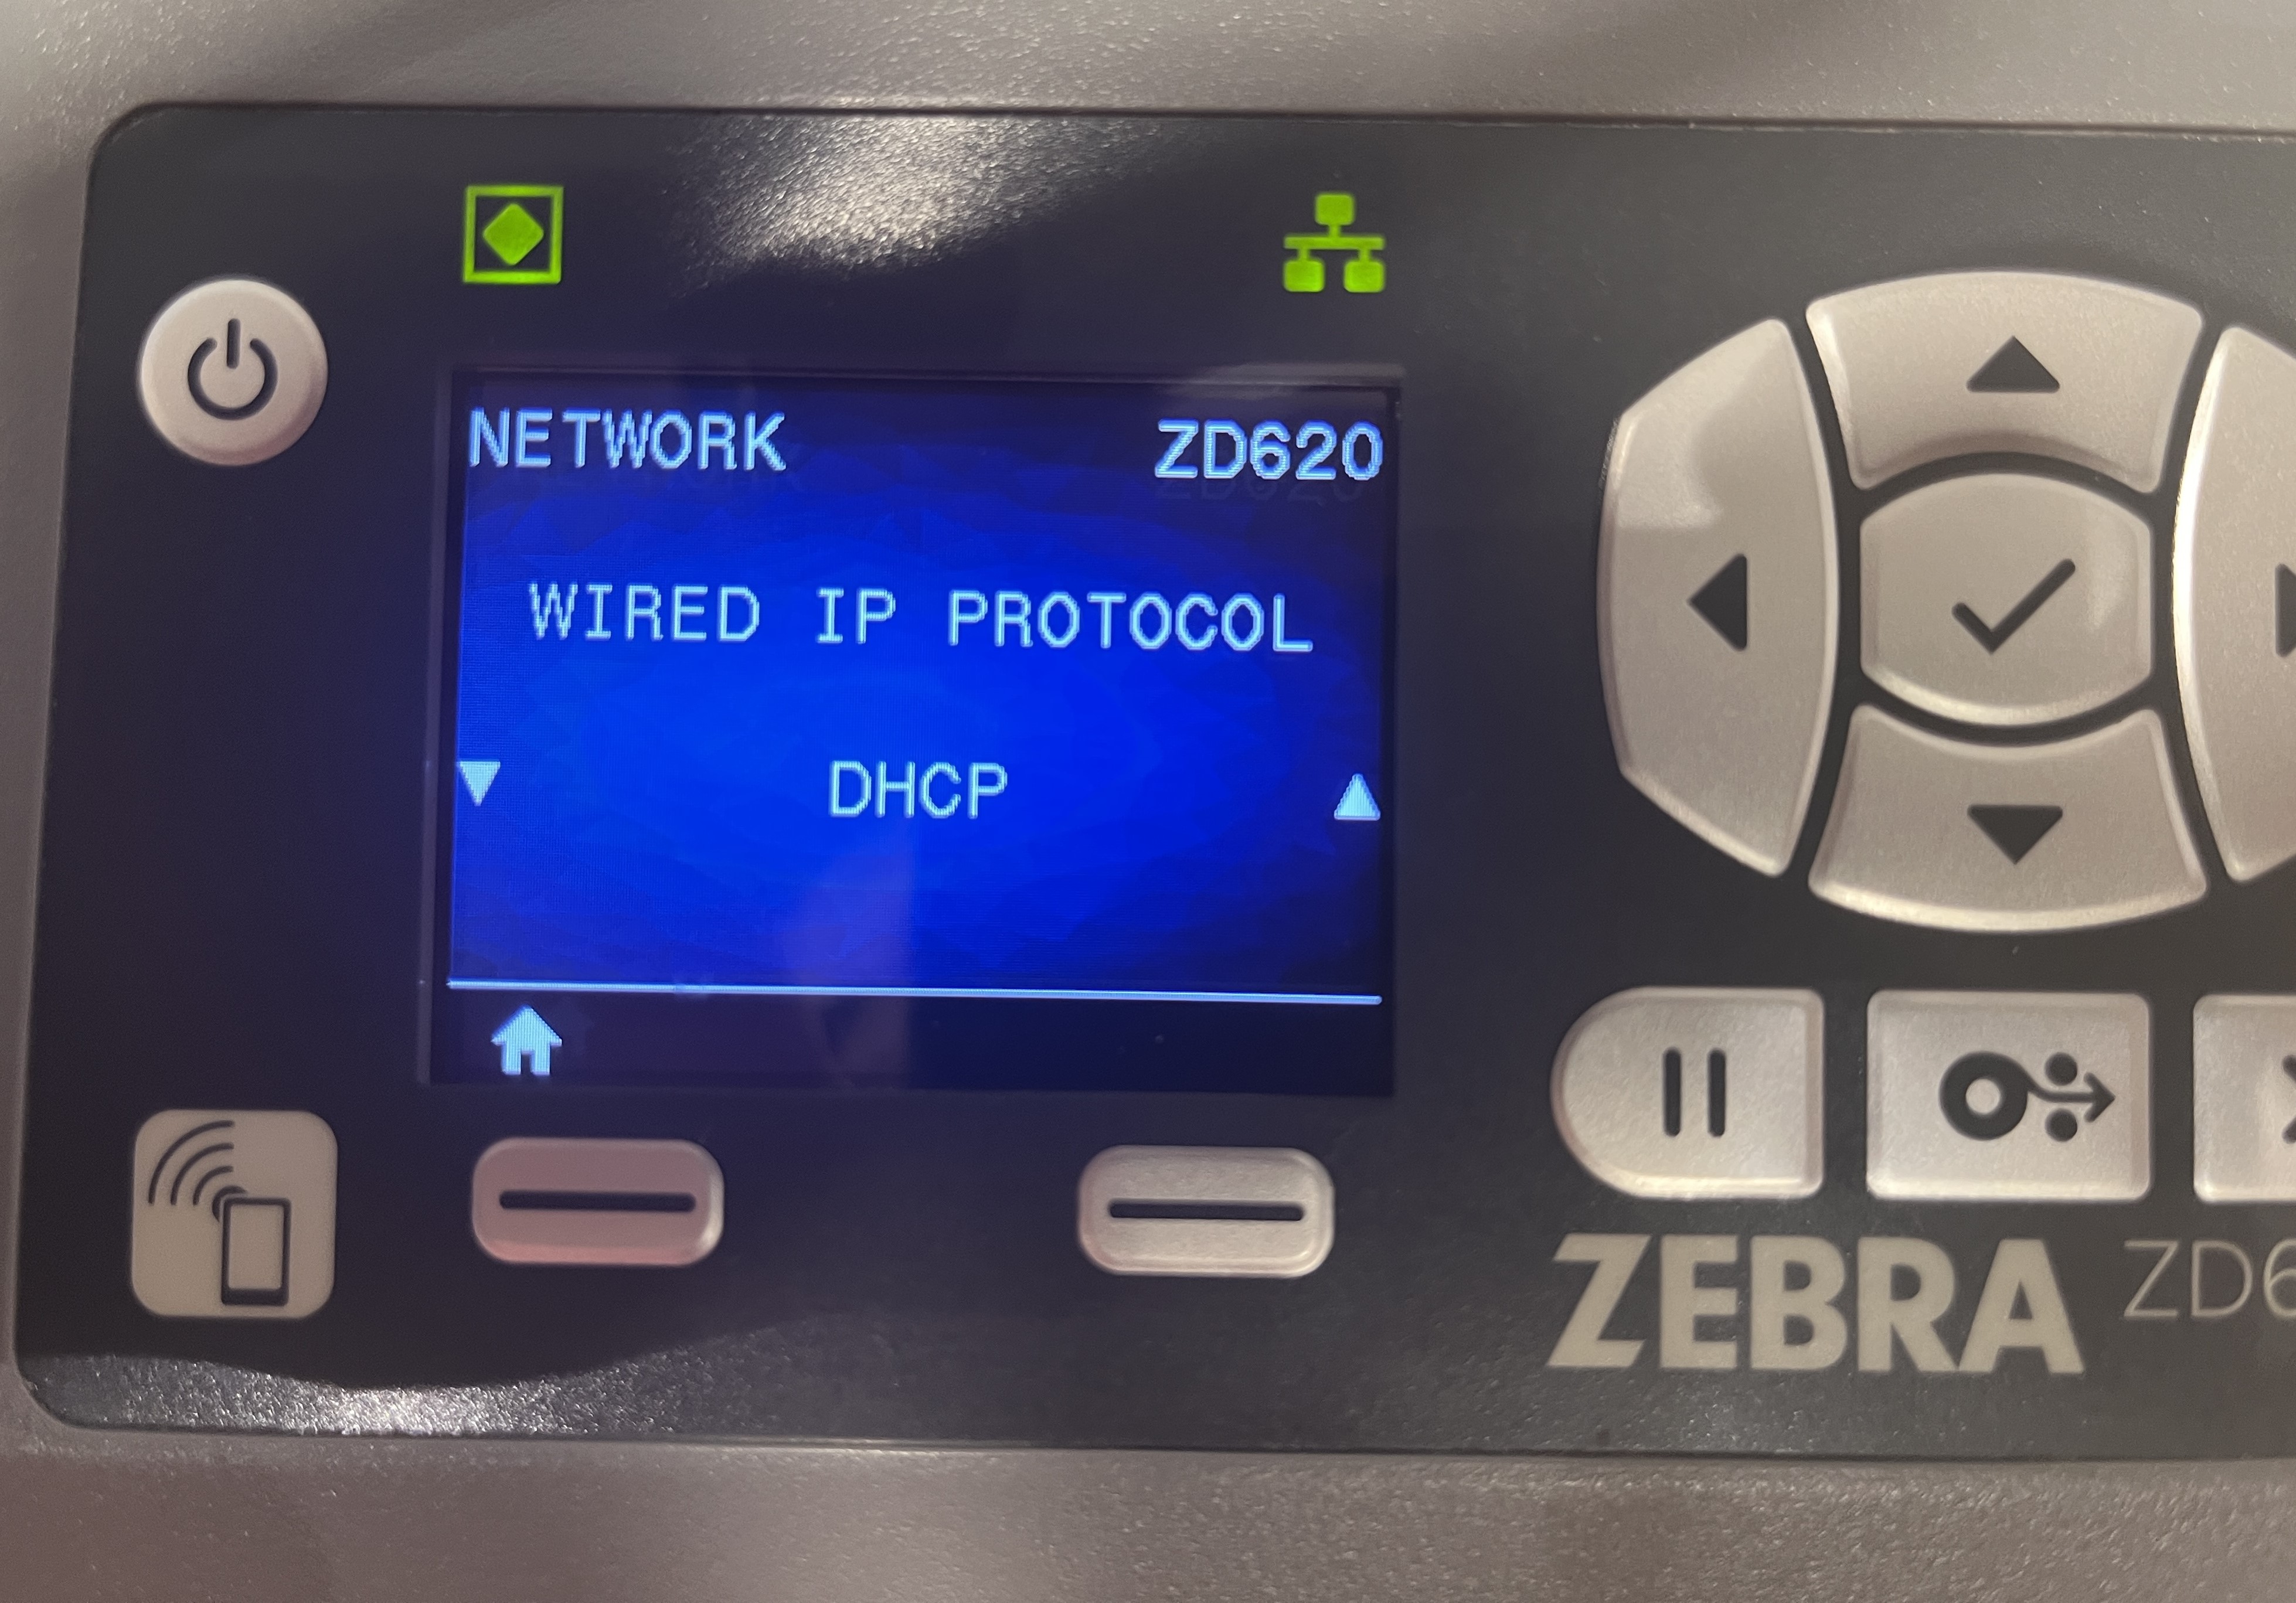
Ensure that the WIRED IP PROTOCOL is set to DHCP.
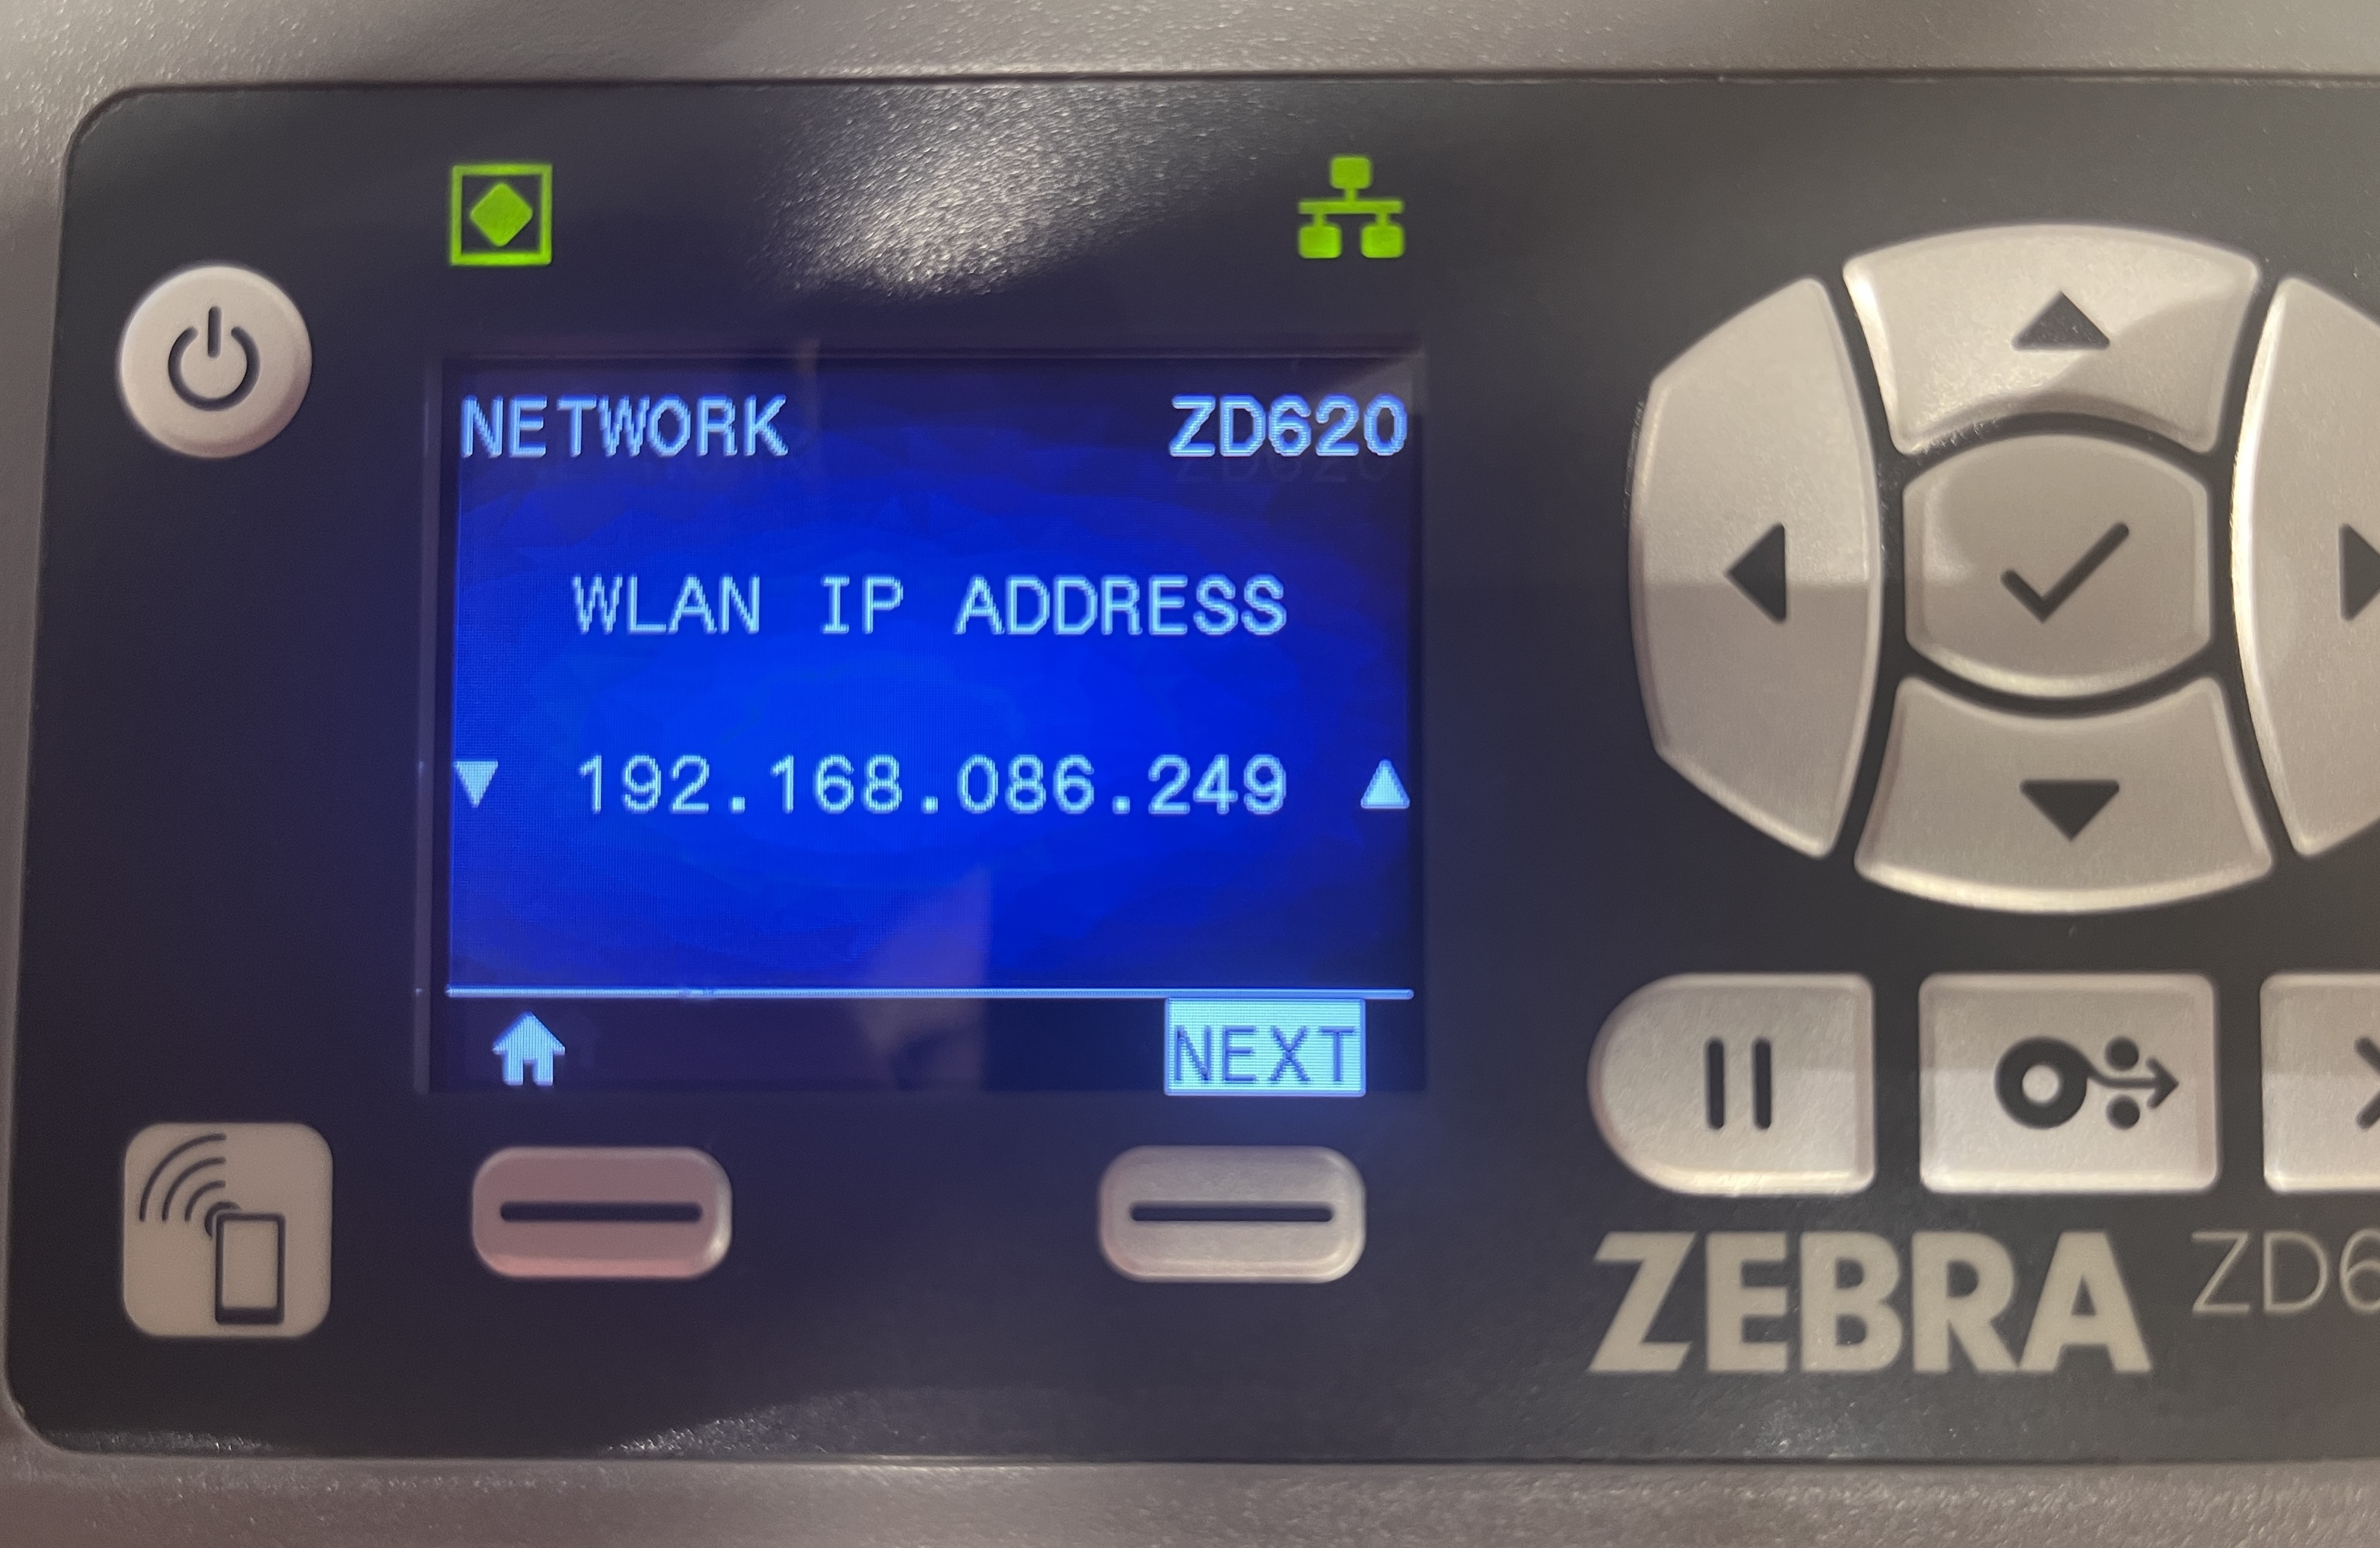
Also verify that the IP address shown under WLAN IP ADDRESS matches the IP address shown on the printer's main display screen. The printer's exact IP address must also match the IP address within the Kiosk settings on the InEvent mobile app.
If Printer is not listed in the InEvent app
If the printer is not listed or displayed at the InEvent mobile app, follow the steps provided below to troubleshoot.
- Navigate to Settings > Wi-Fi on an iOS/iPadOS reading/checking device.
- Tap the blue ⓘ icon next to the currently connected wireless network.
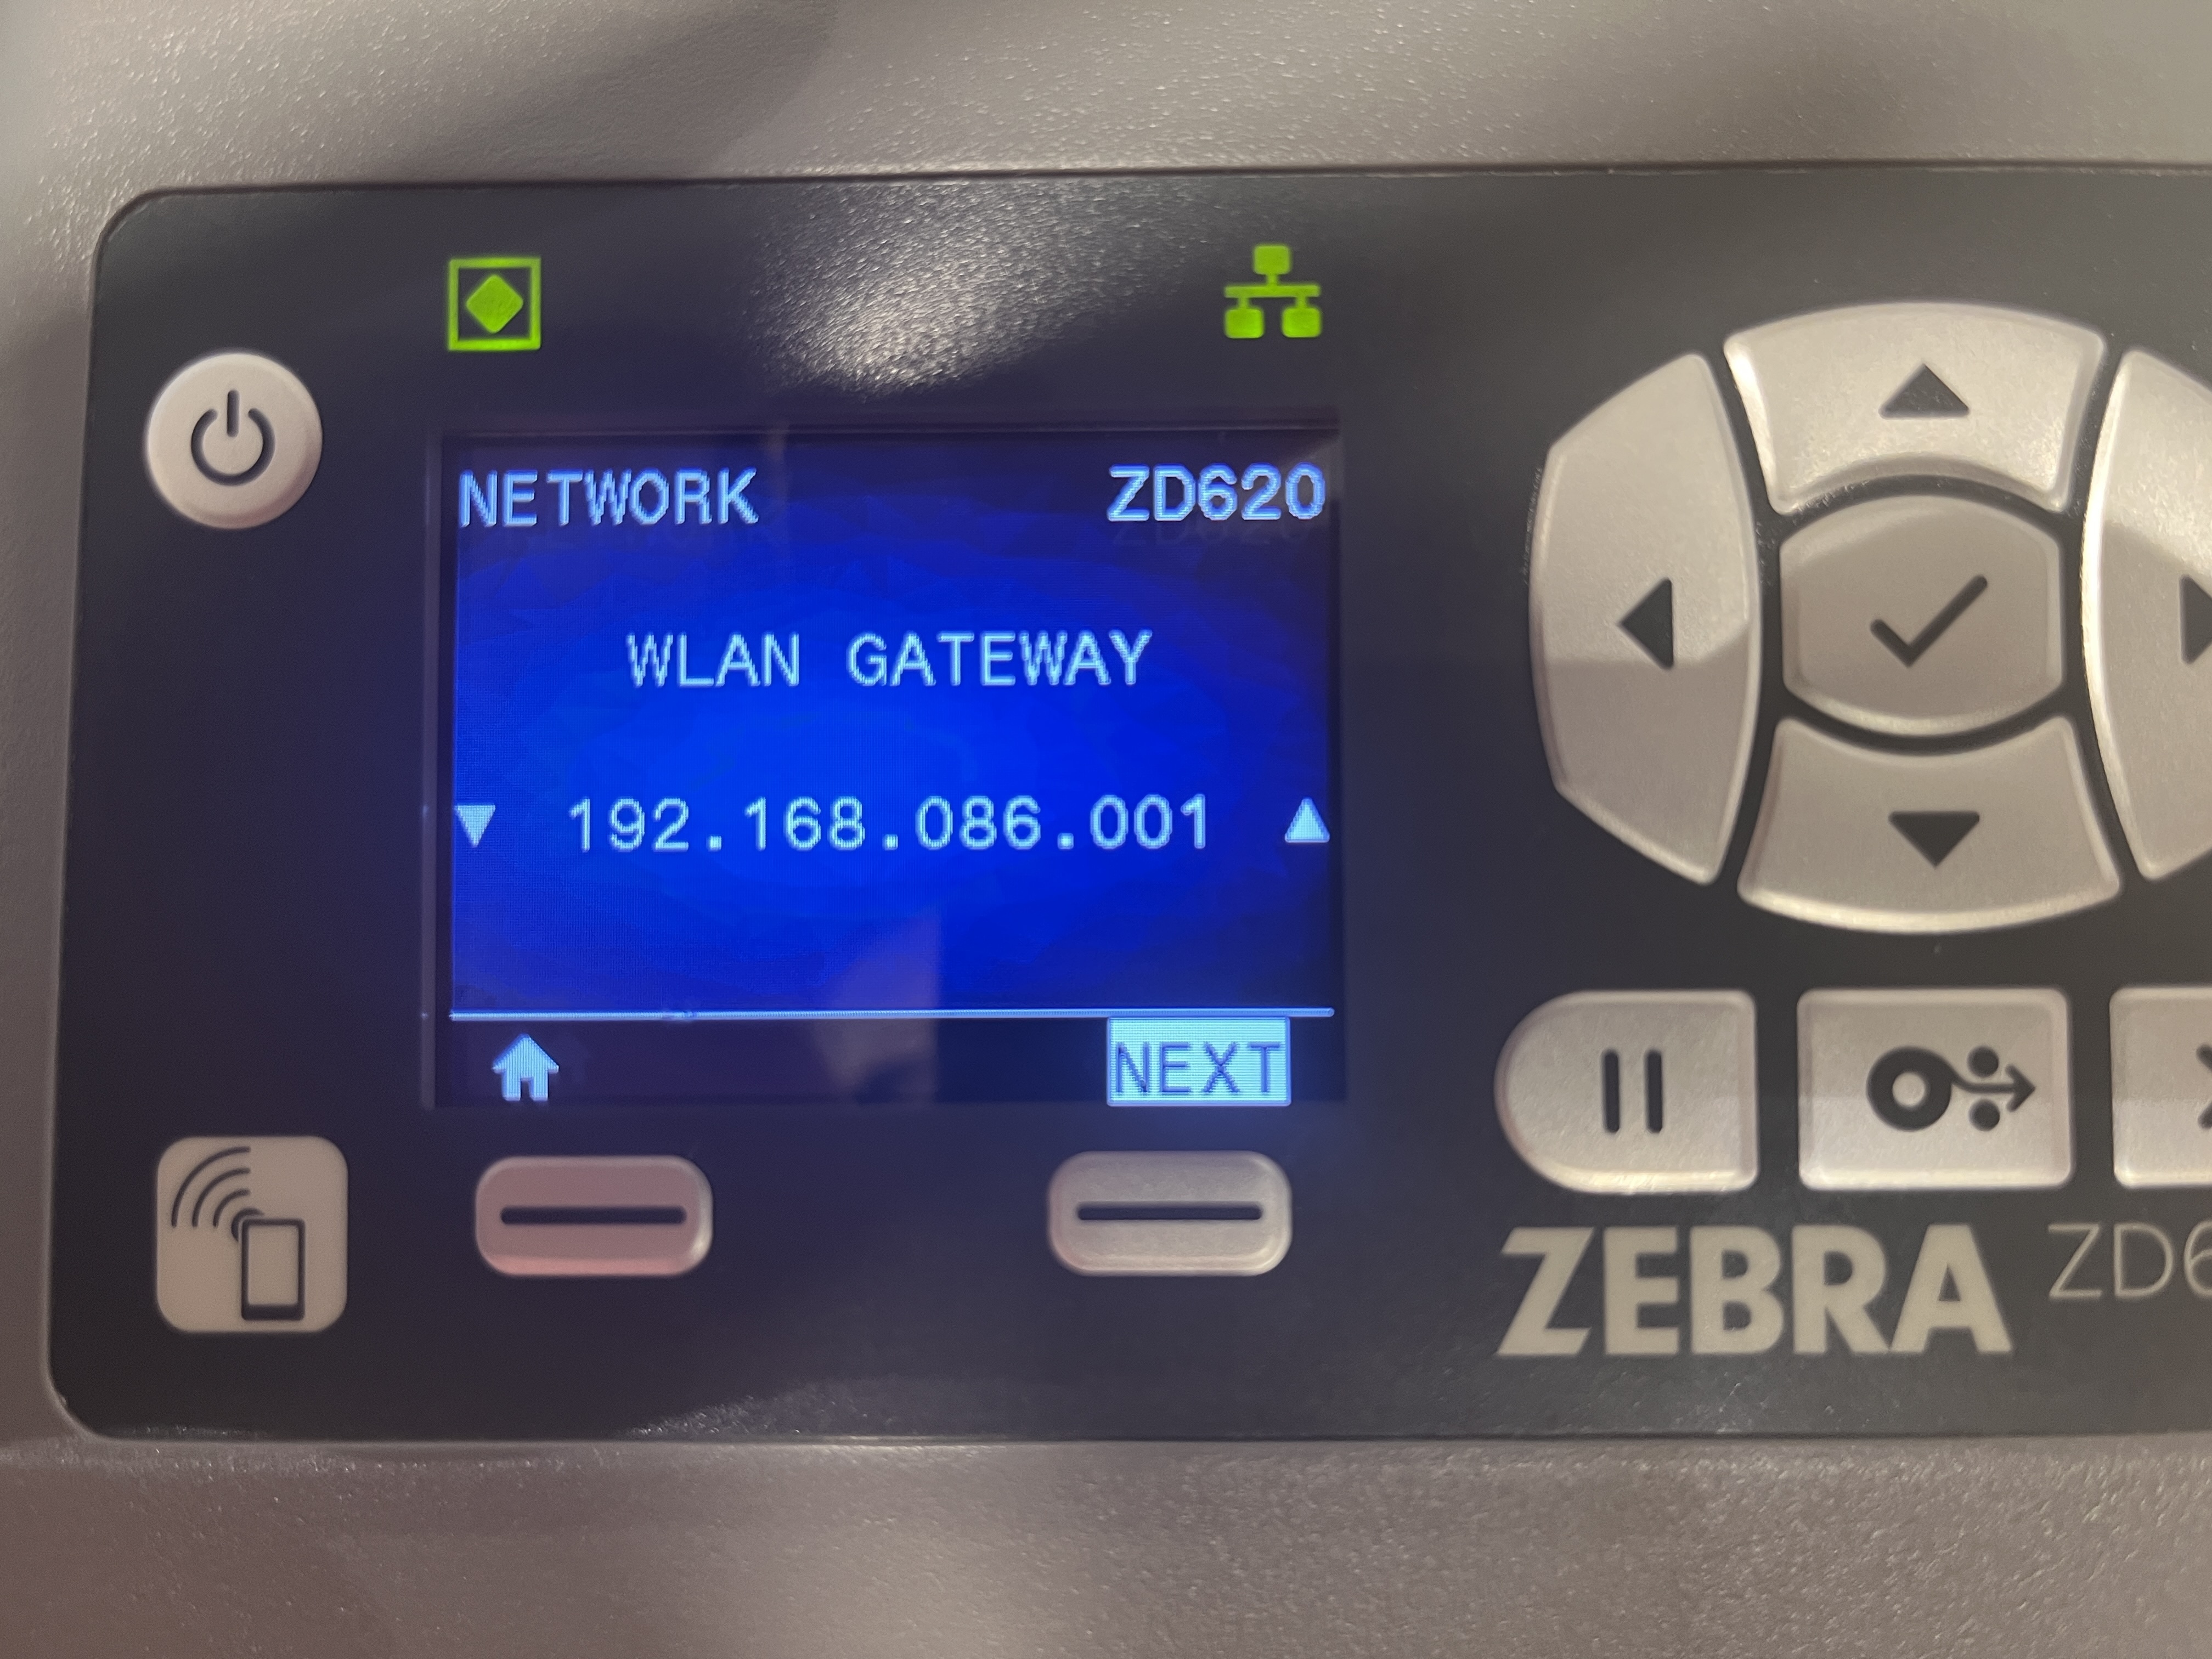
- Verify that the first three digits of the IP address match those of the WLAN GATEWAY address displayed on the printer's NETWORK settings. If the three digits match, the reading/checking device and the printer are connected to the same network. Otherwise, ensure to connect both devices to the same network.
Zebra printer setup utility – Mobile setup guide (iOS & Android devices)
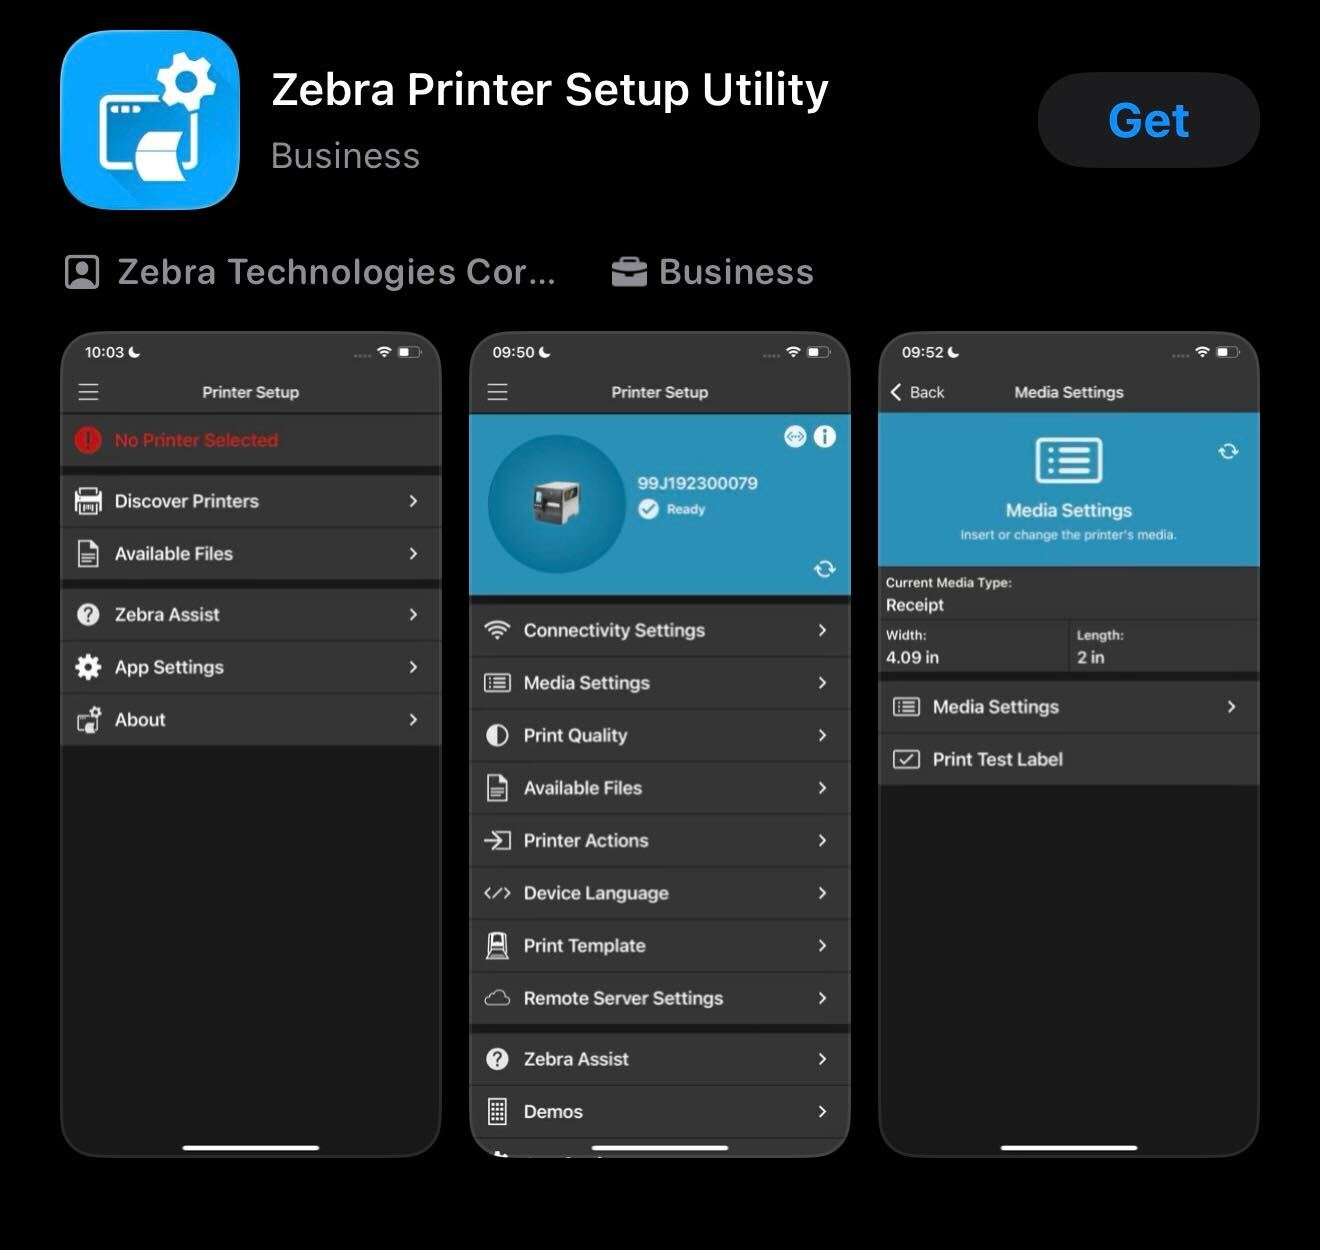
This guide walks you through discovering the Zebra printer, connecting to it, configuring media (including badge stock), and running calibration so badges don’t print blank.
- Install the App
- iOS (iPhone/iPad) - Download Zebra Printer Setup Utility from the Apple App Store.
- Android - Install the same app via Google Play.
This utility is designed for Zebra Link‑OS printers and select mobile Series printers (ZQ200, ZQ120/112, ZR118/138, etc.).
- Connect to the Printer
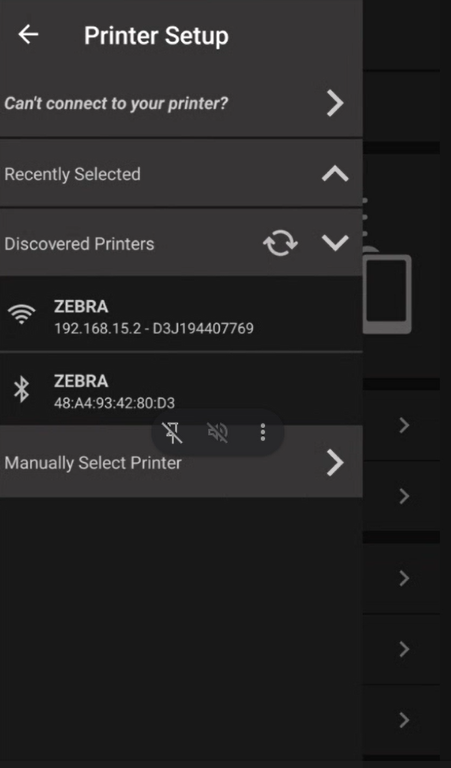
- Open the app and go to Discover Printers.
- Connect to your printer using one of these options:
- Bluetooth (Classic or BLE)
- Wi‑Fi (set printer on network first)
- Wired / USB (Android only)
- NFC tap (on supported Android devices)
- Select the correct printer when it appears in the list.
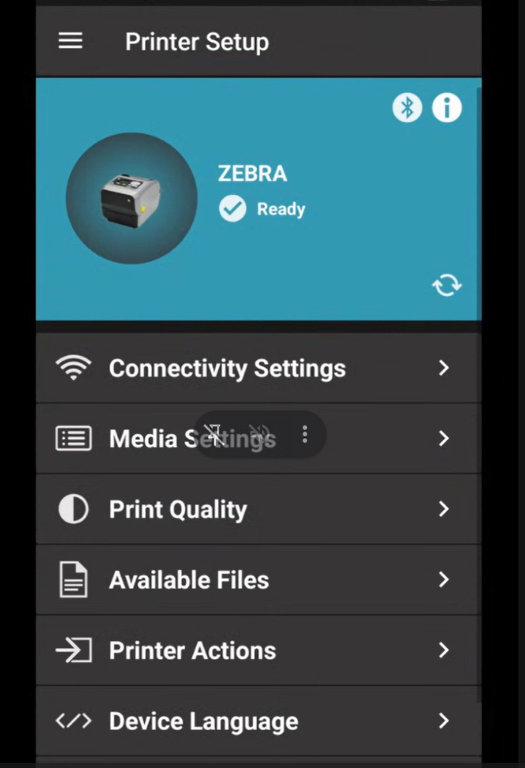
- Once connected, you’ll see the printer’s dashboard and actions menu.
- Media Settings
- Go to Media Settings.
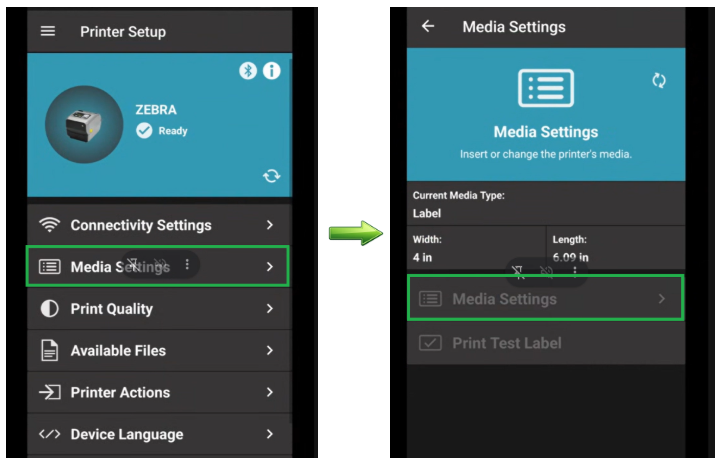
- Confirm media width and length match your badge size.
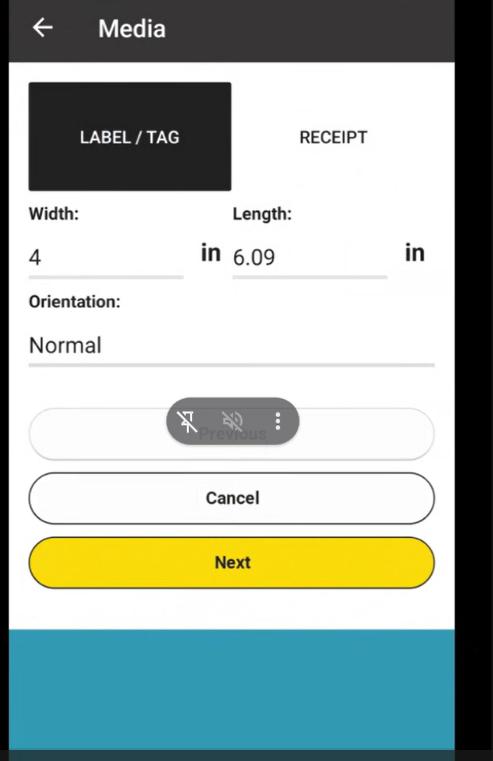
- Set the media type so the printer senses your badge stock correctly:
- Gap / Notch for badge stock with visible spaces or perforations
- Black Mark for badges with a back‑side black mark. It tells the printer where it should start or stop printing.
- Continuous if your badge stock has no separators or marks
- Set the media handling so the printer feeds badges correctly after printing:
- Tear Off
- Feeds badge forward to tear bar
- Manually remove badge
- Recommended for most event badge setups
For most direct thermal ZD621 badge setups: Media Handling → Tear Off. - Peel (Peel-Off Mode)
- Prints one badge at a time
- Waits until badge is removed before printing next
- Requires peel module installed
- Cutter
- Automatically cuts each badge
- Requires cutter accessory
- Rewind
- Rewinds printed labels onto spindle
- Not typically used for badge printing
- Tear Off
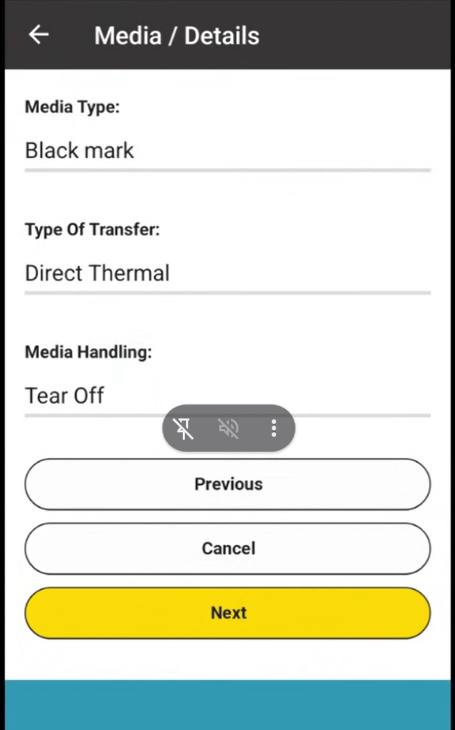
- Click on Next and apply settings.
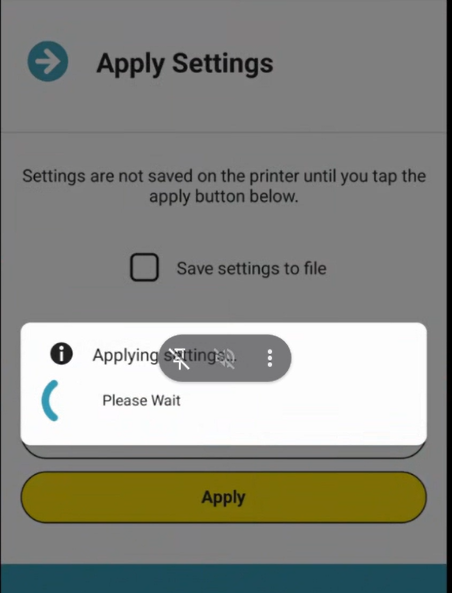
- If media is set wrong, the printer may print blanks because it can’t locate the top of form. This is where many badge issues originate, and the app lets you fix it easily.
- Calibrate the Media
Calibration ensures the printer measures the media and knows where each badge starts and ends:
- In the app’s Printer Actions menu, choose Calibrate Media.
- The printer will run a calibration sequence, feeding through a few labels.
- This aligns sensor thresholds for gap/black‑mark detection.
- Calibration ensures you won’t get blank badges due to misread media, especially with unusual sizes like 4″×12″ badges.
- Set Print Quality and Other Options
Once media is set and calibrated:
- Print Speed - Lower speeds can improve quality on badge stock.
- Print Darkness - Adjust how dark the print output is; darker if too light, lighter if too smudged.
- Printer Language / Emulation - Confirm correct command language (ZPL, CPCL, etc.).
These options help test prints come back clear and accurate.
- Printing Tests & Troubleshooting
Use the app’s Printer Actions to:
- Print a test label
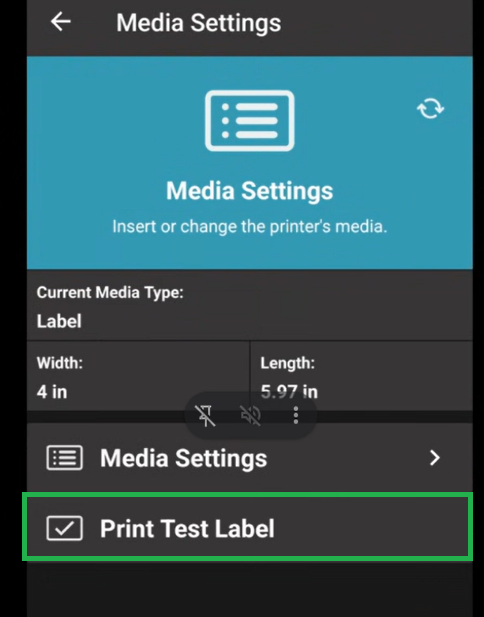
- Print the configuration report
- Restart the printer
- Send print templates stored on your device
These tools help you quickly verify the printer is set up before sending real badge jobs.
Advanced Troubleshooting (Edge Cases)
If badges are still printing blank or the printer cannot print a configuration page:
- Update Firmware & Drivers
- Ensure the ZD621 printer has the latest firmware.
- Install the latest printer drivers on connected PCs or tablets.
- Factory Reset
- Perform a full factory reset if updates don’t work.
- Reconfigure the printer from scratch using the setup wizard and calibrate media again.
- Test with Known-Good Media
- Use verified direct thermal badges to rule out incompatible media.
- Hardware Inspection
- If none of the above resolves the issue, a hardware defect may exist. Contact Zebra support for repair or replacement.
Preventing Blank Badges
The main causes of blank badge prints are improper media type, incorrect sensor calibration, outdated firmware, or hardware issues. Using this app for:
- Media type selection
- Accurate label width/length
- Sensor calibration
- Firmware updates
- Factory reset if needed
…ensures the printer sees each badge correctly and prints reliably.
