InEvent Kiosk app: Guide for event organizers
 Updated 2 weeks ago
by
Caleb Kotey
Updated 2 weeks ago
by
Caleb Kotey
The InEvent Kiosk app is a dedicated kiosk app for event check in needs. The app is straightforward and streamlined, providing a fast and convenient check-in experience for event organizers, check-in station operators, and attendees.
This article is a guide for event organizers, and contains information about obtaining, navigating, and using the InEvent Kiosk app for check-in process.
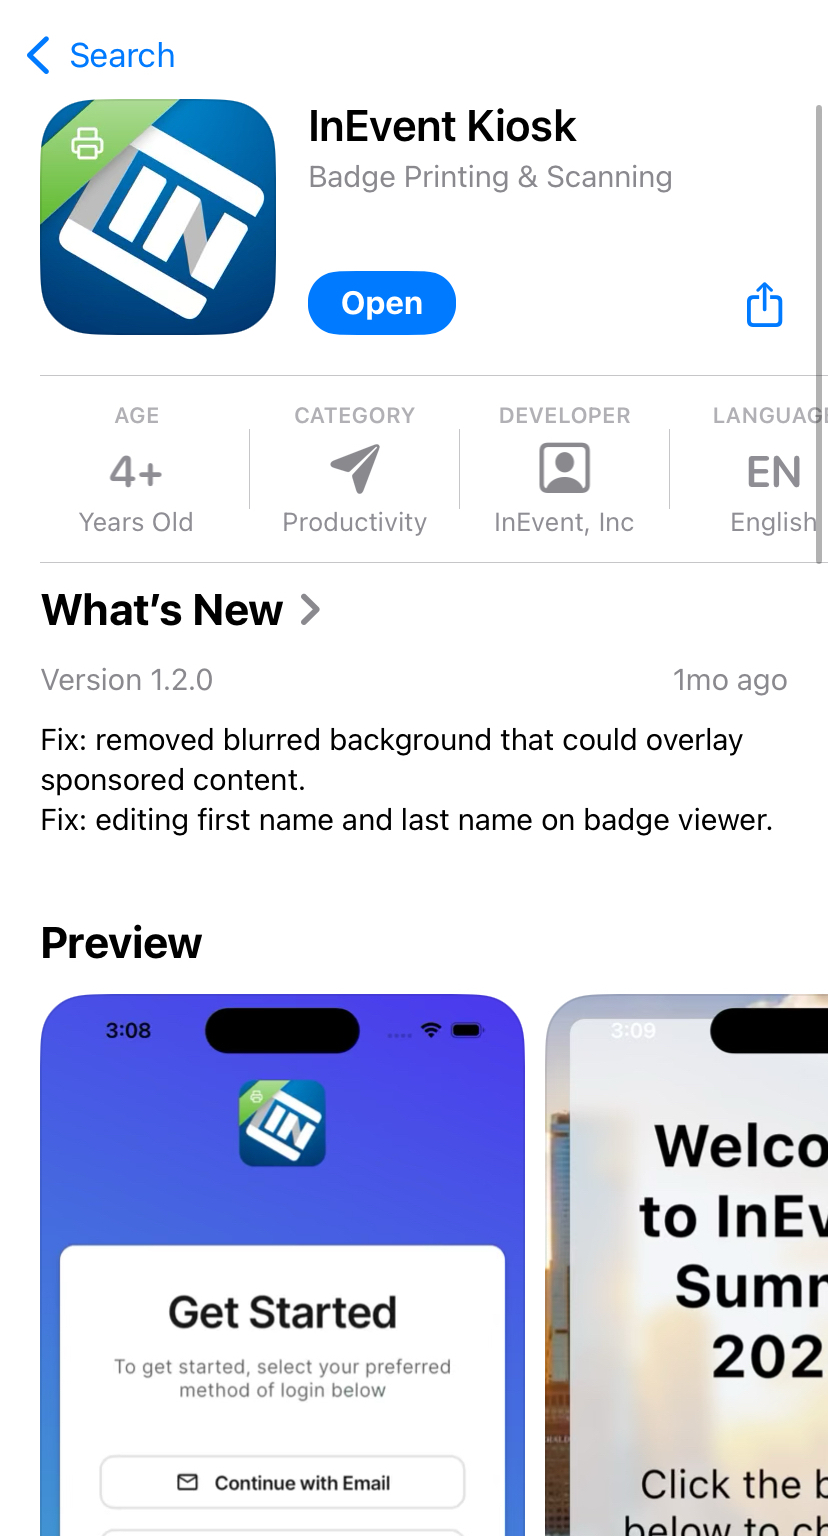
Installing the InEvent Kiosk app
The InEvent Kiosk app can be obtained from Apple App Store in iOS and iPadOS devices. Tap Install, and once installed, tap Open.
Logging in to an admin or operator account
When opening the app for the first time, you will be asked to log into an account for check-in operations.

You can proceed by tapping on Continue with Email to log in with the company's InEvent region, company code, and event code. You will also be prompted to enter your InEvent credentials.
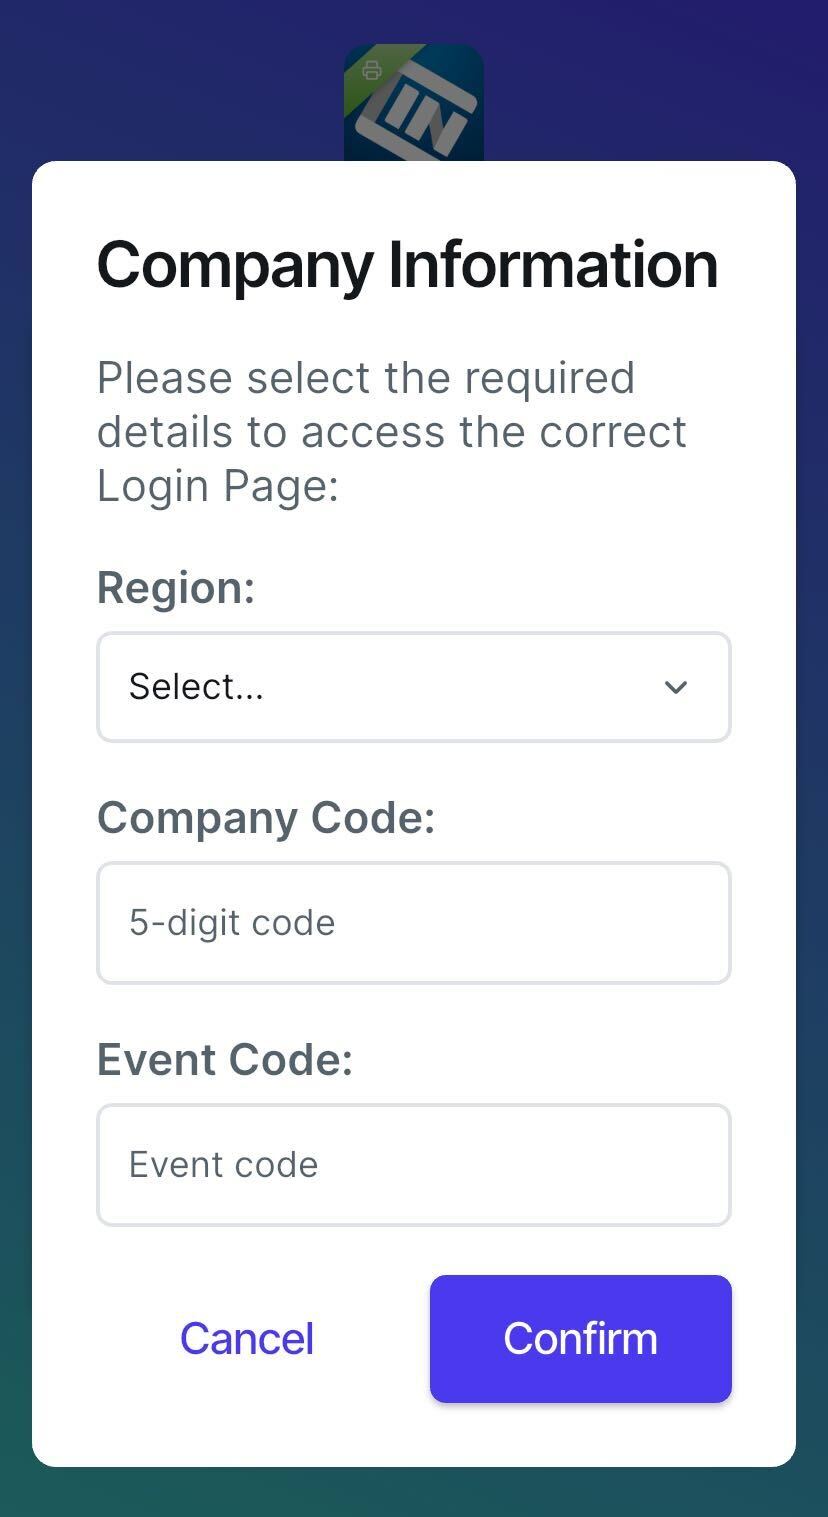
Alternatively, you can also choose the Continue with QR Code to scan the Kiosk QR code. After scanning, you will automatically be logged in to the Kiosk. You can find the QR code by navigating to Marketing >
Registration > Badge printing > Kiosk settings > Authentication on the InEvent platform.
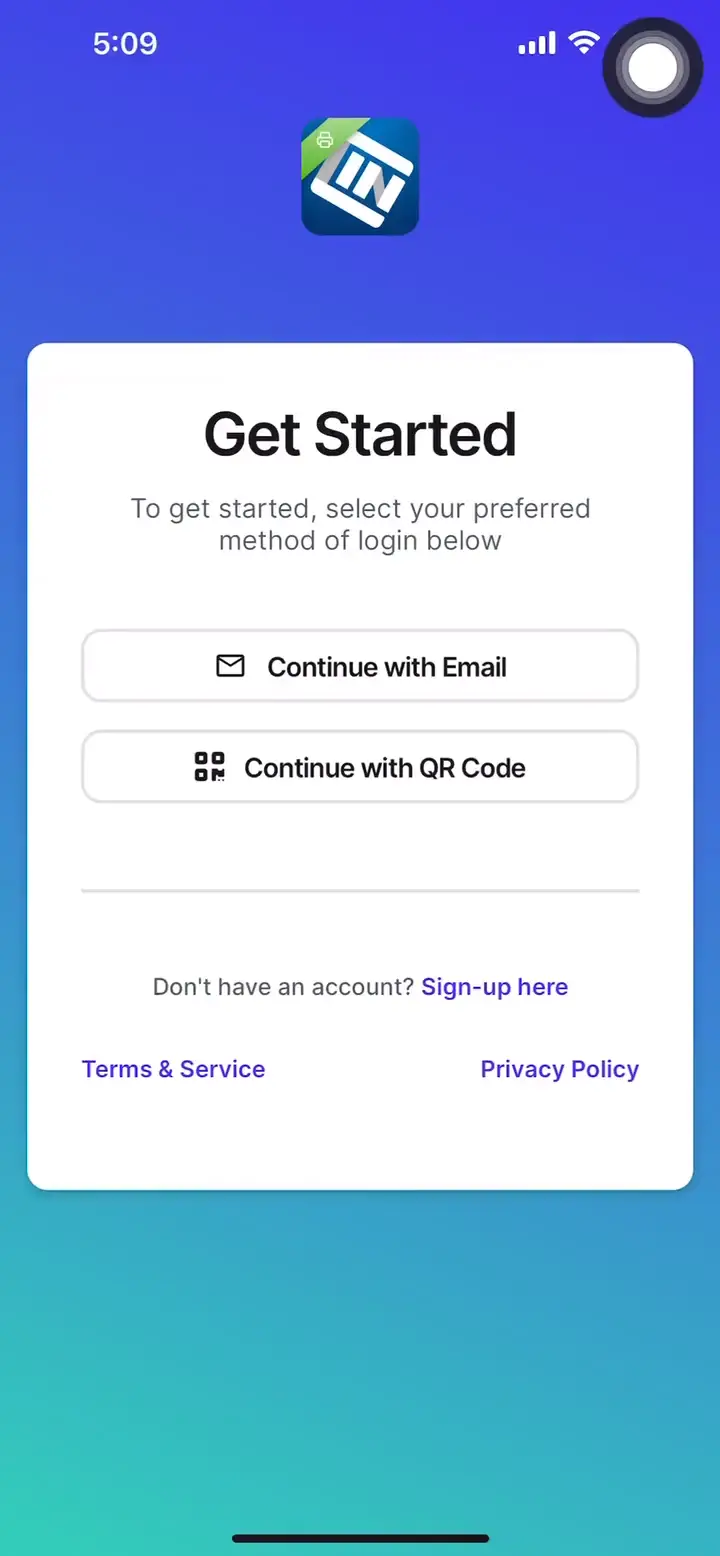
Once successfully logged in, the app will display an interface with Home, Event Scan, and Session Scan navigation options at the bottom of the screen.
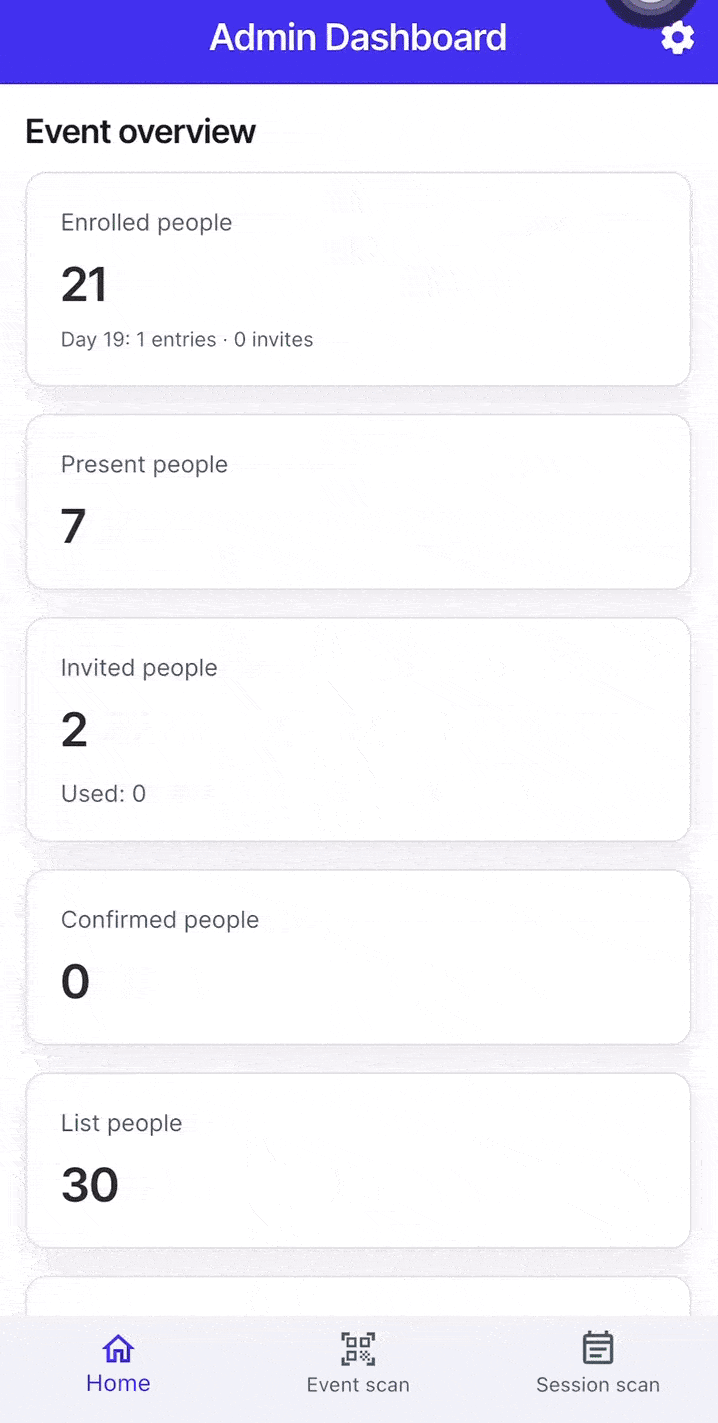
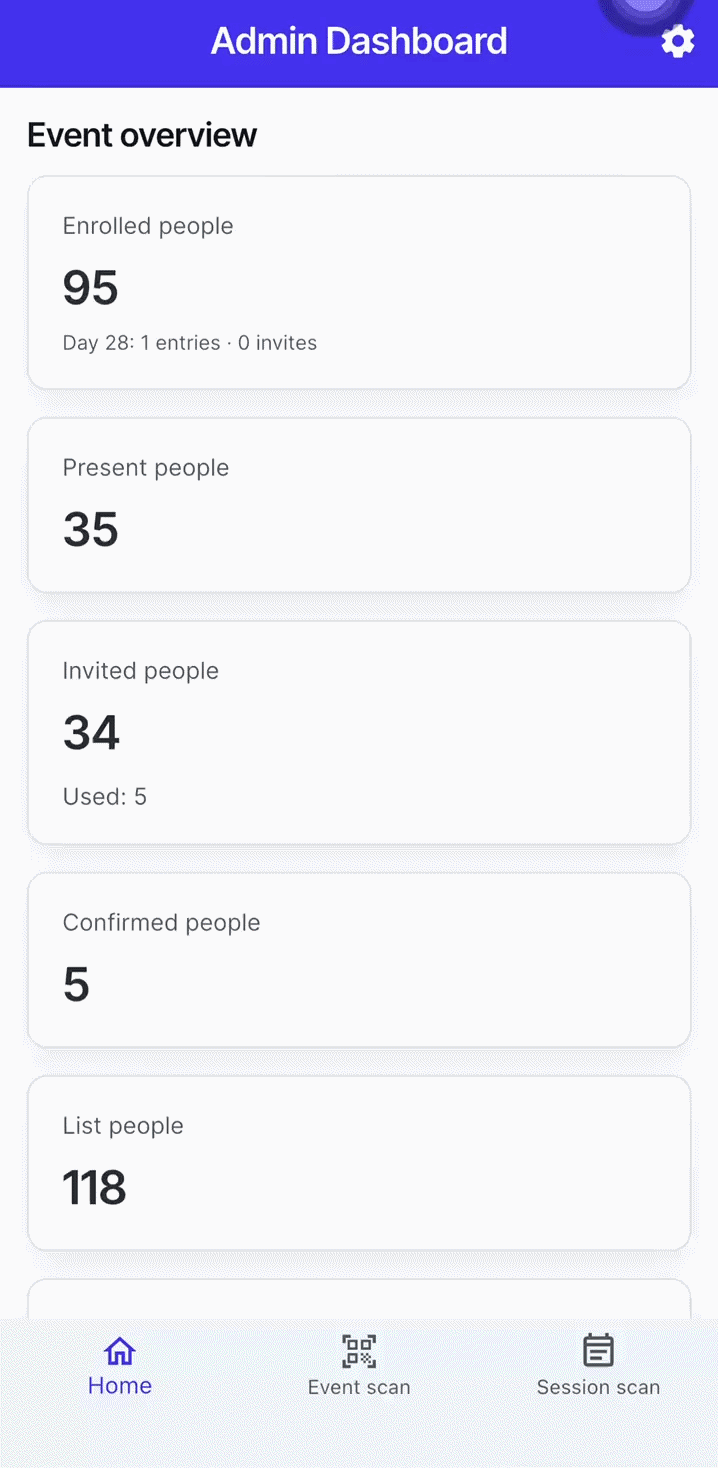
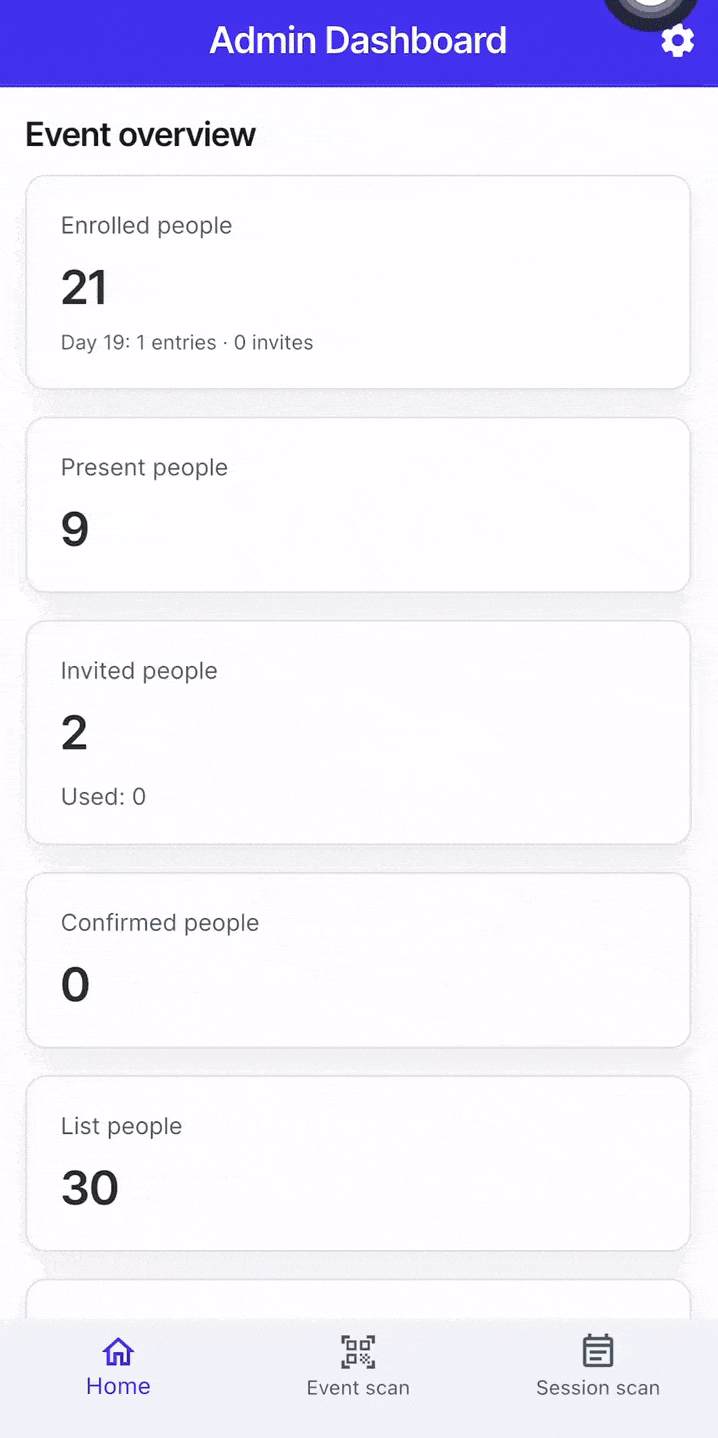
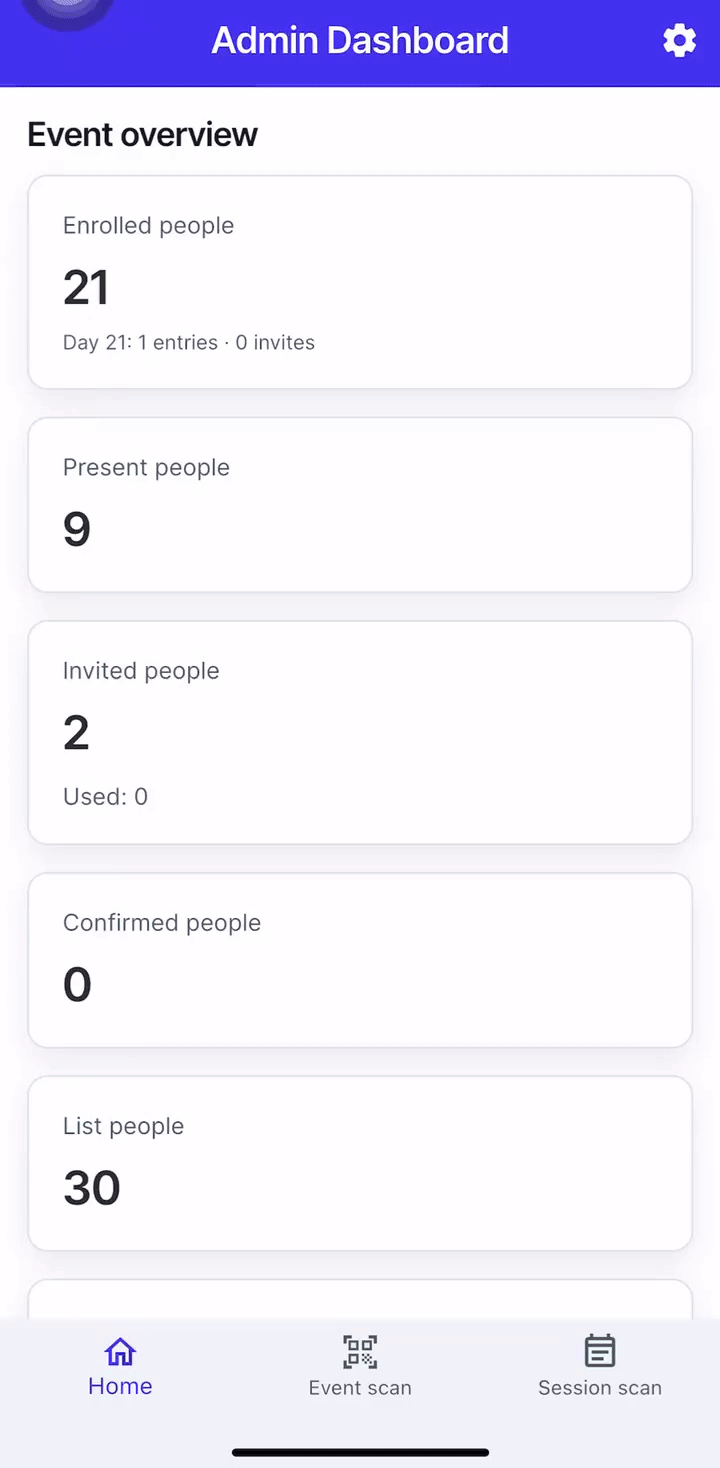
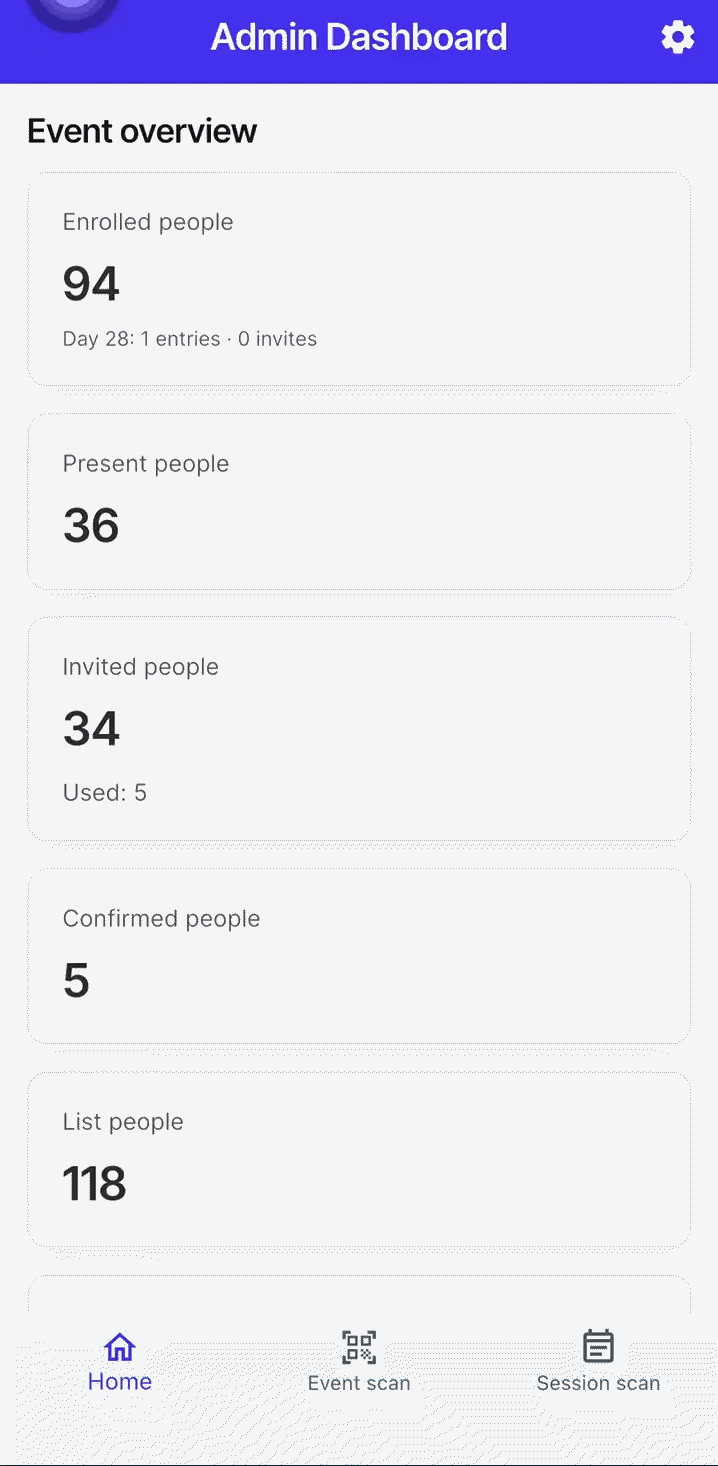
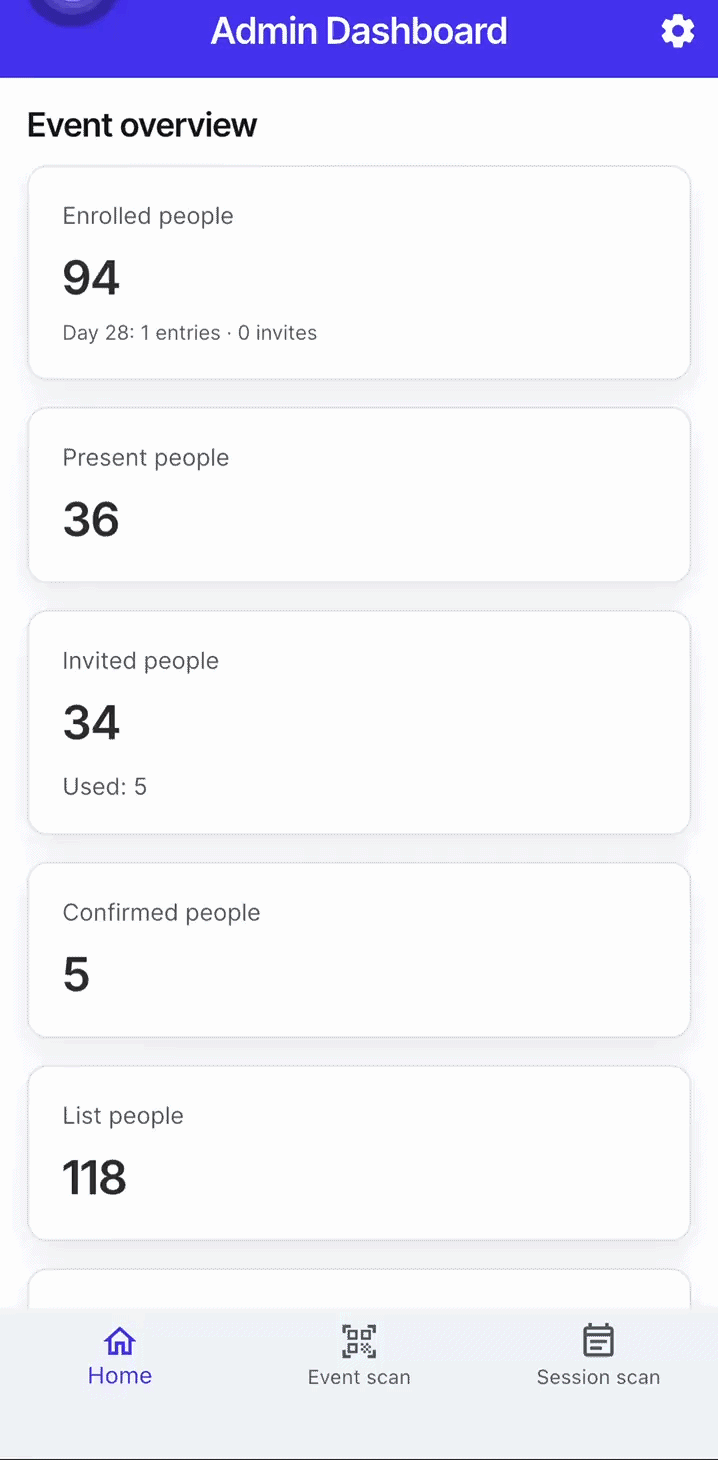
Home screen
This displays the Admin Dashboard, which provides an overview of the event, including:
- Total number of people enrolled
- Number of entries on the day of the event
- Number of people present
- Number of invited and confirmed attendees
- Lists of attendees (waiting, all, and those with printed badges)
- Number of people currently present
- Attendance across all event days
- Top activities
Event scan
This page allows you to scan attendees’ QR codes directly to check them in. Alternatively, you can tap the hamburger menu (three horizontal lines) at the top-left corner to manually check in attendees using the event search. Search for the attendee’s name and tap it to complete the check-in.
You can also check out attendees using the same process, tap the reload arrow at the top-right corner to check them out.

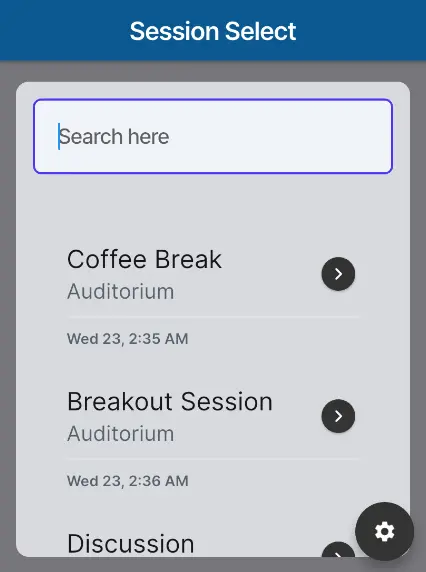
Session Scan
When you select Session Scan, you’ll be taken to a list of activities in your event. Select an activity to open a bottom sheet that slides up from the bottom of the screen.
The bottom sheet provides the following options:
- QR Code Scanning: Scan attendees’ QR codes to check them into the session.
- Face AI: Use facial recognition to check in attendees.
- List Search: Search for attendees and tap their names to check them in.
- Cancel: Close the bottom sheet.
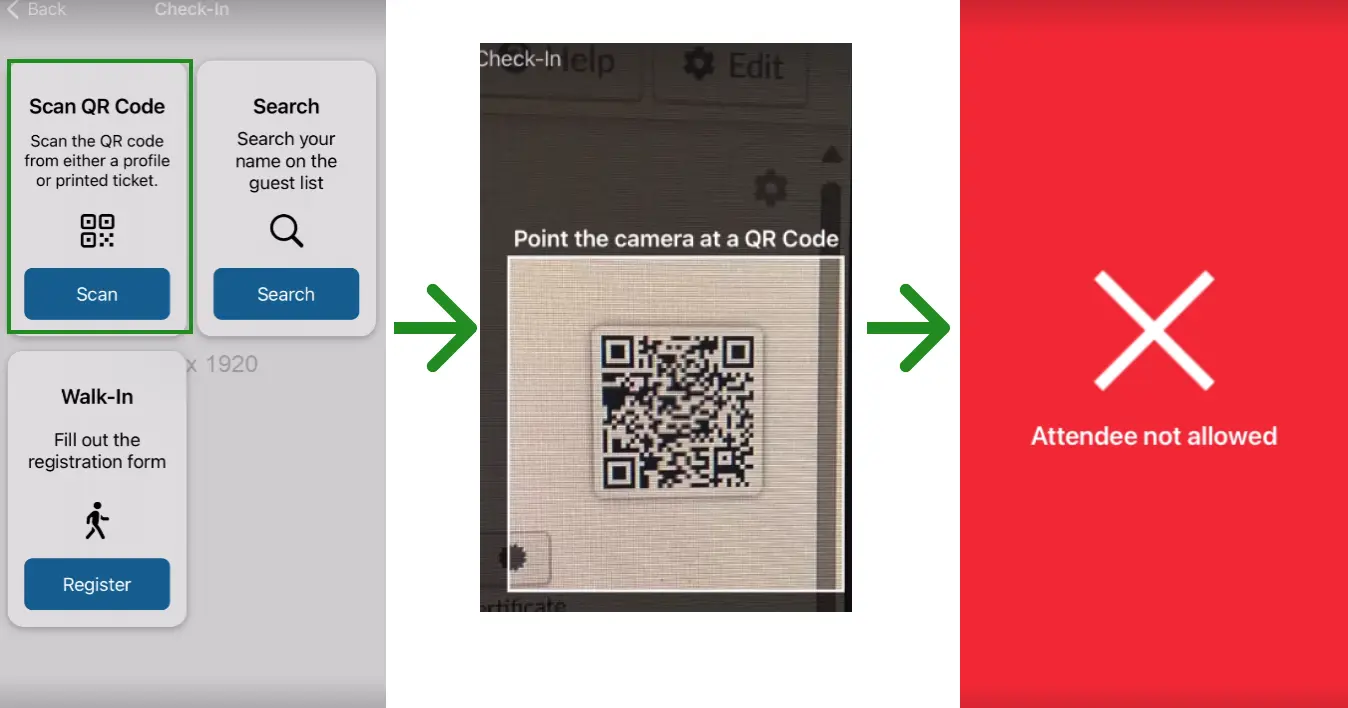
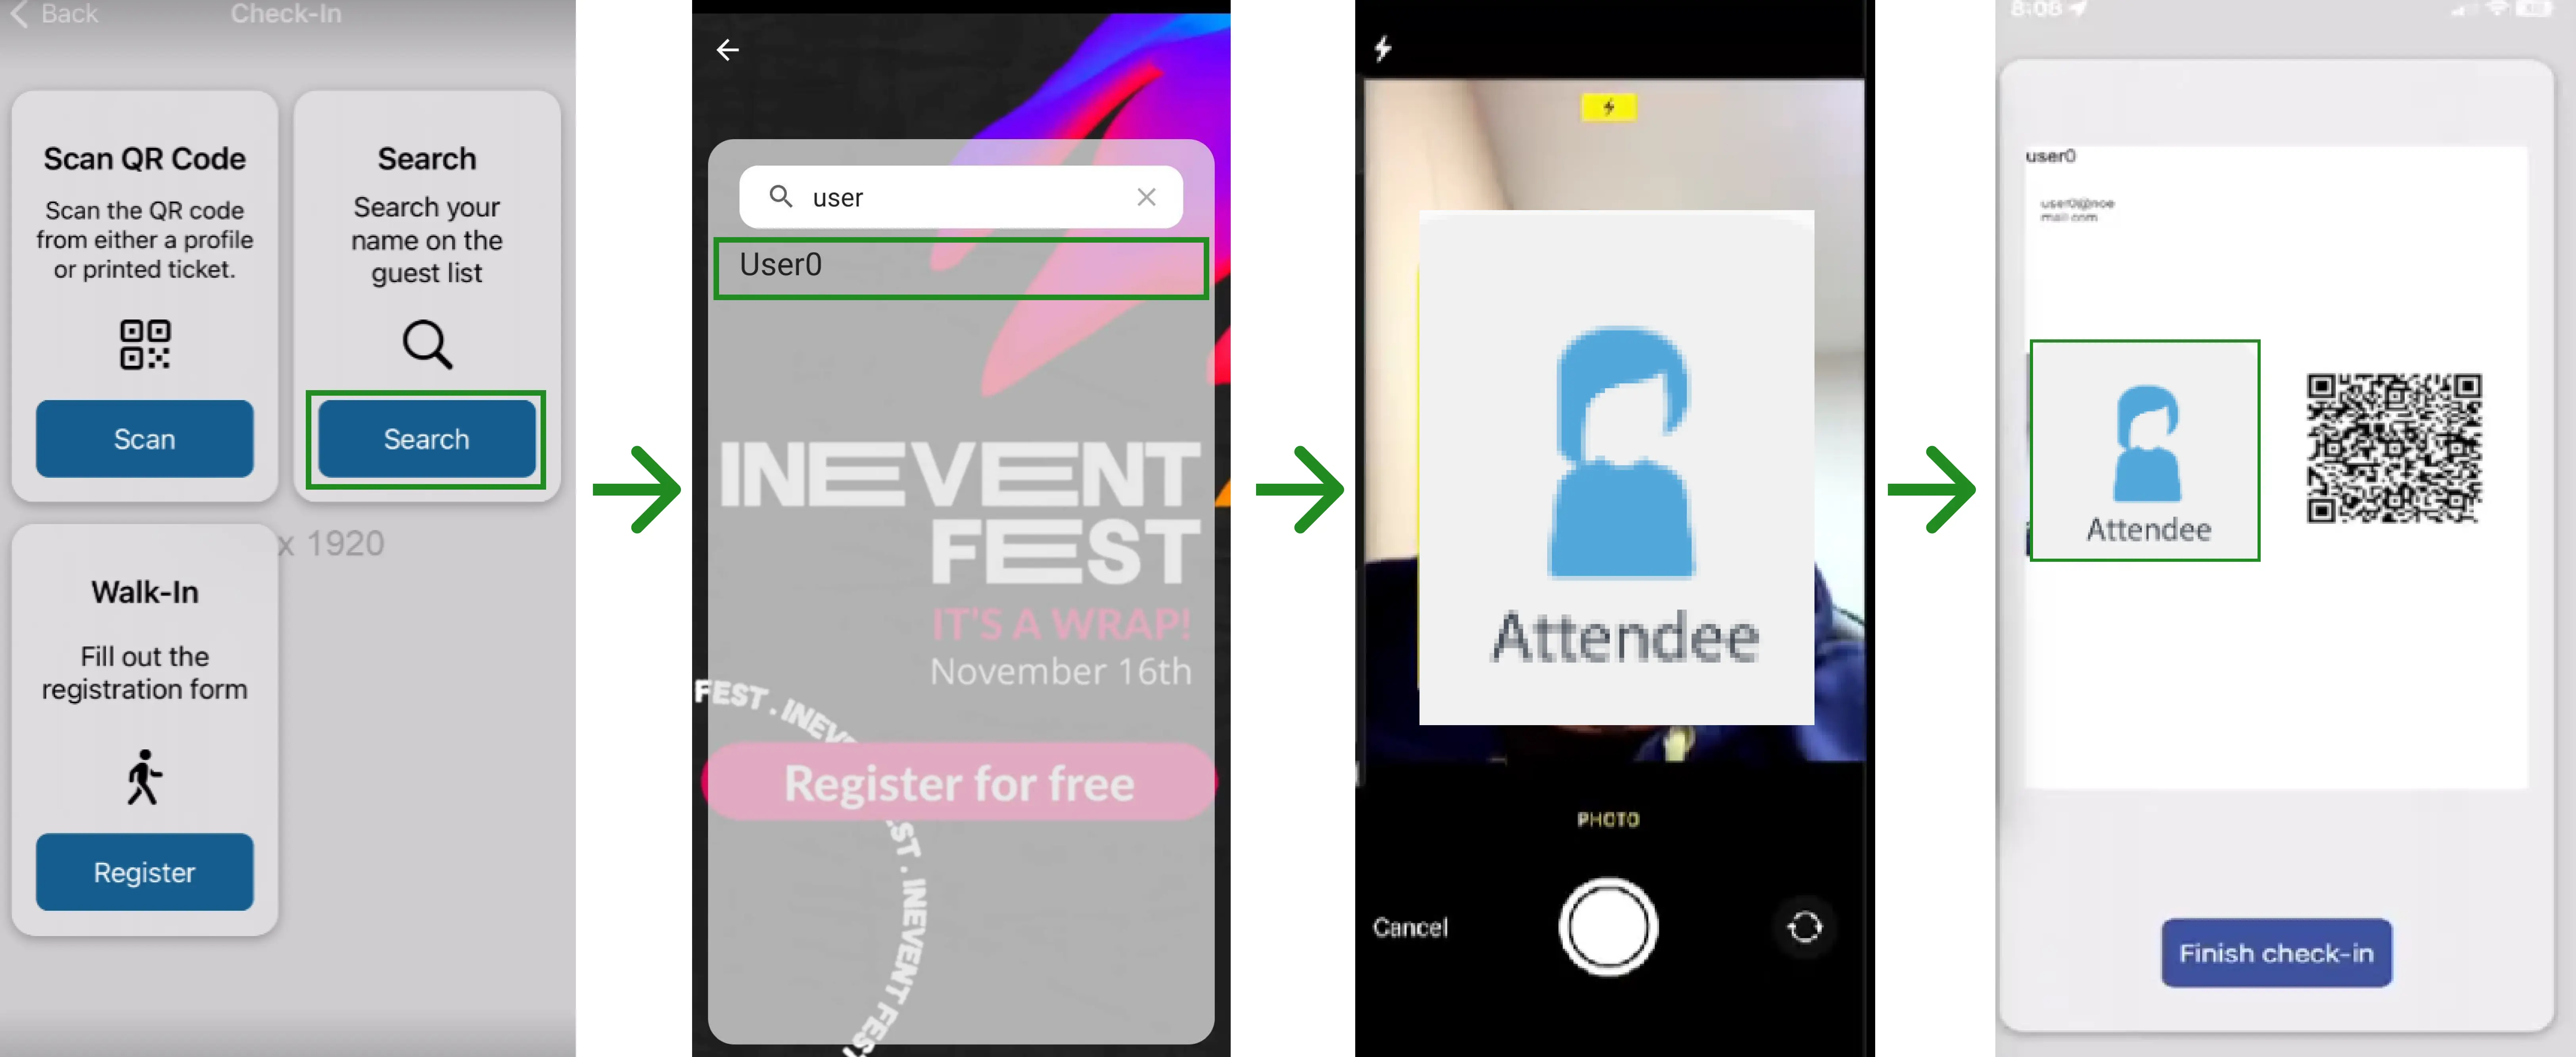
Using the kiosk mode for event check-in
The kiosk mode offers three methods for attendee check in: QR scan, manual search, and Face AI. To open the Kiosk mode, follow these steps:
- On the Home screen, tap the Settings icon at the top-right corner.
- You’ll be taken to the Admin Settings page.
- Tap Open Kiosk Mode.
- This will take you to the Check-in screen.
- Tap Check-in to view the available options for attendee check-in.
The instructions for each of the available methods are as follows:
Scan QR Code
Tap on the Scan button under Scan QR Code to start the device's camera for QR code check-in method. Attendees can show the QR code on their Confirmation email or on the InEvent app.
Search
Tap the Search button under Search to manually enter the name and/or email of the attendee to check them in.
Face AI
Tap the Scan button under Face AI to start the device's camera for Facial Recognition AI. When using this method, the camera will scan the attendee's face and match them using the Facial Recognition AI.
Kiosk settings within the app
Kiosk mode settings can be accessed by tapping the gear button at the bottom right corner of the initial Check-in screen. You will be prompted to enter a Kiosk PIN.
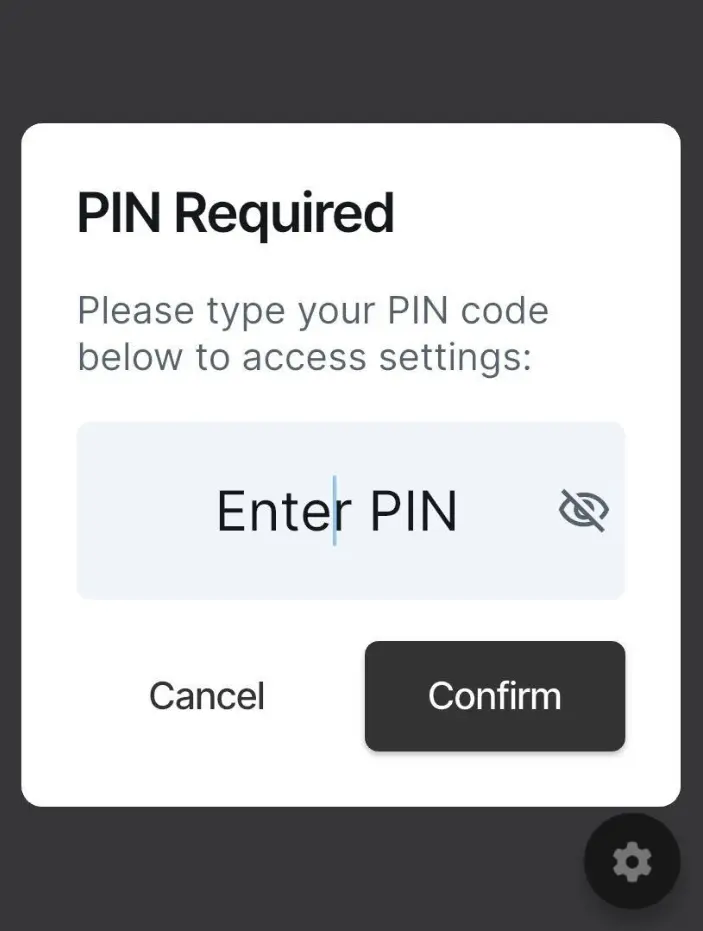
After entering the correct PIN, the settings for Kiosk mode will be displayed. From this menu, you can access the following items.
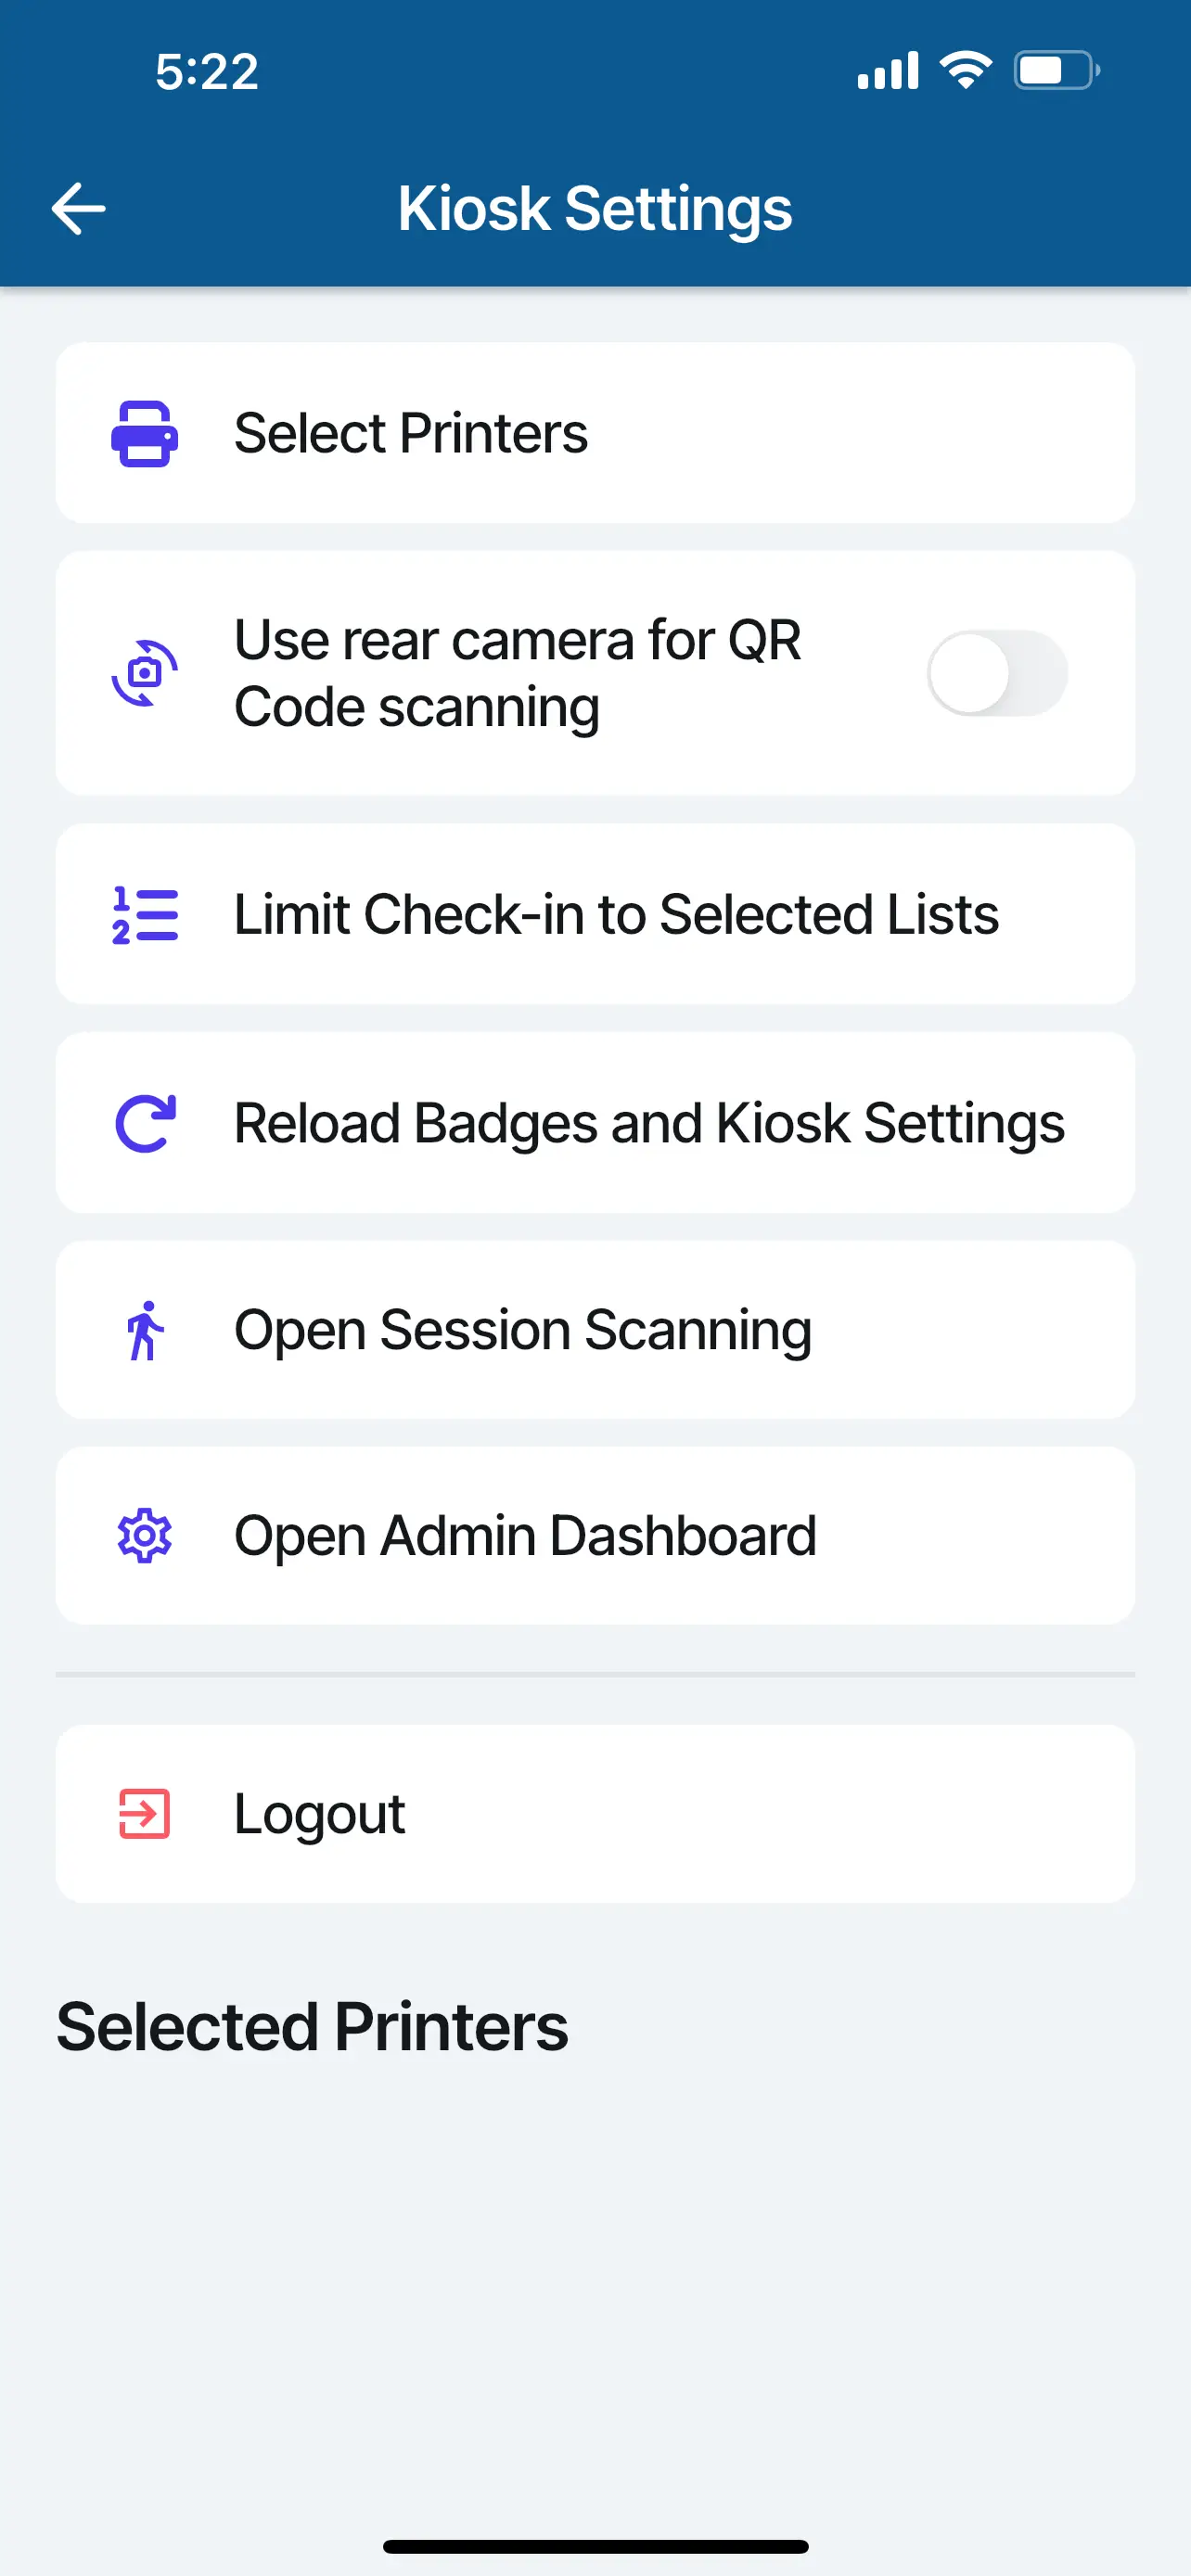
- Select Printers: Select the target printer for badge printing. Printers must be connected to the device, either via WiFi or Bluetooth.
- Use rear camera for QR scanning: Selects the rear camera instead of the front camera for QR code scanning when enabled.
- Reload Badge and Kiosk Settings: Refreshes settings to reflect setting changes made on the InEvent platform.
- Open Session Scanning: Opens the session or activity check-in mode instead of kiosk mode. You will immediately be prompted to select an activity.
- Change Selected Activity: Opens the Session Select interface when the activity check-in mode is active. This item will not be displayed when in kiosk mode.
- Open Kiosk: Returns the app to the kiosk mode.
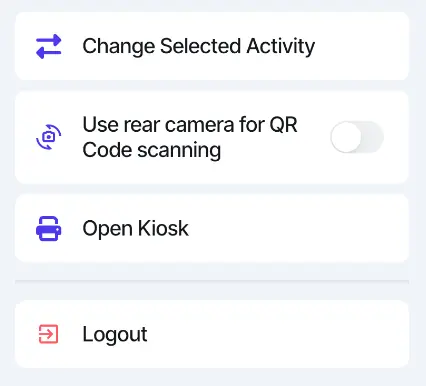
- Logout: Log out from the current account and event.
Adding printers via manual IP address
Event organizers can connect printers to the InEvent Kiosk App by manually entering an IP address. This is especially useful in enterprise or networked environments where printers may not auto-detect.
To add a printer manually, follow the steps below:
- On the Admin dashboard, tap the Settings icon in the top right corner.
- Select Open Kiosk mode.
- You will be redirected to the Start check-in page.
- Tap the Settings icon at the bottom right corner.
- Enter your event Kiosk pin.
- Tap on Select Printer.
- Tap on + Manually at the top right corner of the screen.
- In the Add Printer Manually modal:
- Enter a Printer Name (custom label for easy identification).
- Select the Model (Zebra, Brother, or AirPrint).
- Enter the IP Address of the printer.
- Tap Add Printer to save the configuration
Kiosk settings on the platform
Event administrators can further manage kiosk mode appearance, behavior, and other settings on the InEvent platform. To do so, navigate to Marketing > Badge printing > Kiosk settings.
On this page, you will find five setting sections for the kiosk mode. Each section is described below.
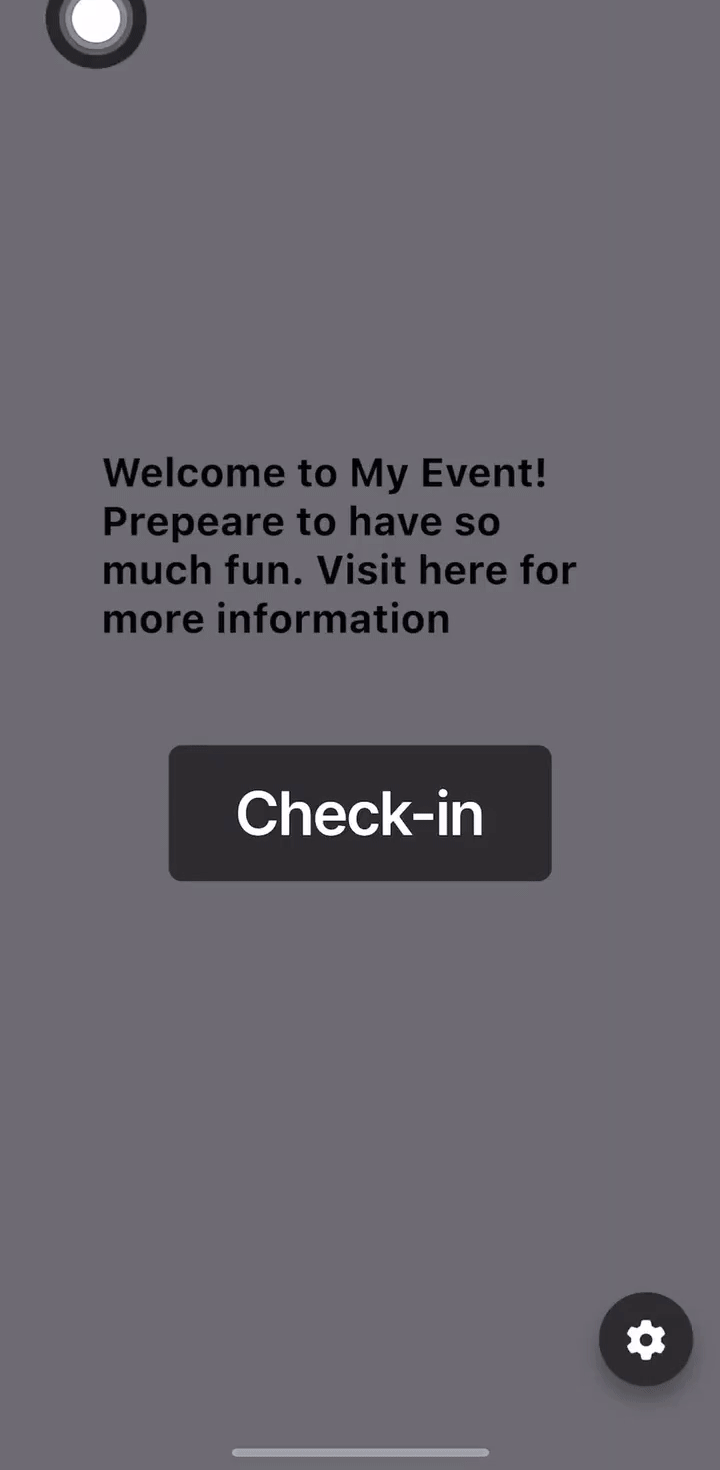
Home
You can configure a custom welcome message in rich text format. You can also set an image as a custom welcome screen, set to landscape or portrait orientation.
1920*1080px.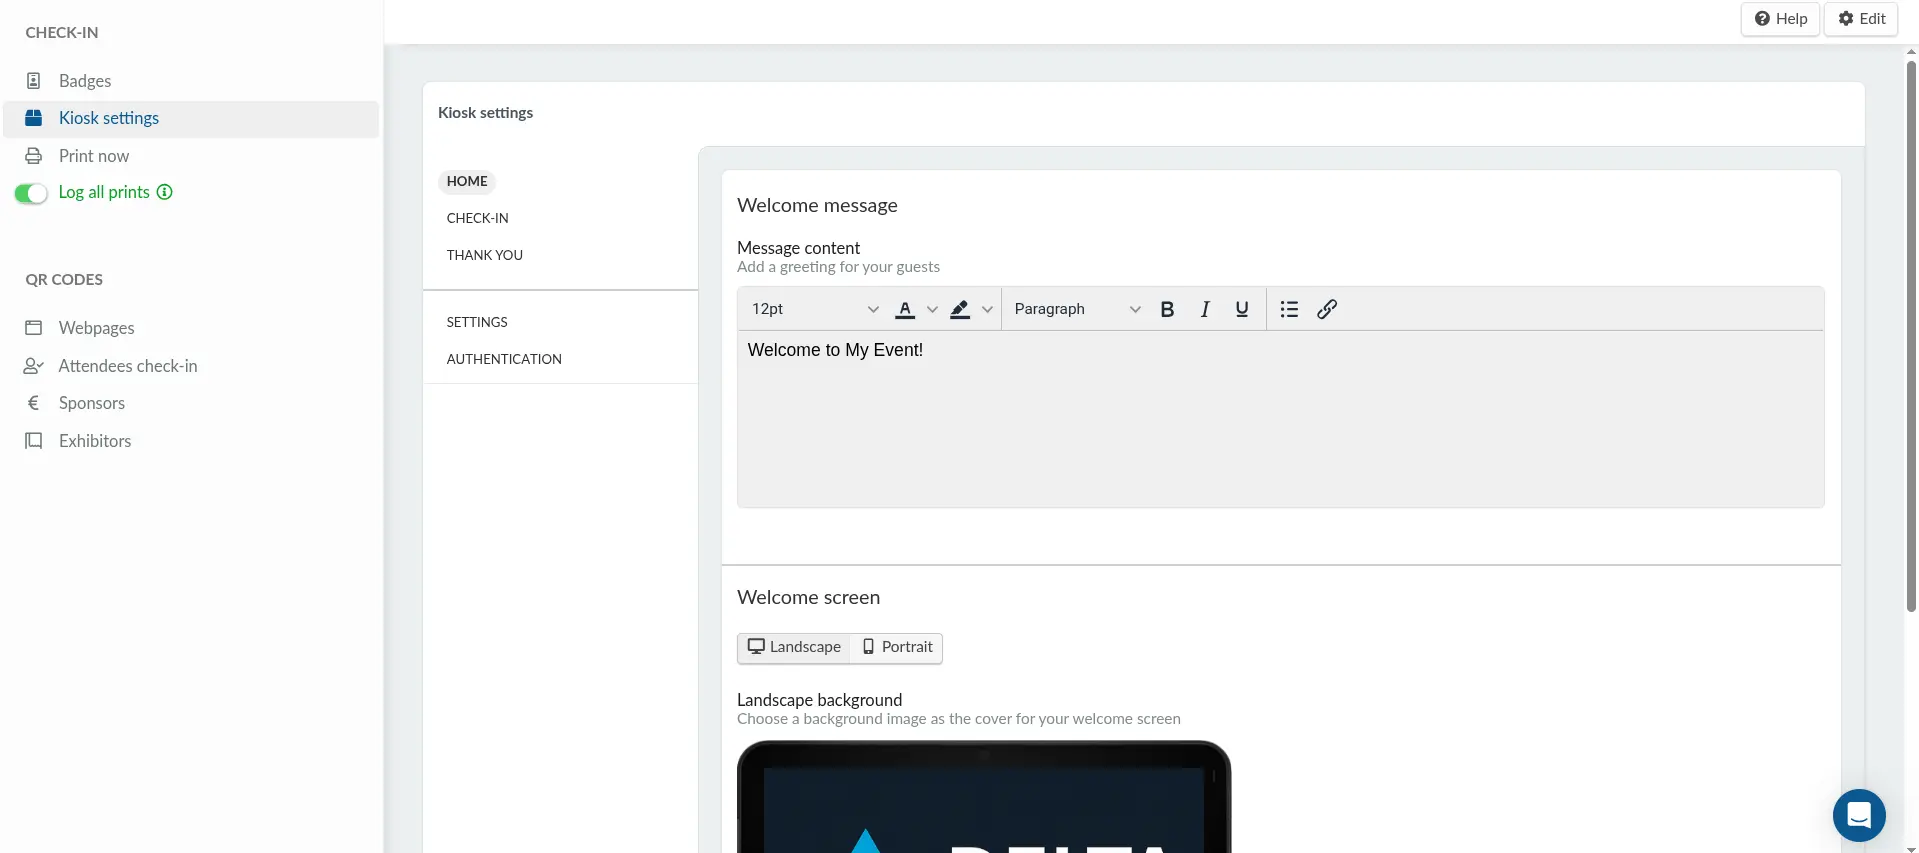
Check-in
Options and settings that change the kiosk behavior can be edited here. Under Check-in options, the following options can be configured.
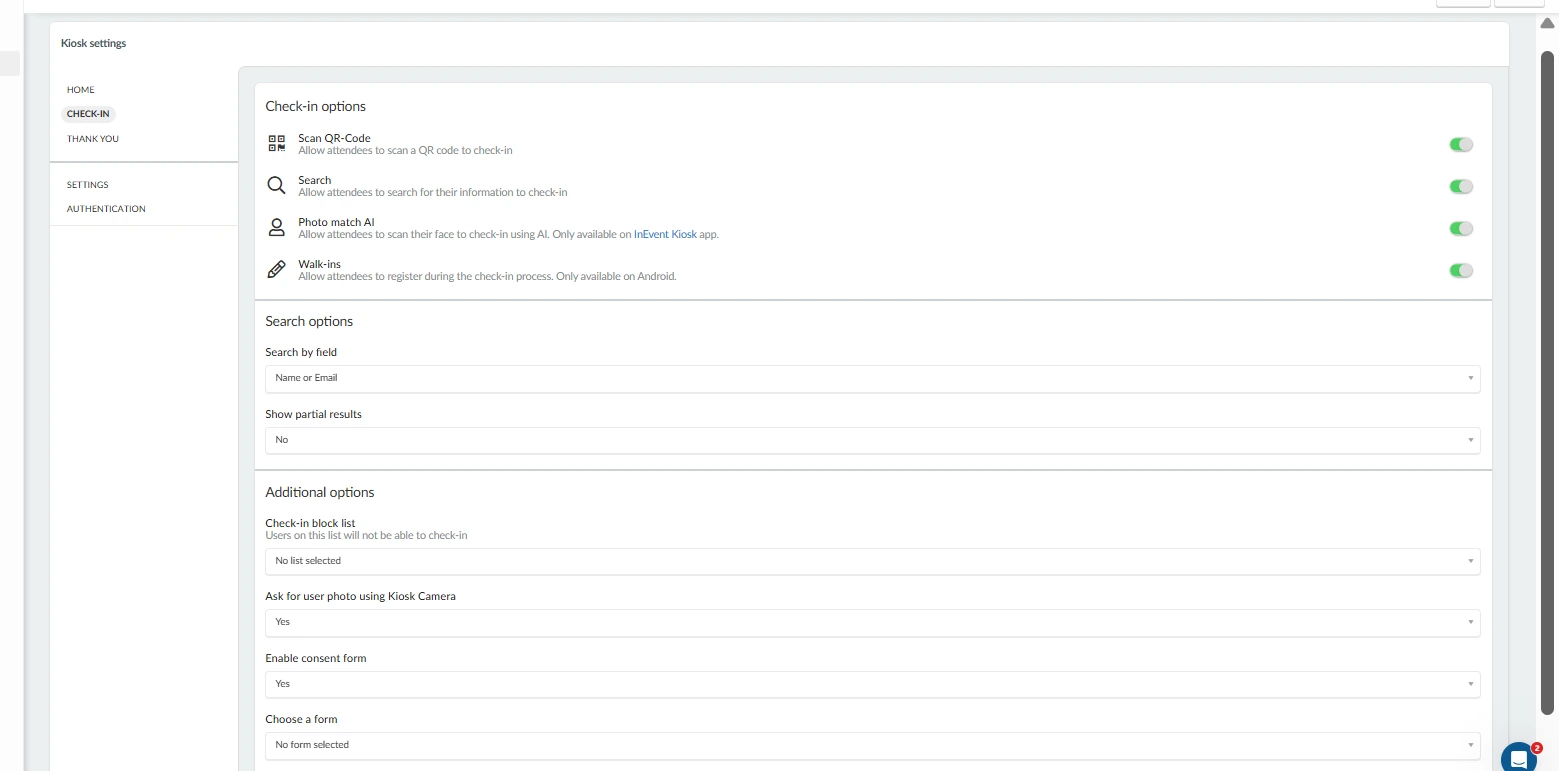
- Scan QR code: Enables QR code scanning method on the kiosk. To disable it, select No.
- Search: Enables manual search method on the kiosk. To disable it, select No.
- Photo Match AI: Enable this option to allow attendees to scan their faces for check-in using the Photo Match AI feature. This feature is only available through the InEvent Kiosk app. Refer to the Facial Recognition AI article for more information.
- Walk-ins: Enables new walk-in or in-person registrations. To disable it, select No.
Under Search options, the following options can be configured.
- Search by field: Selects the preferred fields to search. You can select to search Name or Email fields, or Username fields.
- Show partial results: Enables showing of partial search results. To disable it, select No.
Under Additional options, the following options can be configured.
- Check-in block list: Defines a list of attendees blocked from checking in. To disable the block list feature, select No list selected.
Attendees in the defined block list will still be listed within the list of attendees. However, they cannot be successfully checked in to the event.
- Ask for user photo using Kiosk Camera: Sets the kiosk app to take attendee photos upon check in. When this option is enabled, the app will activate the device's camera, using which the attendee photo is taken. If the badge template includes User photo, the photo will be printed on the badge. To disable the photo prompt, select No.
- Enable consent form: Defines a custom form to be displayed as a consent form. When Yes is selected, you will be prompted to select a target custom form.
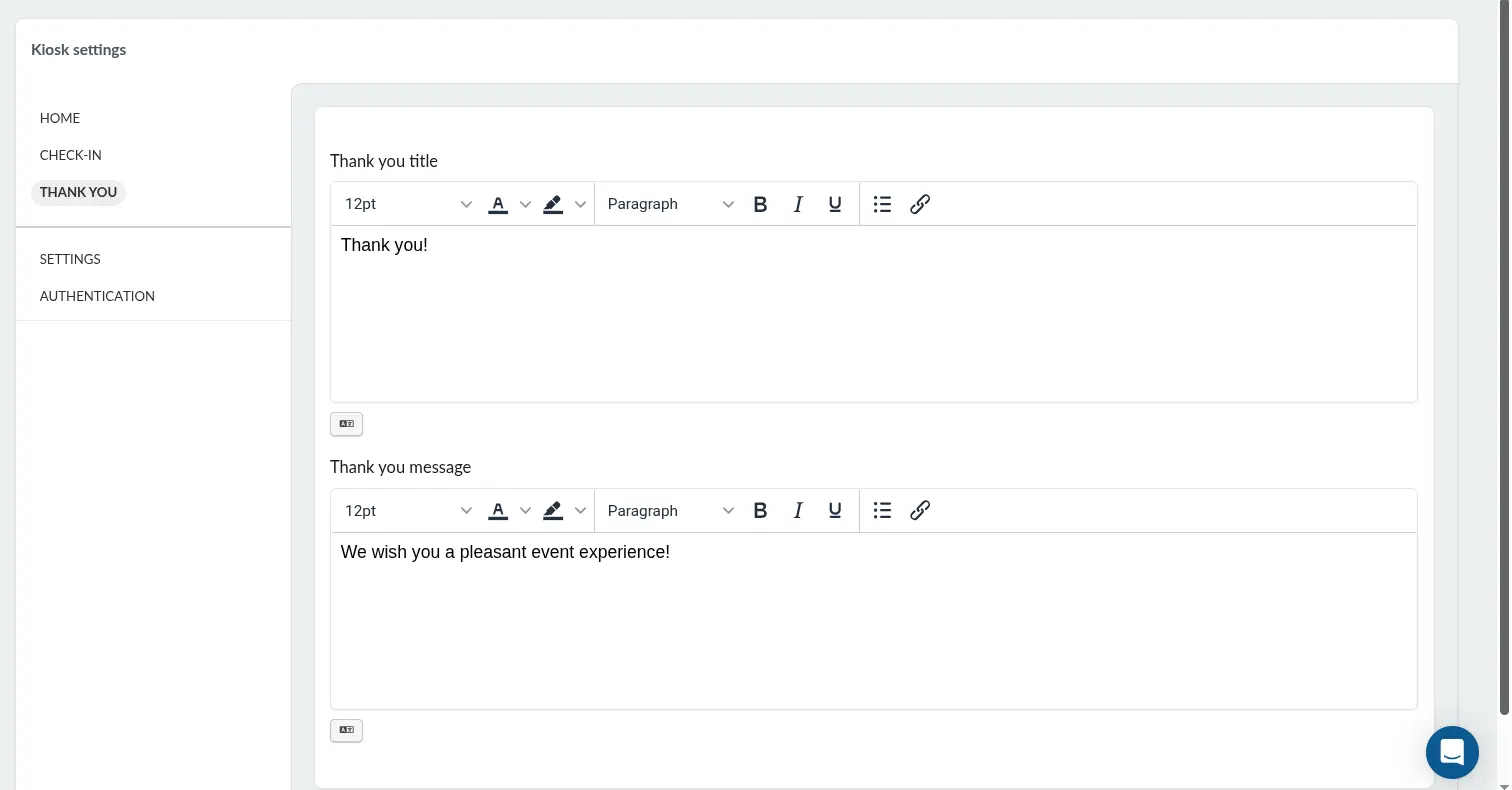
Thank you
You can configure a custom title and message in rich text format to be displayed after an attendee successfully checks in.
Settings
This section contains the following options.
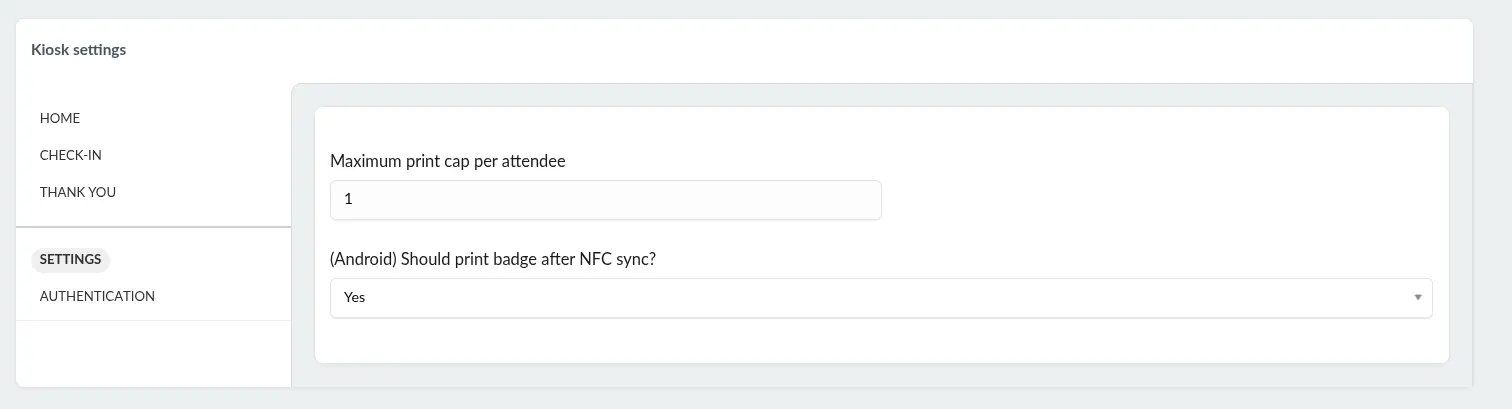
- Maximum print cap per attendee: Sets a cap or limit to the printed badges for one attendee, including reprints.
- (Android) Should print badge after NFC sync?: Defines whether a badge will be printed after an attendee checks in by NFC syncing.
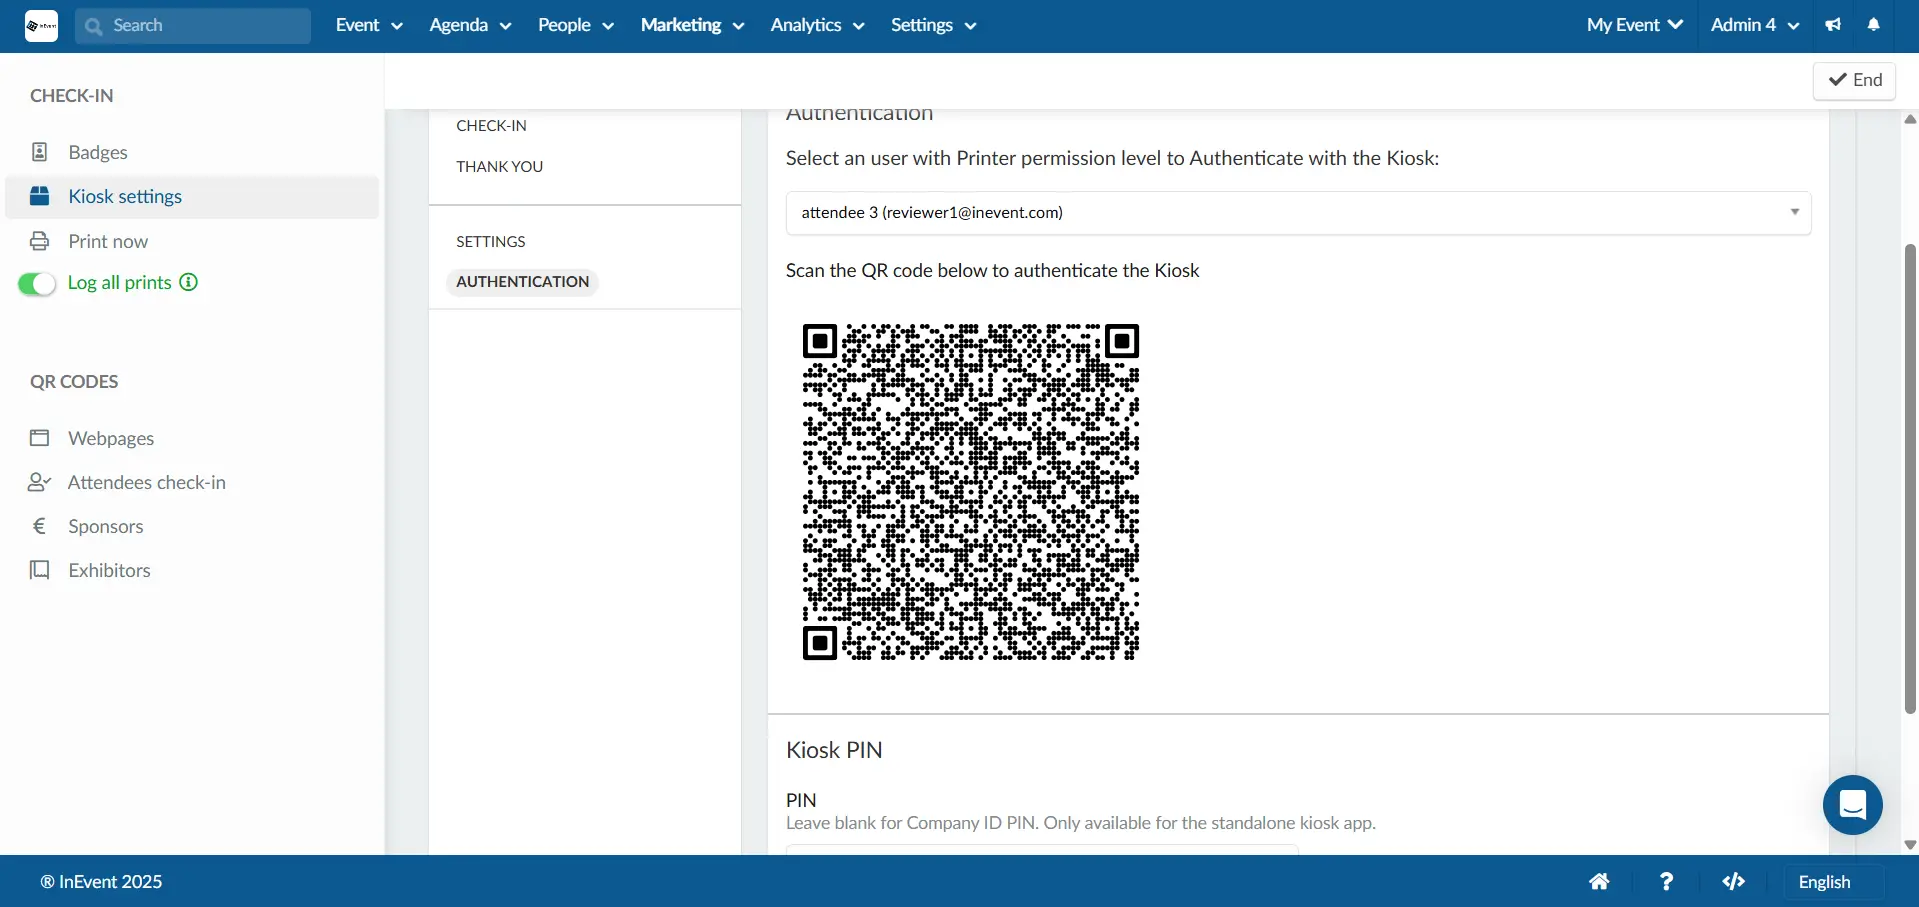
Authentication
This section contains the login QR code to access the event within the InEvent Kiosk app. Event administrators can scan this QR code on the target device and immediately access the kiosk without having to enter company codes and user account credentials.
You can also define a Kiosk PIN on this page. The Kiosk PIN is used to access in-app kiosk settings.
Editing attendee details before badge printing
The Kiosk app supports a two‑way synchronization with the InEvent backend. This allows event organizers and admins to update attendee information directly from the Kiosk before printing badges, with all changes automatically reflected on the InEvent platform.
To edit attendee details in the Kiosk app, follow the steps below:
- Navigate to Kiosk Mode and tap Check-in
- Choose one of the available check-in options: QR scan, manual search, or Face AI.
Once the attendee is checked in, a badge preview with their information will appear on the screen.
- Choose an action by tapping Print Badge to print immediately, or Modify to edit the attendee’s details before printing.
- Make the necessary edits and tap Save to confirm.
The changes will automatically sync with the InEvent platform.

- Default fields such as last name, email address, and company
- Custom fields with conditional answer types (Yes/No, multiple choice, rating scales, dropdowns). These will appear as read‑only in the Kiosk app.
Pre-print badges
The Pre-print badges feature allows event organizers to search, select, and print multiple attendee badges in advance. This is especially useful for preparing badges before attendee arrival and improving on-site check-in efficiency. To use pre-print badges, follow the steps below:
- On the Admin dashboard, tap the Settings icon in the top right corner.
- Select Open Kiosk mode.
- You will be redirected to the Start check-in page.
- Tap the Settings icon at the bottom right corner.
- Enter your event Kiosk pin.
- From the list of options, select Pre-print badges.
- Use the Search registrations field or apply filters to find attendees.
- Select attendees by:
- Checking individual boxes, or
- Tapping Select all
- Enable Save print log to keep a record of printed badges.
- Tap Print to print the selected badges.
You can also tap Open logs to view previously saved print logs.
- List filters: Filter attendees by specific lists or select All registrations to display all attendees. Multiple lists can be selected at the same time.
- Clear filters: Remove any applied filters and reset the attendee list.
- Select all: Automatically select all displayed attendees for badge printing.
- Clear selection: Deselect all currently selected attendees.