Troubleshooting for Badge printing + Session scanning + NFC
 Updated 9 months ago
by
Caleb Kotey
Updated 9 months ago
by
Caleb Kotey
- Badge printing
- How can I have the registration form on the badge printing device?
- I need to hide registration questions to make on-site registration faster
- Error - your email is invalid (not registering new people)
- Error - Badge already printed
- I cannot search for an attendees name
- How do I switch the camera view for scanning a QR code in kiosk mode?
- Badge printing
- The attendee cannot find their QR code. How can I check them in?
- New registrations to the event are not syncing with the badge printing device
- NFC
Badge printing
We advise performing a live registration test a few days prior to the event to avoid any issue which could occur on the day of the event.
How can I have the registration form on the badge printing device?
To enable the registration form on your badge printing device, go to Marketing > Registration > Badge Printing on the platform. Click the click here button in the warning at the top of the page, and your page will be redirected. Once redirected, click Edit, and scroll down to the Has form? field, then select Yes to activate the registration form.

I need to hide registration questions to make on-site registration faster
If you have a registration form for your event which has many questions, but during the onsite check-in you want to hide certain questions on the tablet, you can make certain questions invisible to make the registration process faster.
To do this, go to the platform and click on Marketing > Registration > Registration form > Edit > click on a question and untick the check box which reads Visible.
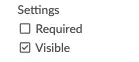
You must also make sure the question is not set to be Required.
Error - your email is invalid (not registering new people)
If you add an email to the registration form and receive the error: Oops, your example@example.com has already been used or it was not found it means that the invite requirement is enabled and that your email hasn't been added to the invitee's list or has been already been added.
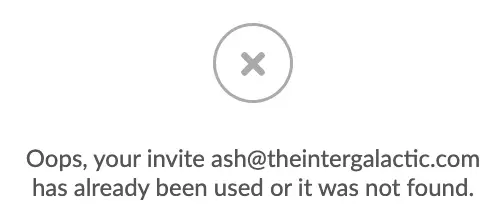
To have an open registration you will need to turn off the Invite requirement.
Go to Settings > Tools > scroll down to Control section, click on Edit > disable the Invite requirement option > press End.

Error - Badge already printed
If you receive the error Badge already printed, you may need to allow for more than one badge to be printed per person. By default, the limit of badge printing per person is 1.
To extend the limit, go to the platform and click on Marketing > Registration > Printing Label > Edit > scroll down to Maximum print cap per attendee and enter a higher value.

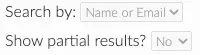
I cannot search for an attendees name
By default, the search is set to search by email addresses only. If you would like to search by name or another topic, go to Marketing > Registration > Printing Label > Edit > scroll down the page until you come to Search by > here you can choose Name & email.
It is also worth setting Show partial results? to Yes if you would like to type only part of the name or email and already get the results.
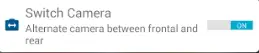
How do I switch the camera view for scanning a QR code in kiosk mode?
While in kiosk mode you will see a 3 dot menu icon in the top right corner. Click the icon and enter your 5 digit company code. To see how to find your 5 digit company code, Click here
Now, in the menu, you will see the Switch Camera tool which you can alternate from front camera to back. Once you have switched the camera view, click Close
Badge printing
I'm getting the message Person Denied when trying to scan an attendee in an activity.

This usually happens because the attendee is not in fact enrolled in that particular activity in which you are checking them in.
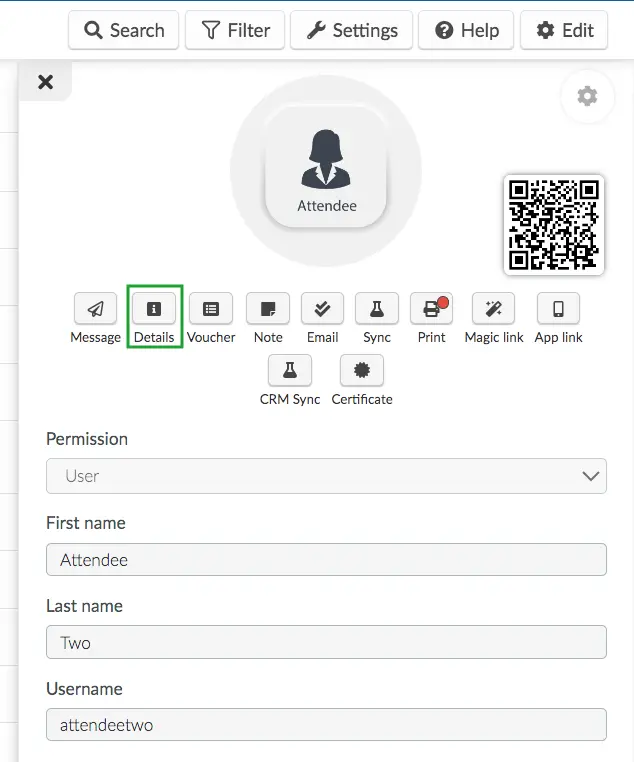
In order to check if the person is registered to that activity you can go to People > Attendees > search for the person's name and press the Details button:
Or, while in the Attendees tab, look to the list of activities on the left, choose the activity and you can see the list of people who have enrolled in the activity.
Check-in block list
The Check-in block list allows you to restrict certain attendees from accessing your activity. Follow the instructions below for badge printing:
- Segment the individuals you want to restrict from your event by creating a list
- Go to Marketing > Registration > Badge Printing and click on Kiosk Settings.
- Click on Edit at the top right corner and select CHECKING IN from the Kiosk settings menu.
- Select the list you want to restrict from the Check-in block list drop down and click on End to save the changes.
This will ensure that the individuals on your restriction list are not able check-in.
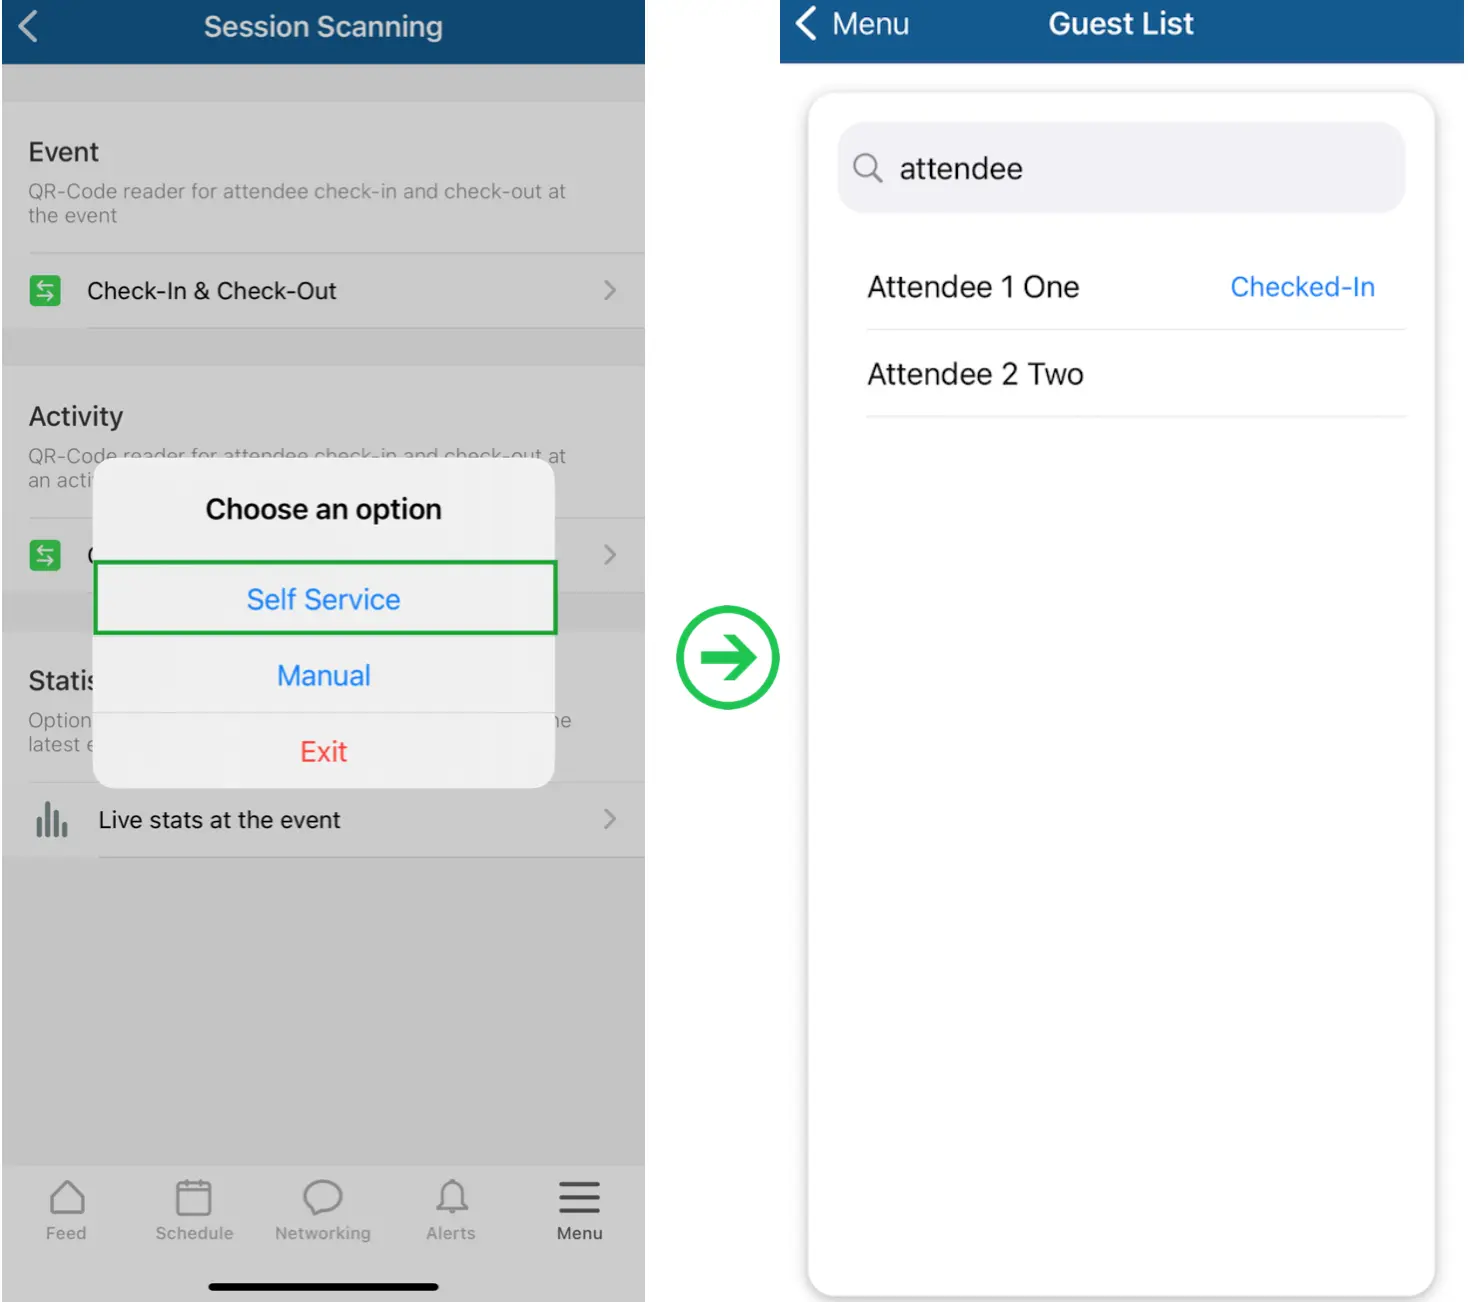
The attendee cannot find their QR code. How can I check them in?
You can perform a self-service search and check-in cases of absent QR codes.
To manually search for an attendee and check them in for badge printing, click on the Event or Activity option (Menu > Session scanning) and then select the Self service option.
You can choose from the list of attendees to check them in, or click on the magnifying glass icon to search for an attendee. Then, click on their name to check them in.
New registrations to the event are not syncing with the badge printing device
I have on-site registrations and find that new registrations are not showing up on the list of attendees on my device and/or when checking them into an activity, I receive the message Person Denied.
In that case, first, you need to make sure you have a stable internet connection: Minimum of 0.5mb /s per reading device
If you are suffering from intermittent Internet connection loss, then you need to close the app on the mobile phone, and open the badge printing again so you can load pre-cache data.
NFC
I am trying to sync a registered attendee with an NFC bracelet but their name is not on the list.
When you are manually Syncing a person to an NFC bracelet you go to Badge printing > NFC Sync > Sync a person with a bracelet. This screen will only show you a list of people who have downloaded the app, that is why the screen is called networking.
To search for other registered people at the event you need to click on the magnifying glass icon in the top right corner and search for their name.
I need to track an attendee, and see where they are at my event
To find an attendees' location using NFC, you can go to Marketing > Registration > Check log > Search tab > and search for the attendee's name to see which activity/session/area of the event they have checked in.