Static and Contact lists
 Updated 1 month ago
by
Faisal Durrani
Updated 1 month ago
by
Faisal Durrani
- Segmented agenda: Linking each activity with a list
- Communication: How do I send an email to a list?
- Ticket: How to link ticket to buyer's lists?
- UTM link: How to add converted leads to lists?
- Push notifications: How to send push notifications to specific lists?
- Custom form: How to add a list to a custom form?
This article intends to teach you how to create Static Lists at the event level, and Contact lists at the company level. With the Lists tool, event organizers can segment individuals into different groups that can be given their own agendas, notifications, emails, among many other features.
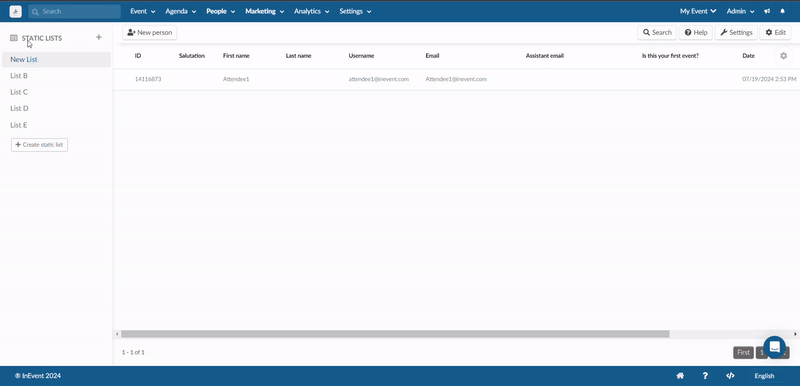
Creating a static list
The first step in segmenting people into different lists is to begin by creating a new list. To do this,
- Go to your event and click on People > Static lists.
- Click on the + button or + Create list button at the left side menu.
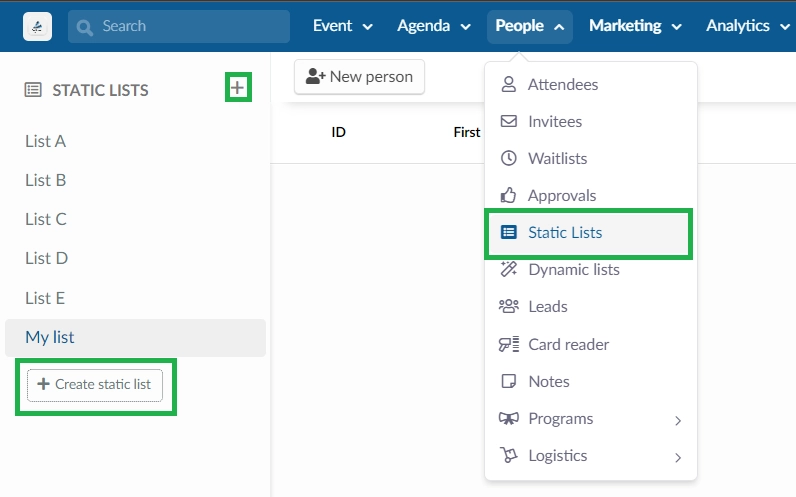
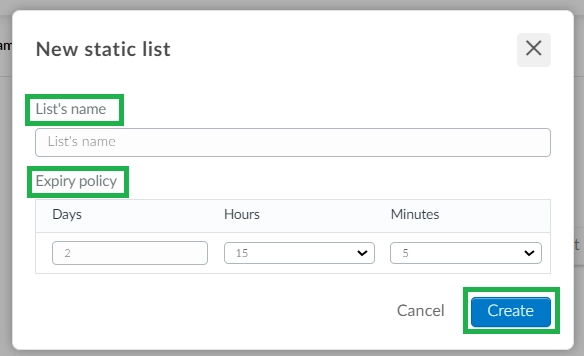
- Enter the name of the list and set an expiry policy.
- Press the blue Create button to create your list.
The created list(s) will appear at the left-hand menu of the page.

Configuring the static list
You can configure your list by clicking on the desired list from the left-hand menu, then clicking on the Settings button.
From the Settings button, you can configure the following:
- Name: You can edit the name of your List by typing the new name in the Name field and pressing the Done button.
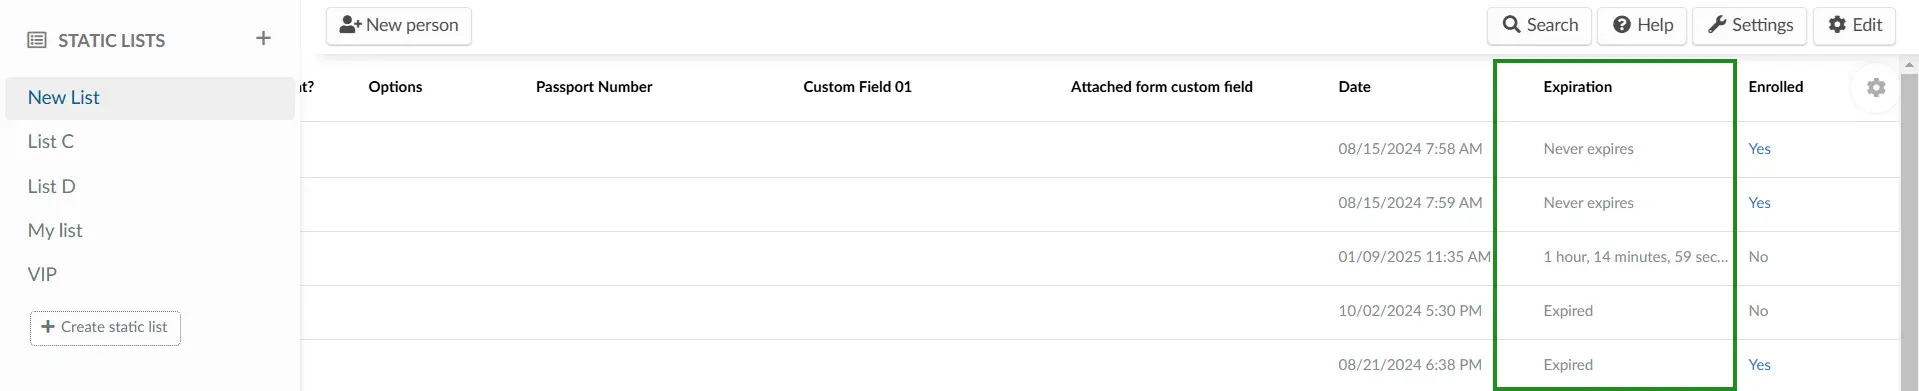
- Expiry Policy: Define the duration in days, hours, and minutes for which a person's status remains active on the list. This setting will be reflected in the Expiration column, which shows one of the following statuses:
- Never Expires
- Expired
- Time remaining until the person’s status changes to expired.
- Action to execute when a person is added to the list: You can select a custom email to be automatically sent when a person is added to the list. To configure this action, select Send email from its drop-down box, select the target email, and press Add trigger. To remove a trigger, click X on the trigger or email box.
- Action to execute when a person is removed from the list: You can select a custom email to be automatically sent when a person is removed from the list. To configure this action, select Send email from its drop-down box, select the target email, and press Add trigger. To remove a trigger, click X on the trigger or email box.
Removing a static list
To remove a static list, click on the desired list from the left-hand menu, then click the Settings button at the top right corner of the page. Press the Remove button and enter REMOVE LIST in the confirmation box. Then press Remove again.
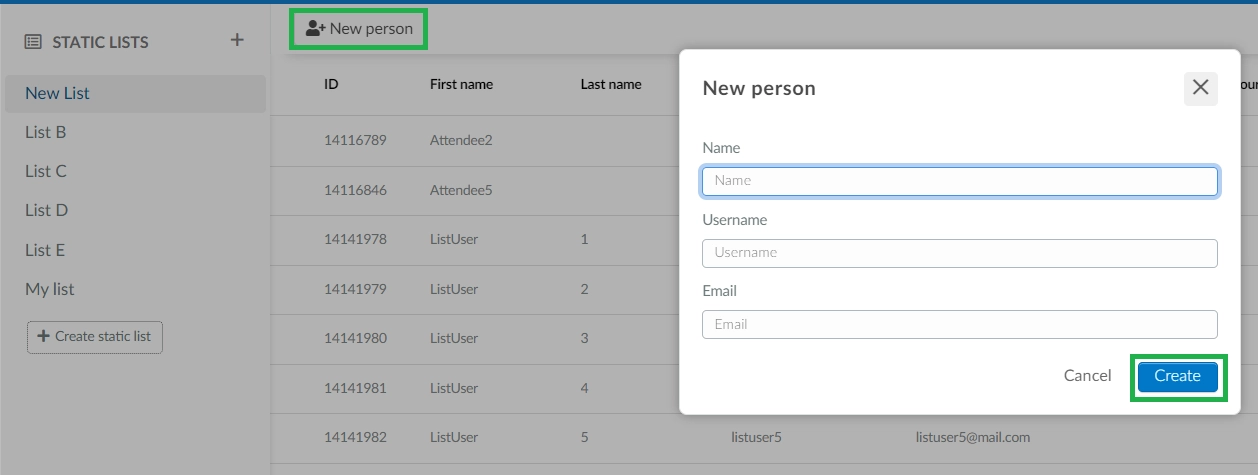
Adding people to the list
Manually
To add a new person to the list, select the list you want to add the person to from the left-hand menu, click + New Person, enter their data and click on Create.
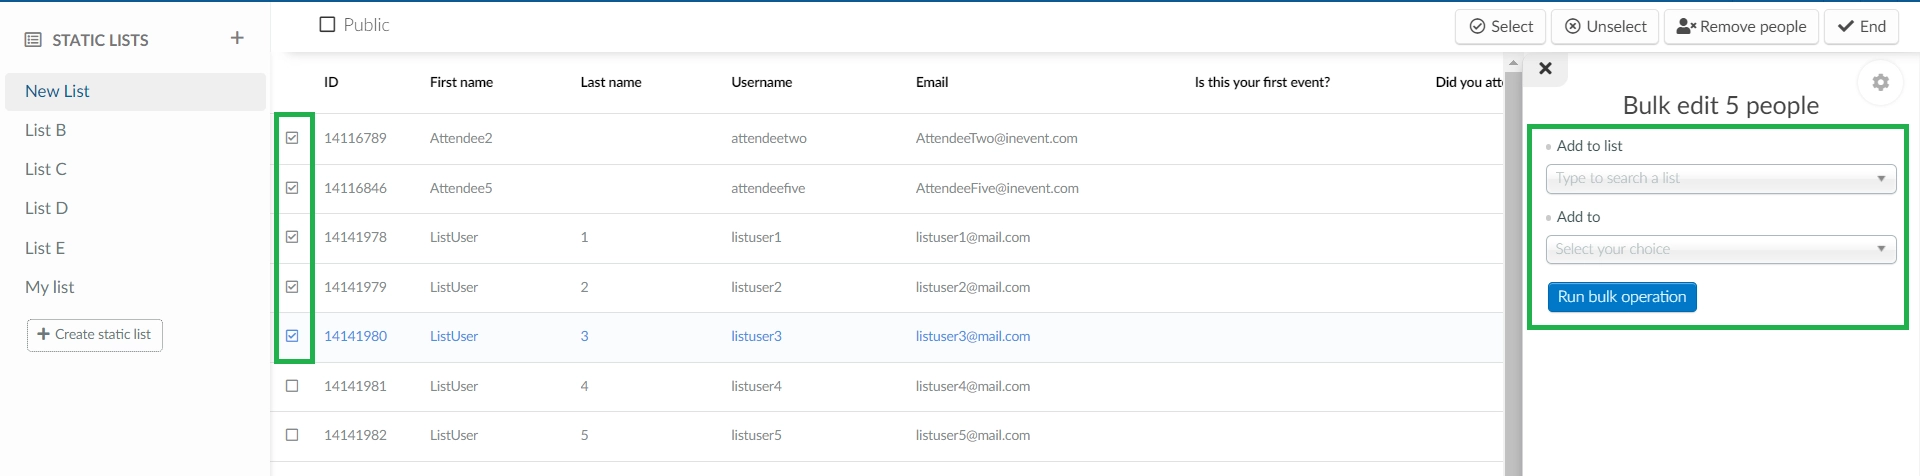
Bulk Movements
Users can be bulk added to a list from another list, or to your attendees or invitees page.
To copy users from one list to another, click Edit from within the list you wish to copy from, and select the users you want to move. After this step, select the destination list from +Add to list the dropdown menu on the right side window. If you are moving them to your attendees or invitees list , select the respective destination from the +Add to drop down menu, and click Run Bulk Operation.
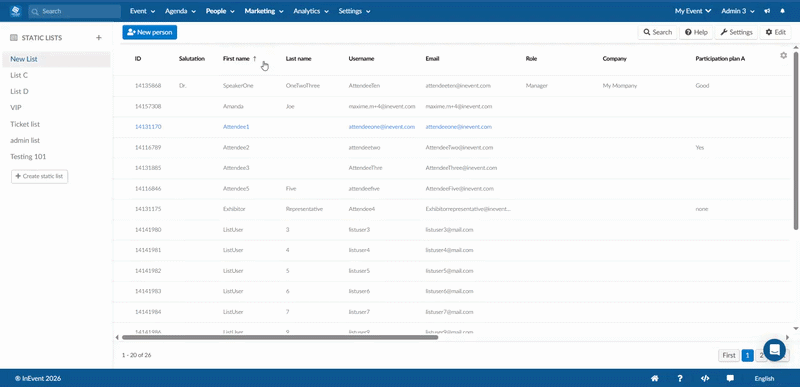
User information display and customization on the Static list dashboard
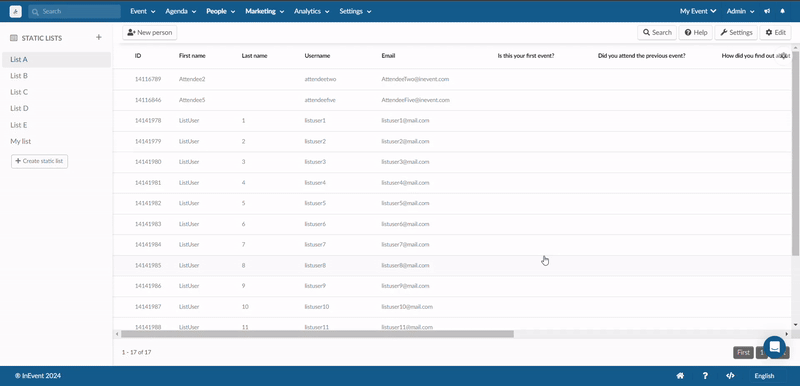
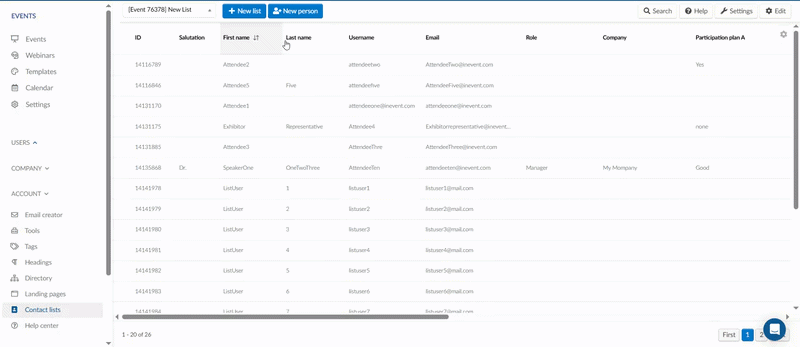
When users are added to a list, the following columns will display information about each user in the dashboard:
- ID of the User
- Salutation
- First Name
- Last Name
- Username
- Role
- Company
- Global and custom fields (if any)
- Date and time added to the list
- Expiration: The duration of time the user will remain on the list.
- Enrolled: Shows if user is enrolled or not in the event.
You can click on the user and a window will appear at the right side of the page displaying the user's profile details, as well as answer to company user fields. By clicking on the settings icon, you can control the visibility of information you wish to be displayed on the dashboard:
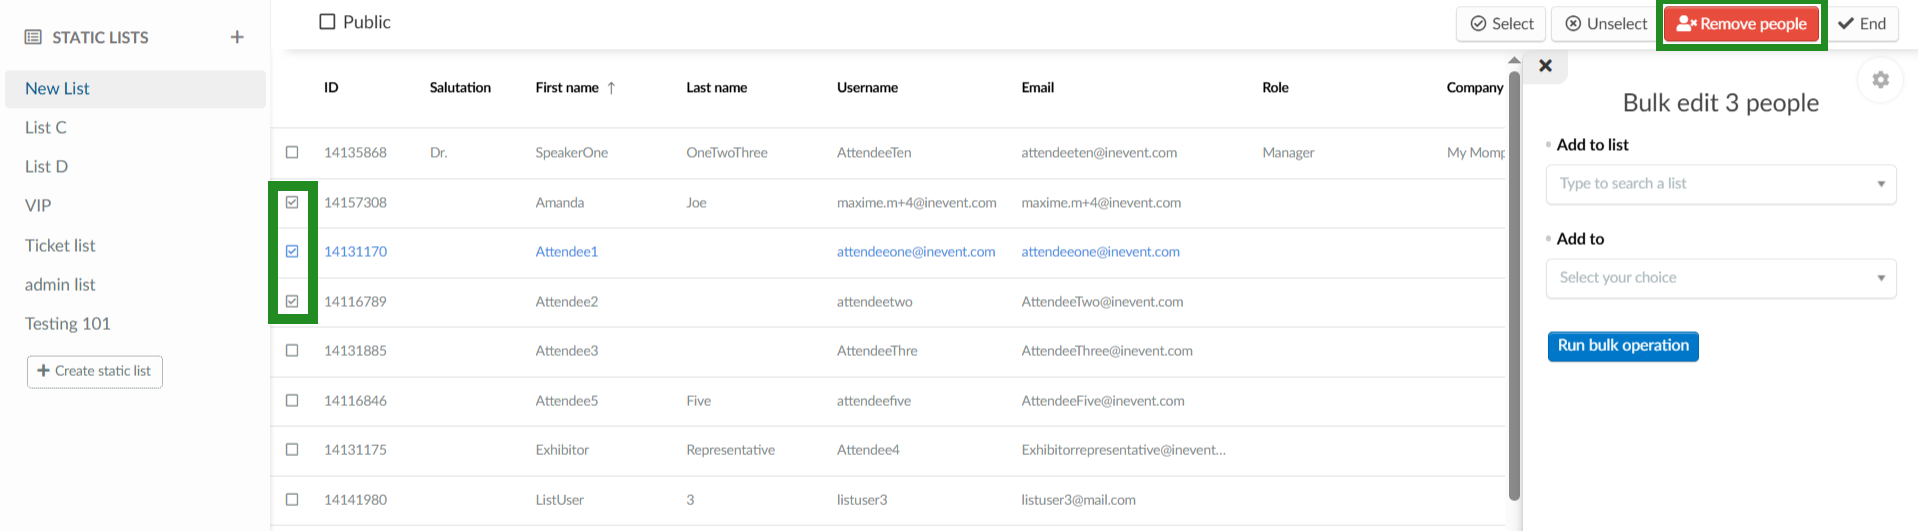
Removing a person from a static list
To remove a person from a static list, follow these steps:
- Select the static list from the list drop-down menu on the top left corner of the page.
- Click on Edit.
- Tick the checkbox(es) beside the person(s) you wish to remove from the contact list.
- Click on Remove people at the top right corner of the page.
Importing lists from other events or company contact lists
If you have already created a list in another event, a contact list, or want to import data from a different list within the same event to another list, follow these steps:
- Press Edit.
- Select the list you wish to import to from the left hand menu.
- Click on the Import button and select List as your data origin.
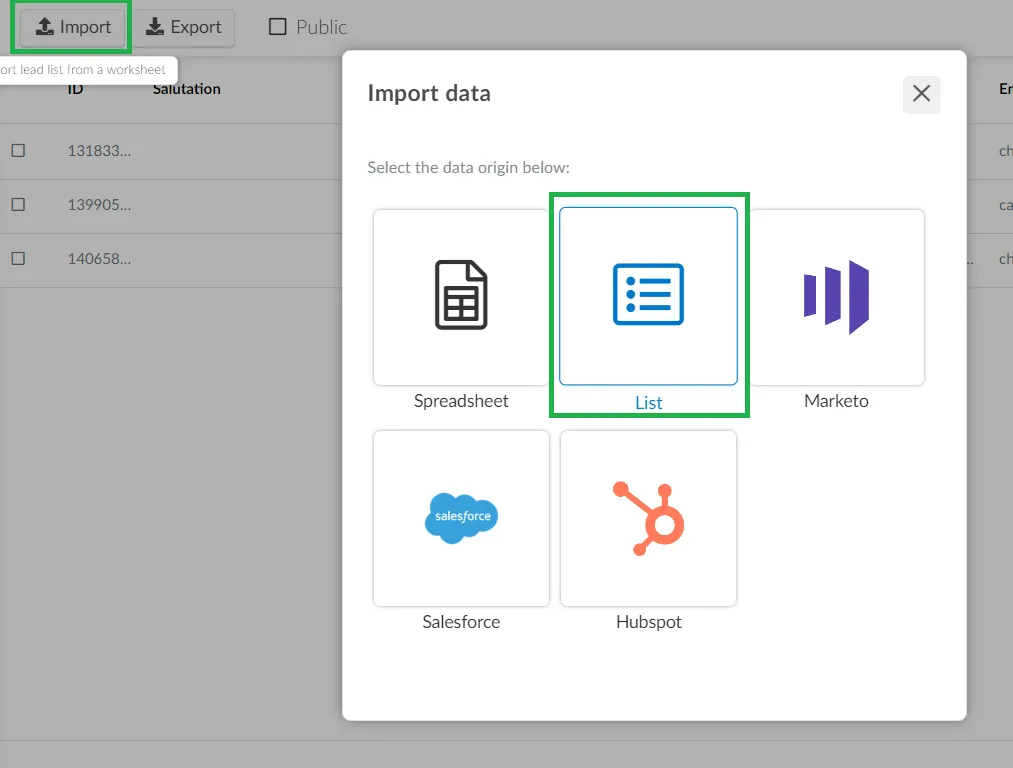
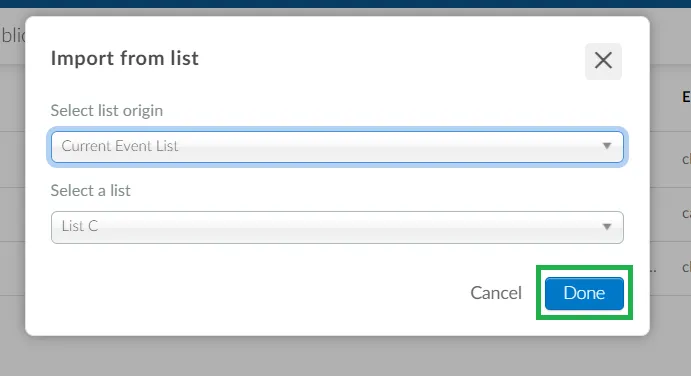
- A new window will open with a dropdown showing all the lists available within the company (including event lists and contact lists). Select the list origin:
- Current Event List: Other lists existing within your event.
- Other Event List: Lists existing in other events within the company.
- Global Event List: Lists created at the company level.
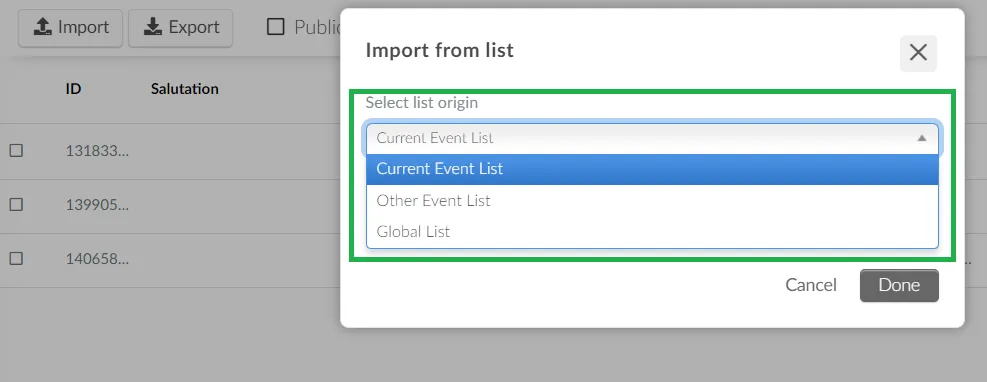
- Select a list from the dropdown after selecting a list origin.
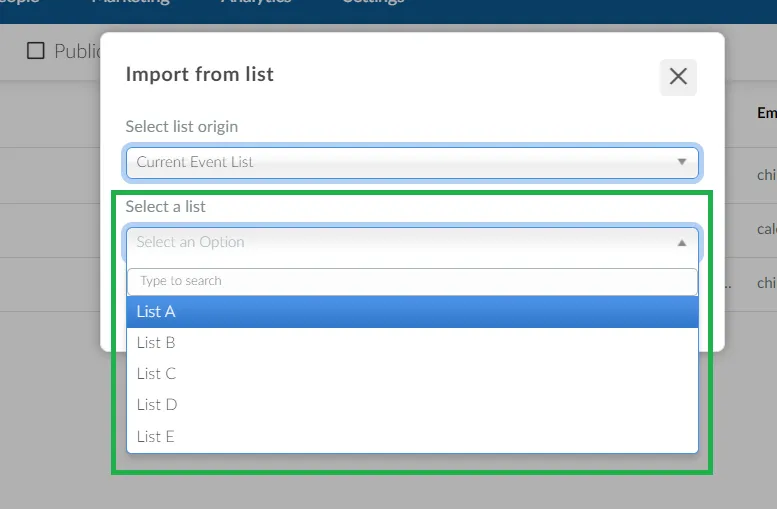
- If you choose Other Event list as list origin, you will first see a field to select an event, before the Select a list field is displayed.
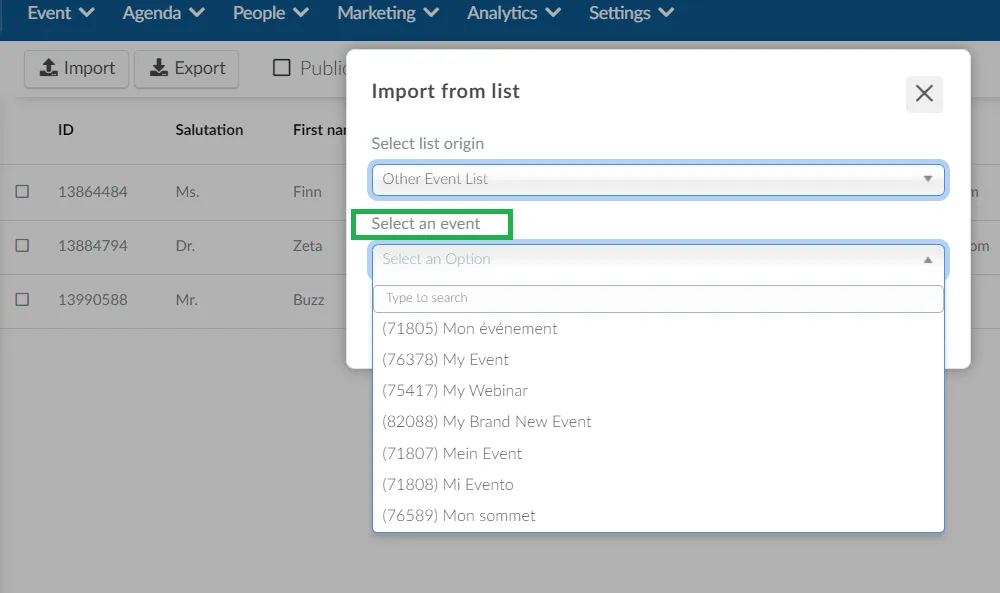
- Click on Done. The list will be imported.
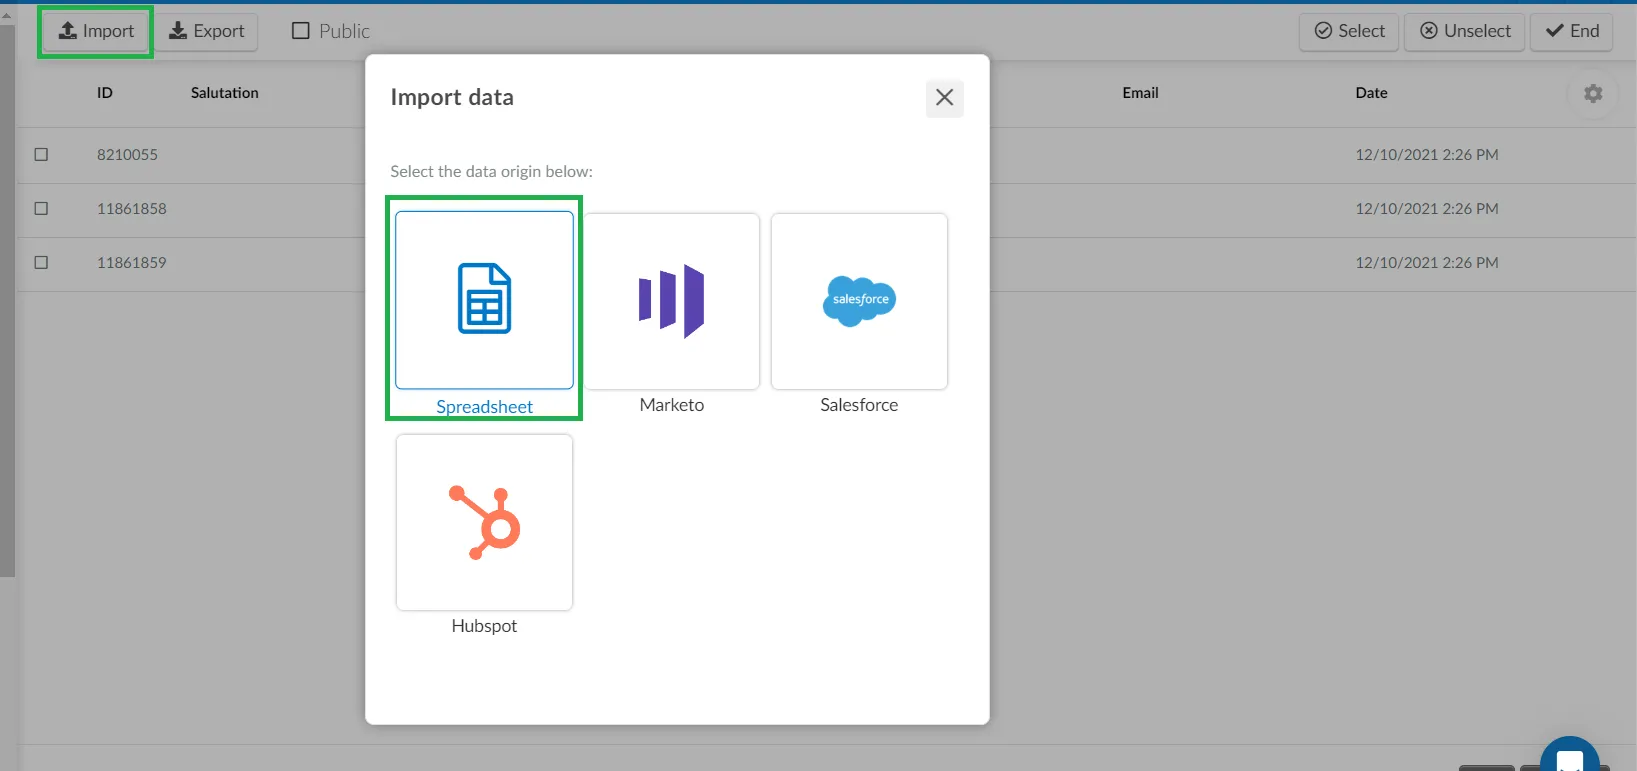
Via spreadsheet
To import lists using a spreadsheet, follow the steps below:
- Click on Edit > Import.
- Select Spreadsheet as your data origin.
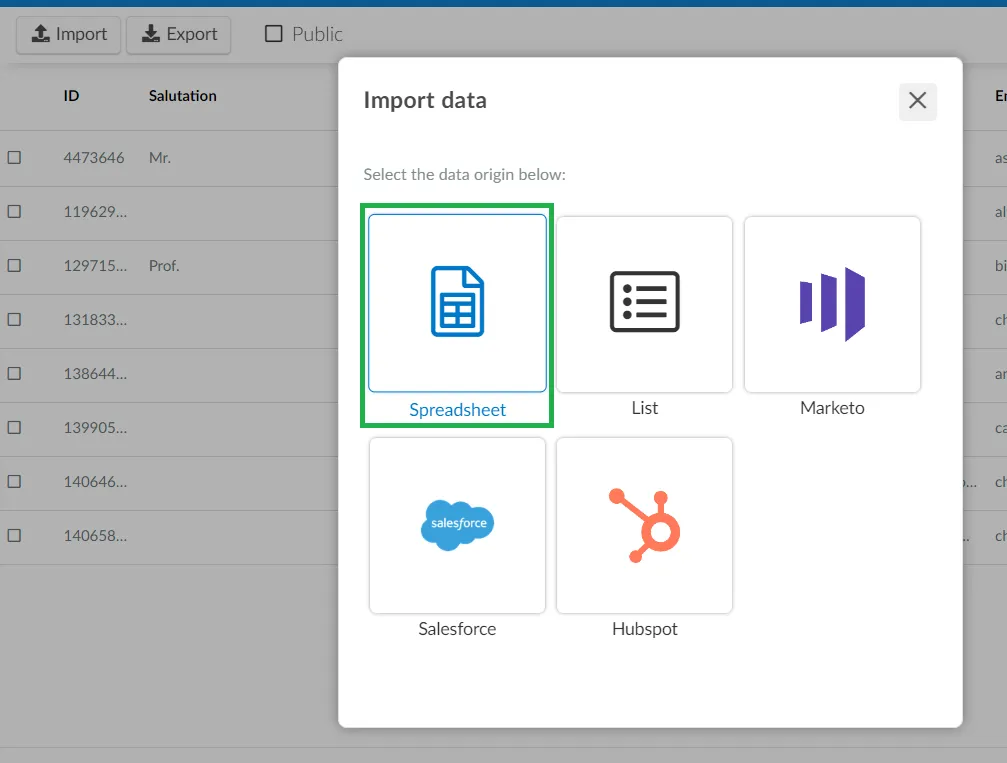
You will have two options: you can either download the demo file provided by InEvent or your own spreadsheet to insert your users' information.

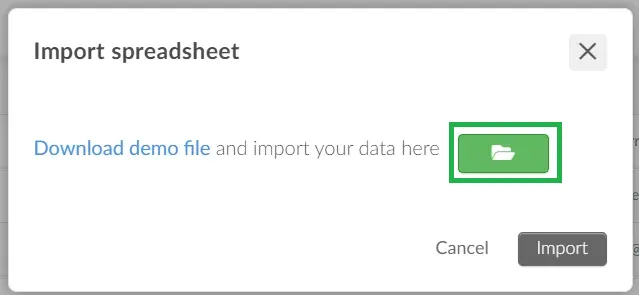
- Download the demo file to your computer and enter the required details, such as the target persons' first name, last name, username, and e-mail address. Additionally, you can also enter Custom field responses for the attendee.

- Upload the spreadsheet by clicking on the green folder button and selecting the target file.
- Press the Import button. For more information on uploading the filled spreadsheet, refer to our article on Importing and exporting spreadsheets.
Contact lists
Contact lists allow you to segment your attendees into different lists. It is a technique used by businesses and marketers to send relevant communications to specific groups of people.
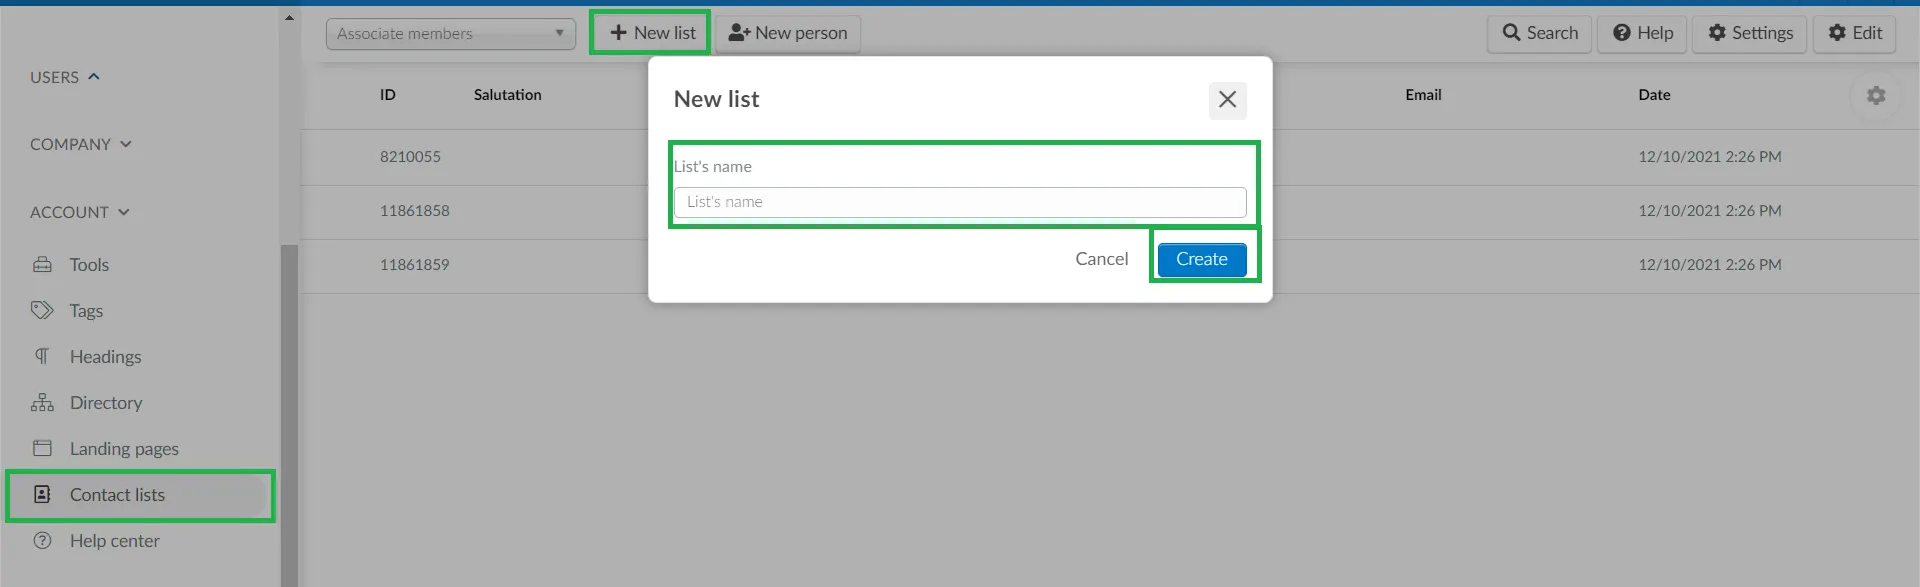
Creating a contact list at the company level
To create a contact list, carry out the following steps from the company level:
- Go to Account > Contact lists.
- Click the + New list button towards the top left of the platform.
- Enter the name of your list in the pop-up box and press Create.
Configuring the contact list
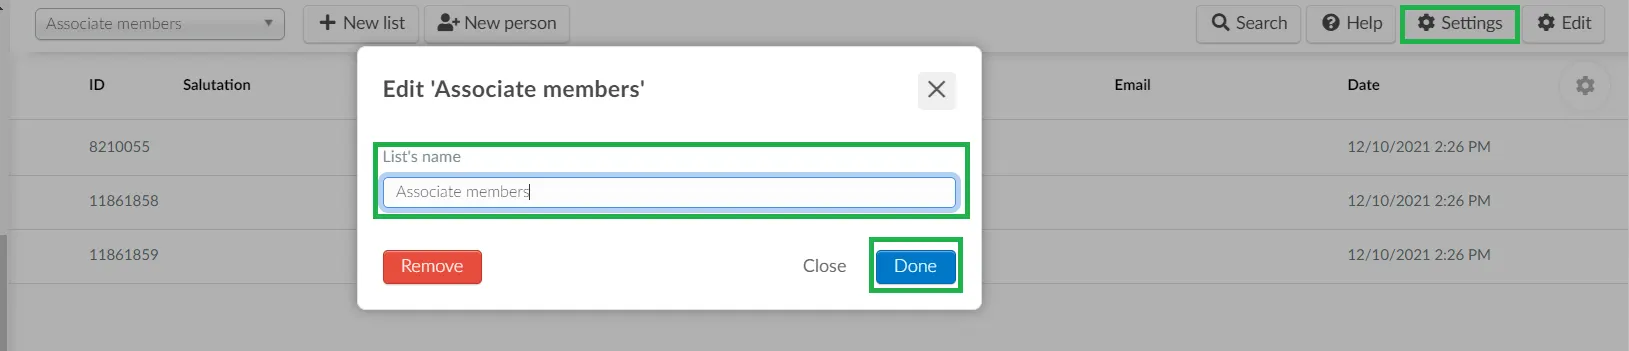
You can configure your list by clicking on the desired list from the left-hand menu, then clicking on the Settings button.
From the Settings button, you can configure the following:
- Name: You can edit the name of your List by typing the new name in the Name field and pressing the Done button.
- Expiry policy: Set the Days, Hours, Minutes you wish the person to remain on the list before being automatically removed.
Adding people to the contact list
You can add people to your contact list in one of the following ways:
- Adding each individual member to your list manually.
- Importing large amounts of list members through a spreadsheet.
- Approving a Membership form submission, which adds the user to the contact list.
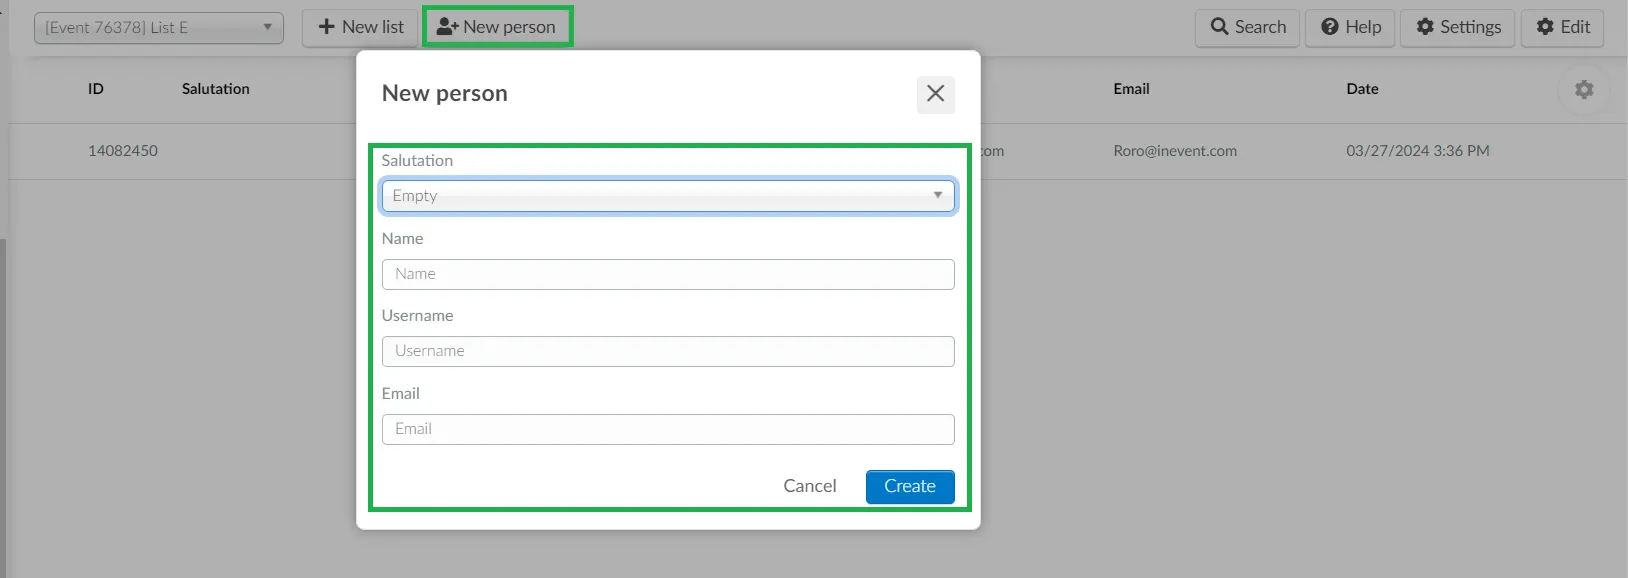
Adding list members manually
To manually add people to your contact list, carry out the steps below:
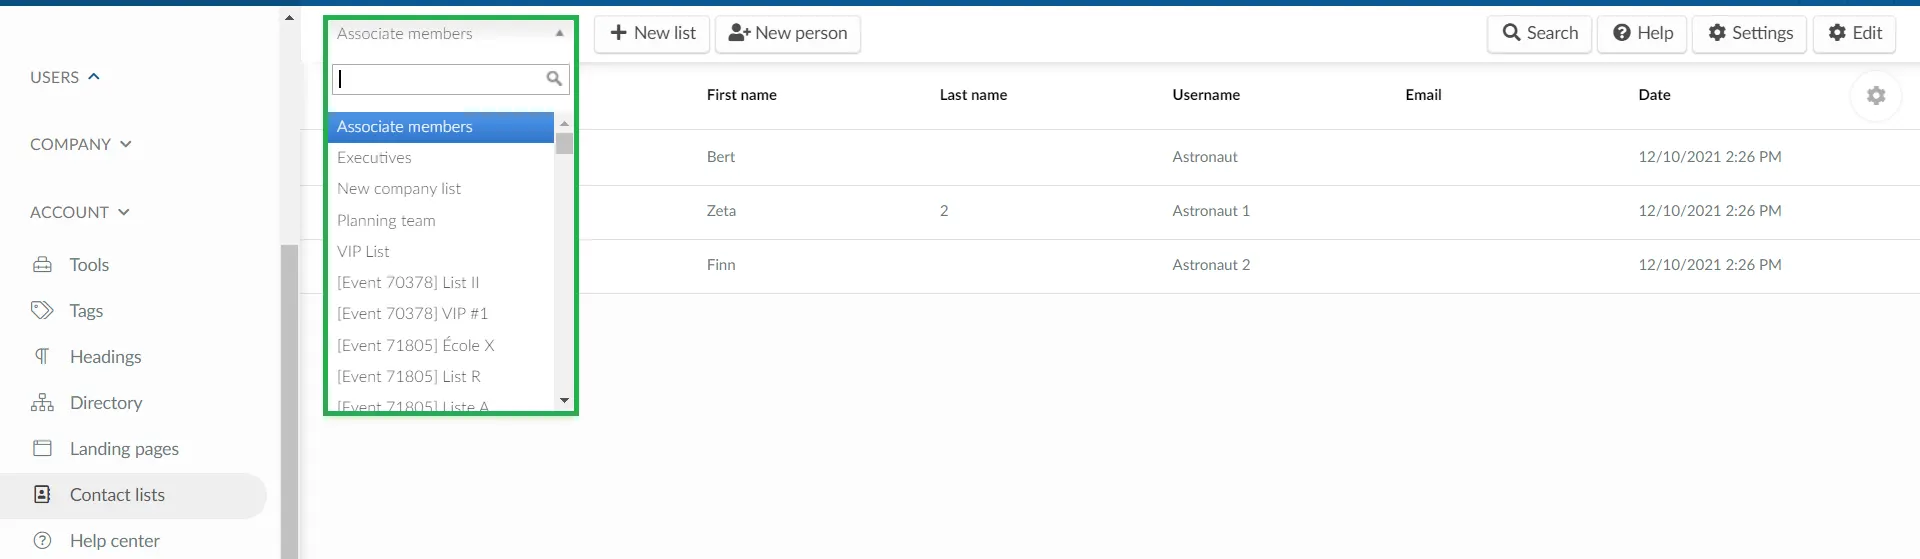
- Select a list from the drop-down at the upper left of your screen.
- Click the + New Person button.
- Fill in the Salutation, Name, Username, and Email fields.
- Press Create.
Importing list members through a spreadsheet
You can import large amounts of people to your contact list by completing the steps below:
- Select a list from the drop-down at the upper left of your screen.
- Click the Edit button in the upper right corner.
- Press the Import button, and select Spreadsheet as the data origin.
- Click on Download demo file to use InEvent's provided demo file.
- A spreadsheet file will be downloaded to your computer, and you will need to fill out the required fields. , complete the rest of the steps to upload the file back onto the platform.
- Once you have entered your data in the spreadsheet, press the green folder button and select the spreadsheet file from your computer.

- Press Import once the file upload is complete.
Approving a Membership form submission
You can also use a registration-based approach to add users to your contact list. In order to do so, you must create a Membership form and connect it with your target contact list.
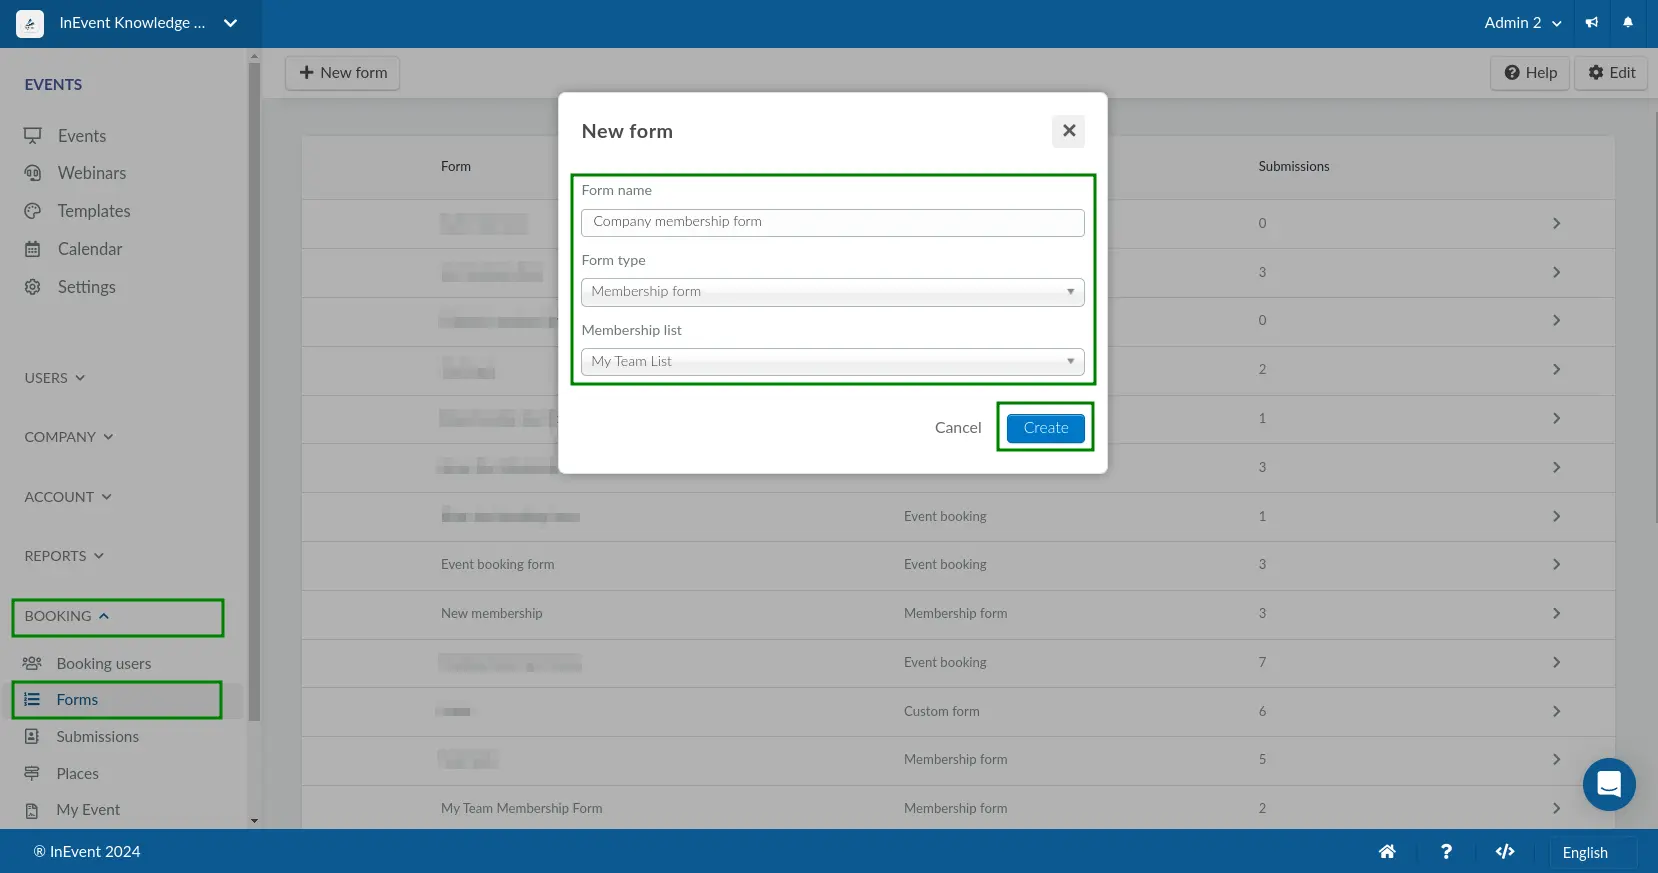
Once the form is created, users can make submissions for the administrators' approval. Users whose submissions are approved will be automatically added to your target contact list. In addition, administrators can also send a message to users whose submissions are rejected.
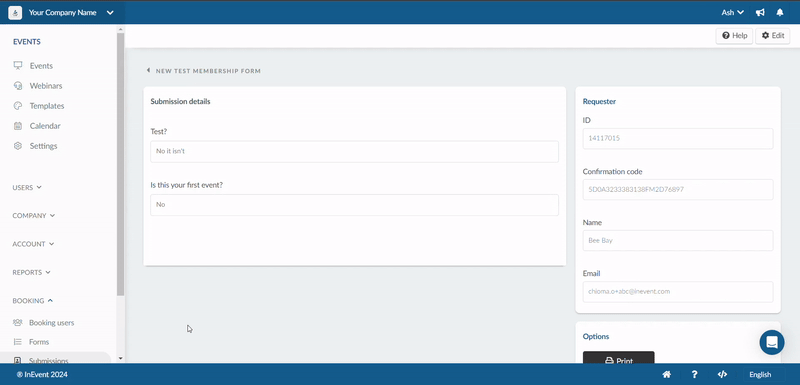
Users editing their membership form submissions
Users who have submitted a membership form can edit their information by following these steps:
- Click on the Already a member? text at the top of the form.
- Provide the email address used to register for the event, and the confirmation code from your approval or rejection email.
- If you do not remember the code, click on Forgot confirmation code, enter your email address and press Submit.
- The confirmation code will be sent to you via email. Copy and paste it in the confirmation code field.
- The membership form will be displayed allowing you to make changes.
- Press Confirm when done.
The submission answers will be updated as shown in the gif below.
User information display and customization on the Contact list Dashboard
When users are added to a contact list, the following columns will display information about each user in the dashboard:
- ID of the User
- Salutation
- First Name
- Last Name
- Username
- Role
- Company
- User Fields (Company Global Fields)
- Date and Time Added to the List
- Expiration: The duration of time the user will remain on the list.
You can click on the user and a window will appear at the right side of the page displaying the user's profile details, as well as answer to company user fields. By clicking on the settings icon, you can control the visibility of information you wish to be displayed on the dashboard:
Removing or editing a contact list
To edit or remove a contact list, simply select the contact list from the list drop-down menu on the top left corner of the page. Next, click on the Settings button at the top right corner of the page. A pop-up box will be displayed with the option to rename the contact list. Press Done once completed.
If you wish to delete the list, click on the Remove button and type REMOVE LIST in the confirmation box that appears. Next click on the Remove button.

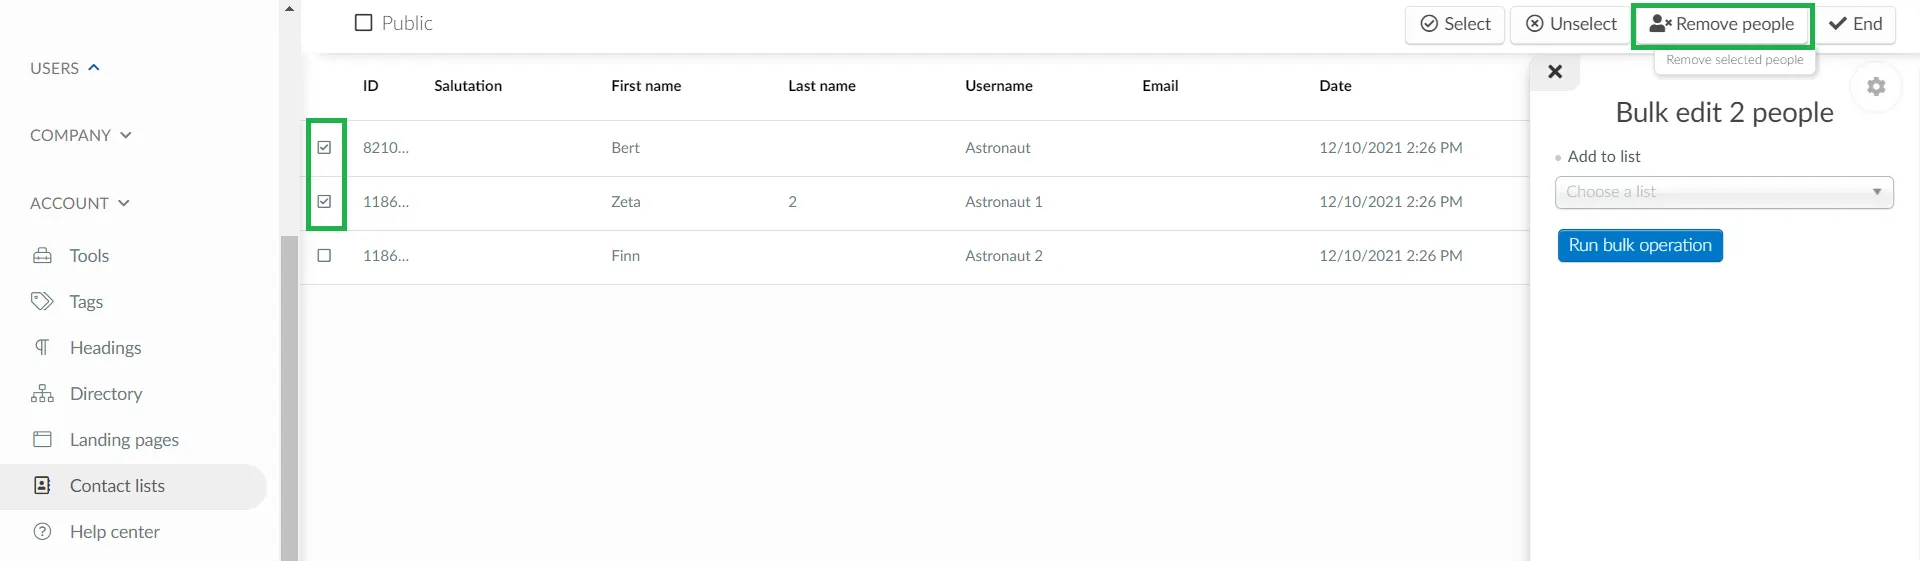
Removing a person from the contact list
To remove a person from a contact list, follow these steps:
- Select the contact list from the list drop-down menu on the top left corner of the page.
- Click on Edit.
- Tick the checkbox(es) beside the person(s) you wish to remove from the contact list.
- Click on Remove people at the top right corner of the page.
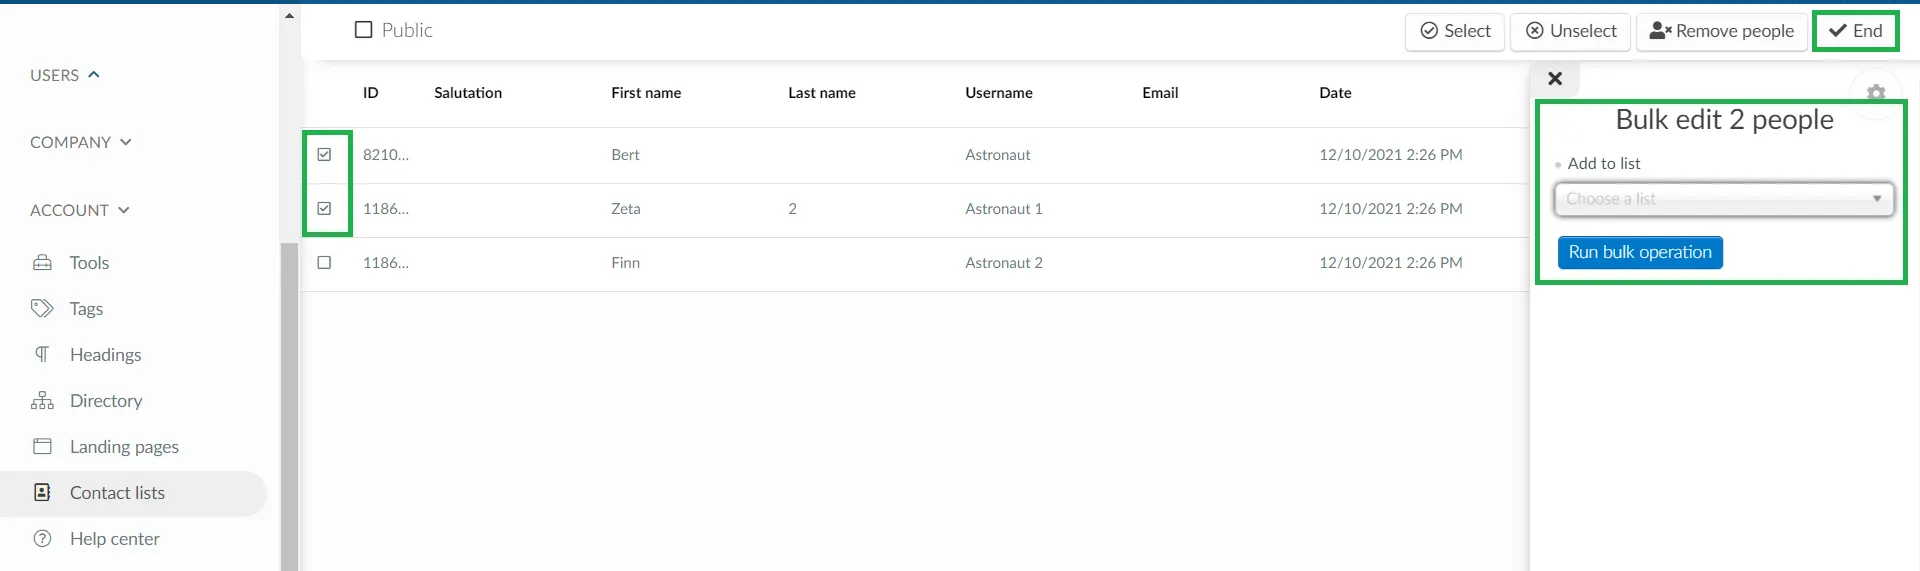
Moving users to another list in bulk
You can move users from one list to another in bulk at the company level. To do this, select the contact list from the lists drop-down menu on the tp left corner, click Edit, select the users you want to move by ticking their checkboxes. Next, select the destination list from +Add to list dropdown menu on the right side window, click Run Bulk Operation, and press End to save your changes.
Importing the contact lists to your events
After creating and adding members to your contact lists, you can import the list within any event of your choice. To do this, navigate to People > Lists at the event level and follow the steps in this section.
Using lists
There are many different uses for your lists once they are created. You can find more detailed explanations on each of these uses in the articles below.
Segmented agenda: Linking each activity with a list
Refer to the Activities with restrictions and choice blocks article to learn how to do so.
Communication: How do I send an email to a list?
Refer to the Email Creator - Event Level article to learn how to do so.
Ticket: How to link ticket to buyer's lists?
Refer to the Ticket Management article to learn how to do so.
UTM link: How to add converted leads to lists?
Refer to the Link Tracking (UTM) article to learn how to do so.
Push notifications: How to send push notifications to specific lists?
Refer to the Push Notifications article to learn how to do so.
Custom form: How to add a list to a custom form?
Refer to the Custom Forms article to learn how to do so.
Extracting a report
To extract a spreadsheet report of your lists, follow the steps below:
- Select the list from the left side of the page.
- Click on Edit > Export.
- Select Spreadsheet as data destination.
- A message will appear along the top of the screen letting you know that your excel sheet is being processed and will be sent to your email once completed.
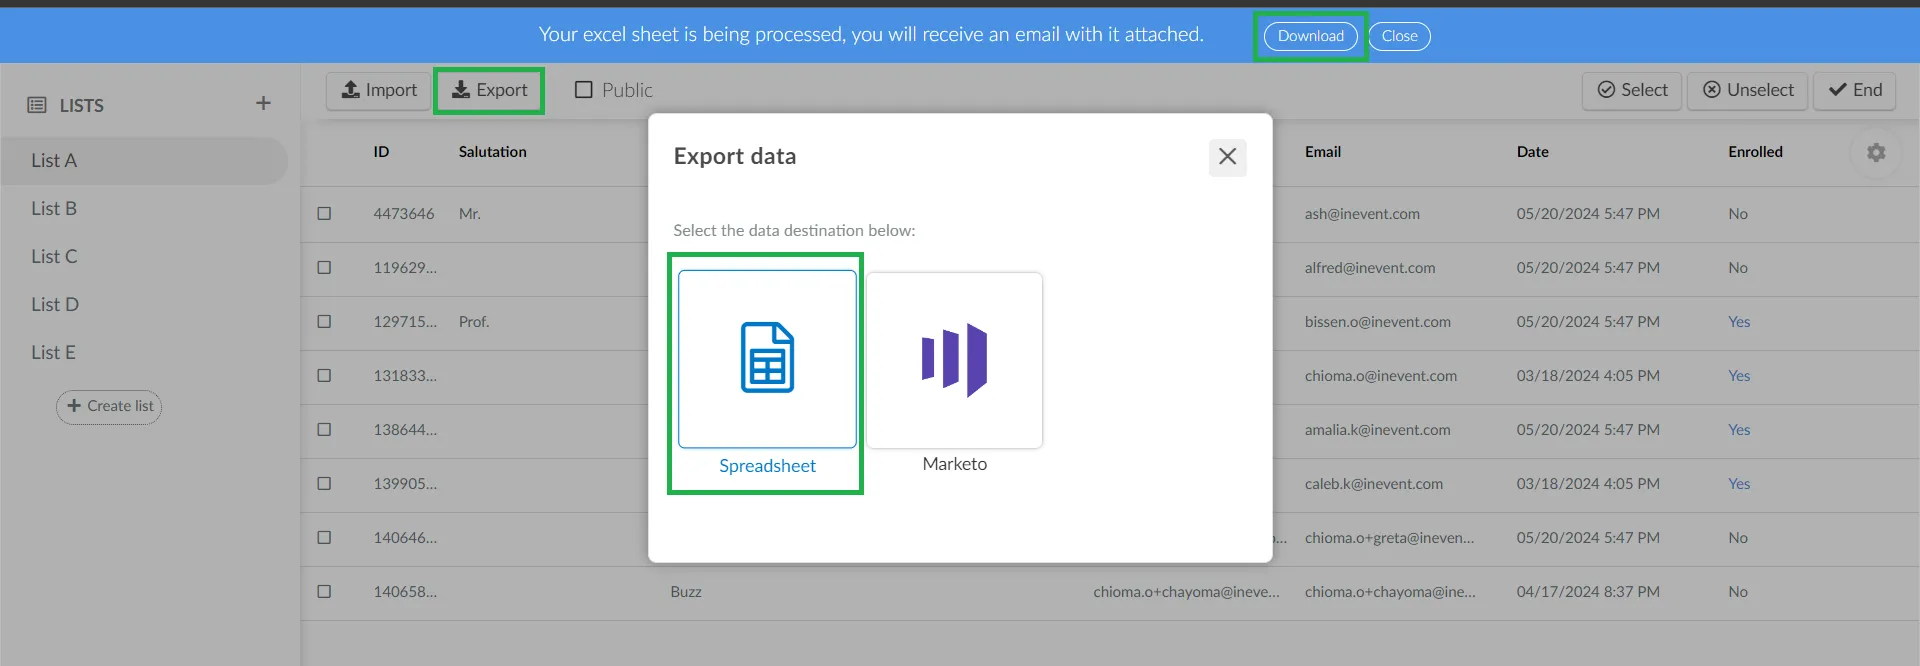
The report will show information of the list and attendees within the list, such as: personID, username, listpersonID, listID, firstName, lastName, name, email, role, company, enrolled etc.