Creating a backstage area for your speakers
Within the InEvent platform, you have a few options to create a backstage area where your speakers can meet and prepare themselves before the activity they are speaking in starts.
Below you will find a step-by-step outlining how to proceed with each of these.
Backstage area
When using Live Studio as the room video mode for an activity, you will be able to have a backstage area for everyone who will be presenting on that session.
- Refer to the Live Studio article to learn how to add and remove speakers from the stage when using the Live Studio.
Allowing speakers early access to activities
If you want to give the speakers early access to an activity, there are two options:
Early access to all activities
To give speakers early access to all activities, complete the steps provided below.
- Navigate to People > Attendees, and add an attendee with Presenter permissions.
- Navigate to Event > Speakers.
- Create a profile for your speaker with all their information.
- Click on a specific speaker and press Edit. A new window will open up on the right-hand side.
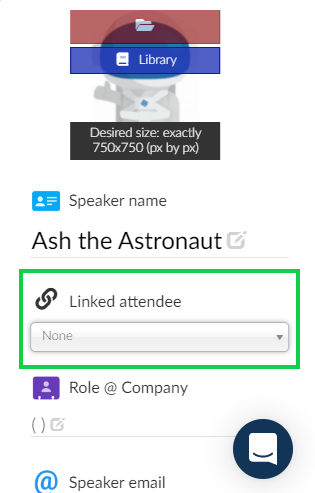
- Link the speaker profile to their attendee profile using the Linked attendee drop-down menu.

Early access to specific activities
In Agenda > Activities, go to the Speakers tab and add the respective Speakers to that activity. To learn more about this, refer to the Setting up your online activities article.

After this step, you're done! With these settings, speakers will be able to have early access to the activities they'll be presenting at, to prepare themselves and interact with other speakers.
Create a Green Room
You can also create a green room where speakers can meet before and after their activities. Using people lists, you can create a room that will only be visible to the people on the list.
Create a list of speakers
First, you need to create a list on People > Lists > + New list.
Then provide a name for this list, for example, the Backstage list.
Click on the Create button to finish the process. To learn more about creating new lists, click here.
Add speakers to the list
You can run a bulk operation by adding multiple attendees to the list you just created.
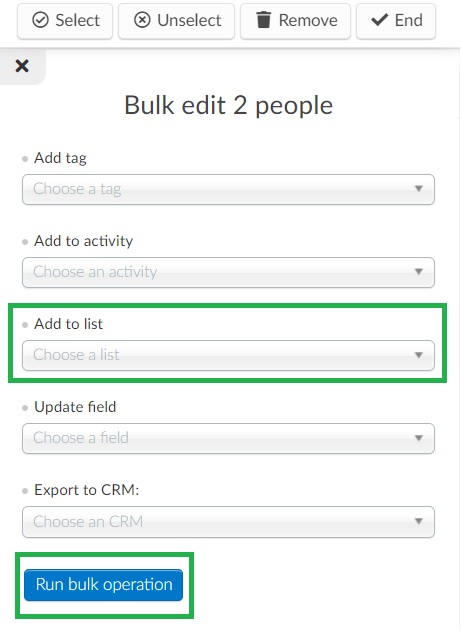
Go to People > Attendees, and click on Edit. Tick the check box of each speaker you would like to add to that list, and in the pop-up menu at the right side of the page, select your list within the Add to list drop-down menu. Then click on Run bulk operation to finish.

This process can be used if your speakers have not registered yet. Once completed, the speakers will now be added to your list.
Create the room
Go to Agenda > Activities > Add activity.
Set the title, dates, and times of this activity and click on Create.
Next, inside the activity Details tab, you will need to set up the following tools:
- Make sure the Virtual Room option is ticked
- Select the room host
- Untick/disable Automatic enrollment
To learn more about these configurations, refer to the Virtual Lobby article.
Link the list to the room
Inside the activity you created, click on the People lists tab. Click Edit and choose the list of speaker you created in the drop-down menu. Then click on the blue button Add list.

Once you follow those steps, you'll have a separate room for speakers to test their cameras and microphones, as well as prepare for the sessions. This activity will only be visible for the people in the linked list, so your event's attendees won't be able to see and join this session on their Virtual Lobby.
Create an Invisible activity
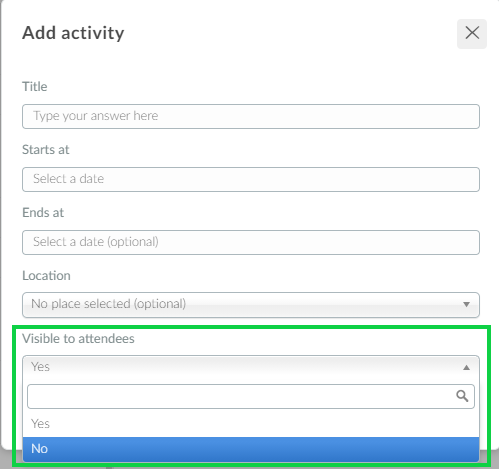
Another backstage option is having an invisible activity on both the Virtual Lobby and Website. In order to do that, under Visible to attendees, you need to select No in the drop-down menu when creating an activity.

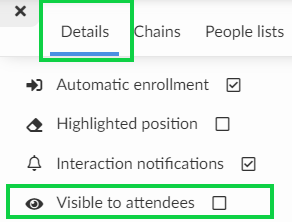
If the activity has already been created and you would like to edit it, you will need to select the activity, press Edit and scroll down the Details tab until you see the option Visible to attendees. Then, make sure the checkbox isn't ticked.

Private chat
When presenting, the speakers will also have the option to switch from public to private chat. By doing so, they will be able to communicate with other presenters, admins, staff, and room hosts.
Refer to the User guide for speakers and room hosts article for further information on the private chat.

