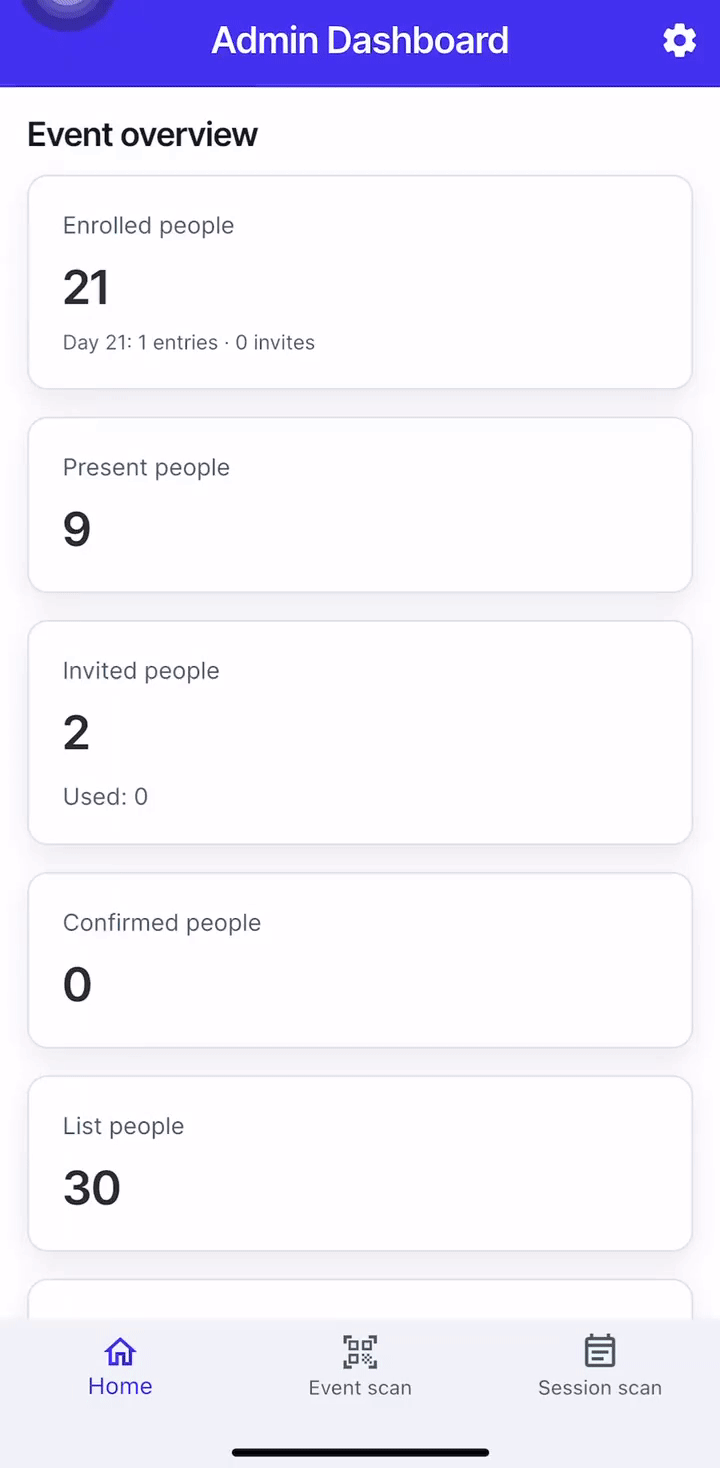
Badge printing
 Updated 1 hour ago
by
Amalia
Updated 1 hour ago
by
Amalia
- Technical requirements
- Registering the checklog profile
- Enabling the Badges feature
- Badges
- Kiosk settings
- Setting up printers for badge printing on the InEvent Kiosk app
- Print now
- QR Codes
The InEvent platform integrates seamlessly with the InEvent Kiosk app. Using the platform, you can easily create and design badges, define specific badges for groups of attendees, and control attendee check-ins as well as print attendee badges during in-person events, with check-in operations fully completed using the InEvent Kiosk app.
This guide contains information on how to navigate through the Badge Printing page, set up your Printing badges and Kiosk settings for your Check-in process, and manage QR Codes.
Technical requirements
The technical requirements for badge printing may vary depending on the format it will have at your event. It can be either self-service or with the support of promoters at each credential printing station.
Check out the possibilities below:
Type of Accreditation | Self service | Accreditation with promoters |
Supported printers |
Refer to the section on creating a new printing badge to see the printers' supported labels. |
|
Hardware | Devices running iOS 13.0 and above Smartphones running Android 8.0 or later | Mac OS x 11.0 or later with the following browser specifications: Chrome V.40 (or later), Mozilla Firefox V.7 (or later), or Safari V.9 (or later) |
Internet speed | Basic Printing: Printing directly from a computer connected to the same network as the printer usually does not require a high-speed internet connection. The speed of your local network (Wi-Fi or Ethernet) is more relevant for basic printing tasks. Remote Printing: If you plan to use remote printing features, such as printing from a mobile device or sending print jobs over the internet while away from the printer, a stable and reasonably fast internet connection is necessary. The required speed may vary depending on the size and complexity of the print jobs. | Basic Printing: Printing directly from a computer connected to the same network as the printer usually does not require a high-speed internet connection. The speed of your local network (Wi-Fi or Ethernet) is more relevant for basic printing tasks. Remote Printing: If you plan to use remote printing features, such as printing from a mobile device or sending print jobs over the internet while away from the printer, a stable and reasonably fast internet connection is necessary. The required speed may vary depending on the size and complexity of the print jobs. |
Number of Promoters | 1 promoter for every 3 accreditation stations | 1 promoter per accreditation station |
The technical requirements for accreditation vary depending on the format it will have at your event. It can be either self-service or with the support of promoters at each credential printing station.
In addition, the InEvent Kiosk app is highly recommended for a seamless in-person check-in experience. For further information regarding the InEvent Kiosk app, refer to the InEvent Kiosk app: Access control & usage guide for event organizers article.
Registering the checklog profile
First, you need to create a Checklog profile in the list of attendees, and with that profile, log in to the app so that this user can read QR codes. Refer to the InEvent Kiosk app: Access control & usage guide for event organizers article to learn how to register a profile with Checklog permission.
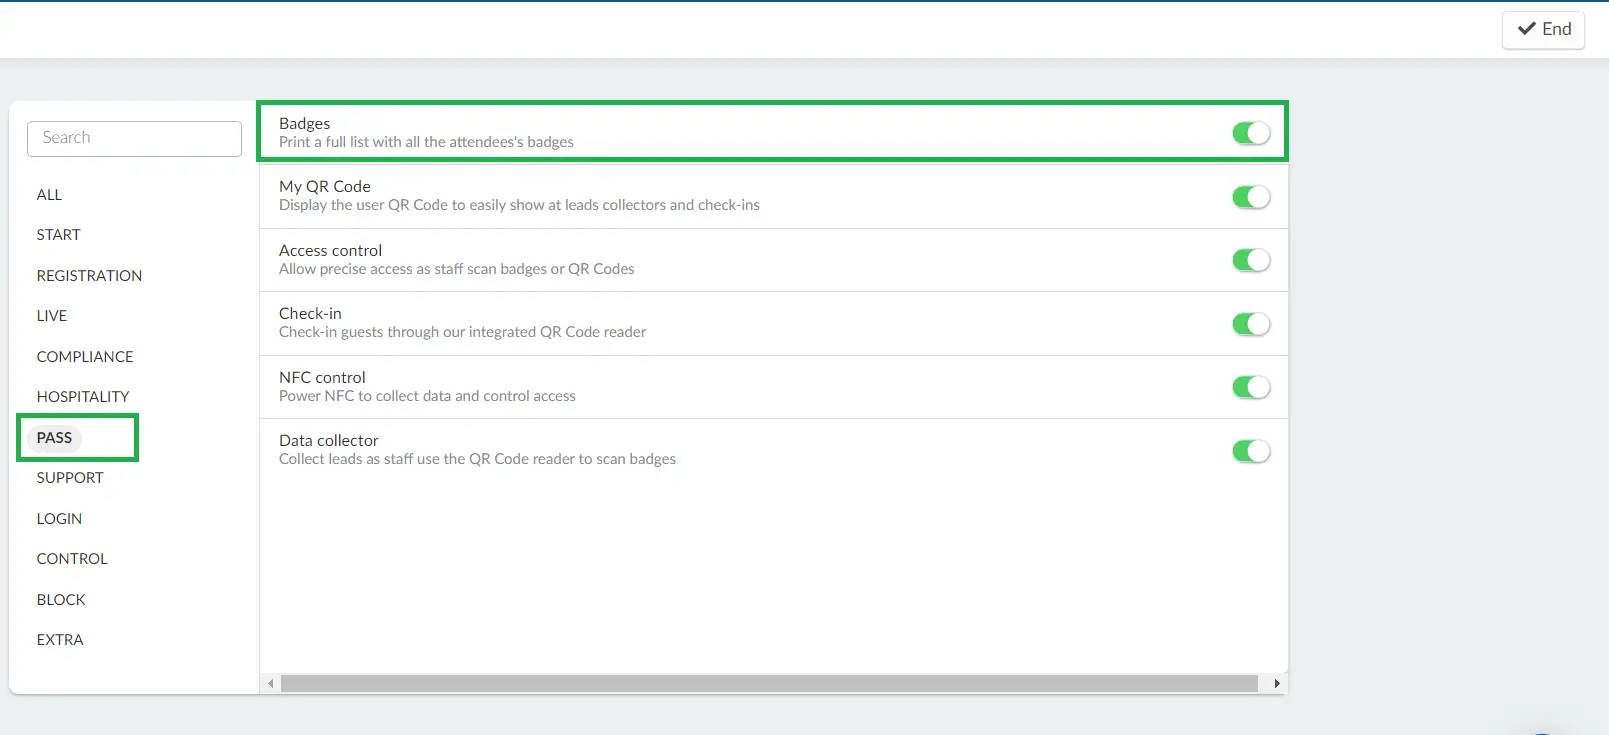
Enabling the Badges feature
Click on Settings > Tools > Pass section. Click Edit and toggle on the button corresponding to the Badges tool.
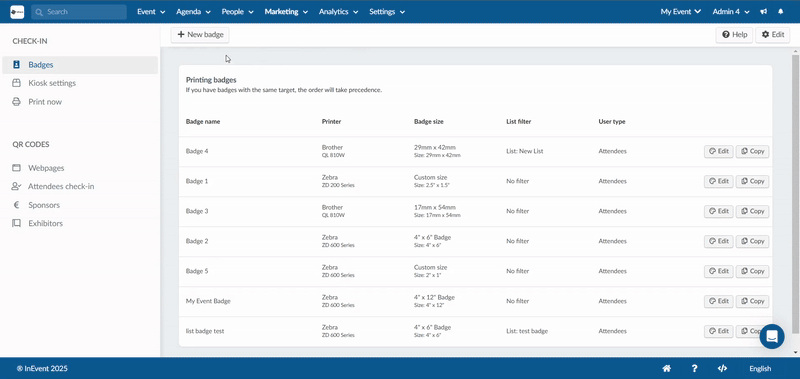
Badges
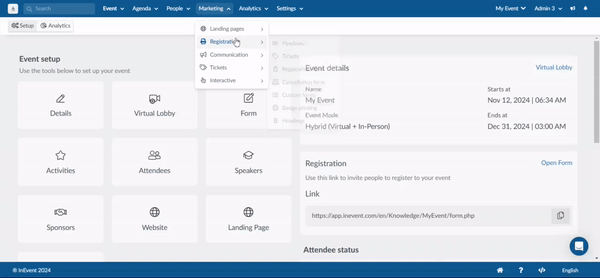
The Badge Printing page can be accessed by navigating to Marketing > Registration > Badge Printing from the Event level.
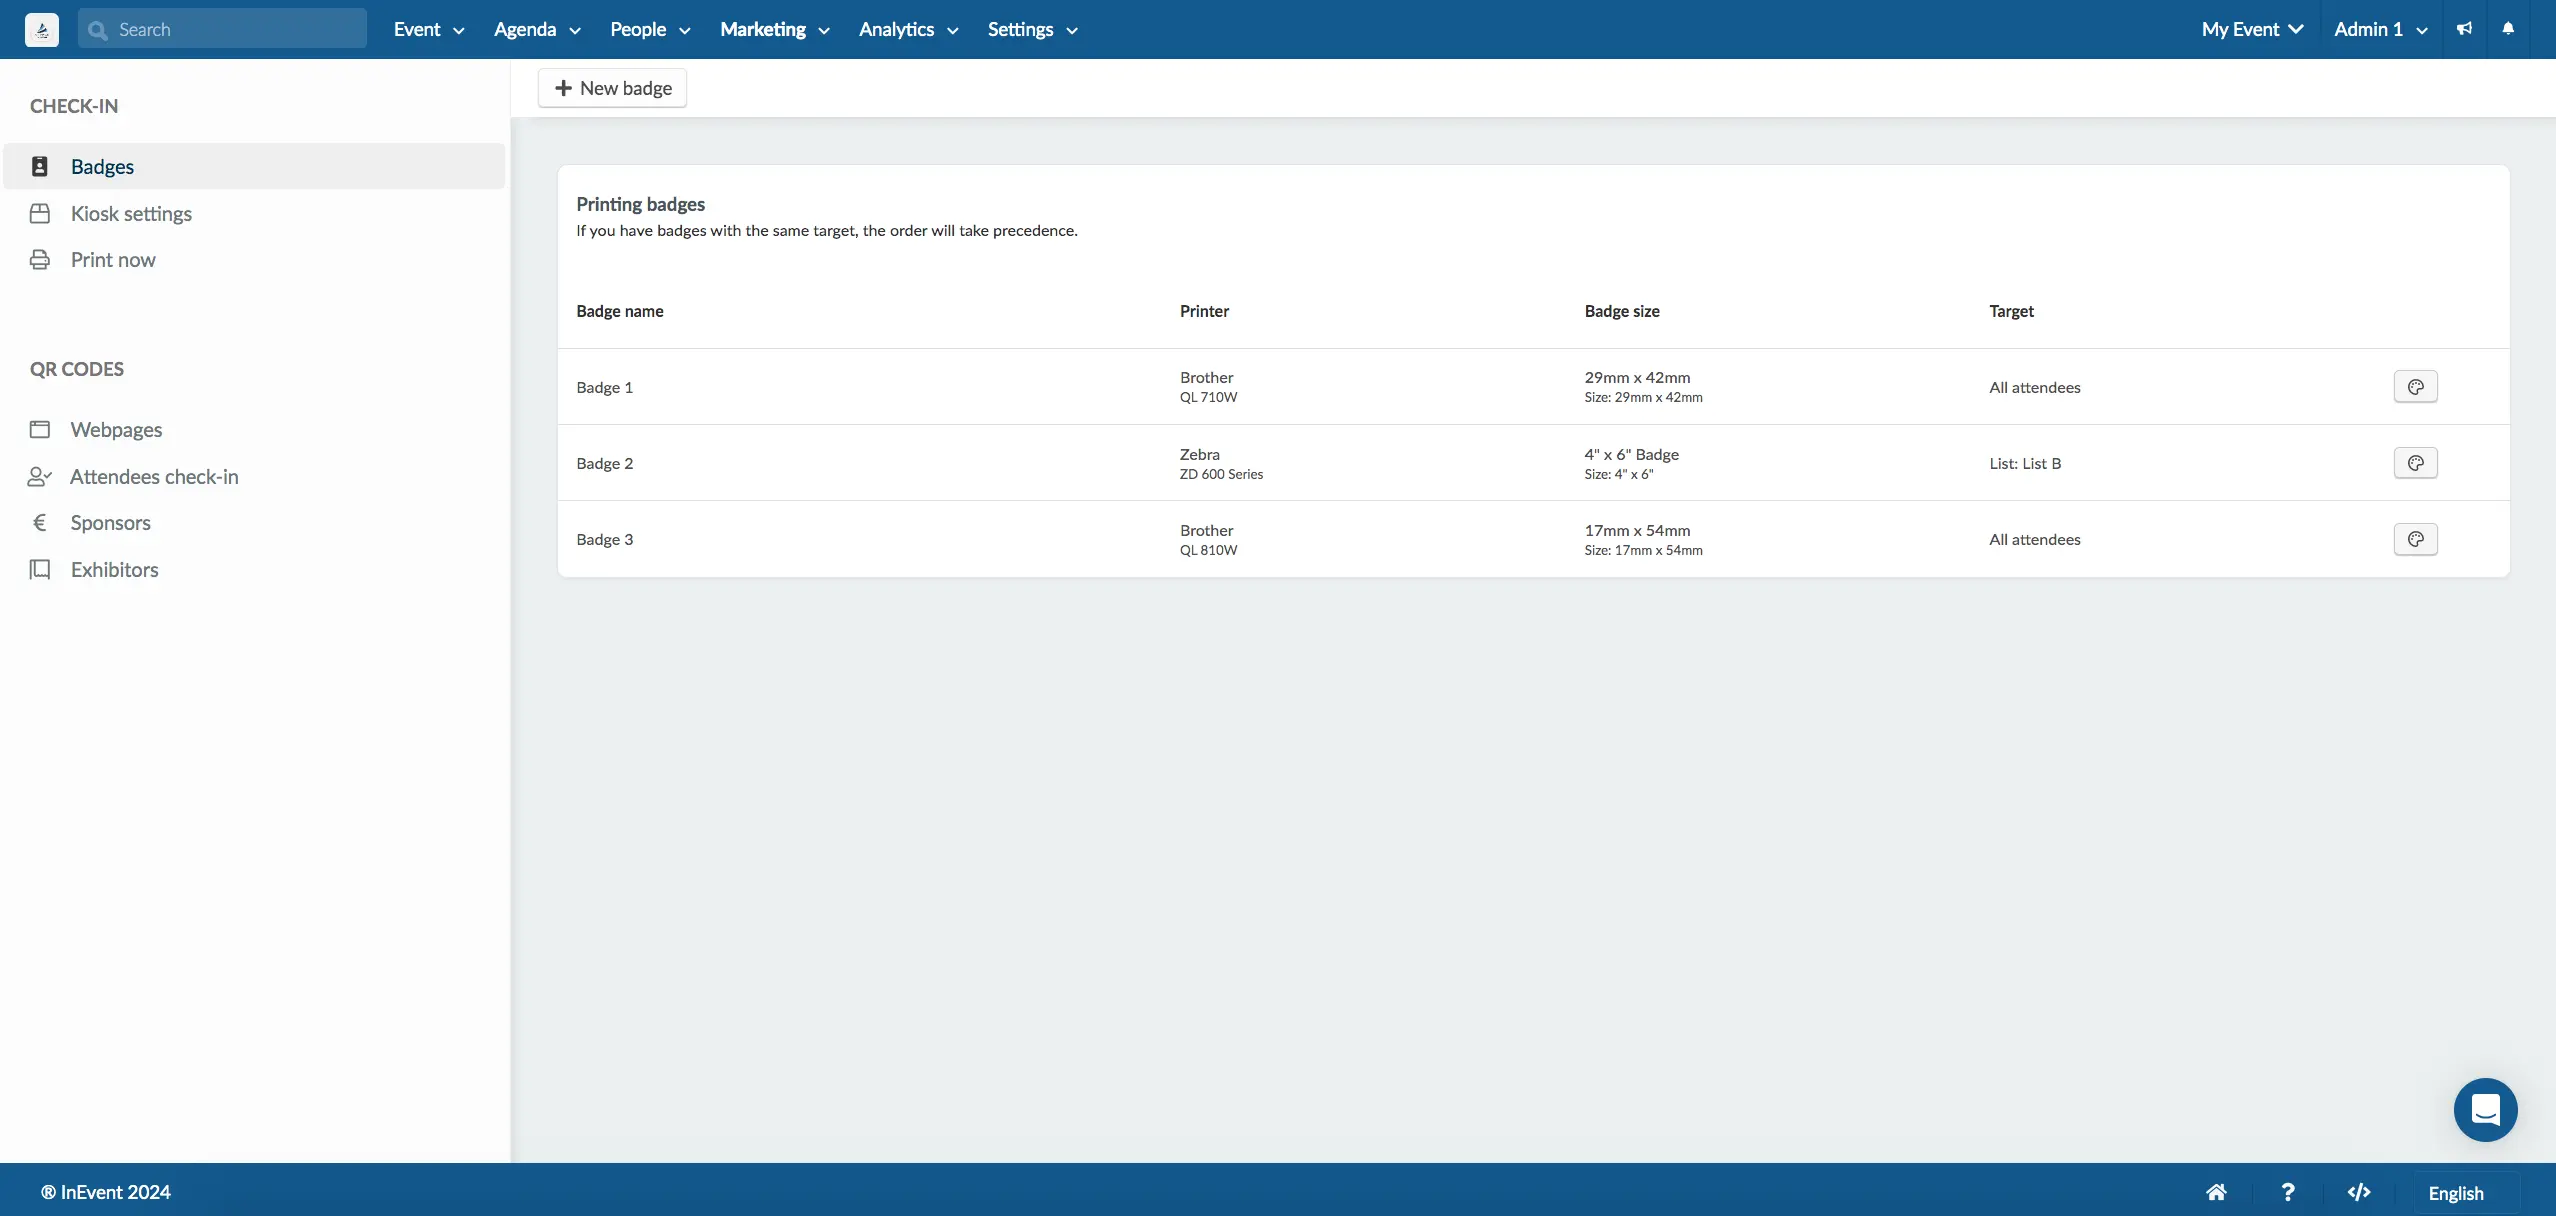
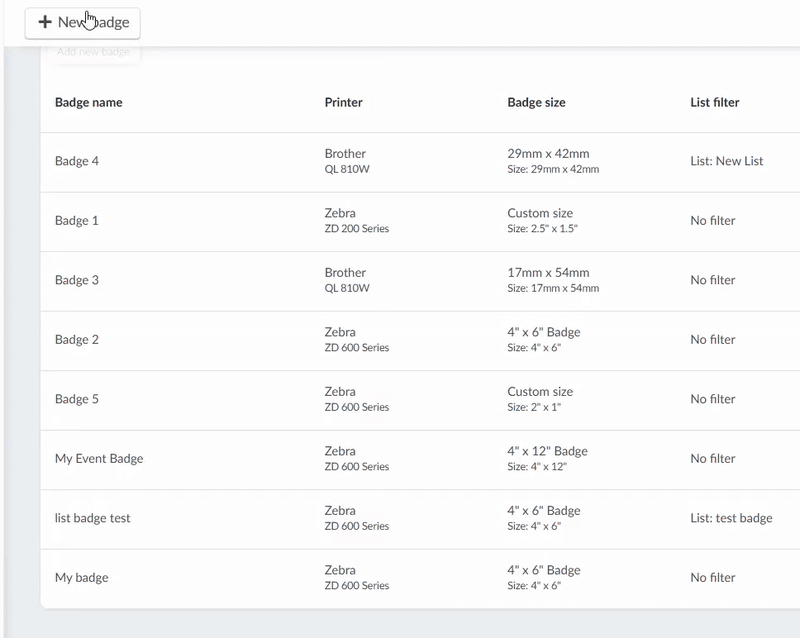
The Badges section is where you can create, configure, and review your created printing badges. The interface displays information on the badge's name, printer type, size, and target attendees.
Creating a new printing badge
You can create a new printing badge by following the steps below:
- Click on the New badge button on the top left corner of the Printing badge section. The Printing badge pop-up box will be displayed.
- Enter the desired Badge name.
- Select the list of attendees for which the badge will be created using the list filter drop-down box. The list displayed in the drop-down menu will show the static lists and the dynamic list that the user has created. For more information, refer to our Static list and Dynamic list articles.
- Select your badge User type The available options are:
- Attendees
- Speakers
- Sponsors
- Exhibitors
- Select the printer using which the badge will be printed using the Printer drop-down box. The available options are:
- Brother
- Zebra
- Select the printer model.
- For Zebra printer, its models are: ZD 200 Series, ZD 400 Series, ZD 600 Series.
- For Brother printer, its models are: QL 710W, QL 720NW, QL 810W, QL 820NWB.
- Select the label type on which the badge will be printed using the Label type drop-down box.
The available options for Brother printers are:
- 17mm x 54mm
- 17mm x 87mm
- 23mm x 23 mm
- 29mm x 42mm
- 29mm x 90mm
- 38mm x 90mm
- 39mm x 48mm
- 52mm x 29mm
- 62mm x 29mm
- 62mm x 100mm
- 12mm
- 29mm
- 38mm
- 50mm
- 54mm
- 62mm
- 60mm x 86mm
- Black/Red 62mm
- 54mm x 29mm
- 12mm round
- 24mm round
- 58mm round
The available options for Zebra printers are:
- 4" x 3" Badge
- 4" x 6" Badge
- 4" x 12" Badge
- Custom size
- Click on Create to finish creating the printing badge.
Once you have completed the steps above, you can start adding elements and customizing the appearance of your printing badge.
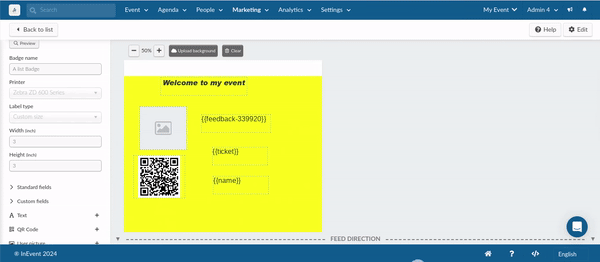
Customizing a printing badge using the badge editor
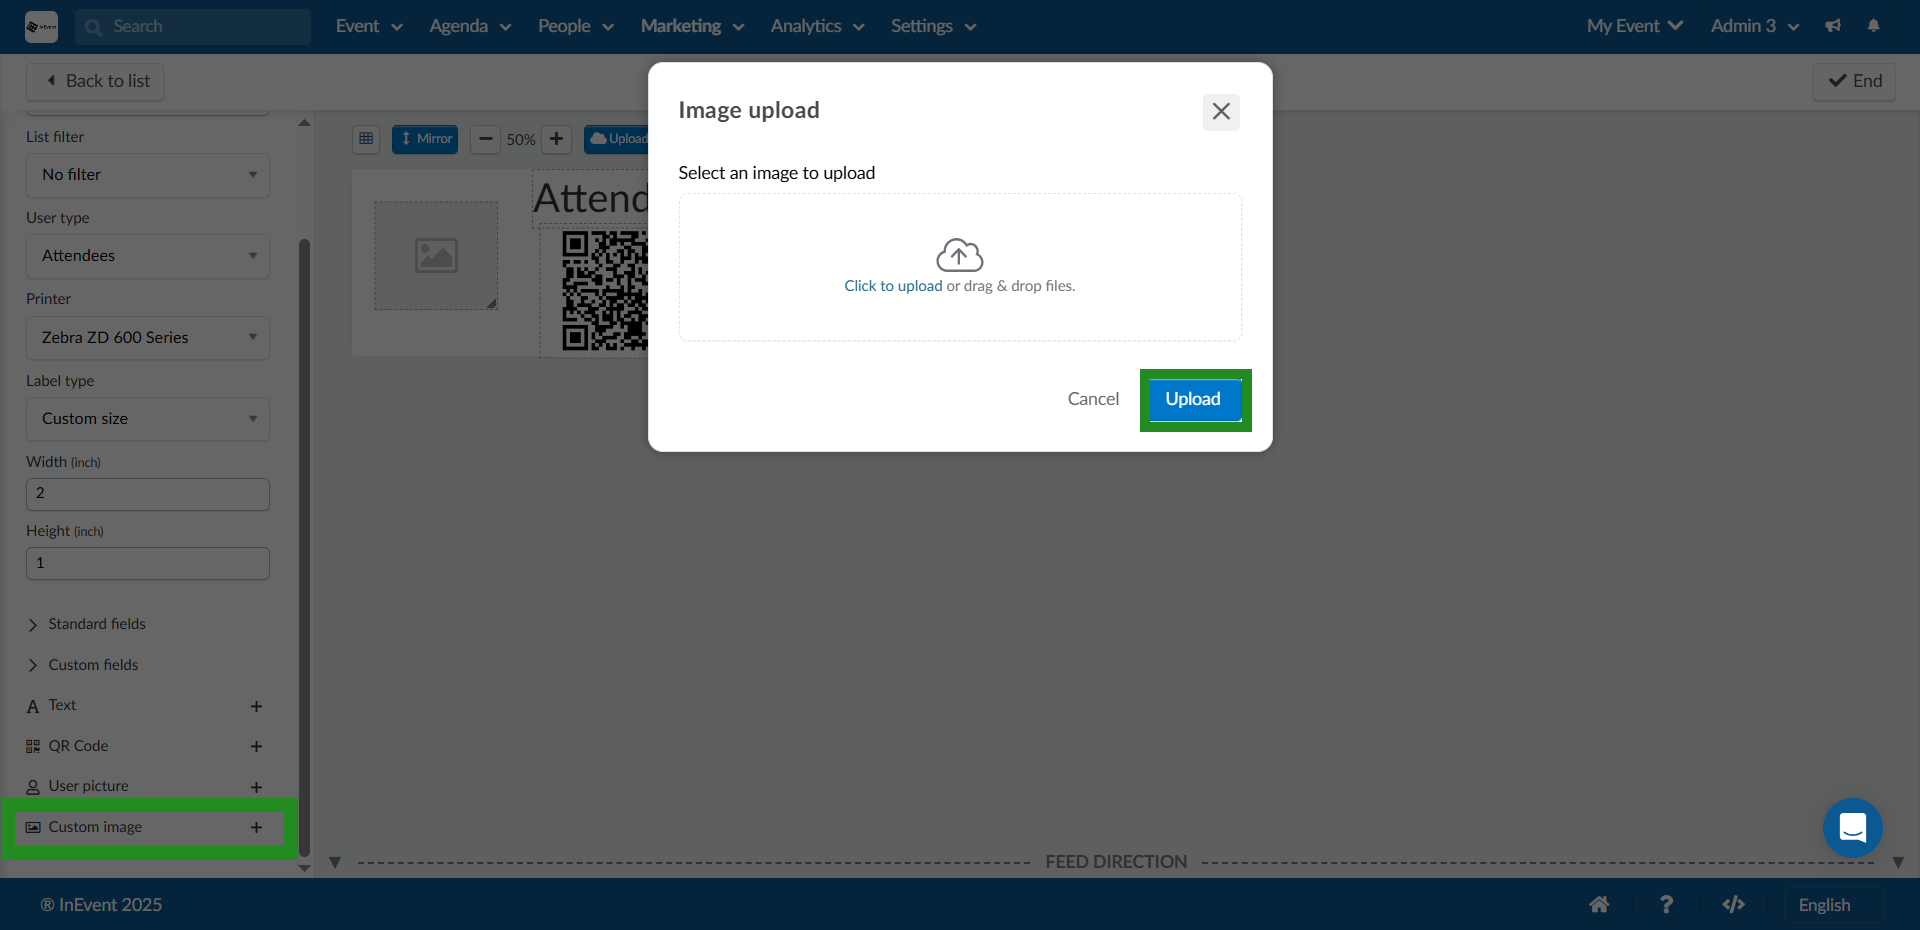
After creating a printing badge, you can add elements and customize the appearance of the badge. To do so, click on the Palette icon next to the printing badge. You will be directed to the Badge editor.
To start adding and editing the items in the Badge editor, click on the Edit button.
On the left side of the editor, you will find items that can be added to your badge by clicking on the + button. The items are as follows:
- Standard fields: Standard fields associated with your attendees. The available fields are Name, First name, Last name, Email address, Role, Company, and Ticket.
- Custom fields: Your event's Custom fields associated with your attendees.
- Text: Custom text.
- QR Code: QR Code associated with your attendee.
- User picture associated with your attendee.
- Custom Image: You can upload a custom image to your badge. Once you click on the + button a new window will appear asking you to click or drag & drop files to upload. Follow the instructions and select Upload to finish.
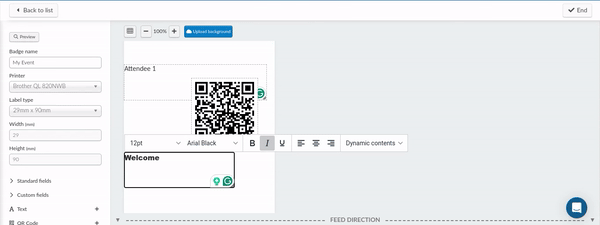
You will find the following buttons in the top left corner of the main editor area:
- Grid: Show grid lines in the badge area.
- Zoom controls: Zooms the view of the badge area in or out.
On the top side of the editor, you will find the following items:
- Preview button: Click on the Preview button to see a clean preview of your badge. You will then be prompted to select an attendee so you can preview their badge in the Preview badge pop-up box.
- Badge name field: Edit the name of your badge in this field.
- List filter: This allows you to refine and target specific attendee groups when editing badges. By typing in the list filter field, you can search for an existing list or create a new one by entering a name and pressing Enter on your keyboard. This ensures that badges are assigned only to the selected attendees based on your specified criteria
- Printer drop-down box: Change the printer using which the badge will be printed using the drop-down box.
- Label type drop-down box: Change the label type on which the badge will be printed using the drop-down box.
- Width and Height fields: Configure the width and height of your badge.
Customizing text for your badge
You can select a variety of font styles including variations of those fonts for all text fields on your badge. This allows you to customize your badges to match your event's branding and style. You can select from different font families, sizes, weights (such as bold or italic), and styles to create the perfect look for your badges:
Kiosk settings
Event administrators can modify and configure the appearance and behavior of the check-in kiosk with options listed under Kiosk settings.
For complete information on Kiosk settings, refer to our InEvent Kiosk app guide. Additionally, when using the Kiosk app, you can modify certain settings directly from the mobile app.
Setting up printers for badge printing on the InEvent Kiosk app
In order to use the InEvent Kiosk app for badge printing, you need to perform an initial printer setup on each operating device. This must be done to connect the device with the printer, and allows for a seamless check-in experience. The initial setup on the app is quick and easy, as it only involves enabling automatic printer discovery and selecting the printer, or manually entering details for the target printer into the InEvent Kiosk app.
A complete guide on setting up printers for badge printing can be found in the InEvent Kiosk app guide.
Print now
The Print now section allows you to print your attendees' badges directly from the platform using the InEvent plugin.
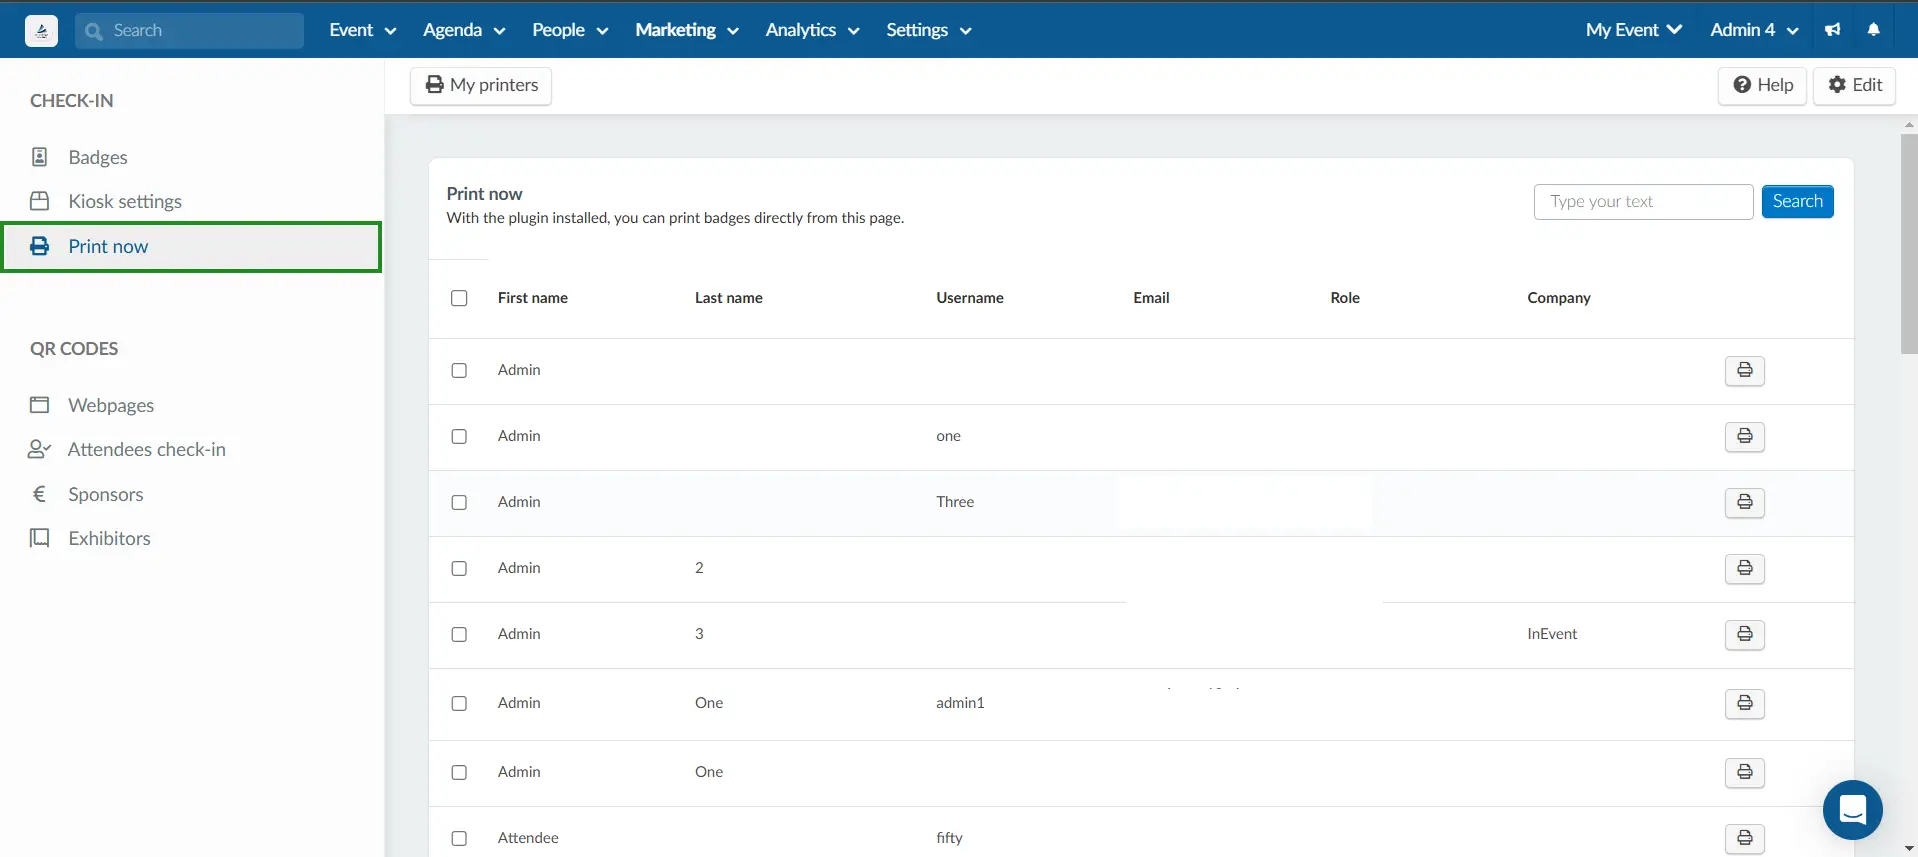
To start printing an attendee's badge, follow the steps listed below.
- Click on the print icon next to their entry on the page. The Print badge pop-up box will be displayed.
- You can choose to Print or Download the badge.
- Click on Print. The platform will attempt to connect to the InEvent printing plugin.
If you do not have the plugin installed, you will be prompted to download and install the plugin. Click on download it here - you will be prompted to add the plugin to your browser. After adding the plugin, refresh the page.
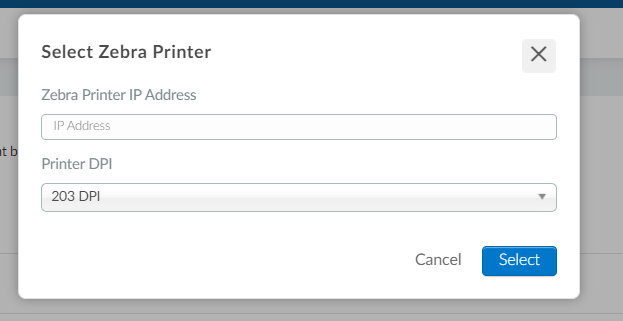
- Click on the Print button. You will be prompted to:
- Enter the IP Address and select the Printer DPI if the badge is connected to a Zebra Printer.
- Enter the IP Address if the badge is connected to a Brother Printer.
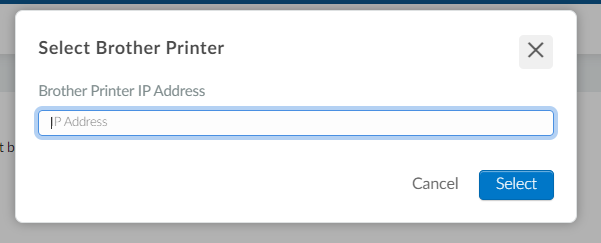
- Press Select and the attendee's badge will proceed to be printed.
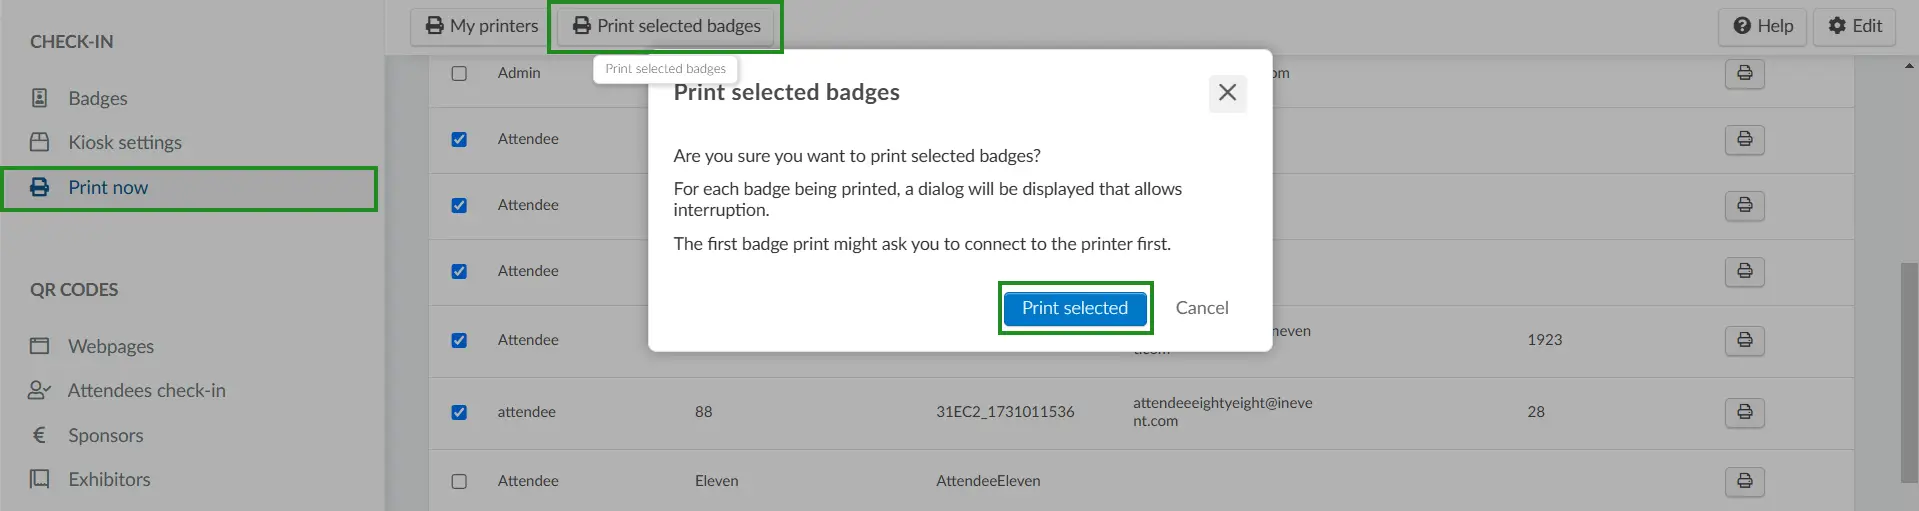
Printing multiple badges
To print multiple badges at once, follow these steps:
- Navigate to the Print now section.
- Select the checkboxes corresponding to the attendees whose badges you want to print.
- Click on Print selected badges. You will see a print selected badges pop-up box confirming whether you want to proceed with printing the selected badges.
- Click on Print selected to proceed with printing your badges.

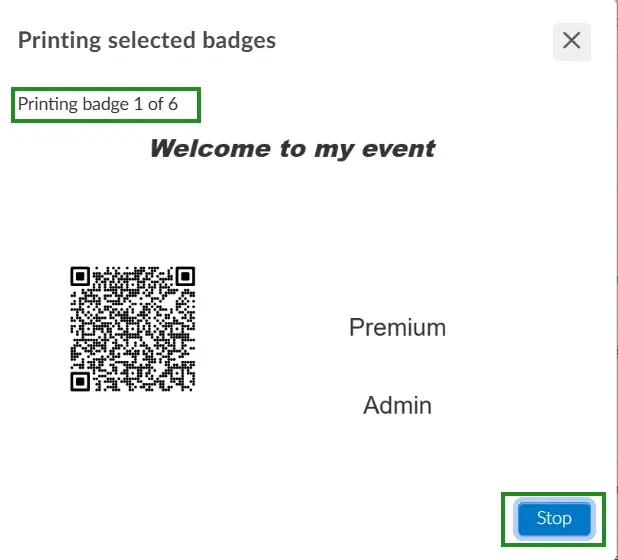
To cancel the badge printing process, simply click Stop in the dialog box.
QR Codes
The QR Codes section is where you can manage the QR codes for the pages in your event.
Webpages
In the Webpages section, you can view the list of QR codes available for your event pages along with their links. You can also download the QR codes as images by pressing the Download button. You can scan the QR codes to visit the web pages on your browser. The QR codes are available for the following pages:
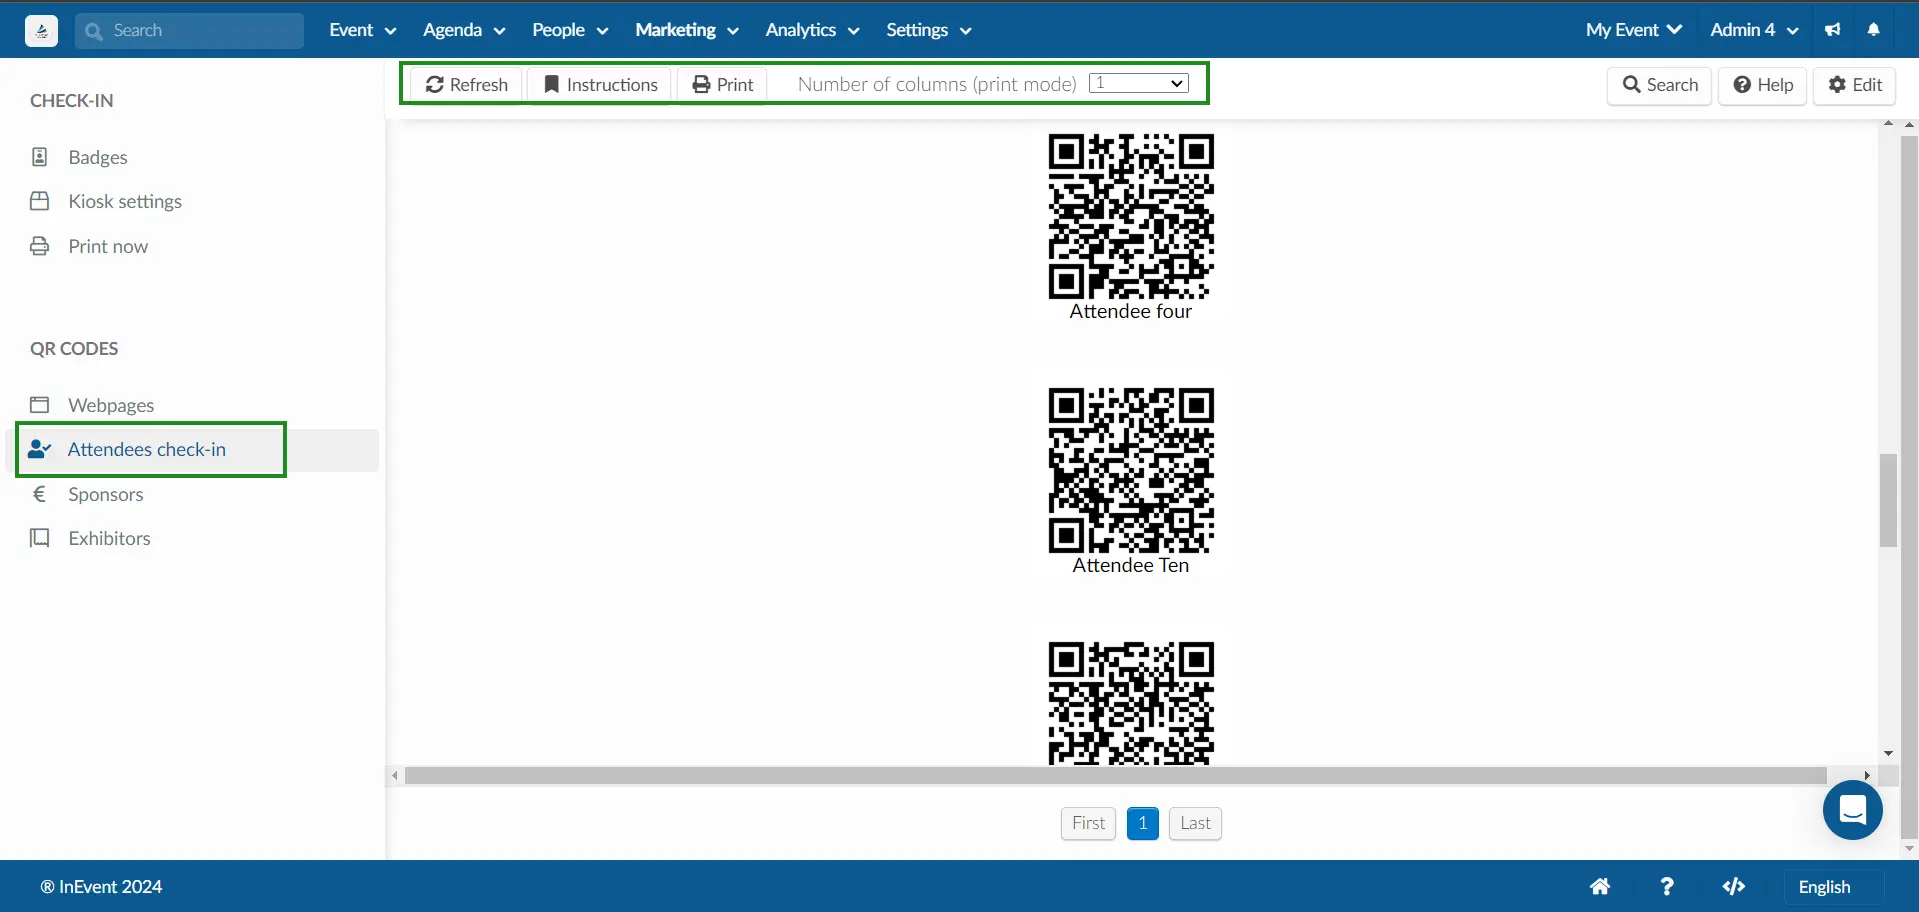
Attendees check-in
In the Attendees check-in section, you can configure and print QR codes for all of your attendees. You will see the following items on top of the page:
- Refresh button: Refreshes the QR codes.
- Instructions button: Opens the printing instructions.
- Print button: Opens your browser's Print pop-up dialogue to start printing.
- Number of columns (print mode) drop-down menu: Select the number of columns in which the QR codes will be printed.
Printing QR codes for all attendees
To print QR codes for all attendees, follow the steps below:
- Click on Refresh in the Attendees check-in section to ensure all QR codes are successfully loaded.
- Select the Number of columns (print mode) using the drop-down menu. You can select up to 4 columns.
- Click on the Print button. Your browser's Print pop-up dialogue will open.
- Click on Print.
After completing the steps above, the QR codes for all attendees will be printed.
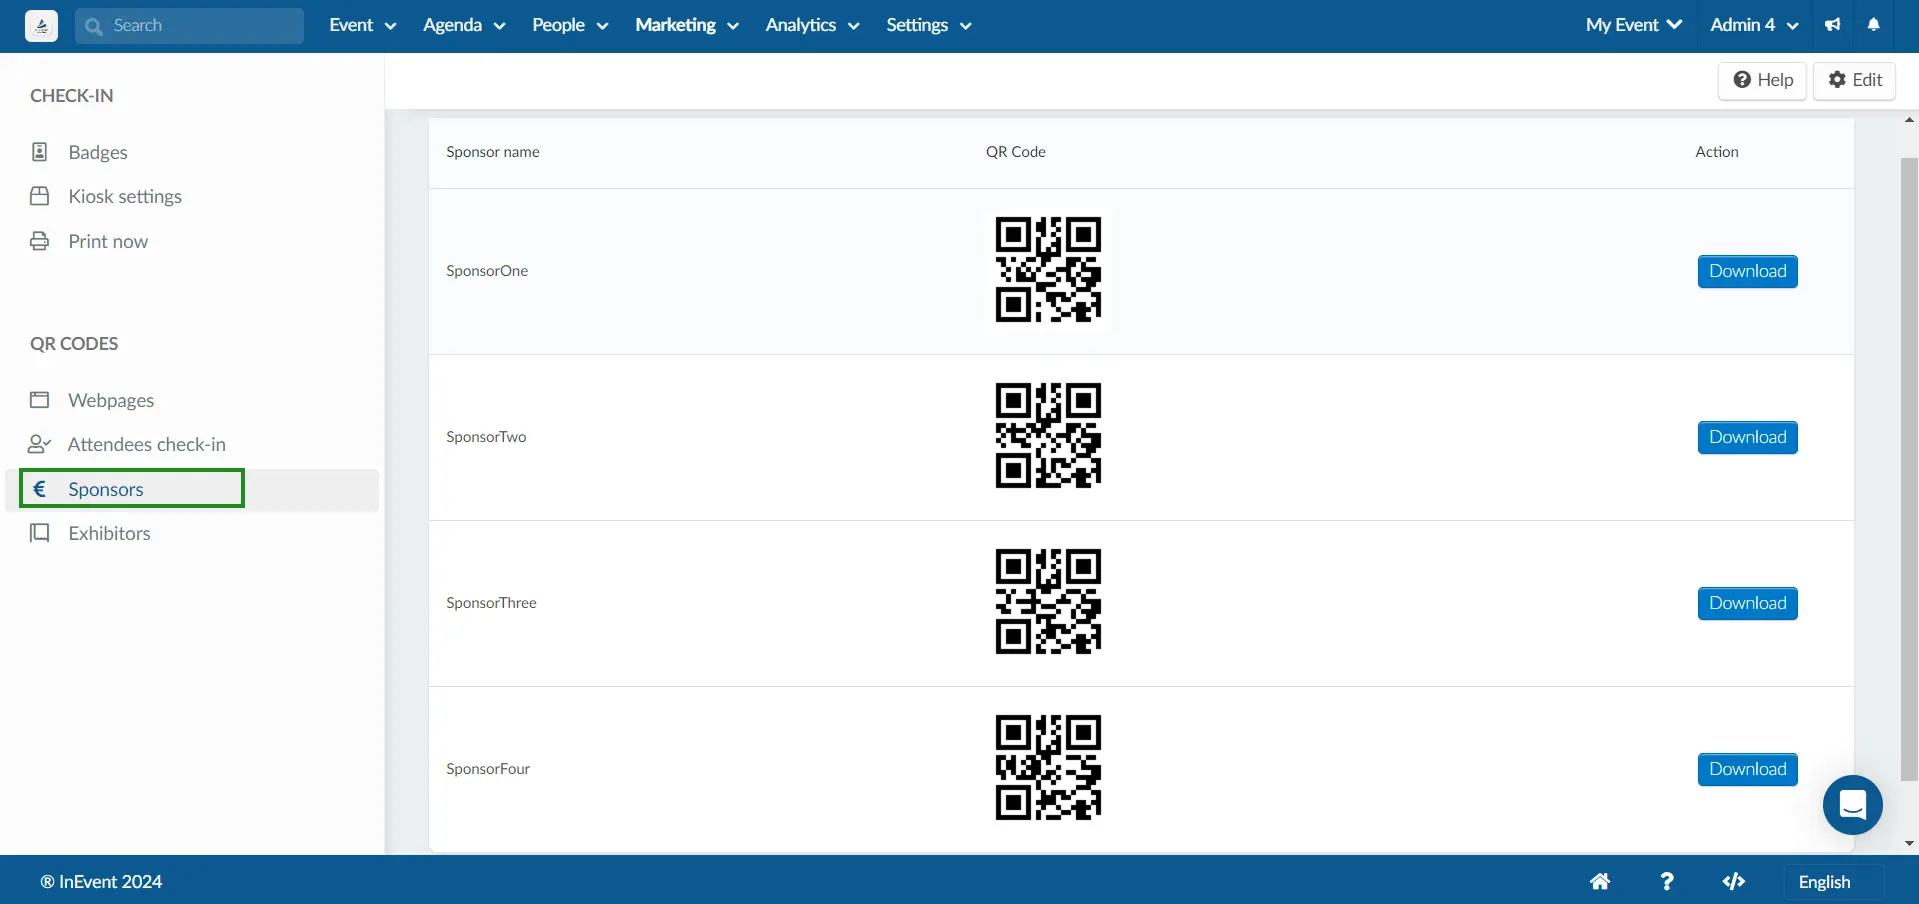
Sponsors
In the Sponsors section, you can view the list of QR codes of for your sponsors. You can also download the QR codes as images by pressing the Download button.
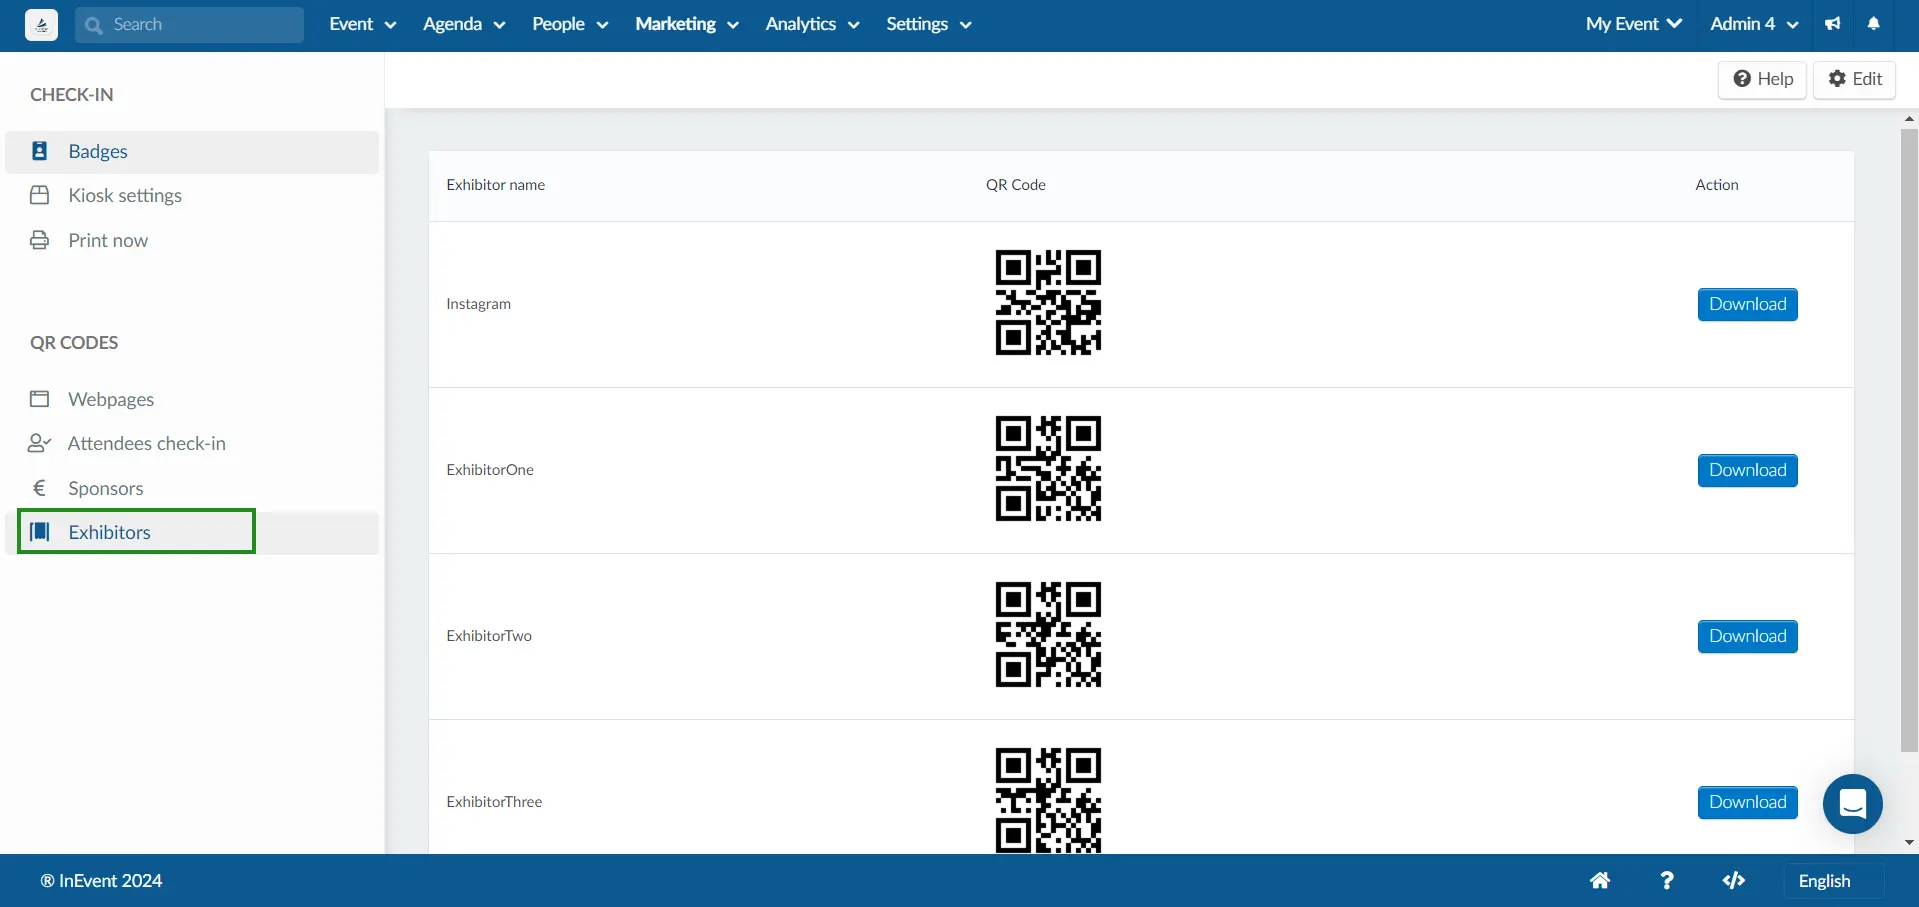
Exhibitors
In the Exhibitors section, you can view the list of QR codes of for your exhibitors. You can also download the QR codes as images by pressing the Download button.
Attendee check-in procedure
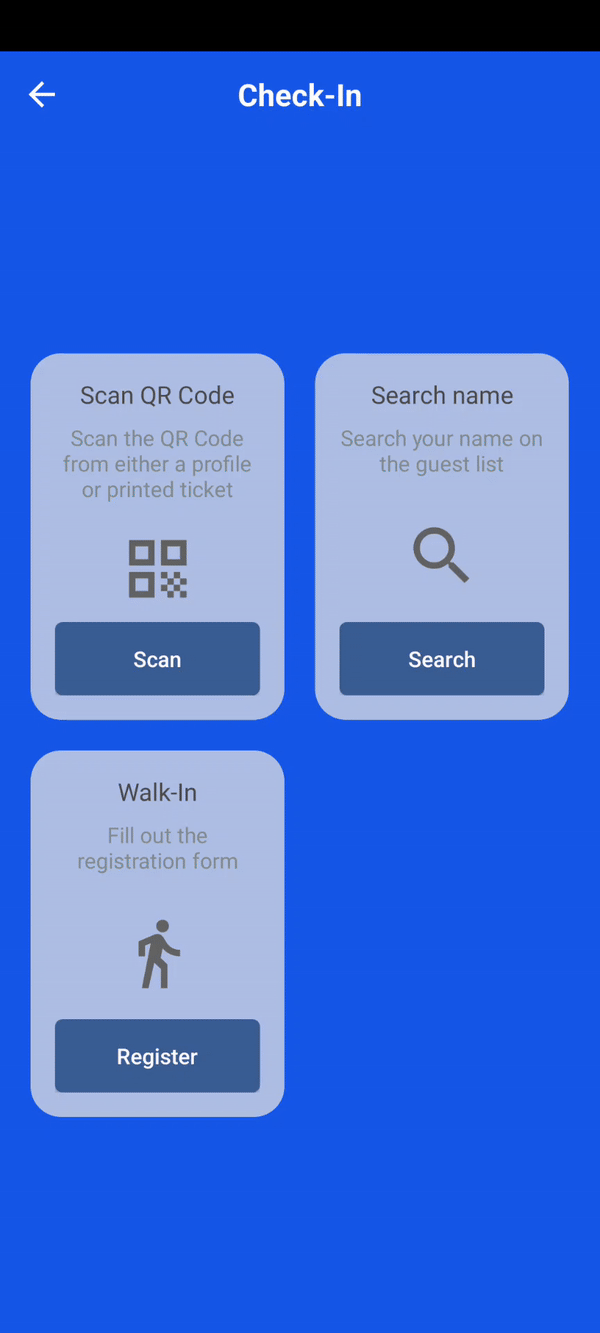
To start checking in attendees to an in-person event, follow the steps below.
- Launch the official InEvent Kiosk app.
- Add and connect a printer to the InEvent Kiosk app.
- Open the Kiosk mode in the InEvent Kiosk app.
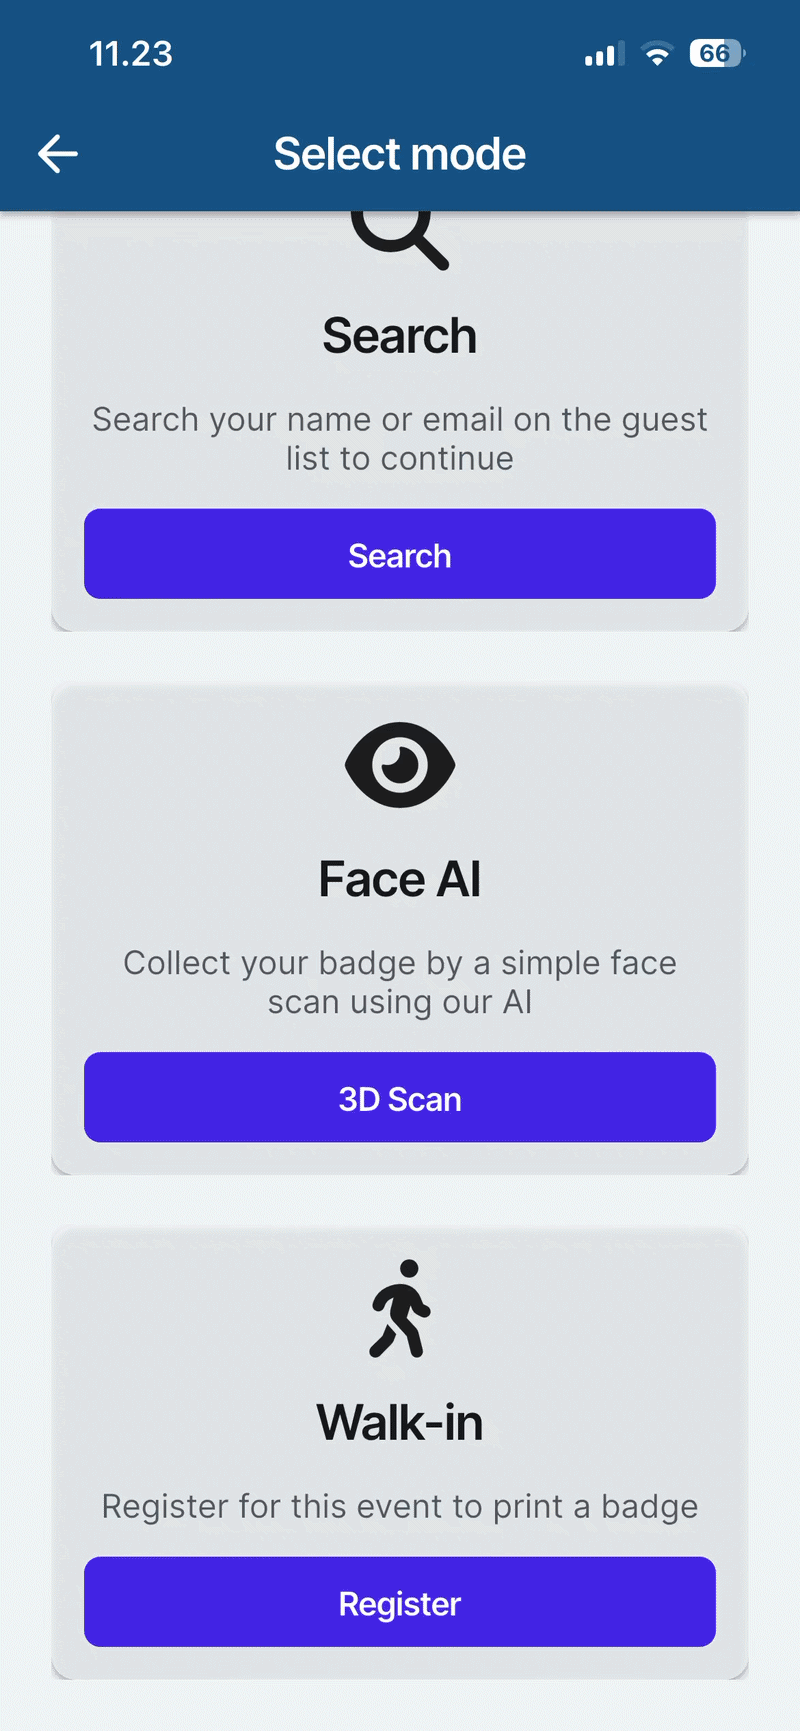
- Select the preferred check-in methods within the Kiosk mode: Scan QR code, Manual search, Face AI, or Walk-in.
- Review the attendees' details as shown on the Kiosk.
- Tap on Confirm and sign. The badge will start printing.
- Tap on Finish check in to finalize the attendee's check-in process.
Changing your printer
If you wish to change the printer your device is connected to, you simply need to follow the steps below:
- Ensure the new printer is powered on and connected to the same network as your device if you are using a network (Wi-Fi or Ethernet) printer.
- Navigate to the Kiosk settings within the InEvent Kiosk app.
- Open the printer selection panel.
- Tap on Select printer to select the new printer connected to your device with which the badges will be printed.
Previewing your badge before printing
On the Android mobile app, you can preview the badge that is about to be printed during the check-in process.
- Tap the Scan button under Scan QR Code to start scanning attendees' QR codes. Alternatively, select Search attendee to manually search for the attendees at the Check-in page.
- Tap on Confirm. The Badge preview page will be displayed.
- Click Print to proceed with the badge printing.
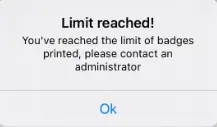
Maximum print cap per attendee
The number of badges you can print per attendee is determined by the value you set in the Maximum print cap per attendee within the Kiosk settings. By default, this cap is set to 1 print per attendee. If you need to allow more prints, you can adjust this setting according to your requirements to avoid receiving prompts or pop-ups when the print limit is reached.
Filtering attendees during event check in
You can filter and control who can check in at at your event by using Lists. To filter and check in attendees via list, follow the steps below:
- Open the InEvent app and go to Menu > Badge printing > Kiosk mode.
- Select Filter by list/Limit check-in to selected lists in Kiosk mode settings. A pop-up will appear showing all event lists.
- Select the list containing the attendees you want to check in. You will then be directed to the check-in page.
- Tap on Start Check-in.
You can either manually search for attendees by selecting Search in the check-in page, or start scanning attendees' QR codes by tapping the Scan button beneath Scan QR Code.
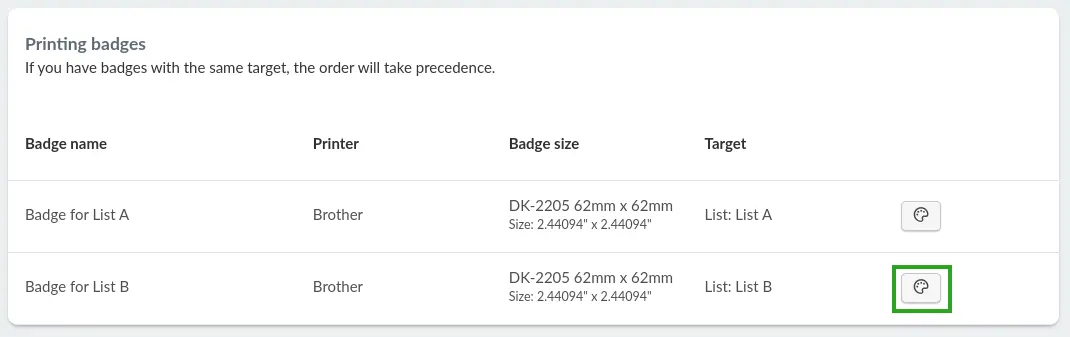
Filtering badges by list during check-in
You can filter and control which attendees can check in and which badges are printed for them during check-in by using Lists. This allows you to print multiple badge designs for different groups, such as VIPs, staff, speakers, or attendees. Ensuring the right badge is printed for each category.
You can create and print unique badge designs for each attendee group by linking badges to specific lists. Refer to our Creating a new printing badge article for more information on how to link badges to a specific list.
To filter and check in attendees with specific badges, follow the steps below:
- Open the InEvent app and go to Menu > Badge printing > Kiosk mode.
- Select Filter by list / Limit check-in to selected lists in the Kiosk mode settings. A pop-up will appear showing the available list.
- Select the list tied to the badge design you want to print.
- Tap Start Check-in to begin.
You can either manually search for attendees by selecting Search in the check-in page, or start scanning attendees' QR codes by tapping the Scan button beneath Scan QR Code.
Timeout due to inactivity
If there is inactivity during the check-in process, you will automatically be timed out and returned to the Start Check-in page. This ensures the security and efficiency of the check-in process.
To avoid being timed out, make sure to tap on the Yes i'm here and Are you still here? confirmation pop ups. If you need to step away, try to complete the check-in first or be prepared to start over when you return.

Offline Sync
During events, connectivity issues may arise due to unexpected causes. The InEvent app provides the Offline Sync functionality to mitigate such situations.
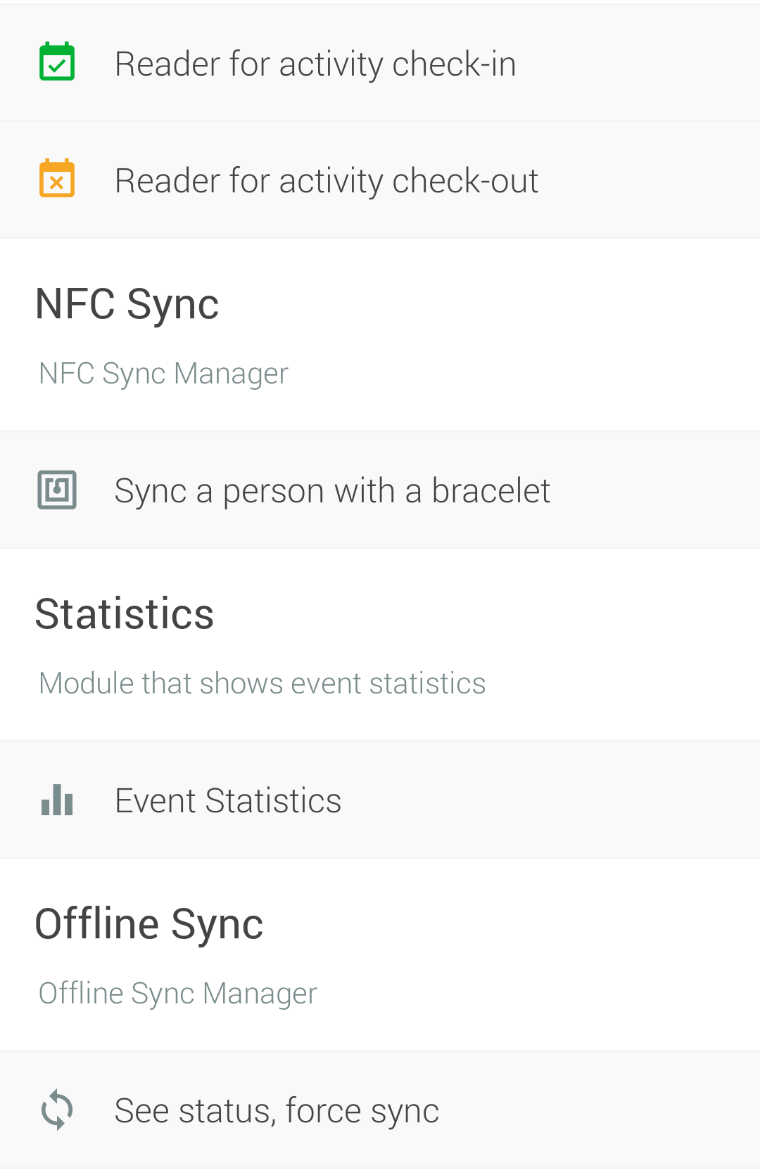
Offline Sync ensures that local, on-device data is readily cached for synchronization. When the device's connectivity stabilizes or returns, the cached data will safely be synced without loss. Device operators can also use Force Sync to force-trigger a synchronization attempt.

Enabling consent form before badge printing
The consent form feature allows event organizers to require attendees to complete a consent form before printing their badges, ensuring all necessary permissions are obtained. You can enable this feature in the Kiosk Settings > Check-in Tab.
After setup, attendees will be prompted to fill out the consent form before their badges are printed. Once they complete and submit the form, you can proceed with badge printing.
Walk-in registration
If Walk-ins is enabled, new attendee registration can be made on the spot at the check-in Kiosk. The steps to do walk-in registration are as follows:
- Start the Kiosk mode on the mobile app and tap on Start Check-in.
- Tap on the Register button under Walk-in. The Registration form will load.
- Complete the registration form for the new attendee. After doing so, you will be able to check the new attendee into the event.
- Tap the Confirm and sign button to start the attendee check in process. The QR code will be automatically loaded.
- Tap on Finish check-in.
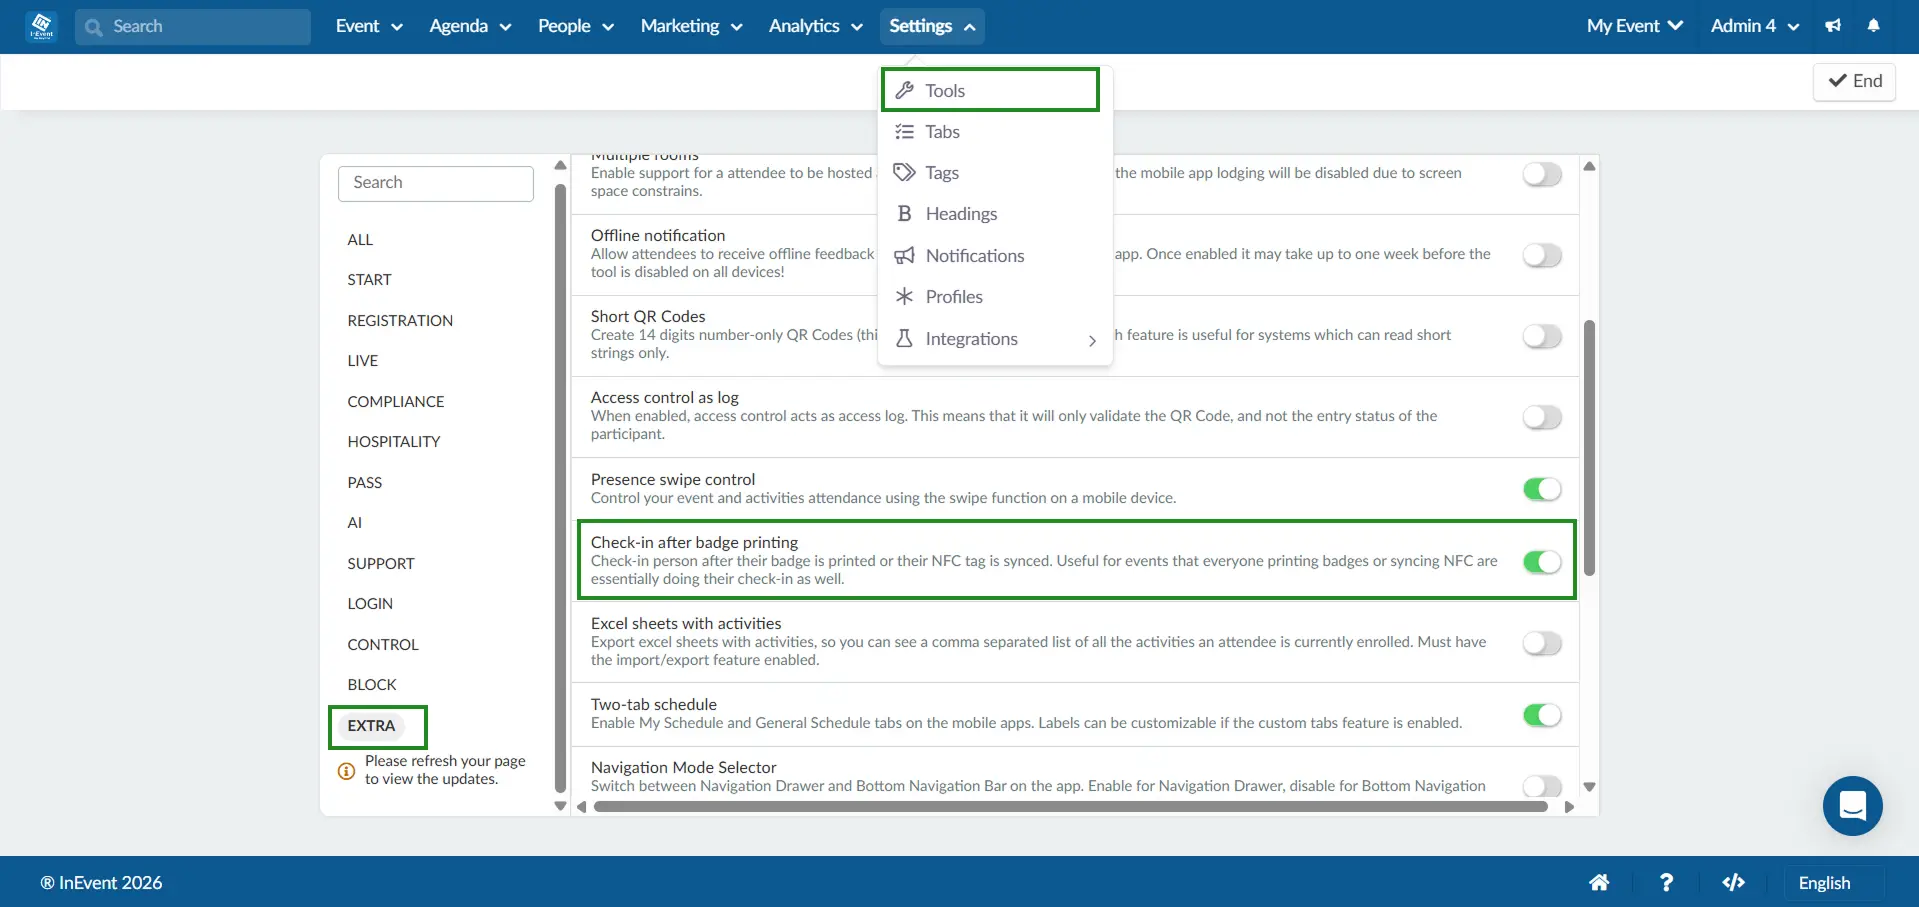
Check-in after badge printing
You can enable the Check-in after badge printing tool to automatically check in attendees once their badge is printed or their NFC tag is synced.
When this option is disabled, attendees must be manually checked in after their badge is printed. When the option is enabled, the system will automatically mark attendees as checked in immediately after their badge is printed or their NFC tag is synchronized.
This tool is useful for events where badge printing or NFC synchronization already confirms that the attendee has arrived on-site.
To enable this feature, navigate to Settings > Tools, click the Extra tab, locate Check-in after badge printing, and toggle the button on.