Most frequently requested CSS codes
 Updated 26 minutes ago
by
Amalia
Updated 26 minutes ago
by
Amalia
- CSS codes to customize the Virtual Lobby
- Import and apply custom fonts
- Hide the Open lobby button from My Account tab in the Virtual Lobby
- Hide the Troubleshoot button from the Virtual Lobby
- Modify Activity room elements
- Hide the Speaker email address from the Virtual Lobby
- Hide activity start and end time
- Add a timezone description to the website agenda
- Remove event timezone and date from Registration/Purchase forms
- Remove the Go to event button from the Registration form
- Set unique background images for specific pages in the Virtual Lobby
- Set unique background colors for specific pages in the Virtual Lobby
With InEvent, it is easy to customize your Virtual Lobby using the Virtual Lobby Editor. The Virtual Lobby Editor allows you to style your Virtual Lobby in a way that reflects the style and atmosphere of your event.
In addition to the Virtual Lobby Editor, you can perform advanced customization of the Virtual Lobby using custom Cascading Style Sheet (CSS) codes.
This article provides some of the most commonly requested CSS codes to further customize the Virtual Lobby.
CSS codes to customize the Virtual Lobby
The codes provided here will do the following:
- Import and apply custom fonts
- Hide the Open lobby button from My Account tab in the Virtual Lobby (Neo and Classic layout)
- Hide the Troubleshoot button from the Virtual Lobby (Neo and Classic layout)
- Hide the Speaker email address from the Virtual Lobby (Neo and Classic layout)
- Modify Activity room elements
- Hide activity start and/or end time
- Add timezone to website Agenda
- Remove event timezone and date from Registration/Purchase forms
- Hide the Go to event button in the Registration form
- Set unique background images for specific pages in the Virtual Lobby
- Set unique background colors for specific pages in the Virtual Lobby
Import and apply custom fonts
This section will explain how you can import custom fonts and then apply them to the Virtual Lobby, specific pages, or apply a custom font universally.
Import custom fonts
To import custom fonts in the Virtual Lobby, paste the following @font-face CSS code in the Source code text box:
@font-face {
    font-family: '[insert font name here]';
    font-style: [insert font style here];
    src: url("insert font link here") format('[insert font format here]');
}
Alternatively, you can import an existing font declaration file by using the following @import code:
@import url('[insert font declaration file link here]');@font-face or @import codes.Apply custom fonts to the Virtual Lobby and all pages universally
To apply custom fonts to the Virtual Lobby and all pages universally, paste the following code in the Source code text box after the @font-face or @import code:
body {
    font-family: '[insert font name here]', '[insert generic font family name here]';
}Apply custom fonts to the Virtual Lobby or specific pages
To apply custom fonts to the Virtual Lobby or specific pages only, paste the following code in the Source code text box after the @font-face or @import code.
[insert root tag here] {
    font-family: '[insert font name here]', '[insert generic font family name here]';
}[insert root tag here] with the corresponding root tag of the target page. A list of pages and the corresponding root tags is available in the CSS editor as well as in this article.Custom font code examples
- Importing and applying a custom font to the Virtual Lobby and all pages universally, using Google Fonts' Signika as an example:
@font-face {
	font-family: 'Signika';
  	font-style: normal;
  	src: url(https://fonts.gstatic.com/s/signika/v20/vEFO2_JTCgwQ5ejvMV0O96D01E8J0tIJHKbBjM4.woff2) format('woff2');
}

body {
    font-family: 'Signika', sans-serif;
}- Importing and applying a custom font to the Virtual Lobby, using Google Fonts' Sarabun as an example:
@font-face {
    font-family: 'Sarabun';
    font-style: normal;
    src: url(https://fonts.gstatic.com/s/sarabun/v13/DtVjJx26TKEr37c9aBVJnw.woff2) format('woff2');
}

#liveWrapper {
    font-family: 'Sarabun', sans-serif;
}- Importing and applying a custom font to My Agenda, using Google Fonts' Space Grotesk as an example:
@import url('https://fonts.googleapis.com/css2?family=Abhaya+Libre&display=swap');

#myAgendaWrapper {
    font-family: 'Space Grotesk', sans-serif;
}- Importing multiple fonts and applying them to different pages, using Google Fonts' Sarabun for the Virtual Lobby, Space Grotesk for My files and My agenda, and Abhaya Libre for My forms and My tickets as an example:
@import url('https://fonts.googleapis.com/css2?family=Space+Grotesk&display=swap');
@import url('https://fonts.googleapis.com/css2?family=Abhaya+Libre&display=swap');

@font-face {
    font-family: 'Sarabun';
    font-style: normal;
    src: url(https://fonts.gstatic.com/s/sarabun/v13/DtVjJx26TKEr37c9aBVJnw.woff2) format('woff2');
}

#liveWrapper {
    font-family: 'Sarabun', sans-serif;
}

#fileManagerWrapper, #myAgendaWrapper {
    font-family: 'Space Grotesk', sans-serif;
}

#myFormsWrapper {
    font-family: 'Abhaya Libre', serif;
}

#ticketManagerWrapper {
    font-family: 'Abhaya Libre', serif;
}
Hide the Open lobby button from My Account tab in the Virtual Lobby
To hide the Open Lobby button from the My Account tab in the Virtual Lobby (Neo and Classic layout), paste the following CSS code in the Source code text box:
#headerVue .eventCover-info-virtual-lobby {
    display: none;
}
Hide the Troubleshoot button from the Virtual Lobby
To hide the Troubleshoot button from the Virtual Lobby (Neo and Classic layouts), paste the following CSS code in the Source code text box:
.v2-barTop .barContent .barDropdown.optionTroubleshoot{
    display: none !important;
}
Modify Activity room elements
This section contains CSS codes to modify Activity room elements.
Change chat font color in activities
To change the chat font color in the activities, paste the following CSS code in the Source code text box:
#liveContent .chat-container .chat-unpinned .chat-body .chat {
    color: "insert color here" !important;
}"insert color here" with the desired color (written as universal CSS color names or as a HEX color code)Remove the Raise Hand button
To remove the Raise Hand button in activities, paste the following CSS code in the Source code text box:
#liveContent .videos .videos-controls .toolRaiseHands {
    position: absolute;
    z-index: 15;
    padding: 7px;
    display: none;
}
Change the color of Chat bubbles
To change the color of Chat bubbles within Activity rooms, paste the following CSS code in the Source code text box:
#liveWrapper.inLive .row .live-chat-column .row .chats .chat-container .chat-body .chat-wrapper .chat.self .message {
    background-color: #25a9e0 !important;
}
Change the color of Chat bubbles in Breakout rooms
To change the color of Chat bubbles within Breakout rooms, paste the following CSS code in the Source code text box:
#liveWrapper.inLive .row .live-chat-column .row .chats .breakout-room-container .breakoutRoomList li.item {
  background-color: #25a9e0 !important;
}
Change the color of Question bubbles
To change the color of Question bubbles within Activity rooms, paste the following CSS code in the Source code text box:
#liveWrapper.inLive .row .live-chat-column .row .chats .chat-container .question-body .question-wrapper .question .question-contents-block,
#liveWrapper.inLive .row .live-chat-column .row .chats .chat-container .question-body .question-wrapper .question .question-contents-block .question
{
  background-color: #yourcolorhere !important;
}
Change the Poll background color
To change the Poll background color within Activity rooms, paste the following CSS code in the Source code text box:
#liveWrapper.inLive .row .live-chat-column .row .chats .quiz-container .quiz-body .quiz-list .results{
  background-color: #yourcolorhere !important;
}cs
Change the Quiz background color
To change the Quiz background color within Activity rooms, paste the following CSS code in the Source code text box:
#liveWrapper #liveContent .quiz-container .quiz-body .quiz-chain-list .details .body {
  background-color: #yourcolorhere !important;
}
Change the Files background color
To change the Files background color within Activity rooms, paste the following CSS code in the Source code text box:
#liveWrapper.inLive .row .live-chat-column .row .chats .file-container .file-body .material {
  background-color: #yourcolorhere !important;
}
Hide the Speaker email address from the Virtual Lobby
To hide Speakers email address from the Virtual Lobby, paste one of the following CSS codes below in the Source code text box, depending on the set event layout:
- Virtual Lobby - Neo layout
#InEventDialog .speaker-modal [data-field="email"] {
    display: none !important;
}- Virtual Lobby - Classic layout
#liveWrapper .live-speakers .floating-info [data-field="email"] {
display: none !important;
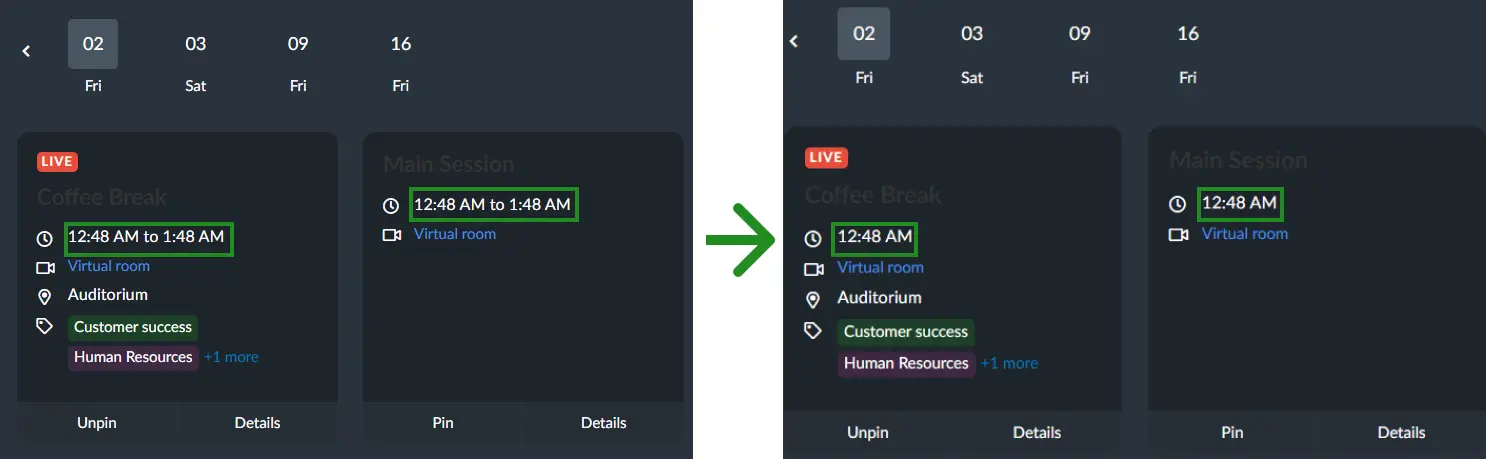
}Hide activity start and end time
This section contains CSS code variations to hide Activity start and/or end time from the Virtual Lobby pages.
Hide activity start and end time in the Virtual Lobby
To hide the activity start and end time in the Virtual Lobby, paste the following CSS code in the Source code text box:
#liveWrapper #liveContent #activities .activity-tile.medium:not(.isHighlighted) .node.activity .details .label-date span,
#liveWrapper #liveContent #activities .activity-tile.medium.isHighlighted .node.activity .details .label-date span
{
  display: none;
}
#liveWrapper #liveContent #activities .activity-tile.small:not(.isHighlighted) .node.activity .more .label-date span,
#liveWrapper #liveContent #activities .activity-tile.small.isHighlighted .node.activity .more .label-date span
{
  display: none;
}
#liveWrapper #liveContent #activities .activity-tile.isHighlighted .node.activity .details .label-date, body.neo-layout #liveContent #activities .activity-tile.large .node.activity .details .label-date span,
#liveWrapper #liveContent #activities .activity-tile:not(.isHighlighted) .node.activity .details .label-date, body.neo-layout #liveContent #activities .activity-tile.large .node.activity .details .label-date span
{
  display: none;
}
Below is how the code will affect your Virtual Lobby:
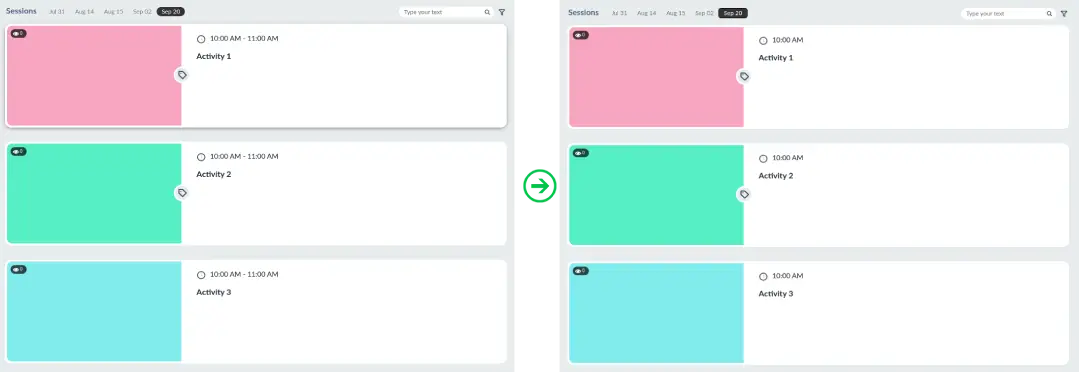
Hide activity start and end time in My Agenda tab
To hide the activity start and end time in the My Agenda tab of the Virtual Lobby, paste the following CSS code in the Source code text box:
#myAgendaContent span.text,
#myAgendaContent i.glyphicon.glyphicon-clock.light {
  display: none;
}
Below is how the code will affect the My Agenda tab:
Hide activity start time in the My Agenda tab
To hide the activity start time in the My Agenda tab of the Virtual Lobby, paste the following CSS code in the Source code text box:
#myAgendaContent .activity-date .activity-date-separator,
#myAgendaContent .activity-date .activity-date-begin {
  display: none;
}
Below is how the code will affect the My Agenda tab:
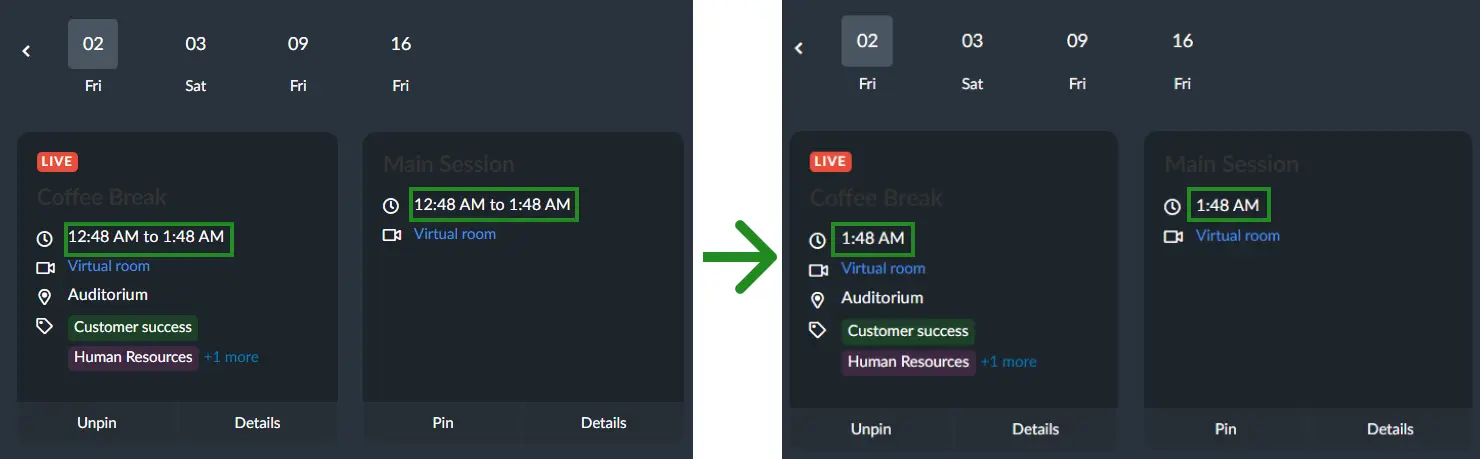
Hide activity end time in the My Agenda tab
To hide the activity start and end time in the My Agenda tab of the Virtual Lobby, paste the following CSS code in the Source code text box:
#myAgendaContent .activity-date .activity-date-separator,
#myAgendaContent .activity-date .activity-date-end {
  display: none;
}
Below is how the code will affect the My Agenda tab:
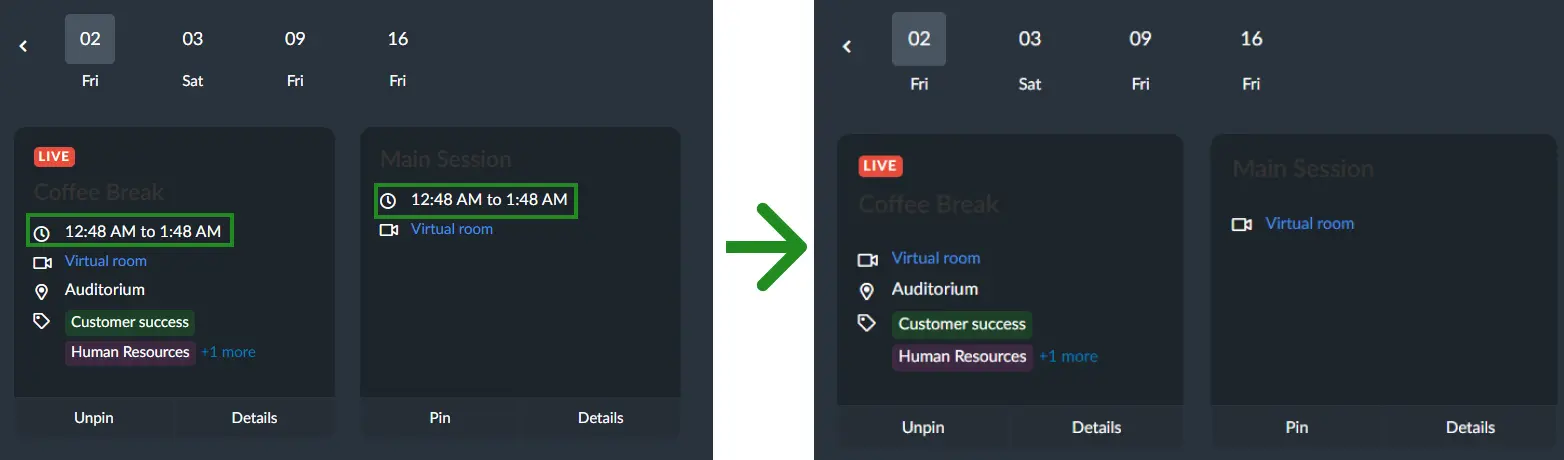
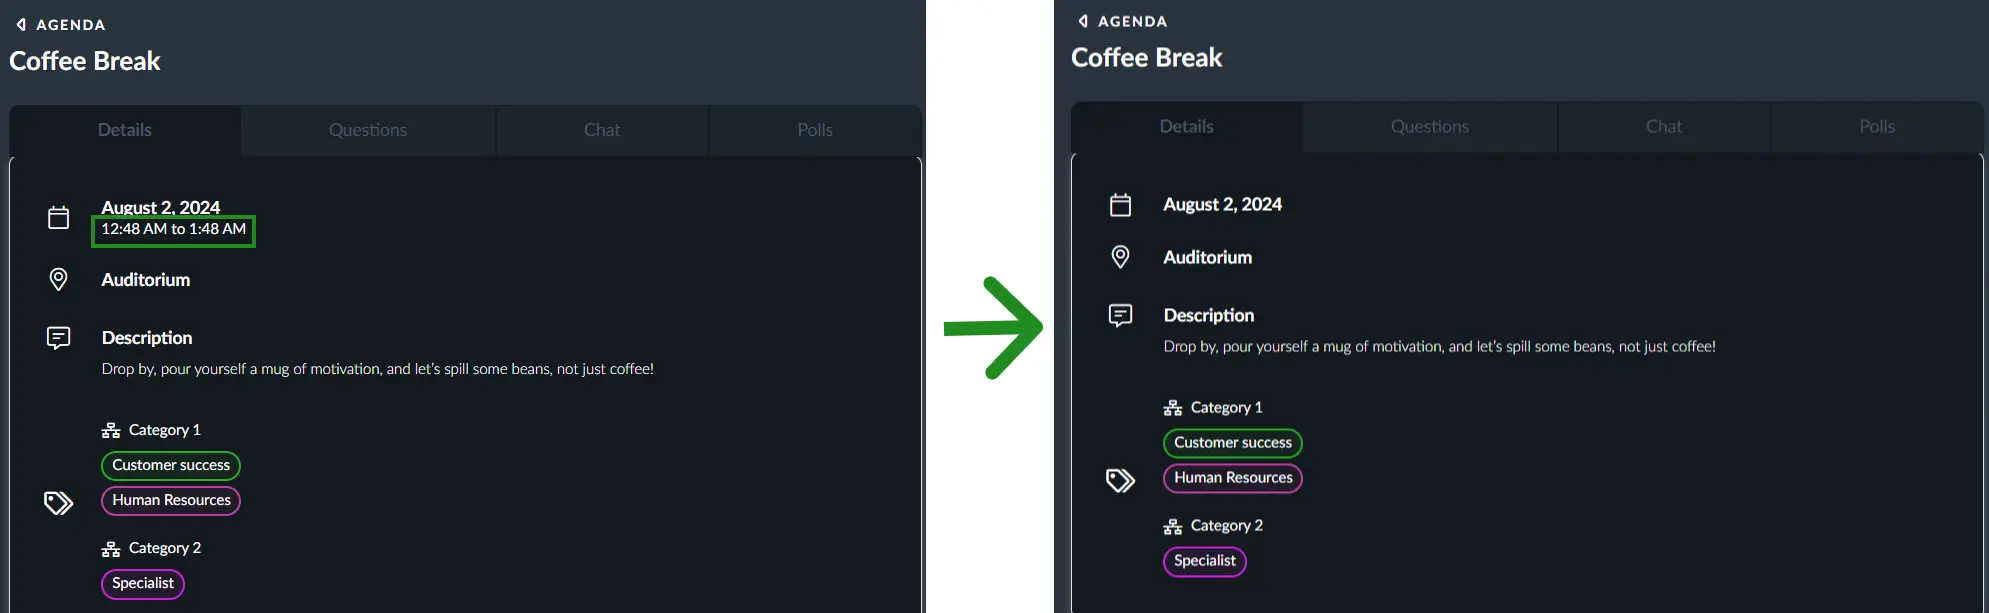
Hide activity start and end time in activity details within the My Agenda tab
To hide activity start and end time in the activity details within the My Agenda tab, paste the following CSS code in the Source code text box:
#myAgendaContent .item-with-icon .secondary:not(.html){
  display: none;
}
Below is how the code will affect the event details within the My Agenda tab:
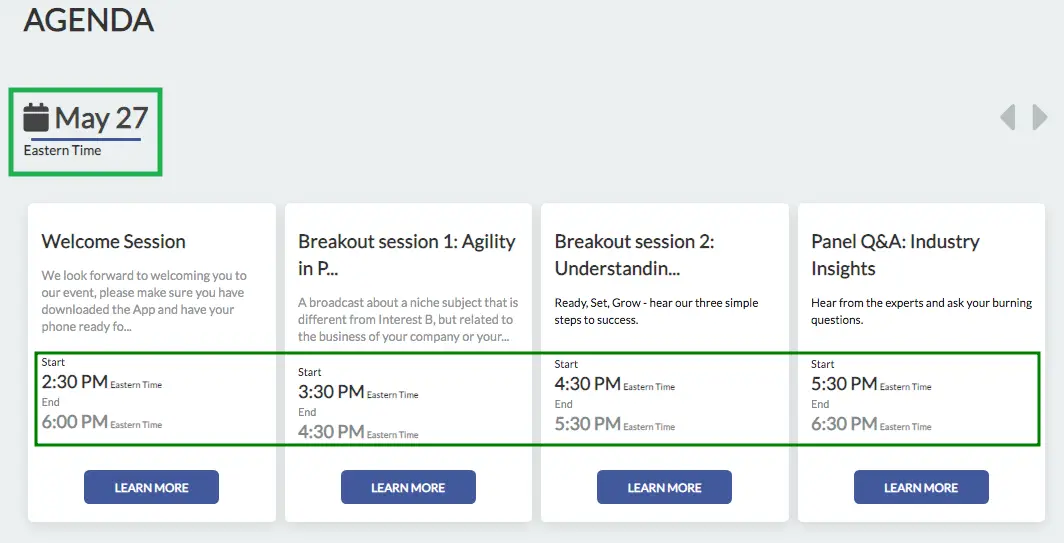
Add a timezone description to the website agenda
These codes will add a timezone description to your agenda under the activity date or beside the activity end time. Paste one of the following CSS codes in the Source code text box:
- Timezone description under activity date
#websiteContent .calendar .tabs:after {
    content: "insert timezone name";
    font-size: 15px;
}insert timezone name with the desired timezone name in text while keeping the quotation marks intact.- Timezone description beside activity end time
#websiteContent .time:after {
    content: "insert timezone name";
    font-size: 16px;
}
The following image shows how the codes above will affect your agenda, with insert timezone name set to Eastern Time:
Remove event timezone and date from Registration/Purchase forms
To remove event timezone and date details from Registration or Purchase forms, paste one or both of the following CSS codes in the Source code text box:
- Registration form
#formContent .eventCover .eventDate {
    visibility: hidden !important;
}- Purchase form
#purchaseContent .eventCover .eventDate {
    visibility: hidden !important;
}
Below is how the code will affect your Registration/Purchase forms:

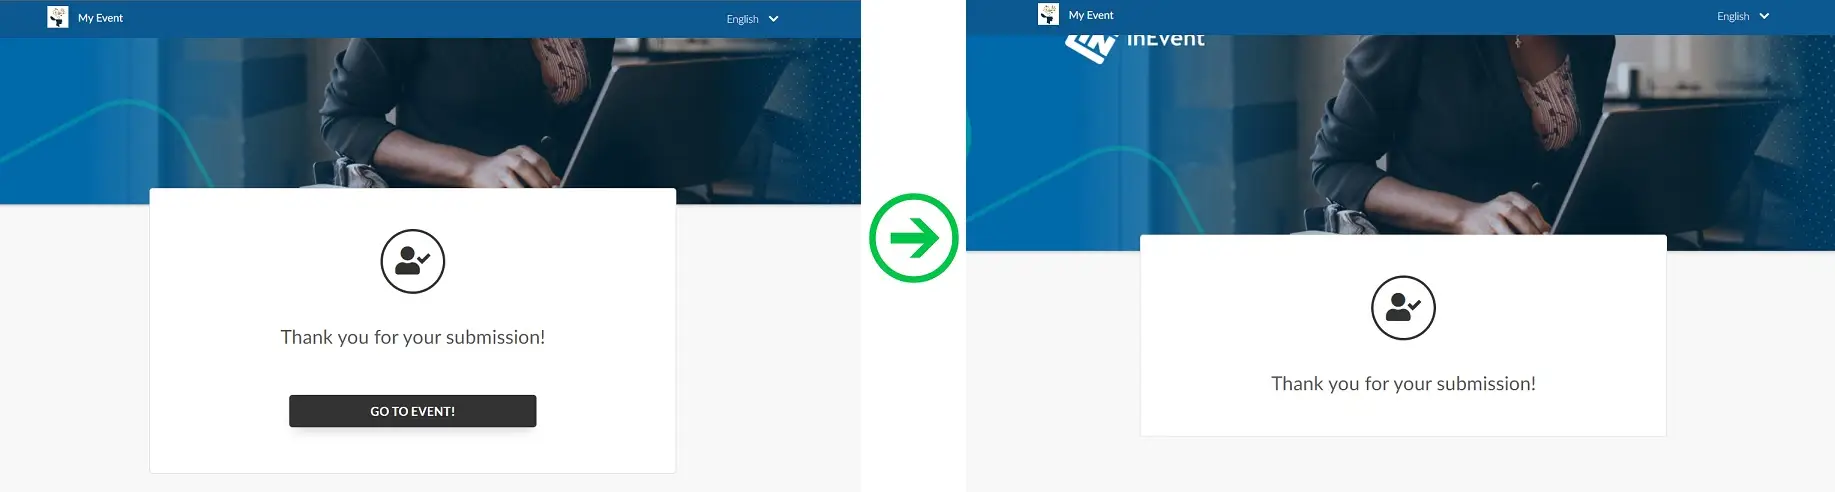
Remove the Go to event button from the Registration form
To remove the Go to event button from Registration form, paste the following CSS code in the Source code text box:
#formContent section.form[role="alert"] .formCard .formEnd {
    display: none !important;
}
Below is how the code will affect your Registration form:
Set unique background images for specific pages in the Virtual Lobby
To set unique background images to specific pages in the Virtual Lobby, paste the corresponding CSS codes into the Source code text box:
- My Account
#myAccountWrapper #myAccountContent {
    background-image: url("insert image link here");
    background-size: [insert image size here];
}background-image URL, keep the quotation marks intact. background-size values include auto, length in pixels (px), percentage %, cover and contain. When inserting background-size value, do not include the brackets.- My Agenda
#myAgendaWrapper #myAccountContent {
    background-image: url("insert image link here");
    background-size: [insert-image-size];
}- My Tickets
#ticketManagerWrapper #myAccountContent {
    background-image: url("insert image link here");
    background-size: [insert image size here];
}- My Forms
#myFormsWrapper #myAccountContent {
    background-image: url("insert image link here");
    background-size: [insert image size here];
}- My App
#appContent #myAccountContent {
    background-image: url("insert image link here");
    background-size: [insert image size here];
}- Registration Form
#formVue .formContent {
    background-image: url("insert image link here");
    background-size: [insert image size here];
}- Custom Form
#customFormVue #customFormContent {
    background-image: url("insert image link here");
    background-size: [insert image size here];
}
Set unique background colors for specific pages in the Virtual Lobby
To set unique background colors instead of background images for the previously mentioned pages, remove the following lines:
    background-image: url("insert image link here");
    background-size: "insert image size here";
Afterwards, insert the following line:
background-color: [insert color here];
CSS codes to customize Forms
The codes provided here will do the following:
- Change the background and text color of the Registration form
Change the background and text color of the Registration form
To change the background and text color of the Registration form, paste the corresponding code snippet into the Source code text box:
#formVue .formCard {
    background: #yourcolorhere !important;
}
#formVue .formCard .formItems .formItem label.title, #formVue .formCard .formItems .formItem p.title, #formVue .formCard .formItems .formItem label.subtitle, #formVue .formCard .formItems .formItem p.subtitle, #formVue #formContent .requirement-disclaimer {
    color: #yourcolorhere;
}
#formVue .btn-modal.blue, #formVue .login-btn {
	background-color: #yourcolorhere !important;
    border-color: #yourcolorhere !important;
    color: #yourcolorhere !important;
}
#formVue .formCard .formItems .formItem .formControl {
	background-color: #yourcolorhere !important;
    color: #yourcolorhere !important;
}
#formVue .formCard .formItems .formItem .select .chosen-container .chosen-single span {
	color: #yourcolorhere !important;
}
#formVue .formCard a, #formVue .formContent article section .formCard .message h2 {
	color: #yourcolorhere !important;
}
#formVue .formCard .message .success {
	color: #yourcolorhere !important;
}
#formVue h1#formRegisterTitle {
    color: #yourcolorhere !important;
  	margin: 0px 0 35px;
}
Customizing your event Website using CSS
In addition to being able create a public website for your event, you can perform advanced customization of your Website using custom CSS codes.
To edit or modify your website using custom CSS codes, you will have to use the root tag #websiteContent, such as shown in an example below.
#websiteContent background {
    height: 600px;
    width: 80%;
}
Distinguishing website pages when adding custom CSS
To distinguish between your multiple website pages when using custom CSS codes, you will have to make the selectors using the data-page property, such as shown in an example below.
#websiteContent [data-page="Your page name"] {
    background-color: /* Sets the background color */;
    color: /* Set text color */;
    padding: /* Add padding inside the element */;
}
Video iframe embed code
You can embed videos to your Website or Landing page by using the following video iframe embed code:
<iframe src="path/to/video.format"></iframe>
Additionally, you can also modify the iframe's CSS properties within the code snippet, as shown in the example code below.
<iframe src="path/to/video.format" width="1920" height="1080"></iframe>
Customizing other page items or elements
To customize other page items or elements, refer to the following instructions:
- Navigate to the desired page.
- Locate the item or element you want to customize.
- Right click on the item you wish to customize. A context menu will appear.
- Click Inspect. Your browser's Developer Tools will appear.
- Locate the properties of the item you want to customize under Styles.
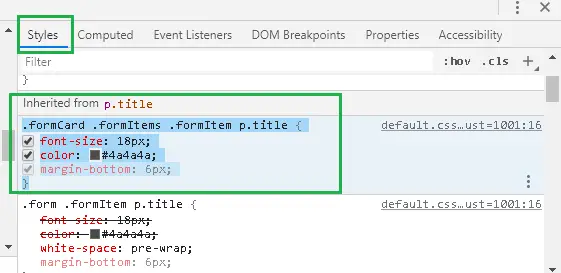
- Replace the item properties as desired.