Event Tags and Tracks
 Updated 2 months ago
by
Faisal Durrani
Updated 2 months ago
by
Faisal Durrani
Tags and Tracks are useful tools to help with the organization of your event. The organizer can choose various topics related to your event and create tags for Attendees, Speakers, Sponsors, as well as Tracks for Activities, in order to categorize them.
Creating a tag/track
Creating tags manually
To manually create a tag, follow these steps:
- Go to Settings > Tags.
- Click on the +New tag button in the top left corner of the page
- A new window will appear for you to type in the Tag name, select/create a Tag category, add a Tag color, select a Tag type, and set the Visibility.
- Click on Create once you have set the fields.
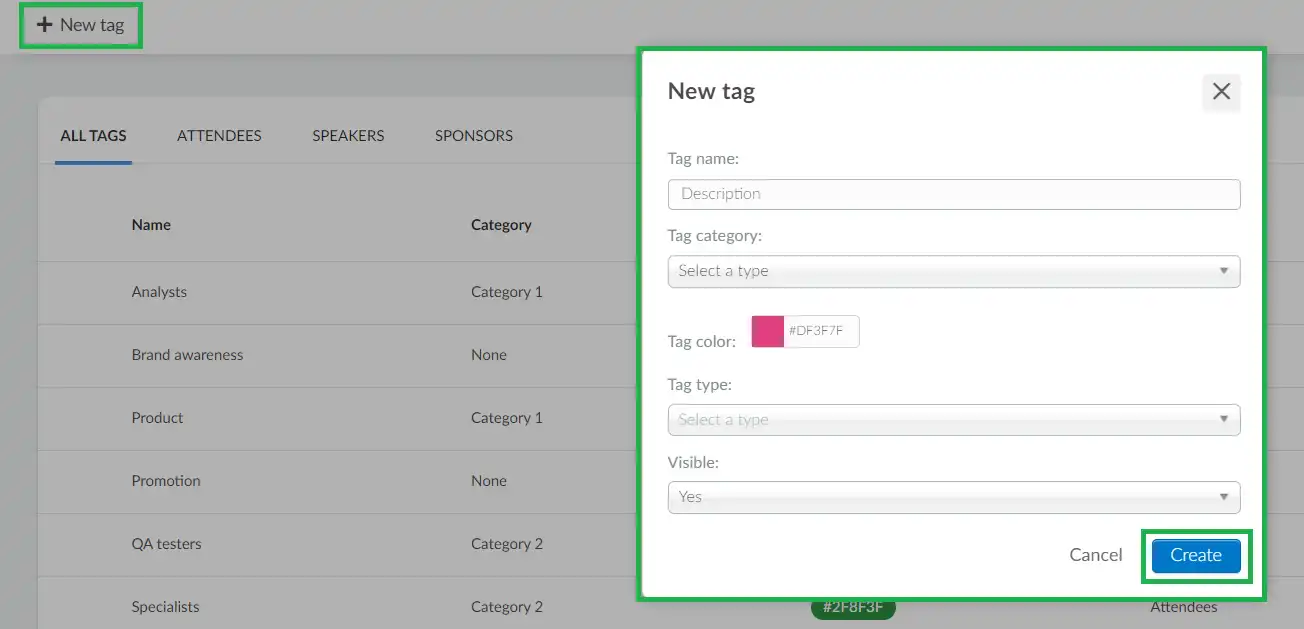
When it comes to the Tag type, you can choose from these options:
- Attendees
- Speaker
- Sponsor
Regarding the tag visibility, If it is set to Yes, the tag will be visible to all participants. If it is set to No, it will only be visible to admins and thus invisible to the event participants.
Removing Tags
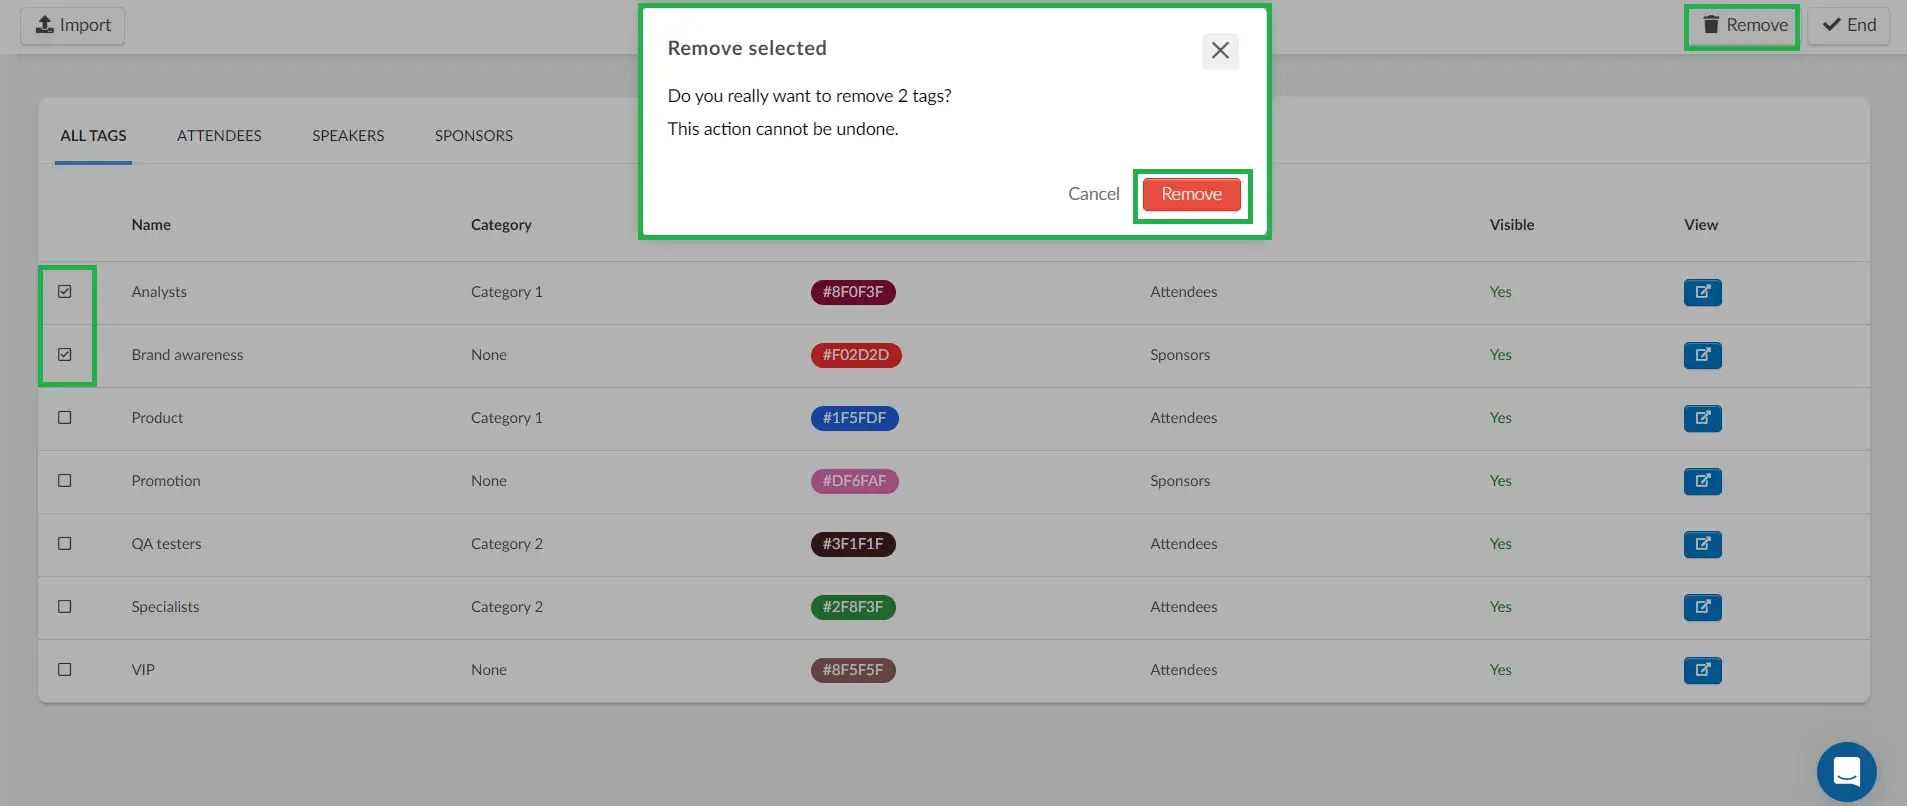
Once Tags have been created, they can also be removed at any time. To remove Tags:
- Click Edit in the Tags section.
- Tick the checkbox for the Tags, then click Remove.
- A confirmation prompt will appear asking you to confirm the deletion of the selected item(s).
- Click Remove in the confirmation message to finalize the action.
Alternatively, you can also remove all tags at once:
- Click Edit in the Tags section.
- Click Select All to automatically mark all Tags.
- After selecting, click Remove.
- A confirmation prompt will appear asking you to confirm the deletion of the selected items.
- To finalize the action, click Remove in the confirmation message.
This feature helps streamline bulk removal of Tags within your event setup.
Tag category
The Tag category is used for grouping tags which helps attendees easily search and filter through multiple tags using the created categories.
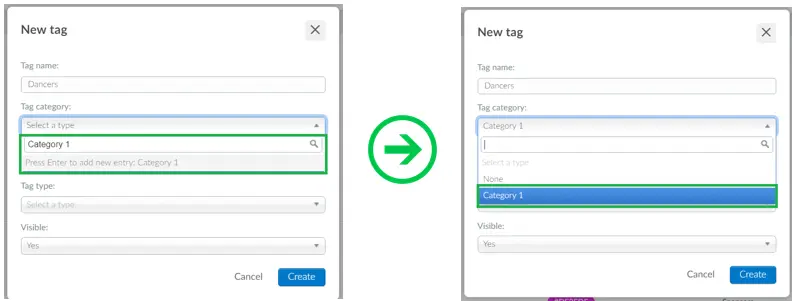
You can also create a tag category during the process of creating a tag. To create a new tag category, click the drop-down beside Select a type, type the name of the category and press Enter. This created category will become available for selection in the drop-down.
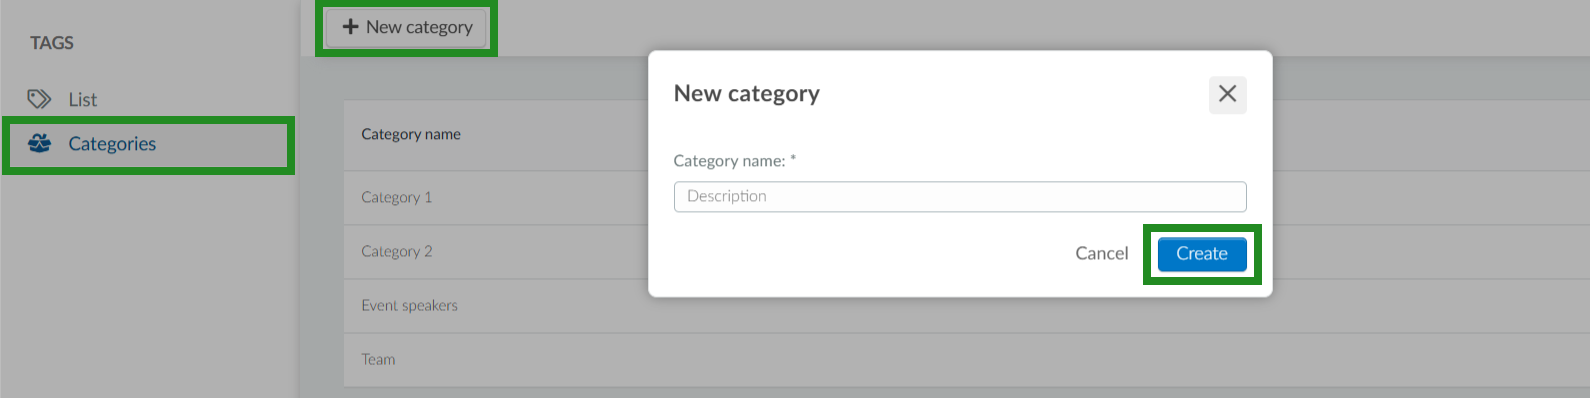
Alternatively, you can also create a category by following these steps:
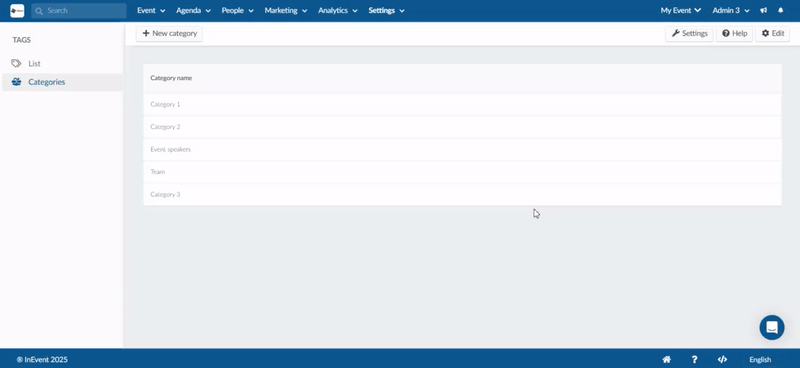
- Go to Settings > Tags.
- Click on Categories from the left hand side menu under list.
- A new window will appear for you to type in the Category name.
- Click on Create after you have typed in the name of the category.
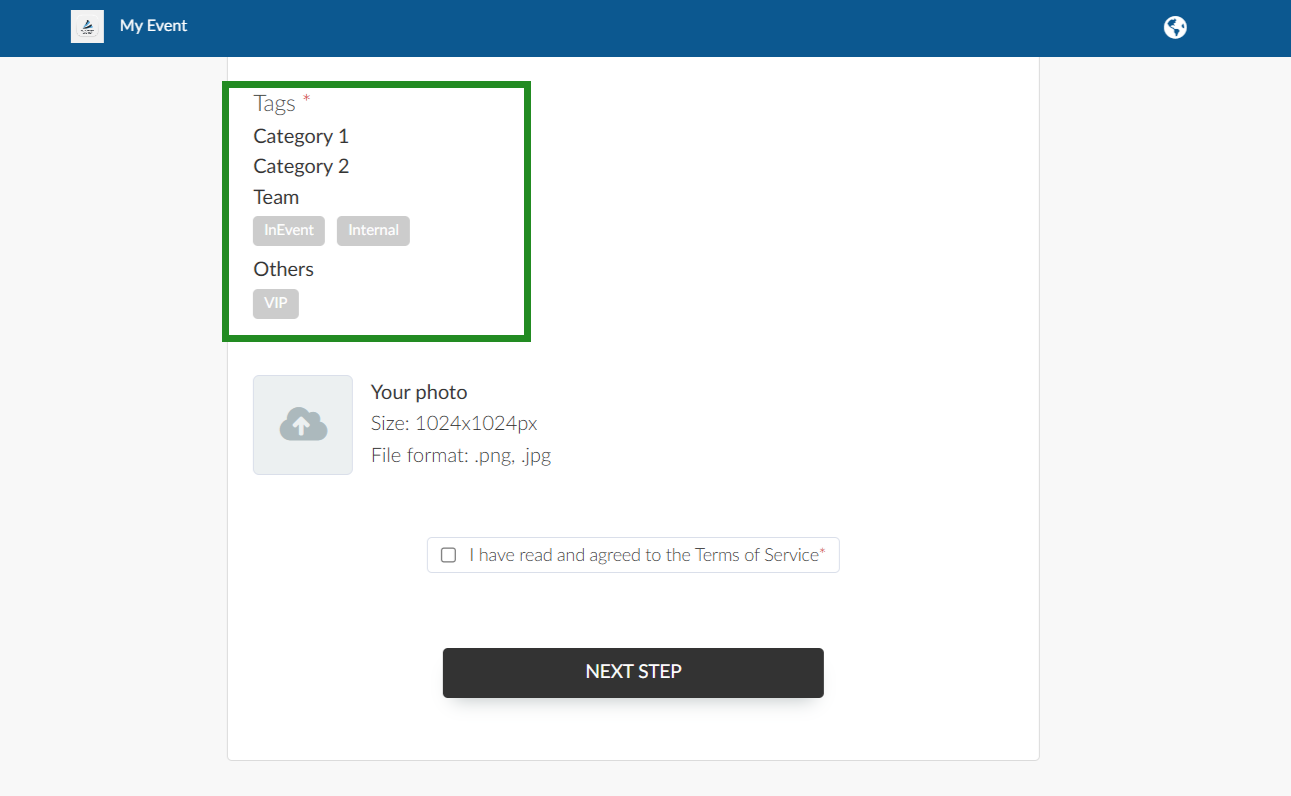
If the tag type chosen is for Attendees, on the Registration form, attendees will find the tags grouped in their respective categories. To make their selection, they can simply click on the desired tag.
Removing a category
To remove a category, click on Edit and then click on the Remove button corresponding to the category you wish to delete. A new window will appear asking for confirmation to remove the category. Press the red Remove button to confirm. Finally, press End to finish.
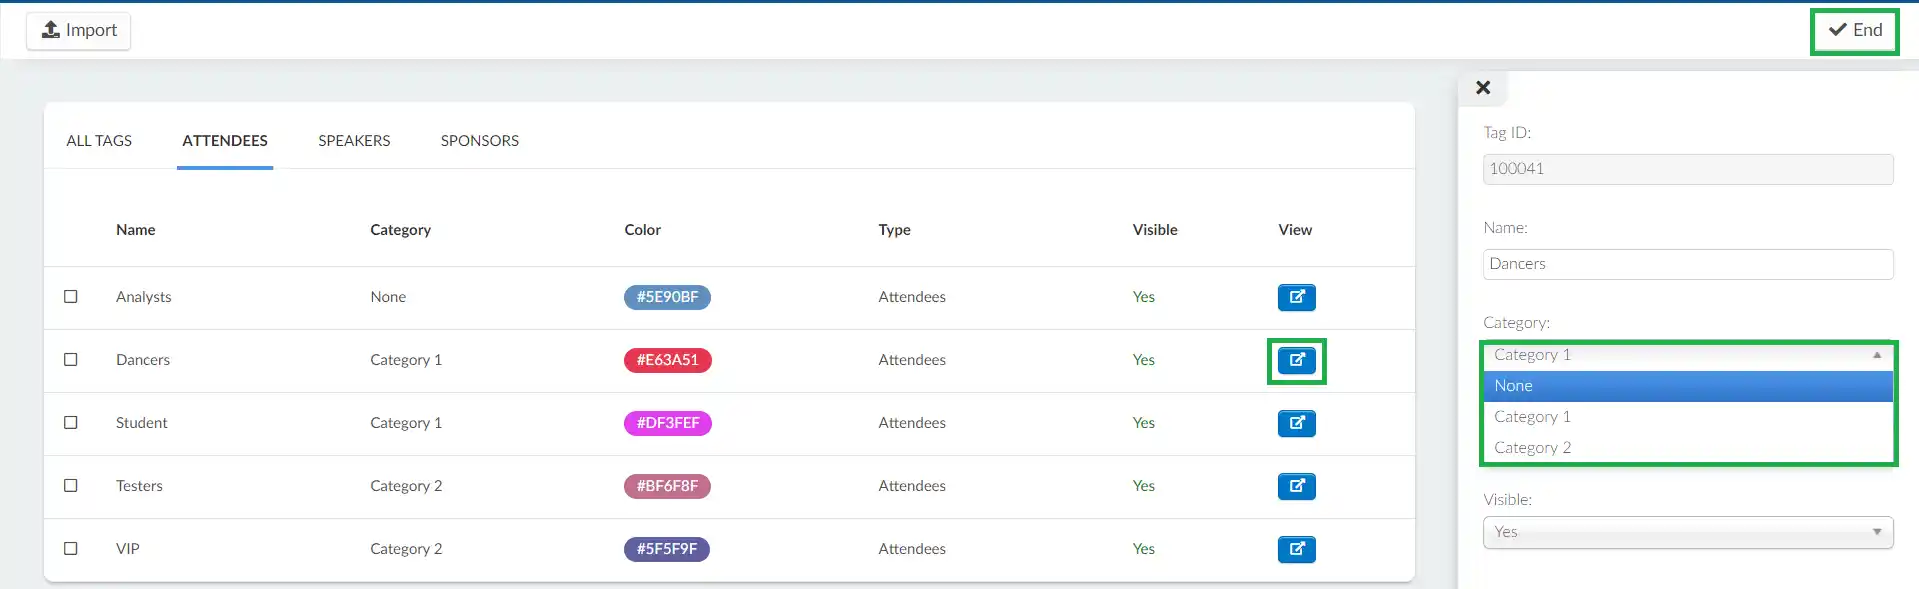
Removing a tag from a category
To remove a tag from a category, click on the blue Open tag details button under the View column of the desired tag. A window will appear at the right hand. Click on Edit and then click on the drop-down in the Category field. Next, select None from the drop-down and then press End to save your changes.
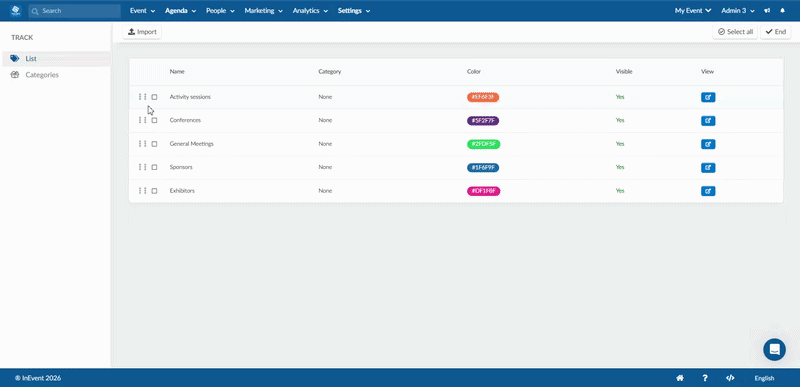
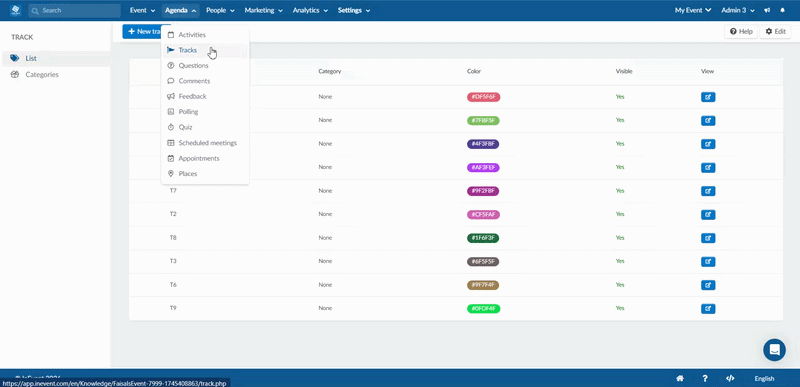
Creating tracks manually
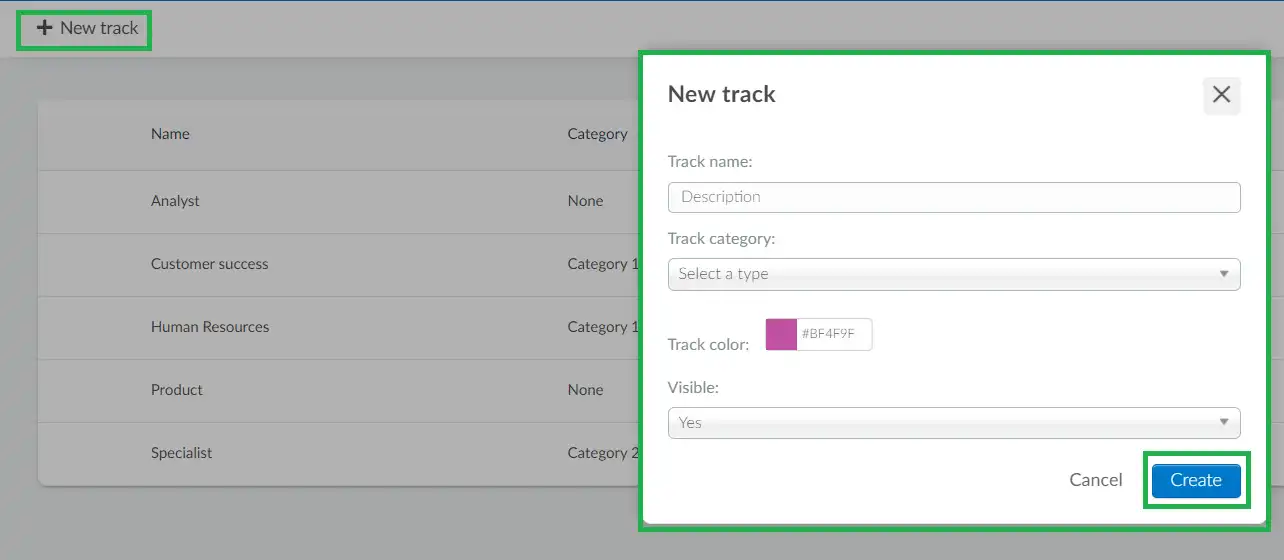
To manually create a track, follow these steps:
- Go to Agenda > Tracks.
- Click on the +New Track button on the left corner of the page
- A new window will appear for you to type in the track name, select/create a track category, add a track color, select a track type, and set the track's visibility.
- Click on Create once you have set the fields.
Regarding the track visibility, if it is set to Yes, the track will be visible to all attendees. If it is set to No, it will only be visible to admins and thus invisible to the event participants.
Removing Tracks
Once Tracks have been created, they can also be removed at any time. To remove Tracks:
- Click Edit.
- Tick the checkbox for the Track(s), then click Remove.
- A confirmation prompt will appear asking you to confirm the deletion of the selected item(s).
- Click Remove in the confirmation message to finalize the action.
Alternatively, you can also remove all tracks at once:
- Click Edit.
- Click Select All to automatically mark all Tracks.
- After selecting, click Remove.
- A confirmation prompt will appear asking you to confirm the deletion of the selected items.
- To finalize the action, click Remove in the confirmation message.
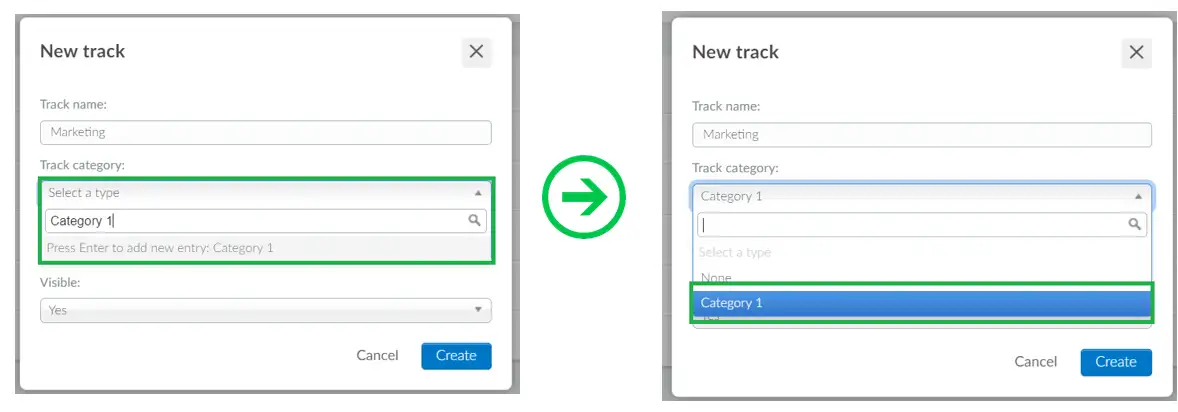
Track category
The track category is used for grouping tracks which will help attendees easily search and filter through multiple tracks using the created categories.
To create a new track category, click on the drop-down beside Select a type, type the name of the category and press enter. This created category will become available for selection in the drop-down.
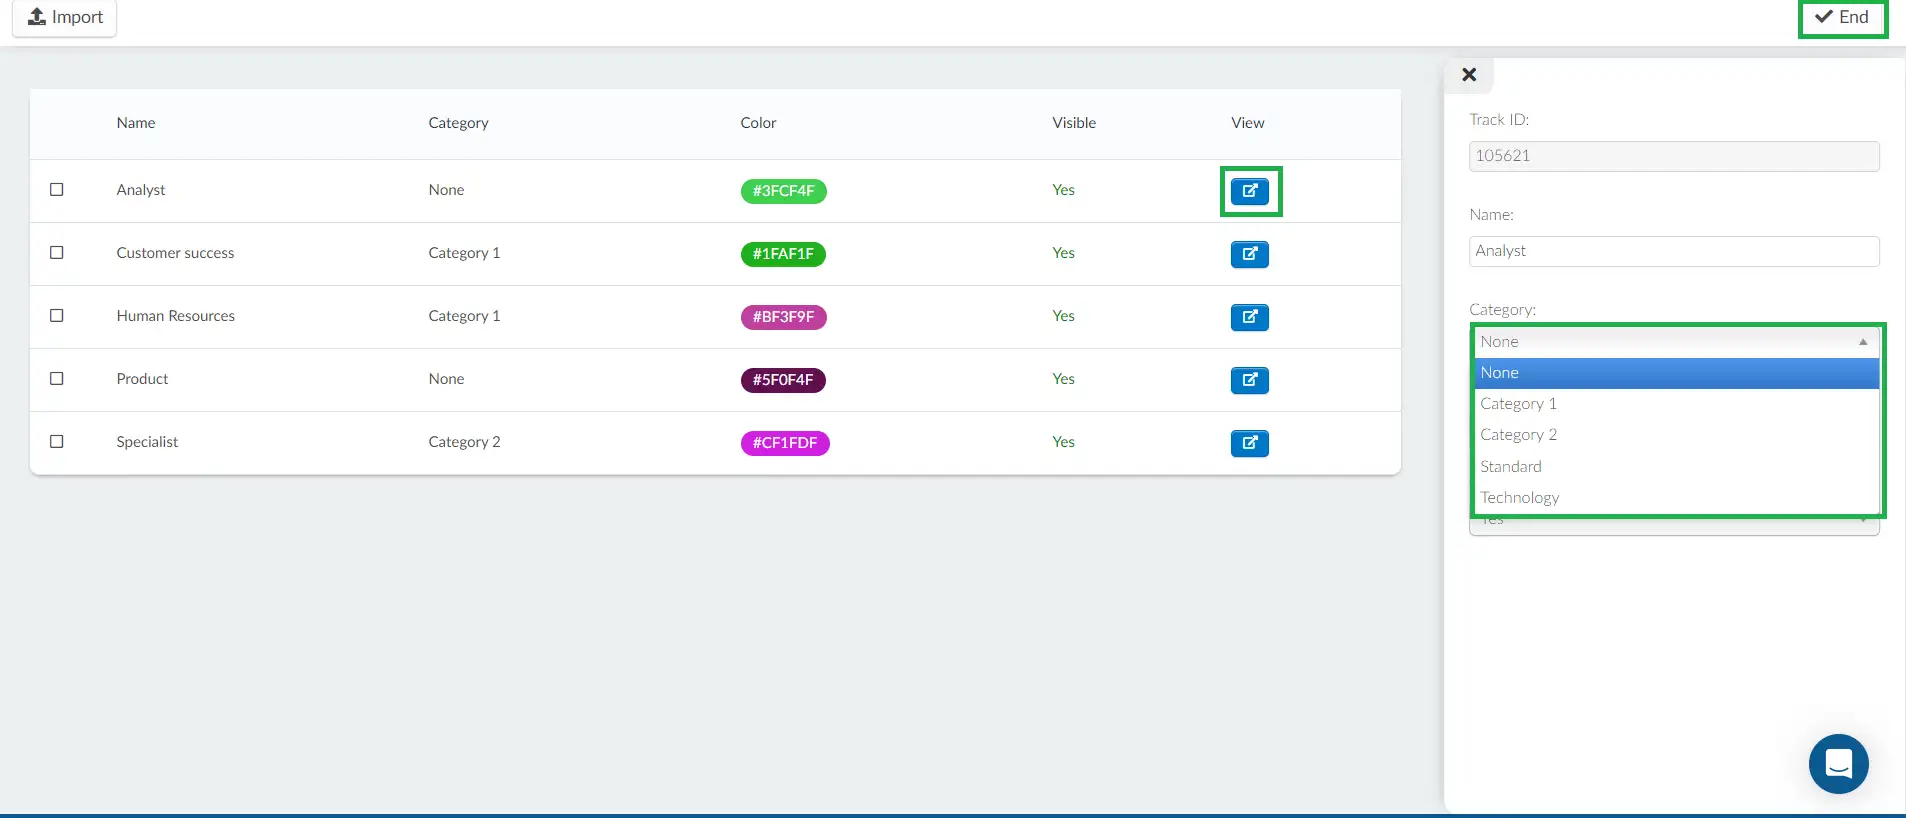
Removing a track from a category
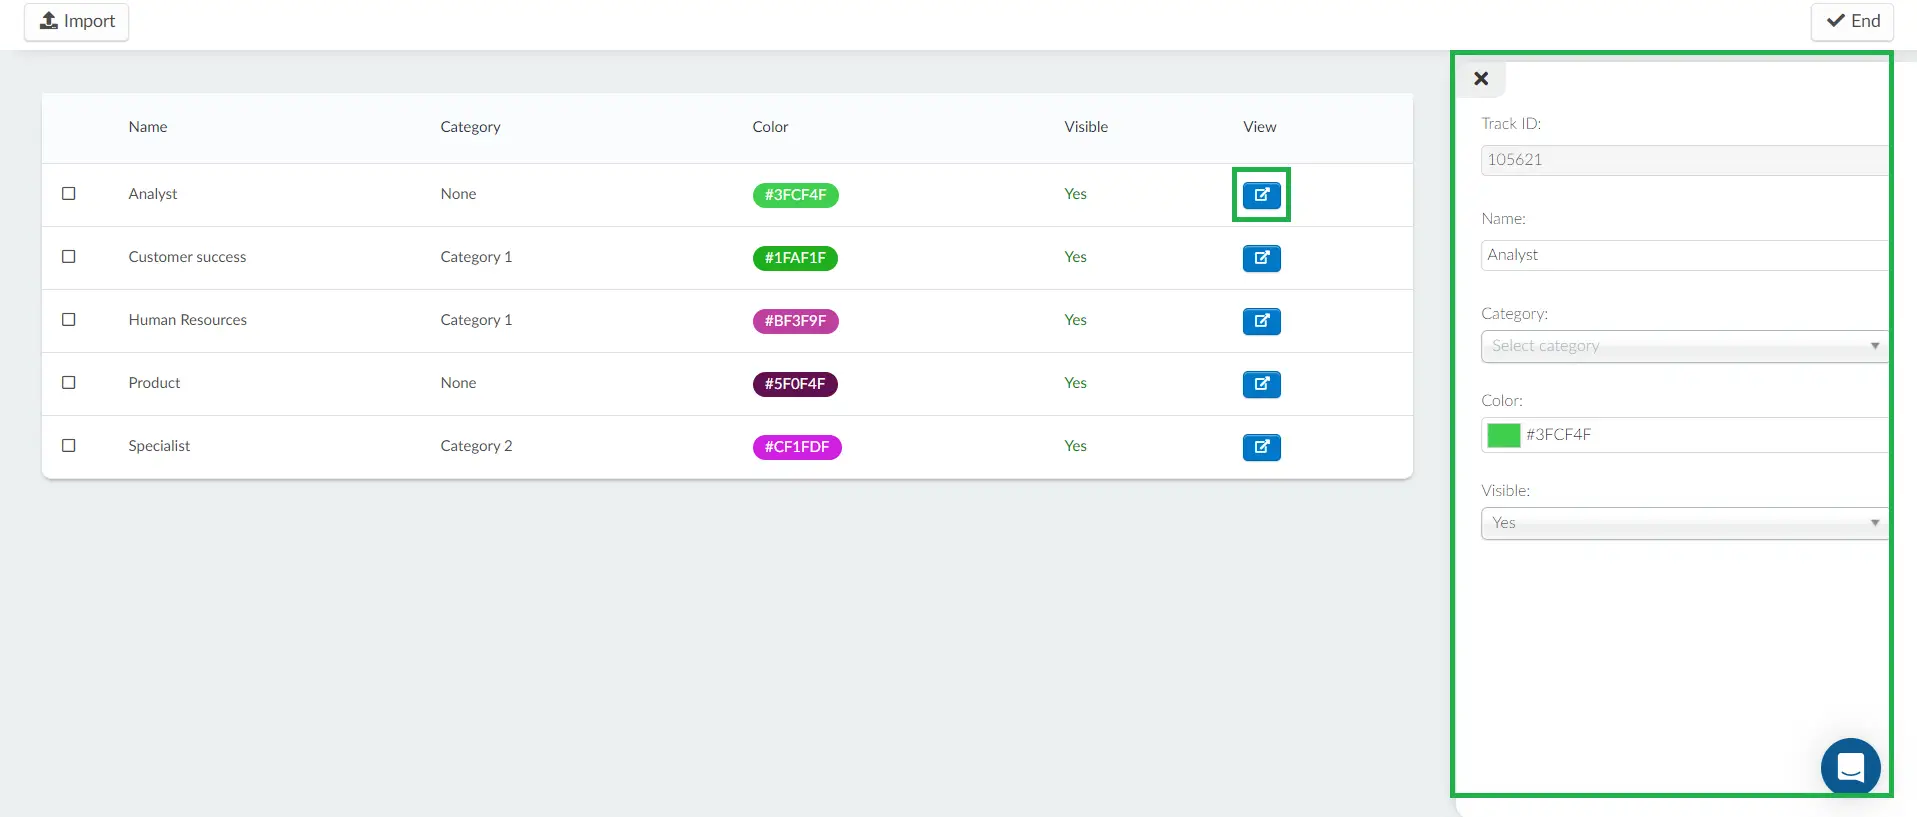
To remove a track from a category, click on the blue Open track details button under the View column of the desired track. A window will appear at the right hand. Click on Edit and then click on the drop-down in the Category field. Next, select None from the drop-down and then press End to save your changes.
Importing a spreadsheet - Tags and Tracks
You can also import a spreadsheet list with your tags and tracks to the platform.
To do so, simply click on Edit > Import > Download demo file. Then fill out the file and upload it back to the platform by clicking on the green file button and then on Import.
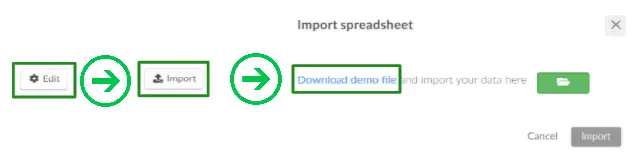
When adding your tags and tracks through the spreadsheet, you will see four columns:

- Under Name, add up to 100 characters when filling out the spreadsheet. If you add more, tag/track names will be displayed incompletely on the platform.
- Under Category, add the name of the tag/track category.
- Under Color, make sure to add the hashtag (#) to the hex code otherwise it will not work.
- Under Type, add the tag type: attendee, speaker or sponsor.
Editing or removing information
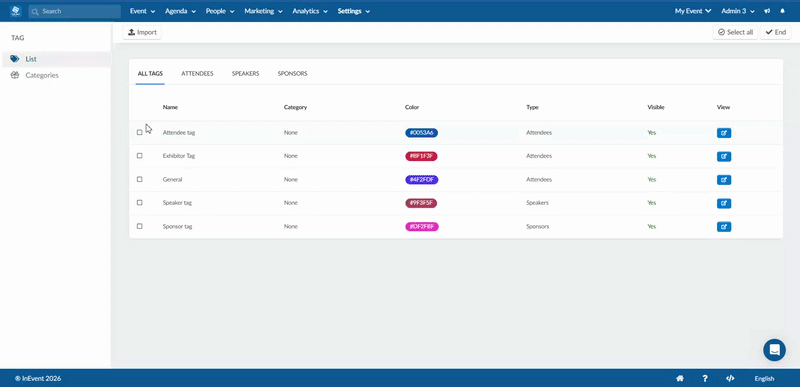
Tag dashboard
To manage all the tags created in your event you can easily filter them by type at the dashboard.
Click on the blue button and a new window will open on the right. Click on Edit if you wish to make changes to the tag's name, category, color or visibility. Click End when you are done.
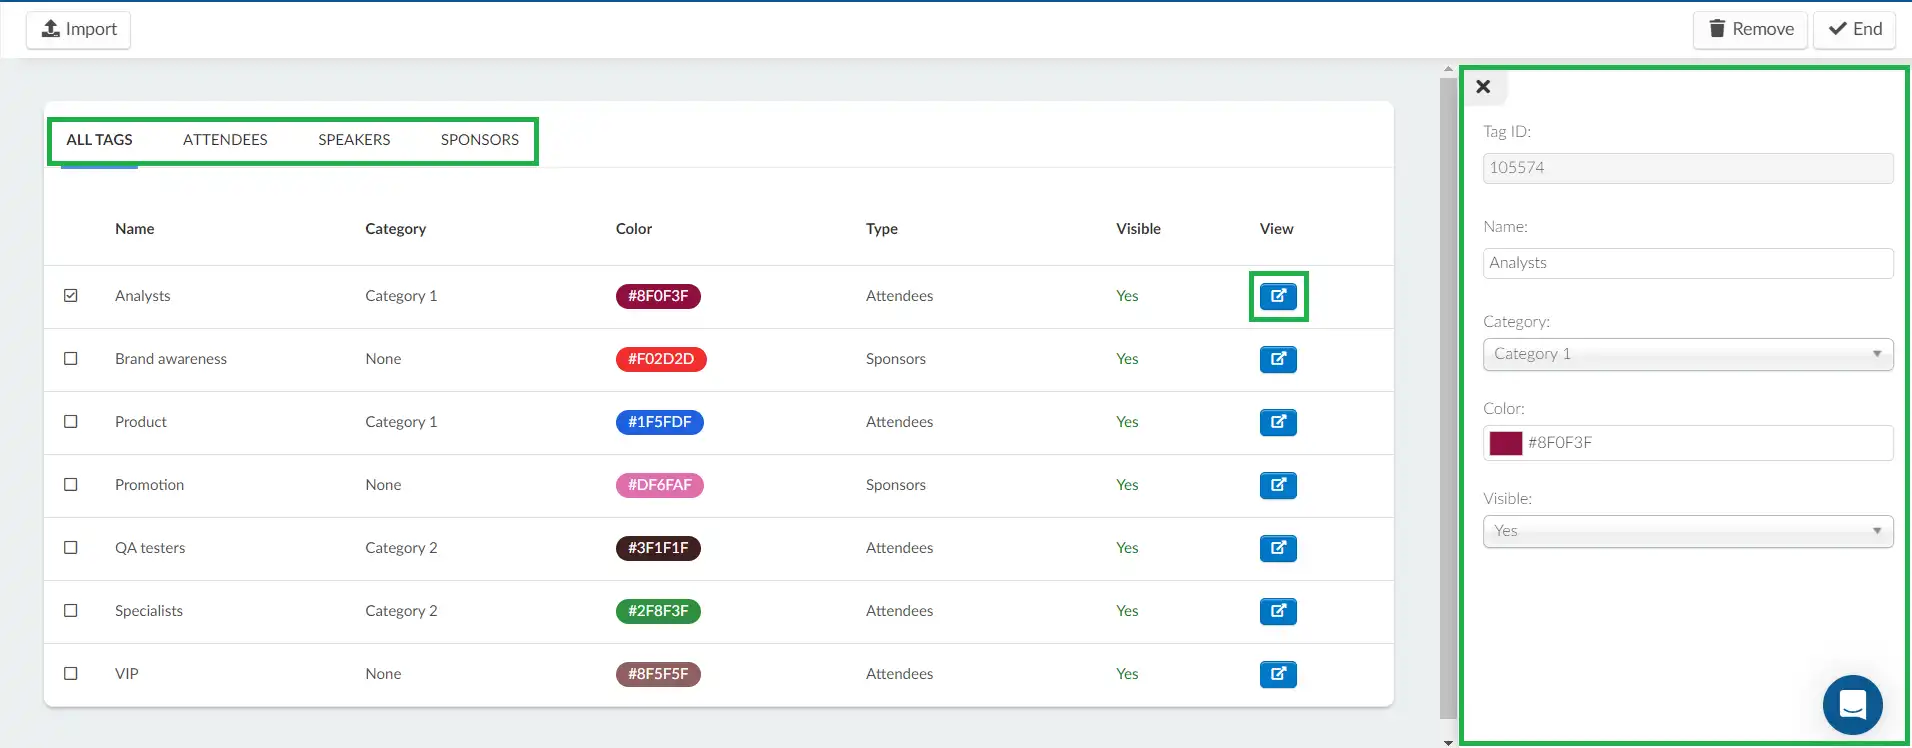
To remove a tag, click on Edit and tick the checkbox(es) beside the tag(s) you wish to remove. Click on the Remove button at the top right of the page. A confirmation box will appear, click Remove again to confirm your action.
Tracks Dashboard
If you wish to modify any information related to the tracks, click on the blue button and a new window will open on the right. Click on Edit to make the necessary changes and click on End when you are done.
You can manually arrange Tracks directly from the tracks dashboard. To do this, navigate to the Tracks section, click on Edit, and drag and reorder the Tracks according to your preferred sequence. The selected order will then be automatically reflected on the frontend wherever Tracks are used, including Session filtering and Virtual Lobby filtering, ensuring a consistent display across attendee-facing areas.
To remove a track, click on Edit and tick the checkbox(es) beside the tag(s) you wish to remove. Click on the Remove button at the top right of the page. A confirmation box will appear, click Remove again to confirm your action.

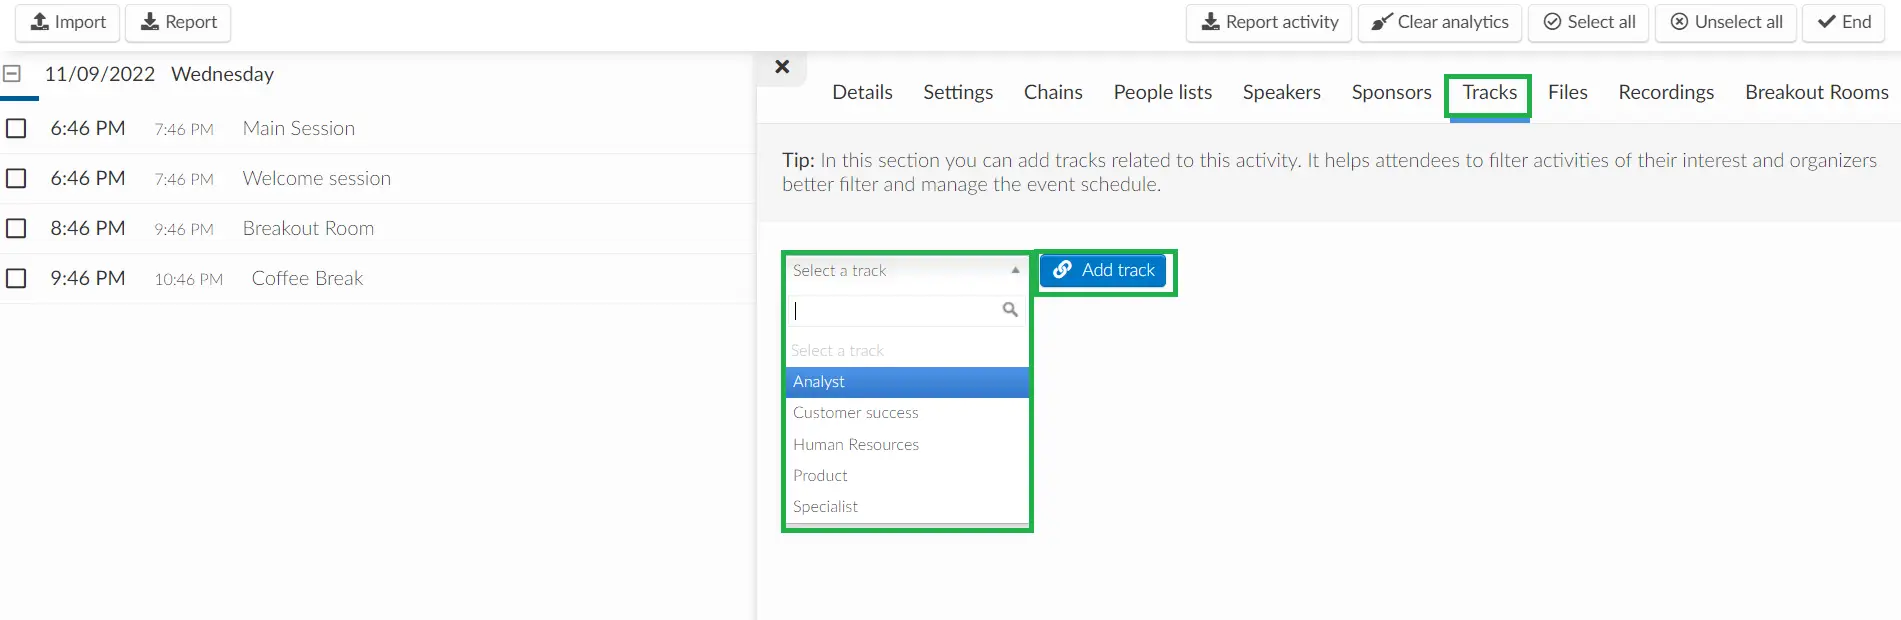
Adding a track to an activity
To add a track to an activity, press Agenda > Activities. In the top right corner press the Edit button.
Click on any activity on the left side. In the window on the right click on Tracks choose a tag from the drop-down bar and then press the blue Add track button. Click End to finish.
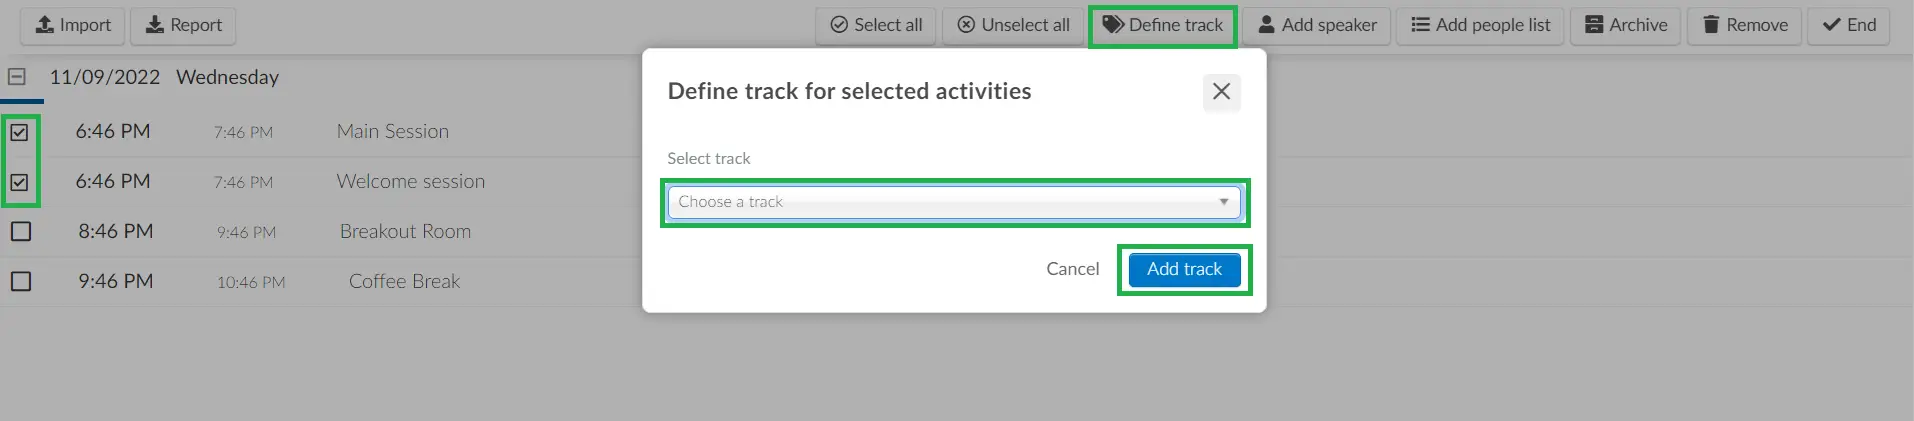
Adding tracks to multiple activities
To add tracks to multiple activities at the same time, click Agenda > Activities > Edit, select the activities by ticking the check box on the left side and then click Define Track in the top right corner. Choose the track you want and confirm by pressing Add Track.
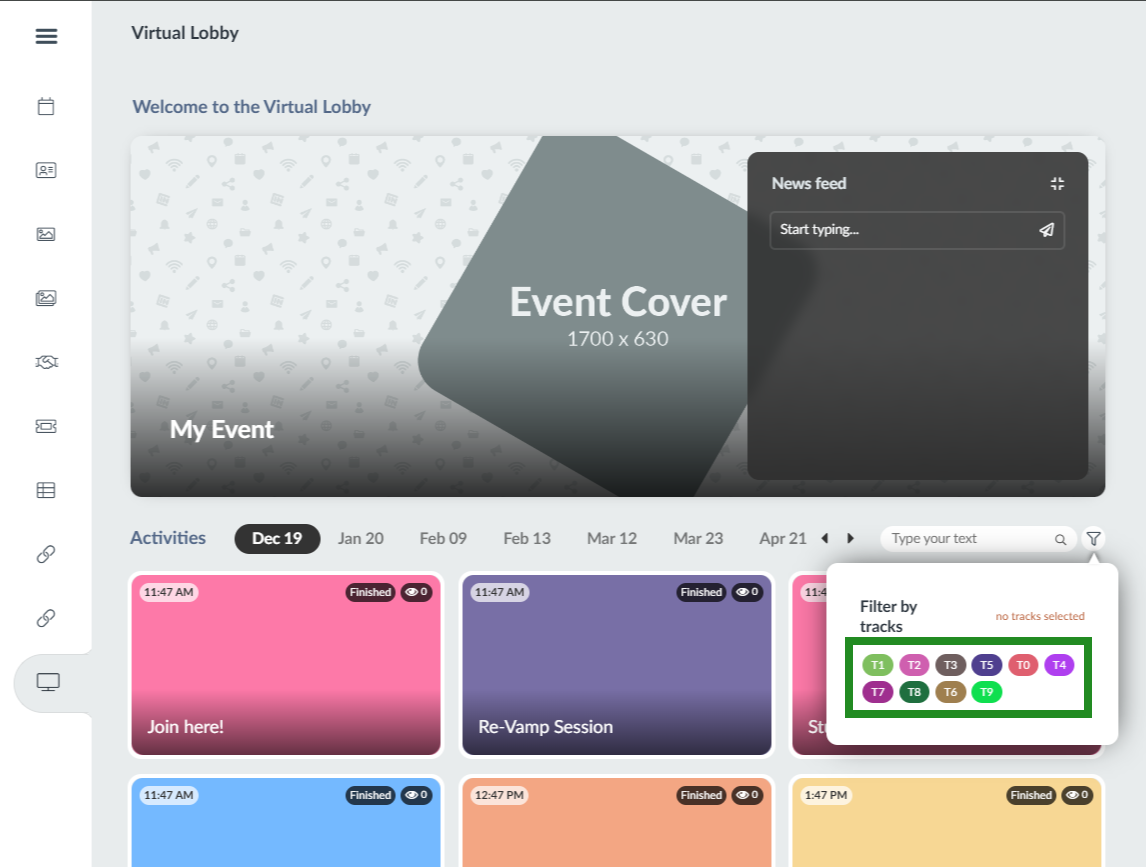
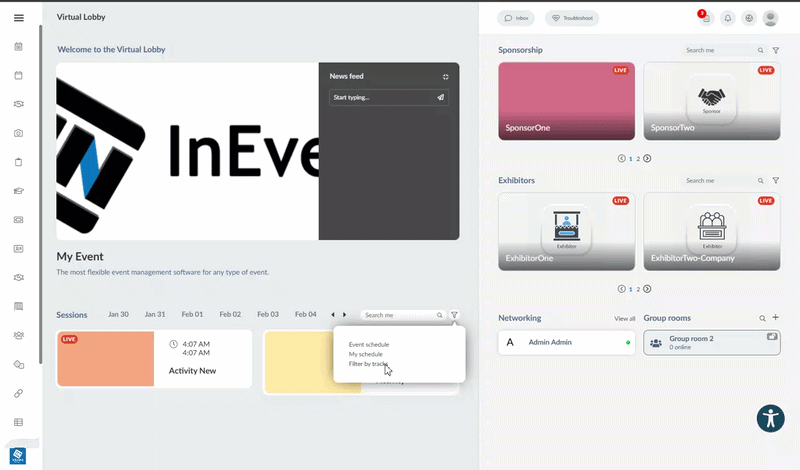
Filtering activities by tracks in the Virtual Lobby
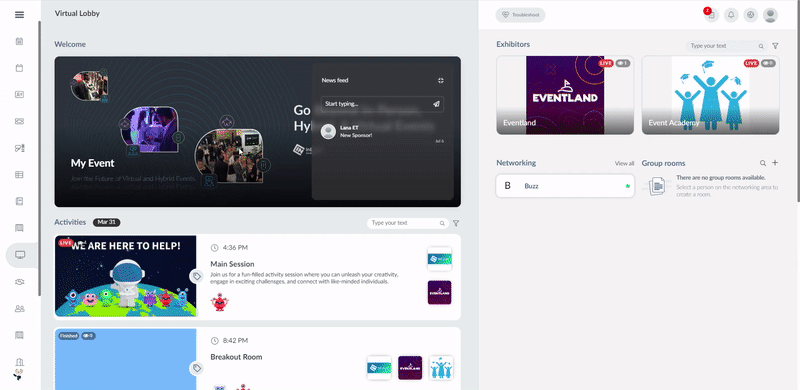
In the Virtual Lobby's main page, all users have the option to filter activities by track. To do this, click on the funnel icon and select Filter by tracks. This action will display the created tracks, grouped in their respective categories (if created). Click on a track or multiple tracks, and the activities linked to the selected track(s) will be shown.
To unselect a track, simply click on it one more time.
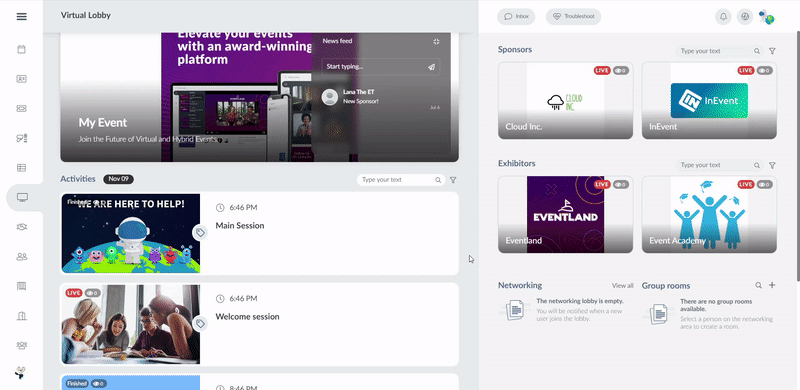
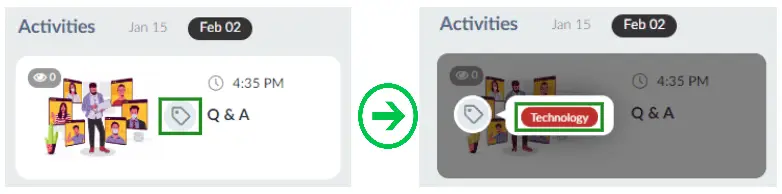
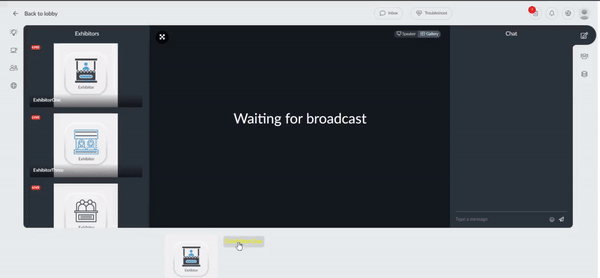
The users can use the tag icon by the activity to see the tracks that have been attached to an activity, as shown in the image below.
Filtering activities using Tracks in My Agenda
It is also possible to filter activities in My Agenda tab through tracks as displayed in the gif below:
Displaying activities by tracks in the Virtual Lobby
Event administrators can configure the Virtual Lobby so that activities are shown by tracks instead of by date. This is useful for streamlining activities for your attendees. To do so, navigate to the Virtual Lobby Editor. Within the Layout tab, click the Activity tabs drop-down menu and select Tracks.
Adding a tag to an attendee
To add a tag to an attendee, follow these steps:
- Go to People > Attendees.
- Select the attendee's name from the list.
- Click on the Edit button in the top right corner. A new window will appear on the right side.
- Scroll down to the bottom, where you will find all the created tags.
- Click on the desired tag you want to associate with the attendee. Once selected, the tag will change from grey to the tag's color.
- Click on the End button to save your changes.
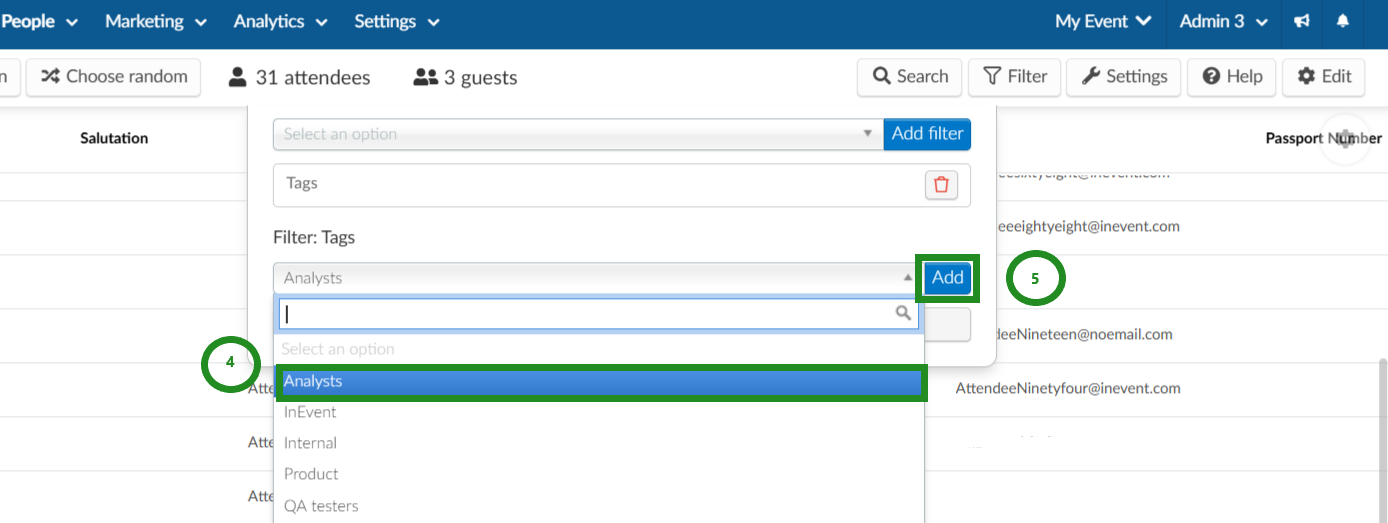
Filtering attendees by their tags
To filter attendees by their tags, go to the People > Attendees page on the platform. Then, click on the Filter icon on the top right > select Tags in the drop-drown bar > and click Add filter.
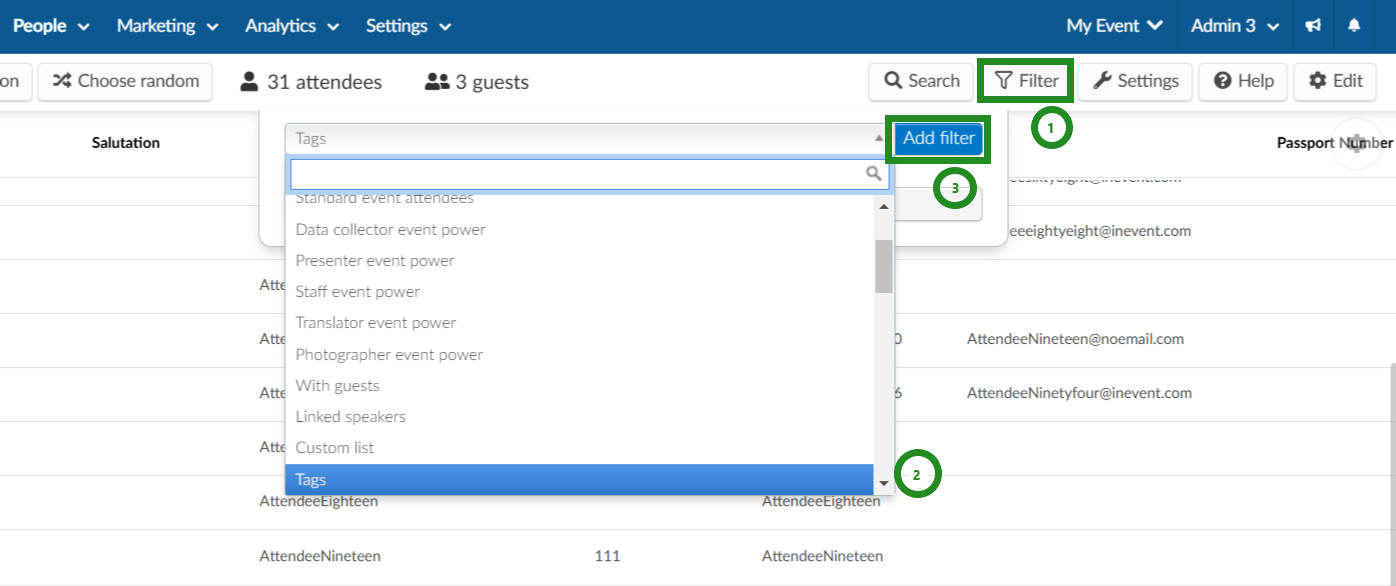
Next, under Filter: Tags, select the tag you wish to use as a filter and press Add to see the filtered results.
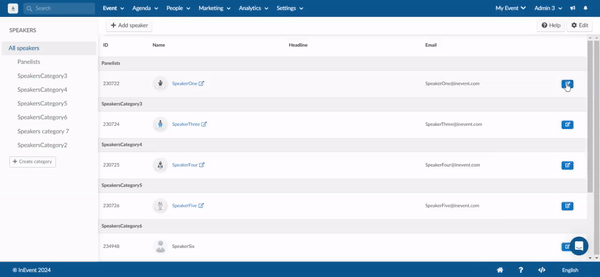
Adding a tag to a speaker
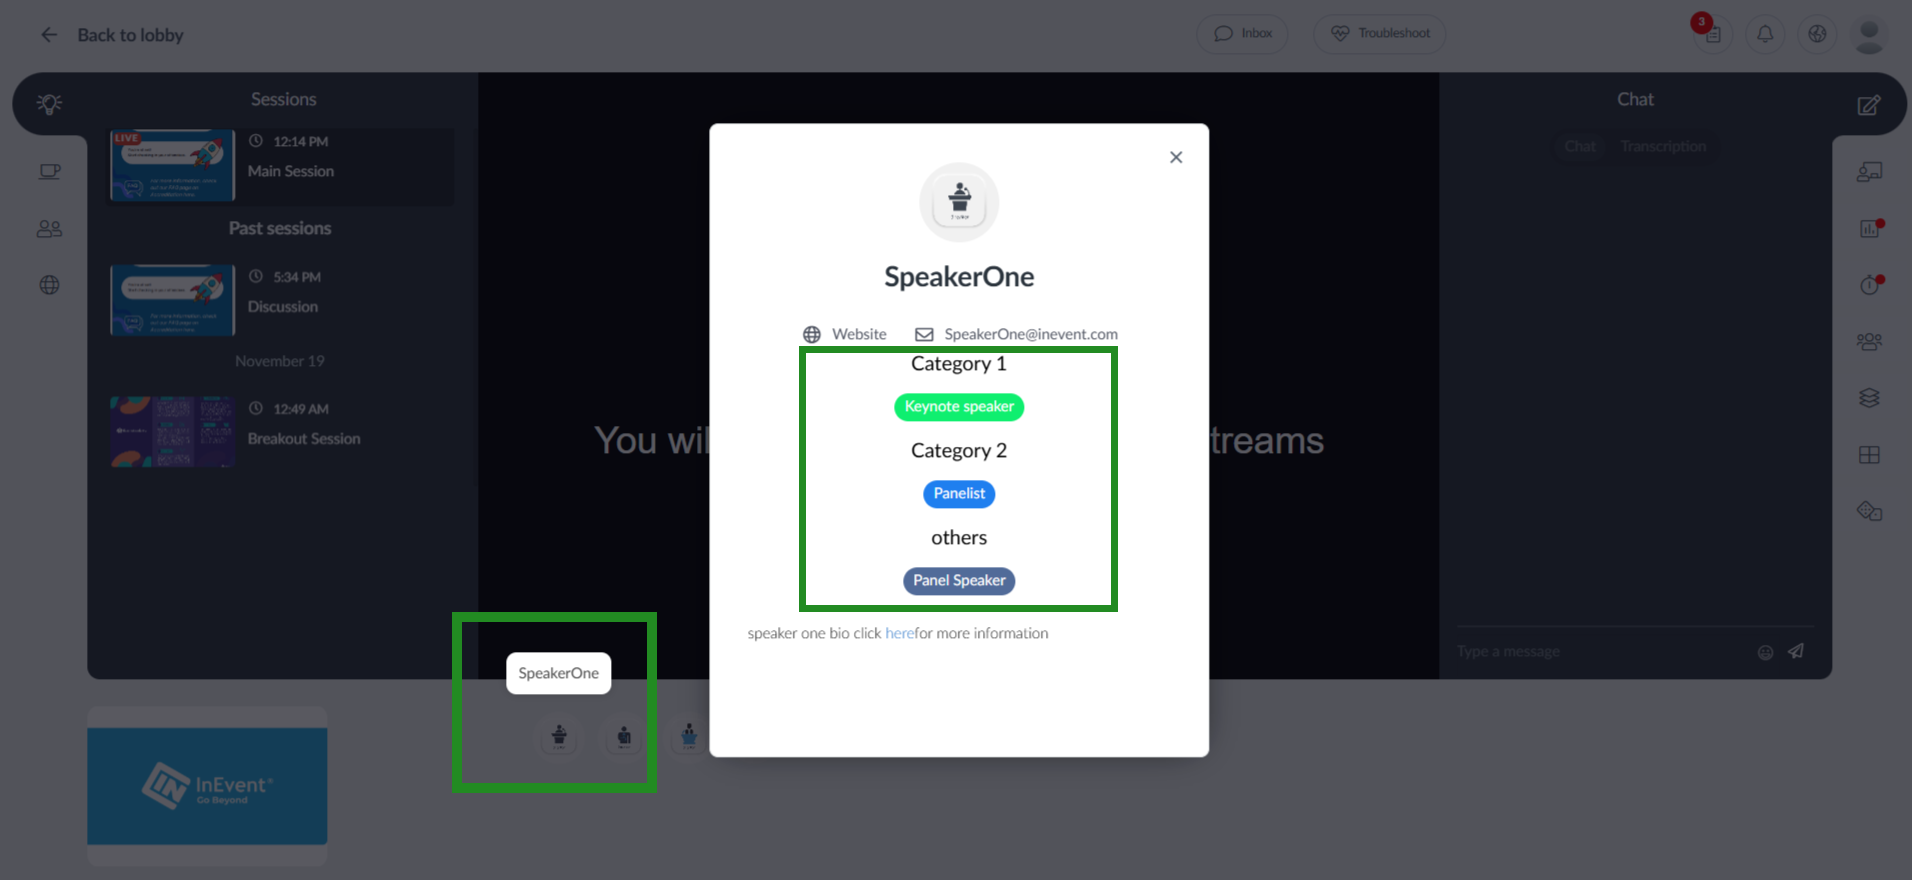
To add a tag to a speaker click Event > Speakers. Press the Edit button in the top right corner. Click on the Speaker's name and a new window will open up on the right side. Scroll down to Speaker tags field. You will find the tag(s) grouped in their respective categories (if created), uncategorized tags will be grouped under others. Choose the tag you want to associate to the Speaker, by clicking on it. This will change the tag to its tag color. Press the End button in the top right corner to save changes.
Attendees can view the tag(s) associated with a Speaker in their respective category(ies) by clicking on the Speaker's profile located at the base of an activity room that they are linked to.
Adding a tag to a Sponsor
To add a tag to a Sponsor click Event > Sponsors. Click on a Sponsor and the Details tab will appear on the right side. Click on the Edit button in the top right corner. Scroll down to Tags. You will find the tag(s) grouped in their respective categories (if created), uncategorized tags will be grouped under others. Choose the tag you want to associate to the Sponsor by clicking on it. This will change the tag to its tag color. Press End to save your changes.

Attendees can view a Sponsor's tag(s) grouped in their respective category(ies) inside the Sponsor's room by clicking on the Sponsor's name located at the base of the room.
Attendees who are linked to a Sponsor, will see the Sponsor tags grouped in their various categories by going to the Sponsor account tab. Here they can add new tags or remove the tags they are already associated with by simply clicking on Edit and then clicking on the respective tag(s). Click Done to save changes.
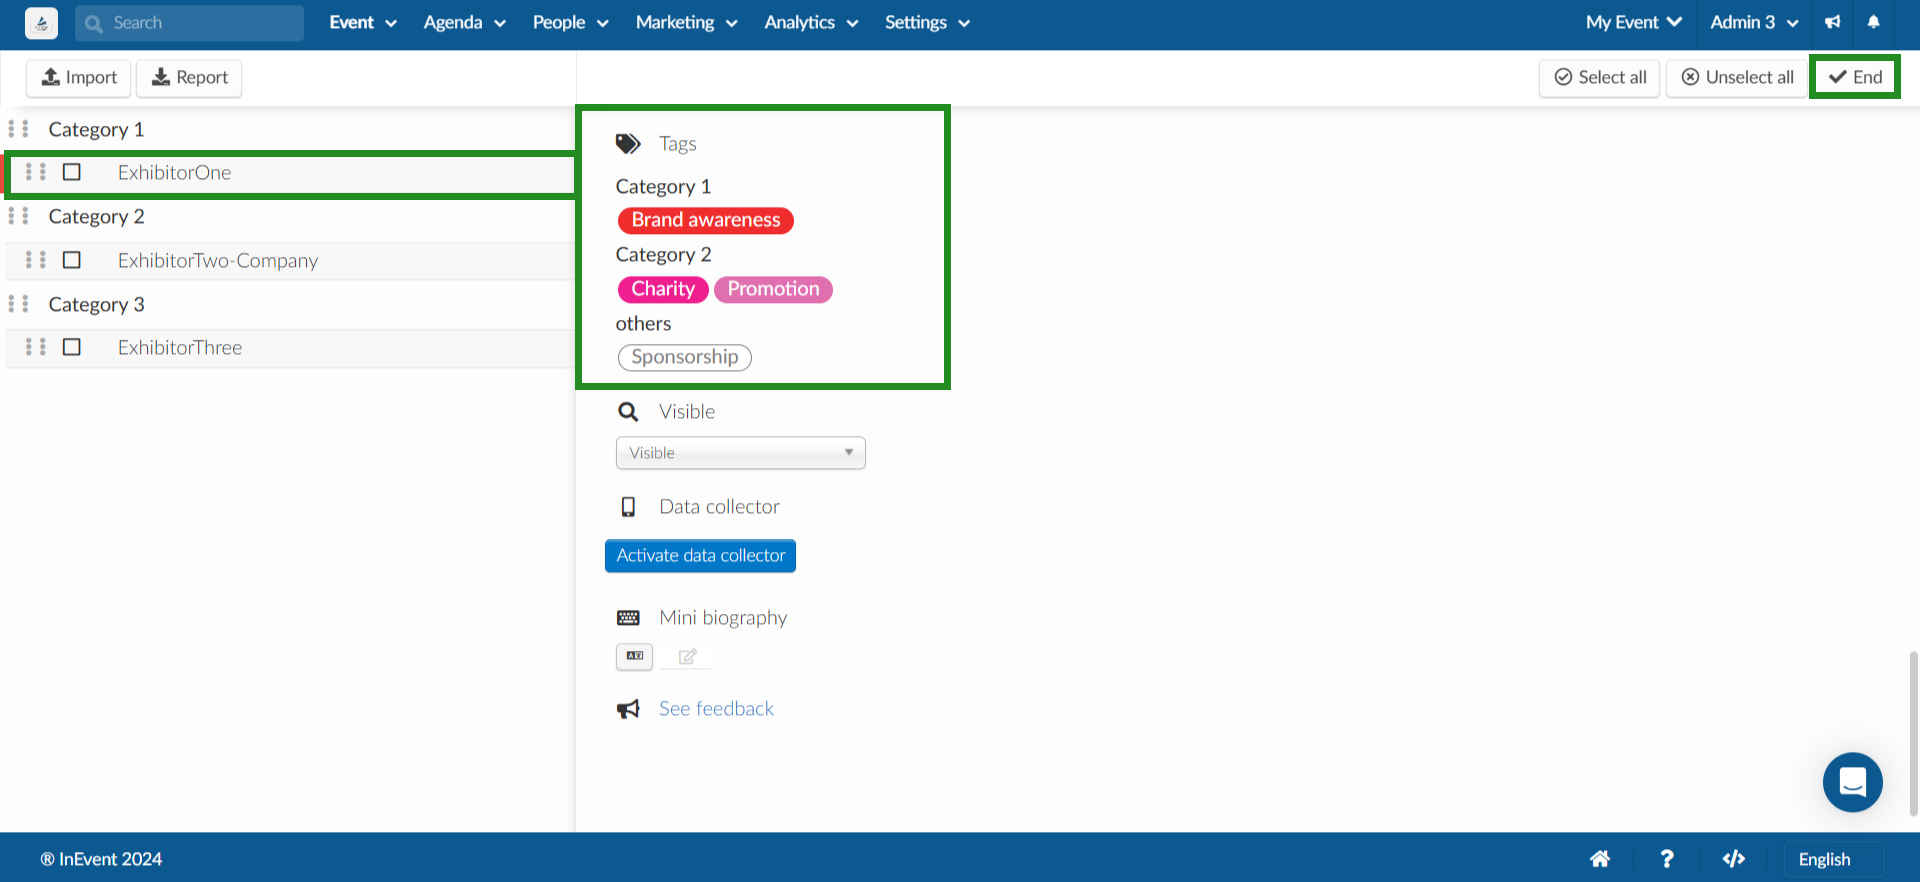
Adding a tag to an Exhibitor
To add a tag to an Exhibitor, go to Event > Exhibitors. Click on an Exhibitor and the Details tab will appear on the right side. Click on the Edit button in the top right corner. Scroll down to Tags. You will find the tag(s) grouped in their respective categories (if created), uncategorized tags will be grouped under others. Choose the tag you want to associate to the Exhibitor by clicking on it. This will change the tag to its tag color. Press End to save your changes.
Attendees can view an Exhibitor's tag(s) grouped in their respective category(ies) inside the Exhibitor's room by clicking on the Exhibitor's name located at the base of the room.
Attendees who are linked to an Exhibitor, will see the Exhibitor tags grouped in their various categories by going to the Exhibitor account tab. Here they can add new tags or remove the tags they are already associated with by simply clicking on Edit and then clicking on the respective tag(s). Click Done to save changes.
Making tags appear on your Registration Form
To make tags that you have created for Attendees visible on your Registration Form, click on the Settings button, and disable the Tags lock tool by toggling the button off as shown below.
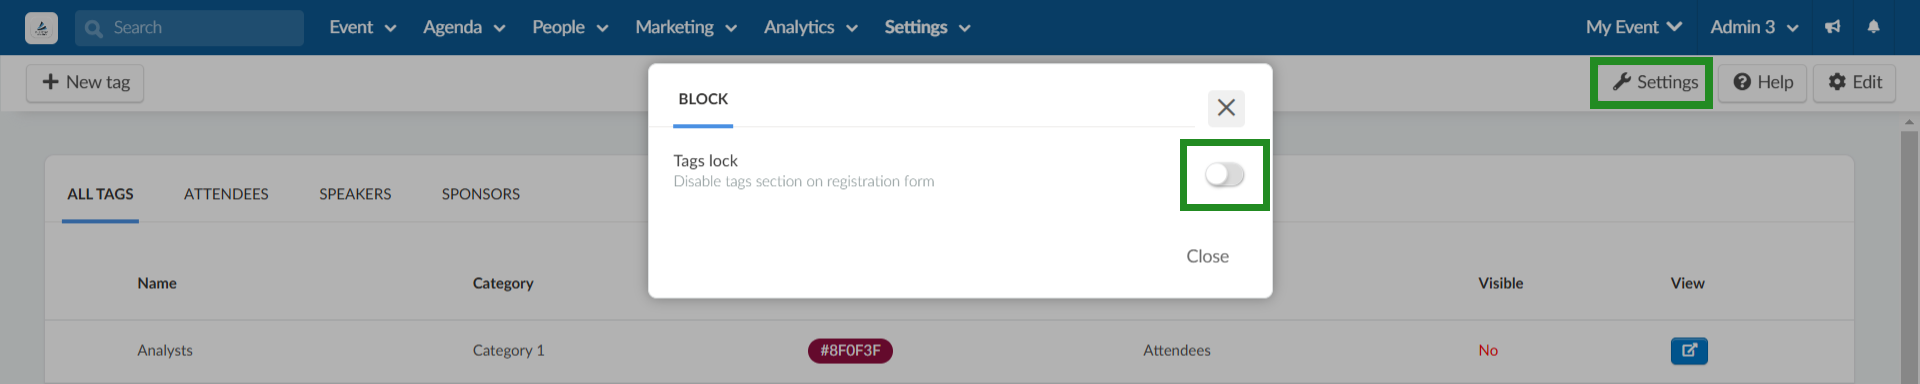
Alternatively, you can turn on the tool if you want to hide tags from your Registration Form.