Your Marketo integration with InEvent can include created lists, associated emails, given names, or attached tags. You will be able to automatically import all data captured on Marketo's landing pages to the InEvent platform, and also export your data from the InEvent event platform to Marketo. Synchronization occurs automatically and allows custom fields to be used.
How do I enable or disable the Marketo integration?
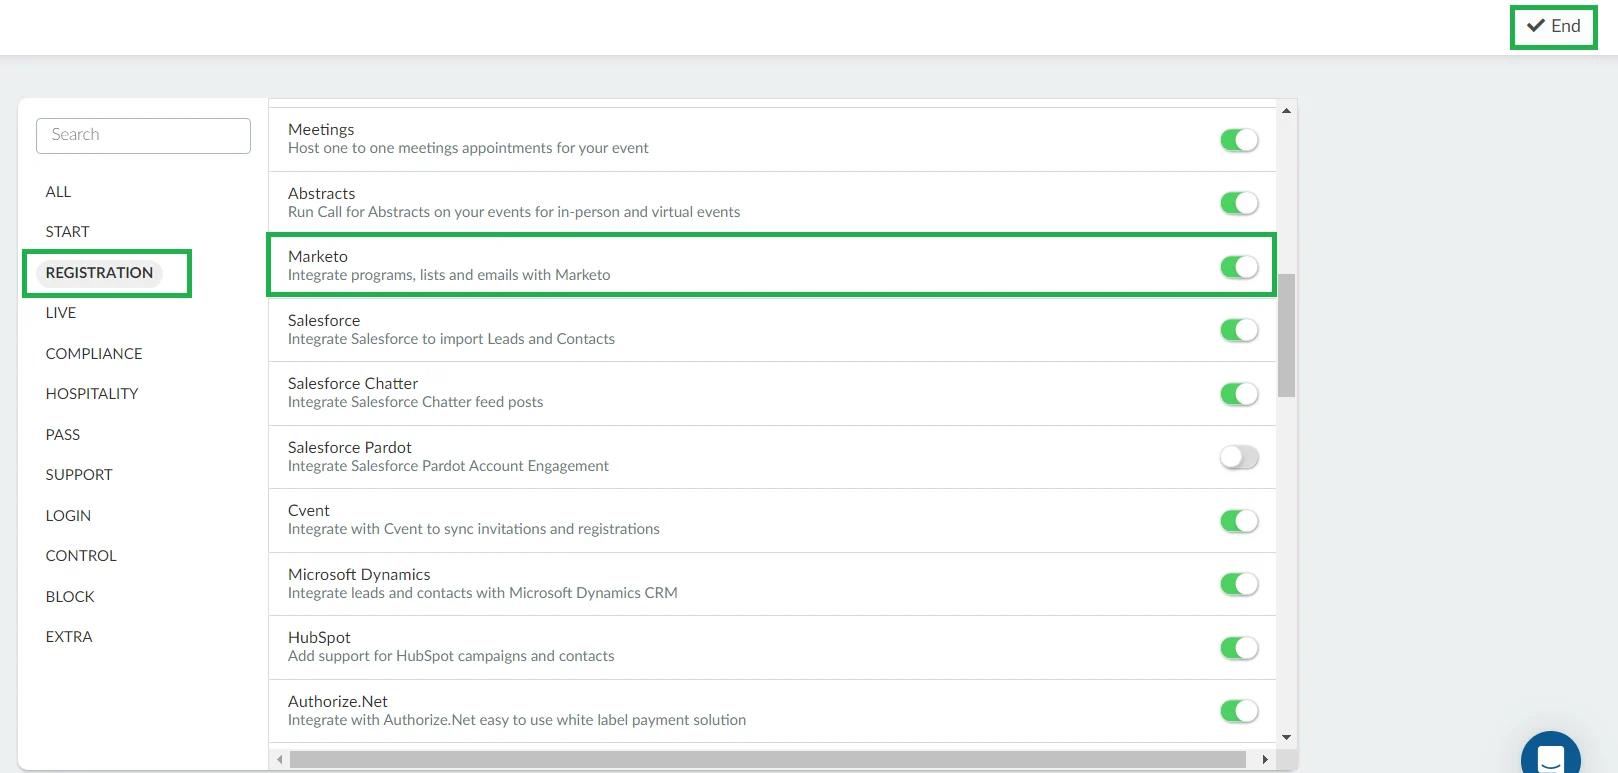
To enable this feature, go to Account>Tools. Click the Registration section and locate Marketo. Press Edit and toggle its button on. Press End to save the changes.
Integrating InEvent with Marketo
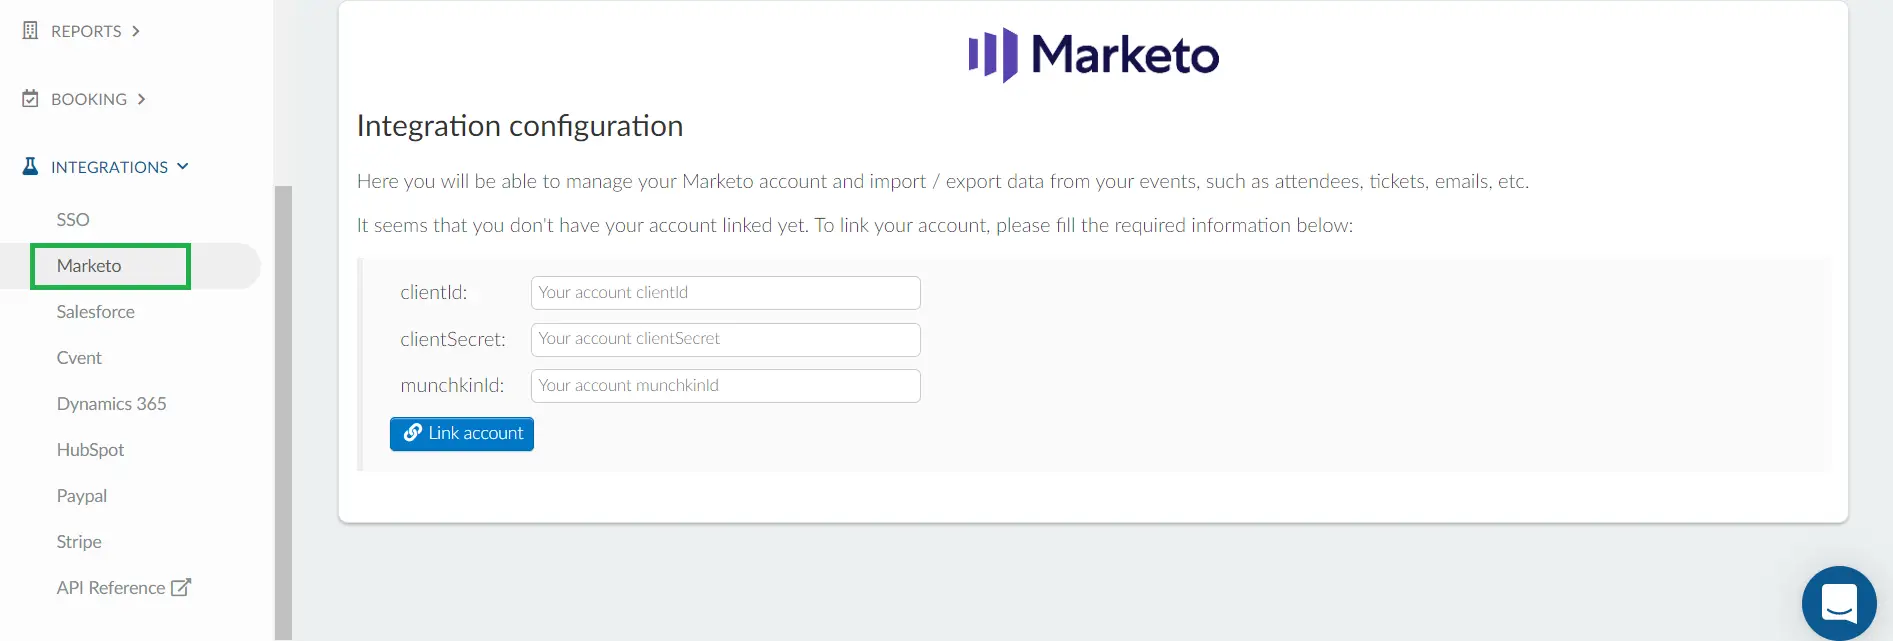
To integrate InEvent with Marketo, go to Integrations > Marketo. On the integration page, you will be prompted to fill in the following details:
clientId
clientSecret
munchkinId
To retrieve your clientId, clientSecret, and munchkinId, log in to your Marketo account. These credentials are necessary to complete the integration and enable data transfer between InEvent and Marketo.
Accessing your Marketo account
Creating a new role
Click on Admin > Security > User & Roles.
In Roles, you must click on New role.
Type API Role under Role name.
Select the Access API (35 of 35) option.
Click on Create.
You will see the recently created Role on your screen just after you finish the step above.
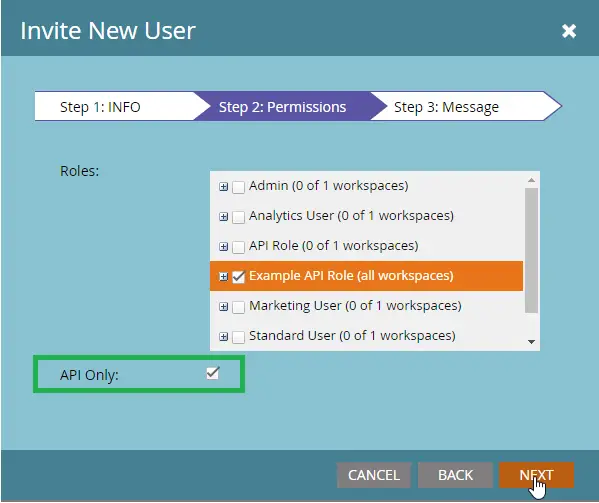
Creating a new user
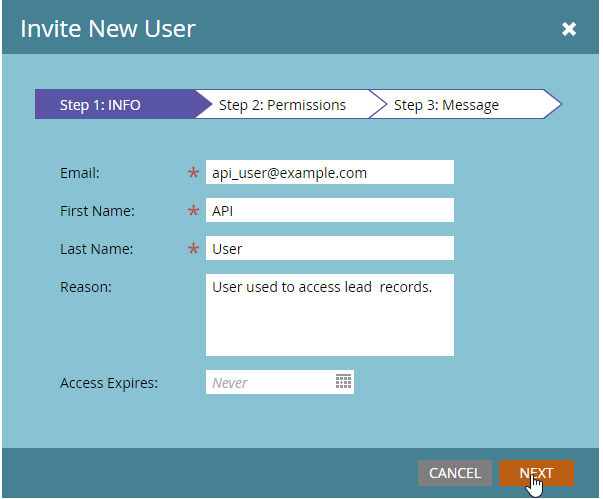
To do this, click on Users > Invite new user and follow the steps below:
Step 1 INFO: Add Email, First name, and Last name (it must be written API). Then, click on Next.
Step 2 Permissions: You must check the 'API' option and also the 'API Only' and click on the Next button. Note: The API Only option is mandatory.
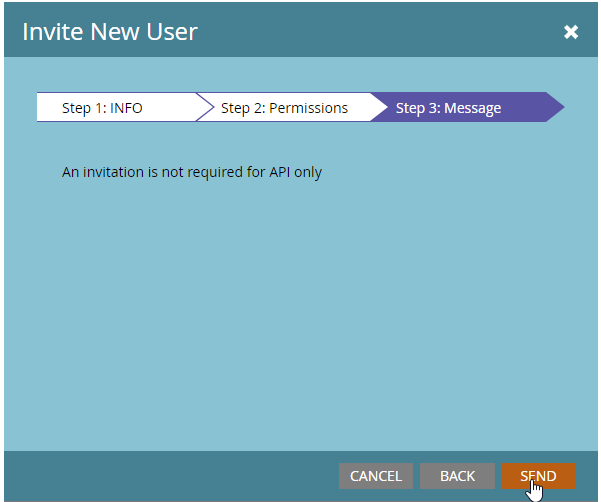
Step 3 MESSAGE: Just click on Send to finalize the process
Setting up the integration
The next step is to configure the Integration,
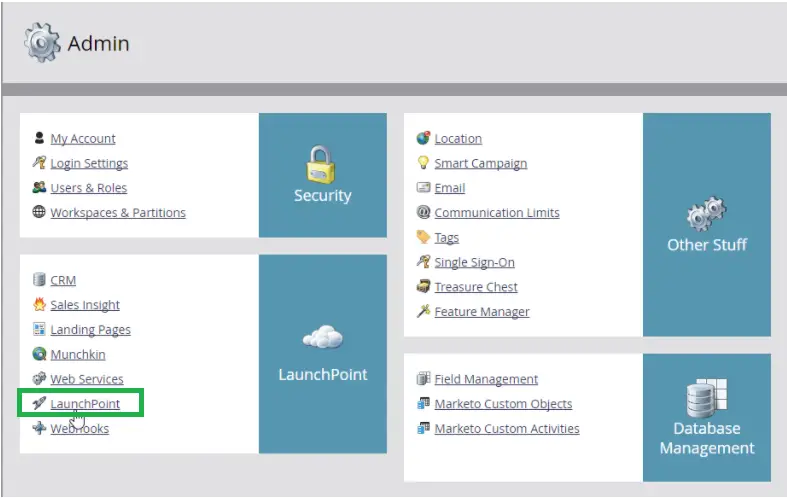
Click on Admin > Integration Launchpoint.
On this screen, you need to create a new service by clicking on New > New service.
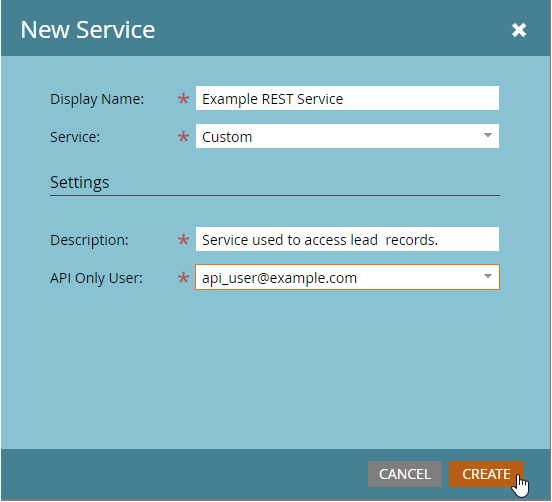
You must fill in the fields according to the following image (except the description field, which can contain any text as it makes no difference, and the API Only User should contain the previously created user) and click on Create.
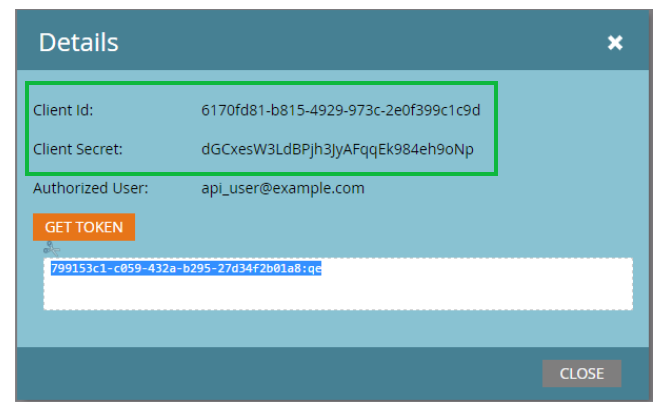
Checking information
To check your final information click View details.
The information requested to finish the integration inside our platform is in the details. Then you just copy and paste the clientId and clientSecret into the integration with the Marketo screen.
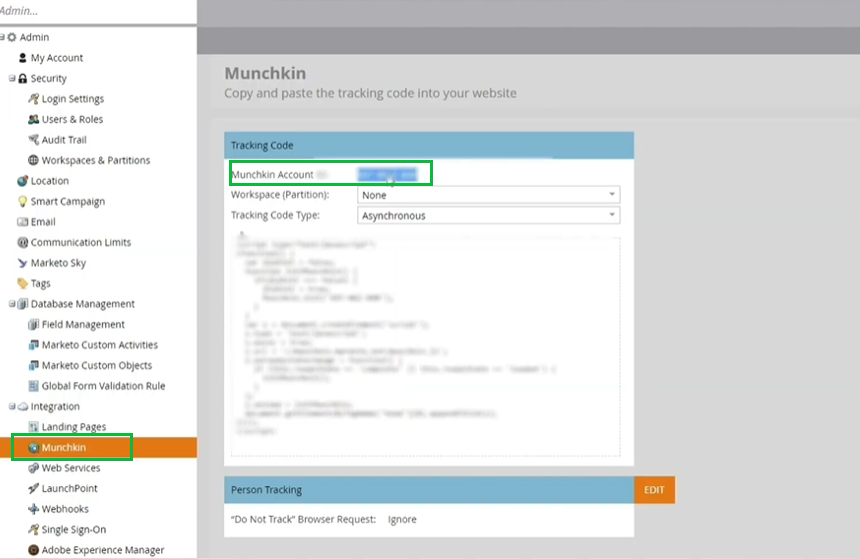
Finally, the munchkinId can be found on Integration > Munchkin > Munchkin account ID.
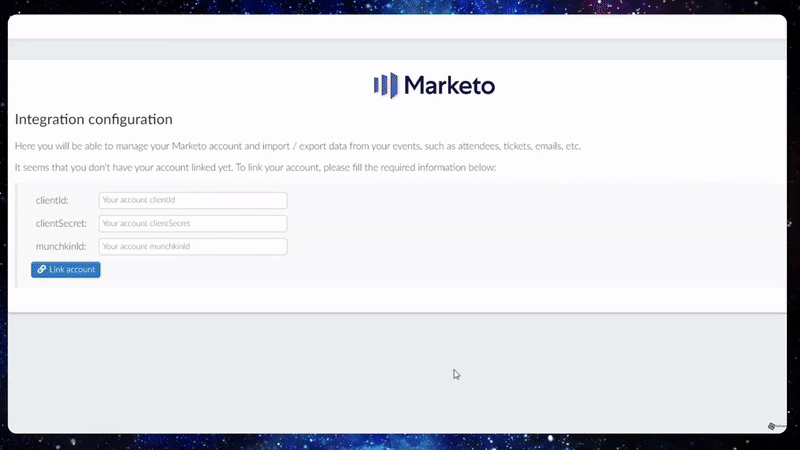
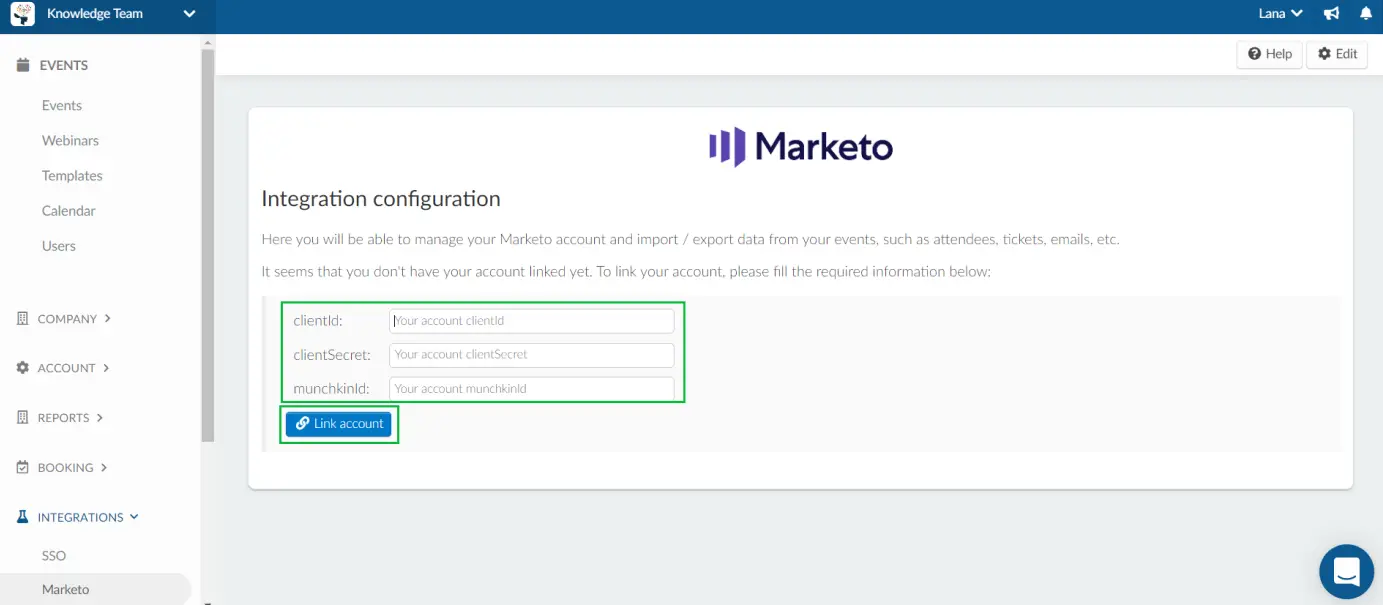
Linking your Marketo account with InEvent
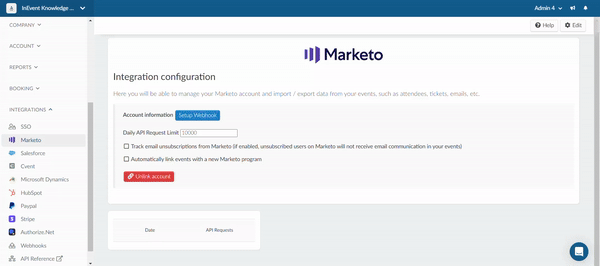
After you have gotten the clientId, clientSecret and munchkinId, add them to their corresponding fields on the Marketo integration screen on InEvent's platform. Then click on Link account.
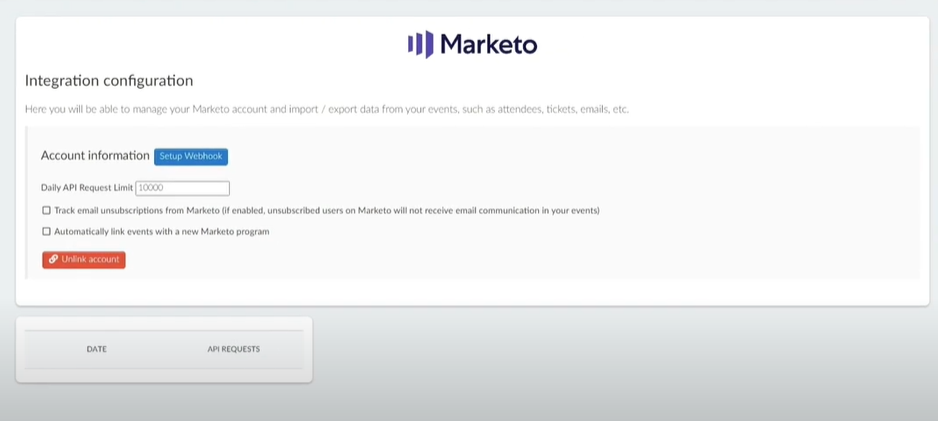
Once the account is linked, you will see additional information that can be set up.
Marketo allows the use of Webhooks to communicate with third party web services. If you wish to set up a webhook integration with Marketo, click on the Setup Webhook button and follow the steps given.
Daily API Request Limit: By default this is set to 10,000. There is a daily allocation of at least 10,000 REST API calls per day. You can set the number of calls per day by inputting the number in the box.
Track email unsubscriptions from Marketo: If enabled, unsubscribed users on Marketo will not receive email communication in your events.
Automatically link events with a new Marketo program: If enabled, it automatically creates a new Marketo program when a new event is created and links the events to the programs.
You can also see the API requests made according to date.
When you enable the option to Automatically link events with a new Marketo program, additional configuration settings will appear. These allow for better control and customization of how your events interact with Marketo. These configurations are listed below:
Select the Folder that Automated Programs Will Be Created : This field allows you to choose the specific folder within Marketo where the new automated programs will be stored.
Select Base Program to Be Used : This field allows you select an existing Marketo program that will serve as the template or base for new automated programs.
Select a Mode of Linkage : This field defines how the new automated program will be linked to the base
Select the Channel that Automated Programs Will Be Created : This field allows you to choose the channel under which the new automated programs will be categorized. For InEvent integration, you would typically select the Events channel if you are creating programs related to events or webinars.
Select the Type of Automated Programs That Will Be Created : This field allows you specify the type of program that will be created, such as a default, engagement, or event program. When integrating with InEvent, you might choose a type of program that best fits the nature of your events, such as an Event for managing event-specific activities and automation.
Select Default Value for Tag : This field allows you to set a default tag value for the new automated programs. Setting a default tag can help in categorizing programs associated with specific events.
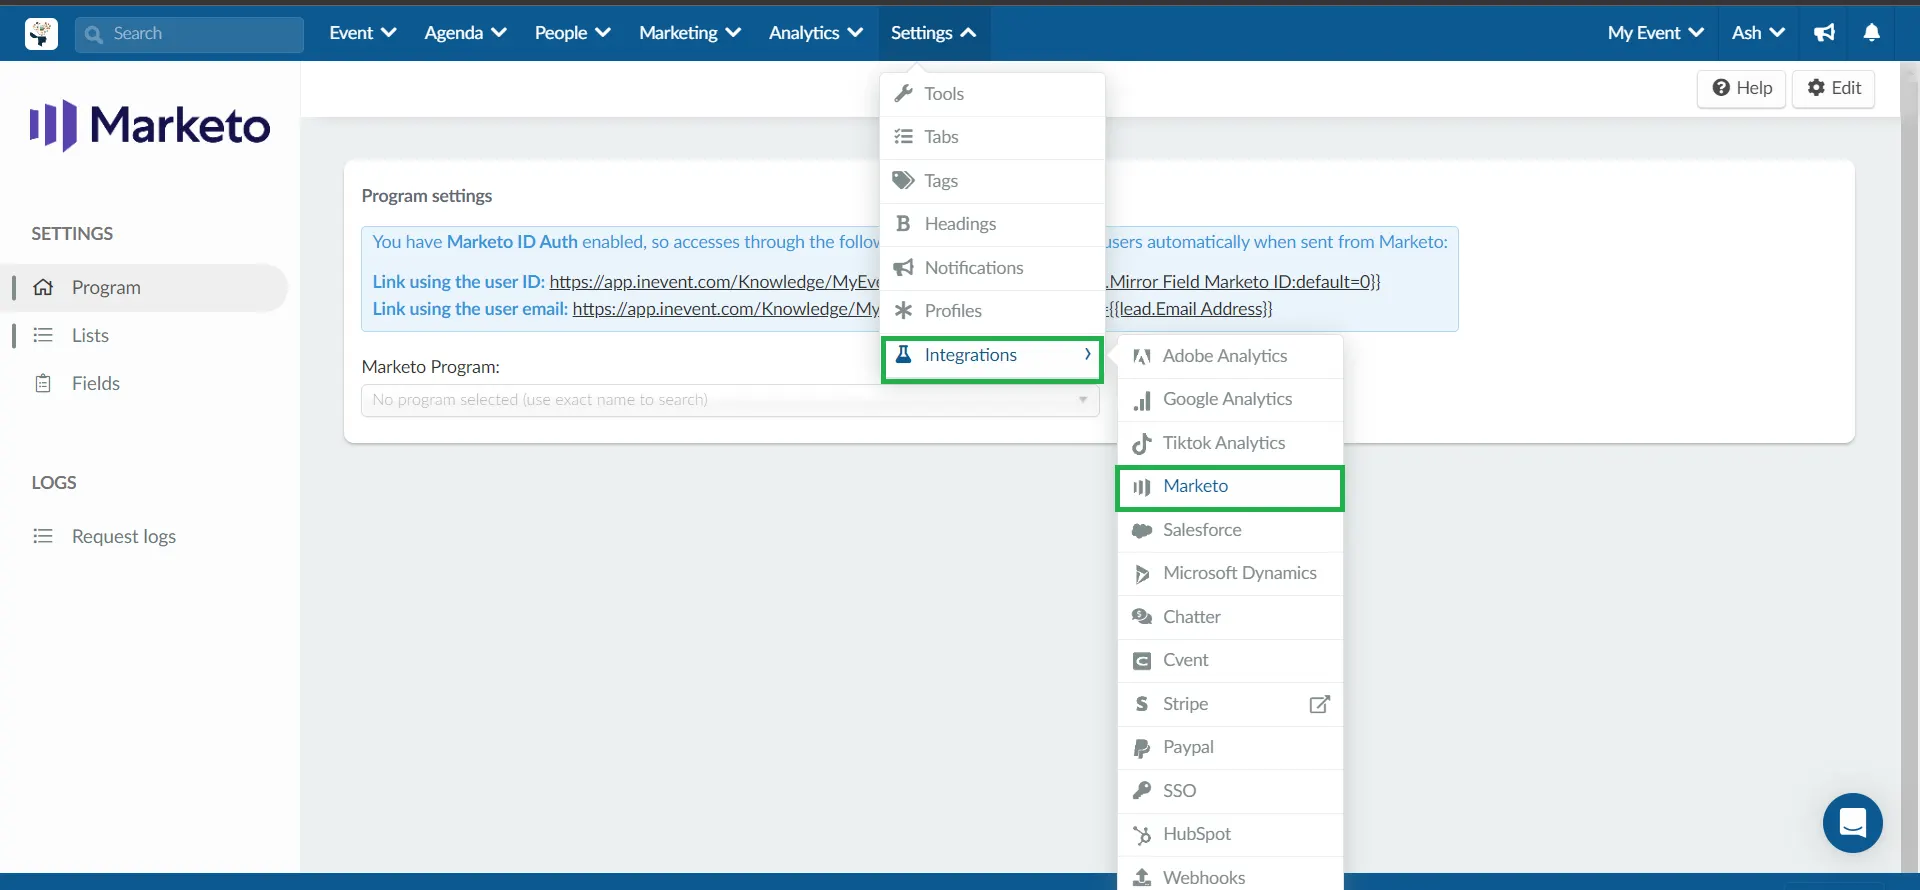
Integration Configuration at the event level
After linking your Marketo Account with InEvent at the company level, you can select your event and continue the configuration of the integration.
To do so, on your event's page click on Settings > Integrations > Marketo.
The integration supports webhooks, which allow the use of the GET or POST HTTP verbs to push or retrieve data from a specific URL. For detailed instructions on in-application creation of Webhooks and how to add them to smart campaigns, please refer to this article.
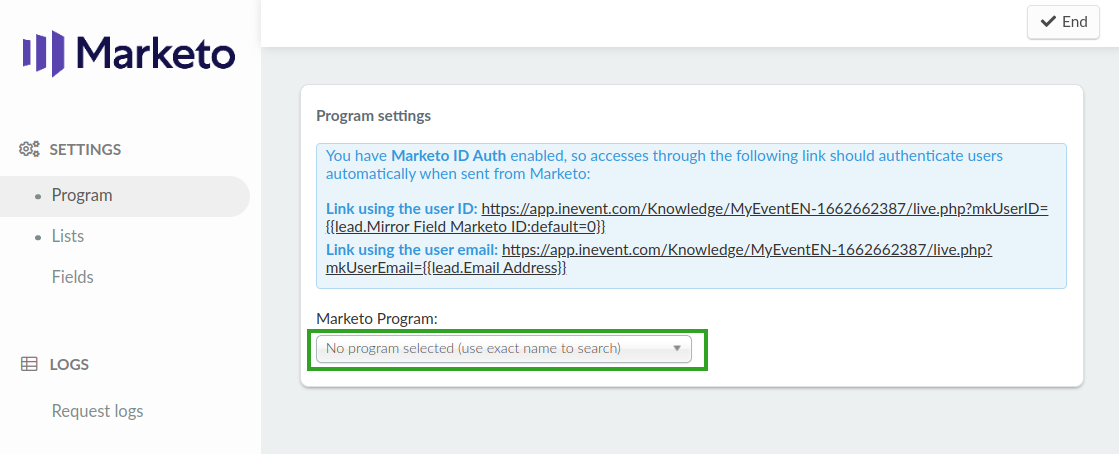
Program information
Marketo programs
Programs are a core organizational component of Marketo Marketing Activities. They can be a parent to most types of assets, and allow for tracking of membership and success of leads within the context of individual marketing initiatives.
On the Marketo integration page, click on Program. Here, you have the option to select the program you want to link with InEvent.
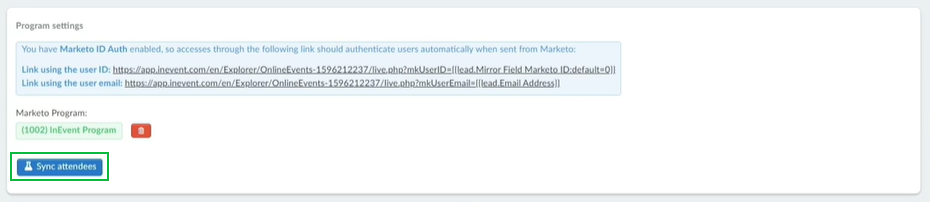
Once you have linked a Marketo Program with your event, you will be able to synchronize your attendees, Lists, Activities, and Custom fields.
Attendees
To synchronize attendees, you must click on Synchronization > Sync attendees. You will be notified by email when the synchronization is ready.
After the synchronization has been confirmed in your email, your information will be updated on the integration information page.
To see the new attendee's information you must update your View Attendees page (F5) and all new information will be updated. Automatic synchronization takes place at every hour.
All attendees who are synchronized via integration with Marketo will be flagged with a lightning bolt in the Attendees page. To see additional information for each attendee, click on Edit and select the person you want. Additional information is available on the right side of your screen.
You also have the option to export data to any custom list anywhere on Marketo by pressing the Export to Marketo buttons on attendees, invitees and lists.
There will be no refund option for leads that are added to Marketo folders and pushed to InEvent, which results in registration credits consumption.
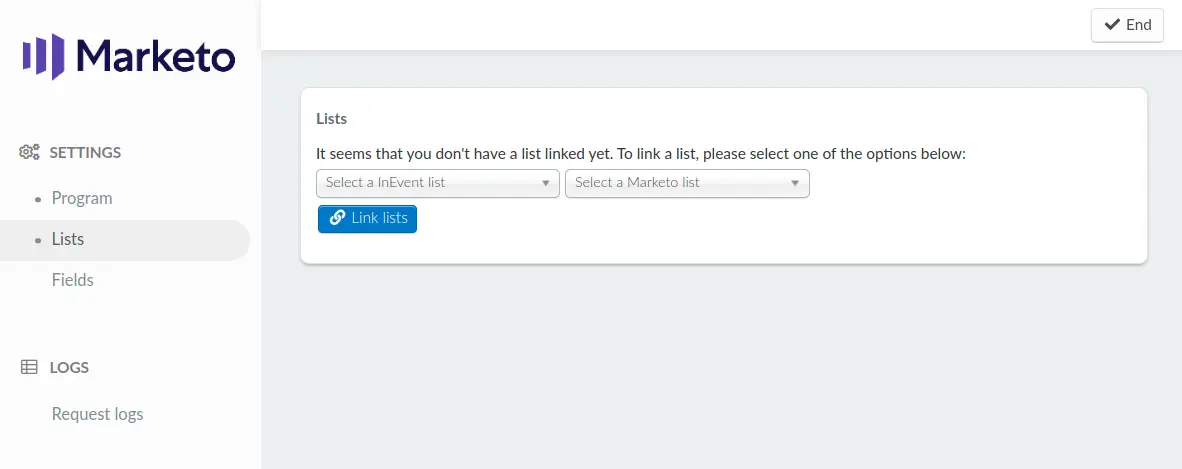
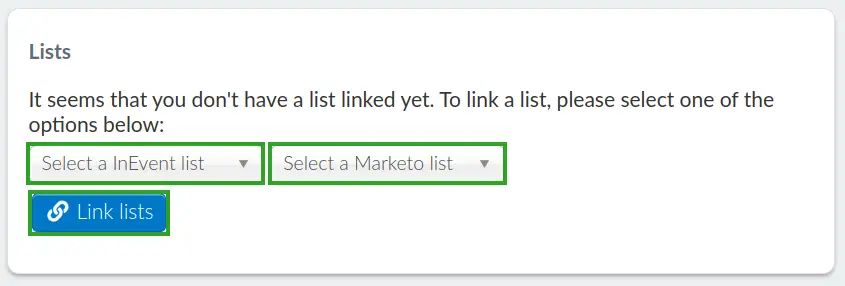
Lists
In the Lists section, you can link your InEvent Lists with your Marketo Static Lists.
Linking Lists
To link your InEvent and Marketo Lists, simply select the target lists using the drop down box and click Link lists.
Once a link is created, the interface will display additional options: List controls and Synchronization.
You can link as many lists as needed.
In Marketo, linked InEvent Lists will be displayed in a Program folder with the same name as your event.
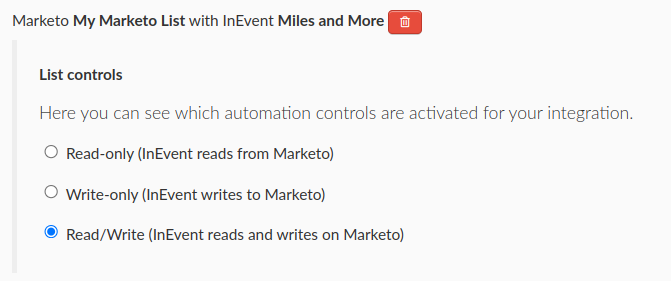
List controls
Using List controls, you can see and configure which automation controls are activated for your integration. Available automation controls are listed below:
Read-only (InEvent reads from Marketo): InEvent will only pull data from your Marketo list into your event list.
Write-only (InEvent writes to Marketo): InEvent will only push data from your event list to your Marketo list.
Read/Write (InEvent reads and writes on Marketo): InEvent and Marketo will exchange data with one another (both pull and push actions).
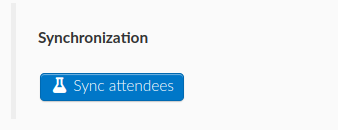
Synchronization
Start the list synchronization process with the configured controls by clicking Sync attendees.
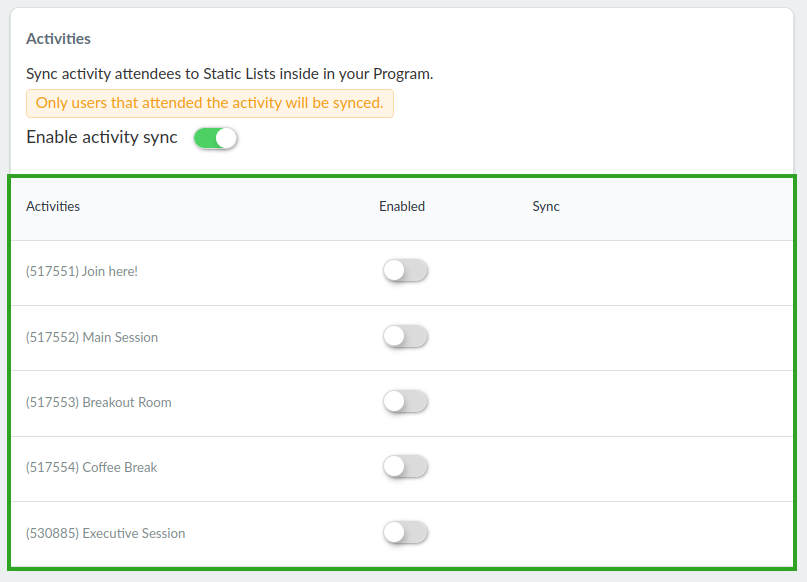
Activities
In the Activities section, you can synchronize attendees of specific activities in your event into a Marketo Static List.
Only attendees who have joined your activity will be synchronized using this feature.
To synchronize your activity attendees with Marketo, follow the instructions below:
Enable activity synchronization by pressing the Enable activity sync toggle in the Activities interface.
The Activities tab will only be visible once you have linked a Marketo Program with your event. Therefore, ensure that you have successfully linked a Marketo Program with your event before proceeding.
Refresh your browser page. The interface will display the activities in your event.
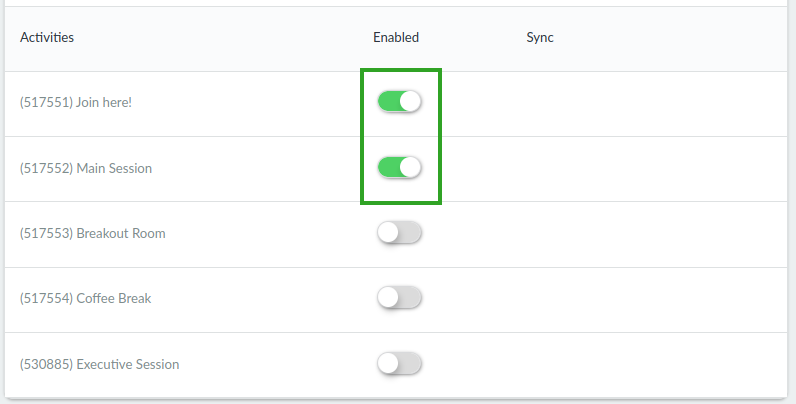
Select the activity you wish to sync with Marketo by activating the Enabled toggle button.
You can synchronize as many activities as needed.
Refresh your browser page. The interface will display a Sync now button beside the selected activity.
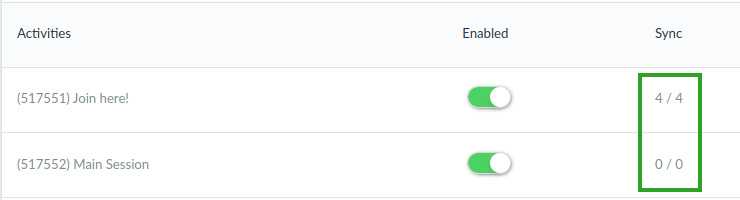
Press Sync now to start synchronizing activity attendees.Once the synchronization is finished, the number of synchronized activity attendees will appear under Sync.
Your synchronized InEvent activities will be displayed in Marketo as Static Lists within the InEvent Sessions folder.
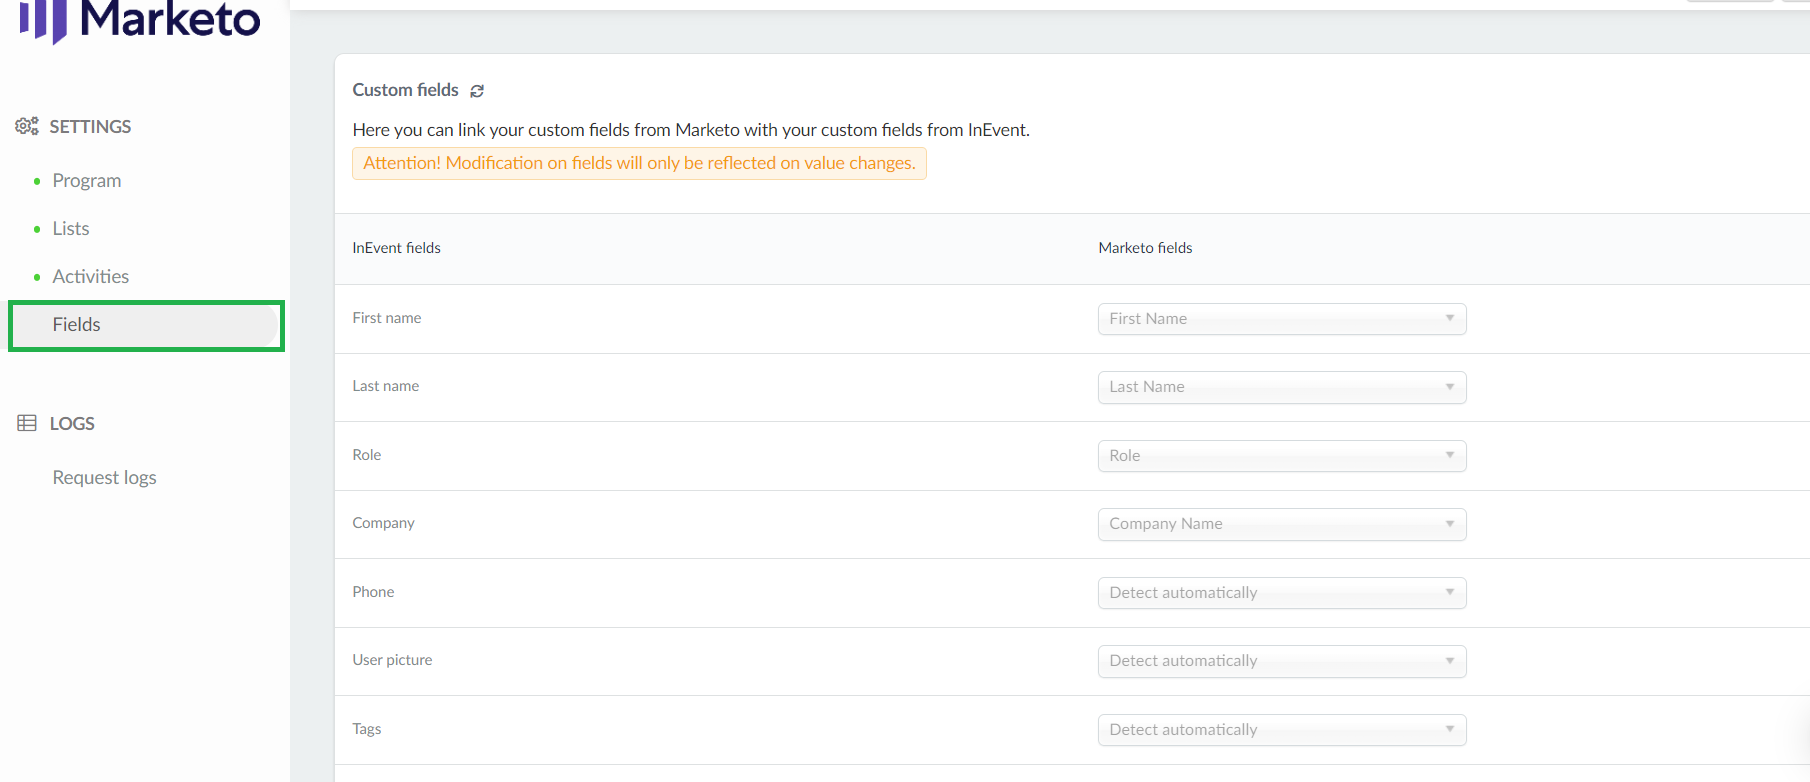
Fields
Under Fields, you will be able to link your custom fields from Marketo with your custom fields from InEvent.
Modification on fields will only be reflected on value changes.
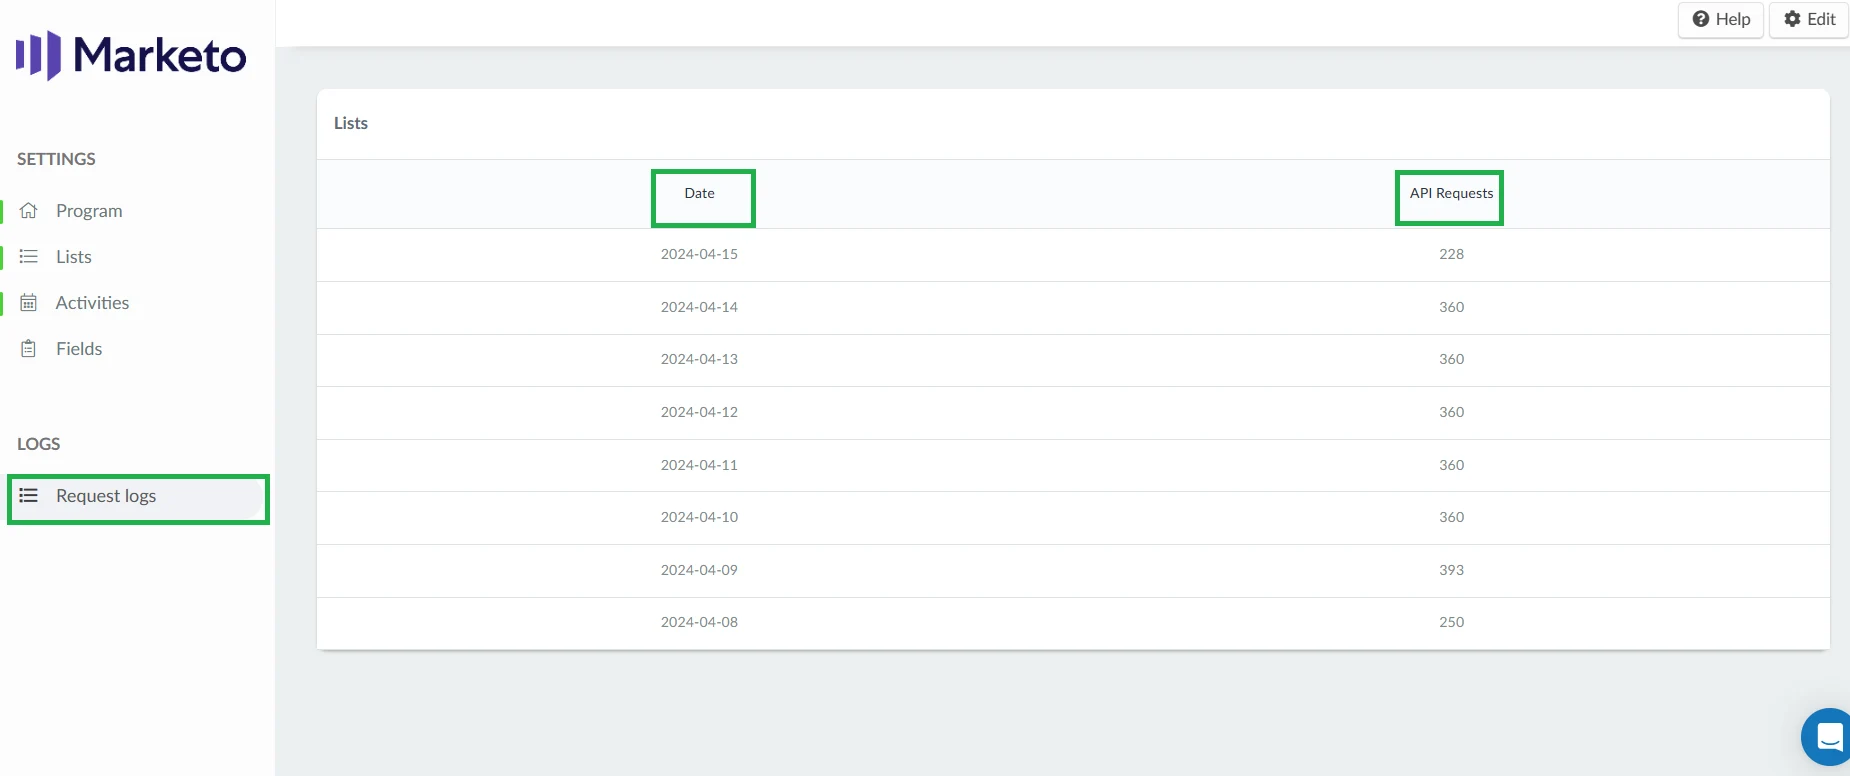
Logs
In the Request logs field, you can view the date and the corresponding number of API requests made on that date.
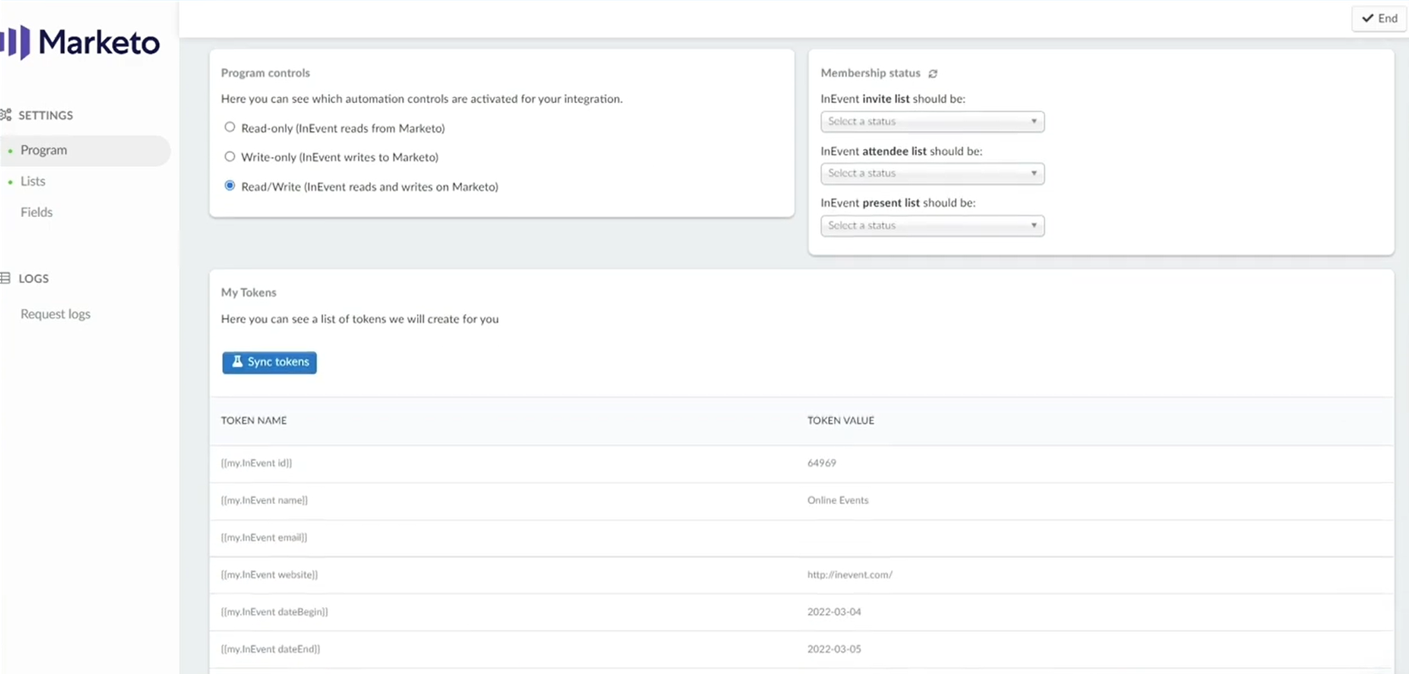
Additional Information
Program controls: Here you will see which automation controls are activated for your integration.
Membership status: Here you will be able to see the status of the different types of lists.
My tokens: Here you will see the list of tokens. When using a token, you also want to provide a default value. This is the text that displays if a person doesn't have a value for the field it references.
InEvent currently offers My Tokens integration on Marketo for the following tokens:
Token name
Token value
{{my.InEvent id}}
Shows the InEvent event's ID.
{{my.InEvent name}}
Shows the event's name.
{{my.InEvent email}}
Shows the event's email address.
{{my.InEvent website}}
Shows the event's website.
{{my.InEvent dateBegin}}
Shows the event's start date.
{{my.InEvent dateEnd}}
Shows the event's end date.
{{my.InEvent registrationForm}}
Shows the event's registration form URL.
{{my.InEvent mainPage}}
Shoes the event's main page (with magic link);
{{my.InEvent virtualLobby}}
Shows the event's virtual lobby page (with magic link).
You will only be able to use tokens containing a magic link when having Marketo ID Auth tool enabled.
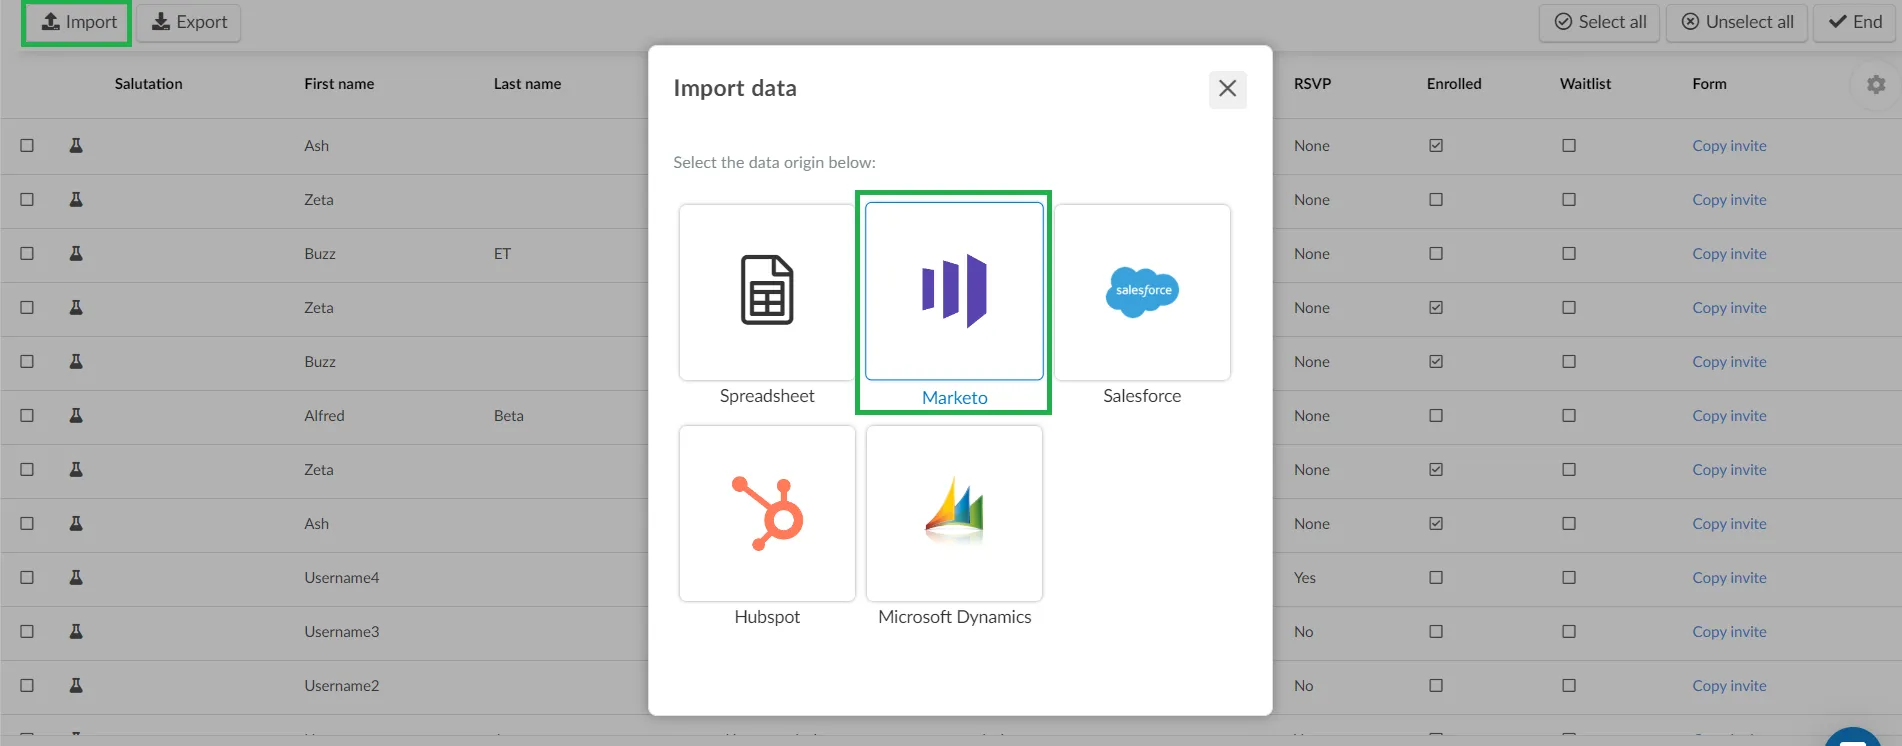
How do I import contact information from Marketo to InEvent?
You can import your invitees and lists from Marketo to InEvent.
To import Invitees, follow these steps:
Go to People > Invitees.
Click on Edit at the top right corner of the page.
Click on the Import button and select Marketo as the data origin. A new window will be displayed.
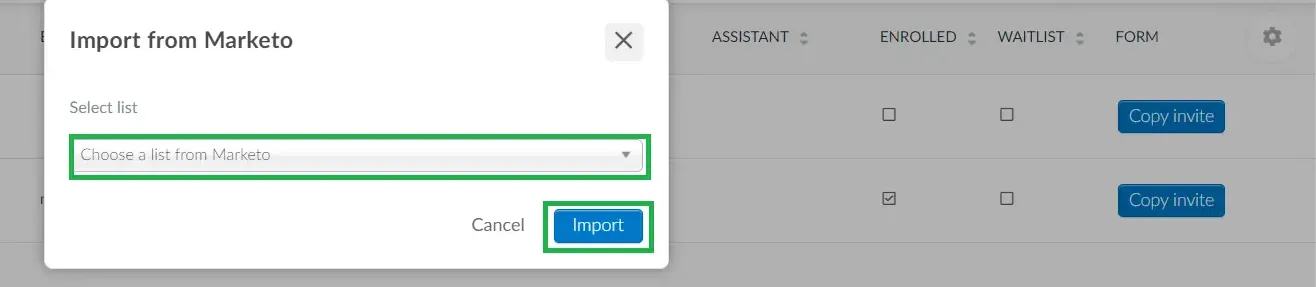
Select the Marketo list that you want to import your Invitees from.
Click on the Import button.
After clicking on Import, all the Invitees imported from the chosen Marketo list will appear on the page. You will have access to their name, username, telephone, company, email, and other information.
You can follow same process above to import people to your lists from the People > Lists page.
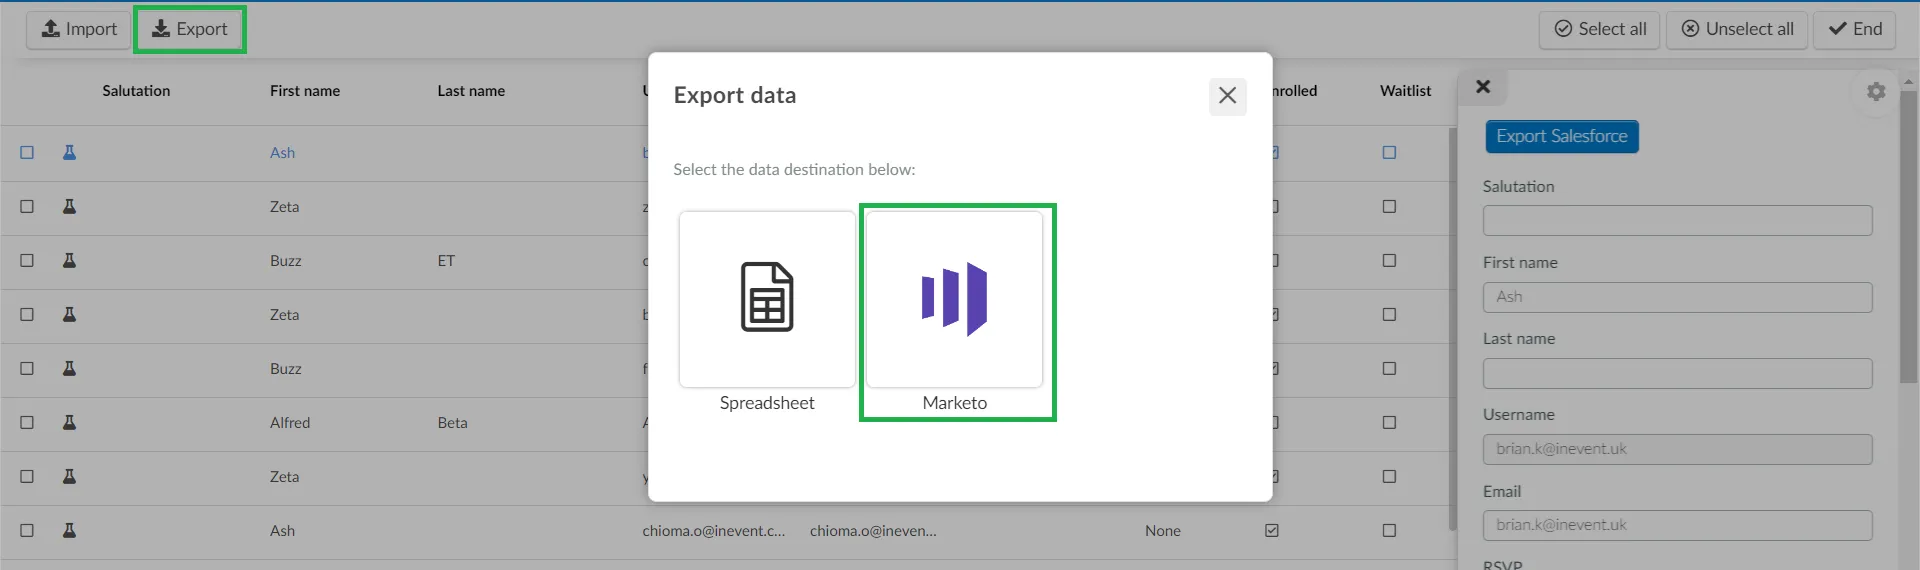
How do I export contact information from InEvent to Marketo?
You can edit the details of attendees, invitees and your list information on the InEvent platform and directly export the updated information into a Marketo list.
To export attendees' information to Marketo, navigate to People > Attendees. To export invitees' information, navigate to People > Invitees. Follow these remaining steps on either page:
Select the attendee,invitee or list you wish to export.
Click on Edit and press the Export button.
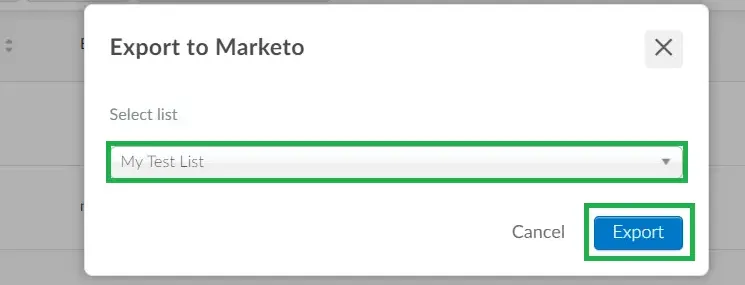
Select Marketo as the data destination.
Select the Marketo list you want to send the information to from the drop-down menu.
Click on the Export button.
You will receive a notification from Marketo once the synchronization is complete.
Additionally, you can export all attendees or invitees at once by clicking on Edit > Export to Marketo once you navigate to People > Attendees or People > Invitees.
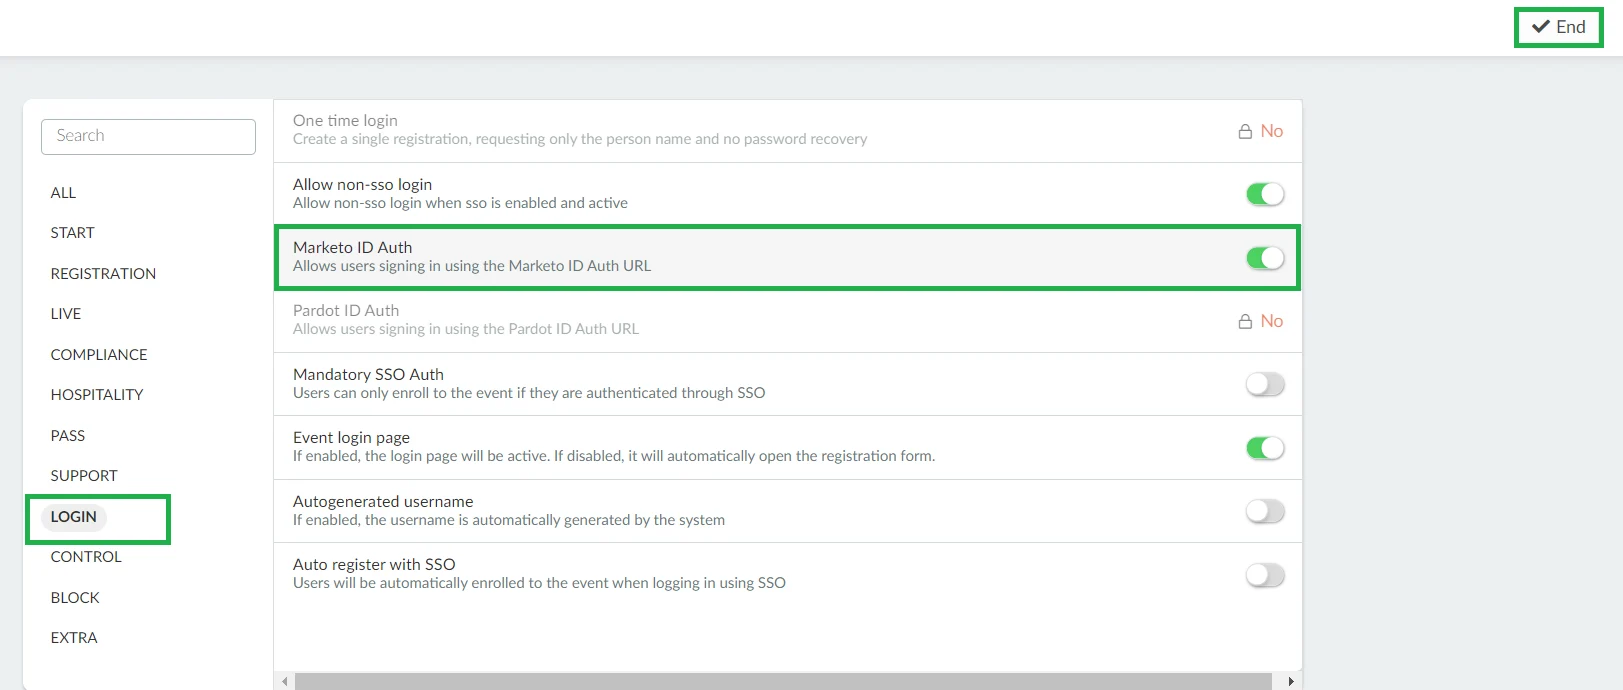
How do I activate the Marketo ID Auth for an event?
To enable this feature, go to Settings>Tools, and click on the Login section. Press Edit and toggle the button beside the Marketo ID Auth tool to show green. Press End to save the changes.
If you see a padlock beside the tool, it means you need to enable it at the company tools page .
Once the tool is enabled, you will have a link example in your Marketo Settings that you can use to generate magic links directly on Marketo.
In terms of API requests, 5 to 6 API calls are sent per registration.
You can rename the Marketo program created by InEvent manually on Marketo, but it may break the integration since Marketo uses the name to integrate. In that case, our recommendation is to not activate the automatic program creation. Create it manually on Marketo, and then link it with an event.
 Updated 11 months ago
by
Chioma Okenwa
Updated 11 months ago
by
Chioma Okenwa