Synchronizing Spreadsheets
This article explains how to synchronize attendees, agenda, speakers, and sponsors data using spreadsheets. You can update or add multiple entries at once, making it easier to manage large events with complex schedules.
The ease of use allows you to upload new information without needing to change each attendee's, speaker, sponsor, or activity data.
Synchronizing attendees data via spreadsheet
You can send various spreadsheets with the attendees' updated data. The updated attendees' information can be sent via the platform during the event. It can be automatically synchronized with the new data and available to the attendees.
Tools that allow this synchronization
We use the Sync functionality on the attendees' list. To do so, you need to use the standard spreadsheet download (Importing/ Exporting Spreadsheets), fill in the Name and Username columns corresponding to the attendees you would like to update the data. Fill in the other relevant information in the correct columns.
The only item that cannot be edited is the Username. If you are using an email as the username, this means that you will not be able to edit the email.
Refer to the Login through the app article for further information on usernames.
Adding a new column to the attendees' standard spreadsheet
To add a new column to the attendee standard spreadsheet, you need to create a new question in the registration form. To learn how, refer to the Registration Form article. Set the answer type as plain text.
Once the new question is added you can go to People > Attendees > Edit > Import > Download demo file > the new field will show on the spreadsheet, you need to fill in the name and username columns to sync the new data with the original attendees. Then import the spreadsheet.
Synchronizing activity updates via spreadsheet
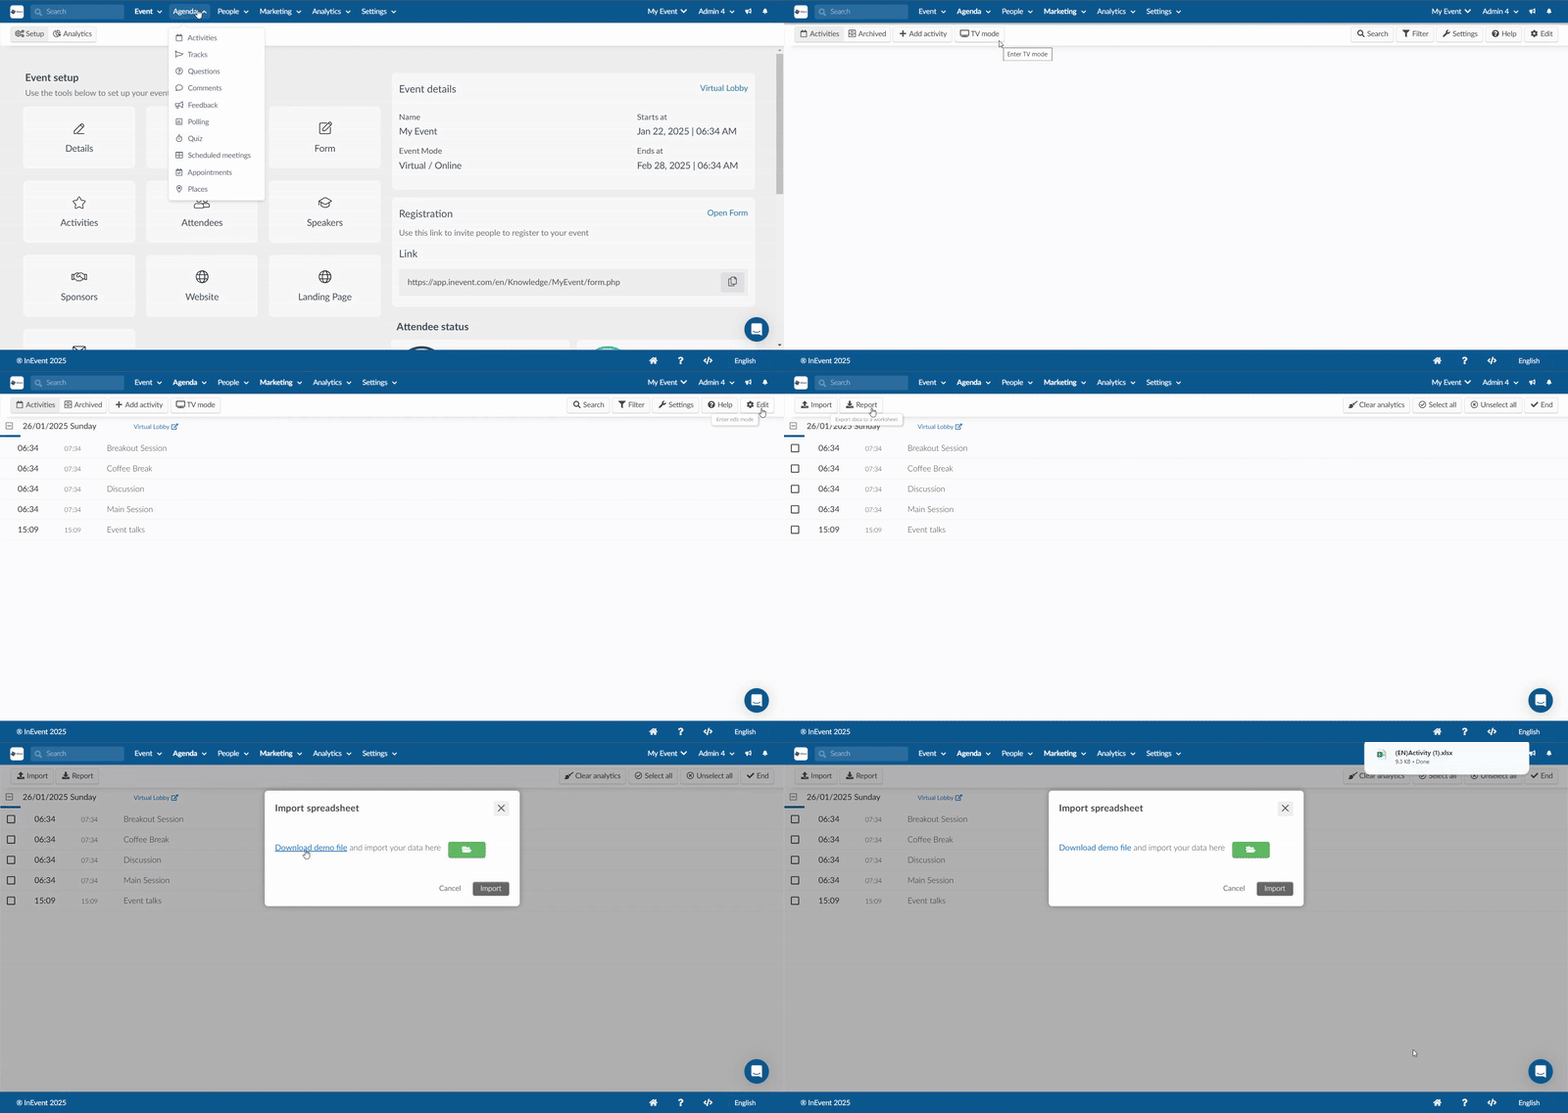
You can quickly add or update multiple activities in your agenda by importing a spreadsheet. This helps you manage your schedule efficiently and keeps everything updated at once.
To get started:
- Go to Agenda > Activities
- Click on Edit, then Import.
- Download the Demo File provided there—this file acts as a template and ensures your spreadsheet is formatted correctly. For more details, see our Agenda Management article.

Filling the spreadsheet
Once you have the spreadsheet template, fill in the key details for each activity, such as:
- Name: The activity title
- Description: Information about the session
- Start Time and End Time: When the activity begins and ends
- Location: Physical or virtual location
- Speakers/Sponsors: Names of speakers or sponsors, separated by commas if there are multiple
Things to Note:
- The platform uses the date and name fields as unique identifiers. Editing either field in your spreadsheet will cause the system to treat it as a new activity instead of an update when re-uploading.
- To ensure a successful import, make sure to format the date and time column in your spreadsheet as MM/DD/YYYY HH:MM:SS (for example, 07/23/2025 10:20:00).
After completing the spreadsheet, go back to Agenda > Activities > Edit > Import, click Import, select your file, and upload it. The platform will process the file and update your agenda accordingly.
Synchronizing sponsors' data via a spreadsheet
This method allows you to add or update multiple sponsors at once, ensuring accurate and streamlined event management. To get started, navigate to Event > Sponsors > Edit > Import, where you will find the option to download a Demo File. Once you have downloaded the demo file, fill in the necessary details. The spreadsheet includes several important columns:
CompanyName: The sponsor’s name.
Email: A unique identifier for each sponsor, such as an email address.
Bio: Details about the sponsor, including background information or key contributions.
Logo URL: A link to the sponsor’s logo, which must be hosted on InEvent’s servers.

Refer to the Sponsors article for more information
Synchronizing speakers' data via a spreadsheet
This method allows you to add or update multiple speakers at once, ensuring that all relevant details are accurately reflected in your event.
To begin, navigate to Event > Speakers > Edit > Import, where you can download a Demo File. This file serves as a template to help you format your data correctly before uploading it to the platform.
Once you have downloaded the demo file, fill in the required details for each speaker. The spreadsheet includes several key columns:
- Name: The full name of the speaker.
- Username: A unique identifier for the speaker, such as an email address.
- Bio: A short description of the speaker, including their background or expertise.
- Role: The speaker’s role in the event (e.g., Keynote Speaker, Panelist).

Refer to the Speakers article for more information
Best Practices for Spreadsheet Synchronization
- Use the demo file: Always start with the demo file to ensure the correct format.
- Backup data: Export your current data before making bulk changes.
- Test with a small file: Upload a small sample file first to check for errors.
- Check for updates: After syncing, review the platform to ensure all data is accurate.

