Hotel Management
- Enabling the feature
- The Hotel Management Dashboard
- Hotel Management Settings
- Hotels
- Room types
- Room Blocks
- Reservations
InEvent's Hotel Management feature streamlines hotel bookings for event organizers. With sub-features like hotels, room blocks, room types, and reservations, event organizers can seamlessly manage attendee experience leading to their event.
Hotel Management also provides extra options and policy settings that allow event organizers to predefine the hotel room capacity and availability. Organizers can also edit hotel details and view analytics.
InEvent's Hotel Management tool is an essential asset for event organizers looking to deliver a smooth guest experience.
Enabling the feature
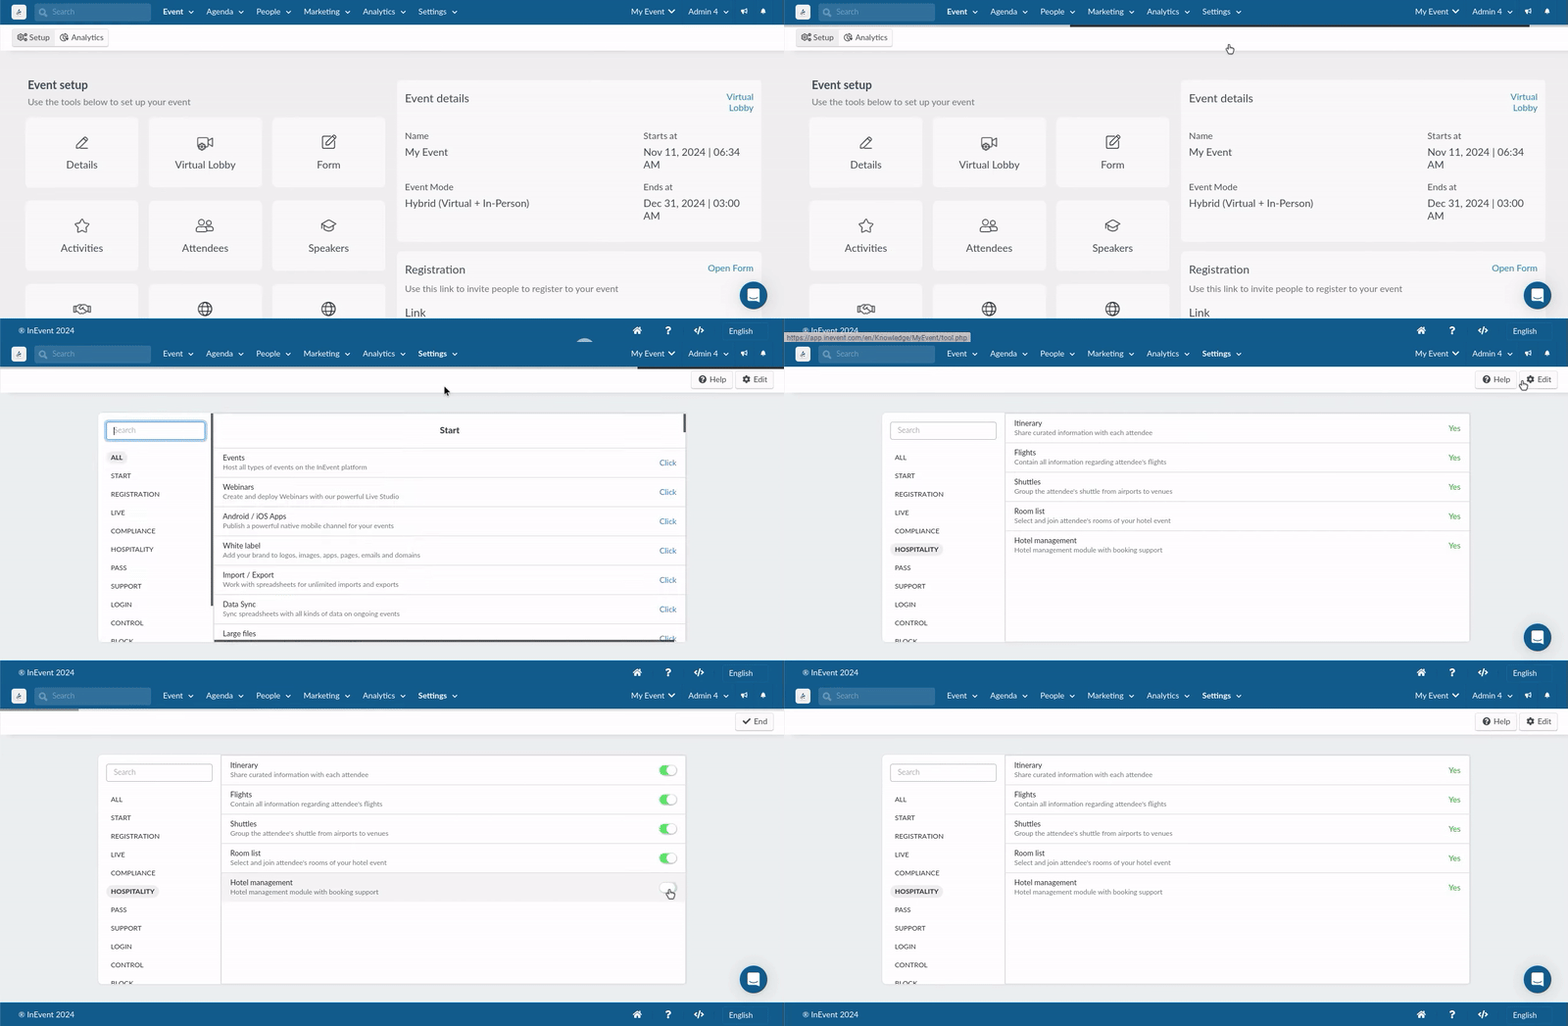
To enable Hotel Management for your event, go to Settings > Tools, and find the tool under the Hospitality section, click on Edit and enable the toggle button next to the tool. Press End to save your changes. The option will appear as Yes when you are done as shown below:
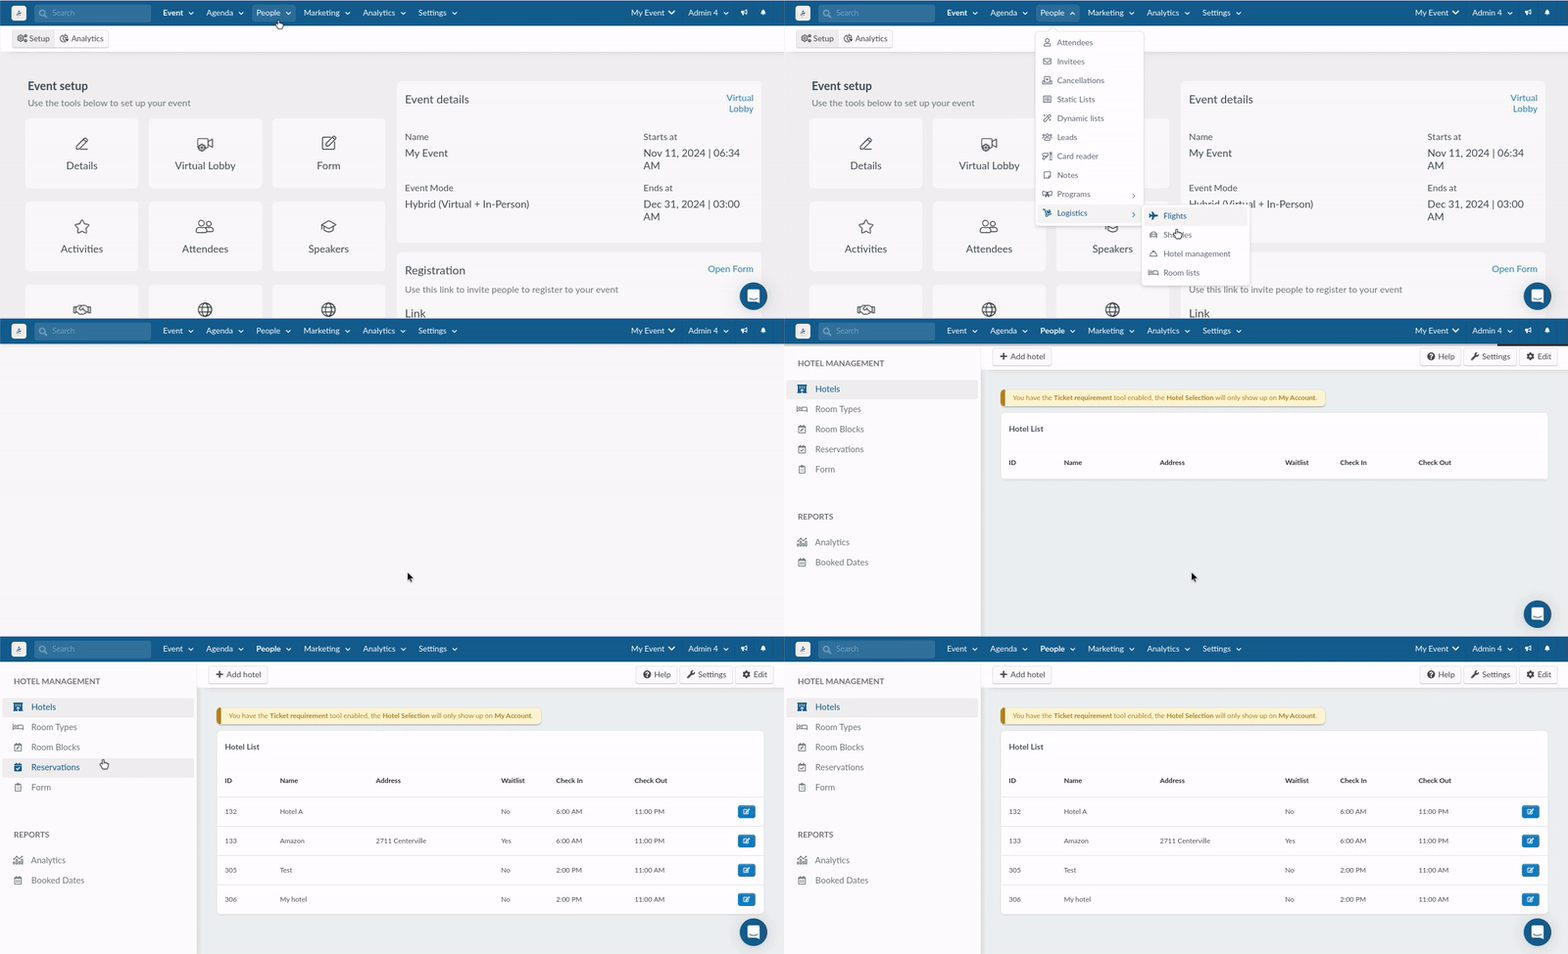
After completing the steps above, you can access the Hotel management dashboard on the platform by navigating to People > Logistics > Hotel Management.
The Hotel Management Dashboard
From the Hotel Management dashboard, you are able to create and manage the following hotel customization options:
- Hotels.
- Room Types.
- Room Blocks.
- Reservations.
- Forms
In addition, you will also be able to access the following analytics and reporting features:
- View Analytics.
- View Booked Dates.

Hotel Management Settings
The Settings button on the top right of the Hotel Management dashboard reveals the most relevant settings to Hotel management which you can toggle on or off. It contains two fields:
Registration

- Hotels on form: This option displays the hotel section on the registration form for selection.
- Hotels on form can be skipped: This option allows attendees to skip the hotel selection step during the registration form if they don't need a hotel.
- Hotel reservation email: The option allows the platform to send automatic emails to participants confirming their hotel reservations and cancellations.
Block

- Hide hotel booking number: This option hides hotel booking numbers from attendees to avoid confusion.
Hotels
Adding Hotels
If you are looking to add a new hotel to your Hotel Management system, follow these steps from your Hotel Management dashboard:
- Select the Hotels option from the left panel.
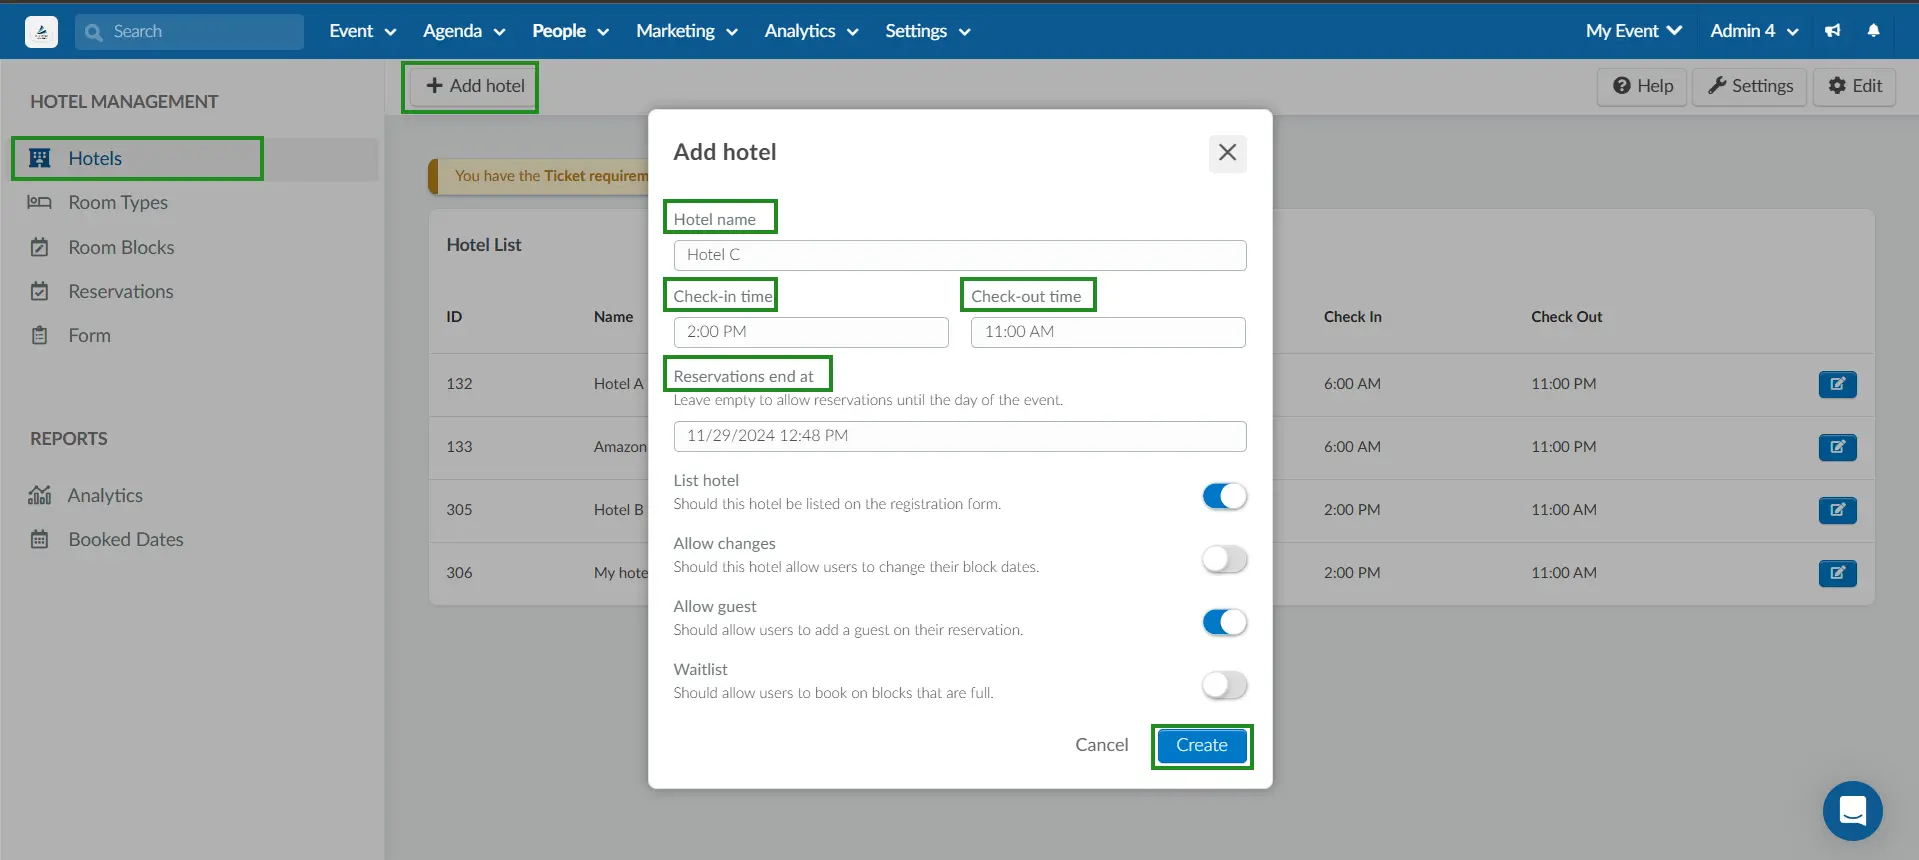
- Click the +Add hotel button at the top of the page.
- Complete the following fields in the dialog box:
- Hotel name: The intended name of your hotel.
- Check-in time and Check-out time: The intended check-in and check-out time for your hotel
- Reservations end at: The specific date and time when you want all hotel reservations to end. (If you leave this field empty, hotel reservations will be available until the day of your event.)
- Enable the following tools, according to your needs:
- List hotel: Enable this if you want your hotel to be listed on the registration form.
- Allow changes: Enable this if you want the hotel to allow participants to make changes to their hotel block dates. To learn what happens when this option is enabled, refer to the Hotel Management Settings section.
- Allow guest: Enable this if you want your participants to include guests in their hotel reservations.
- Waitlist: Enable this if you want to allow users to make reservations on hotel blocks that are already full.
- Press the Create button after entering all the required information and togging the tools according to your needs.
Your new hotel will now be added to your Hotel Management dashboard and is ready to be managed!

Updating Hotel Information
After creating a hotel, you can add additional information in regard to the hotel's Address and Telephone information. To add this additional information, click on the blue button in the right corner of the hotel you want to update.

An information window will appear to the right of your screen. Locate the Address subsection and update your hotel information as required.

Removing Hotels
To remove a hotel you have previously added, click on the blue button in the right corner. An information window will appear to the right of the screen. Scroll down the information window. Click the Edit button at the top right, and click on Remove hotel.

A Remove hotel notification pop-up will appear. To verify hotel removal, follow the pop-up instructions and click on the Remove button for the hotel to be removed (as shown below:)

Room types
The Room Types menu allows you to add different room types for each of your hotels. Participants will be able to select from these room types when booking hotels on the Registration form.
Adding a Room Type
To add a room type, complete the following steps from the Hotel Management dashboard:
- Select the Room Types tab on the left panel.
- Click on +Add room type.
- Select a hotel from the Hotel drop-down menu.
- Enter the name of your room type in the Room name field.
- Press Create.

From the Room Types page, you will also be able to see each Hotel, the types of rooms available, their names, and the number of Booked Dates for each particular room type.

Room Blocks
Room blocks allow you to reserve a specific number of rooms, at a hotel, for a certain period of time.
Adding Room Blocks
To add a Room block to a hotel, follow these steps:
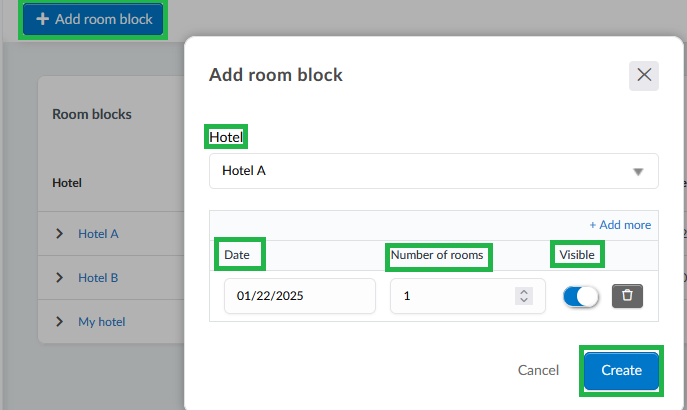
- Click on the Room Blocks tab on the left panel and select +Add room Block.
- Select the hotel you want to reserve rooms at under the Hotel dropdown.
- Choose the Date for the room block, then specify the number of rooms you need to reserve.
- Set the visibility of the room block by toggling the Visible button on or off.
- If toggled on, the room block date will be available for registrants to select on the registration form.
- If toggled off, the room block date will not be available for registrants to select on the registration form.
- Click the Create button to create the room block.
After creating a room block, you will be able to view the following information from the Room blocks page:
- The hotel
- The Block date
- The number of Rooms
- The number of Booked rooms
- The number of Remaining rooms
- The number of participants on the Waitlist
- The visibility status of the room block
If a hotel has multiple room blocks, the dashboard will display the combined total information for all room blocks created within that hotel. To view more details about each room block, click the arrow next to the hotel name.
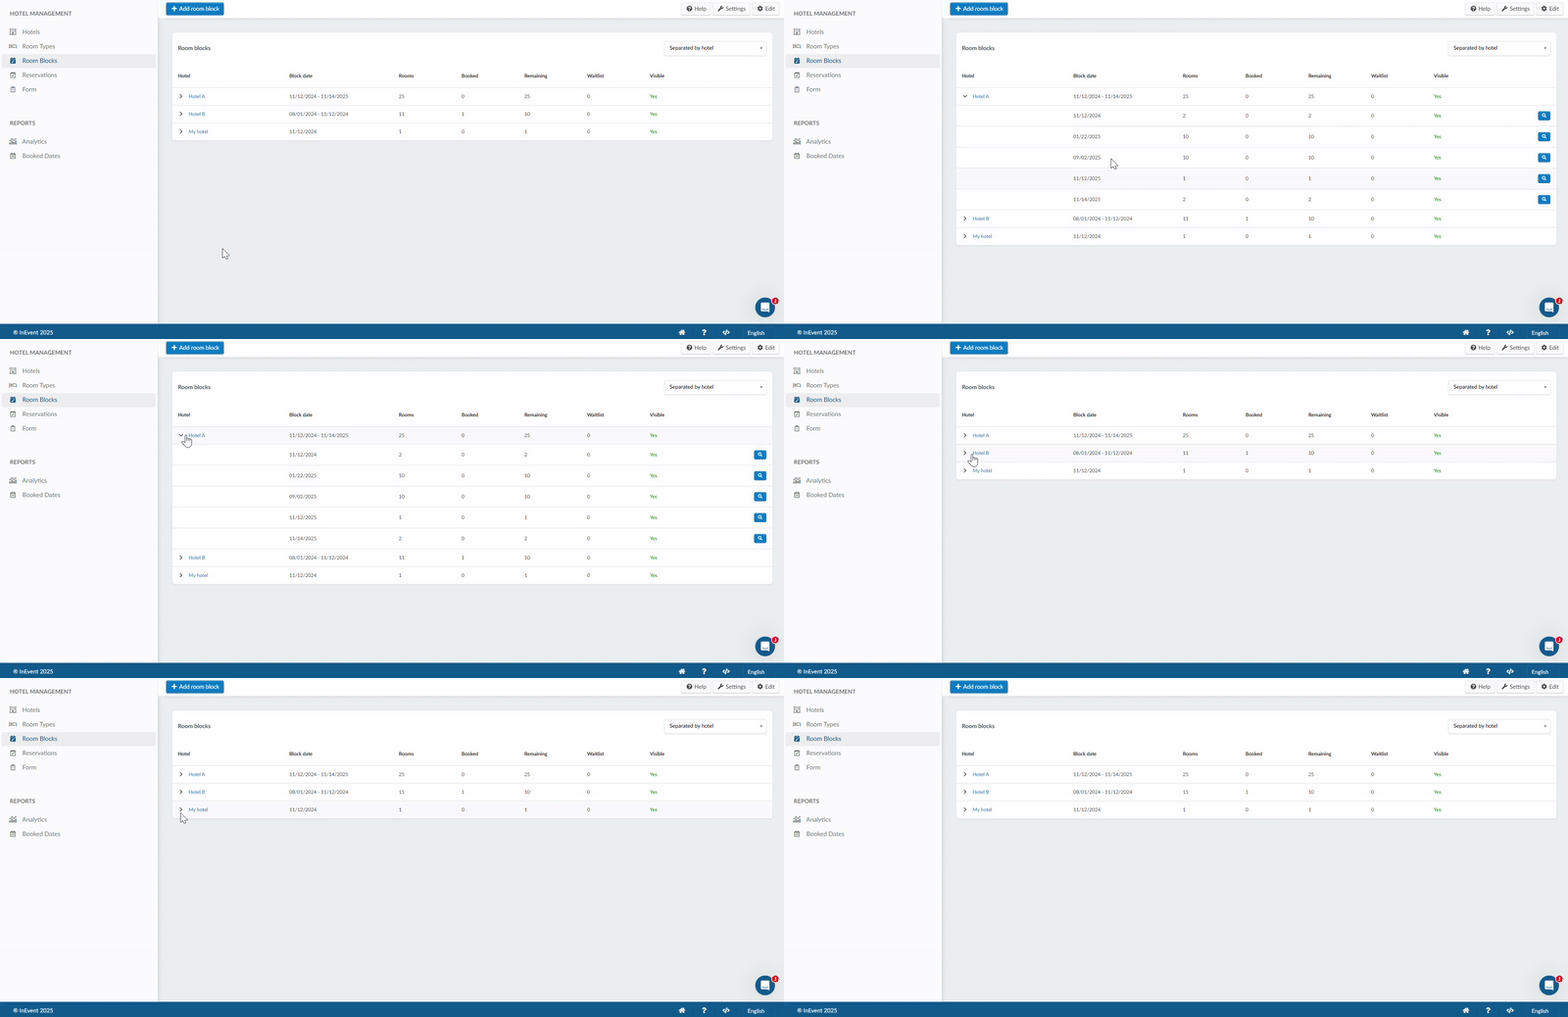
You can also choose the manner in which the Room block information is displayed. To do so, click the drop-down menu in the top right corner. You can choose to Separate by hotel, Aggregate by block, or view the data of any of the individual hotels you have created (as shown below:)

Editing room blocks
You can edit room blocks after creating them. To do this click on the Edit button.
You can change the visibility of a room block by clicking on the drop-down button under the Visibility column and changing its status to Yes or No.

You can view the reservations that have been made for a particular room block. To do so, click on the magnifying glass icon next to the room block you want to inspect. You will be directed to the Reservations page, where you will find detailed information on reservations for that specific room block.
You can delete room blocks by clicking on the Edit button, checking the box next to the room block and pressing Remove in the top right corner of the page.

A notification pop-up will appear. To verify the room block removal, follow the pop-up instructions and click on the Remove button (as shown below):

Reservations
The Reservations page allows event organizers to assign attendees (and their guests) directly to specific room blocks within any hotel.
In addition, the Reservations page also displays information about the reservations made by participants while completing the registration form.
The Reservations dashboard will display the following information of attendee: Name, Role, Company, Booking number, Check in and Check out dates, Hotel , Room type and Status.

Hotel reservations can be made in one of the following ways:
- Event organizers can choose to make reservations for attendees directly on the platform.
- Participants can make reservations on the registration form while enrolling in the event.
Adding reservations from the platform
To add a hotel reservation from the platform, complete the following steps from the Hotel Management dashboard:
- Navigate to Reservations from the left panel.
- Click on +Add reservation.
- Enter the name of the attendee in the Person drop-down.
- Choose a hotel from the Hotel drop-down.
- Select a Block date from the date selector by enabling the toggle next to it.
- Click on the Add button to create the reservation.

Making reservations from the Registration Form
Participants can make reservations directly from the Registration Form while enrolling in the event.
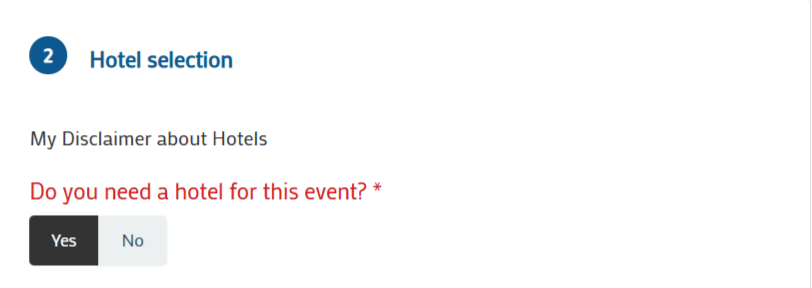
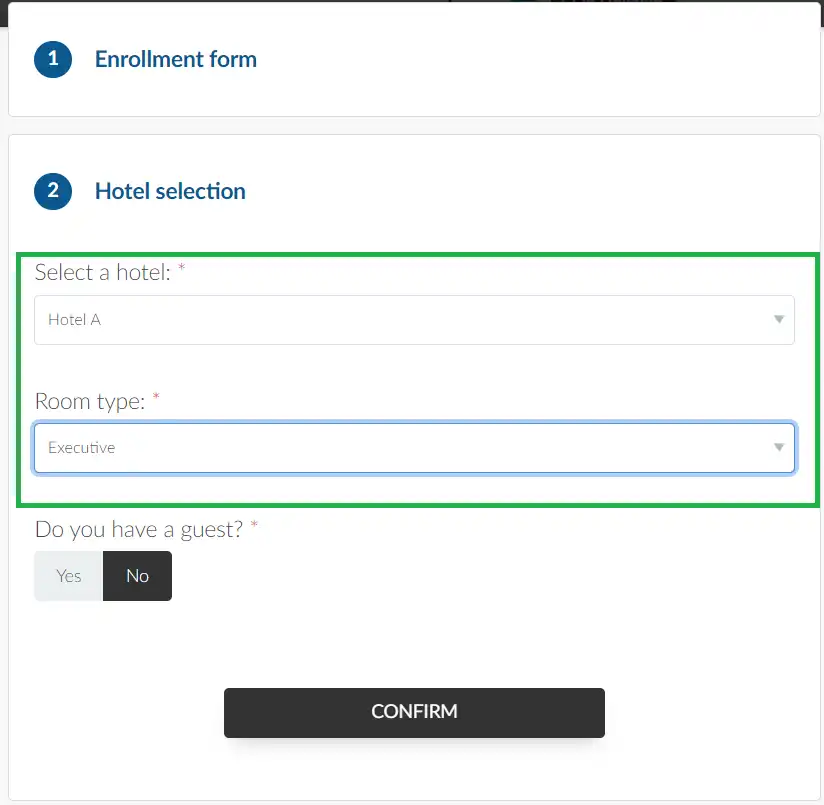
Once the required tools (Hotels on form and List hotel) are enabled, participants will be able to make hotel reservations on the registration form. The image below shows how the Hotel selection section will appear on the registration form:

From the Hotel selection section of the registration form, participants will be able to select hotels, room types, check-in and check-out dates, and choose the option to include a guest in their reservation.
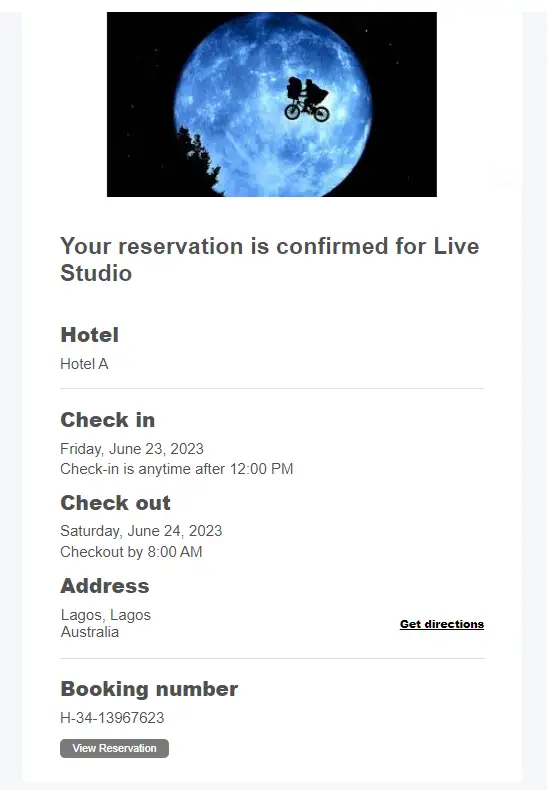
Once completed, attendees will receive an email confirming their reservation if the hotel reservation email feature has been previously enabled by the event admin.
Editing hotel reservations
Event administrators can modify the hotel reservation information of attendees from the platform. To do this, complete the following steps from the Hotel management dashboard.
- Go to Reservations.
- Select the hotel reservation you wish to edit by clicking on the blue pen icon.
- A window pop-up box will appear. You will be able to change the following information
- Guest: Add or remove a guest by turning or off the toggle button.
- Hotel : Use the drop-down to select a new hotel for your attendee
- Block date & Availability: Remove or add more room blocks (if more block dates are available)
- Status: Use the drop-down to select whether reservation is booked or cancelled.
- Click on Save once you have made your changes.

Attendees will be able to see the changes made to their hotel reservations in the Virtual Lobby from the My Hotel section in the My account page.
Hotel waitlist
When the hotel Waitlist tool is enabled, users who try to make a reservation on room blocks that are full will be alerted about the unavailability of a vacant room but will still be able to register.

The attendee will see the message 'You are on waitlist' under the My Hotel dashboard in the My Account tab of the Virtual Lobby.

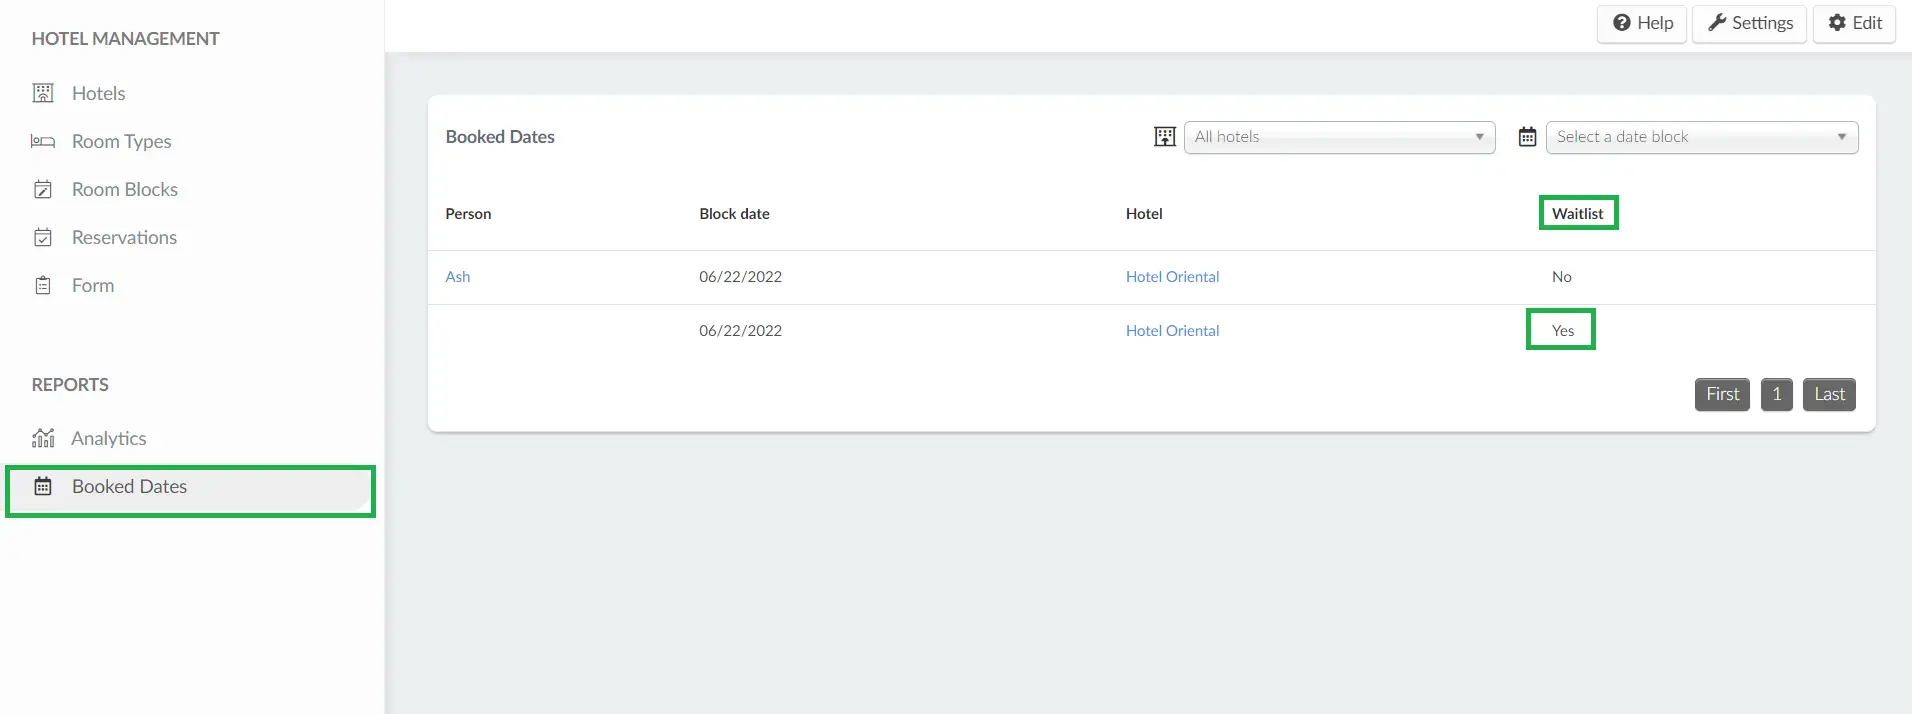
On the platform, admins will be able to see the attendees that are on the hotel's waitlist by going to People > Logistics > Hotel Management, then from the left menu panel click on Booked dates under the Reports section. Those on the waitlist will have a Yes tag:
How are reservations displayed on the Reservations page?
On the reservations page, all hotel reservations will appear with the Name of the attendee who owns the reservation (and their guest, if any), the Company, the Check-in and Check-out dates, the Hotel name and reservation Status i.e. booked or cancelled.


You can also filter how reservations are displayed by selecting the drop-down menu at the right of the Reservations page. The filter provides the option to view all hotel reservations or individual hotel reservations.

Removing room reservations
You can remove room reservations by clicking on the Edit button at the top right corner, ticking the box next to the attendee(s) and pressing the Remove button at the top right corner of the page.
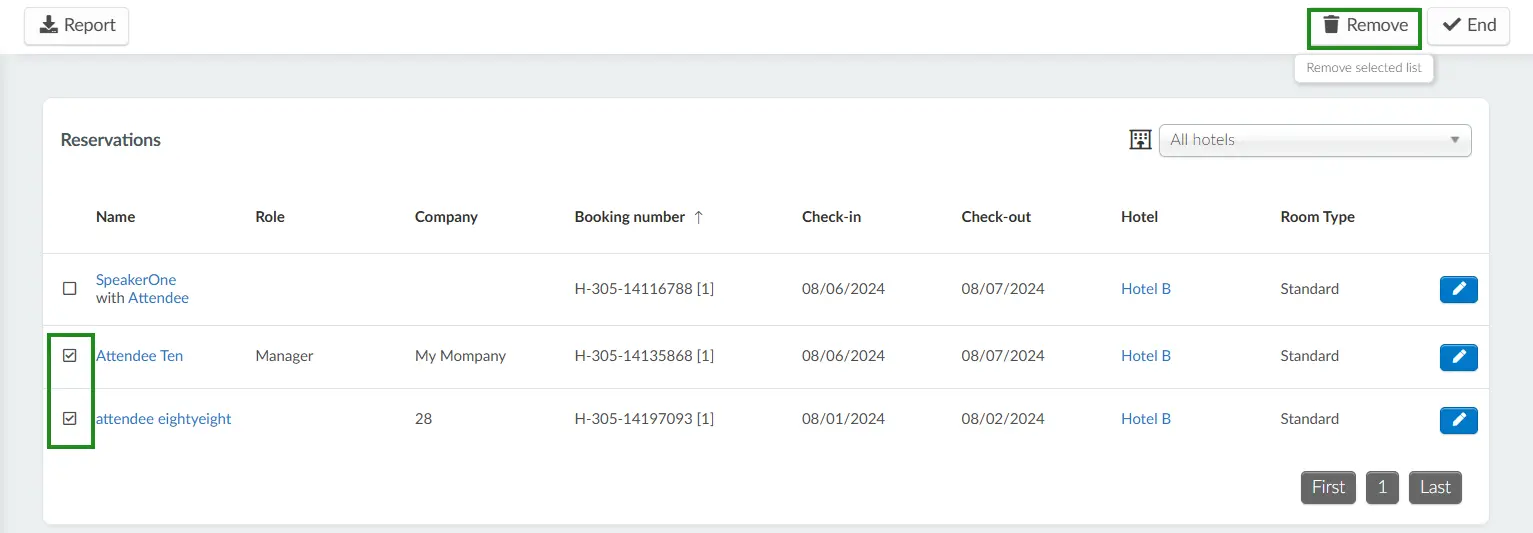
A notification pop-up will appear. To verify the Room reservation removal, follow the pop-up instructions and click on the Remove button (as shown below):

Once completed, the attendee will no longer have a room reservation and a new reservation will have to be made for the attendee if needed.
Forms
You can add fields to the Hotel selection section of the Registration form. To do this, follow these steps:
- Click on Forms at the left-hand menu of the Hotel management dashboard
- Click on +Add field button at the top left corner. A pop-up box will appear.
- Enter the Field title and subtitle and select a Field answer type from the drop-down.
- Click on Create.
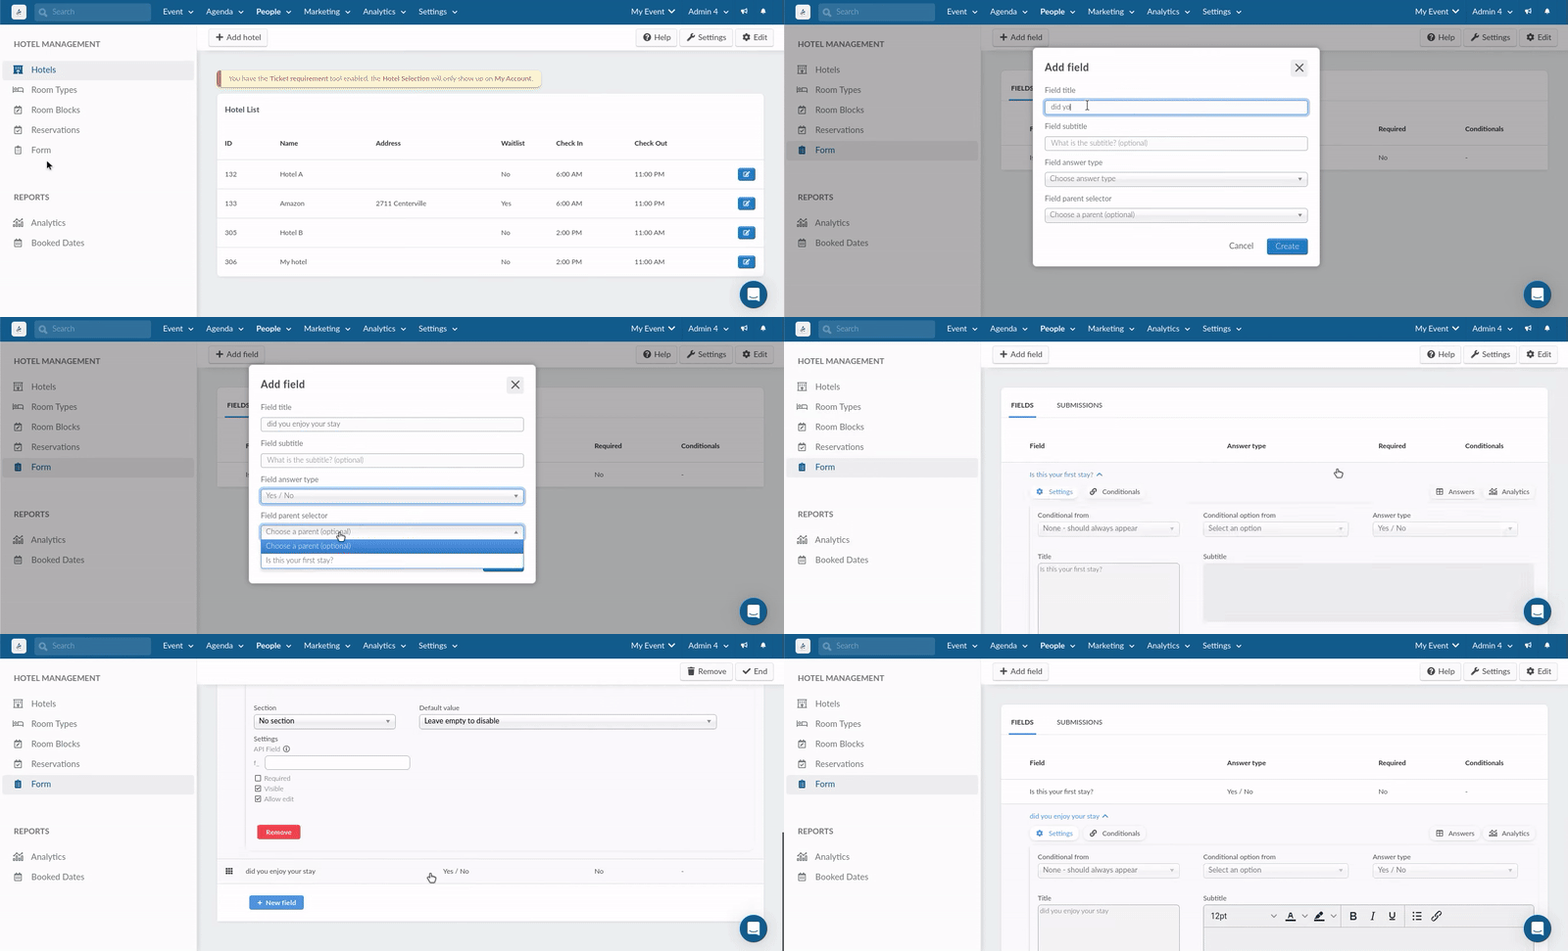
The added field will appear on the registration form after selecting a hotel:
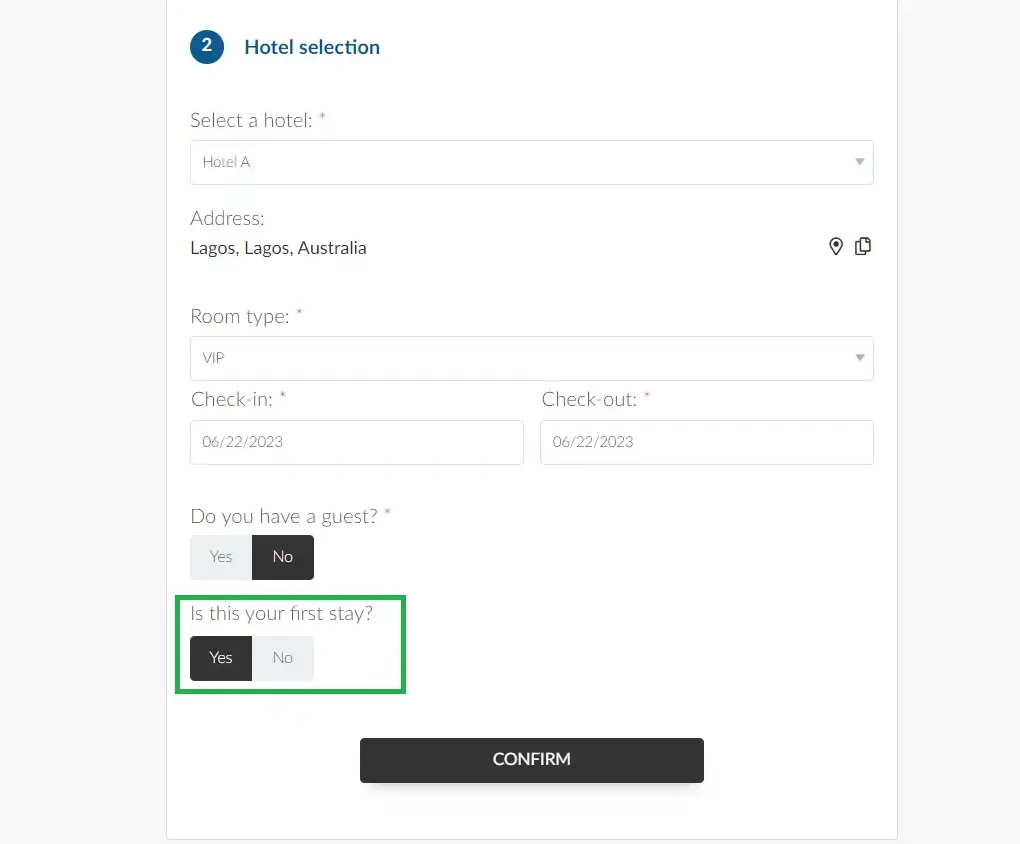
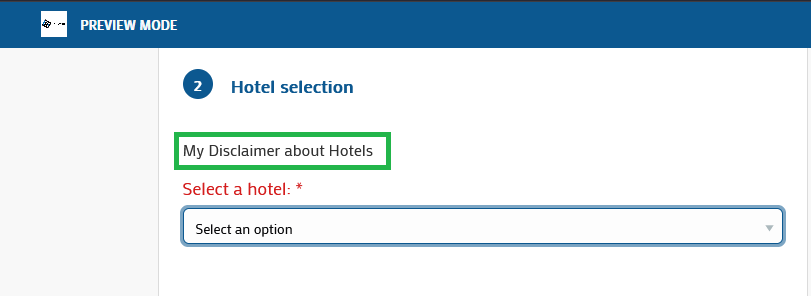
You can also add a disclaimer heading at the top of the Hotel selection section by going to Settings > Headings and creating a new heading for the Form – Disclaimer Hotel field. Once created, it will appear on the form like this:
Viewing Hotel form submissions
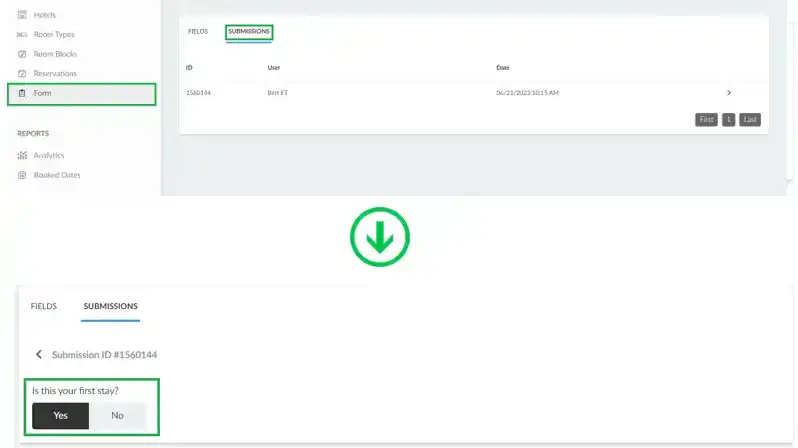
You can view the submissions to the Hotel form fields from attendees. To do this click on Forms at the left-hand menu and click on Submissions. On this page you will find information such as the ID, name of user, and date and time of the form submission. To view the submission answer, click on a user:
Reports
The Reports subsection on the left panel of the Hotel Management dashboard provides you with options to view hotel booking Analytics and explore the Booked dates for your individual hotel blocks.
These insights help event organizers make data-driven decisions that enable them to plan and improve the guest experience.
Analytics
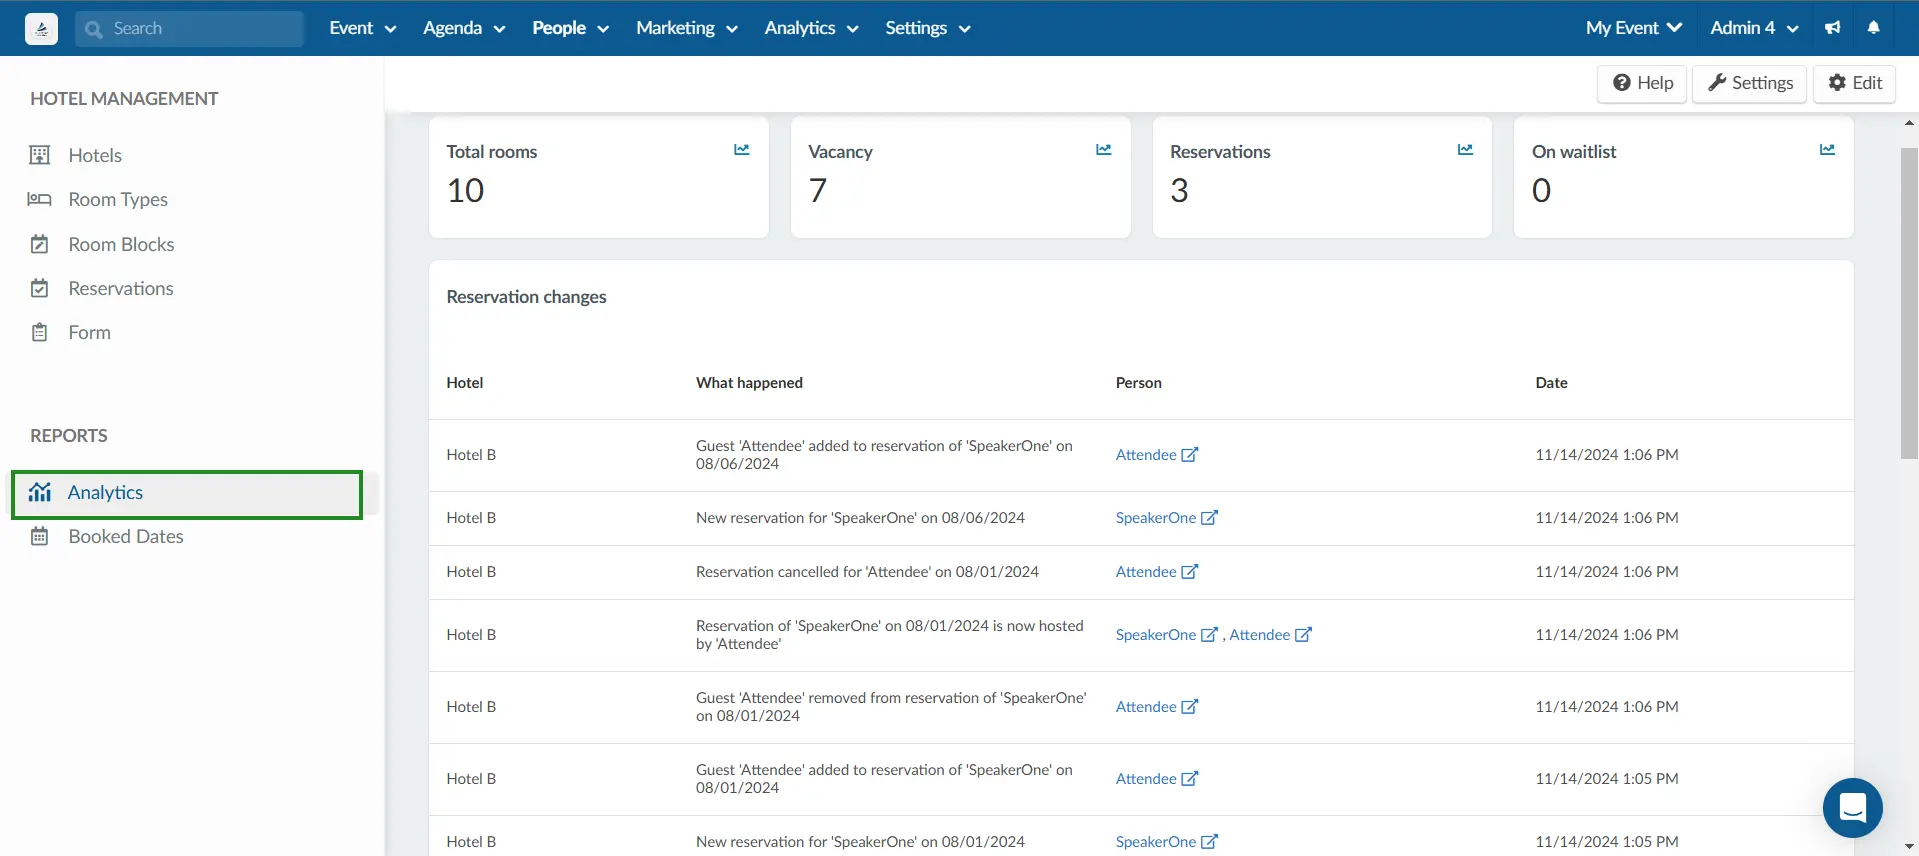
To view hotel booking analytics, navigate to the Analytics tab under the Reports subsection. You will be able to see the following information:
- Total rooms: The total number of rooms across all hotels in the Hotel Management dashboard.
- Vacancy: The total number of rooms available for reservations in the Hotel Management dashboard.
- Reservations: The total number of reservations made across all room blocks in the Hotel Management dashboard. This includes reservations made on the platform (by event organizers) and those made directly from the registration form (by participants).
- On waitlist: Displays the total number of reservations available on room blocks that are already full.
- Reservation changes: Displays information on each Hotel, the changes made to reservations (What has been changed), the Person who owns the reservation, and the Date the reservation was made.
Booked Dates
To view all the booked dates of the hotels and the attendees who have active reservations, select the Booked Dates option from the left panel.
The resulting page will display information on the Person who owns the reservation, the Block date (for the Room Blocks), the Hotel, and information on whether there are any reservations on the Waitlist (if the room block capacities are full and the tool is enabled).
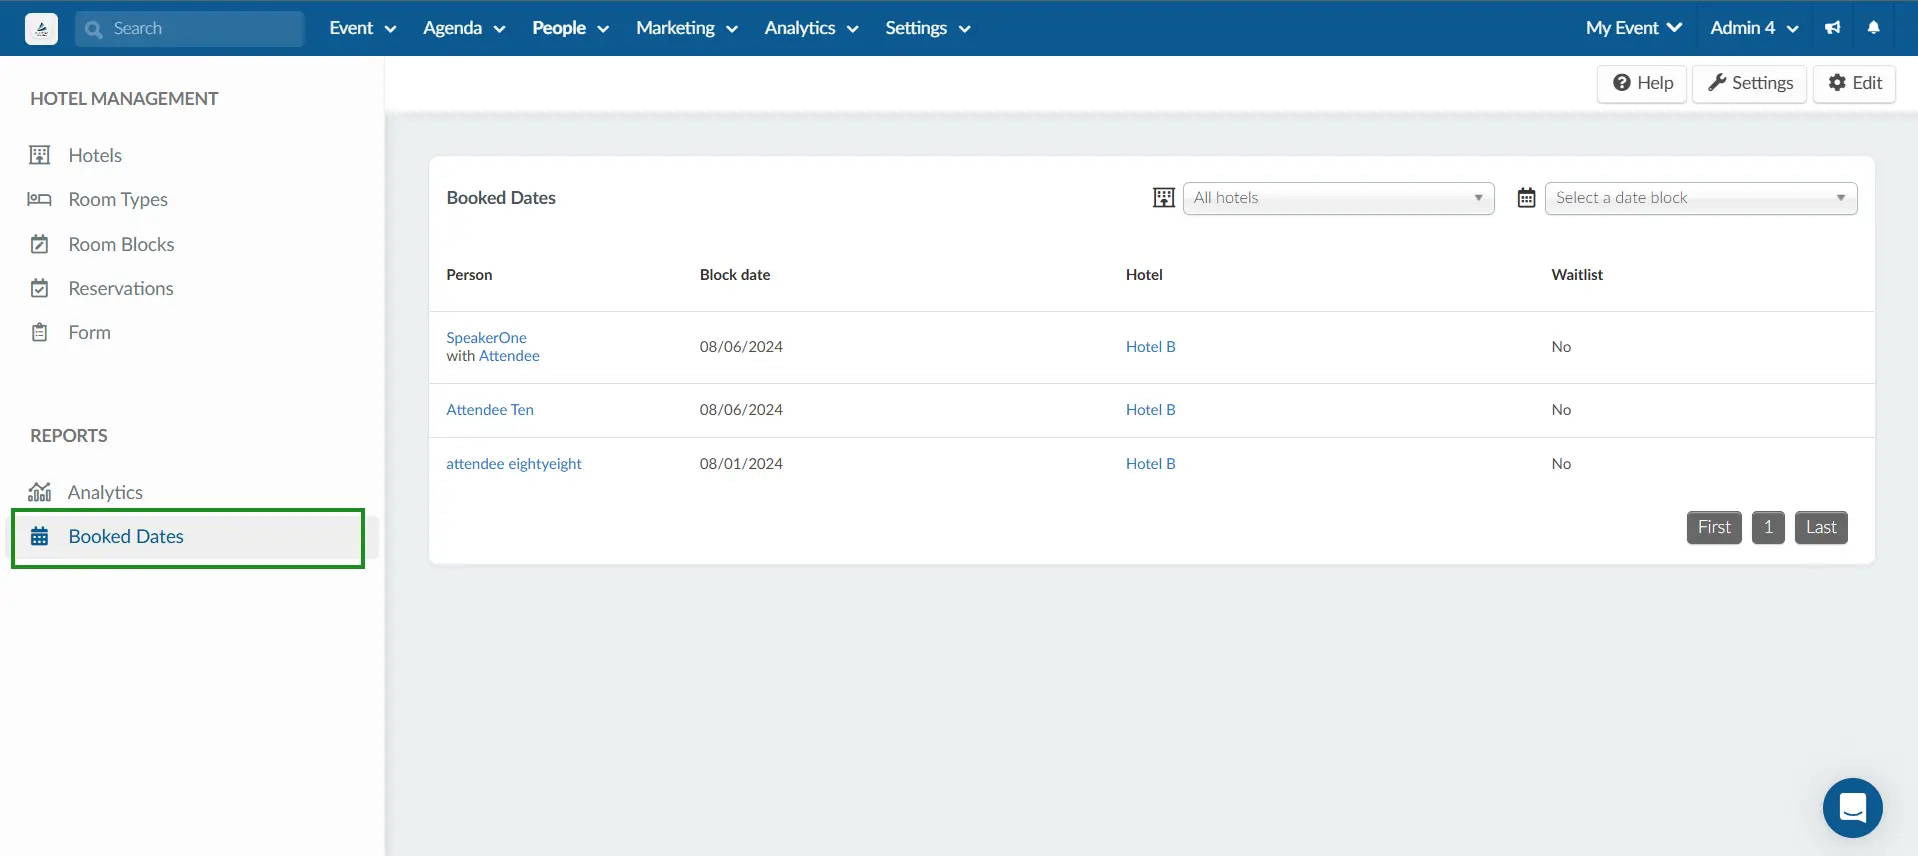
In addition, You can also use the Hotels or Date filters on the right to filter relevant information according to your needs. To do so, select your choice from the available options in the drop-down menus highlighted below:

Can I download reports from the Hotel Management dashboard?
It is possible to download reports from the following pages of the Hotel Management dashboard:
- Room blocks
- Reservations
- Booked Dates
To download reports from any of these pages, navigate to the desired page. Click on the Edit button in the top right corner, and click on the Report button at the left corner of the page.
Once you click on the Report button, a message will appear at the top of the screen, with a notice that you will receive the excel file with the data in your email when the process is complete.


What can attendees do from the My Hotel page in the Virtual Lobby?
From the Virtual Lobby, attendees can access the event's hotel information by going to the My Account tab and clicking on My Hotel which is right next to My Profile.
From the My Hotel page, attendees can:
- Make hotel reservations
- Change hotel reservations
- View hotel reservations
- Download hotel confirmations
Making hotel reservations
If attendees have neither made hotel reservations on the Registration Form, nor have they had reservations made for them by event organizers, they will be able to Make a reservation by clicking on the button and completing the hotel reservation process. This way, they will be able to see their hotel reservation and confirmation on the page afterwards.

Changing hotel reservations
Attendees who have made reservations from the registration form or have had reservations made for them by the event organizers will only be able to make changes if the event organizer has enabled the allow changes tool from the hotel selection section.

To change a reservation, they will need to click on the Change Reservation button at the top left corner of the My hotel section and make a new selection.

Viewing hotel reservations
If or when attendees have made hotel reservations, they will be able to view their hotel information on the first section of the My Hotel page. They can also add the reservation to their calendar by clicking on Add to calendar in the second section below:

Hotel confirmation
Attendees can find their hotel confirmation from the last section of the page. They can download their hotel confirmation by clicking on the Download button at the bottom right corner of the Confirmation section.
The hotel confirmation is the attendee's digital ticket voucher that will hold the attendee's hotel information - the name of hotel and address, the check-in and check-out date and time as well as the Booking number.


