Custom domain
 Updated 11 months ago
by
Amalia
Updated 11 months ago
by
Amalia
At InEvent, you can integrate your own new or existing custom domain for use with your events. This is especially useful for branding purposes, as well as maintaining simplicity and ease of access for your users.
Custom domain can be set up at the Company level or directly at the Event level. This article will guide you in setting up a custom domain at both levels, starting from creating the appropriate DNS records to integrating them at the InEvent platform.
Configuring DNS records for your custom domain
Before using a custom domain at InEvent, it is necessary for to configure its DNS records first.
Configuring DNS records for a root domain
This section will guide you on how to set up DNS records for a root domain for use as custom domain at InEvent.
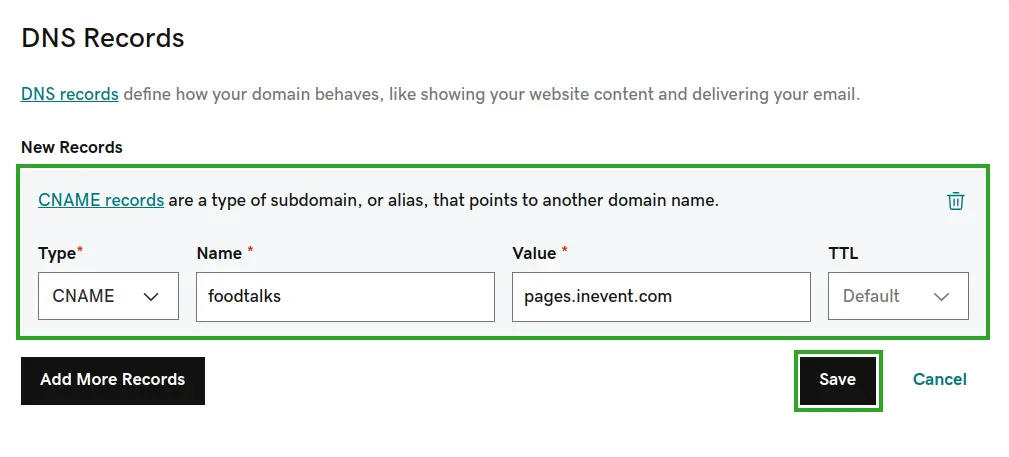
Creating a CNAME-Type DNS Record
After verifying InEvent's IP address, you can start to configure a CNAME-Type DNS record at your domain name registrar. To do so, follow the instructions below, using GoDaddy as an example.
- Navigate to the DNS management interface of your domain name registrar.
- Create a DNS record with the following specifications:
- Type:
CNAME - Name: The desired name or identifier of your subdomain.
- Value:
pages.inevent.comif you are using the US server, orpages.inevent.ukif you are using the EU server. - TTL: Leave as default, or select as necessary.
- Save the DNS record.
Once you have configured the DNS record, you can proceed to add it to InEvent as a custom domain.
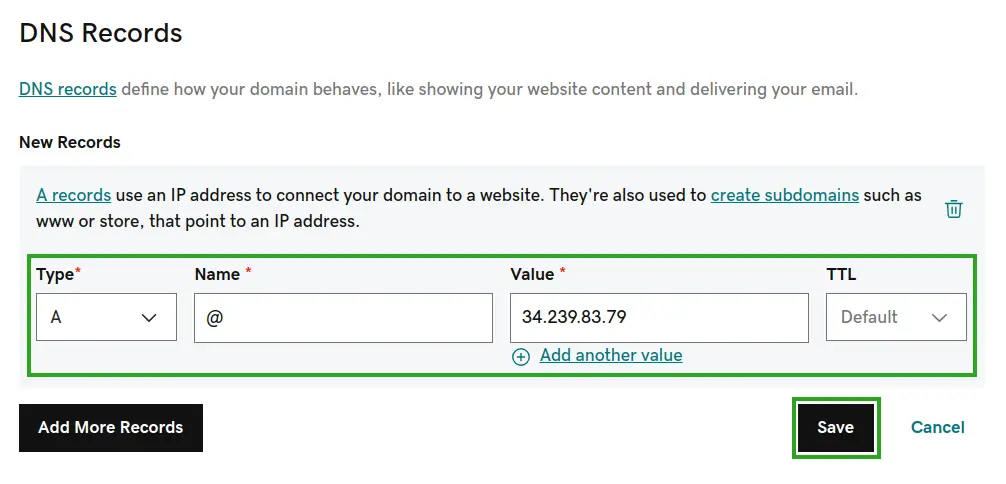
Creating an A-Type DNS record
After verifying InEvent's IP address, you can start to configure an A-Type DNS record at your domain name registrar. To do so, follow the instructions below, using GoDaddy as an example.
- Navigate to the DNS management interface of your domain name registrar.
- Create a DNS record with the following specifications:
- Type:
A - Name:
@ - Value: IP address of
pages.inevent.comif you are using the US server, orpages.inevent.ukif you are using the EU server.
nslookup to ensure you are entering the correct address.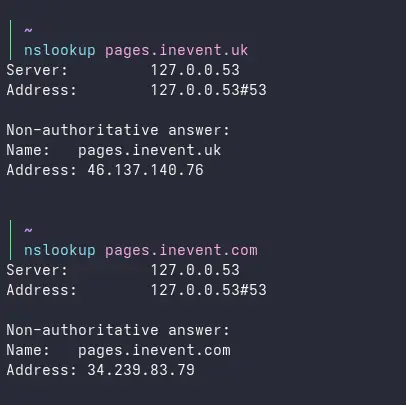
- TTL: Leave as default, or select as necessary.
- Save the DNS record.
Once you have configured the DNS record, you can proceed to add it to InEvent as a custom domain.
Configuring DNS records for a subdomain
This section will guide you on how to set up a CNAME-Type DNS record for a subdomain for use as custom domain at InEvent.
- Navigate to the DNS management interface of your domain name registrar.
- Create a DNS record with the following specifications:
- Type:
CNAME - Name: The desired name or identifier of your subdomain.
- Value:
pages.inevent.comif you are using the US server, orpages.inevent.ukif you are using the EU server. - TTL: Leave as default, or select as necessary.
- Save the DNS record.
Once you have configured the DNS record, you can proceed to add it to InEvent as a custom domain.
Configuring a custom domain at the InEvent platform
Custom domain can be configured at the Company level and at the Event level. By configuring the custom domain at the Company level, all events and pages within the same company will use the configured custom domain, whereas configuring at the Event level will apply the changes only for the pages of the target event.
Configuring a custom domain at the Company level
To configure a custom domain at the Company level, follow the steps below.
- Navigate to the Details page under the Company section of the Company level.
- Click on the Edit button.
- Enter your domain name in the Custom domain field.
- Press End to save your changes.
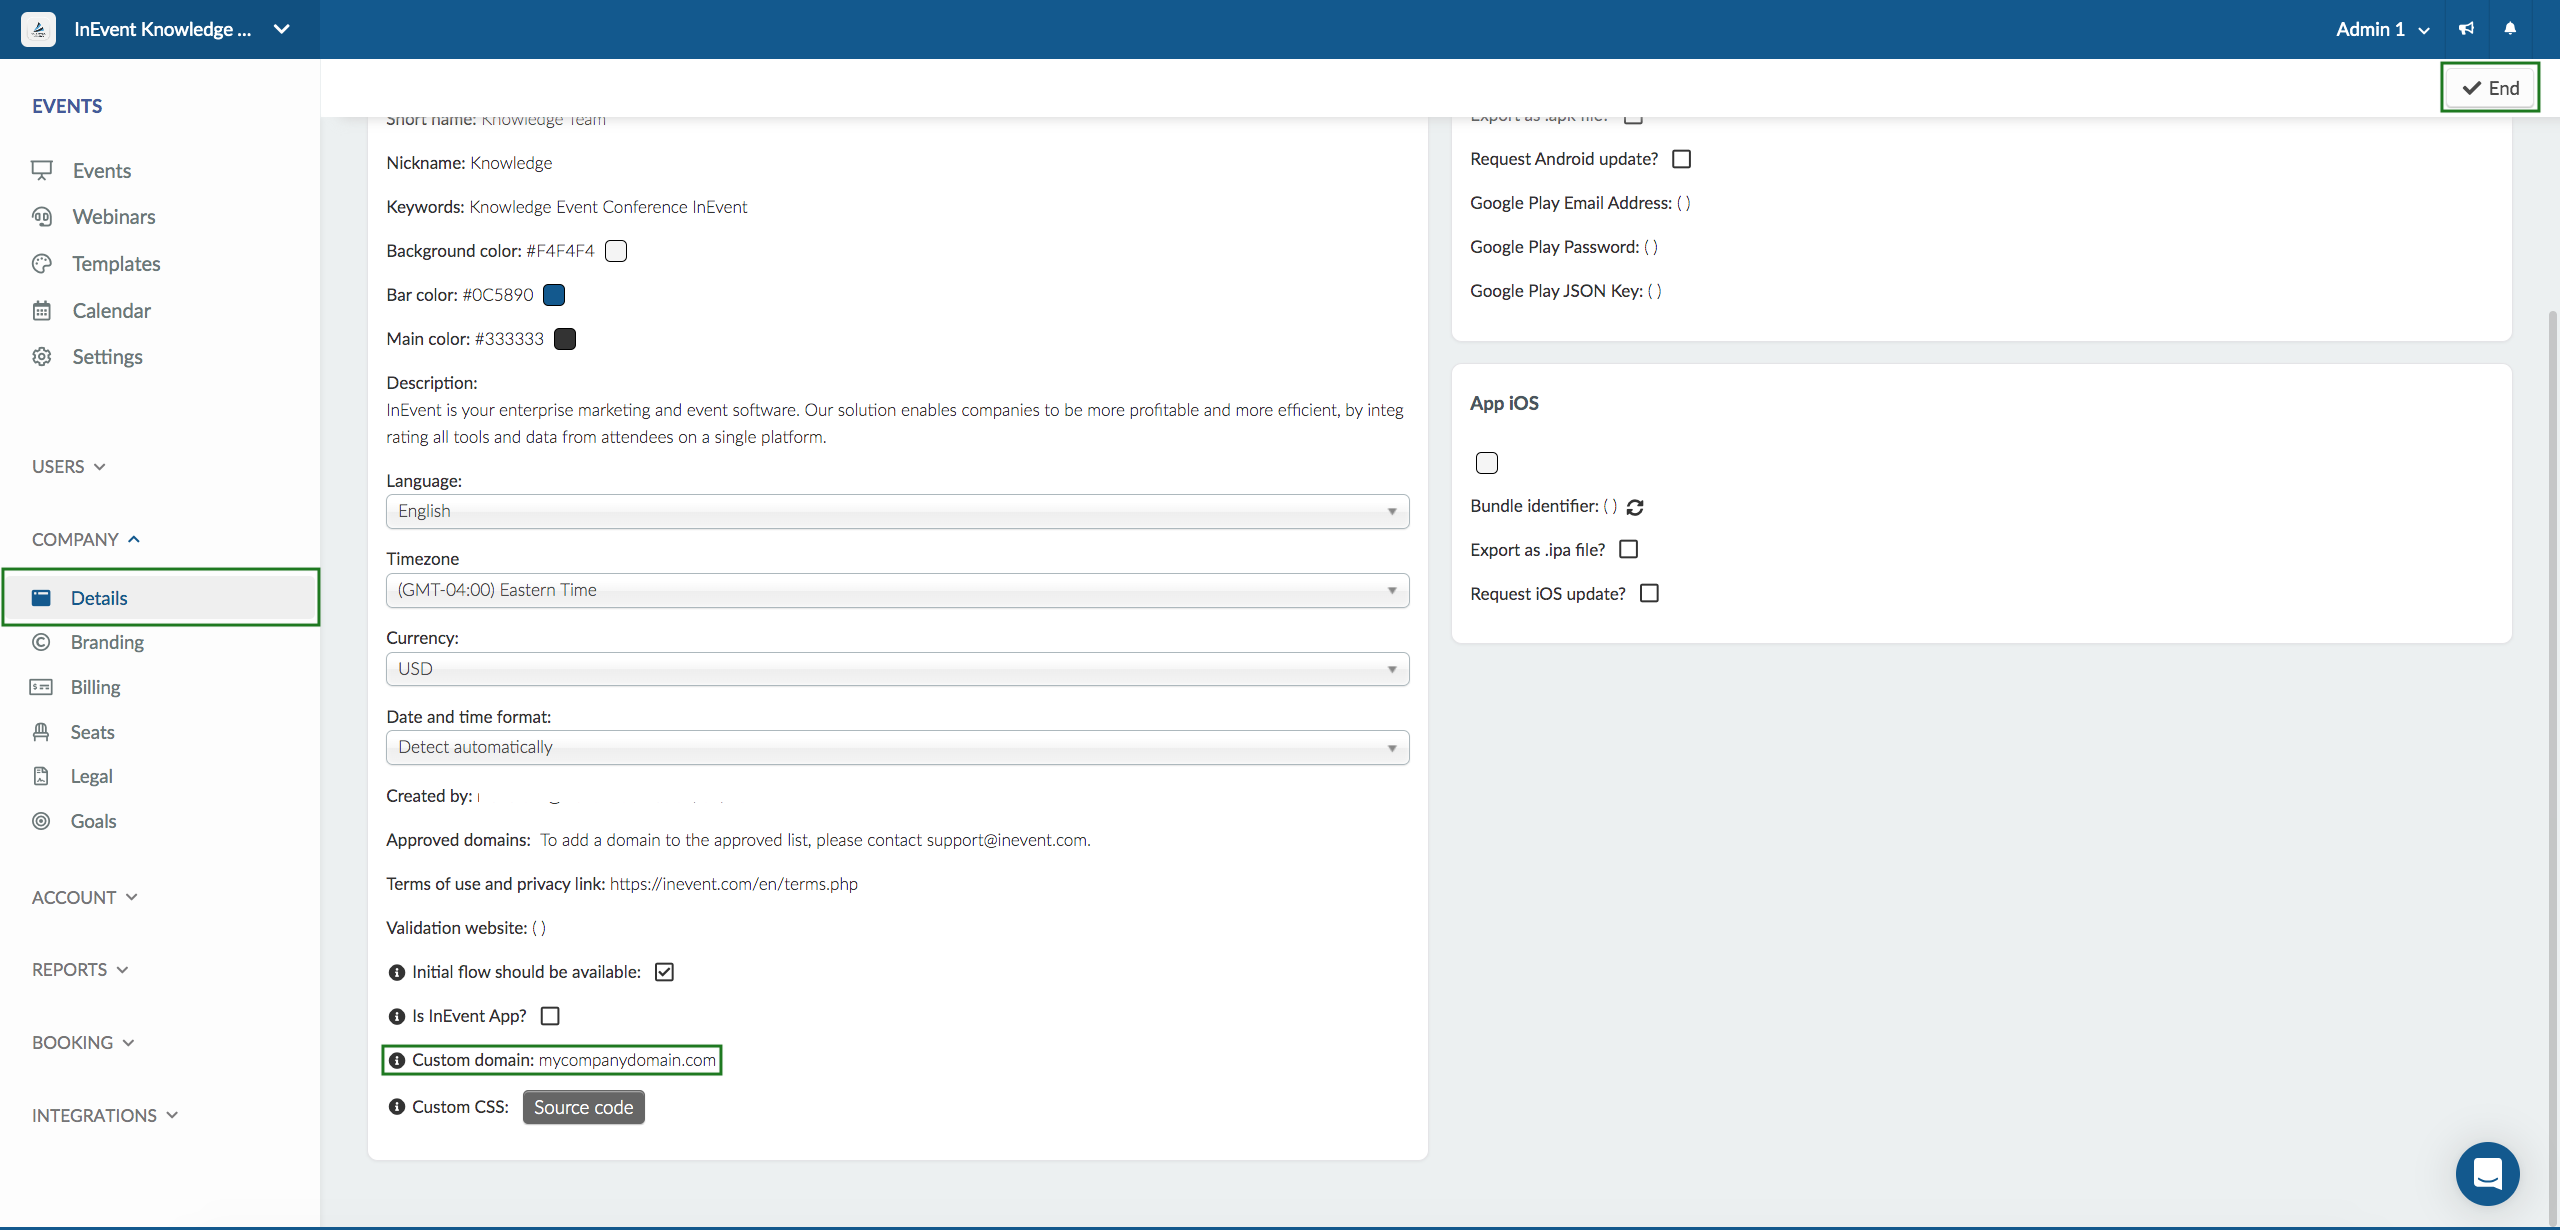
Once you have successfully configured your custom domain, the custom domain will be applied to events and pages within the same company at the InEvent platform. Additionally, accessing the configured custom domain name will lead to the Event directory page as the default landing page.
0 issue "letsencrypt.org") to your DNS management interface. For more information, refer to Let's Encrypt's Frequently Asked Questions page.Using a custom domain for an Umbrella account
When using a custom domain at the Company level of an Umbrella account, the custom domain will also be applied to the child companies within the umbrella account if custom domain is not set at the child company level.
Below is a table of the URL structure and its description, using my-company.com as the example custom domain for the umbrella company.
URL | Description |
| Opens the umbrella account's Event directory |
| Opens the umbrella account's Event directory. The umbrella account is specified using its Company nickname. For more information on Company nickname and other company details, refer to our Company Details article. |
| Opens a child company's Event directory. The child company is specified using its company nickname. |
| Opens an event within the umbrella account. The umbrella account is specified using its Company nickname, and the event is specified using its Event nickname. For more information on event nickname and other event details, refer to our Event details article. |
| Opens an event within the child company. The child company is specified using its Company nickname, and the event is specified using its Event nickname. |
| Redirects to |
Configuring a custom domain at the Event level
To configure a custom domain at the Event level, follow the steps below.
- Navigate to Event > Details from the Event level.
- Click on the Edit button.
- Enter your domain name in the Custom domain field.
- Press End to save your changes.
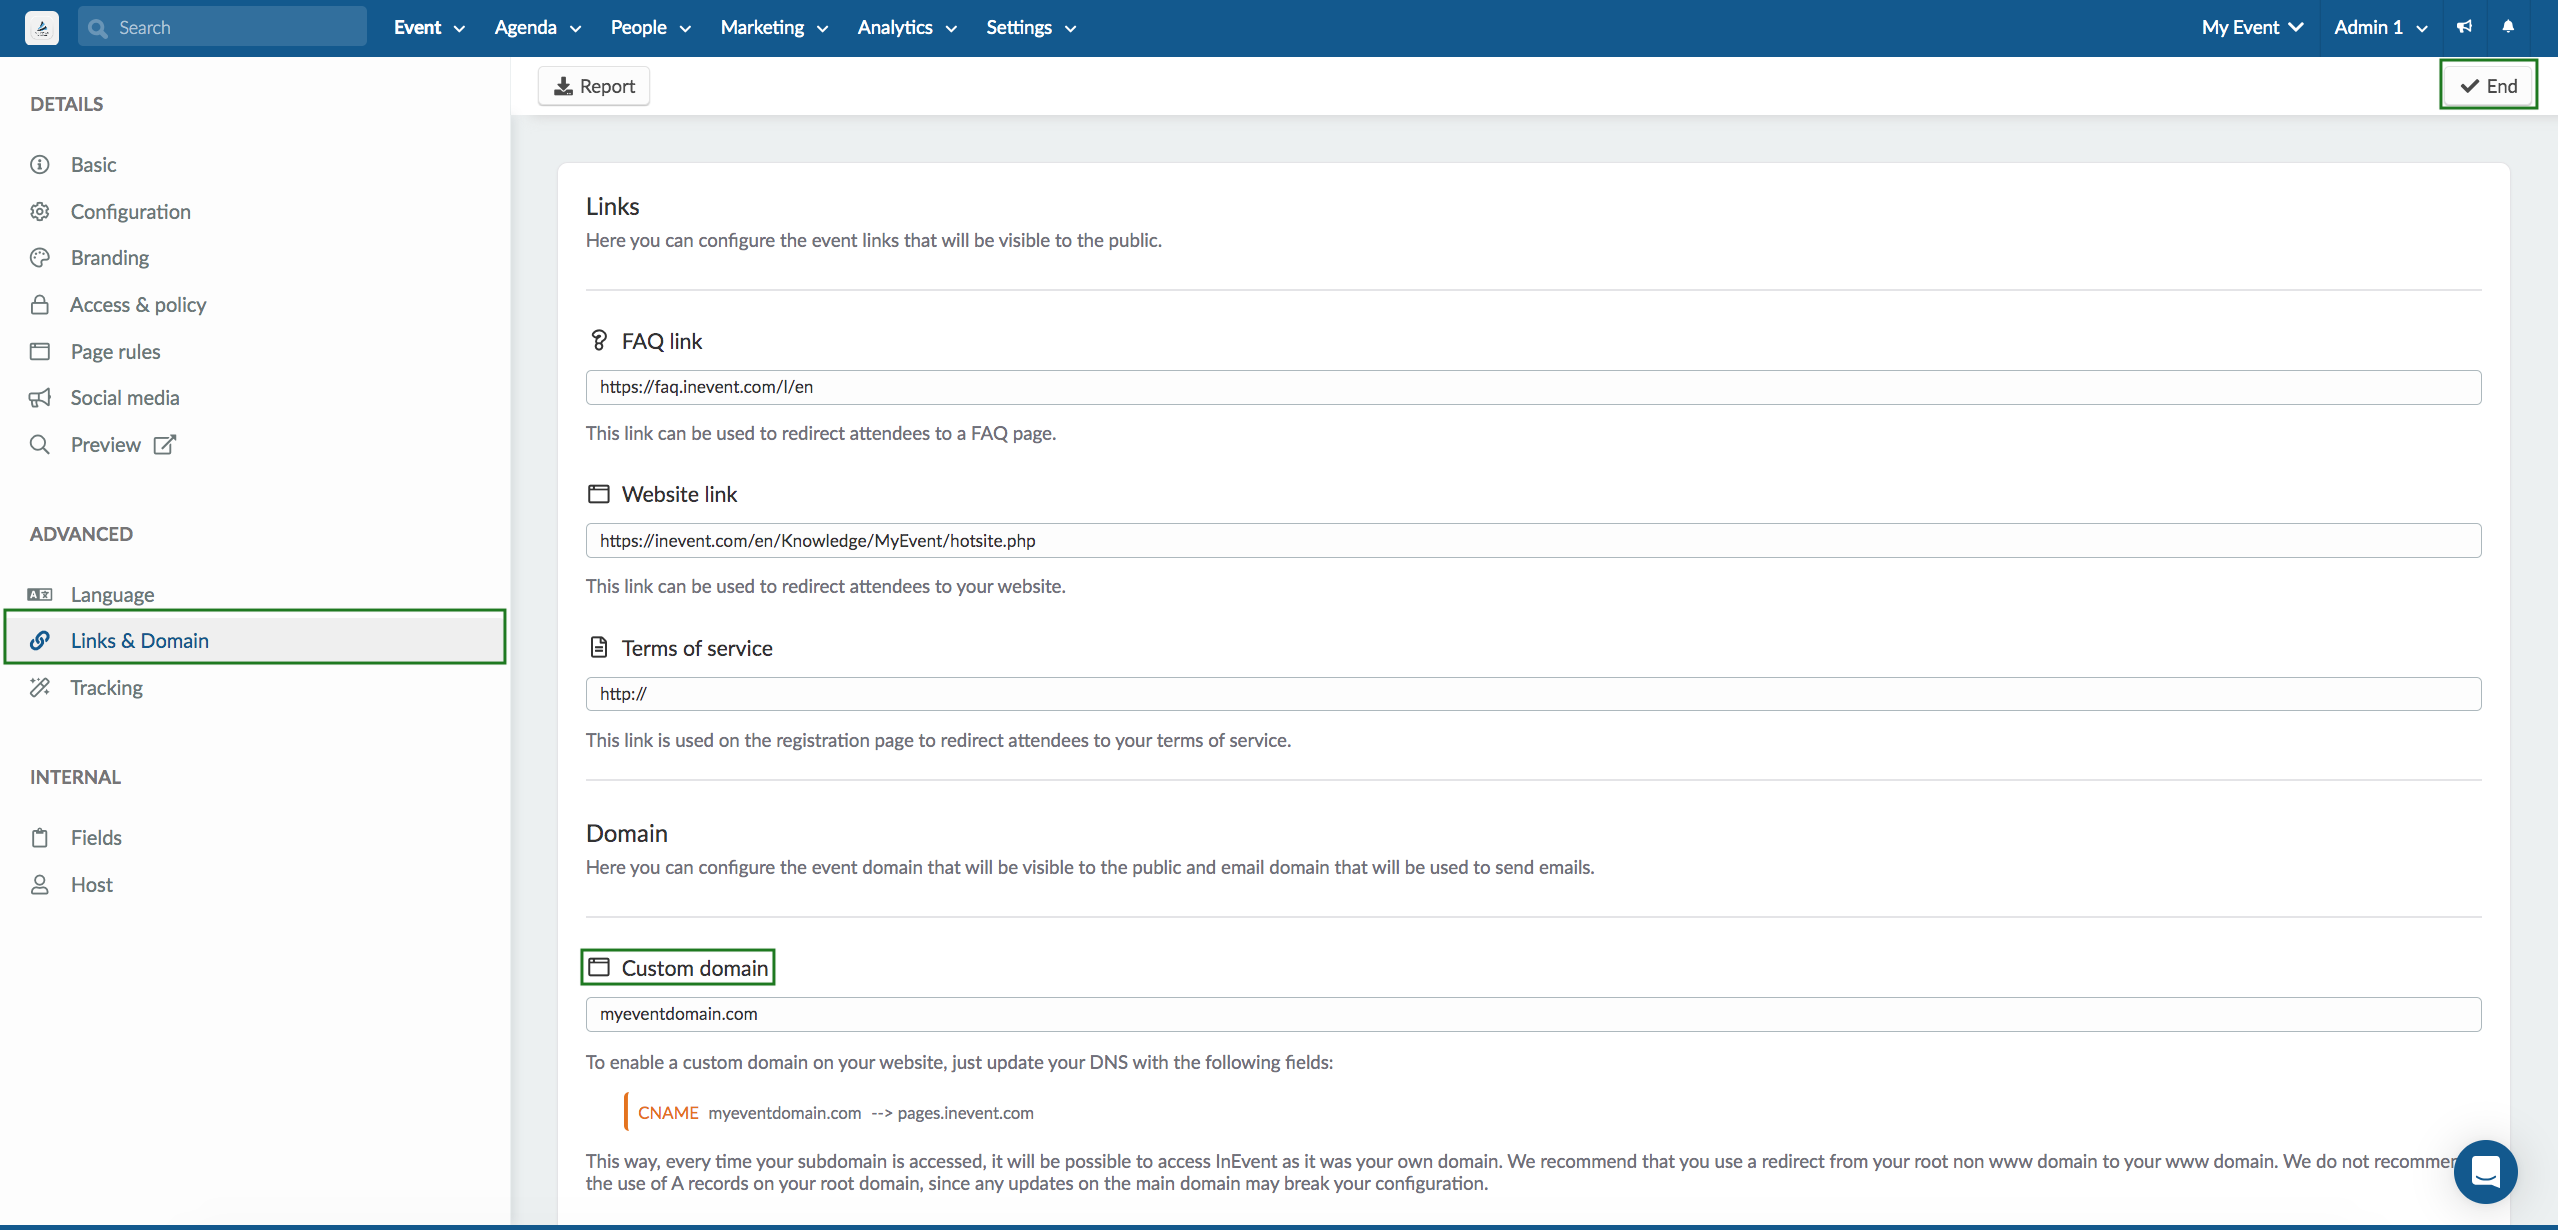
Once you have successfully configured your custom domain, the custom domain will be applied your event pages. Additionally, accessing the configured custom domain name will lead to your Website if you have the Website tool enabled, or to the website configured using InEvent's Website builder if you have the Landing pages tool enabled.
Website and Landing page
After configuring your custom domain, you can also proceed to configure and manage your Website or Landing page according to your preferences. For more information, refer to the articles listed below.
- Website: Easily set up a website page using templates and InEvent's curated options.
- Landing page: Create a website page from scratch using elements provided by InEvent, and further customize its CSS properties.
- Code builder: Manage your own landing page codes.
Page redirect
You can automatically redirect users by setting up a server-side redirect or using Meta Refresh. In this section, you will find information regarding the two set up methods.
Server-side redirect
Server-side redirects occur directly on the webserver that hosts your website. When a browser requests a page with a server-side redirect in place, the server responds with a HTTP status code (usually 301 or 302) and a Location header, which informs the updated destination to the browser. You can set up either a Permanent or Temporary redirect.
- Permanent redirect: Signals to search engines to update their indexes, so that the updated page is shown in search engine results. This is recommended for when the domain change is permanent and will not be reverted. Permanent redirect is indicated by the
301or308HTTP status codes. - Temporary redirect: Shows the source page in search engine results. This is useful for when a service your site offers is temporarily unavailable, as you can set up a temporary notice or information page without compromising the original URL in the search results. Temporary redirect is indicated by the
302HTTP status code.
Meta Refresh redirect
Meta Refresh functions to inform your browser to automatically refresh the page or redirect the user to the destination page after a specified amount of time. Meta Refresh redirect can be configured using InEvent's Code builder feature. To do so, follow the steps below.
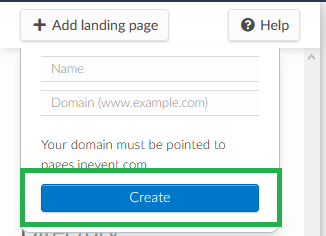
- Navigate to Marketing > Landing pages > Code builder.
- Click on +Add landing page.
- Enter the desired name and the domain from which you want to redirect.
- Click on Create.
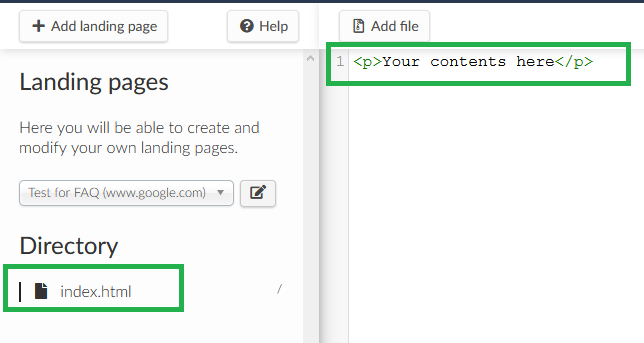
- Click on
index.html. - Remove the
<p>Your contents here</p>snippet from the code editor.
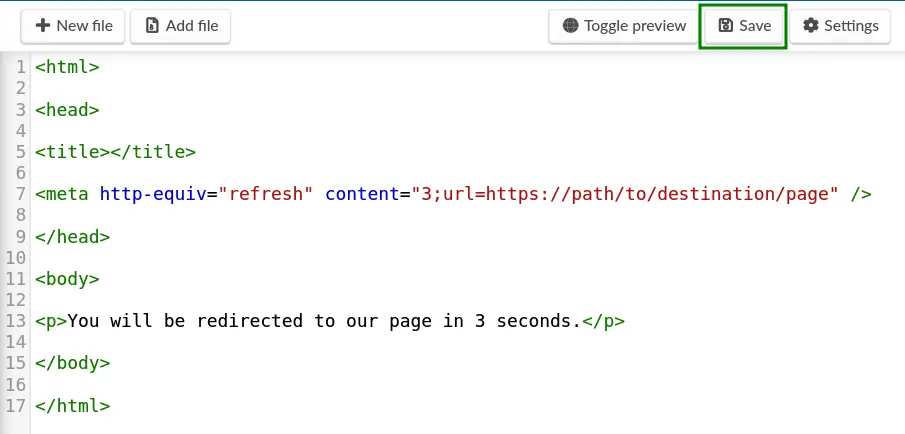
- Insert the following code snippet, replacing
path/to/destination/pagewith the address of your redirect destination. You can also insert a redirect notice in between<body>and</body>.
3 with your desired amount of time in seconds.<html>
<head>
<title></title>
<meta http-equiv="refresh" content="3;url=https://path/to/destination/page" />
</head>
<body>
</body>
</html>
- Press the Save button.
After completing the steps above, your user will be automatically redirected to the destination page after the specified amount of time has passed.