Setting up the Purchase form
 Updated 1 month ago
by
Caleb Kotey
Updated 1 month ago
by
Caleb Kotey
Once you add tickets to your Registration form and have the required tools enabled in your event, attendees will be directed to the Purchase form upon registering. This article will guide event organizers on how to set up a purchase form and participants on how to fill out the purchase form.
Setting up a Purchase form
Setting up your Purchase form is a relatively short process which involves: adding tickets and enabling the relevant tools. Below you will learn about both steps.
Adding tickets
The first step to setting up a Purchase form is setting up tickets for your event, click here to learn how to add tickets to your event.
Displaying tickets based on form responses
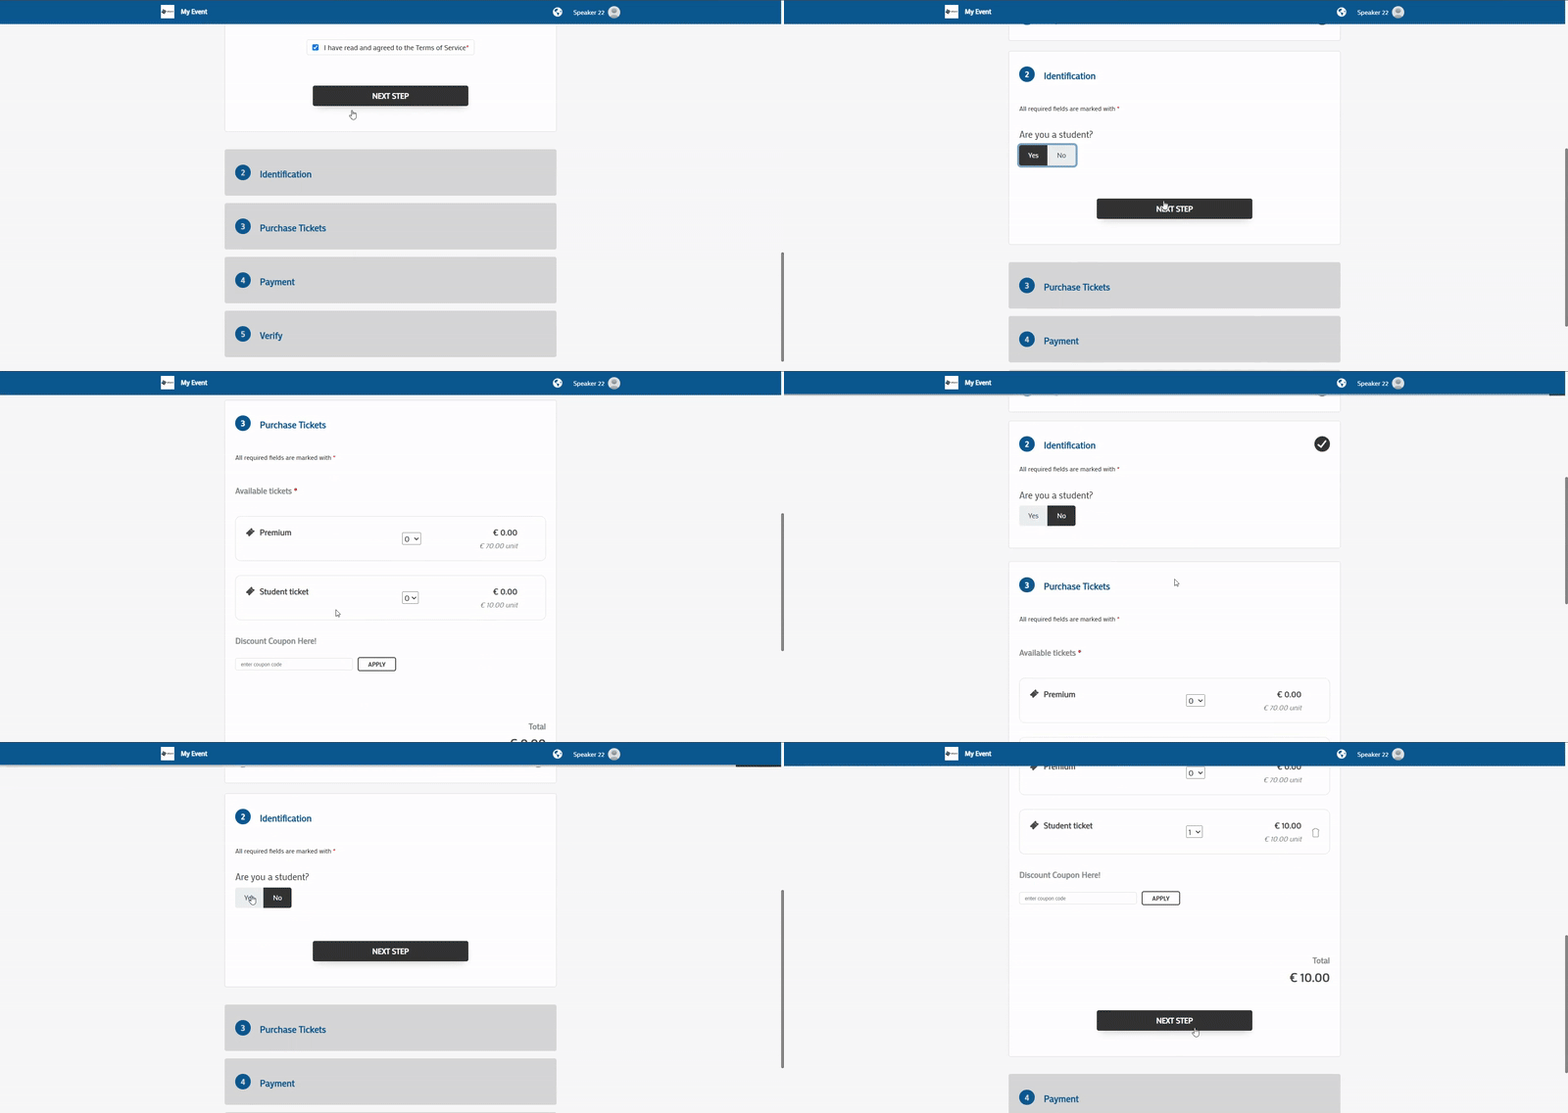
Once you are done adding tickets to your event, you can tailor the ticket options presented to registrants based on their answers to specific questions in the registration form.
By leveraging conditional logic, you can set up the registration form so that certain tickets are shown or hidden depending on the registrant's response to a designated question. This is particularly useful for events with multiple ticket tiers or categories, ensuring that attendees are presented with options that align with their profile or preferences. To set up ticket visibility based on responses in your registration form, follow the steps below:
Also, make sure to disable the Display tickets before identification tool so the Tickets field is visible for these answer types.
- Navigate to Marketing > Registration > Registration Form.
- Click the + Add fields button located in the top left corner of the page.
- Enter a title for your field and select the appropriate answer type
- Click Create to save the field.
Once your field is created, you can assign specific tickets to each of the possible answers
- Click on the field you just created to open the Field settings panel.
- Select the Tickets tab.
- For each available answer, choose the corresponding ticket from the dropdown menu.
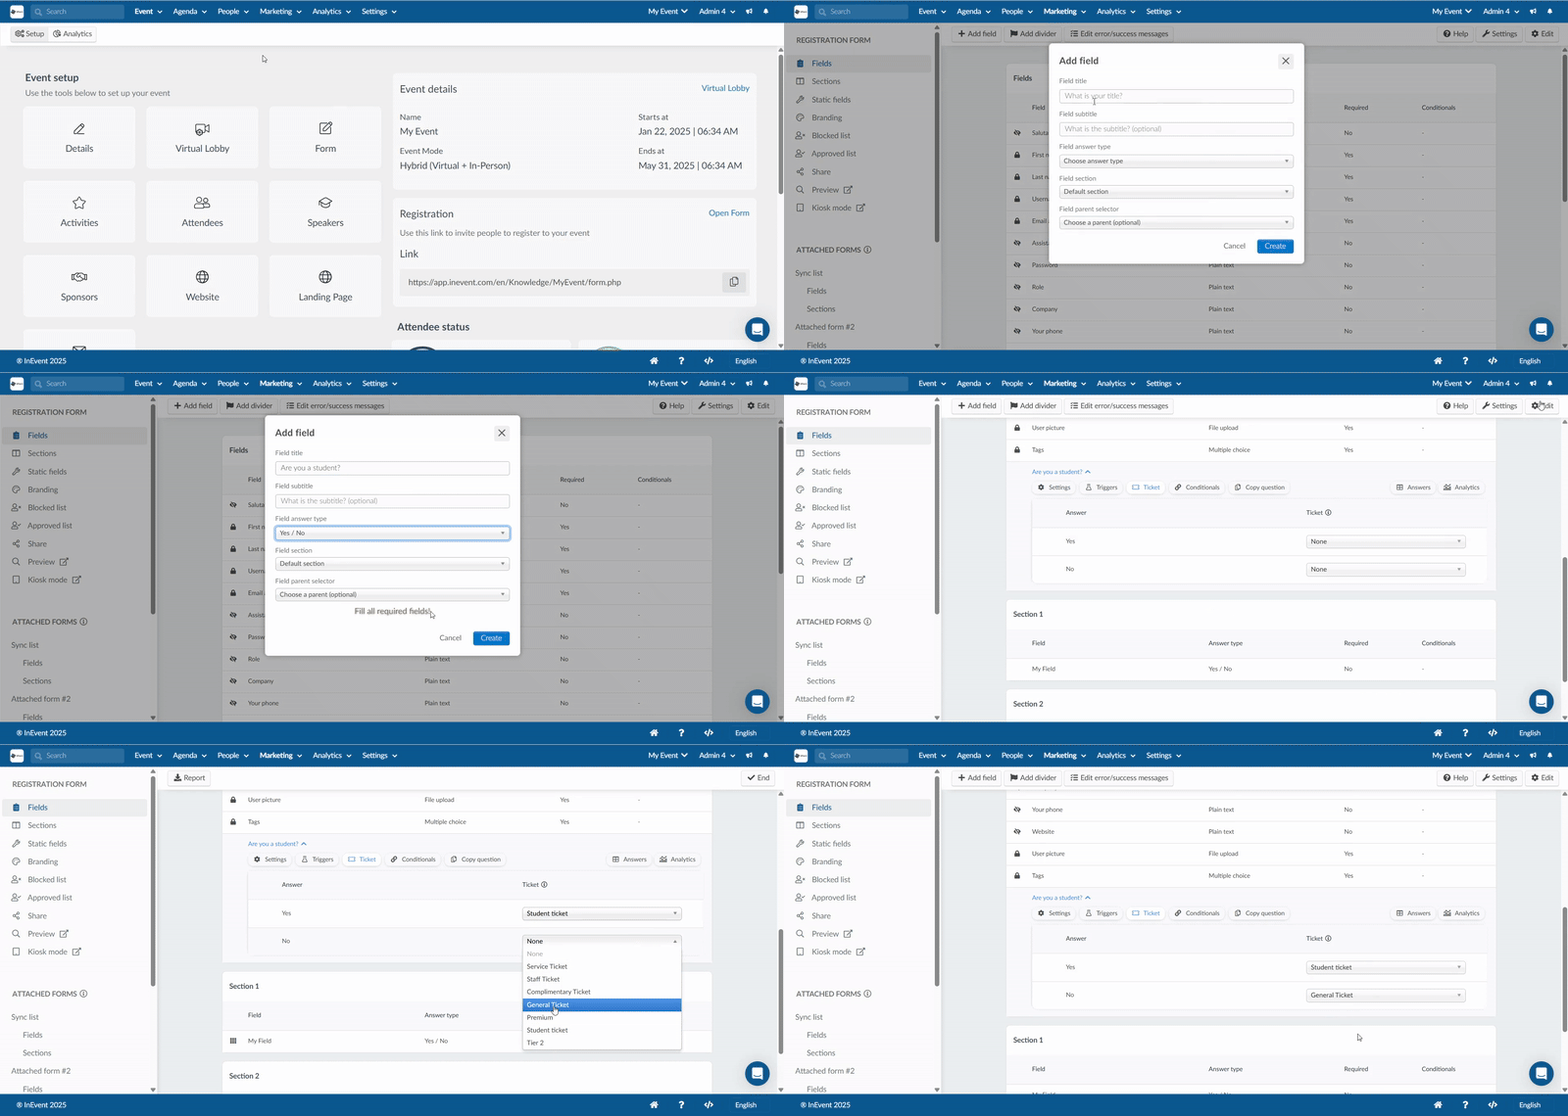
This ensures that attendees will only see ticket options relevant to their responses on the registration form.
Enabling tools
In order for the Purchase form to appear on the Registration form you need to have the following tools enabled from the Settings . Tools > Registration section:
- Tickets: This tool enables ticket purchases on the VL, which also enables the purchase form
(purchase.php) - Ticket requirement: This tool makes ticket purchase a requirement for participants when registering for the event, so it immediately directs them to
purchase.phpform when registering.
If you have these two tools enabled, people who want to register to the event will have to fill a Purchase Form.
Navigate to Settings > Tools > Registration section to enable them.
Ticket requirement can additionally be enabled from the Settings button in the Tickets page.
Purchase form Headings
As an event admin, it is possible for you to customize the labels related to the Purchase form using the Headings feature. Below are some examples of the Purchase form headings that you can modify:
Purchase form disclaimers
You can add a disclaimer to your Purchase form which will appear in the section of the selected heading.
Below is an example of steps taken to add a disclaimer in the Purchase - Register disclaimer heading which appears in the Register section of the Purchase form.
- Go to Settings > Headings at the event level.
- Click the +Add heading button. A pop-up box will appear.
- From the Select heading type dropdown, select Purchase - Register disclaimer.
- Enter the disclaimer in the Type heading value text box.
- Highlight the specific part(s) of the heading values you wish to hyperlink and click on the Insert/edit link icon.
- A new window will appear where you can paste the link, add a title, and choose whether the link should open in the current window or a new window.
- If you select new window, it will open in a new tab.
- If you select current window, the form page will be redirected to the page.
- Click Save and then Create to finalize your changes.
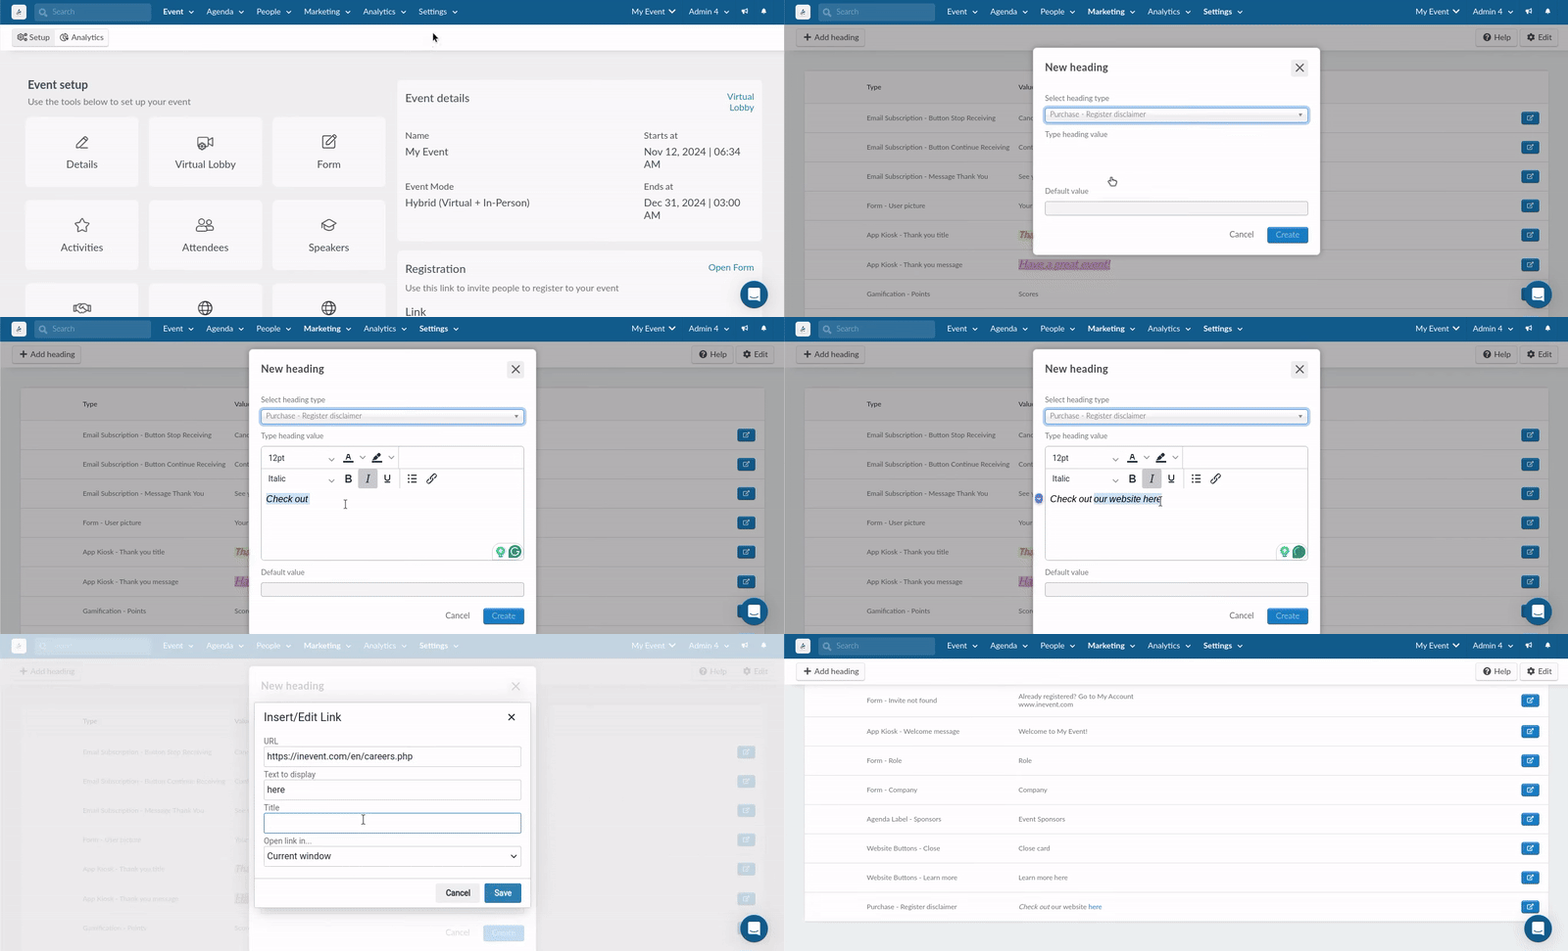
Below is an example of the Purchase form before and after adding the Purchase - Register disclaimer heading.
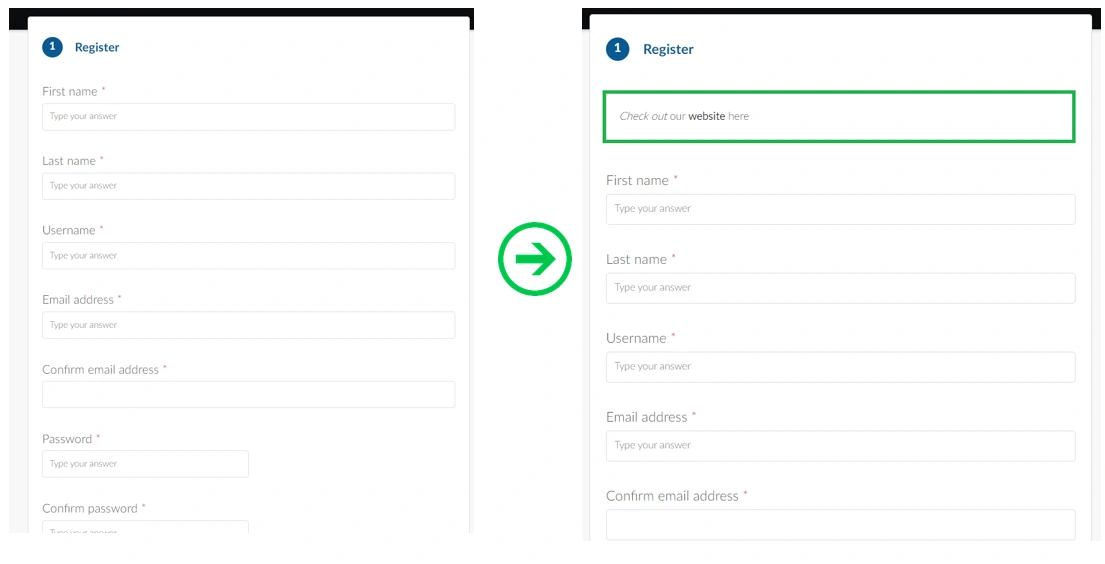
Purchase form titles
You can modify the titles of your Purchase form sections. Below is an example of the steps taken using the Purchase - Confirm title heading
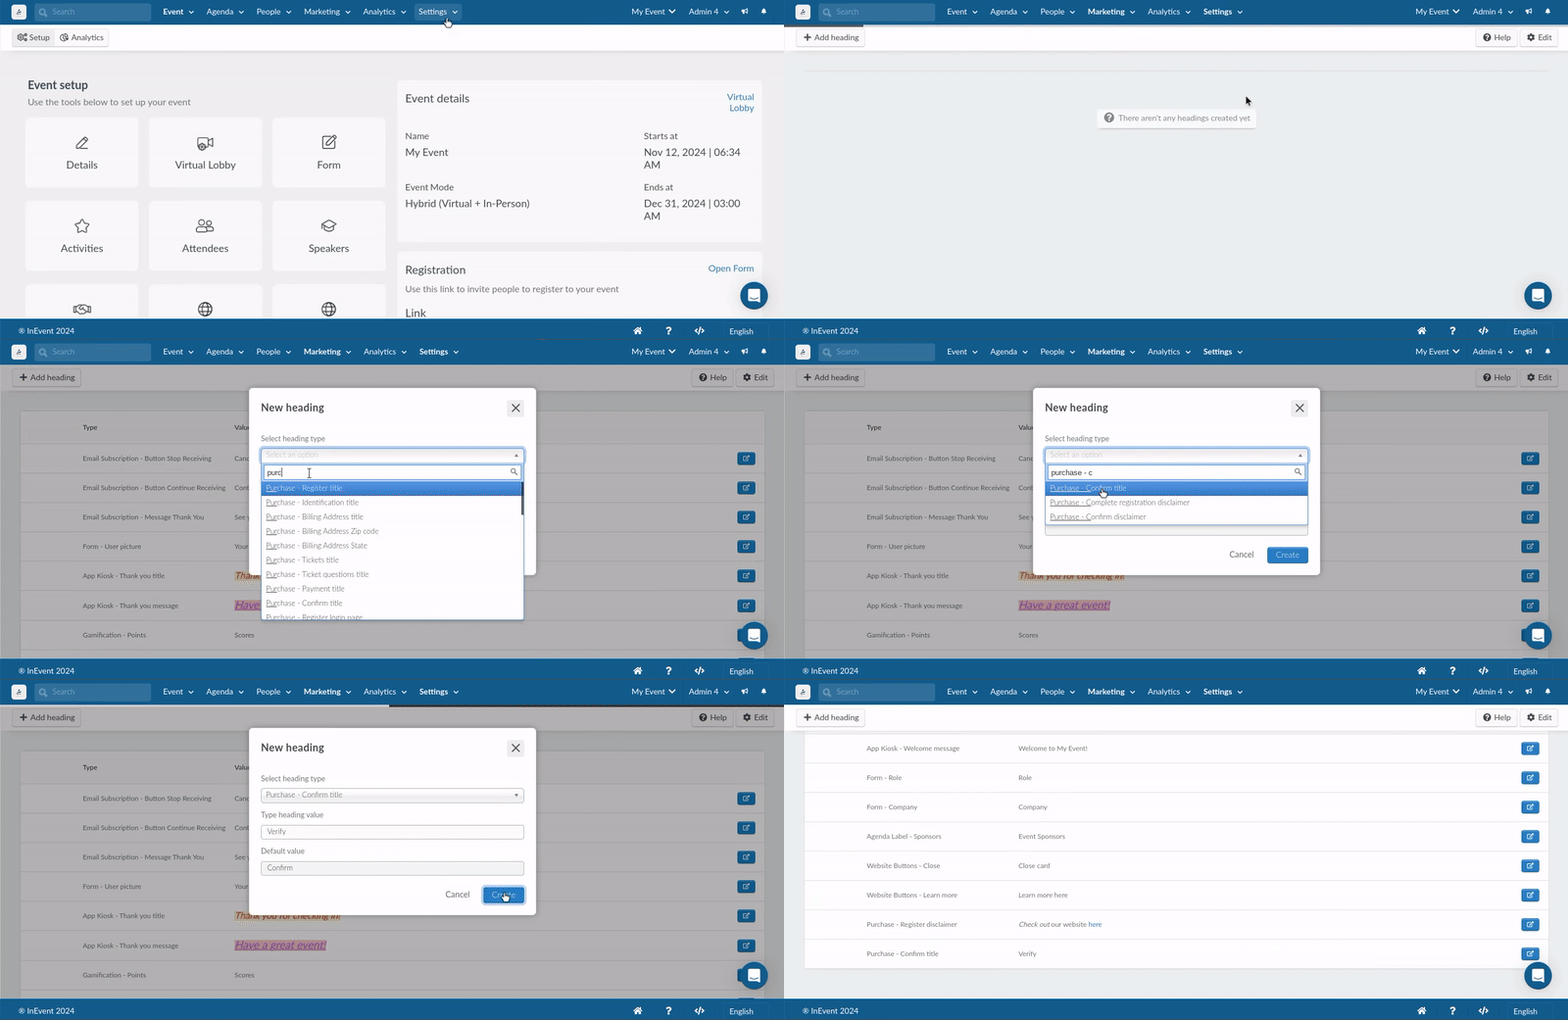
- Go to Settings > Headings.
- Click the +Add heading button. A pop-up box will appear.
- From the Select heading type dropdown, select Purchase - Confirm title.
- Enter the new heading in the Type heading value text box.
- Click on Create.
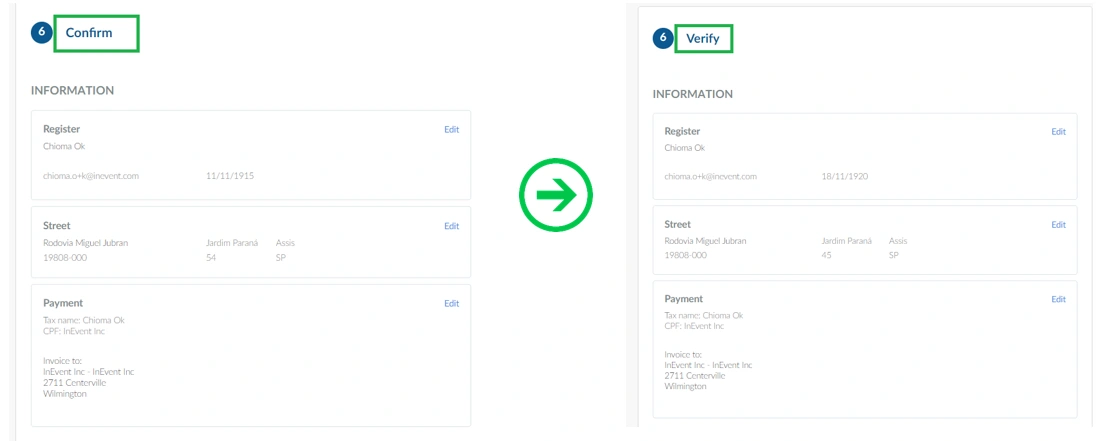
Below is an example of the Purchase form before and after changing the Purchase form - Confirm title heading.
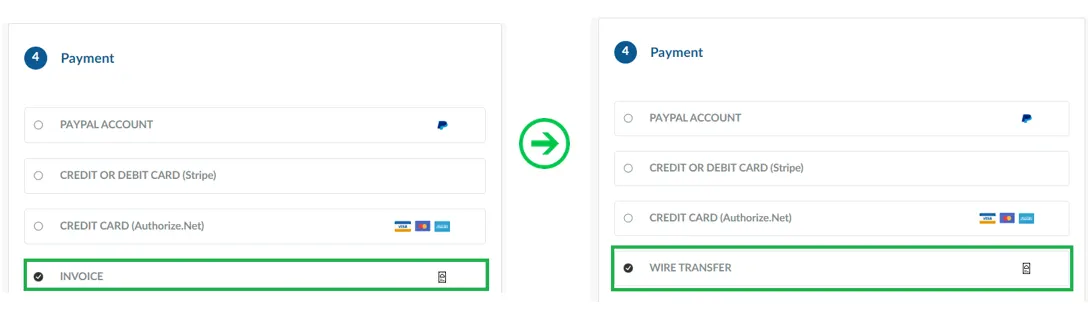
Below is an example of the Purchase form before and after changing the Invoice label of the Purchase - Invoice title on payment options:
Below is another example of the Purchase form before and after changing the Coupon label of the Purchase - Coupon Discount:

Purchase form feedback success
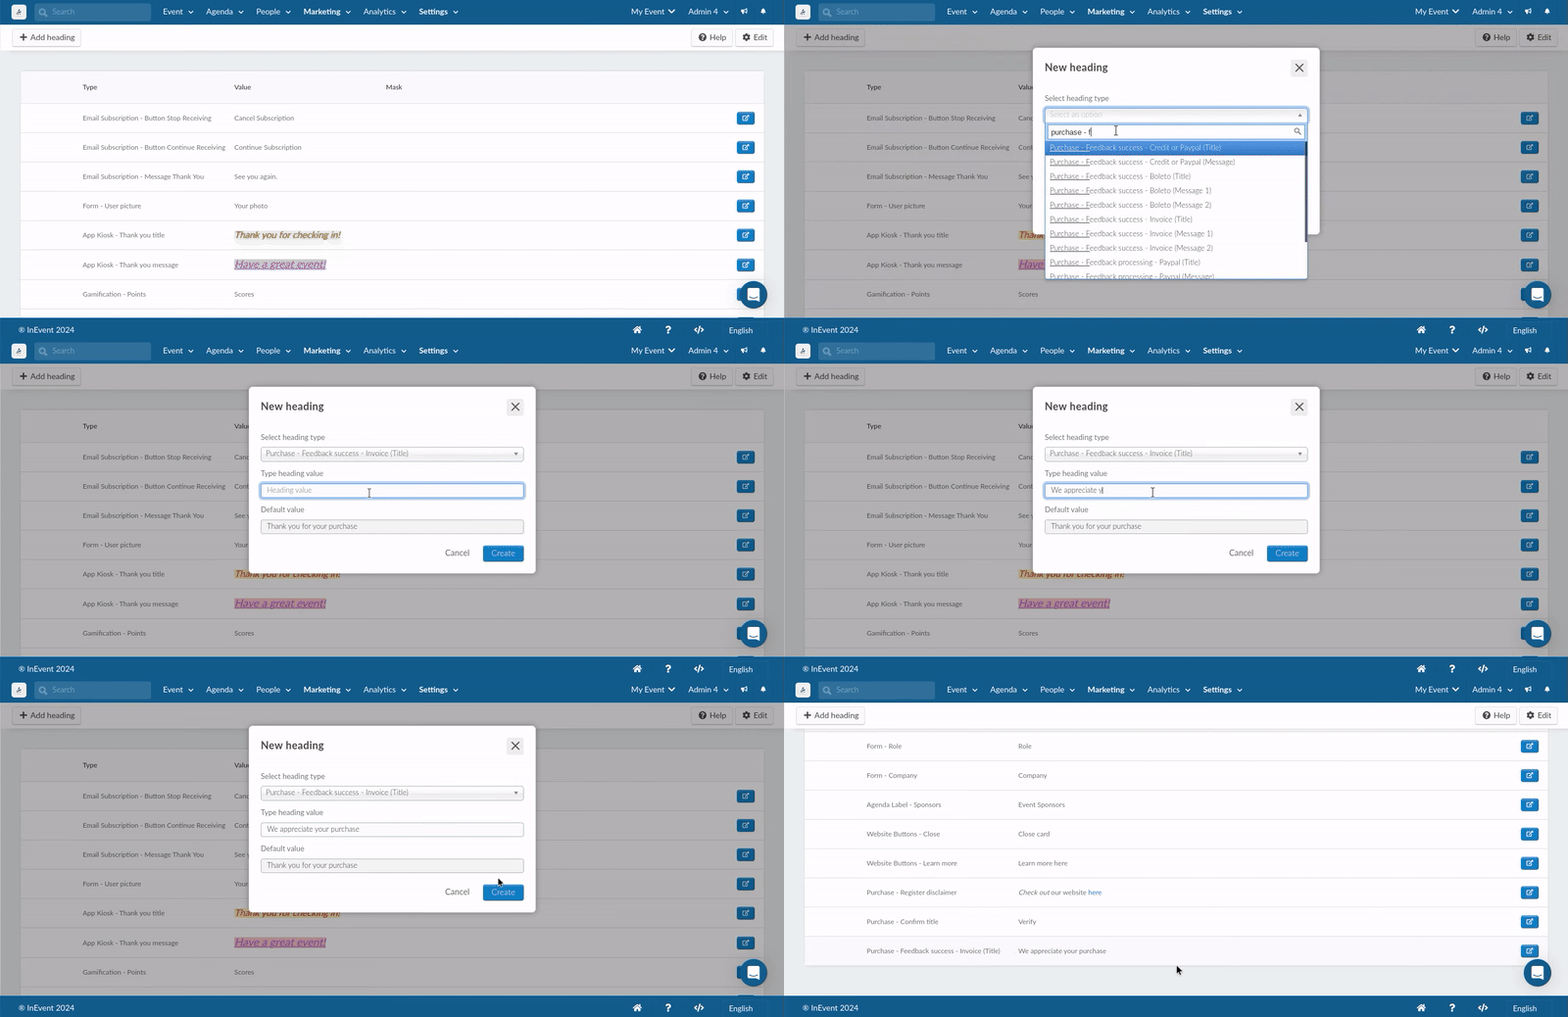
You can modify the feedback success labels that appear when a participant successfully purchased a ticket. Below is an example of the steps taken using the Purchase - Feedback success - Invoice (Title) heading:
- Go to Settings > Headings.
- Click the +Add heading button. A pop-up box will appear.
- From the Select heading type dropdown, select Purchase - Confirm title.
- Enter the new heading in the Type heading value text box.
- Click on Create.
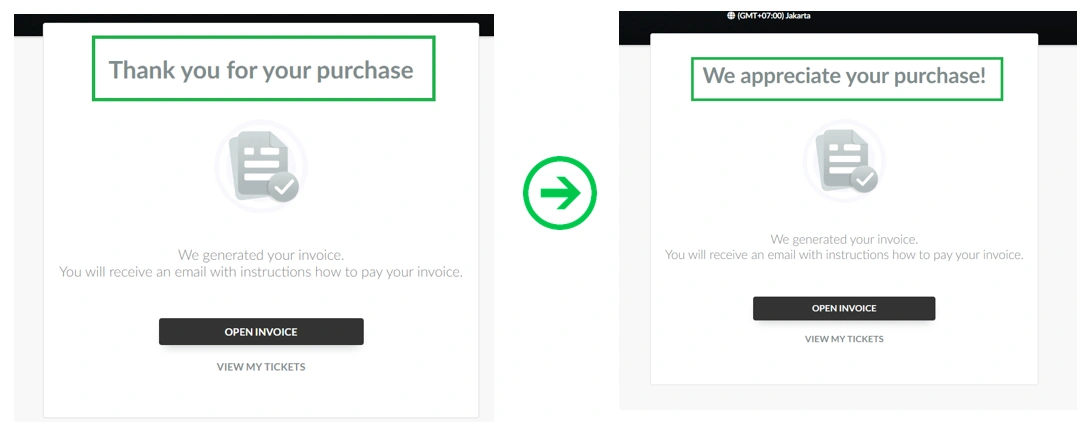
Below is an example of the Purchase form before and after changing the Purchase - Feedback success - Invoice (Title) heading.
Enabling reCAPTCHA on your purchase form
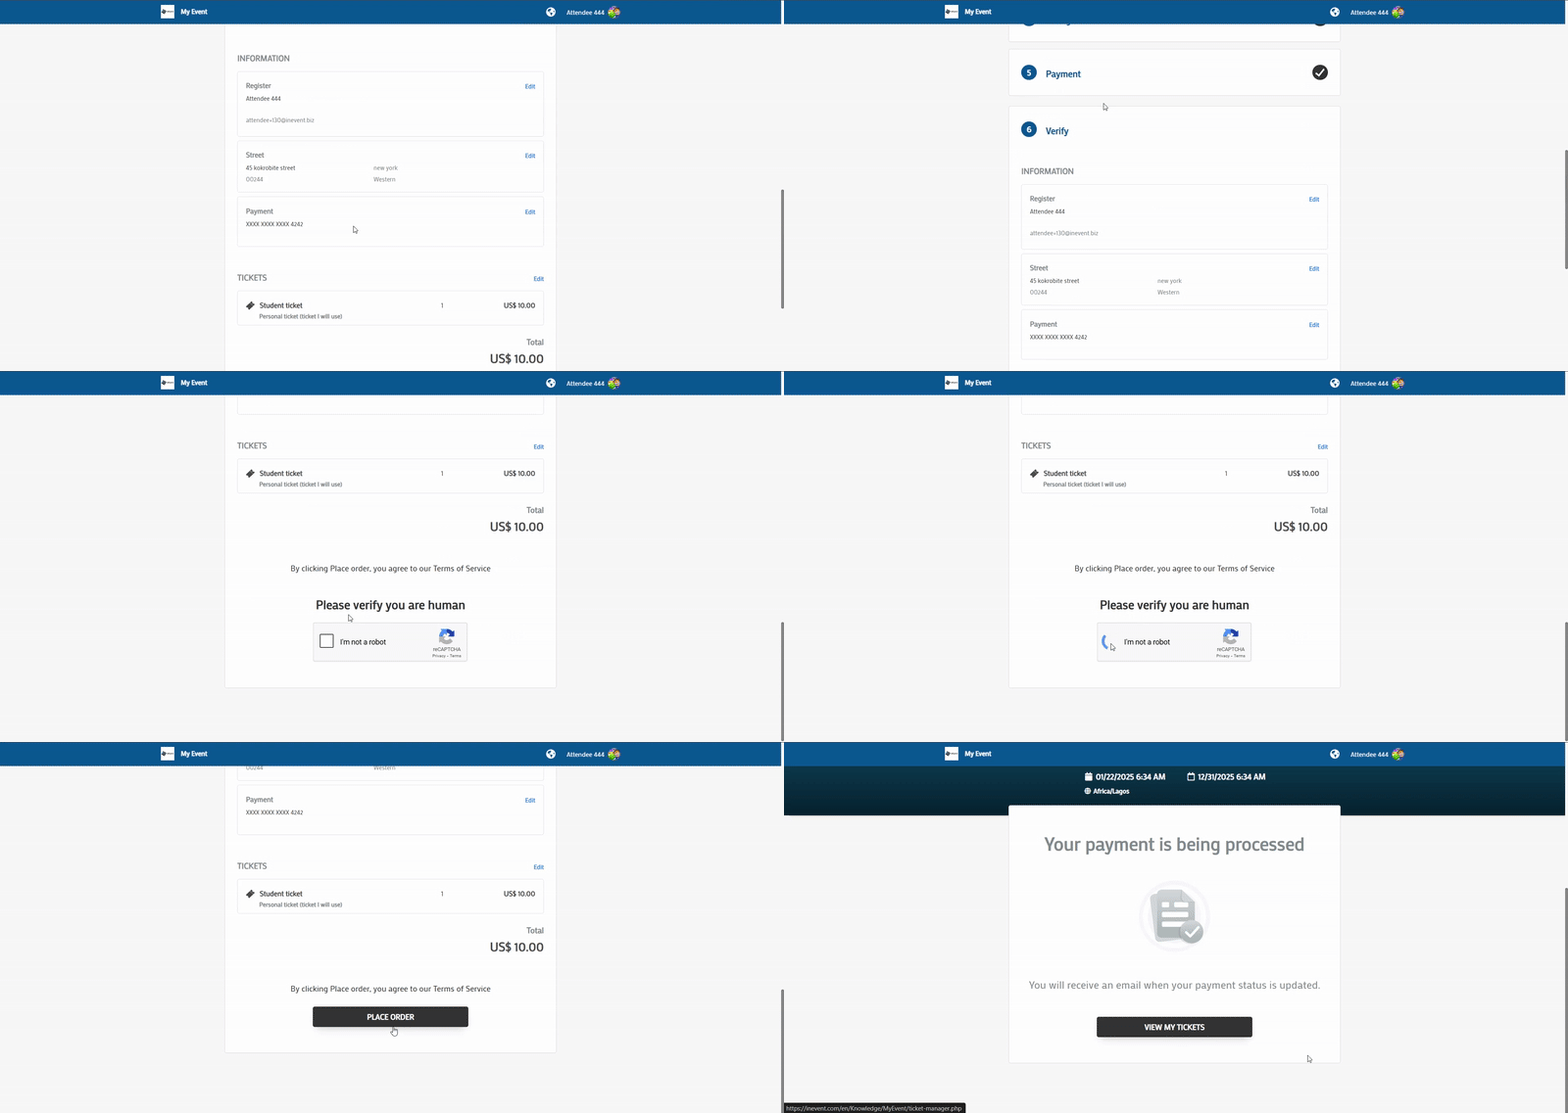
To protect your purchase form from spam and bot submissions, InEvent allows you to enable Google reCAPTCHA. This adds an extra layer of security to ensure that only genuine users can complete the purchase and registration process.
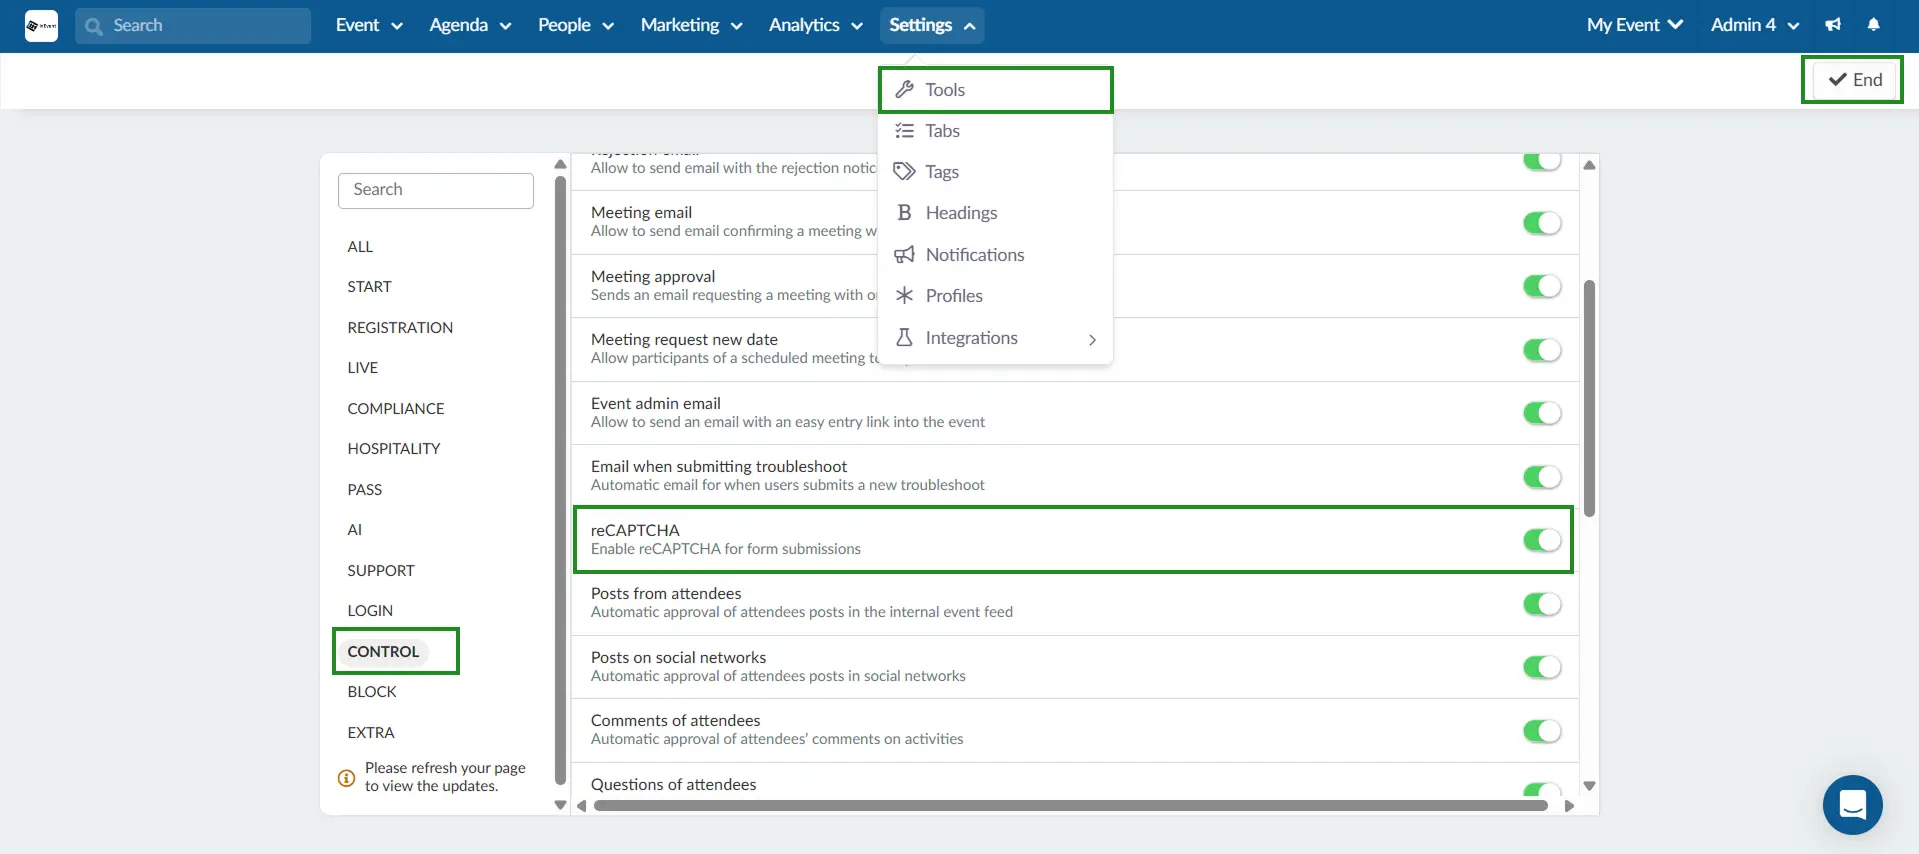
To enable reCAPTCHA for your event’s purchase form, follow these steps:
- Navigate to Settings > Tools.
- Locate the reCAPTCHA option in the Control section.
- Toggle the switch to enable the tool.
- Click on End to save changes.
Once enabled, attendees will see the CAPTCHA challenge when submitting the form.