Ticket Management
 Updated 1 week ago
by
Lorenzo
Updated 1 week ago
by
Lorenzo
The ticket management dashboard allows you to configure tickets, coupons, and payments. You can also create different types of tickets for your audience and analyze your event success. Furthermore, you have the option to separate tickets by group, segmentation, custom form, or invitees' name.
Enabling the Tickets tool
To enable the Tickets tool, follow the steps provided below.
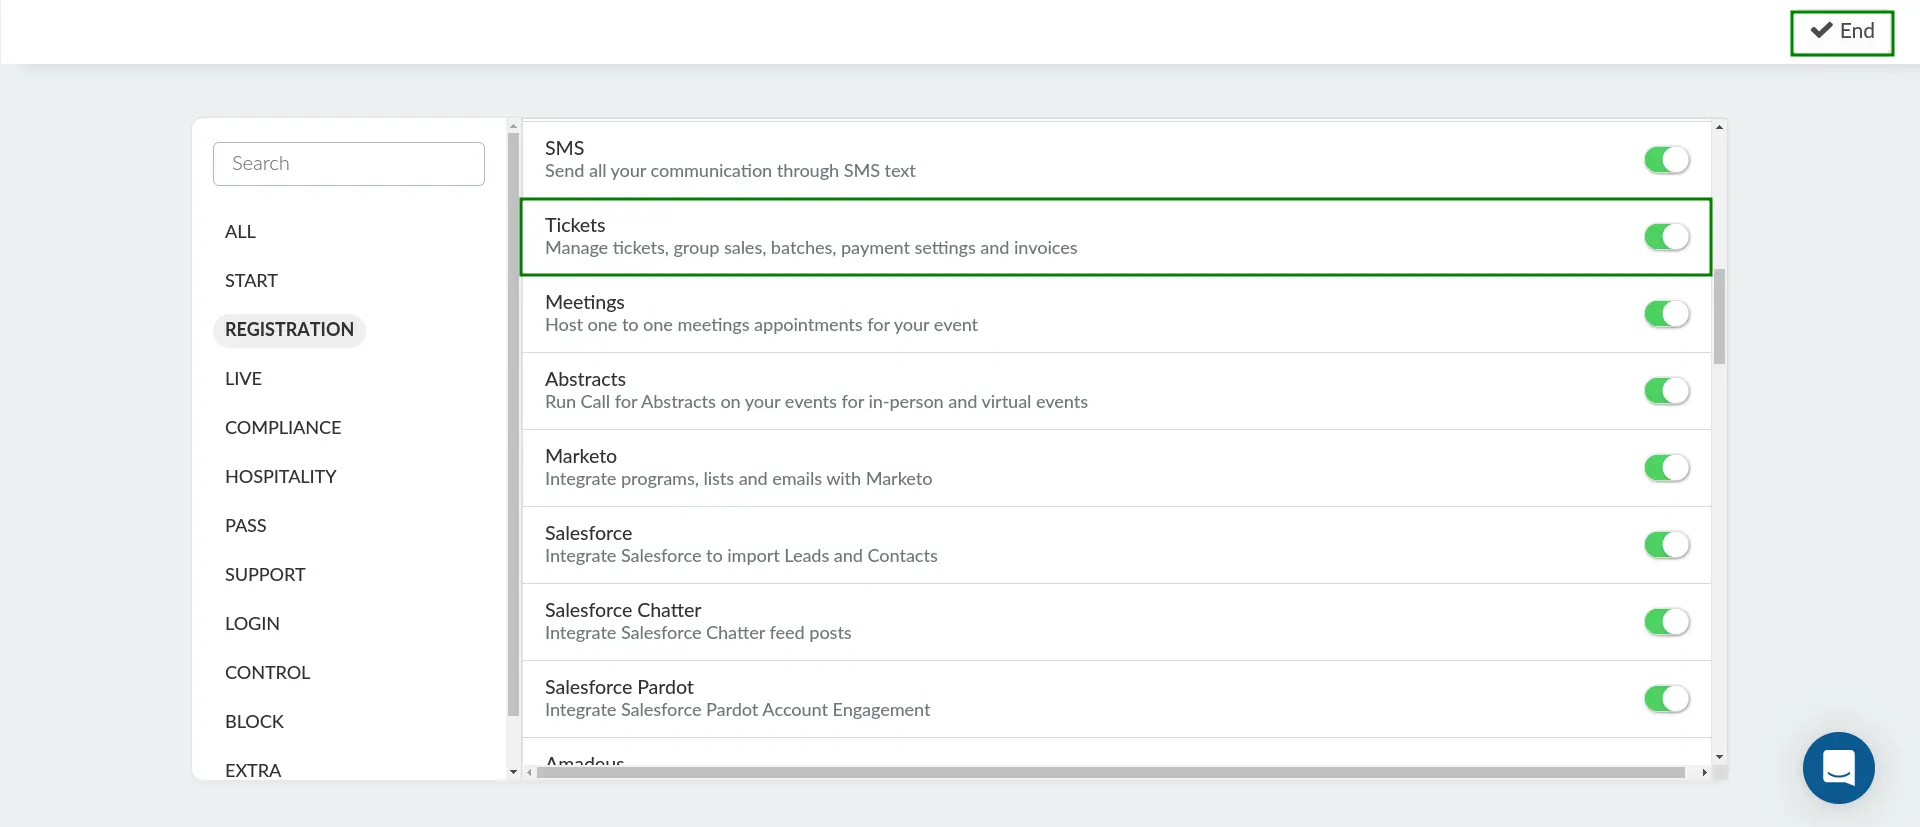
- Navigate to Settings > Tools from the Event level.
- Locate the Tickets tool under the Registration section.
- Click on the Edit button.
- Enable the Tickets tool using the corresponding toggle.
- Click on the End button to save your changes.
After completing the steps above, the Tickets tool will be enabled for your event.
Creating and managing tickets
This section covers creating tickets, editing ticket information, including ticket details, group assignments, form attachments, and the configuration of sales and pricing, as well as removal.
Creating tickets
Tickets can be created manually or by importing spreadsheets. The following sections will explain how to use both of these options.
Manually creating tickets
To create tickets manually, follow the steps below:
- Navigate to Marketing > Tickets > Tickets.
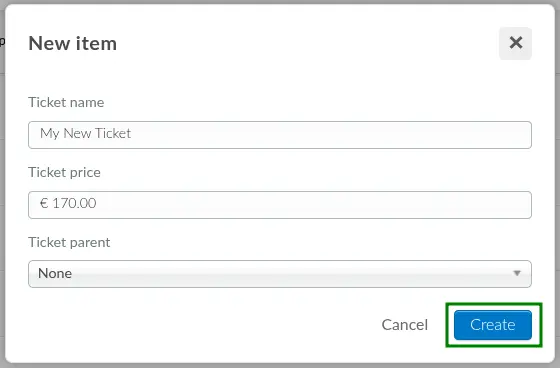
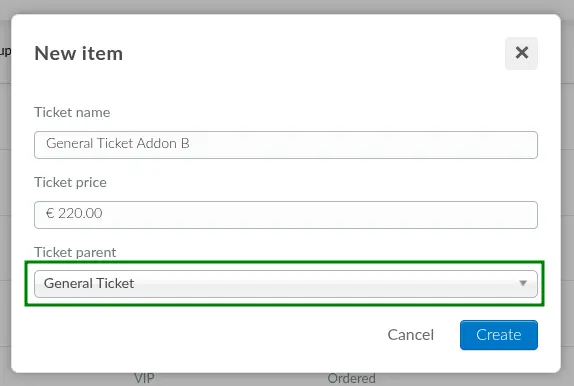
- Press the +Add ticket button on the top left corner of the Tickets > List page.
- Enter the Ticket name and Ticket price. Additionally, you can also select a Ticket parent.
- Click Create.
Importing tickets in bulk using a spreadsheet
The platform allows you to bulk import tickets using a spreadsheet. This section provides a guide on downloading, modifying, and importing the spreadsheet into InEvent.
- Downloading a demo file
A demo file is recommended to ensure data compatibility. To download the Tickets demo spreadsheet, navigate to the Tickets page. In the List section, click Edit, then select Import, and finally, click Download demo file. This action will download a spreadsheet to your computer, which includes explanations for completing each column.
The following columns are available in the spreadsheet:

nameparentIDparentNamepricedescriptionentrancecapacitypurchaseMinpurchaseMaxpurchaseLimitactivegroup
group column, enter the name of a new group to create it on the platform. Alternatively, enter the name of an existing group to add the ticket to that group.segmentationListsassignLists
segmentationLists and assignLists columns, enter the name of a new list to create it on the Lists page. Alternatively, enter the name of an existing list to add the ticket(s) to that list. Separate multiple list names with a semicolon (;).assignHoldergiveawayticket
assignLists, assignHolder, and giveawayticket columns accepts 0 for No and 1 for Yes.Save the completed spreadsheet to your computer for importing to the InEvent platform.
- Importing the modified demo spreadsheet
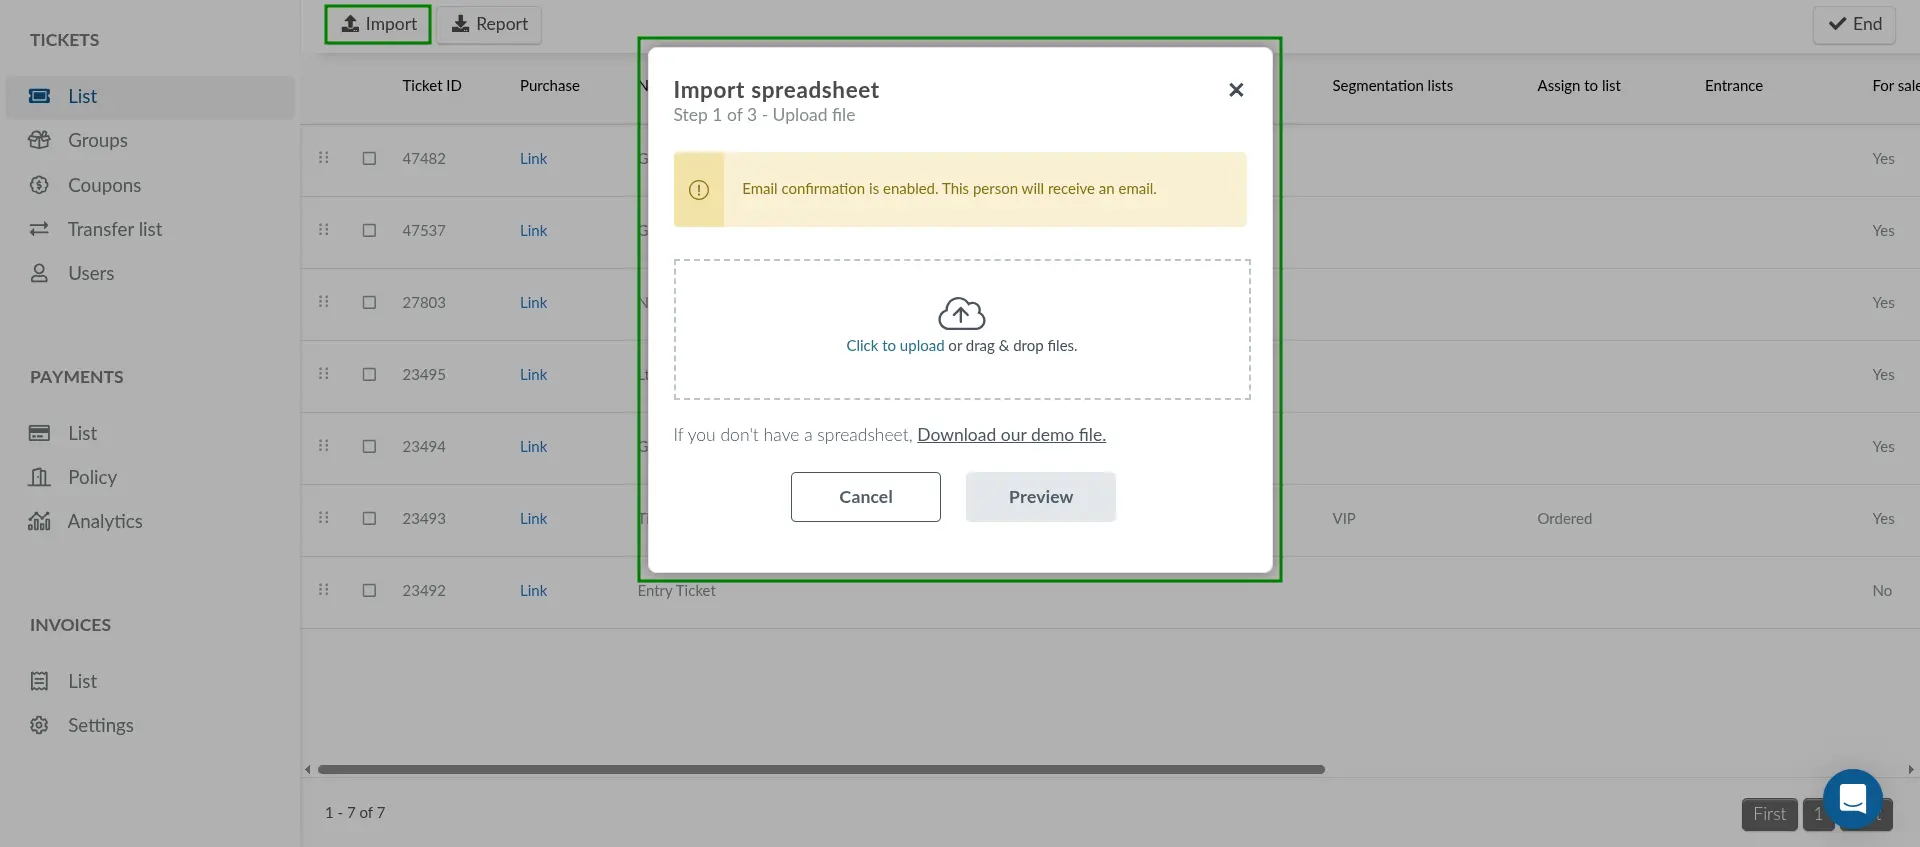
After modifying the demo spreadsheet with your desired ticket details and saving it, proceed by following the staps below.
- Navigate to the List section of the Tickets page.
- Click Edit.
- Select Import.
- Drag and drop the file into the pop-up window or click the Click to upload butto and select the modified spreadsheet from your computer.
- Click Preview to review the detected columns.
- Click Import to begin the import process.
- Refresh your page to view the imported tickets with all of the populated details following the completion of the import process.

Removing tickets
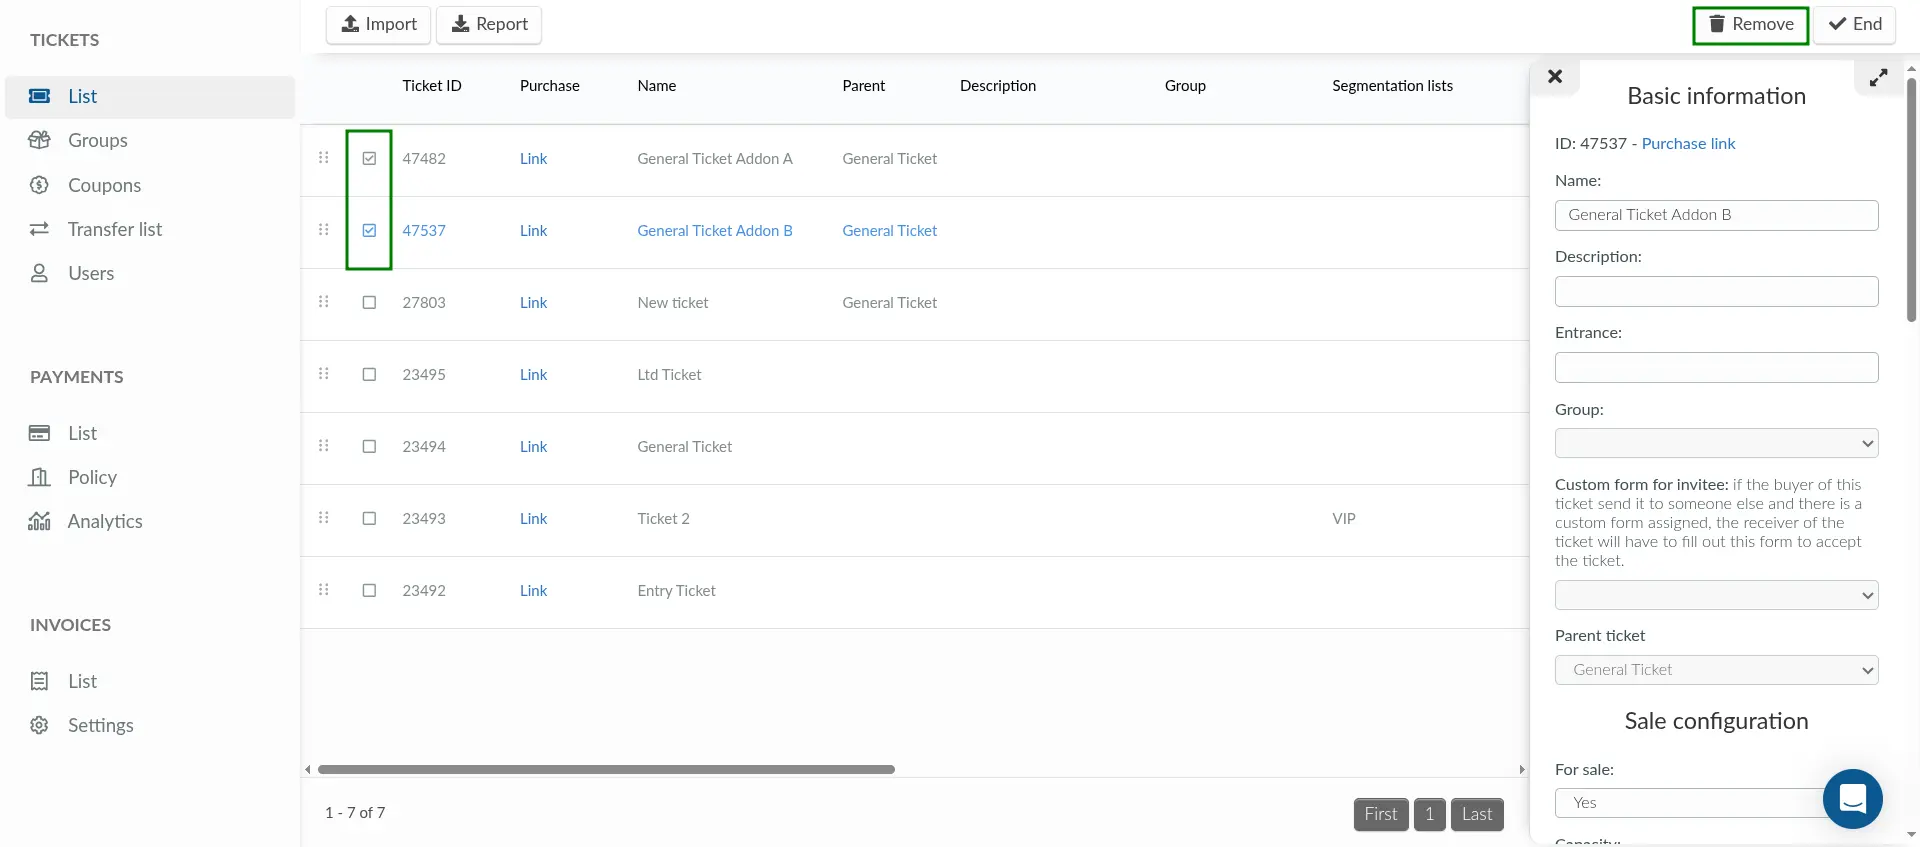
To delete a ticket, navigate to the Tickets > List page and click Edit in the top right corner. Then, select the ticket by checking the corresponding box and click the Remove button. This action will open a confirmation dialog box. Click on Remove. To finish removing tickets, click End.
Searching for a ticket
When multiple tickets have been created, the Search functionality allows for easy location of a specific ticket. Administrators can click on Search, enter the ticket name in the search box, and then click on the blue Search button.
Filtering tickets
To filter tickets, click the Filter button. Select the desired ticket group using the drop-down menu and click the blue Filter button. Tickets associated with the selected group will then be displayed.
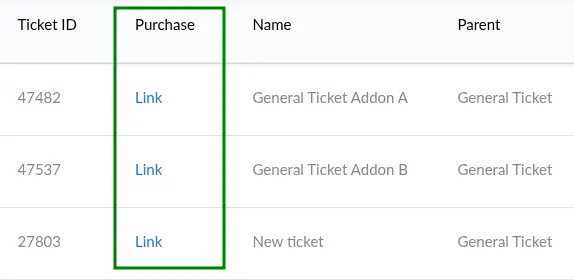
Obtaining links to the Purchase form with pre-selected tickets
The Tickets interface provides the Purchase column, which contains links to the Purchase form with the target ticket pre-selected. This way, users will not have to manually locate and select the target ticket when completing the Purchase form.
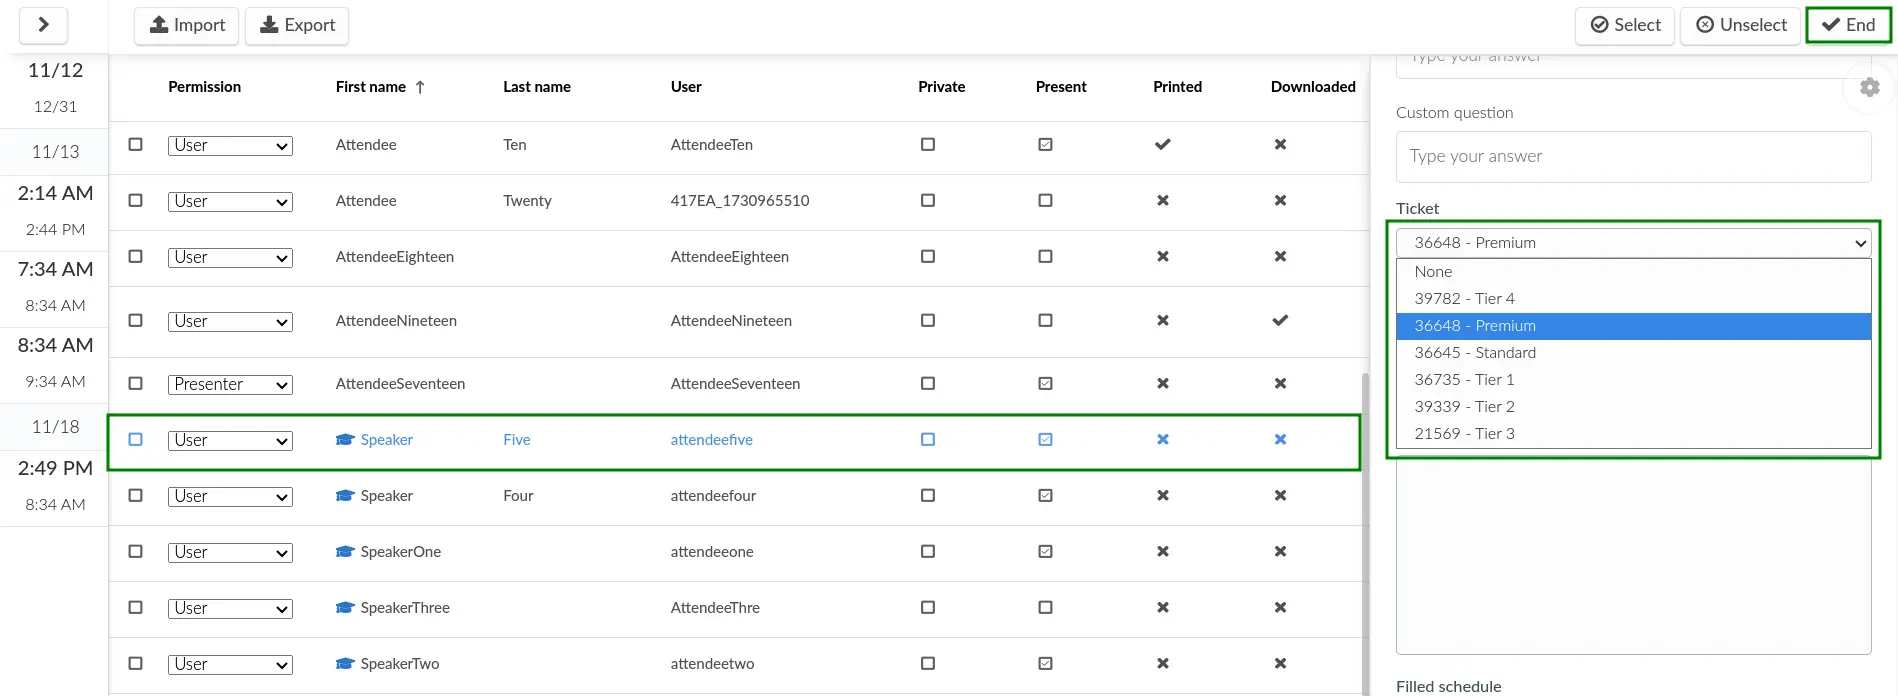
Manually assigning tickets to attendees
Administrators can manually assign tickets to attendees. This eliminates the need for attendees to complete the Purchase form. To do this, complete the following steps:
- Navigate to People > Attendees.
- Click Edit in the top right corner.
- Select an attendee from the attendee list. The attendee's details will then be displayed in a new panel on the right-hand side.
- Locate the Ticket section within the attendee details panel.
- Select the target ticket for the attendee using the Ticket drop-down box.
- Click End to save changes.
It is also possible to provide the digital ticket via a voucher, which can be distributed to the attendee by email or through the mobile application. The Digital Ticket Voucher is customizable, allowing the event administrator to select the information it presents, such as QR Code or entrance information. To generate a voucher, click on an attendee, then click on the Voucher icon in the attendee details panel as highlighted in green below:
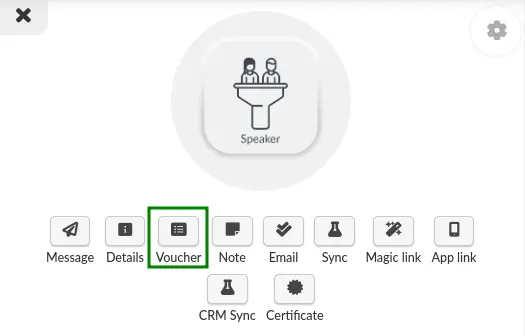
For more information, refer to our Digital Ticket Voucher article.
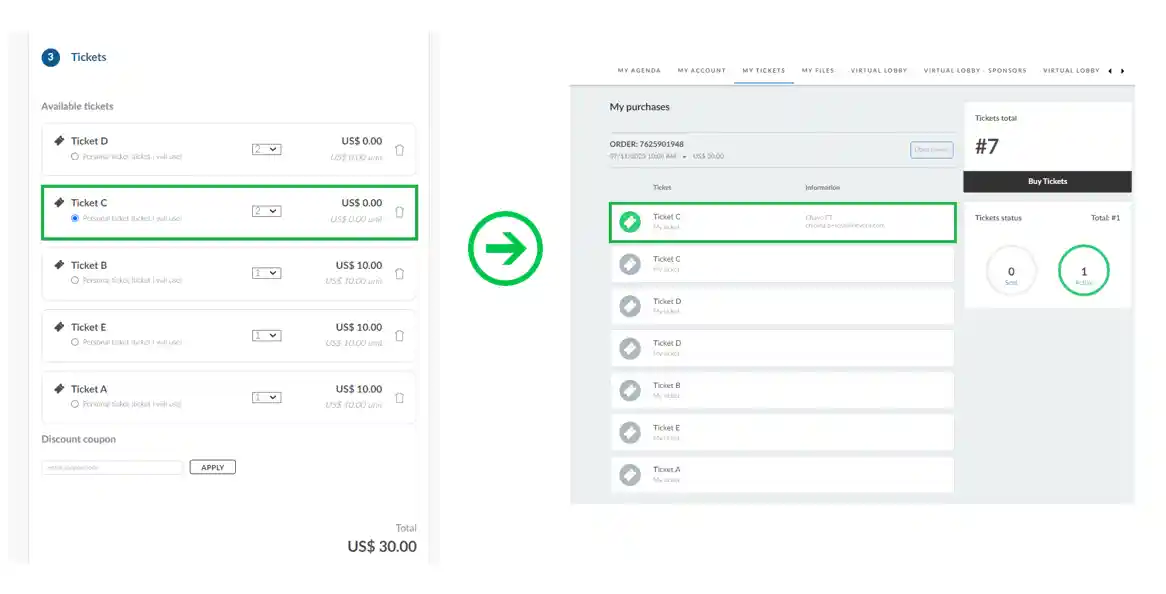
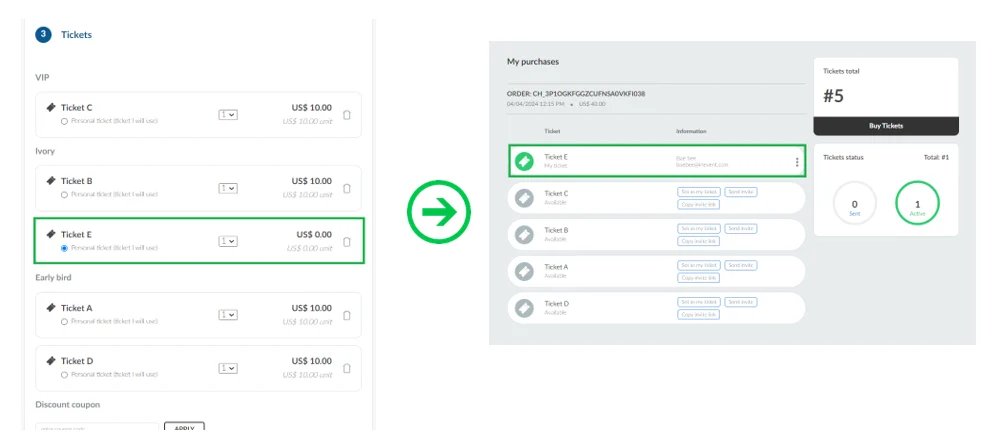
Manually selecting an active ticket in the Purchase form
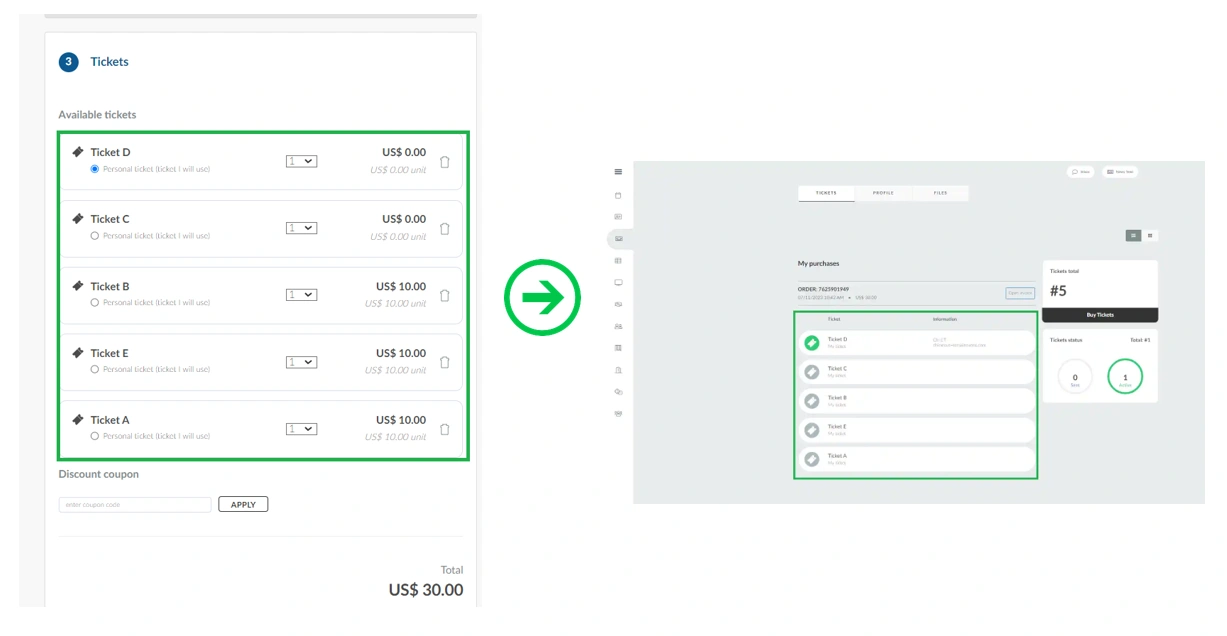
Upon purchasing multiple tickets, the platform automatically designates the first selected ticket as the attendee's active ticket. However, attendees can choose their active ticket during the purchase process by selecting Personal ticket (ticket I will use) located beneath the name of the preferred ticket. Following the purchase, the selected ticket will be displayed at the top of the My Tickets list in the Virtual Lobby.
Editing and configuring tickets
To modify ticket information and configure it further, click the target ticket. This action will display the ticket's details, allowing for the configuration of its Basic Information, Sale Configuration, Segmentation Control, Triggers, and Price Batch.
Basic information
The following basic information can be edited:
- Name: Modifies the ticket name. Limited to 100 characters.
- Description: Adds a ticket description with standard formatting options. Limited to 2200 characters. The formatting options include:
Bold, underline, and italic text: Format the text into these options
Adding hyperlinks: Add links to the Ticket description
Background color: Changes the background color of the text (in a box)
Font color: Changes the color of the text itself
Font style options: Changes the text to be inline; aligned to the left, right, center, or justify
Bullet list: Changes the text into a bulleted list
The image below presents an example of how the Ticket will show up with the formatting options: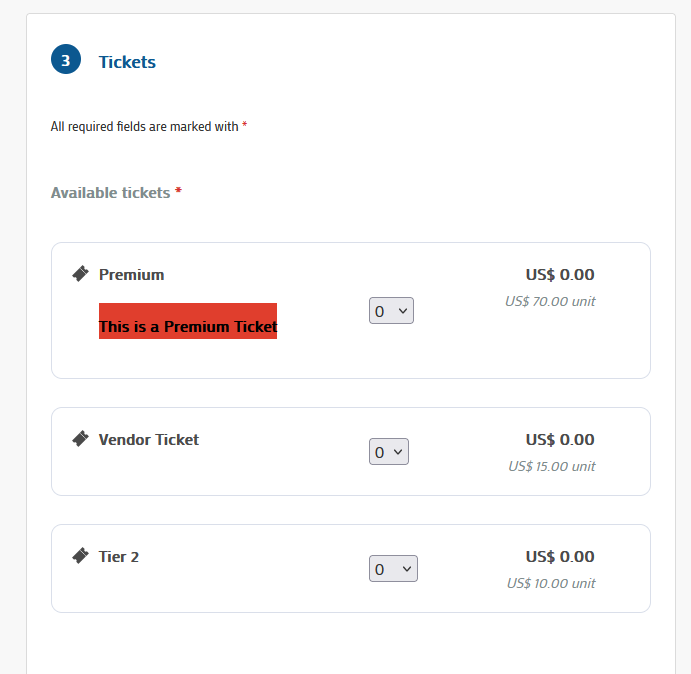
- Entrance: Specifies the entry point for the ticket holder. Limited to 255 characters.
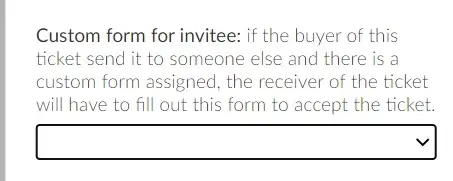
- Custom form for invitee: Specifies custom form for ticket recipient.
- Parent ticket: Designates a ticket as the parent of the current ticket.
Group
This setting allows for the visual grouping of tickets at the time of purchase, affecting their display on the purchase form.
To create ticket groups, follow the steps below:
- Click Groups from the left menu of the page.
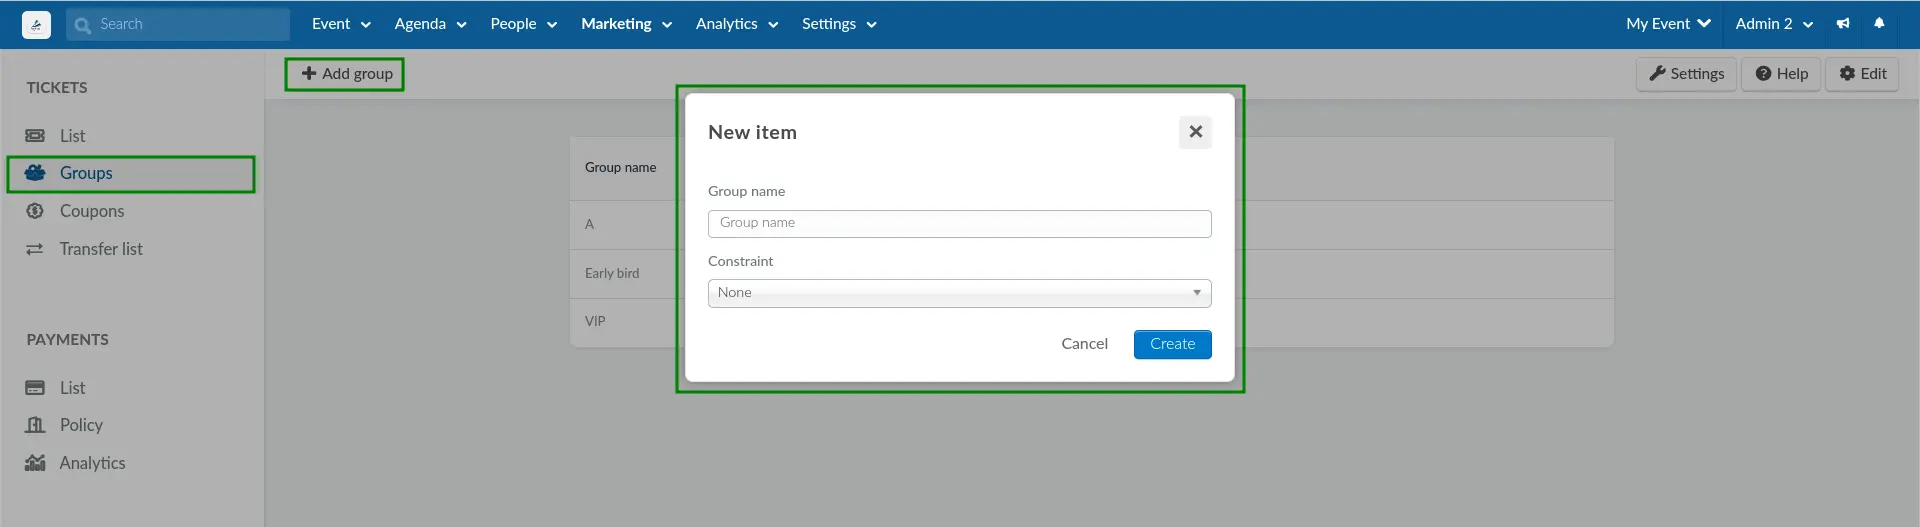
- Click the +Add group button at the top left corner. A new window will appear.
- Enter the Group name and define the Constraint. The following Constraint options are available:
- None: Selecting this option removes any limit on the number of purchasable ticket types from this group.
- One type of ticket: Selecting this option restricts users to purchasing only one ticket type from this group, as demonstrated by General admission tickets entry within this guide.
- Click Create.
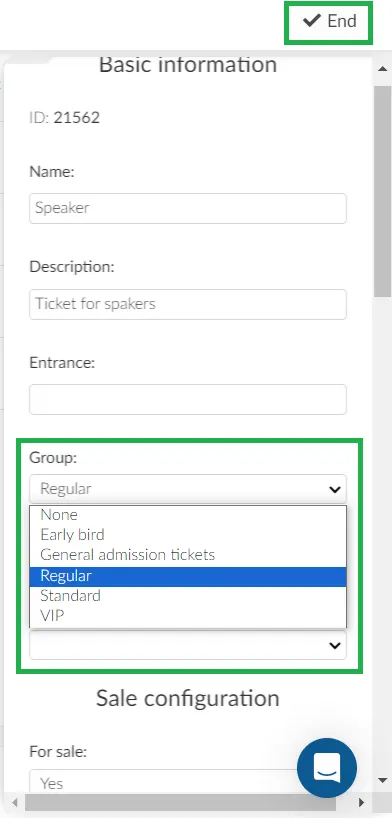
After creating the ticket group(s), a ticket can be added to a group. To do this, click the ticket to be added using the Group field in the target ticket's edit menu.
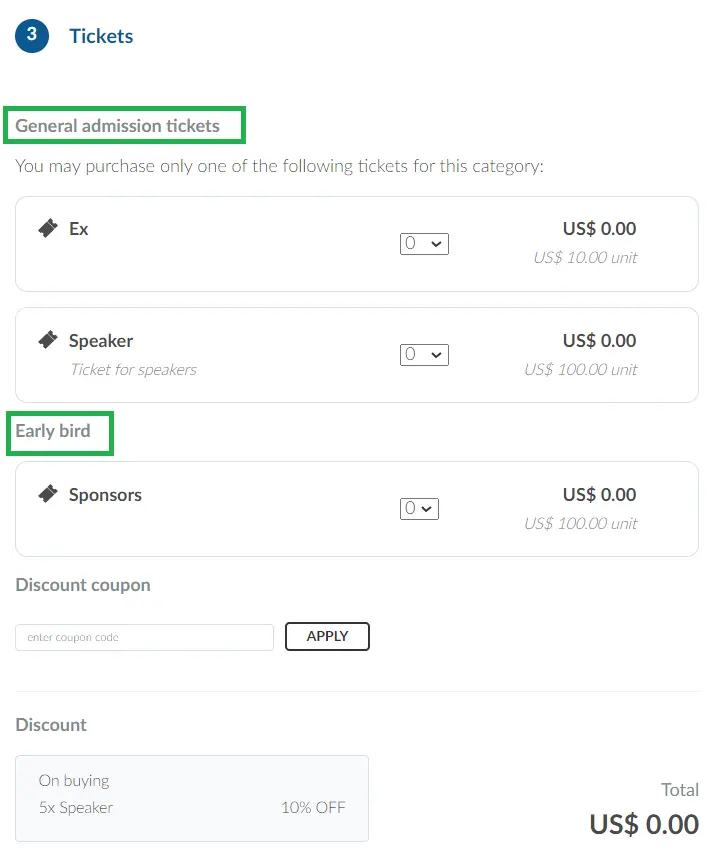
The following image shows how tickets are categorized within their respective groups on the Purchase form. Groups with constraints will display the Only one of the following tickets may be purchased for this category message.
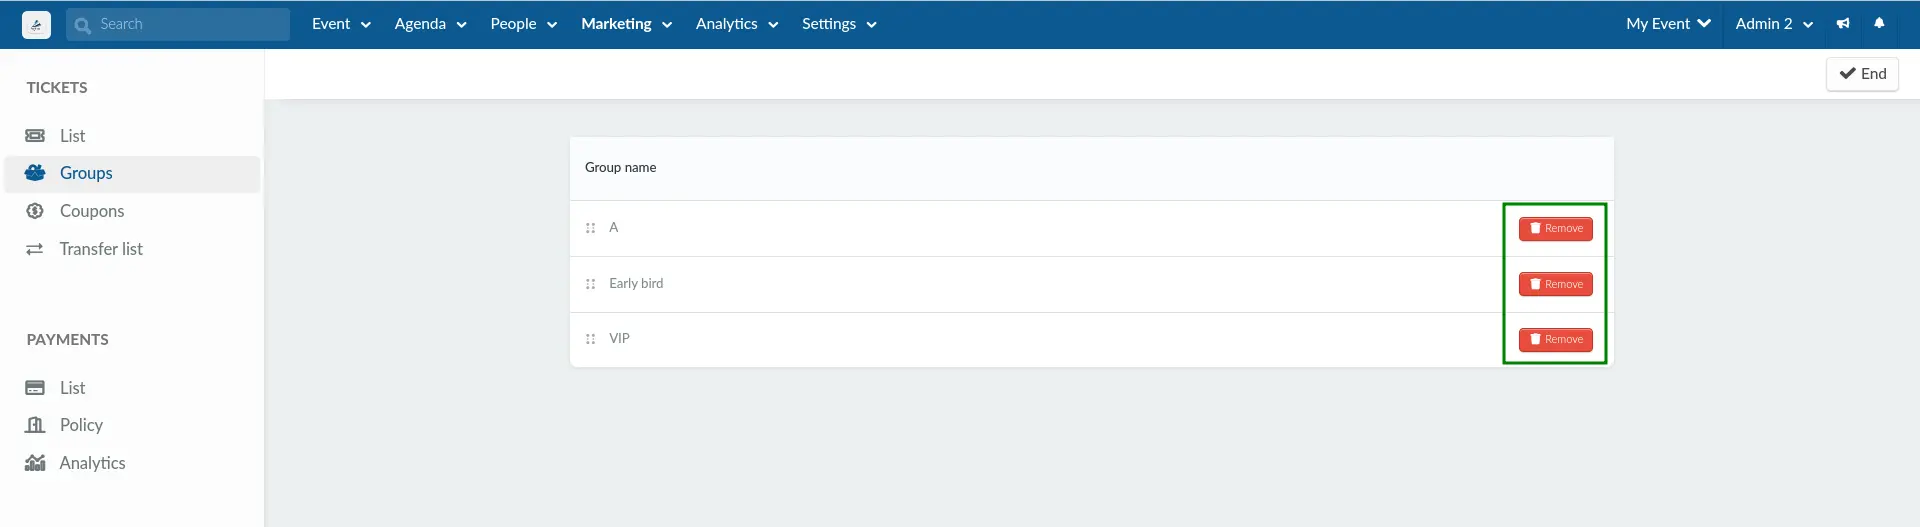
Created groups will be displayed on the Groups page. To delete a group, click Edit, and click the Remove button.
Custom form for invitee
If the purchaser of this ticket transfers it to another individual and a custom form is assigned, the recipient will be required to complete this form to accept the ticket. To associate a custom form with a ticket for invitees, complete the following steps:
- Create an Attached form containing the questions for the invitee.
- Navigate to Marketing > Tickets > Tickets.
- Select the ticket to be associated with the Attached form.
- Click Edit.
- Select the desired Attached form from the Custom form for the invitee drop-down menu.
- Click End to save changes.
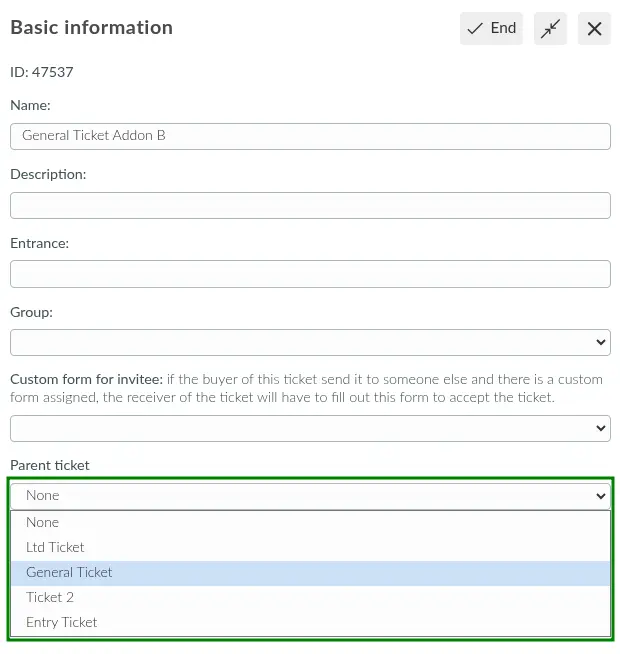
Parent ticket
The parent ticket option allows a ticket to be a child or sub ticket to a parent ticket. To define a ticket's parent, click on the Parent ticket drop-down box and select the target parent during ticket creation.
Alternatively, select the target parent within the ticket's Basic information section.
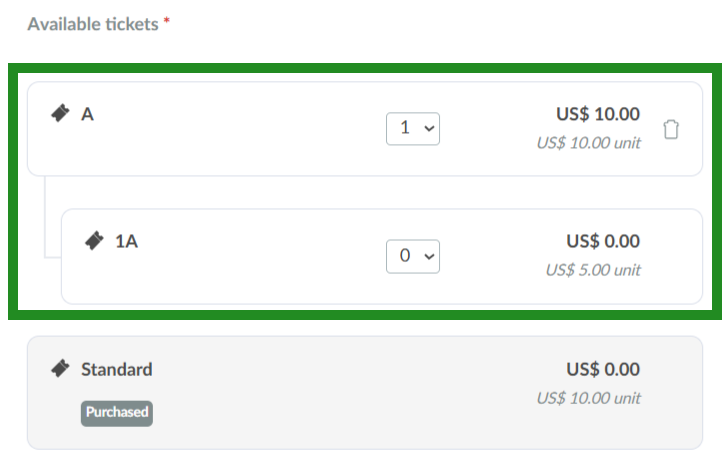
Parent and sub tickets will be displayed in the Purchase form as shown below. The sub ticket will only become visible after the parent ticket has been selected. Once the parent ticket has been deselected, there is no option to purchase a sub-ticket.
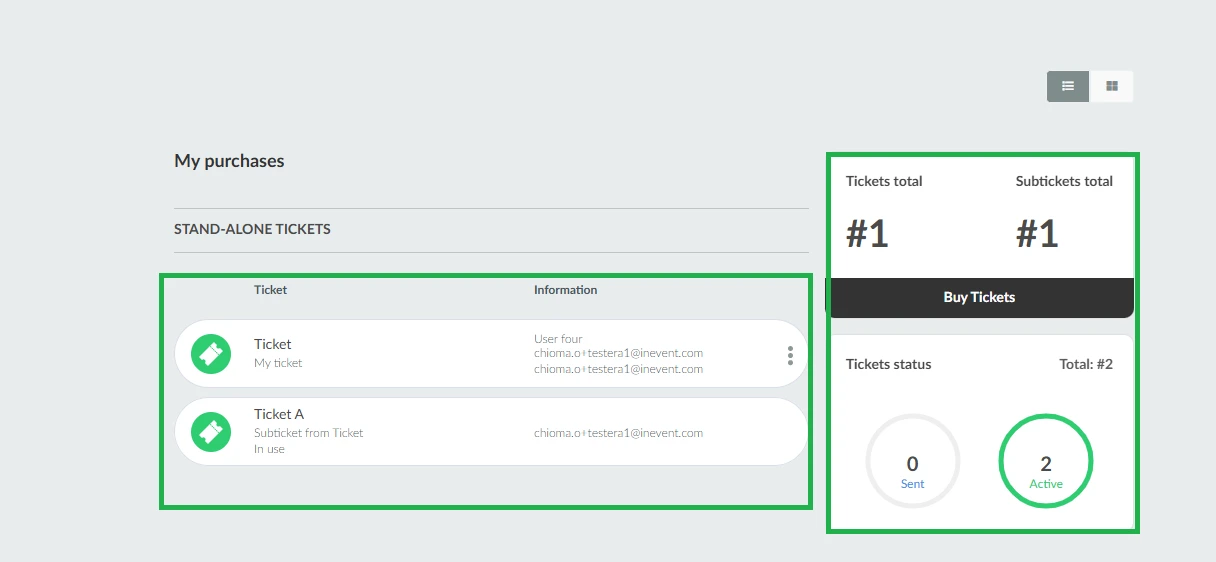
After purchase, the parent tickets and sub tickets will be displayed in the My tickets tab on the web app as shown below:

Below is an example of how a transferred ticket with a linked sub ticket will appear to the receiving user in their My tickets tab:
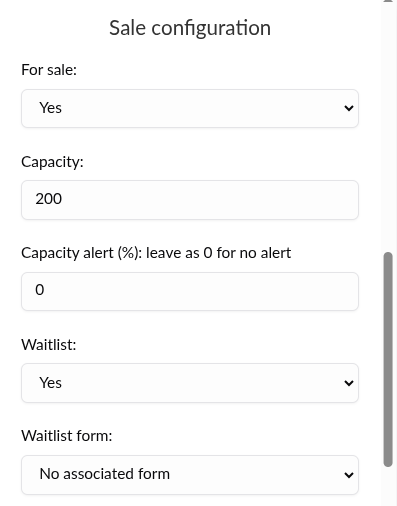
Sale configuration
The following sale configuration can be edited:
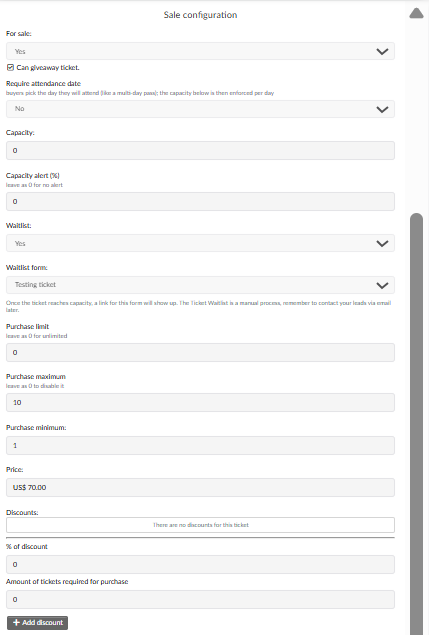
- For sale: Enable the sale of this ticket by setting it to Yes.
- Can giveaway ticket: This option is visible only if Ticket transfer is enabled in the registration form settings. Disabling this option prevents attendees from giving away this specific ticket.
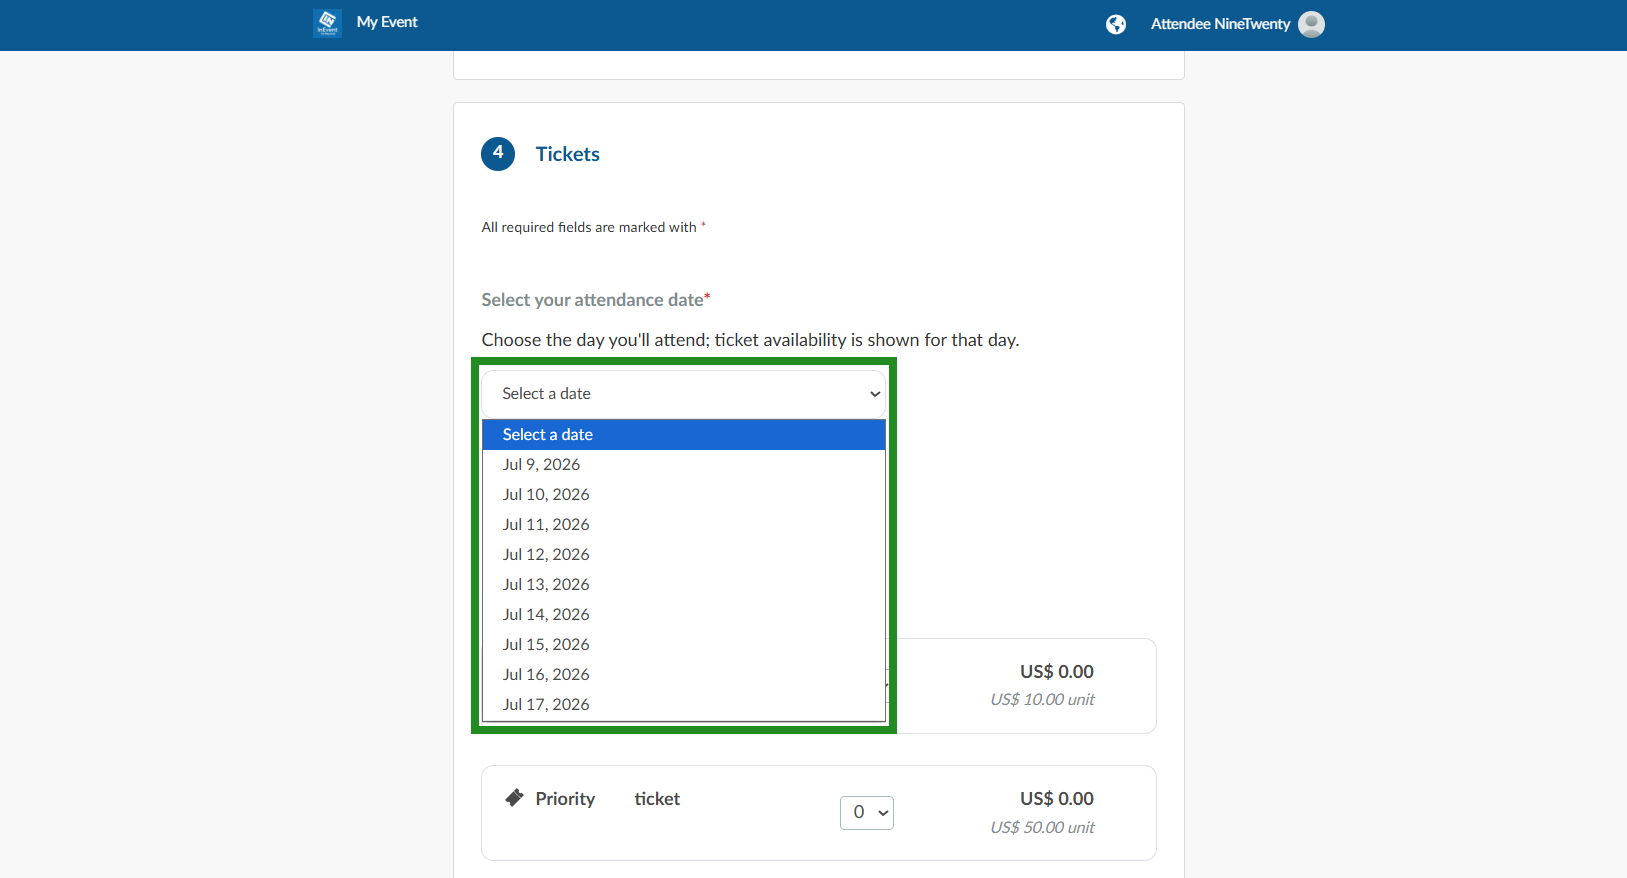
- Require attendance date: This option allows buyers to pick the day they will attend (like a multi-day pass) as seen below in the GIF provided. During the registration process, at the ticket section, the buyer will be provided with a calendar and dates to select the day they wish to purchase the ticket for. If Yes is selected from the drop-down menu, the configuration of Sell up to days before the date becomes visible. Select No from the drop-down if you do not want this requirement on the ticket.
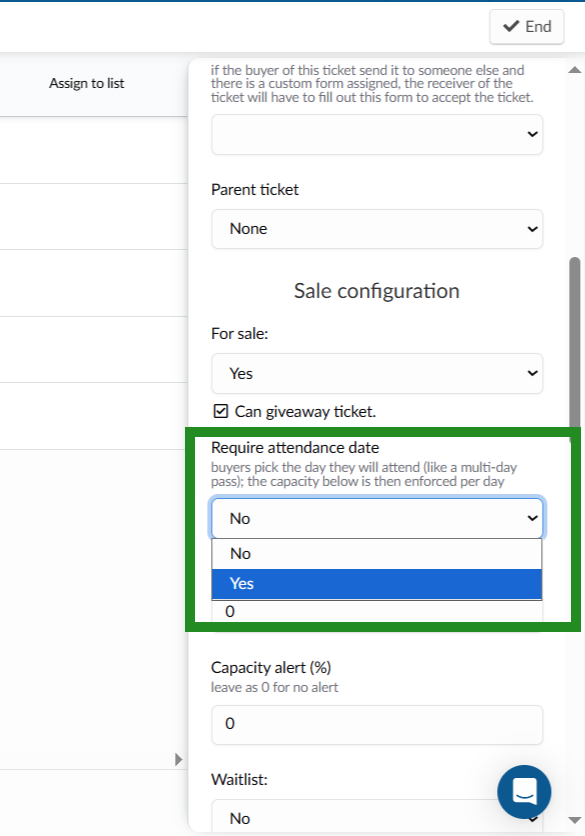
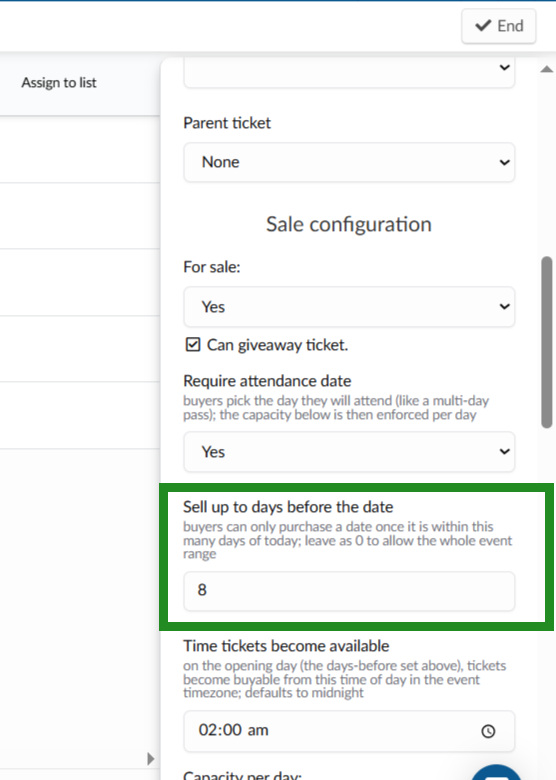
- Sell up to days before the date: Once you select Yes from the above (Require attendance date) configuration, this setting becomes visible. This setting controls how far in advance attendees can purchase tickets for specific event dates. When a value is selected, attendees will only be able to purchase a ticket for a particular date once that date falls within the specified number of days from the current date. This allows organizers to gradually make dates available for purchase instead of opening the entire event schedule at once. If the value is set to 0, attendees can purchase tickets for any available date across the entire event date range without restriction.
- Time tickets become available: This setting works with the Sell up to days before the date setting and determines the exact time tickets become available for purchase on the opening day of the sales window.
- Capacity: The total number of tickets available for purchase for this event.
0 (unlimited) capacity for tickets.- Capacity Alert (%): Specifies the percentage of total ticket capacity at which an alert will be triggered for administrators. This alert is activated when the number of purchased tickets reaches the defined percentage.
- Waitlist: Enables a manual waitlist for this ticket. When the ticket's Capacity is reached, registering users will be able to submit a defined custom ticket waitlist form. For more information, refer to the Ticket waitlist section.
- Waitlist form: Defines the custom form to be used for the ticket waitlist. This option is visible only when the ticket Waitlist option is set to Yes. For more information, refer to the Ticket waitlist section.
- Purchase minimum: The minimum number of tickets a user can purchase in a single transaction.
- Purchase maximum: The maximum number of tickets a user can purchase in a single transaction.
- Purchase limit: The maximum total number of these tickets a user can purchase.
- Price: The cost to be paid for this ticket.
- Discounts: Allows the creation of automatic discount policies for this ticket. For more information, refer to our Discounts article.
Ticket transfer between attendees
Event organizers can allow attendees to give away or transfer tickets to another attendee. For further information, refer to our article on Ticket transfer configuration and on sending tickets to other attendees.
Ticket waitlist
The Waitlist feature for tickets allow registering users to fill a custom form to notify event organizers that they would like to purchase a ticket that has been sold out. This feature can be used together with Custom Forms.
To set this feature up for a ticket, follow the steps below.
- Click on the target ticket.
- Click on Edit.
- Select Yes in the Waitlist drop-down menu under the Sales configuration section.
- Select whether to assign a Custom form for the ticket using the Waitlist form drop-down menu. When No associated form is selected, registering users will be added to the waitlist when clicking Join waitlist on the Purchase form. When a Custom form is assigned, registering users will be directed to the assigned form, and they will be added to the waitlist only when the form submission is complete.
- Click on End.
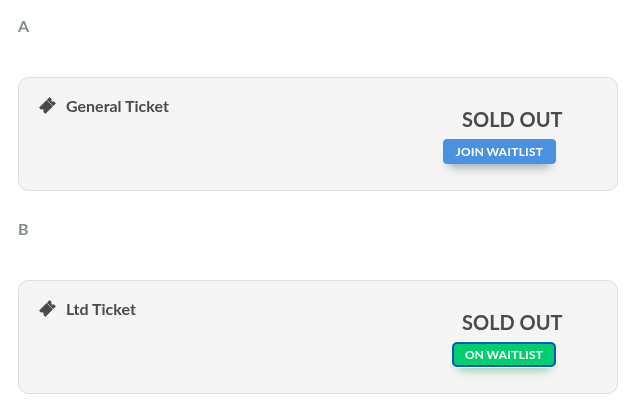
After completing the steps above, the Waitlist will be enabled for the relevant ticket. Registering users will be able to join the Waitlist when the ticket is sold out by clicking on the Join waitlist button.
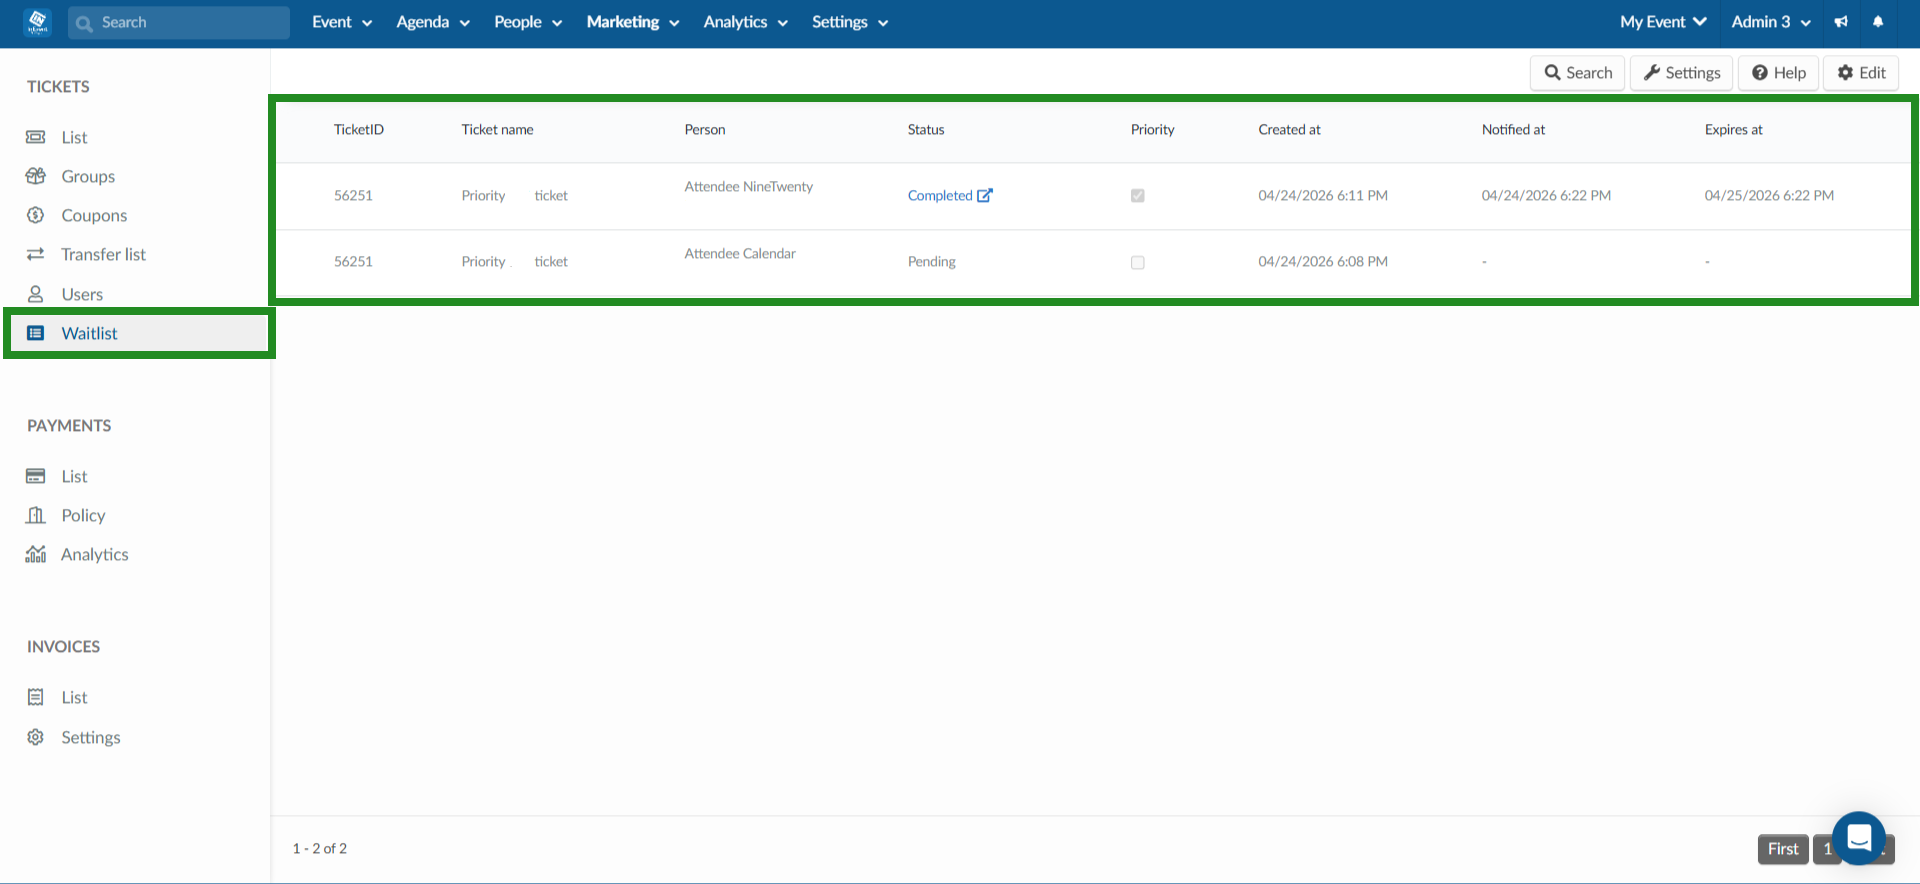
Administrators can review the ticket Waitlist from the platform. In addition, if any Custom forms were assigned for tickets, administrators can also review Custom form submissions. The Waitlist section will show information such as:
TicketID: The unique identifier assigned to each ticket record in the platform.
Ticket name: The name of the ticket being purchased.
Person: The name of the user purchasing the ticket.
Status: The status of the ticket on the waitlist, i.e., Pending (When the ticket is on the waitlist), Notified (When the user is notified that the ticket will be available for the next 24 hours), and completed (When the user has completed the purchase).
Priority: If a ticket on the waitlist needs to be prioritized, click Edit and tick the checkbox corresponding to the ticket in the priority column.
Created at: The date and time when the user was put on the waitlist.
Notified at: The date and time when the user was notified that the ticket they are trying to purchase is available.
Expires at: The date and time of when the ticket will expire and be given to the next person in line on the waitlist.
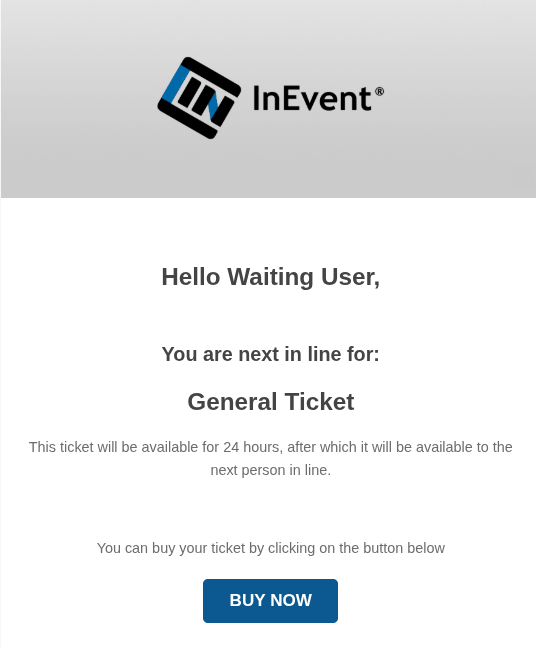
Then, administrators can proceed to add or increase Ticket capacity within Sales configuration. Doing so will automatically send notification emails to users in the Waitlist.
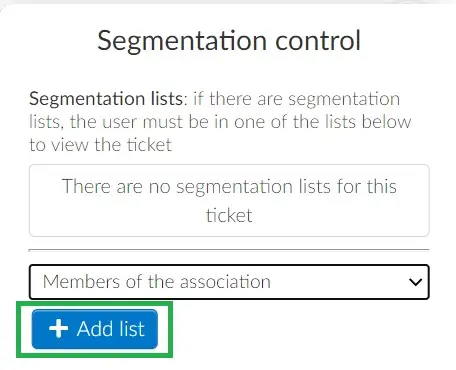
Segmentation control
This feature allows you set who can see and buy specific tickets for your event. To use Segmentation control, follow these steps after you have created your ticket:
- Create a Custom list and add the intended users to the list. These users will be granted access to the specific ticket.
- Navigate to Marketing > Registration > Tickets.
- Select the target ticket and click the blue Open ticket details button. The ticket's details will then be displayed in a new window.
- Click Edit and locate the Segmentation Control section.
- Select the created list from the drop-down menu within the section.
- Click the +Add List button.
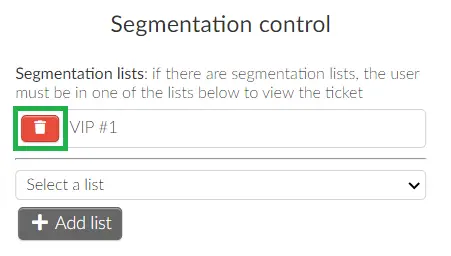
- Click End to save changes.
To remove a segmentation list, click on the trash icon beside it.
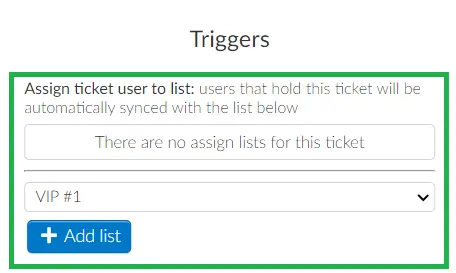
Assigning ticket users to lists using Triggers
The Triggers function allows for the automatic addition of users to static lists based on their purchase of a specific ticket linked to that list. To set up Triggers for a ticket, complete the following steps:
- Create custom lists by following the instructions provided in our Static and Contact lists and/or Dynamic lists articles.
- Navigate to Marketing > Tickets > Tickets.
- Select the target ticket and click the blue Open ticket details button. The ticket's details will then be displayed in a new window.
- Click Edit.
- Locate Assign the ticket user to list under Triggers.
- Choose the list to be associated with this ticket from the drop-down menu and click the +Add list button.
- Click End to save changes.
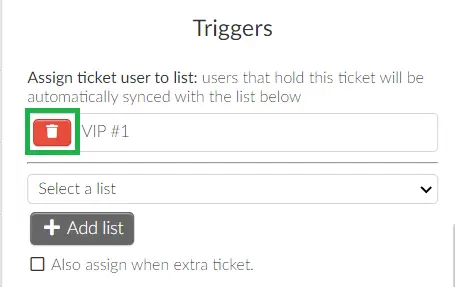
After the Triggers are successfully configured, attendees will be automatically added to the specified list(s) after completing their ticket purchase.
To remove a list associated with a ticket, click on the trash icon beside the list.
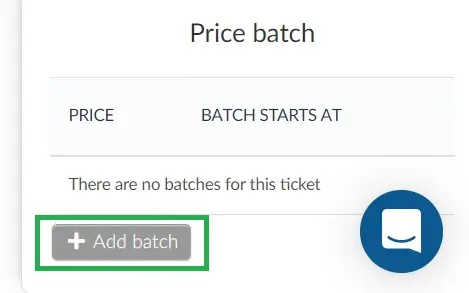
Price batch
This feature allows for the creation of varying price tiers for a ticket over time. To add a price batch, click +Add Batch.
Next, specify the price and the start date of this batch's sale.

Once completed, click End to save the changes. The sale period for a price batch concludes at the start date of the next batch.
Ticket settings
You can control all of the most relevant ticket tools without leaving the Tickets page by clicking the Settings button in the top right corner. A pop-up box will appear, displaying the tools segmented into different fields: Registration, Moderation, and Block. You can enable or disable a tool by toggling the button beside it on or off.
Coupons and discounts
Discounts for tickets can be configured using Coupons. For more information, refer to the Coupons article.
Reordering tickets and groups
The display order of individual tickets and ticket groups on the Purchase form can be manually configured, overriding the platform's default arrangement.
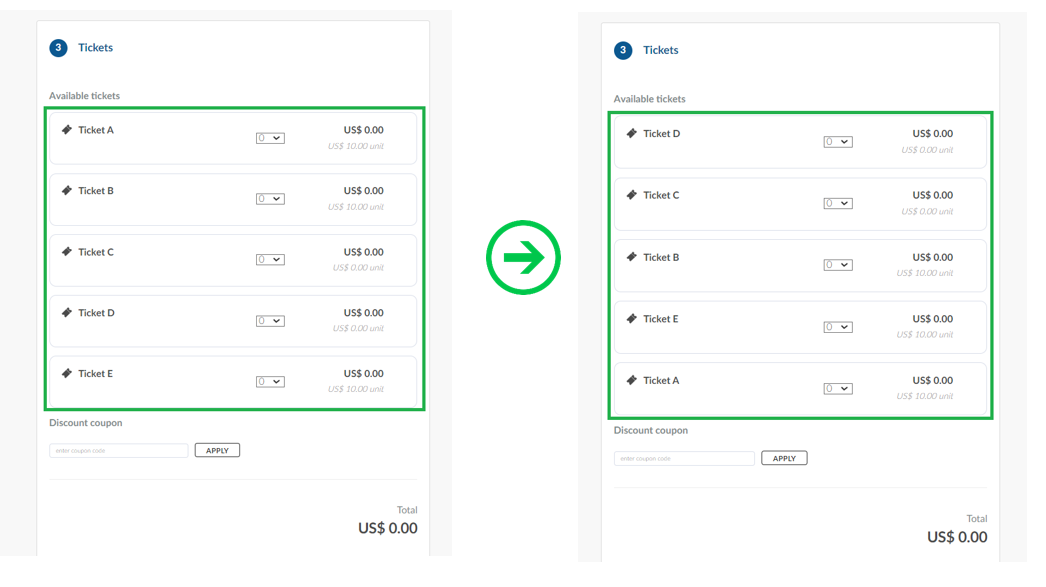
Reordering tickets
To reorder tickets, click Edit. On the far left of the page, click and drag the dots beside the target ticket to adjust its position as desired.
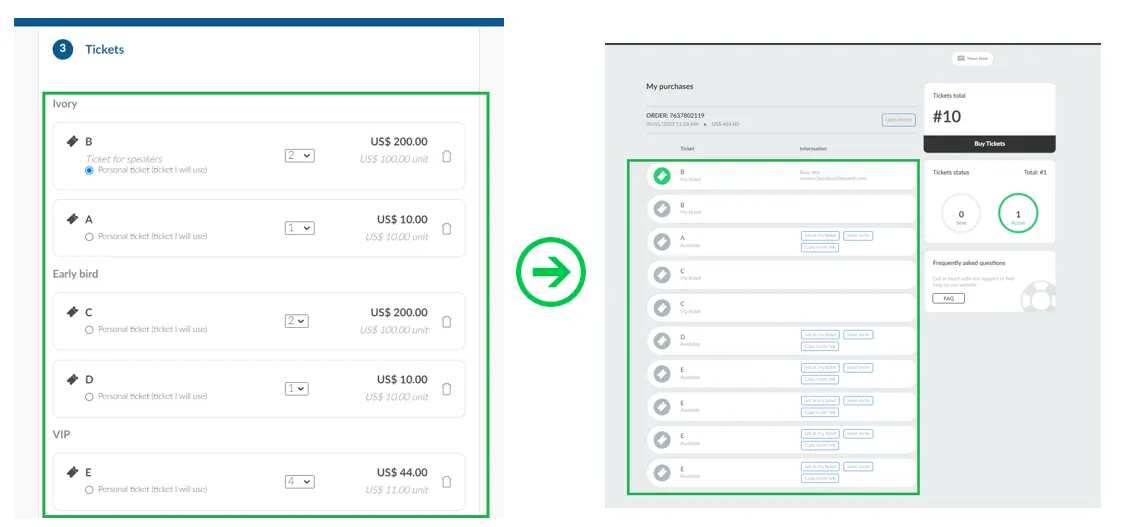
The change will be reflected on the Purchase form, such as seen in the image below:
If attendees purchase multiple ticket types, the purchased tickets will be displayed in the My Tickets tab of the Virtual Lobby following the order established on the platform.
Reordering groups
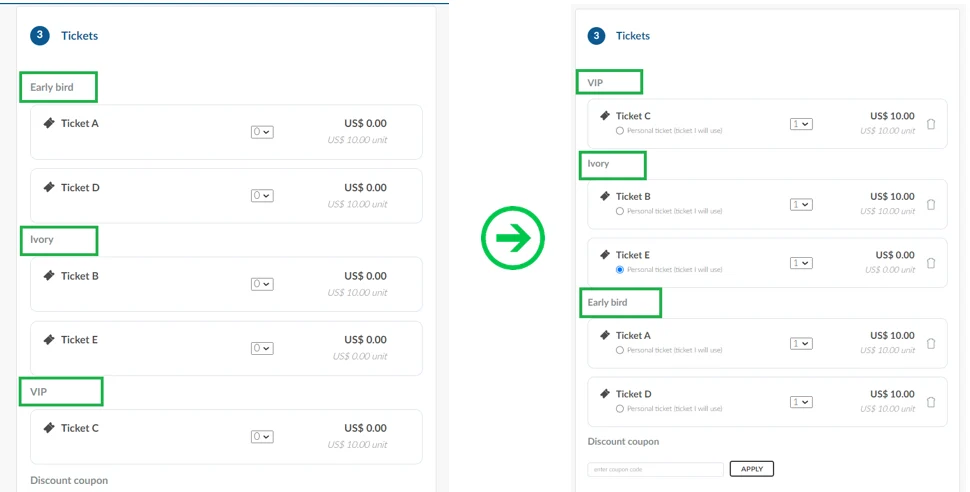
By default, ticket groups are arranged chronologically on both the Groups dashboard and the Purchase form. However, modifying the order of ticket groups enables the foremost group, along with its associated tickets, to be displayed first on both the Tickets dashboard and the Purchase form.
To reorder ticket groups, navigate to Groups and click Edit. click and drag the dots beside the target ticket group to adjust its position as desired. This adjustment will be automatically reflected on the List page where the tickets are displayed.
The change will be reflected on the Purchase form, such as shown in the image below:
If attendees purchase multiple ticket types, the purchased tickets will be displayed in the My Tickets tab of the Virtual Lobby following the same order set by the event organizer.
Viewing users' ticket data
The Users page displays the numerical data of the users' tickets in a table. In this page, administrators can easily view the following items:

PersonID: User's personal identification number in the platform- Person name: User's registered name. Clicking on their name will open the user's attendee details.
- Person email: User's registered email
- Total main tickets: Number of main/parent tickets owned by the user
- Total sub tickets: Number of sub/child tickets owned by the user
- Main tickets in use: Number of main/parent tickets in use by the user
- Sub tickets in use: Number of sub/child tickets in use by the user
- Total tickets in use: Total number of tickets in use by the user
PersonID, but without a name. To identify the attendee, search the PersonID in the Audit reports.Generating ticket reports
To generate a report of all tickets in the form of spreadsheets, navigate to the Tickets > List page. Then, click Edit and click Report A notification will appear, indicating that the Excel sheet is being processed and will be sent upon completion.

The ticket report will contain the following information:

ticketID: The unique identifier of the ticket.customOrder: The sequential number of the ticket purchased.eventID: The unique identifier of the event associated with the ticket.chainID: The unique identifier of the associated ticket group.active: Displays1if the ticket is for sale. This column will be blank if the ticket is not for sale.name: The name of the ticket.description: The ticket's description.entrance: The designated entrance information for the ticket holder.dateBegin: The date and time of ticket creation.dateEnd: The date and time of ticket creation.capacity: The ticket's capacity, if specified. This column will be blank if no capacity is set.capacityAlert: The percentage of total ticket capacity at which the capacity alert will be triggered, if configured.purchaseMin: The configured minimum number of tickets per purchase.purchaseMax: The configured maximum number of tickets per purchase. This column will be blank if no maximum number is set.purchaseLimit: The configured total purchase limit for this ticket per participant.giveawayTicket: Displays1if Can giveaway ticket function is enabled. This column will be blank if the function is deactivated.price: The ticket's price.chainName: The name of the ticket's group. This column will be blank if the ticket is not associated with a group.constraint: Displaysone-typeif the ticket is linked to a group with a constraint. This column will be blank if no constraint is associated with the ticket.approvedTickets: The number of approved ticket purchases and tickets assigned to users by administrators via the People > Attendees page.pendingTickets: The total number of pending, refunded, and cancelled purchases associated with the ticket.approvedPrice: The total value of received income, or approved purchases, related to the ticket.pendingPrice: The total value of pending, refunded, and cancelled purchases associated with the ticket.
lotPrice (the price of the batch) and lotDate (the date of the batch).