Payments
 Updated 2 weeks ago
by
Lorenzo
Updated 2 weeks ago
by
Lorenzo
- Accessing the payment page
- Creating a manual payment on the platform
- Settings - Integrating other payment options
- Emails related to the payment process
- Performing searches and filters on the report
- Configuring your company's payment details
- Configuring your company's refund policy
- Analytics
- Resending a receipt
- Cancelling a payment without refund
- Deleting a payment
- Magic link
- Extracting a report
Track your ticket sales for your event in real-time, your revenue received, pending revenue, and creating manual payments. Have up-to-date charts and reports in .xls with dates, values, and discounts.
Accessing the payment page
You can access the payment page, both on the event level and on the company level.
Event level
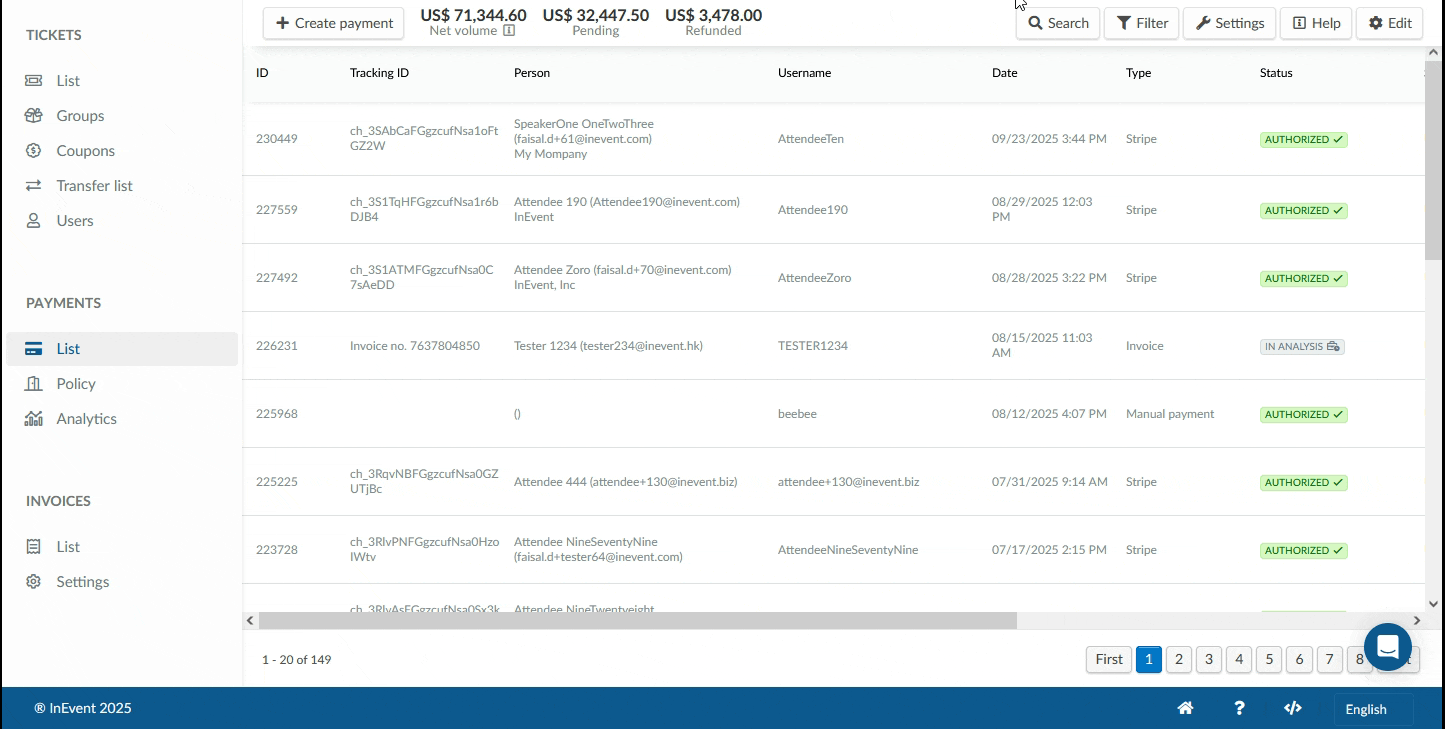
To access the Payments page in the event level, navigate to Marketing > Tickets > Payments. You will be directed to the List page under the Payments section.
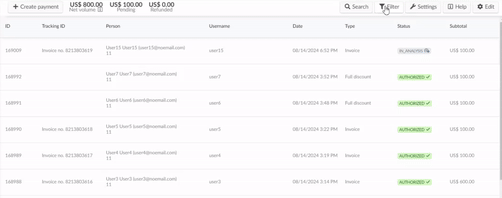
On the List dashboard you will get the following information:
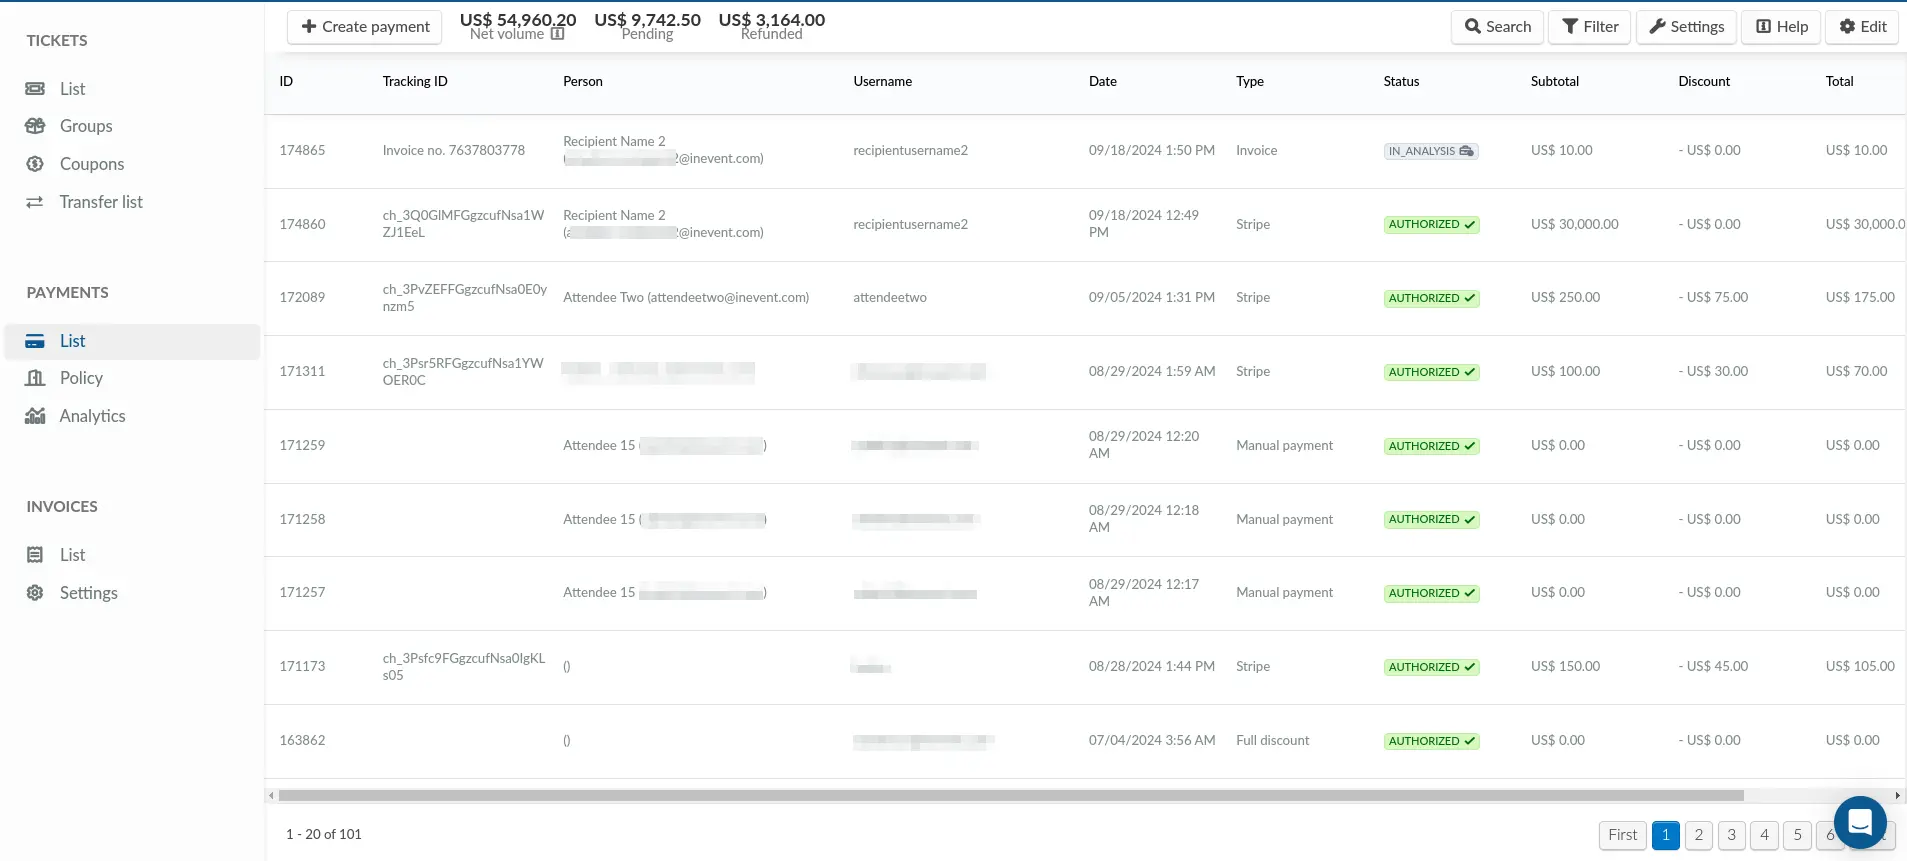
- ID: Unique ID associated with the payment.
- Tracking ID: Unique tracking code associated with the type of financial transaction
- Person: Name provided by the attendee for billing.
- Username: Column with the username provided by the attendee at the time of purchase.
- Date: Date of purchase.
- Type: Type of payment.
- Status: Status of ticket purchase.
- Subtotal: Purchase value without discount deduction.
- Discount: Discount value of the purchase (if applicable).
- Total: The total amount paid by the attendee after discount (if applicable).
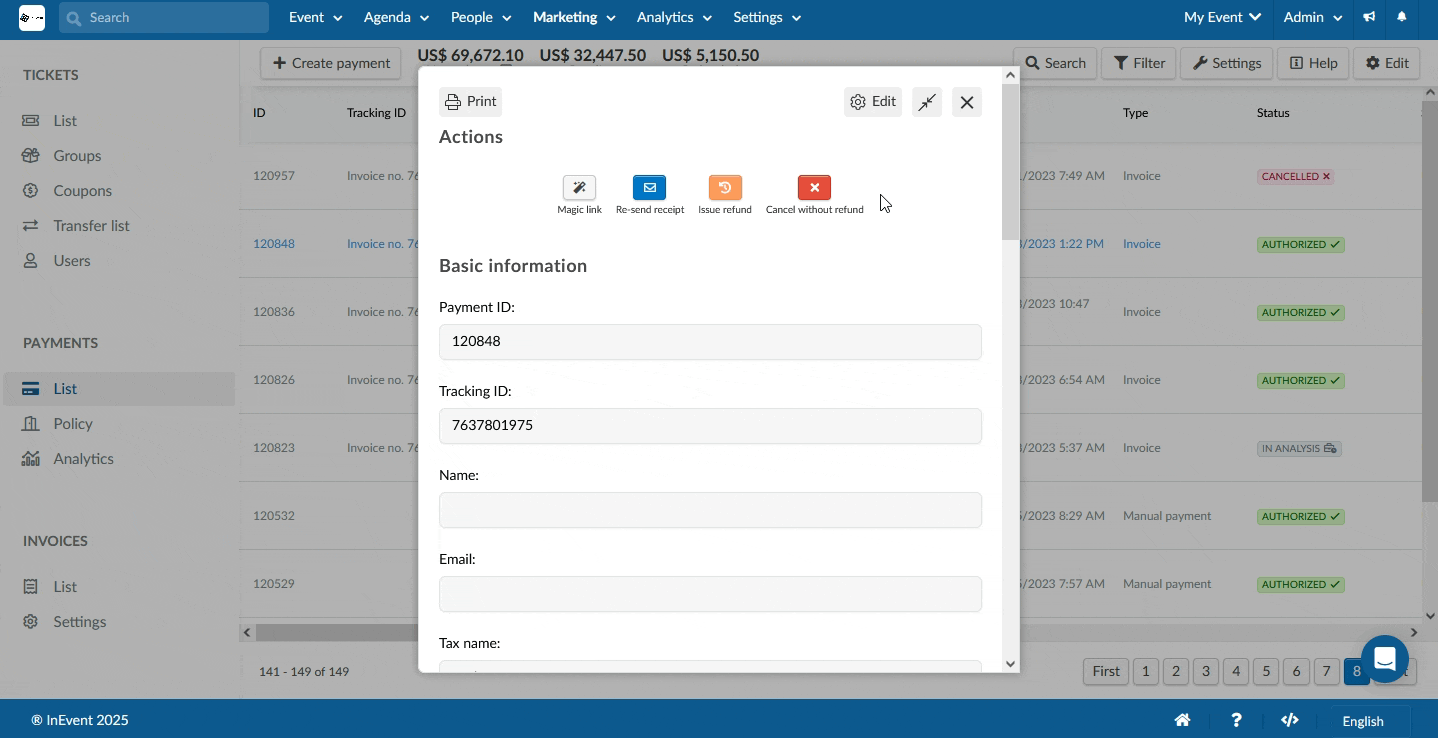
By clicking on a participant, a window will be displayed containing further information about the participant, including Basic information, Billing information, Payment information, Tickets purchased, etc.
You will also be able to view a printer icon on the top left corner of the window, allowing you to print and save a payment record (pdf format).
If you prefer to move the window to the sidebar, click on the arrow icon labeled Collapse window to sidebar, and the information will be displayed on the right side of the page. You will also still be able to view and click on the printer icon on the top of the window, allowing you to print the payment record.
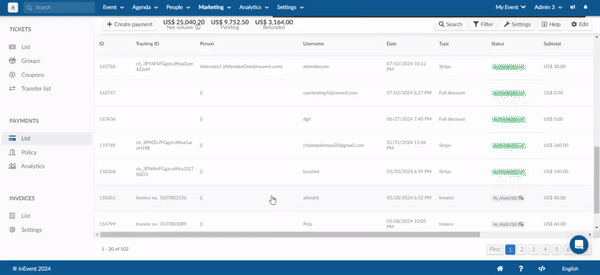
Company level
You can also access the page from the company level, by clicking on Reports > Payments. At the company level, the payment center will show all participants payment details within events of the company as shown below.
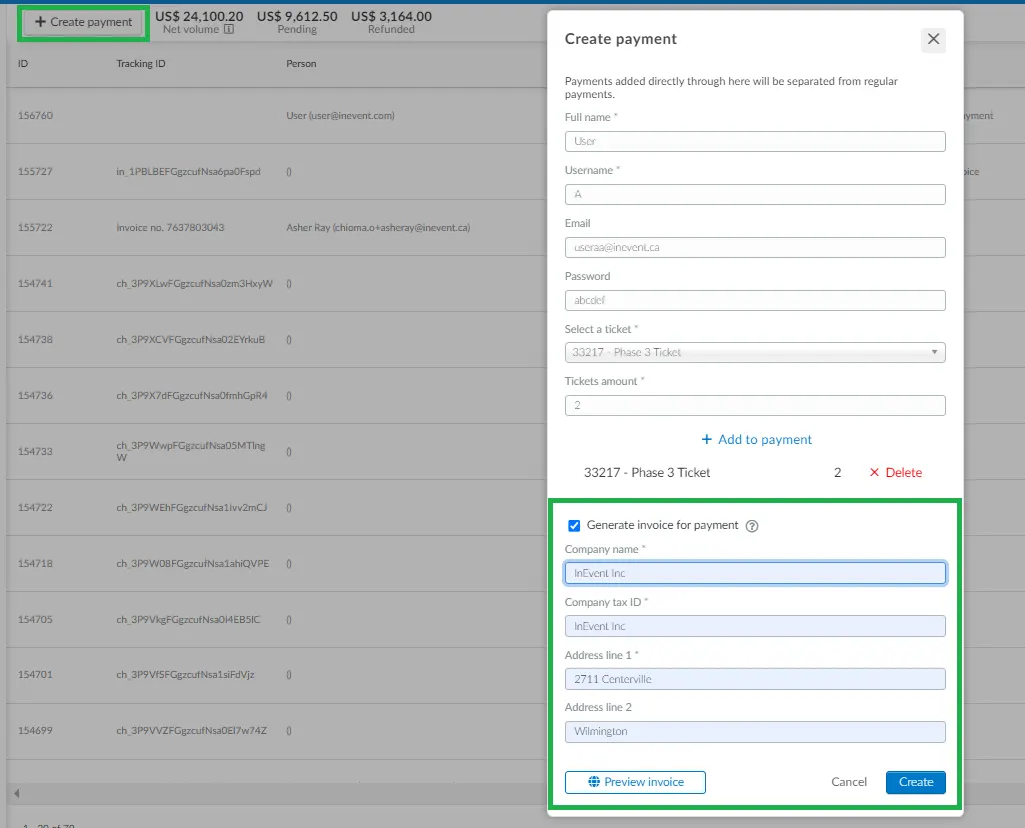
Creating a manual payment on the platform
This section will explain how event admins can register a manual payment for participants on the platform with or without generating an invoice.
Creating a manual payment without generating an invoice
To create a manual payment without generating an invoice, complete the following steps:
- Click on the Create payment button in the Payments > List page.
- Enter the following details associated with your attendee in the Create payment pop-up box:
- Full name
- Username
- Password (optional)
- Select a ticket from the drop-down.
- Tickets amount: Enter the the amount of ticket, then click the +Add to payment button.
- Click Create to finish adding the manual payment.
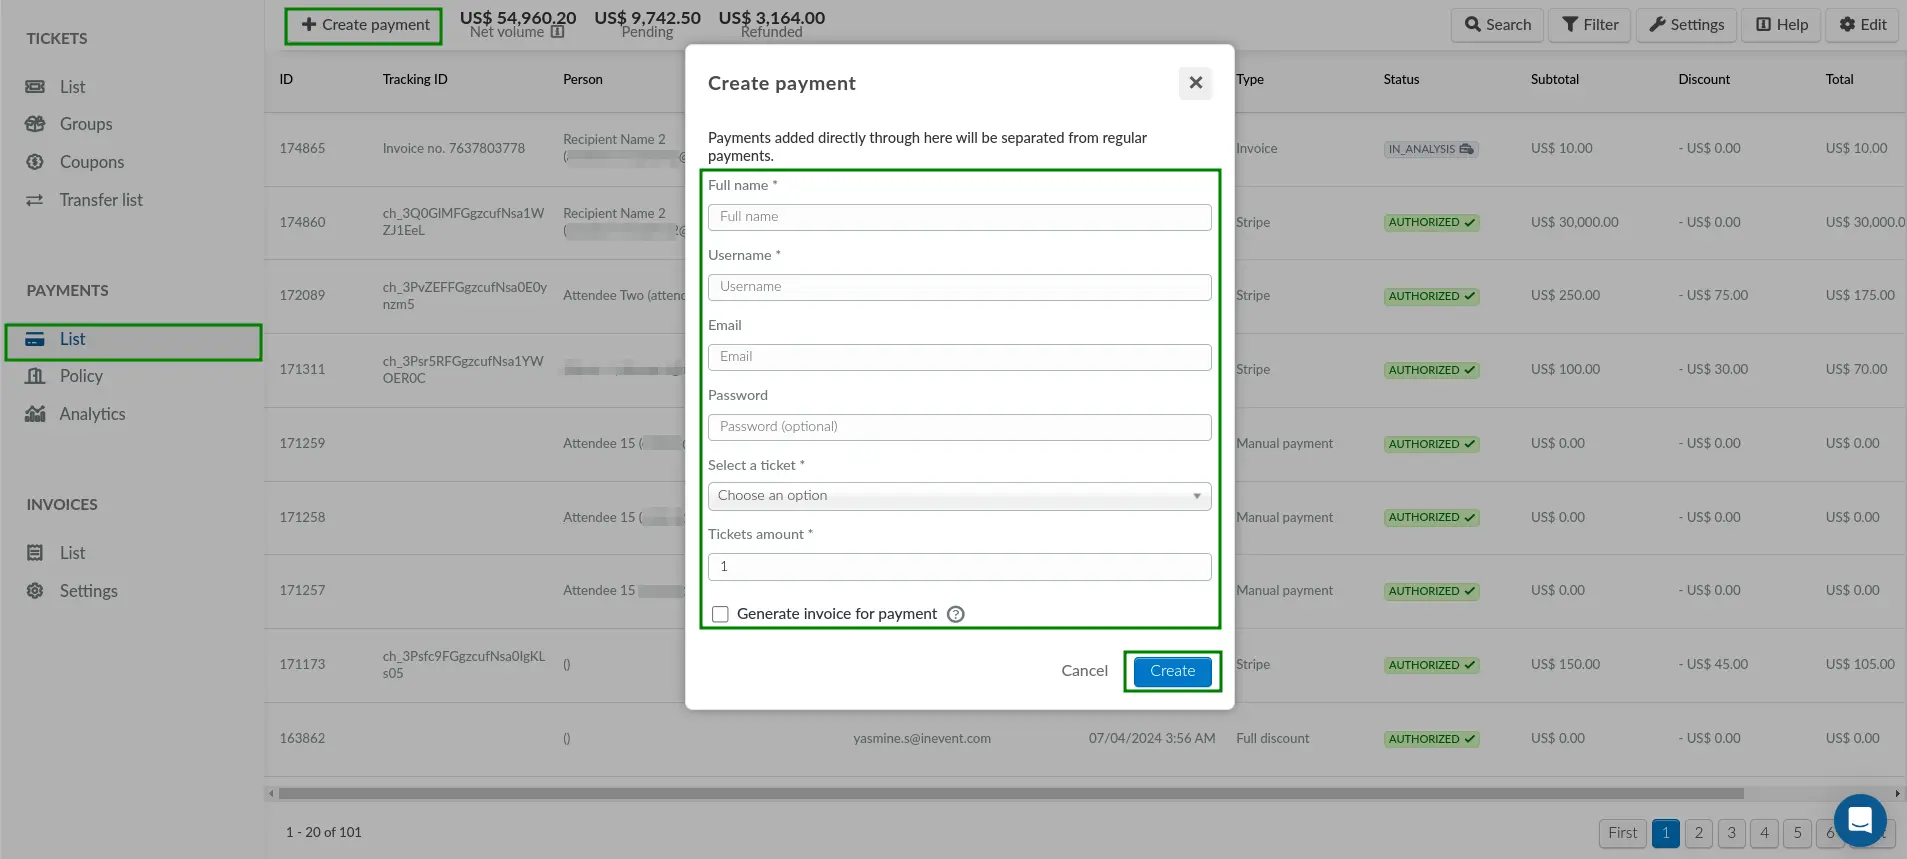
Creating a manual payment and generating an invoice
To create a manual payment and generate an invoice for the payment, complete the following steps:
- Click on the Create payment button in the Payments > List page.
- Enter the following details associated with your attendee in the Create payment pop-up box:
- Full name
- Username
- Password (optional)
- Select a ticket from the drop-down.
- Tickets amount: Enter the the amount of ticket, then click the +Add to payment button.
- Tick the Generate invoice for payment checkbox. Fields associated with your attendee will be displayed.
- Enter the following payment details associated with your attendee:
- Company name
- Company tax ID
- Address line 1 & 2
- Click Create to finish adding the manual payment and generating the invoice.
Previewing an invoice before creating a payment
You can preview your invoice and send the preview before registering your payment by clicking Preview invoice in the Create payment pop-up box. A new pop-up box will appear displaying a preview of your invoice.
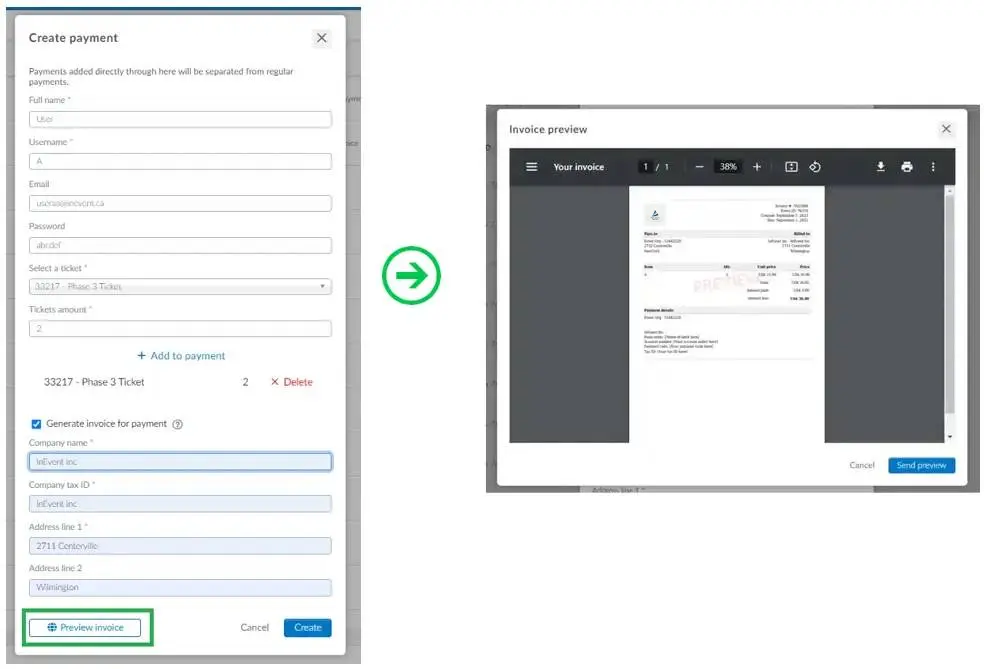
Once you are done previewing your invoice, simply click on Cancel or press the close button.
To send the invoice preview, click Send preview. In the following pop-up box, select the recipient of the invoice preview and click Send preview.
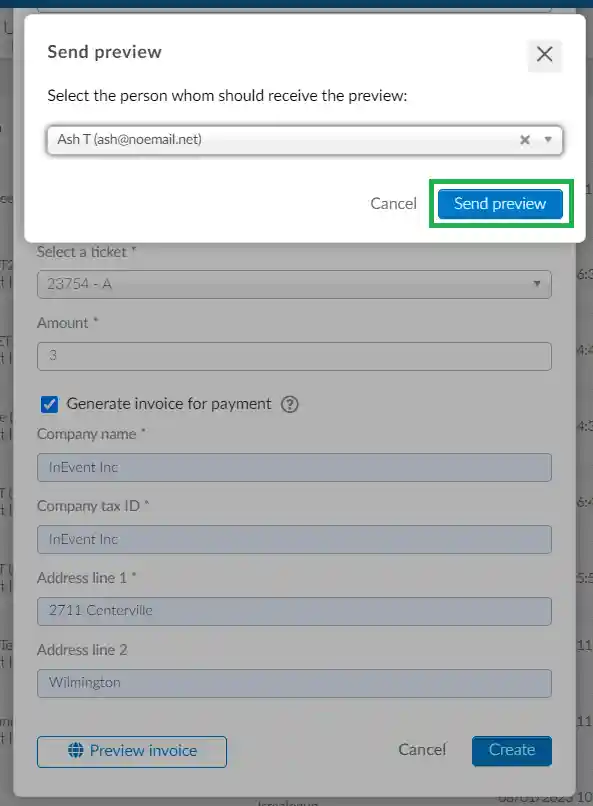
The invoice preview will be sent to the recipient's email address.
Settings - Integrating other payment options
You can access the payment integration options as well as other relevant tools related to the payments feature from the Settings button in the top right corner of the Payments > Lists page. If you want to enable or disable each option, toggle the switch next to them.
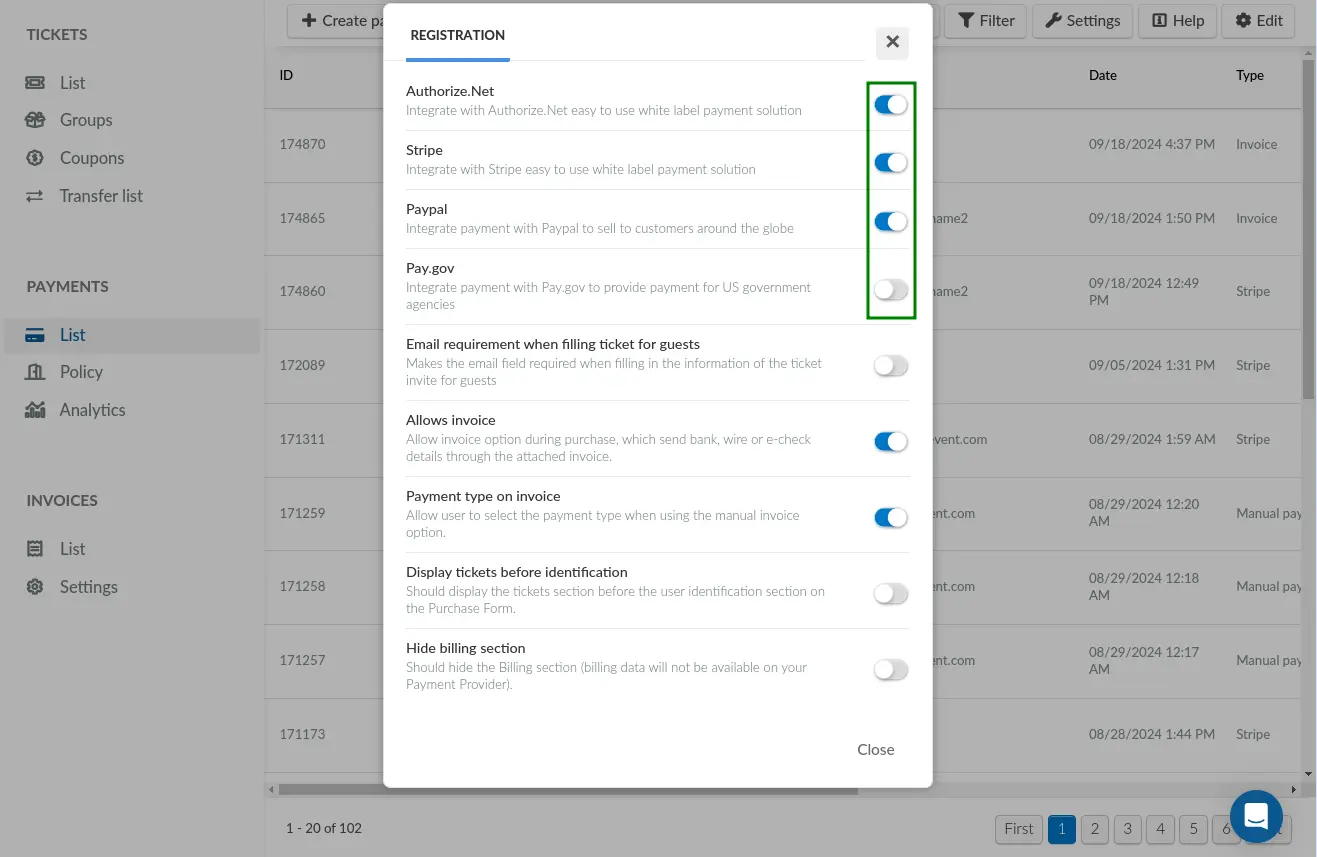
To learn more about the payment integrations, click the links below:
To learn more about other tools related to payment, refer to the Set Event Tools article.
Emails related to the payment process
When you are selling tickets for your event, the participants will receive 4 different emails that will be deducted from the email credits:
- The admission email: Even though is likely that the Approval requirement and the Waitlist requirement are deactivated from the Registration form settings, from the moment the users submit their form until the payment gets processed, the user will be temporarily listed under the Waitlist whichever payment gateway is selected. Therefore they will receive at first the admission email.
- We are waiting for your payment: During the process to accept payment, an email will be sent to inform the user that it is under analysis. An example of this email can be seen in this article.
- Your payment has been confirmed/ Your payment has been denied: Regardless of the method of payment that has been used, once the process is over the user will receive one of the emails informed that is confirmed or denied.
- The confirmation email/ The rejection email: The user will receive one of the emails depending on the payment status, if it has been confirmed then the confirmation email. If the payment has been denied then the rejection email will be sent.
- You can disable emails related to Payments for Tickets that are free by going to Settings > Tools > Registration > Payment email on free purchases and setting it to No. For more information, refer to the Set Event Tools article.
Performing searches and filters on the report
You can perform searches and filters on the report for quick sales queries.
To search for names, e-mails or the username of a buyer, click the Search button in the top right corner of the List page.
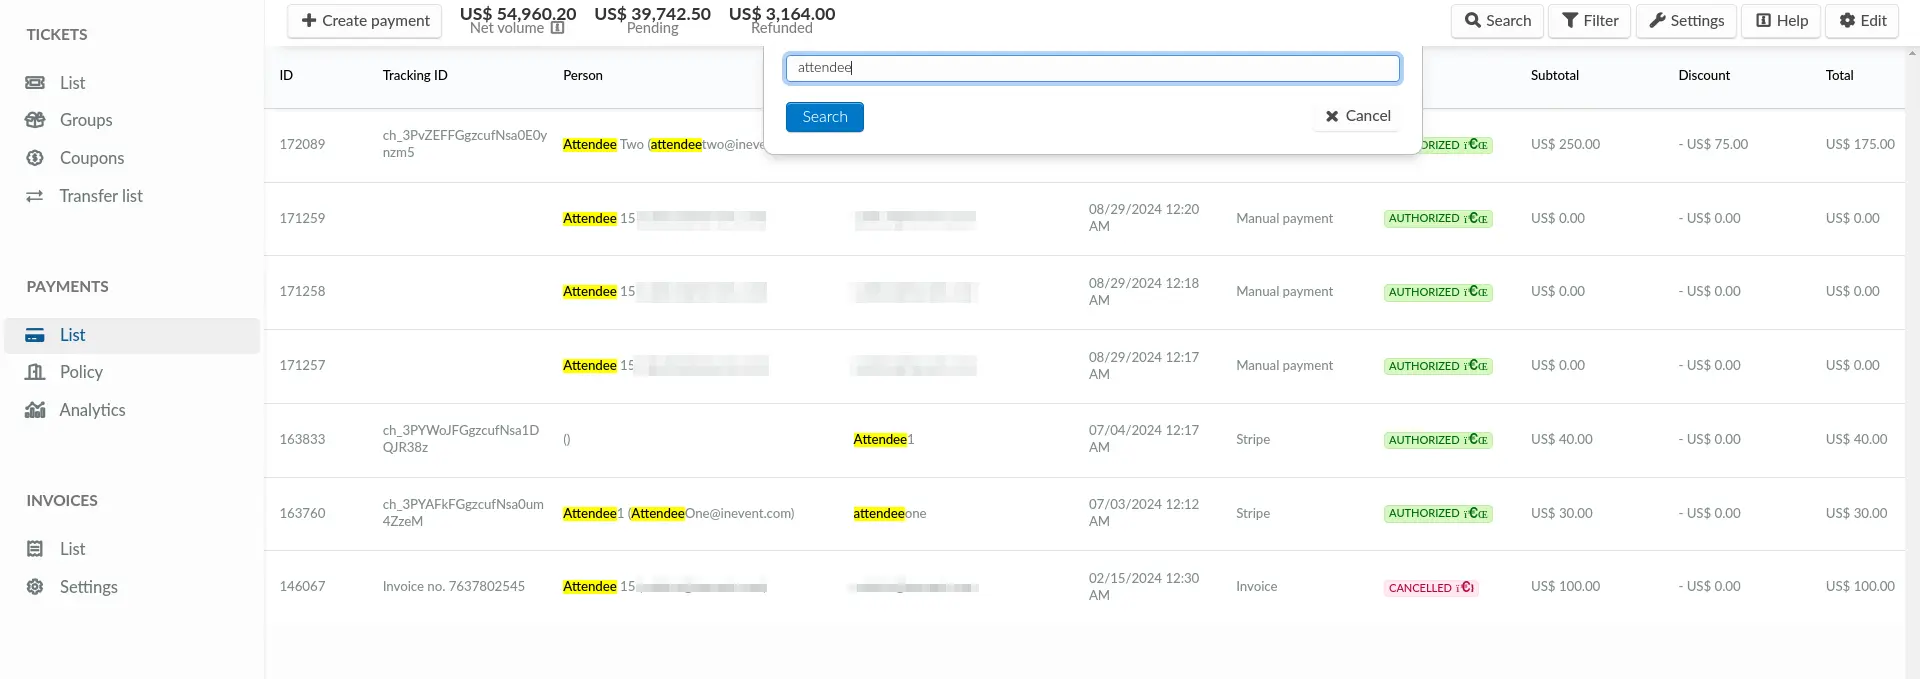
Click on Cancel to close the search bar.
To filter by payment type, dates, payment status or payments with discount, click the Filter button in the top right corner.
The Payment type drop down menu provides various payment method options:
- Credit card
- Paypal
- Paypal credit card
- Invoice
- Manual payment
- Stripe
- Stripe invoice
- Authorize.net
- Full discount (if you do not have to pay)
The Payment status drop down menu allows you to choose from:
- Waiting for payment
- Payment in analysis
- Payment approved
- Payment cancelled
- Payment refunded
- Refund request
- The Payment with discount drop down menu allows you to choose the following discount options: Full, Partial and Coupon. Select the desired option from the Payment with discount drop down menu to filter out payments accordingly.
To fill in the payment dates, use the provided date selector.
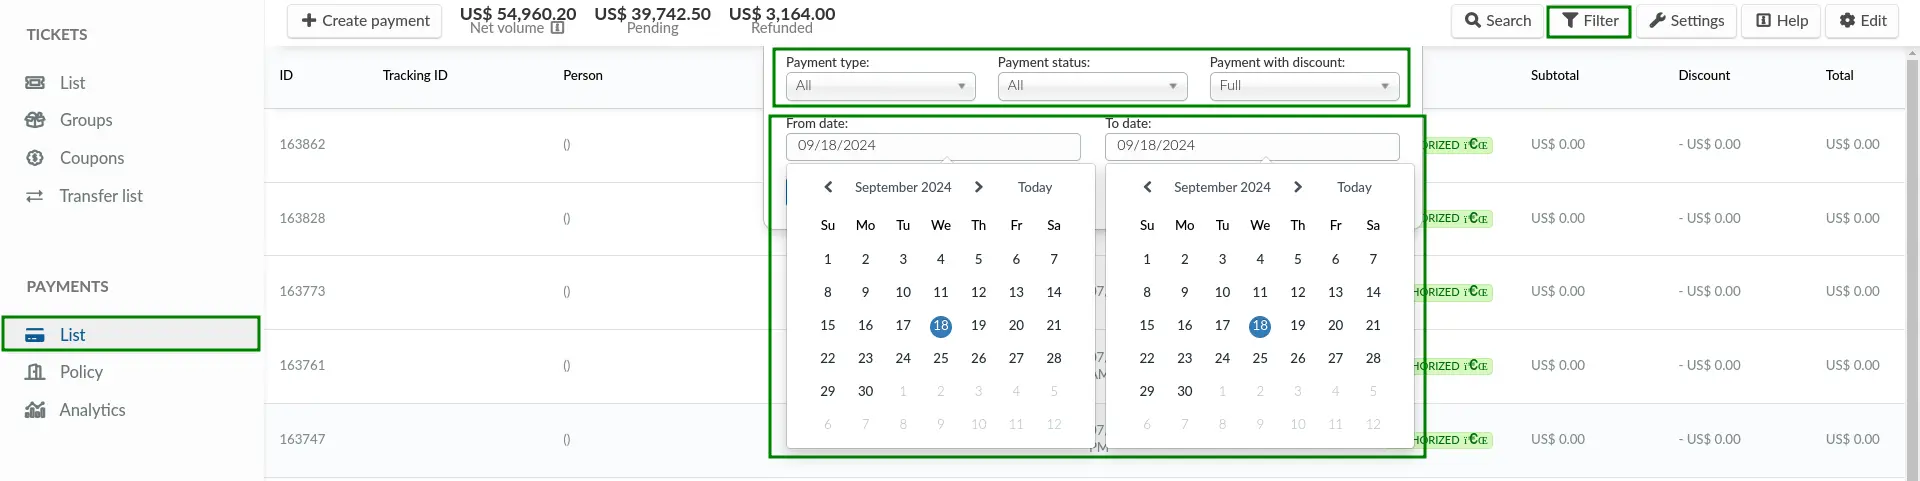
Click on Cancel to close the filter bar.
Configuring your company's payment details
You can configure your company's payment details which will appear in the manual invoice, from the Payments > Invoice page. Refer to the Invoice payment option article to learn how to do this.
Configuring your company's refund policy
You can configure your company's refund policy which will allow you define whether or not to allow refunds up to a certain period of time before your event. To do this, navigate to Policy in the left menu bar. Click Edit in the top right corner of the page. Select your Refund policy using the drop-down box: disallow refunds or allow refunds up to a specified period.
The available options are:
- No refunds
- Until 1 day before the event
- Until 7 days before the event
- Until 15 days before the event
- Until 30 days before the event
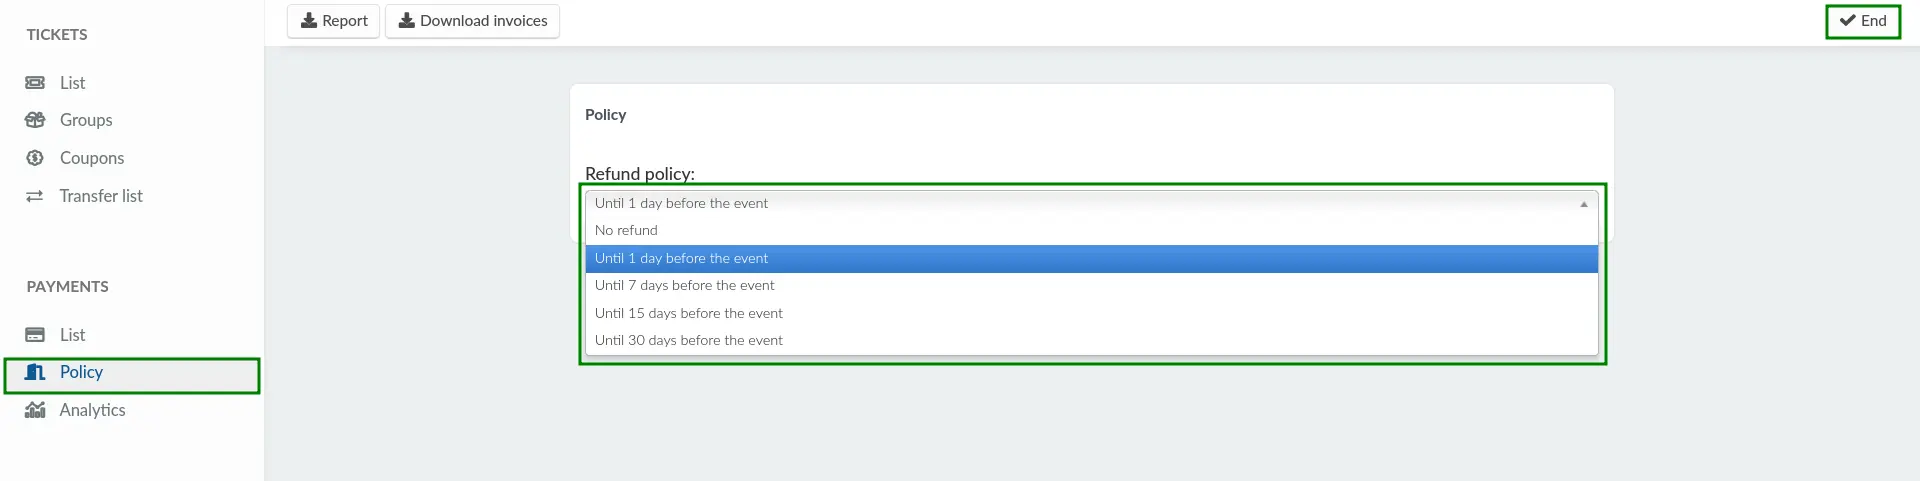
After you have set up a refund policy, attendees will be able to ask for a refund based on the refund policy set up. To learn how to issue a refund as an event admin, read the How can I refund attendees' purchase? article.
Analytics
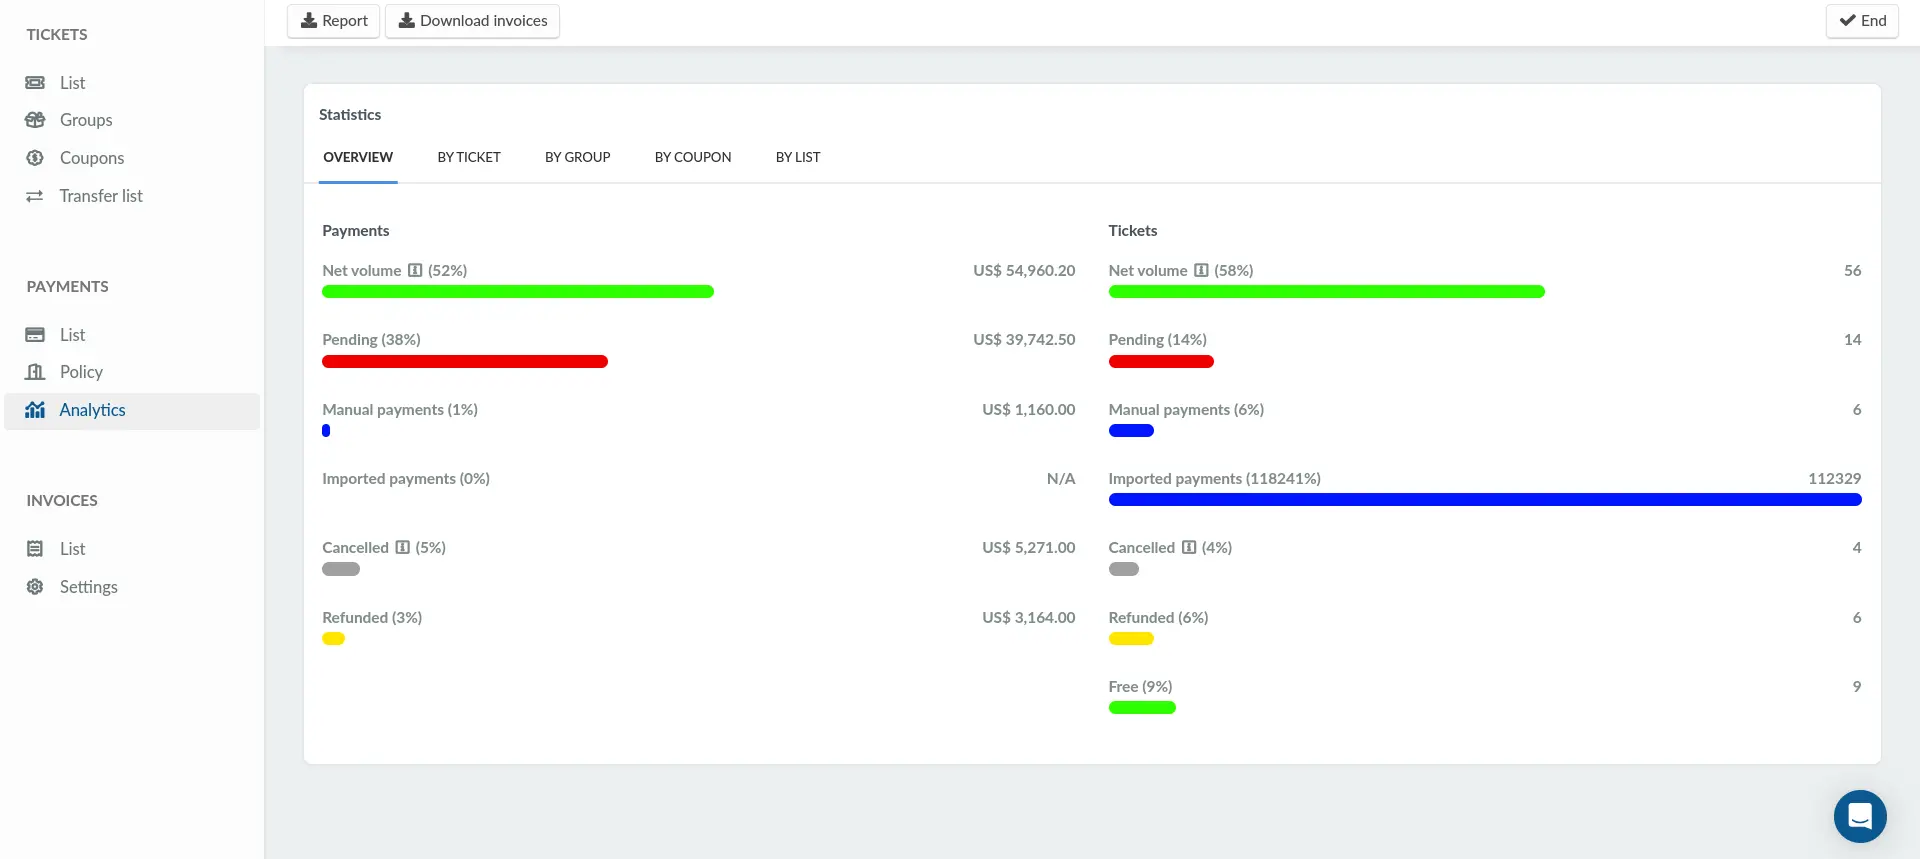
To access your payment statistics, click on Analytics from the left menu bar. On this page you can view the overview of Payments and Tickets analytics in a graph format.
You can also view the tickets' data by filtering through the options: By ticket, By groups, or By lists.
Statistics by ticket
To view the statistics by ticket, click on By ticket. This will give you a report on the following:
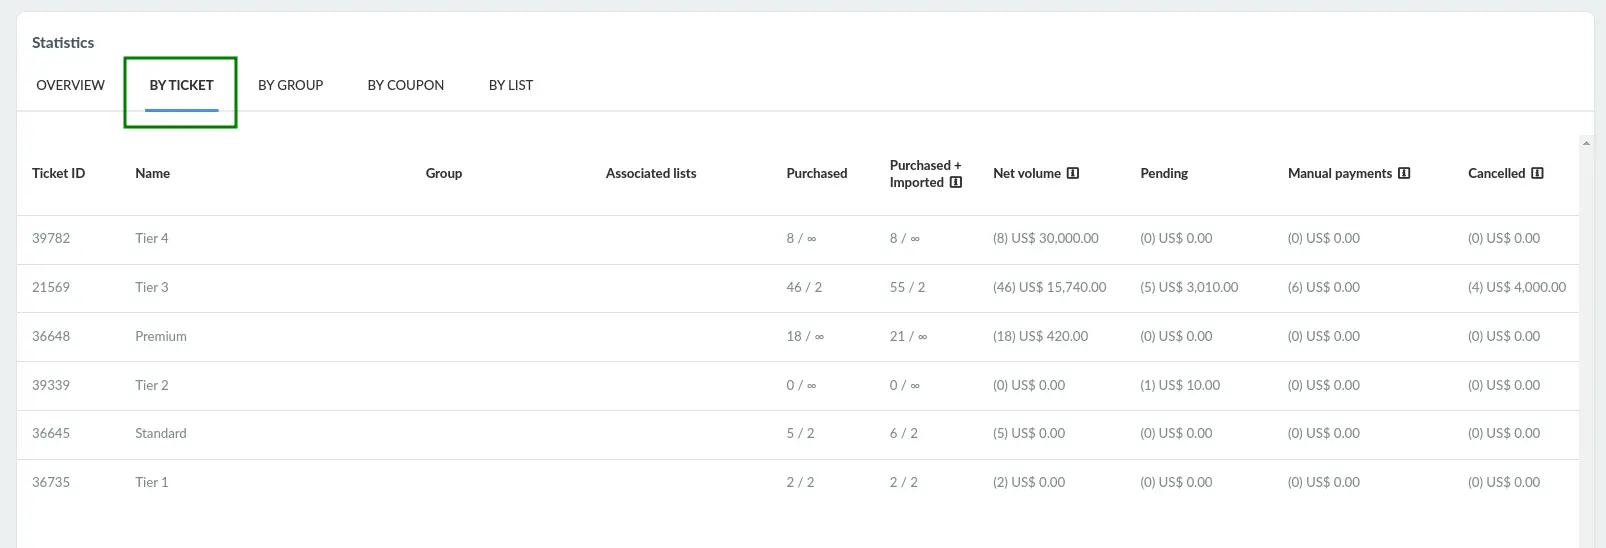
- Ticket ID: Shows the unique ID of the ticket.
- Name: Shows the name of the ticket.
- Group: Shows the group the ticket belongs to.
- Associated list: Shows the list(s) the ticket has been assigned to.
- Purchased: Shows the total number of approved ticket purchases over the total number of available tickets (capacity).
- Purchased + Imported: Shows the combined count of total approved ticket purchases, along with tickets assigned to attendees by admins from the People > Attendee page.
If attendees are assigned tickets that have reached their set capacity by event admins, the number of purchased tickets will appear higher than the ticket capacity.
- Net volume: Displays the total income generated from approved ticket purchases, along with the corresponding number of tickets purchased shown in brackets.
- Pending: Displays the total income that is currently pending, along with the corresponding number of associated tickets, shown in parentheses.
- Manual payments: Displays the total value of tickets manually added by event administrators from the platform, along with the corresponding number of ticket purchases, shown in parentheses.
- Cancelled: Displays the total value of cancelled ticket purchases, along with the corresponding number of cancelled tickets shown in parentheses.
- Refunded: Displays the total value of refunds issued for tickets, along with the corresponding number of refunds made, shown in parentheses.
Statistics by group
To view the statistics by group, click on By group. This will give you a report on the following:

- Group name: Displays the name of the ticket group.
- Purchased: Shows the total number of approved ticket purchases within the same group.
- Purchased + Imported: Displays the combined count of approved ticket purchases within the same group, as well as tickets allocated by admins to attendees through the People > Attendees page.
- Net volume: Displays the total income generated from approved ticket purchases within the same group, along with the number of tickets purchased in bracket.
- Pending : Displays the total income that is currently pending from tickets within the same group, along with the corresponding number of tickets, displayed in brackets.
- Manual payments: Displays the total value of tickets within the same group, manually added by event admins from the platform, along with the corresponding number of ticket purchases, shown in brackets.
- Cancelled: Displays the total value of cancelled purchases of tickets within the same group, along with the corresponding number of cancelled tickets, displayed in brackets
- Refunded: Displays the total value of refunds issued for tickets within the same group, along with the corresponding number of refunds made, shown in brackets.
Statistics by coupon
To view the statistics by coupon, click on By coupon. This will give you a report on the following:
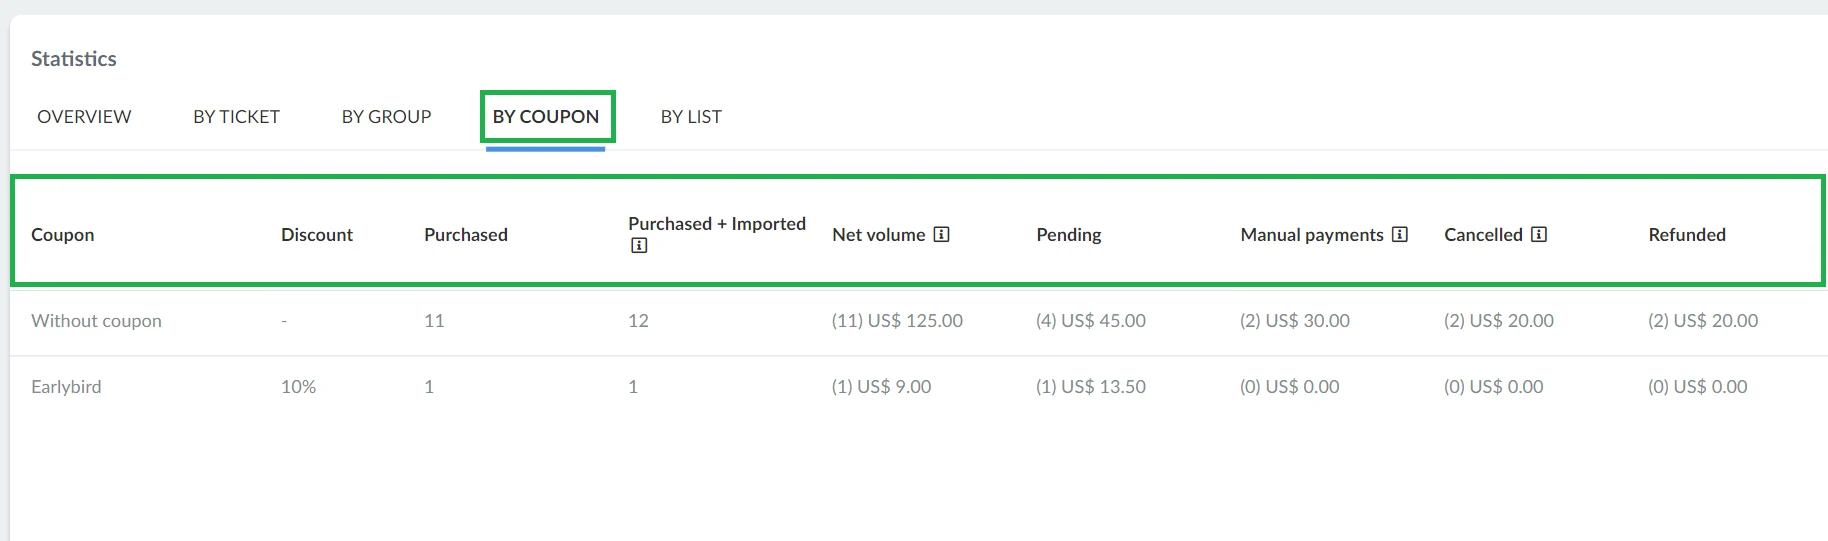
- Coupon: The coupon code.
- Discount: Displays the percentage discount offered by the coupon code.
- Purchased: Displays the total number of and approved ticket purchases within the same coupon code.
- Purchased + Imported: Displays the combined count of approved ticket purchases, along with tickets allocated by admins to attendees through the People > Attendees.
- Net volume: Displays the total income generated from approved ticket purchases using the same coupon code, along with the number of tickets purchased shown in brackets.
- Pending: Displays the value of pending income from tickets purchased using the same coupon code, along with the corresponding number of tickets shown in brackets.
- Manual payments: Shows the value of ticket purchases manually added by event admins from the platform, along with the number of ticket purchases shown in brackets.
- Cancelled: Displays the value of cancelled purchase of tickets using the same coupon code, along with the number of cancelled tickets shown in brackets.
- Refunded: Displays the total value of refunds issued for tickets purchased using the same coupon code, along with the number of ticket refunds made shown in bracket.
Statistics by list
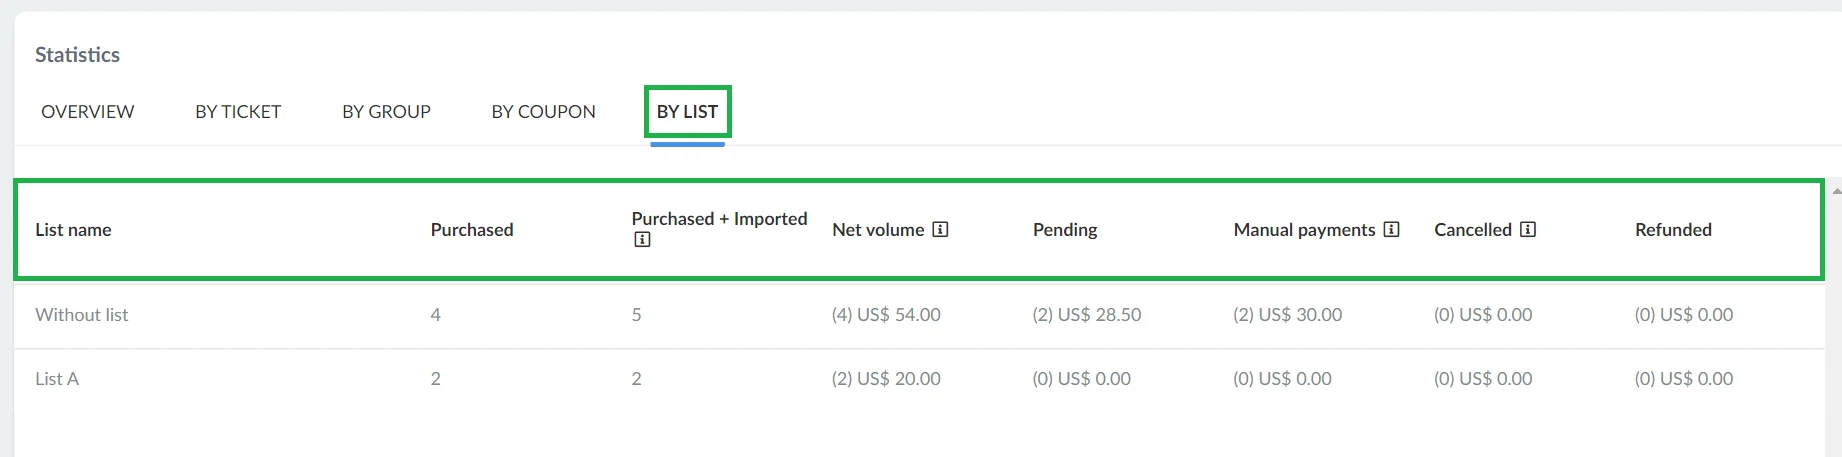
- List name: Displays the name of the list to which tickets are linked.
- Purchased: Shows the total number of approved ticket purchases associated with the same list.
- Purchased + Imported: Displays the combined count of approved ticket purchases, along with tickets allocated to attendees by admins from the People > Attendees page that are associated with the same list.
- Net volume: Displays the total income generated from approved ticket purchases within the same group, along with the corresponding number of tickets purchased shown in brackets.
- Pending: Displays the value of pending income from purchased tickets associated with the same list, along with the corresponding number of tickets shown in bracket.
- Manual payments: Displays the value of ticket purchases within the same list that have been manually added by event admins, along with the number of ticket purchase shown in bracket.
- Cancelled: Displays the value of cancelled ticket purchases within the same list, along with the number of cancelled tickets shown in brackets.
- Refunded: Displays the total value of refunds issued for tickets within the same list, along with the number of refunds made, shown in brackets.
Resending a receipt
After a payment has been authorized, you can resend the invoice receipt to your attendee if needed. To do so, click on the attendee's payment. A new window will appear. Scroll down and press the Re-send receipt button. Once the receipt has been sent, you'll receive a message confirming its successful delivery.
Force update
For payments processed via external platforms like Stripe, PayPal, etc. you'll see the Force Update option. This feature triggers a synchronization between the payment platform and InEvent, ensuring that the payment status is accurately reflected within InEvent's system
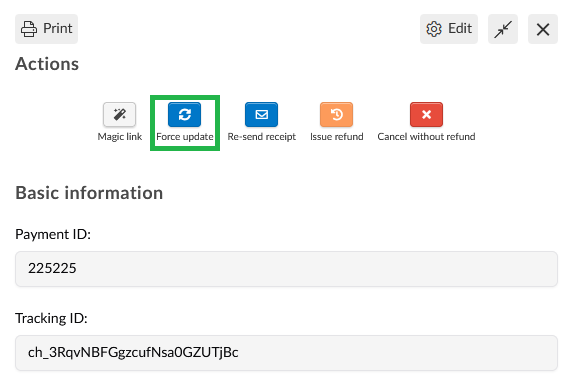
Cancelling a payment without refund
It is possible to cancel a payment without refunding, simply select the approved payment you wish to cancel and click Cancel without refund, it will prompt you to confirm the selection as well as the option to notify the attendee via email or not.
Once the process is completed, the user assigned to the payment will be removed from the event.
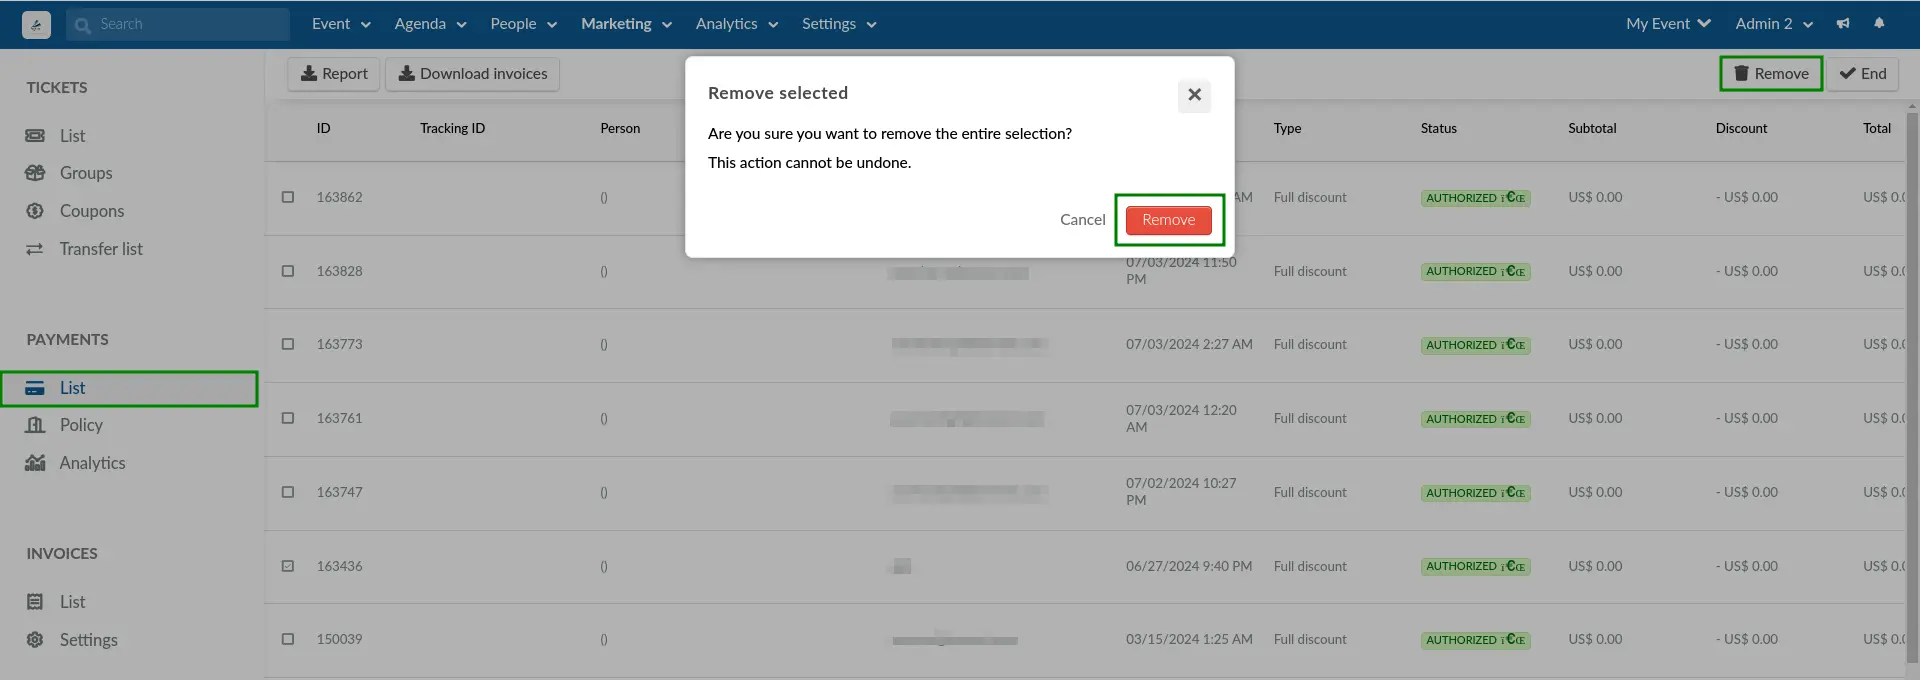
Deleting a payment
It is possible to delete an attendee's payment record. To delete an invoice payment follow these steps:
- Click on the Edit button in the Payments > List page.
- Tick the checkbox(es) by the side of the payment(s) you wish to remove.
- Click on the Remove button at the top right corner of the page.
- Press Remove in the confirmation box that appears.
Upon completing this action, the payment and invoice record (if applicable) of the user will be removed
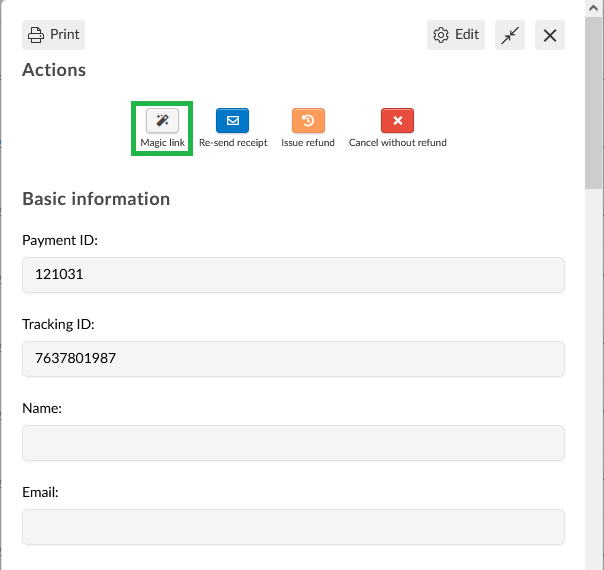
Magic link
Before, or after the attendee's payment is approved, you can select the Magic link option which copies to clipboard the link that takes them to their My Tickets page on the Virtual Lobby. The magic link of users whose payments are still pending approval will not be able to navigate anywhere else and will see their pending tickets, but users who have approved payment can easily access other tabs of the web app.
Extracting a report
You can extract a report on all payments. From any of the pages under the Payments or Invoices section, simply click on Edit > Report at the top left corner of the page. An excel sheet will be sent to your email once processed.
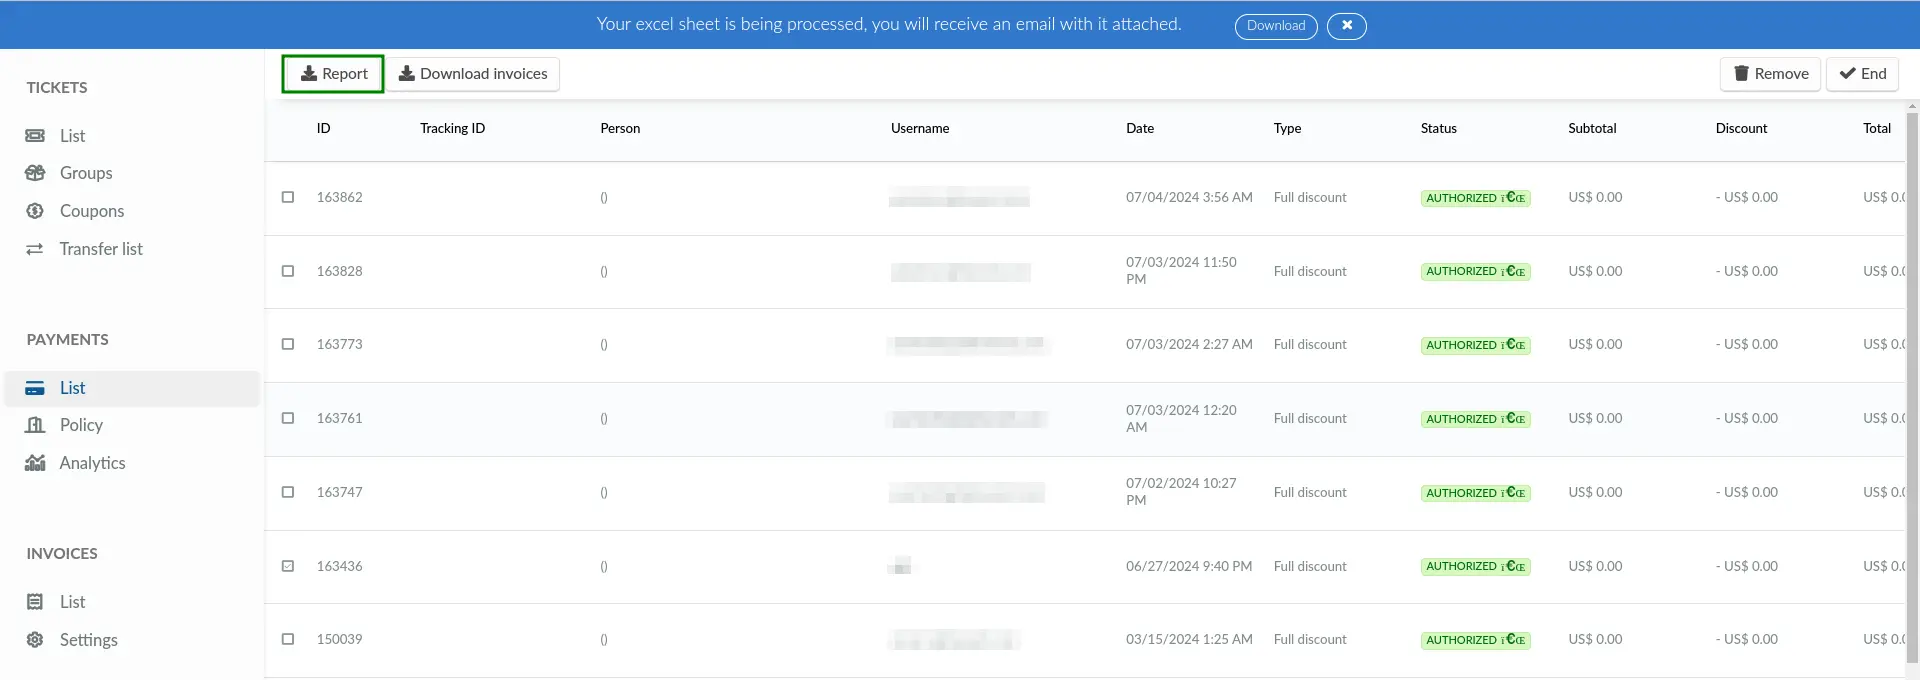
Once you download the report, you will be able to see the following information: payment ID, event ID, member ID, customer ID, payment ID, payment type, payment subtype, price, ticket IDs, ticket names, subtotal among others.
Additionally, the report will include details related to any coupons offered: couponIDs, couponCodes, couponDiscount, couponsCreated (date and time of creation).
