RTMP Streaming
 Updated 1 week ago
by
Lorenzo
Updated 1 week ago
by
Lorenzo
This article intends to teach you how to select RTMP Streaming as your room video mode, where to find the necessary information to live stream using external software, and how to operate its endpoints.
Choosing RTMP as the room video mode
Once you have created activities for your event's agenda, you need to set up its details and configurations, such as the room video mode.
To set RTMP Streaming as the room video mode, follow the steps below:
- First, go to Agenda > Activities > Select an activity on the left-hand side and press Edit in the upper right corner of the screen.
- Then, scroll down until you see Room video mode and choose RTMP Streaming from the dropdown bar.
- Click on End in the upper right corner of the screen, to save the changes made.
Live stream using external software
You can choose RTMP streaming as your room video mode to live stream a session using external software such as OBS, Wirecast, vMix, or any other live streaming platform. See below how to set this up:
- After you choose RTMP as your room video mode, scroll down to the checkbox that is marked with Live stream using external software.
- Click on the blue button titled 'View information' on the right side.

- A pop-up window will open with the STREAM URL and STREAM KEY codes. Simply copy these codes and insert them into the external software of your choice.
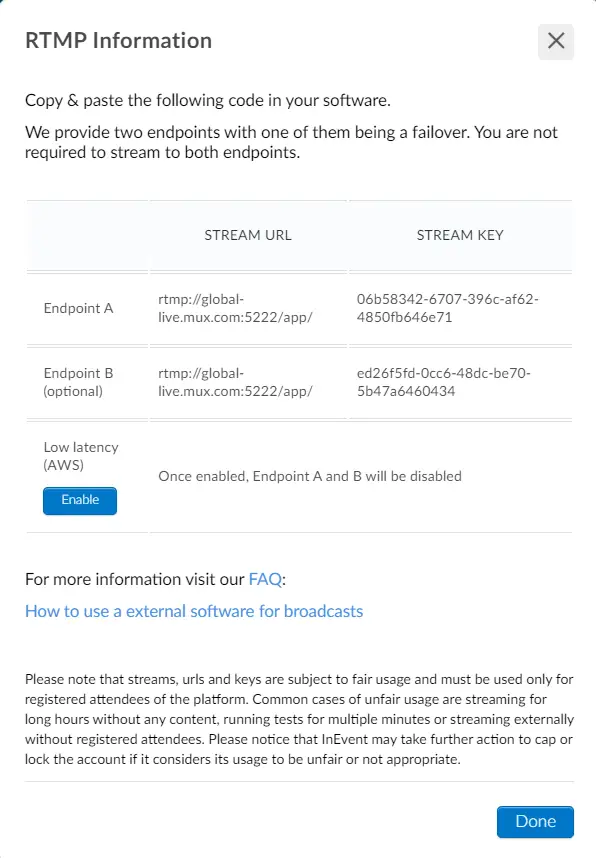
InEvent provides endpoints as a failsafe. All endpoints do not need to be enabled.
RTMP Alternate Tracks
If you need to create multiple RTMP endpoints within a single activity, you can do so by following the steps below:
- Now that you have set up your external software, you can add alternative tracks to your activity. To do this, first, click on Edit in the upper right corner.
- Then scroll down to RTMP Alternate tracks and in track name, type the name of the track you would like to add and press Add.
- Once you have added the track name, click on the blue information button under details. A pop-up window with the STREAM URL and STREAM KEY will open. Copy and paste these codes into your external software.
- Click on End in the upper right corner of the screen, to save the changes made.
Inside the activity
Below we can see how the previously set activity will function.
In order to change the track, simply click on the Settings icon below the video and choose the desired track.
Session replica
You can simplify your RTMP streaming management by replicating one activity that has your desired settings. By doing so, you will be able to stream the same video across multiple replicated sessions using a single stream key. The replicated settings include:
- Room status label
- Room video mode
- Hive Streaming
- Room recording
- Closed Captions & Subtitles
- Speech to text transcription
- Audio interpretation
- Live stream using external software
To replicate an RTMP session, follow the steps below.
- Make sure you have created two activities: the activity you wish to make into a replica and the main session (the activity the settings will be copied from)
- Click on the activity you want to make into a replica, press Edit, and click Enable replica.

- A window will pop up asking you to select the session you wish to copy the settings from. Once you have selected the activity, press Enable replica.

- Once the settings have been replicated, you will see a note explaining that the activity is a replica and the option to Disable replica.

Downloading RTMP details in bulk
To easily download and copy your RTMP details, including keys and URLs associated with your activity (such as streamingKey, streamingFailoverKey, streamingLowLatencyKey, and rtmpAlternateTracks), follow these steps:
- Go to Agenda > Activities.
- Click on Edit.
- Press the Report button located at the top left corner of the page, and a spreadsheet will be sent to your email containing reports on your activities.
Locate your RTMP activity and scroll to the streamingKey, streamingFailoverKey, streamingLowLatencyKey, and rtmpAlternateTracks fields to see the information.

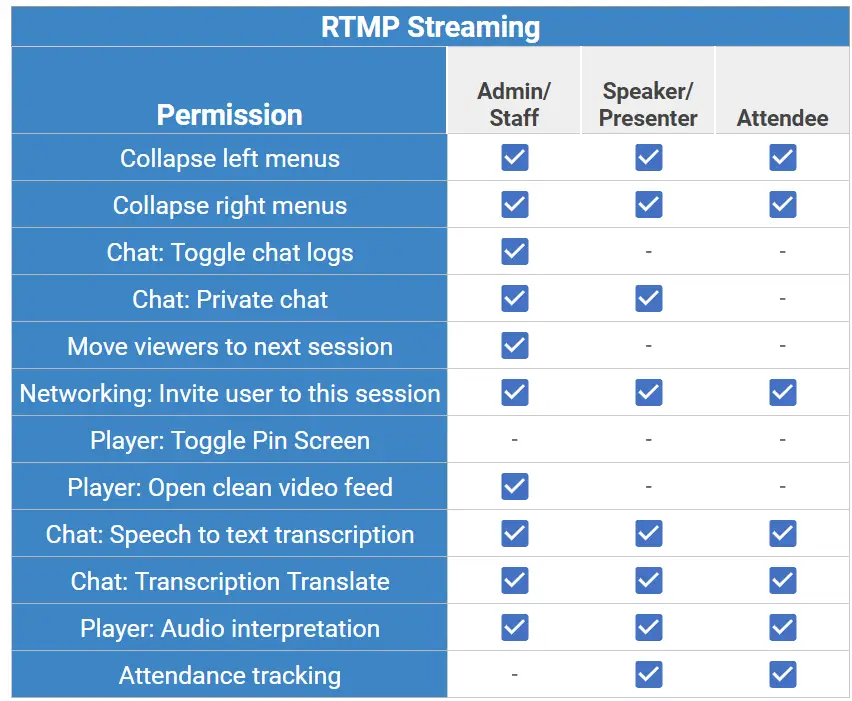
Permission levels in RTMP Streaming
Choosing the level of access your attendees will have on the platform means they will have different permission levels throughout your event.
Here is what each permission level can do in the RTMP Streaming room video mode: