Video On Demand: Pre-recorded room video mode
On Demand, also known as Video On Demand (VOD), allows viewers to watch the selected videos whenever at their schedule's convenience. With this option, viewers can pause, play, fast-forward, rewind, and re-watch the videos On-Demand as much as they would like.
Room video modes
If you are having online activities, once you activate your virtual room, you will be asked to choose your Room Video Mode.
This article intends to teach you how to enable and use the Pre-recorded room video mode to have On-Demand content in your online activities. If you wish to learn more about the other room video modes offered by InEvent, check this article.
Choosing Pre-recorded as your room video mode
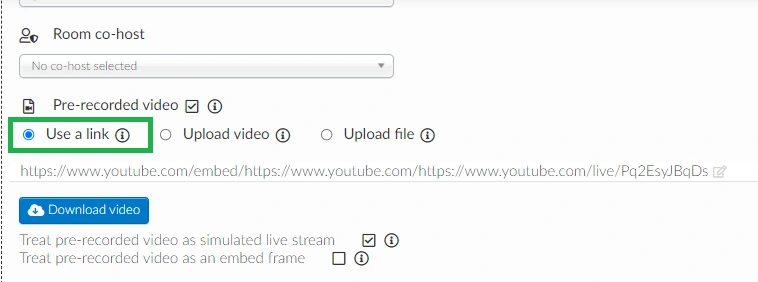
If you have chosen pre-recorded as your room video mode, you have many options to choose from. You can paste a link to a web-based video, upload a video of your own or upload a file.
To do so, go to Agenda > Activities > select an activity > press Edit. Next, scroll down until you see Room video mode and select Pre-recorded. Then, press End in the upper right corner to save the changes.
Now that you have selected Pre-recorded as the room video mode, there are three options for you to define which video will be available on-demand: you can either use a web-based video via web URL or you can upload a video from your computer.
Use a link
To replace your video stream with a web-based video or a browsable website simply select Use a link, and paste the video or website link into the text box.
- The option Treat pre-recorded video as an embed frame will be automatically selected. This is how participants will see a website link in the virtual room:
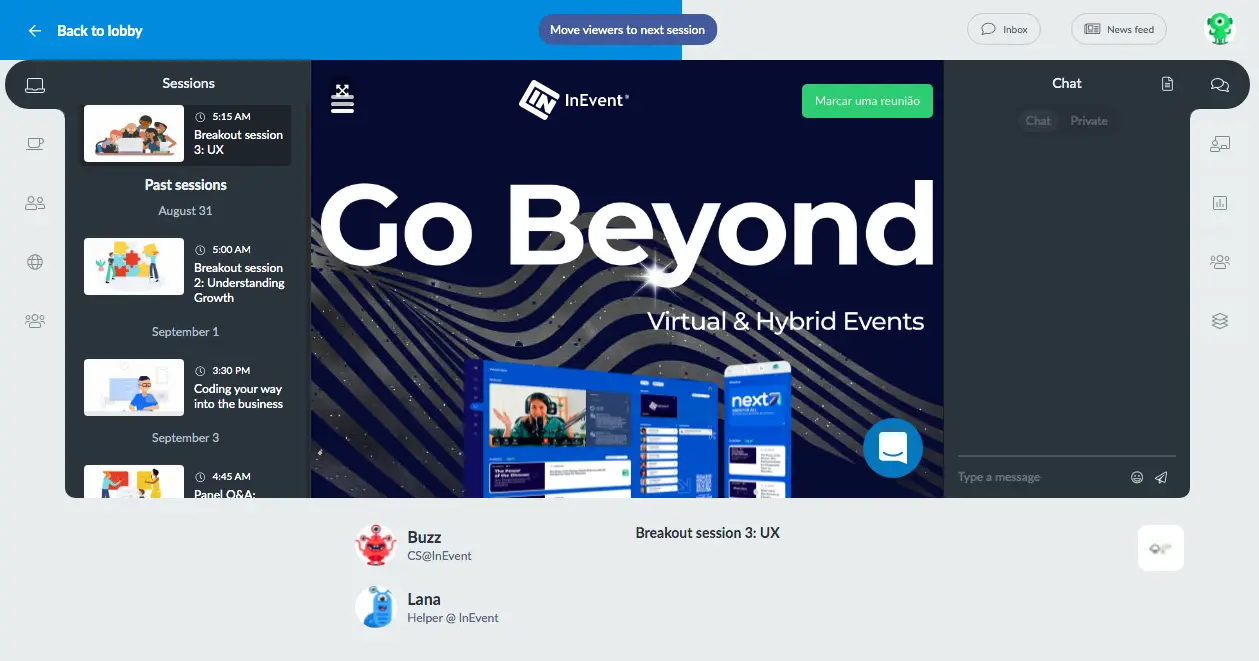
This is how participants will see the selected an embedded video when accessing your virtual room:
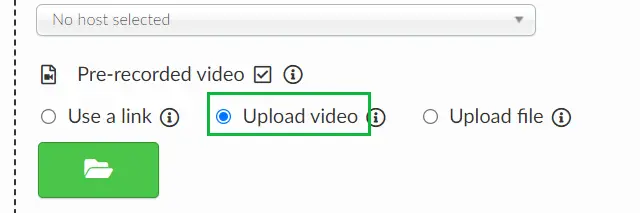
Upload video
You can use this option if you want to set your Pre-recorded video as a Simulated Live Stream. To upload your own video file, select Upload video, and click on the green upload button to find this file on your computer.
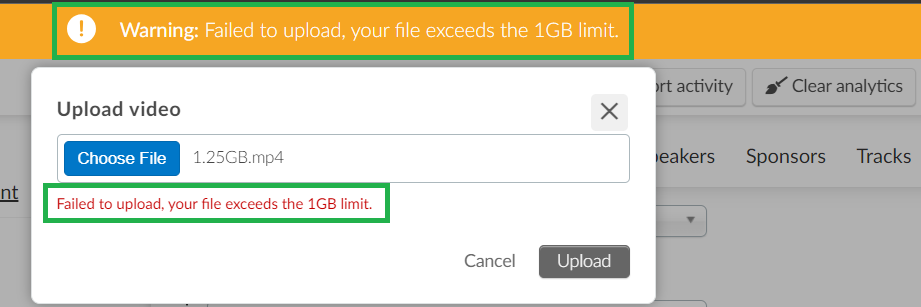
You can upload videos up to 1GB in size. If you attempt to upload a video over 1GB, you'll see the error message depicted below:
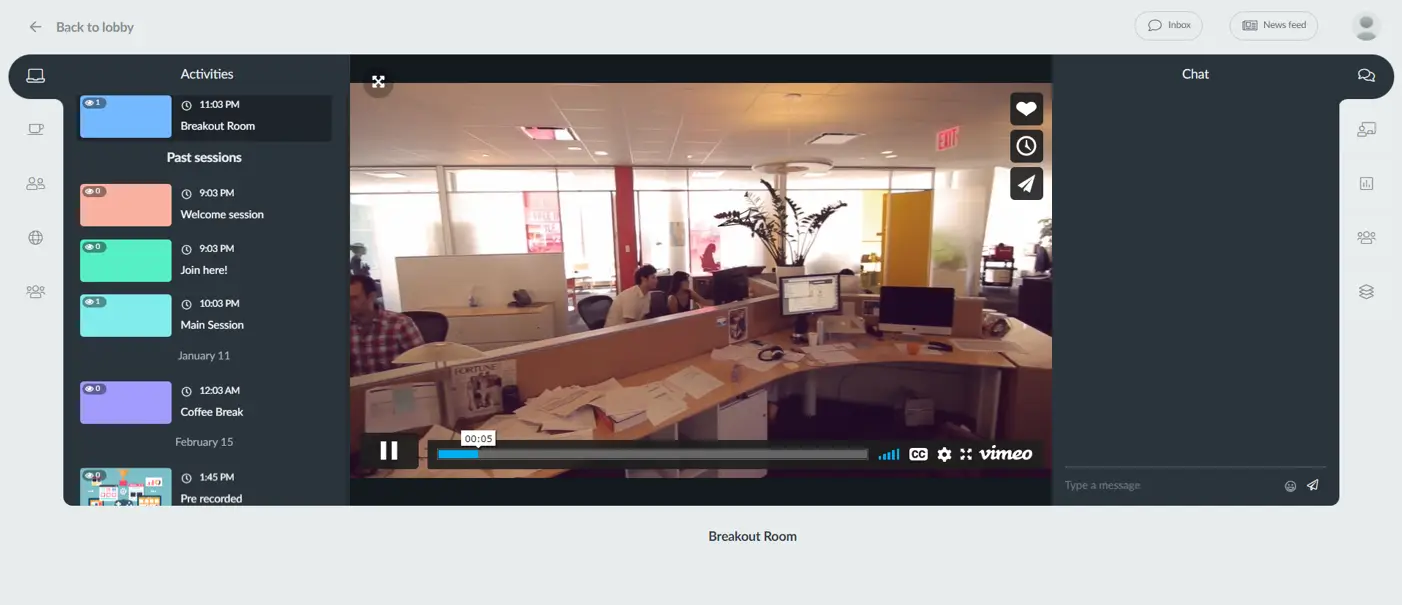
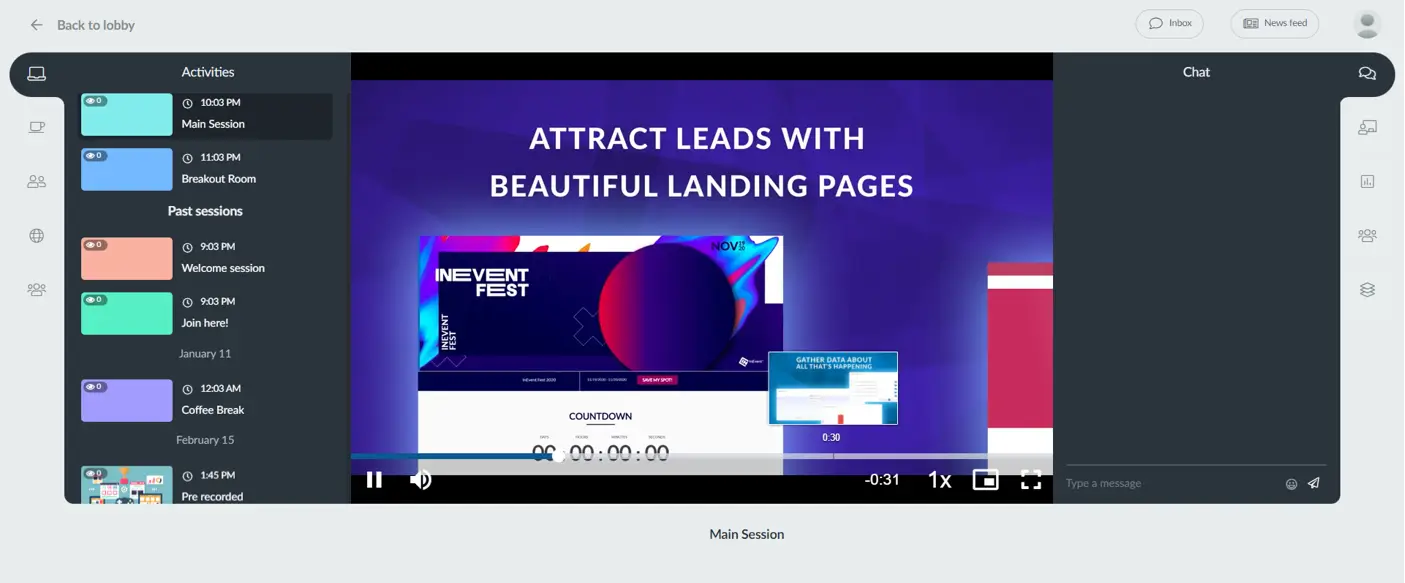
- If you upload a video, participants who accessed the virtual room will be able to play and stop the video and increase or decrease the playback speed. They will also see a time slider on top of the bottom bar on the entire video player.
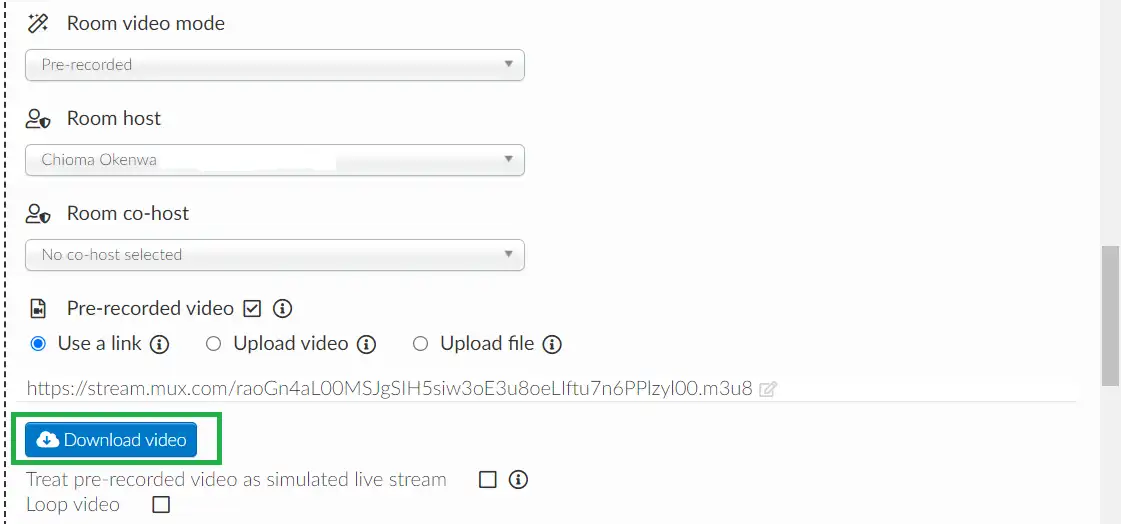
By selecting this option to upload a video from your computer, you will also find a Download video button, that can be very useful when uploading a large video to the platform and then sharing a downloadable link with other admins.
Video Trim Mode
The Video Trim tool allows you to trim your videos when uploading them as On-Demand content. The feature provides an interactive UI to select your video's best start and end times.
When uploading a pre-recorded video from the backend, you can follow these steps to use the tool:
- Go to Pre-recorded video.
- Select the Upload video option.
- Click on Add video and choose your video file.
- Toggle the button under your video preview to activate the Trim mode.
- Move the markers to set the start and end times. You can manually insert your Start and End times using the time boxes below the marker.
- Click Upload to save your trimmed video.
Setting your Pre-recorded video as a Simulated Live Stream
This option is only available if you select the Upload video option, you can not choose the Use link option when treating the video as a simulated live stream.
16:9
If you want to simulate a live stream, click on Treat pre-recorded video as simulated live stream. Click here to learn more about it.
Upload file
You can use this option to upload files as PNG, JPEG and PDF, as well as videos also. Click on the red bar and choose the file you want to upload.

You can upload files up to 100MB in size. If you attempt to upload a file over 100MB, you'll see the error message depicted below:
- And this is what the browsable PDF file will look like for your event's participants:
On-Demand Chapters
It is possible to add On-Demand chapters to your videos when using pre-recorded as your room video mode. To learn how to do it, check this article.
Setting the pre-recorded video on loop
You can loop pre-recorded videos so that they repeat automatically once they end. This will appear to viewers in the activity session.
To have access to the loop video option, ensure that you have uploaded a pre-recorded video using one of the following methods: Use a link, Upload video or Upload file.
After adding your video, tick the Loop video checkbox:
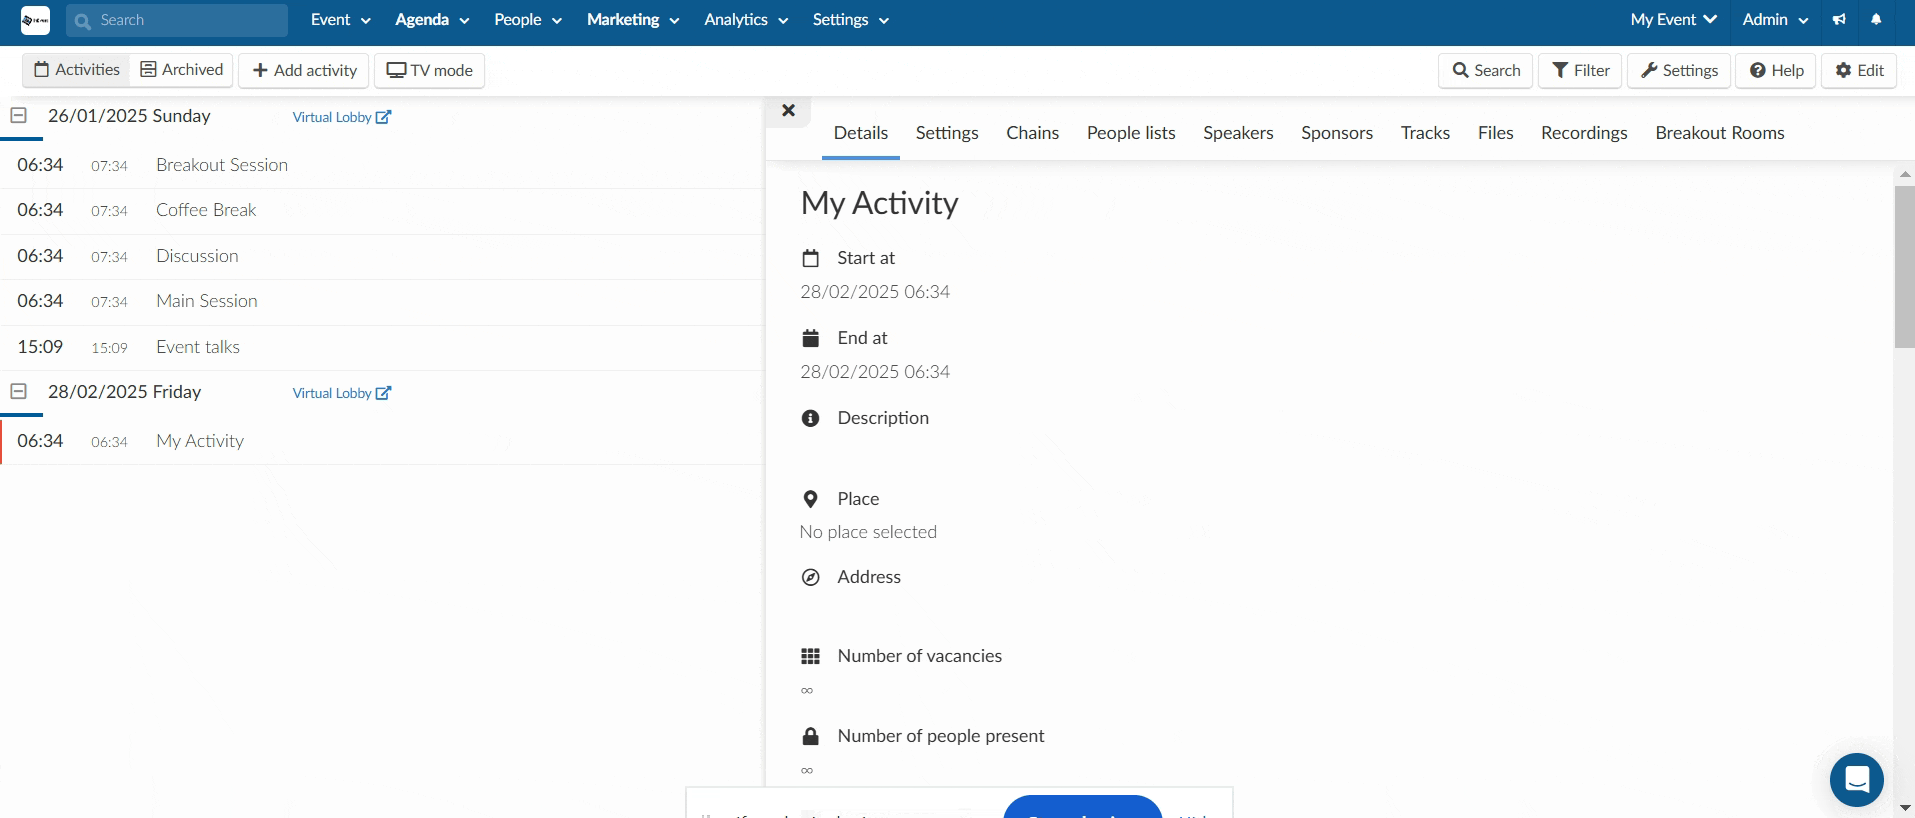
Closed captions and subtitles
The platform provides you with 2 options in adding captions and subtitles to your pre-recorded videos.
- Upload closed captions / subtitles file (WebVTT format)
- Generating by AI
Uploading closed captions / subtitles file (WebVTT format)
The platform provides you the option to upload captions and subtitles to your pre-recorded videos using a WebVTT file. To do this:
First, set up your pre-recorded video by choosing Pre-recorded as your room video mode and uploading a video.
After setting up your video, complete the following steps to upload subtitles:
- Click on the Edit button at the top right corner.
- Scroll down and tick the Closed captions & subtitles checkbox.
- Click on the red folder icon beside Upload closed captions / subtitles file (WebVTT format).
- Upload your webVTT file.
- Select the file language and the language(s) you want it translated to from the drop-down.
- Click on End to save your changes.
Generating closed captions by AI
To use automatic closed captions generated by AI for your pre-recorded videos, follow these steps after you have uploaded your video.
- In the Activities settings page, scroll down to the Closed Captions and Subititles.
- Enable the checkbox.
- Click the blue Generate by AI button. A window will appear.
- From the Translate to drop down, select the languages you want your video to be translated to.
- Click on Confirm.
You will see a notification informing you that the closed captions is starting the generation. And will also be informed once it is ready. The translated languages will also be displayed:
The original language must be English for AI generation.
AI captions may take several minutes to generate.
You will receive a notification once captions are ready.
All selected translated languages will also be shown.
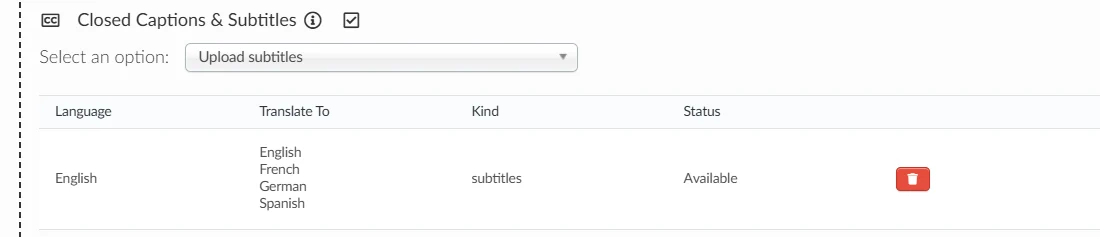
How to remove a closed caption/subtitle
To remove your subtitle, click on the red trash icon. A confirmation box will appear, press Remove after confirmation.
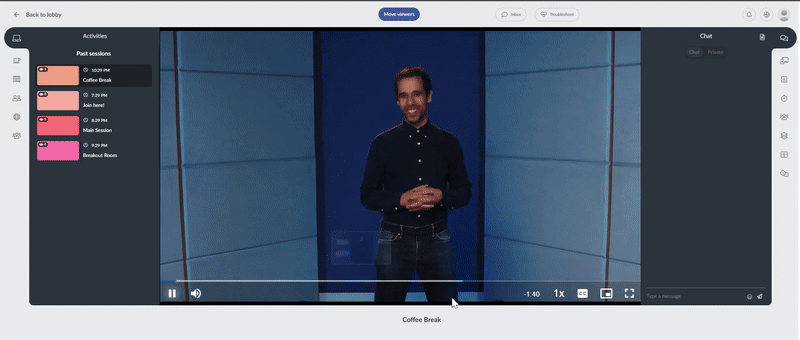
Closed captions and subtitles inside the Virtual Lobby
Once you have configured closed captions and subtitles for your pre-recorded activity on the backend, you can enable them in the activity room: Click on the CC icon at the bottom of the video player and choose the captions/subtitles in the language you configured.
Besides being able to activate captions/subtitles, you can also configure the aesthetics of the text in captions settings.
To turn off the captions, simply click on captions off.
When using closed captions, it is important to consider the following:
- Real-Time captions: If using InEvent AI-generated captions, it may take up to 20 seconds after enabling for captions to appear.
- Captions may experience delays when speakers use very long, unbroken sentences (system waits for transcription to finalize).
- Both Closed Captions and Speech-to-Text Transcription should be enabled for captions to work in live scenarios.
- Unstable internet (on the viewer's or speaker’s end) may prevent captions from appearing or cause delays.
How to use attendance tracking in a pre-recorded session?
- First, you need to add the credit units to the Attendance menu to learn how to do this, click here
- Create a pre-recorded activity as shown above
- Click on Edit and scroll down until you find the Attendance tracking option
- Now select the attendance tracking unit you created on the drop-down menu and click on Add.
Press End to save all the changes made.
Below you can see how the attendance tracking pop-up works in simulated and on demand session:
How to set a recorded live stream as pre-recorded session?
- The first step before your live activity begins, is to enable room recording in the activity details tab. Click here for more instructions.
- After your activity is finished, go to the recordings tab of your activity and click 'Set as pre-recorded'. Click here for more details.
What can each permission level do in the Pre-recorded room video mode?
Choosing the level of access your attendees will have on the platform means that they will have different permission levels throughout your event. Here is what each permission level can do in the Pre-recorded room video mode:
To learn more about the permission levels, click here.