Files and documents
 Updated 19 hours ago
by
Caleb Kotey
Updated 19 hours ago
by
Caleb Kotey
- Supported formats
- Adding files from the platform
- Adding files from the Virtual Lobby
- Uploading Large Files
- Post-event file restrictions
- Deleting a shared file
- Editing files
With InEvent's Files feature, it is easy to share files with your event attendees, such as articles, catalogs, and presentations.
This article will guide you on how to upload, access, and delete files within your event.
Also check out this video on InEvent's Files feature:
Supported formats
The InEvent Files feature supports uploading of files in the formats listed below:
- Documents:
.CSV,.DOC,.DOCX,.PDF,.PPT,.PPTX,XLSX,.TXT - Video:
.3GP,.MOV,.MP4
- Images:
.GIF,.JPEG,.JPG,.WEBP,.PNG - Audio transcription files:
.SRT,.VTT,.TXT
Adding files from the platform
Event files: Uploading files to the Files tab
To upload a file to the Files tab of an event, complete the following steps:
- Navigate to Event > Content > Files.
- Click Upload on the top left corner of the page to upload your file. A pop-up box will appear.
- Press the Click to upload file to open the file selector or drag and drop a file directly on the prompt.
- Select your file. The file upload will automatically begin. Once the upload process is finished, you will be prompted to enter a file name.
- Enter your file name in the Create file pop-up box.
- Press Create to finish uploading and creating your file.
Event files: Uploading a zip file
You can upload compressed zip files into the Files tab aswell. To do so, complete the following steps:
- Click the More Options drop-down in the top-left of the page.
- Press Upload zip.
- Press Import. It will upload the file.
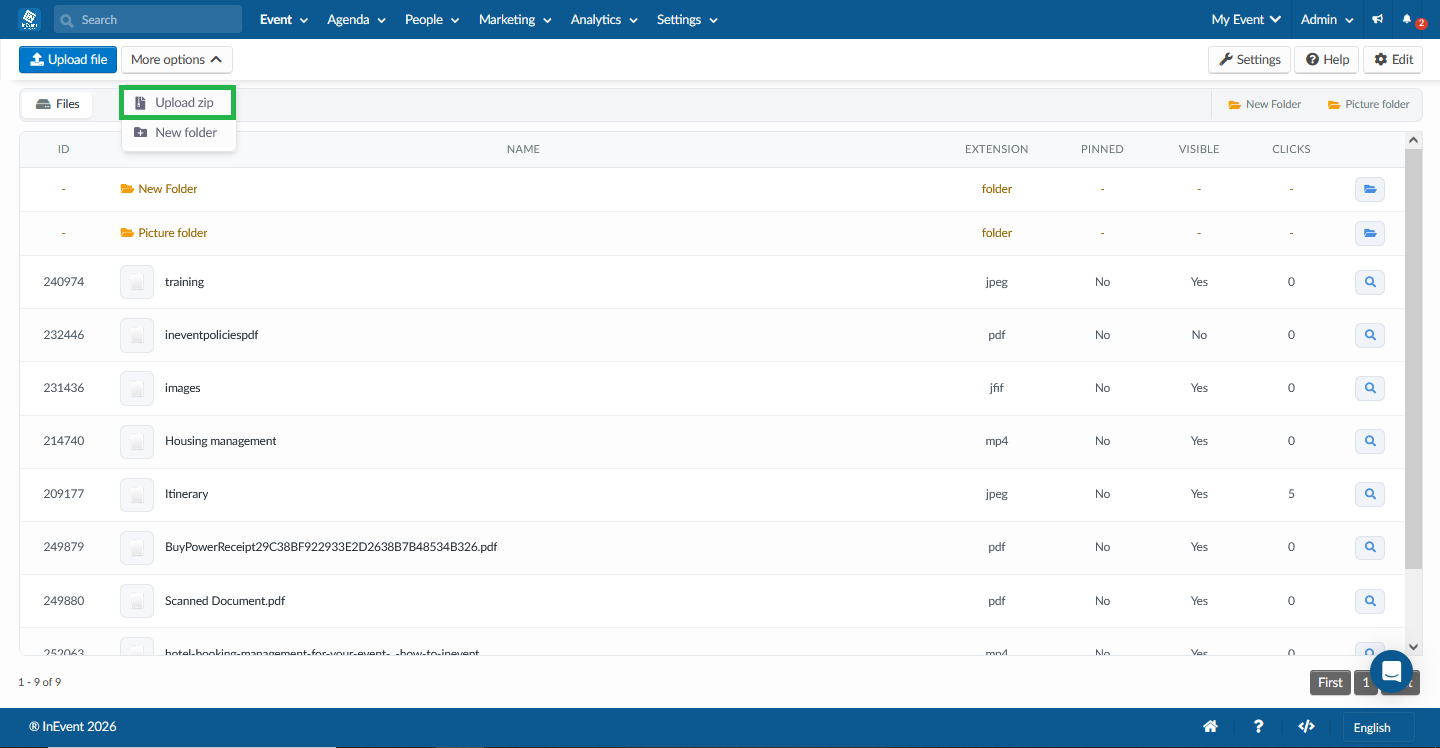
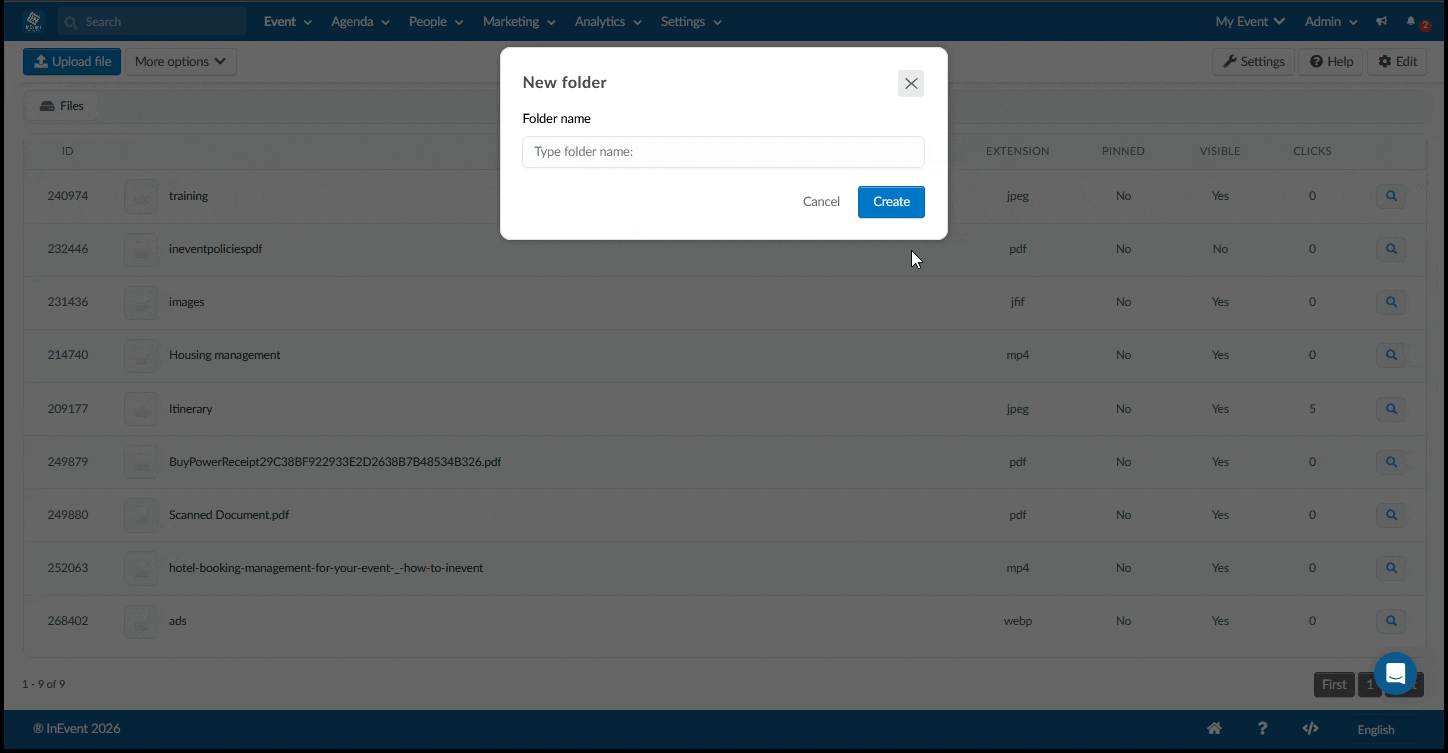
.zip are supported.Event files: Creating folders in the Files tab
You can create folders in the Files tab for better organisation. To do so, complete the following steps:
- Click the More Options drop-down in the top-left of the page.
- Press New folder.
- Name your folder. Then press create.
You should have a new folder now.
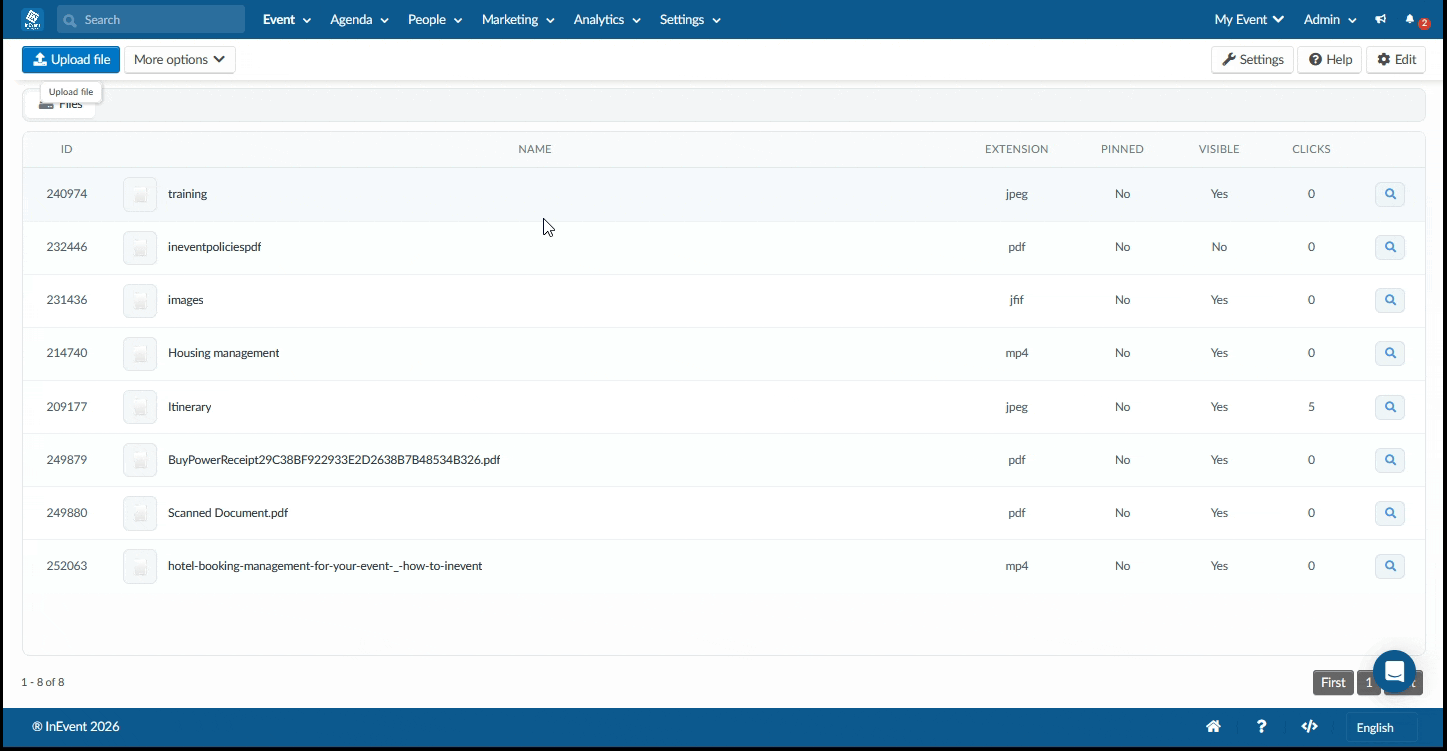
Event files: Files display
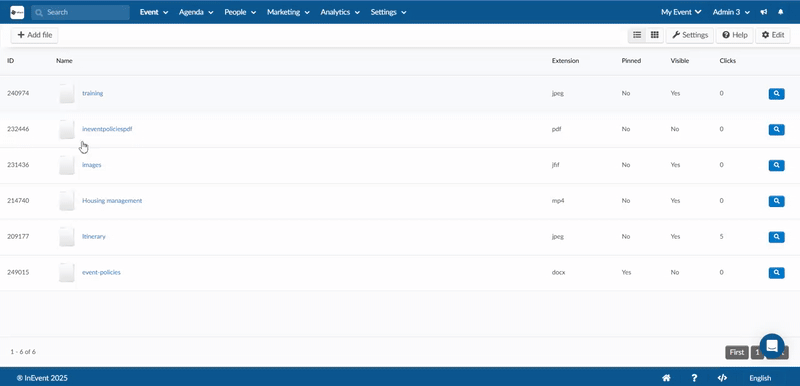
Files can be displayed in two different views: List View and Gallery View. You can choose which form of display you prefer by clicking on the view buttons next to setting button on the files page.
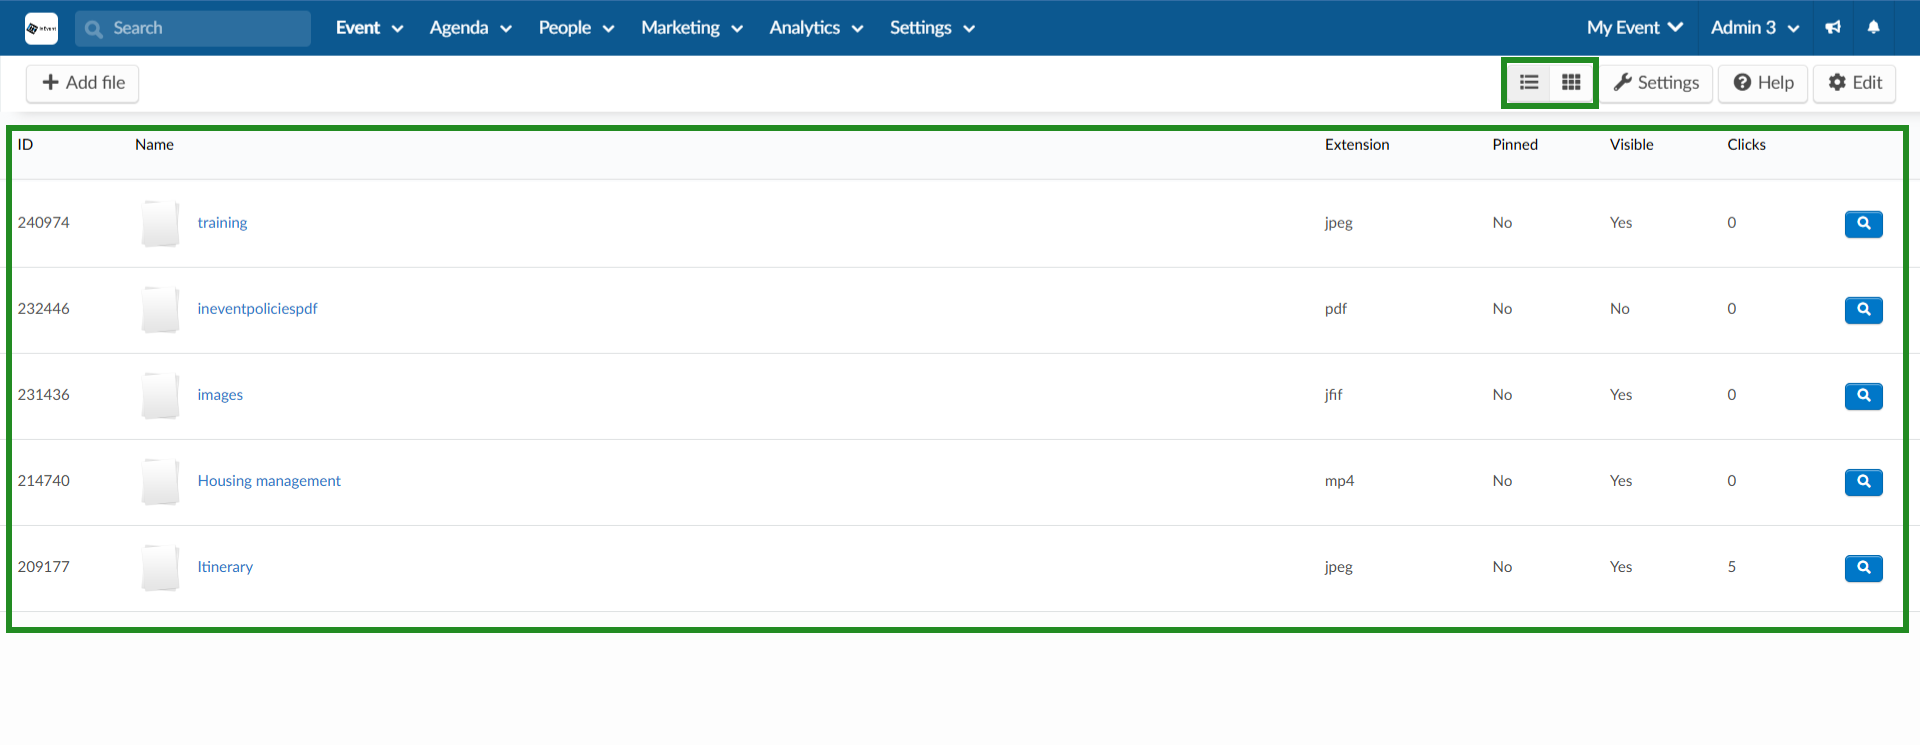
List View
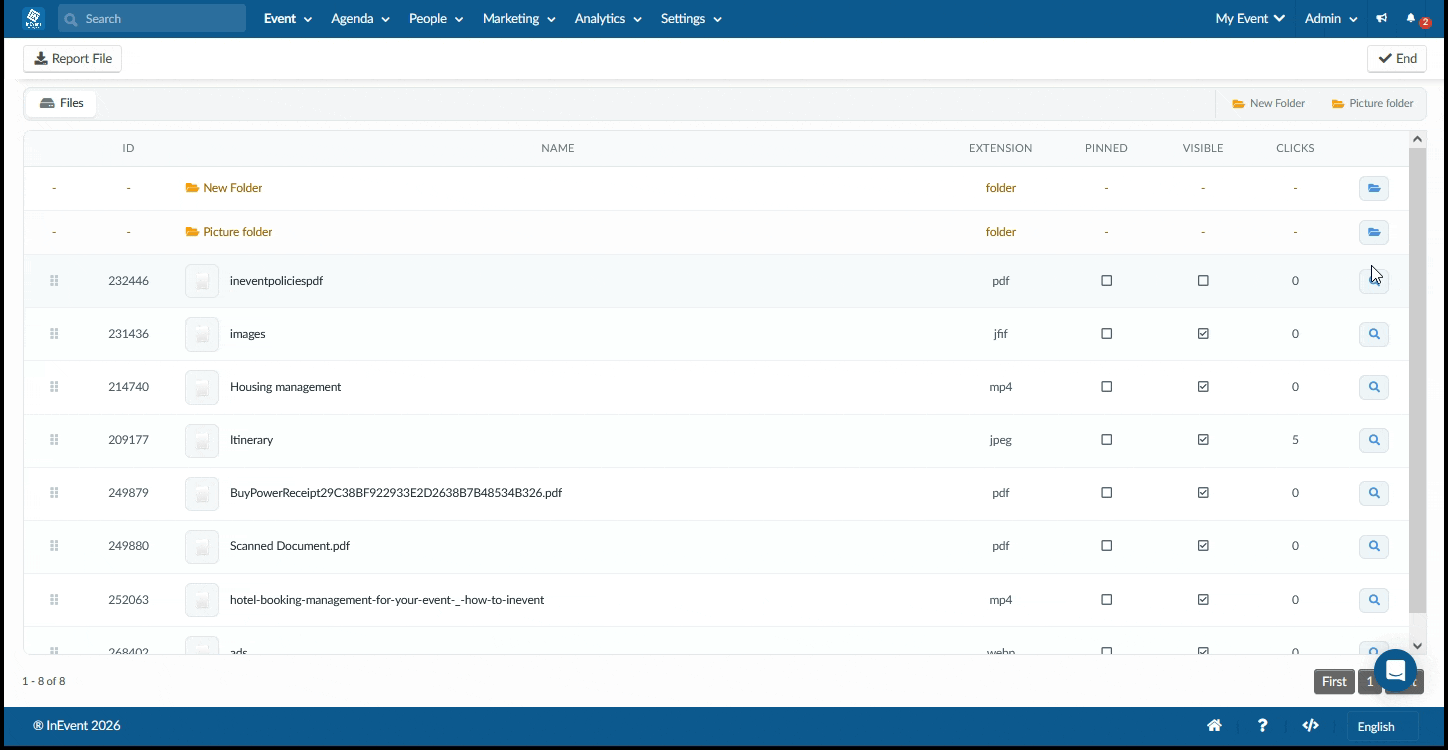
In List View, files are displayed in a structured table format. The following details are available:
- ID: The unique identifier assigned to each file.
- Name: The file name as uploaded to the platform.
- Extension: The file type or format (e.g., PDF, JPEG, MP4).
- Pinned: Indicates whether the file has been pinned for quick access.
- Visible: Defines whether the file is visible to attendees.
- Clicks: Displays the total number of times the file has been accessed.
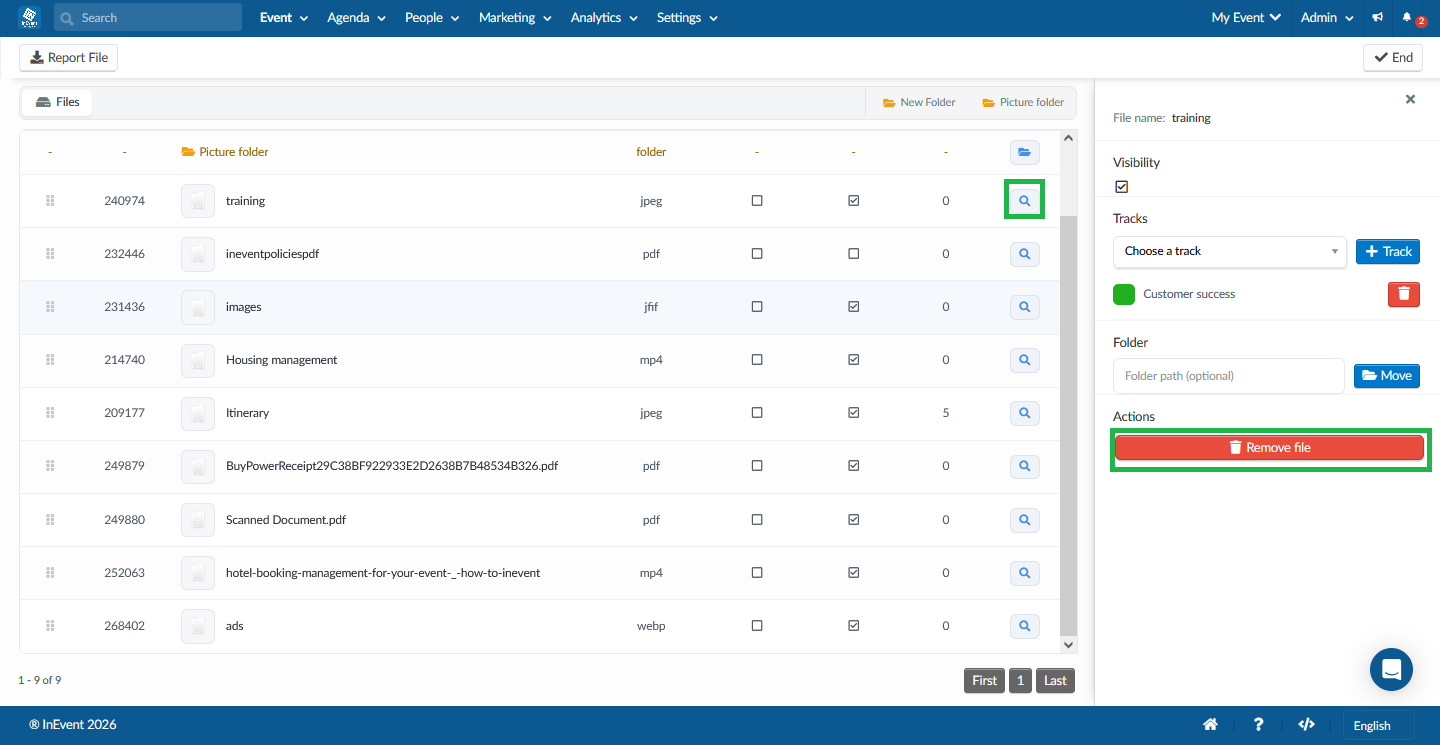
Organizers can modify the Pinned and Visible status by selecting the file, clicking Edit, and checking or unchecking the corresponding boxes. They can also edit the visibility of the file by clicking on the blue button corresponding to the file, which will open the file detail card from the right-side of the screen. Here you can edit visibility, add tracks and perform action like remove file as shown below.
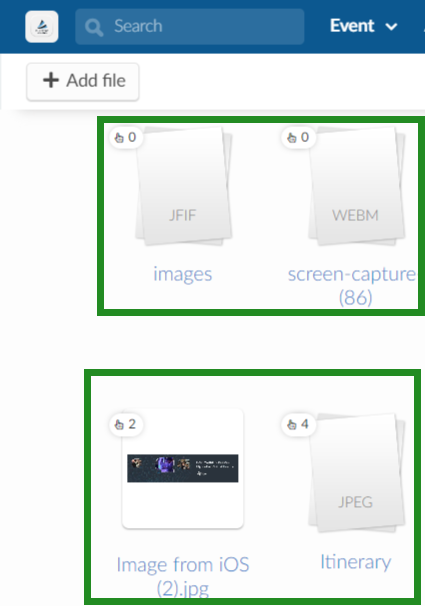
Gallery View
In Gallery View, files are presented as visual icons. Each file icon displays:
- The file name
- The file format
- The click count
This view provides a more visual approach to browsing files compared to the table-based list view.
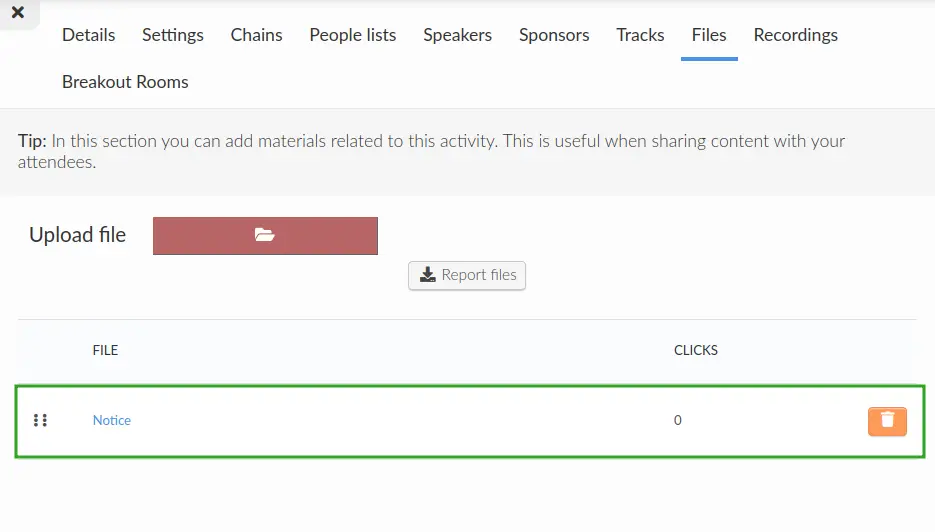
Activity files: Uploading files to activities
Event organizers can easily upload a file to a specific activity. To do so, complete the following steps:
- Navigate to Agenda > Activities.
- Select the activity to which your file will be added.
- Click the Files tab.
- Click Edit.
- Press the red button to open the file selector.
- Select your file. The file upload will automatically begin. Once the upload process is finished, you will be prompted to enter a file name.
- Enter your file name in the Create file pop-up box.
- Press Create to finish uploading and creating your file.
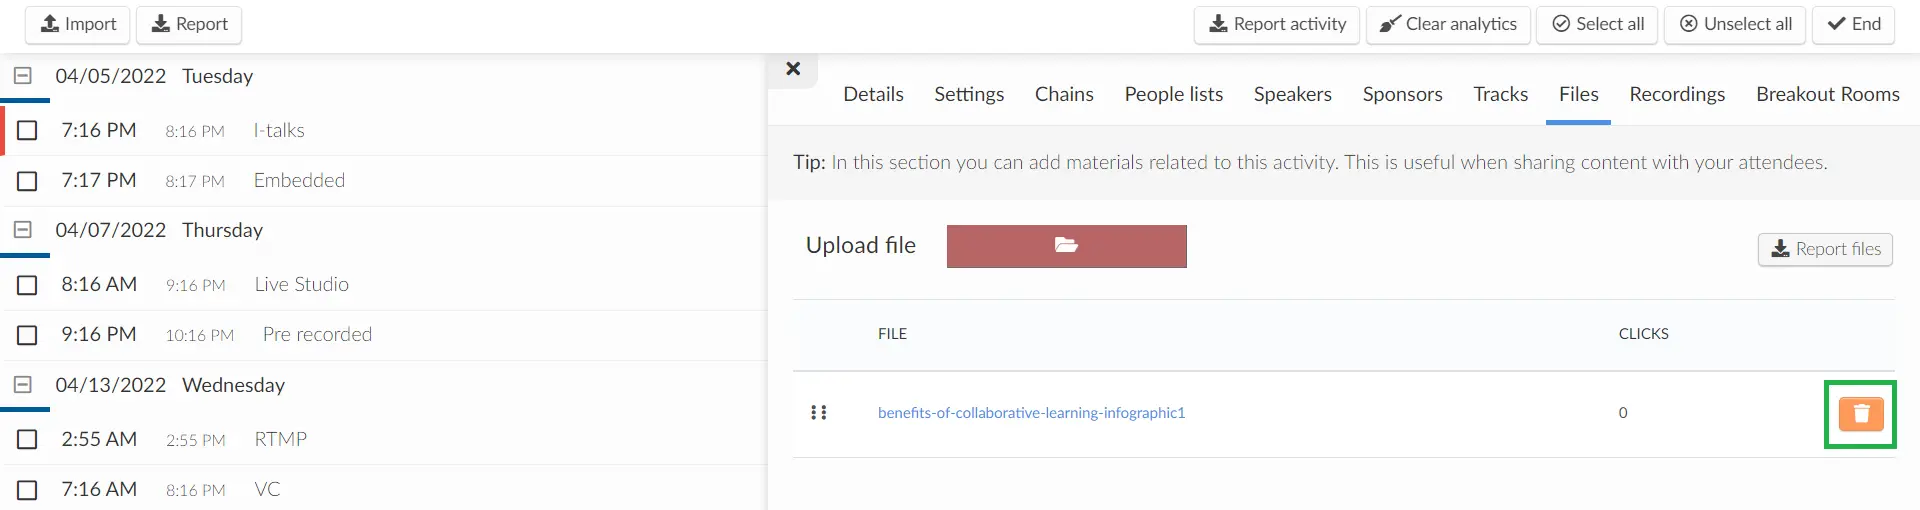
Once your file is uploaded and created, a new list entry will be added to the Files tab with the file name and click count, as shown below:
Adding files from the Virtual Lobby
Activity Files: Uploading files in an activity
To upload a file directly to an activity in the Virtual Lobby, follow the instructions below:
- Navigate to the Files tab from an activity.
- Click the paper plane icon to Upload a file.
- Select your file.
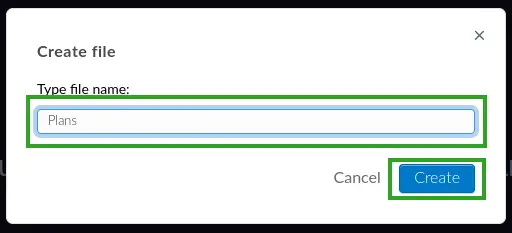
- Press the paper plane button to Send and upload your file. A pop-up box will appear.
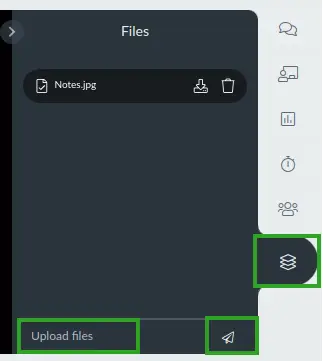
- Enter your file name in the Type file name field.
- Press Create to finish uploading and creating your file.
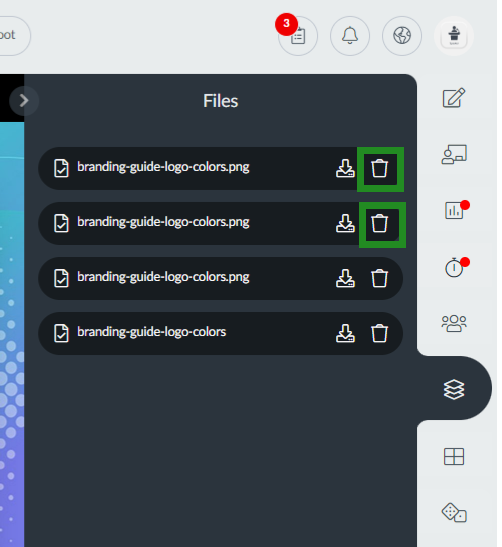
Once your file is uploaded and created, it will be visible from the Files tab in the activity, as shown below:
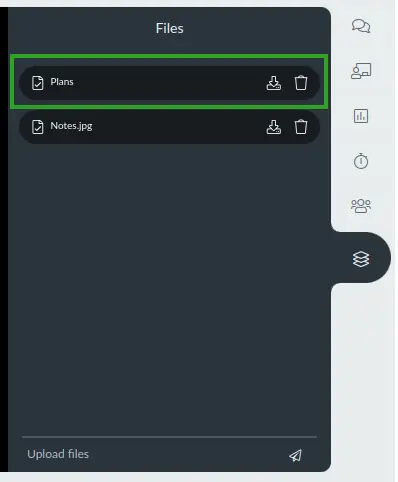
The files will also be visible from My Files in the Virtual Lobby, as shown below:
Uploading files in the My Files tab
Files can be uploaded directly from the Virtual Lobby using the File Manager. To do so, refer to the following instructions:
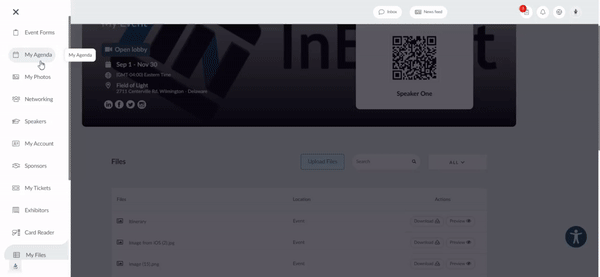
- Navigate to My Files from the Virtual Lobby.
- Click the Upload Files button. A pop-up box will appear.
- Press Click to upload to open the file selector or drag & drop your files from a file explorer into the Upload a file box.
- Click Next to start uploading your file. Once your file is uploaded, you will be prompted to link your files to a specific activity or location.
- Use the Select a session type drop-down menu to choose the file's destination: Event/Webinar, Exhibitors, Sponsors or Activities.
- Use the Session name drop-down to choose the specific activity, sponsor or exhibitor room.
- Press Upload files to finish uploading and creating your file.
The newly uploaded file will immediately be visible from the File Manager and from the linked Activity, Exhibitor, or Sponsor room.
Uploading Files to activities from the My Agenda page
If you are an Admin, Staff, Presenter, or Linked Speaker, you can upload files to activities directly from the My Agenda page. To do this, navigate to the My Agenda page from the left menu of the Virtual Lobby.
For Admins and Staff:
- Click on the Details button of the activity you want to add a file to under the Agenda tab.
- Click on the Upload Files button under the Materials section.
- Select your file from your computer or drag and drop it into the box.
- Click Next. The file will be uploaded and displayed under the Materials section.
For Presenters and Linked speakers:
- Click on the My sessions tab which appears before the Agenda tab.
- Click on the Details button of the desired activity.
- Click on the Upload Files button under the Materials section.
- Select your file from your computer or drag and drop it into the box.
- Click Next and the file will be added and displayed under the Materials section.
Files uploaded here will also be displayed in the My Files tab.
Can all permission levels upload files? Permission levels that can upload files
Most permission levels are able to upload files from the file manager, however, each permission level is restricted to uploading in certain rooms. An admin or staff are the only permission levels that are able to upload files in all rooms.
- Admins & Staff can add files to the Event/Webinar itself or any room of choice (activities, sponsor rooms, exhibitor rooms).
- Hosts can only upload files in the activity in which they have been assigned to host.
- Presenters can only add files to all activities.
- Linked speakers can only add files to the activity they have been linked to.
- Linked sponsor/exhibitor reps can only add files to the sponsor or exhibitor rooms they are assigned to."
- Collectors & Interpreters, as well as Users cannot upload files.
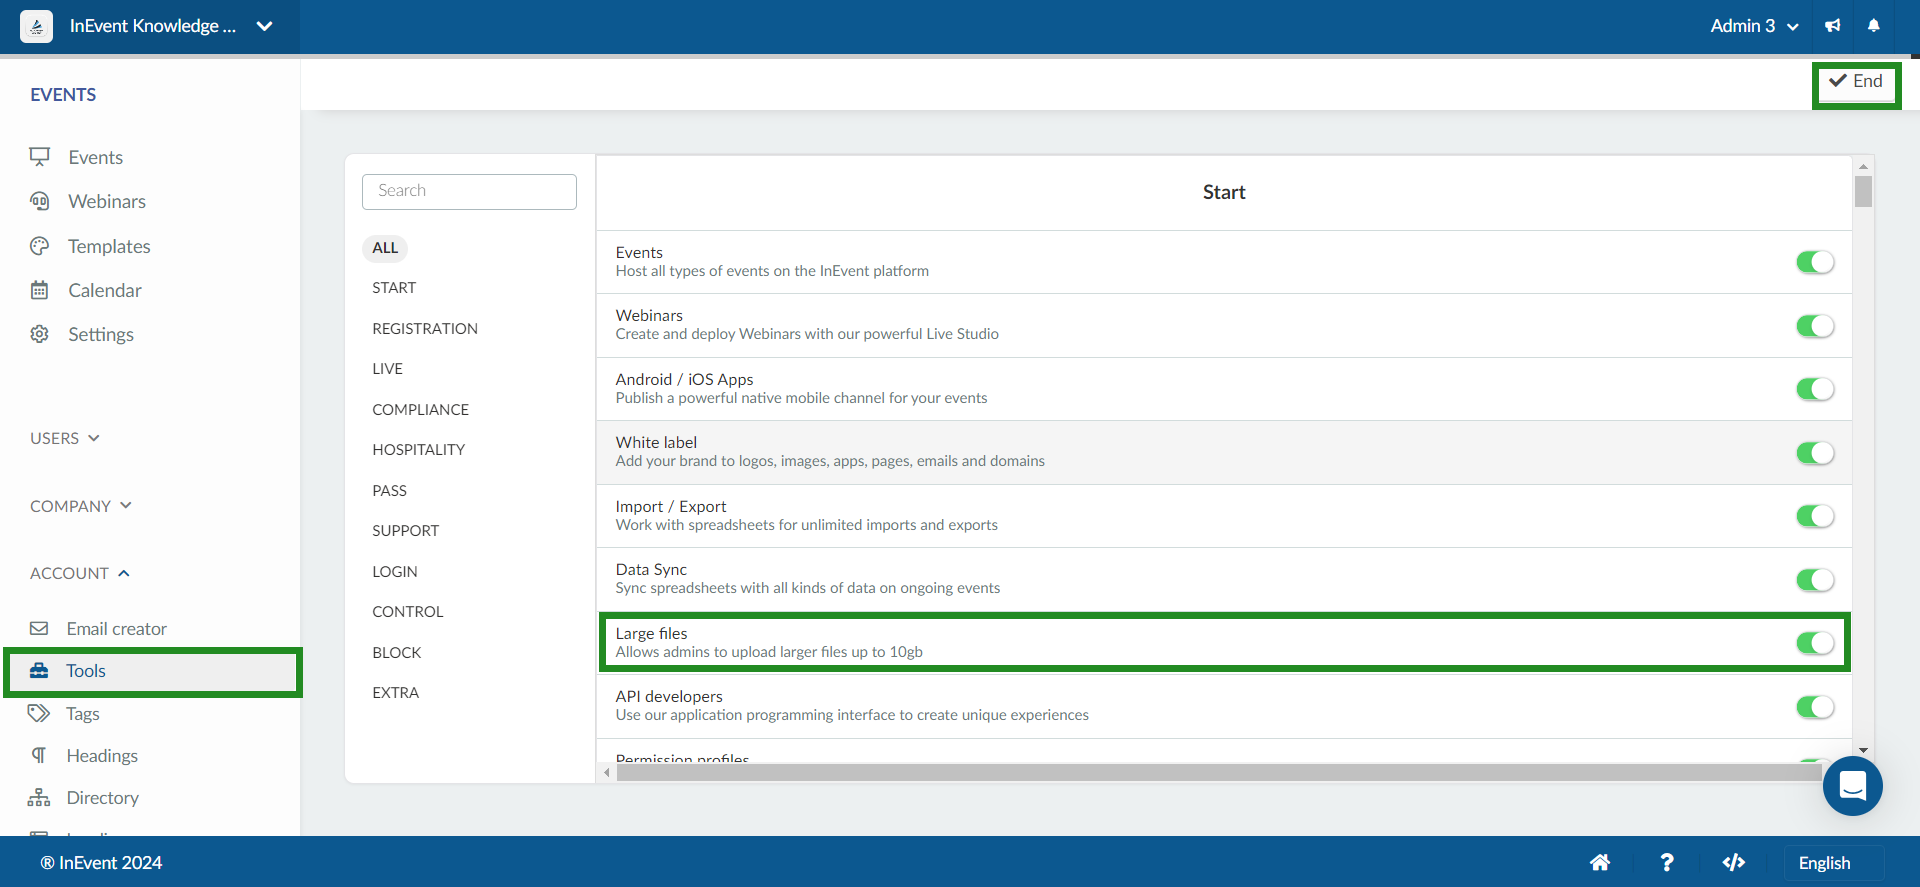
Uploading Large Files
The Large files tool is an add-on feature that allows you upload files larger than 100MB. With the Large files tool enabled, you can upload files and videos up to 5GB in size.
To access this feature, navigate to Account > Tools at the company level, locate the Large files tool under the Live section and enable the tool.
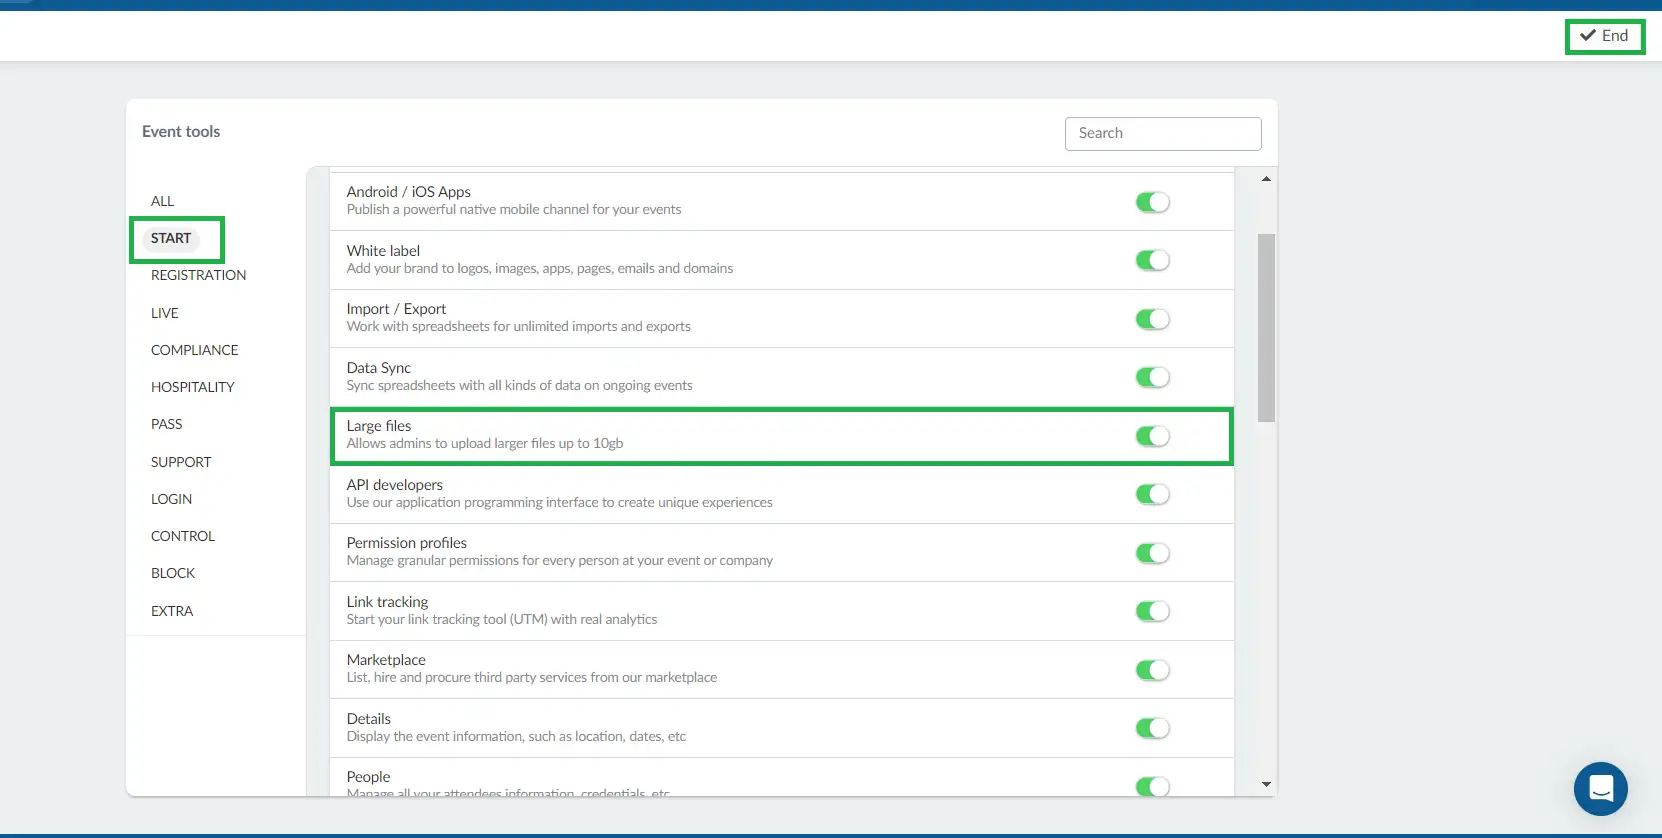
Once this feature is purchased, follow these steps to enable it in your event:
- Go to Settings > Tools.
- Scroll down to Large files under the Start section.
- Click on Edit and enable the toggle button beside Large files.
- Press End to save your changes.
Alternatively, the Large files tool can be enabled in your event from the Files page. Click on the Settings button located on the top right corner of the Files page. Then, click on the toggle button next to Large Files, as shown below.

Adding files to sponsor and exhibitor rooms
Refer to the Sponsors and Exhibitors: People, Invite, Files, Ads, Tickets and Chats article to learn how to upload files that will be available in your sponsor and exhibitor rooms.
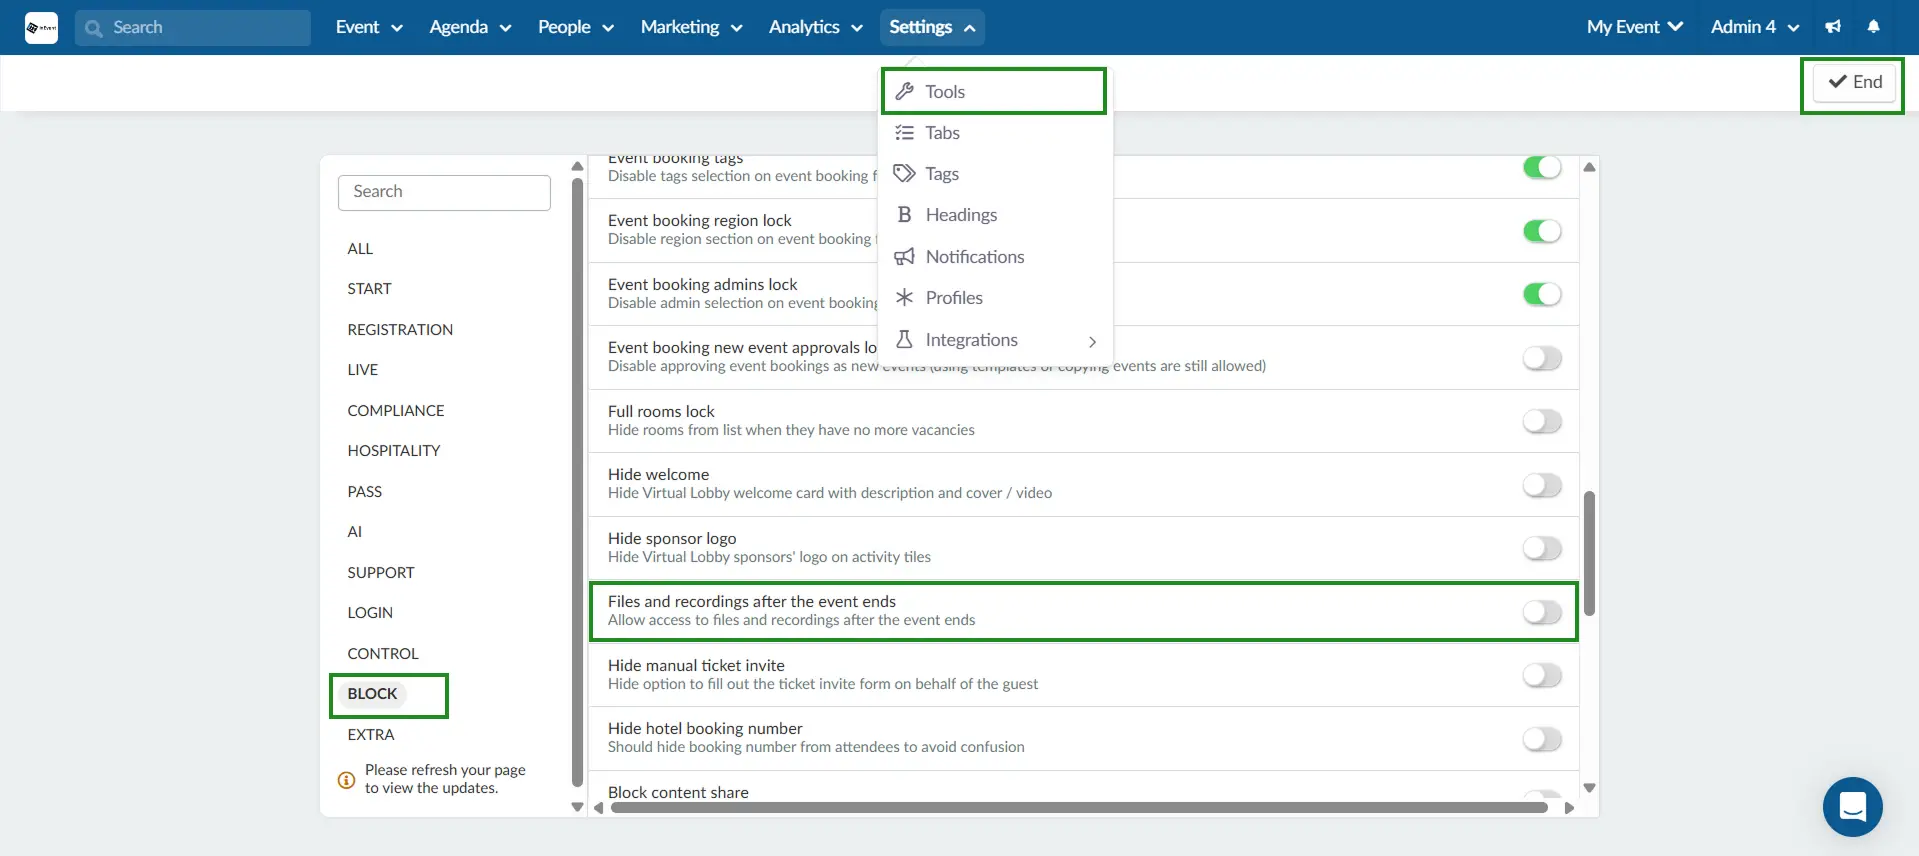
Post-event file restrictions
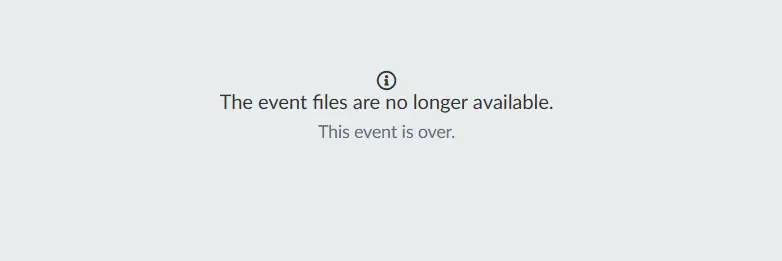
You can prevent users from accessing files after your event has reached its end date by disabling the Files and recordings after event date tool. This will block access to all files, whether attached to activities or displayed in the My Files tab, ensuring that attendees can no longer view or download them once the event ends.
To disable the tool:
- Navigate to settings > tools
- Select the Block section
- Locate the option Files and recordings after the event ends.
- Toggle the button off to disable access.
- Click on End to save changes.
Once disabled, this will prevent users from accessing event content such as files, photos, and session recordings.
Deleting a shared file
Deleting event files (from the Files tab on the app and Virtual Lobby)
To delete a shared file, follow these steps:
- Go to Event > Content > Files.
- Press the Edit button at the top right corner of the page.
- Choose the file you wish to delete and an editing tab will appear on the right-hand side.
- There, press the orange Remove file button.
- A popup message will appear, press the red button Remove to confirm.
- Press End to save your changes.
Deleting files from activities on the platform
To delete a file from an activity, go to Agenda > Activities > select an activity and then in the right side corner press Edit > Files.
You will see an orange button with a trash icon close to each file you have updated. Click on it to delete the file from this activity.
Deleting files from activities in the Virtual Lobby
If you are an Admin, Staff, Presenter or Linked Speaker (to the specific activity), you can delete files inside an activity. To do this, simply click on the File tab on the right-hand side and press the trash icon beside the file you want to remove.
Editing files
When you upload files to the entire event, you will have the possibility to choose their visibility and add tracks.
Visibility: To set the visibility, click on top of the selected file, press Edit> and pick the visibility accordingly. Press End to save the changes.
Tracks: To select a track, click on the drop down menu of Tracks and select one of the tracks you have previously created in the Settings > Tracks page and then click on the blue +Track button.
Folder: To move a folder, input the name of the destination folder you wish to send the file to, then press Move. Note that the input is case-sensitive and if you enter a folder that does not exist it will create that folder.
Remove file: To remove a file, you can click on the orange Remove file button.
Viewing files in the Virtual Lobby
You can view the files in the Virtual Lobby from the My Files tab and the My Agenda tab as well as inside the room of an activity.
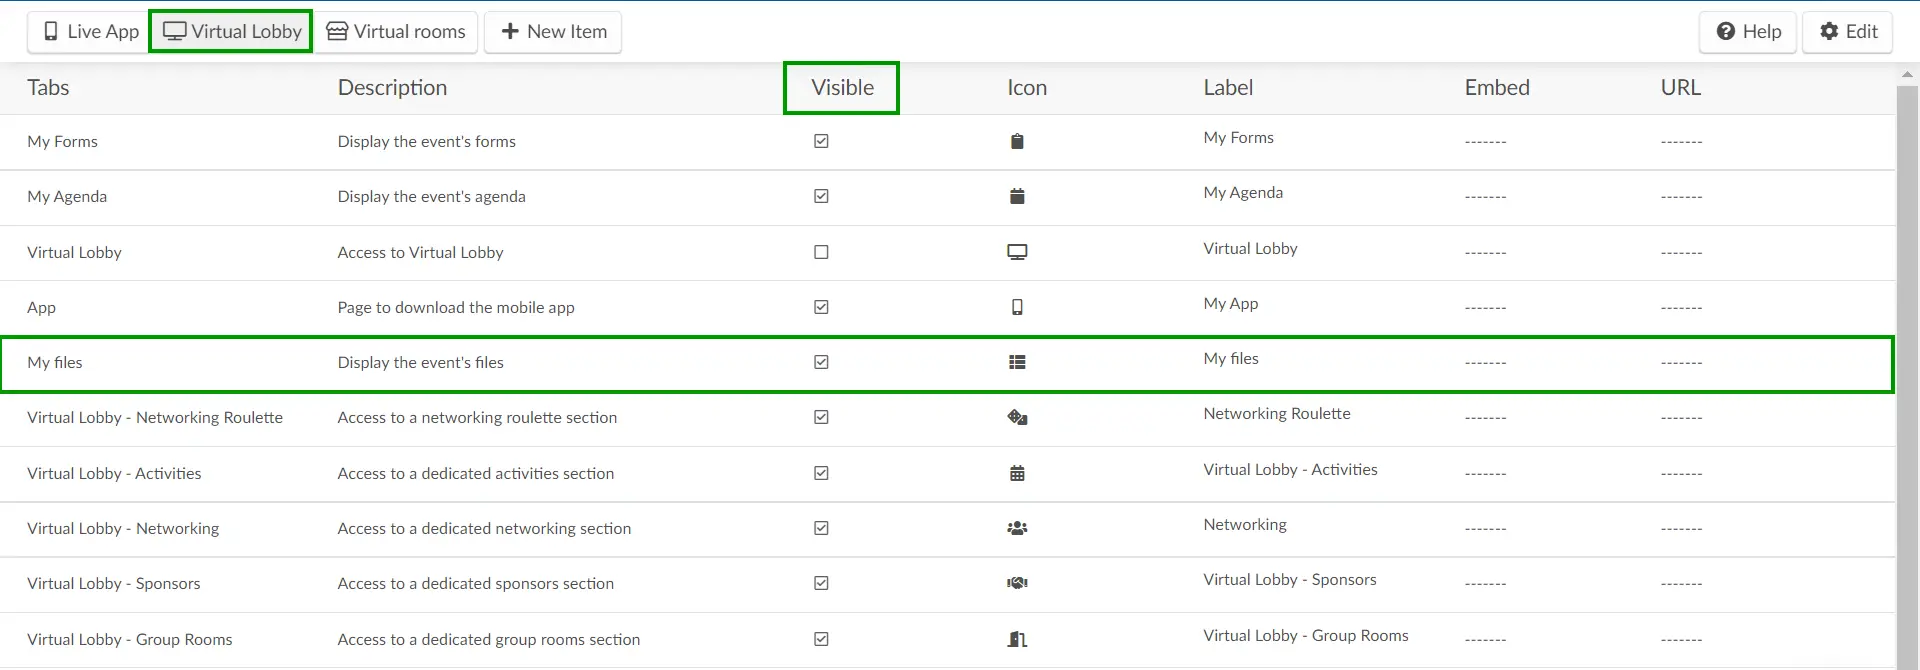
Enabling My Files tab
If you wish to have a dedicated page for files in the Virtual Lobby, go to Settings > Tabs and click on Virtual Lobby. Then, make sure the tab My files is set to Visible.
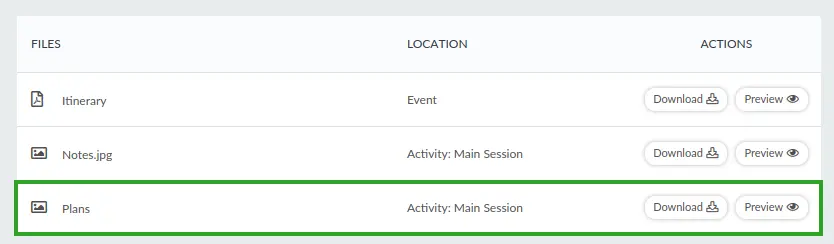
In the Virtual Lobby, attendees can access the dedicated page by selecting the My files in the menu on the left-hand side, as shown below:
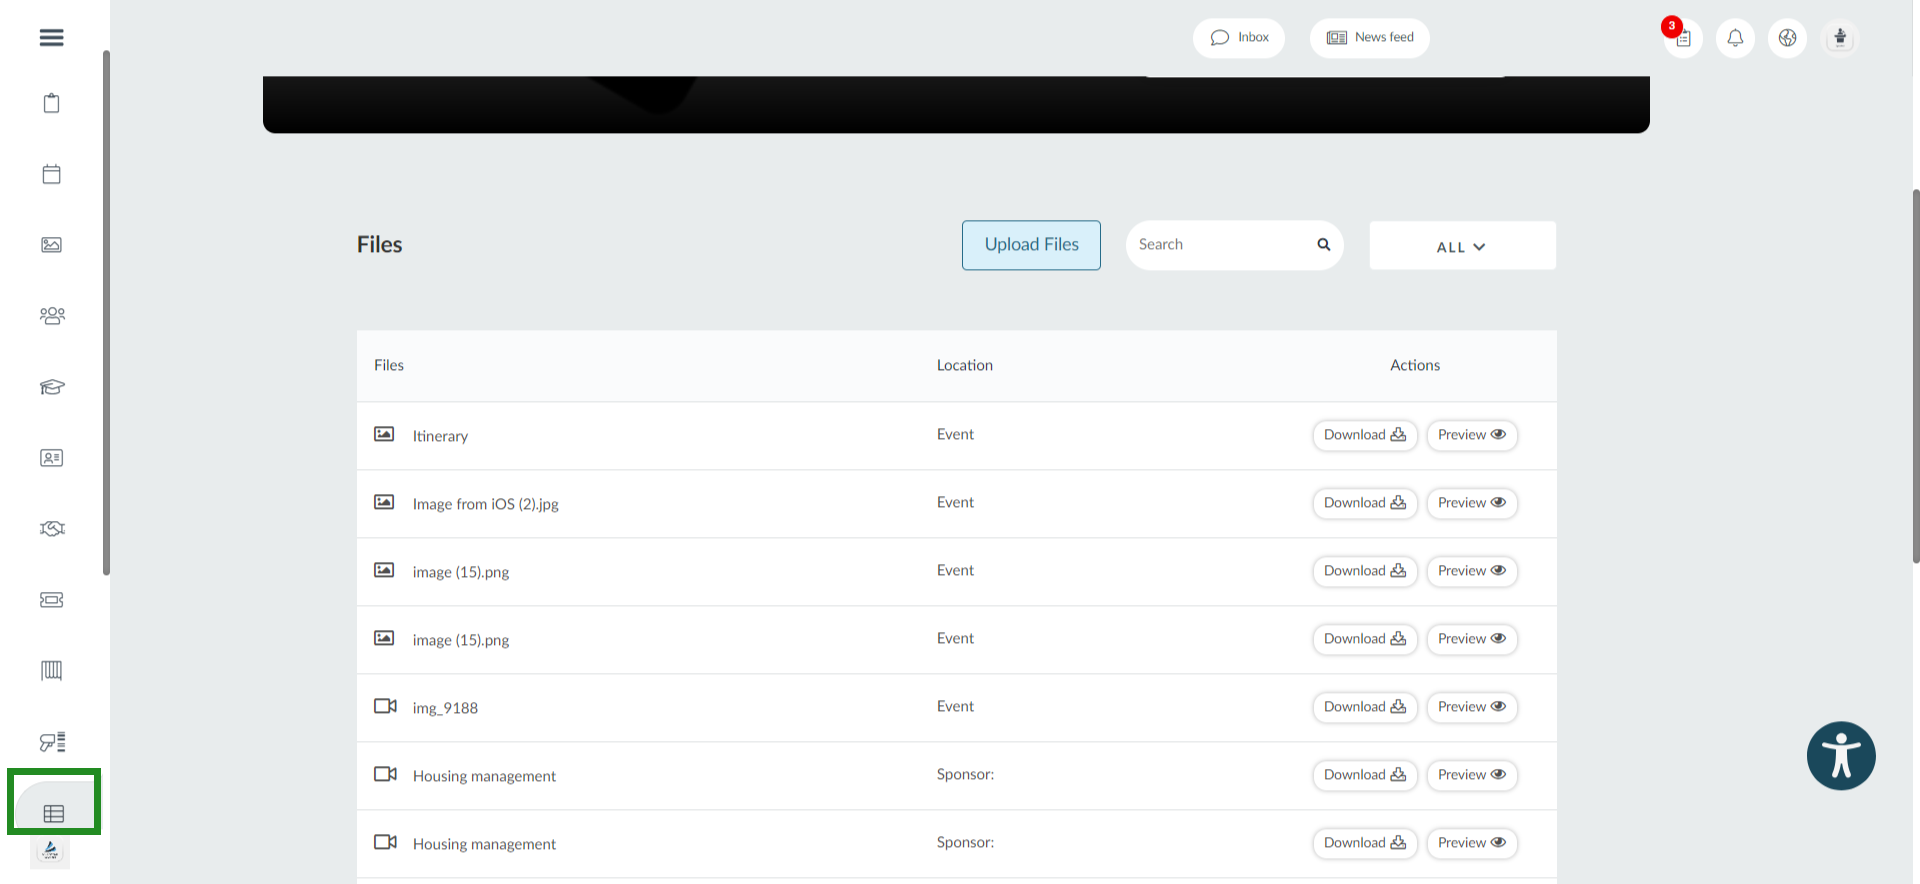
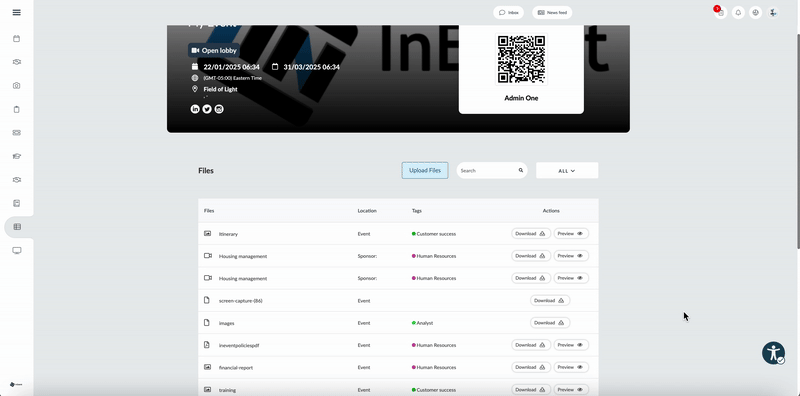
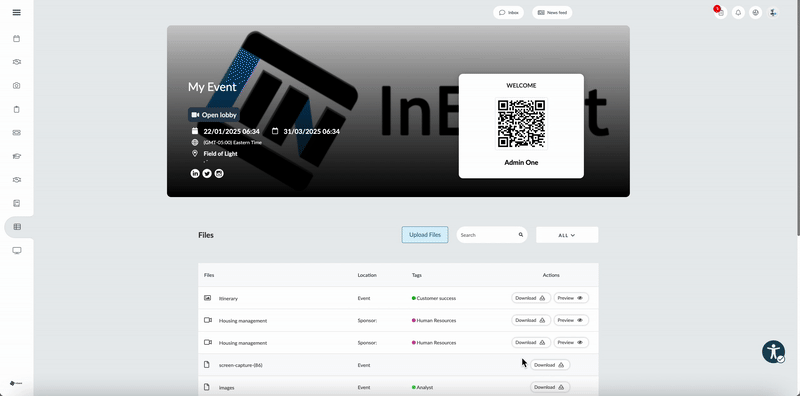
On this page, all event files will be listed, including their location (to which room this file has been added: event, sponsor, activity) with the option to either preview it or download it.
Searching for files
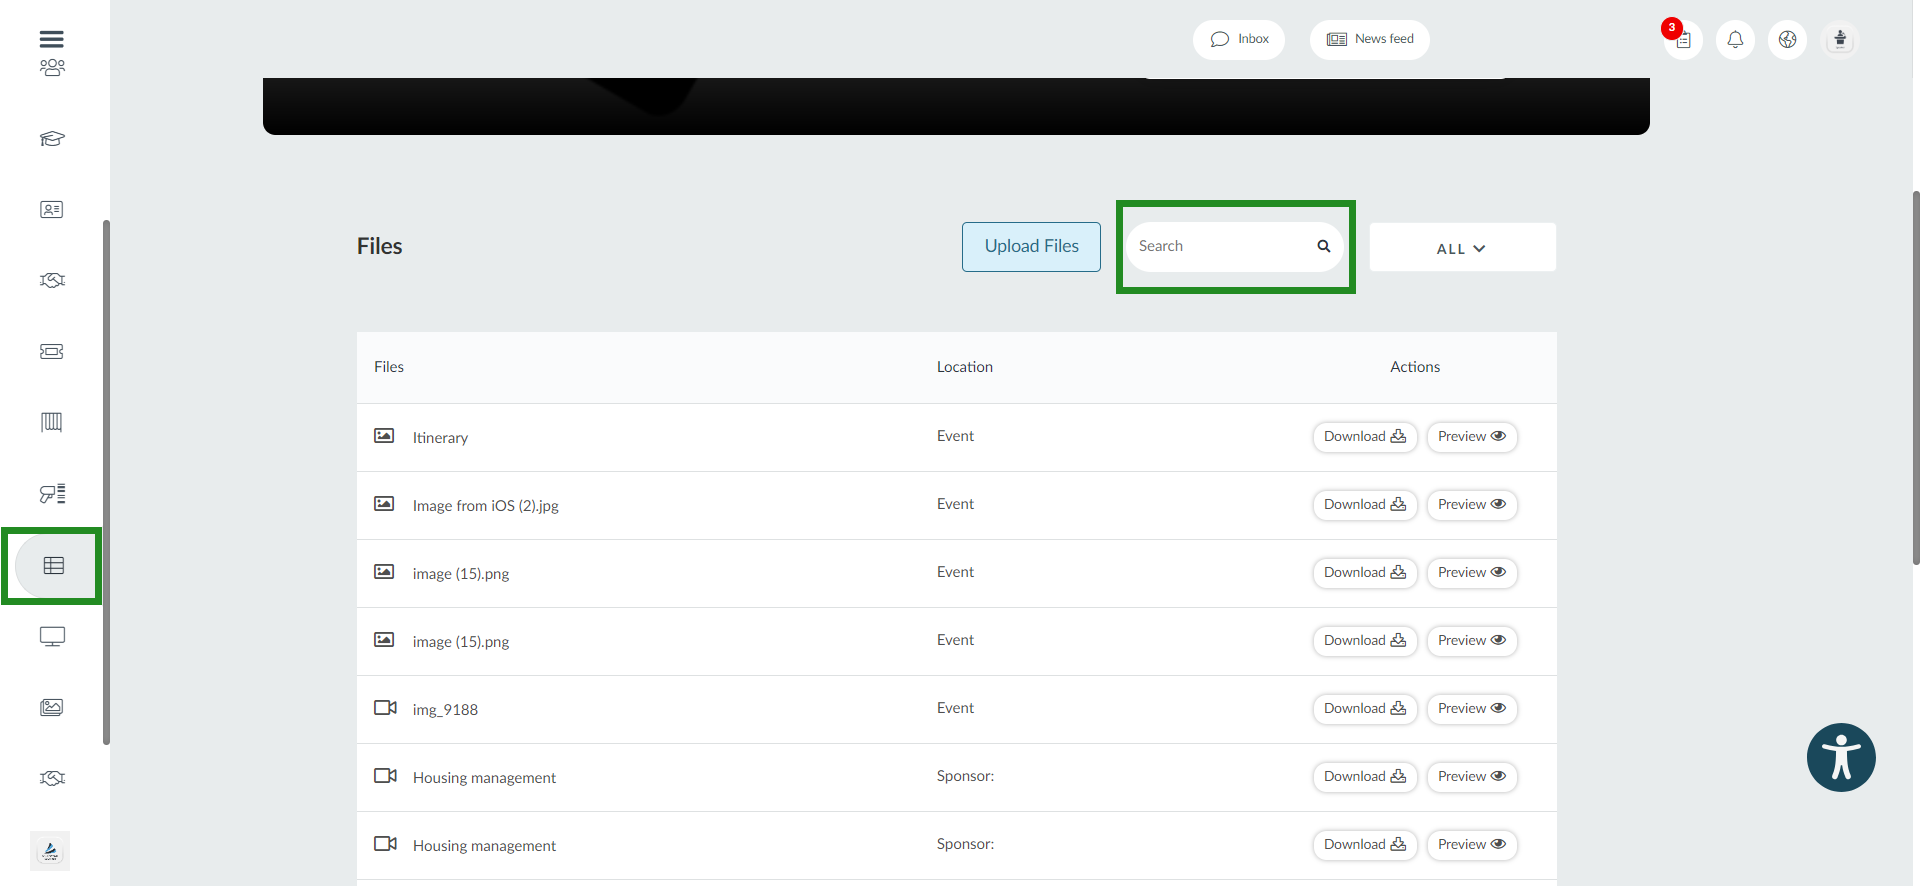
You can search for a file related to your event by typing the name in the Search button on the right hand side.
Filtering files
You can filter files by category or by tags.
- Filtering by Category
To filter files by category, click the Tags button and select the appropriate file category based on where the file was uploaded. Available options include:- Sponsors: Files uploaded in the Sponsor booth or the Event > Sponsors page will appear under this category.
- Activity: Files uploaded in the Agenda > Activities page, Activity room, or the Event > Content > Files page in the backend will appear under this category.
- All: Displays all files, regardless of tag or upload location.
- Filtering by Tags
To filter files using tags, click the Tags button and select the relevant tag:
My Agenda
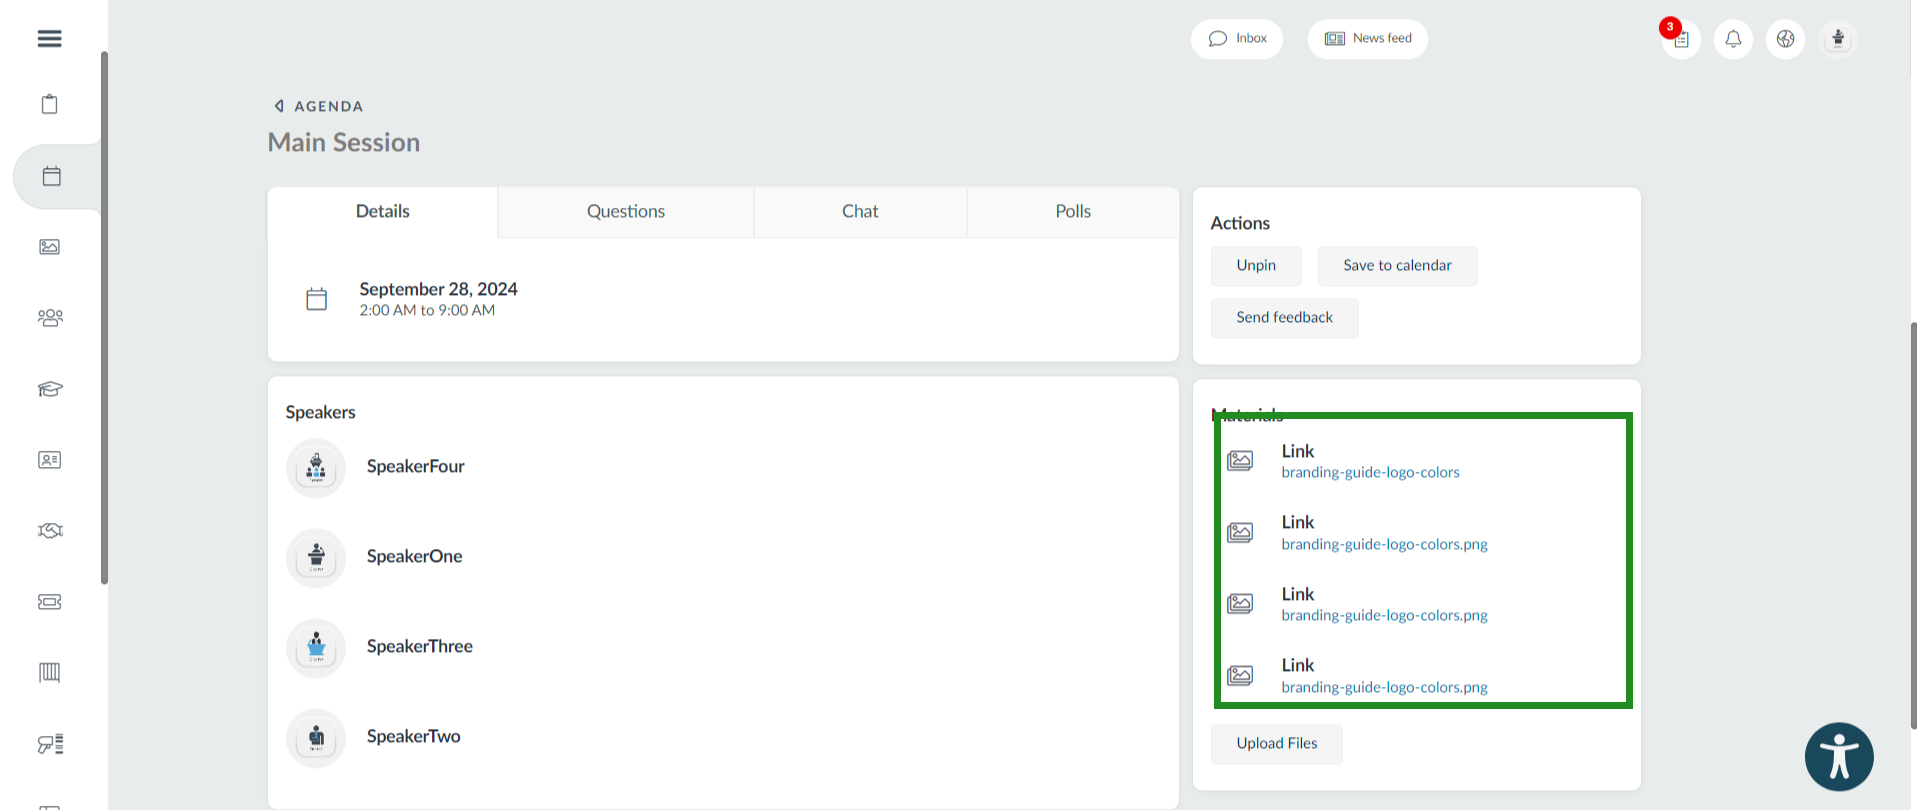
Attendees can access pre-uploaded files linked to an activity in which they had enrolled in their Agenda - refer to the My Agenda article to learn more about it.
To see all documents linked to an activity: choose the activity, click on Details. You should see the files under the Materials section.
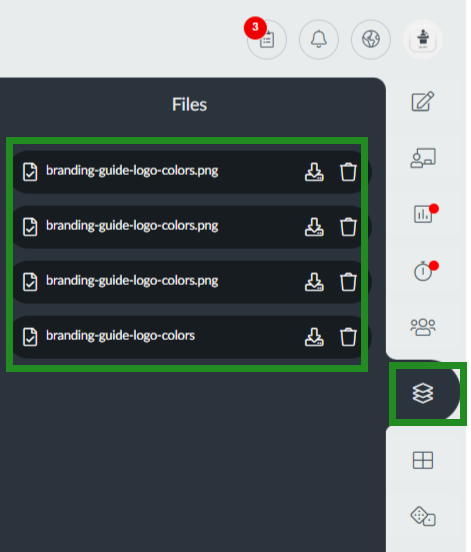
Inside the activity room
When inside a room in the Virtual Lobby, attendees can click on the Files tab to visualize all available files. They can preview and download the file from the specific activity's Files tab, as shown below
Viewing files in the app
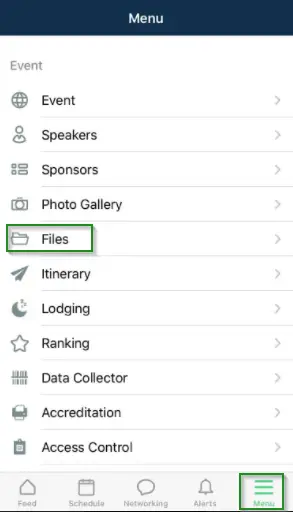
To view a file in the app, tap on Menu > Files. For your files to be displayed in this tab, they should be added to the platform via Event > Content > Files as mentioned above.
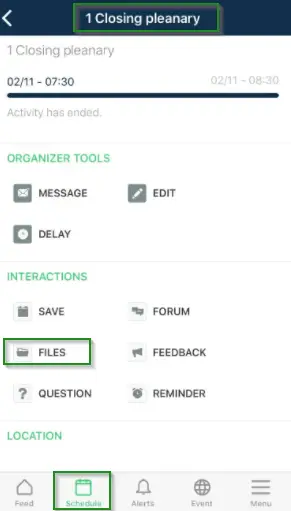
Viewing files in an activity using the app
Tap the Schedule tab in the app, choose an activity, and press Details > Files
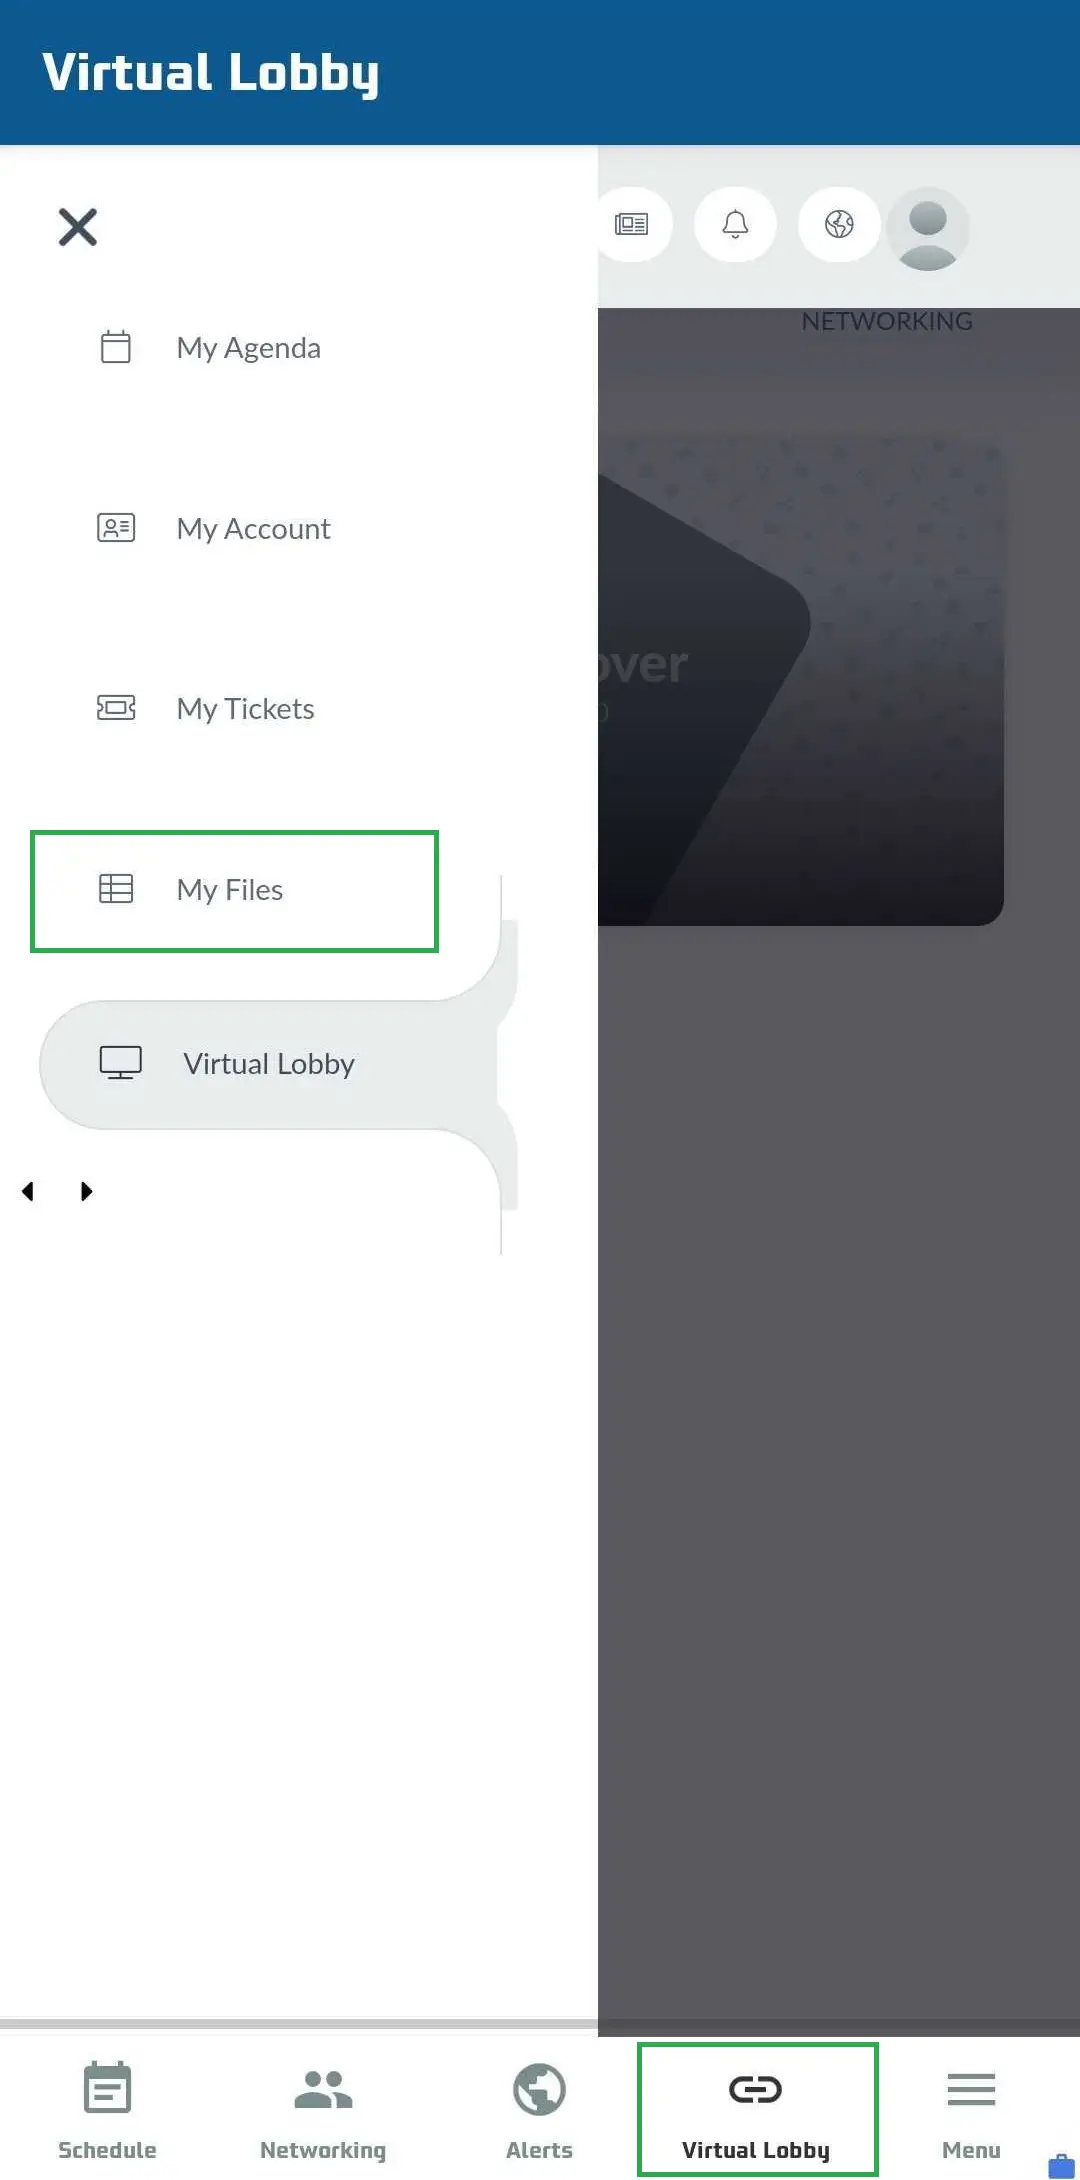
Viewing files in My Files tab using the app
If the Virtual Lobby is available on the app, you can also access the files via My Files tab.
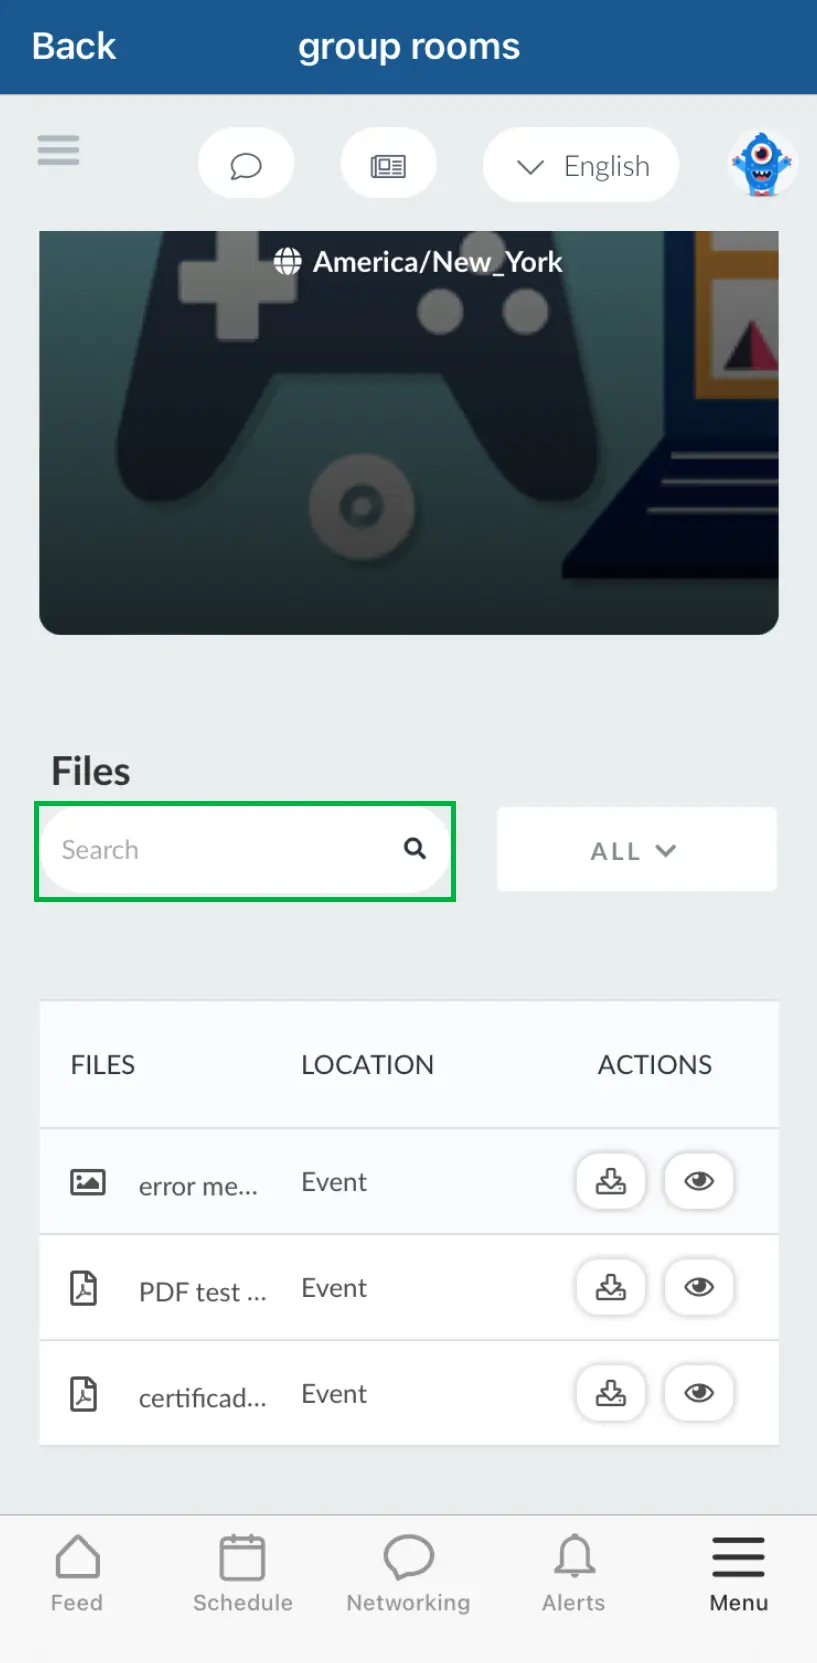
Search file
You can also easily search for a file related to your event by typing the name in the Search button on the left hand side.
Hiding files on the app
It is possible to hide files on the app and only make them available for attendees within the sessions listed in the schedule. To do so, go to Event > Virtual Lobby > Tools. Untick the checkbox for Files, and select End to save the changes.
Reporting activities' files
If you wish to generate a report on activities' files, you should select the activity > press Edit in the top right > select the Files tab > click Report files.
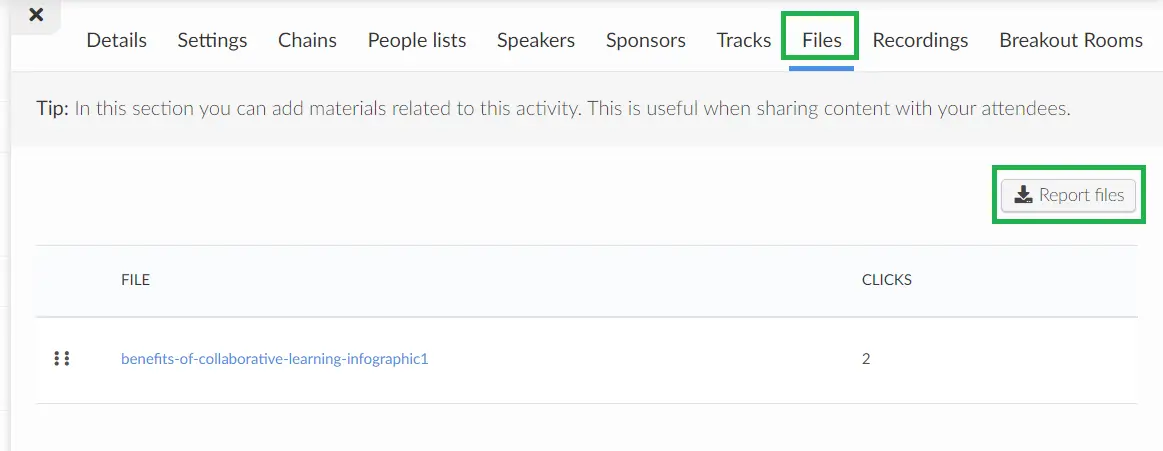
Once you click the button, a message will appear at the top of the screen, warning you that you will receive the file with the data in your email when the process is complete.
The spreadsheet will cover categories such as who viewed the file and how many clicks it got, the file URL, the first click date, among other data.
Reporting event files
You can download a report of all the event files that have been clicked under Event > Content > Files. This report will show you information about who viewed a file, the file name, the URL of the file, number of times the person clicked on the file during the event, and the date and time of the first click.
To download the report, follow the steps below:
- Go to Event > Content > Files.
- Click on Edit > Report File.
- You will see a blue notification popup letting you know that your report is being processed and will be sent to your email.