Importing and exporting spreadsheets
 Updated 3 months ago
by
Lorenzo
Updated 3 months ago
by
Lorenzo
You can import or export a spreadsheet that contains various types of information without having to add individual units one at a time. This article intends to teach you how to upload data in bulk through the use of a standard spreadsheet in Excel format.
Activating the feature
To activate this tool, go to Settings > Tools. Click on the Start section, press Edit and toggle the button corresponding to the Import/ Export tool on.

Characteristic of the spreadsheet
When importing or exporting the spreadsheet, bear in mind that: '0' is always for No and '1' is always for Yes.
For example, when importing the agenda's activities the column H says: 'It is an open activity? Anyone can sign up?' if you type '0' the automatic enrollment will be disabled. Because '0' means No.
Or to illustrate when exporting the file to check if the participants' agenda is full, if you see '0' means that the agenda is not full yet and '1' that the agenda is full.
Importing data using a spreadsheet
When importing data, you will have two options: you can either use the demo file provided by InEvent or your own spreadsheet.
Using the demo file provided by InEvent
To ensure all data is imported correctly, we highly recommend you to download and use the provided demo file, which you can then upload.
To download the demo file, go to the respective page and click on Edit > Import, and then select Download our demo file/Download demo file. The file will be downloaded to your computer and you will need to fill out the required fields.
Once you have entered your data in the excel sheet, upload the file back onto the platform by clicking Edit > Import and follow the 3 steps below:
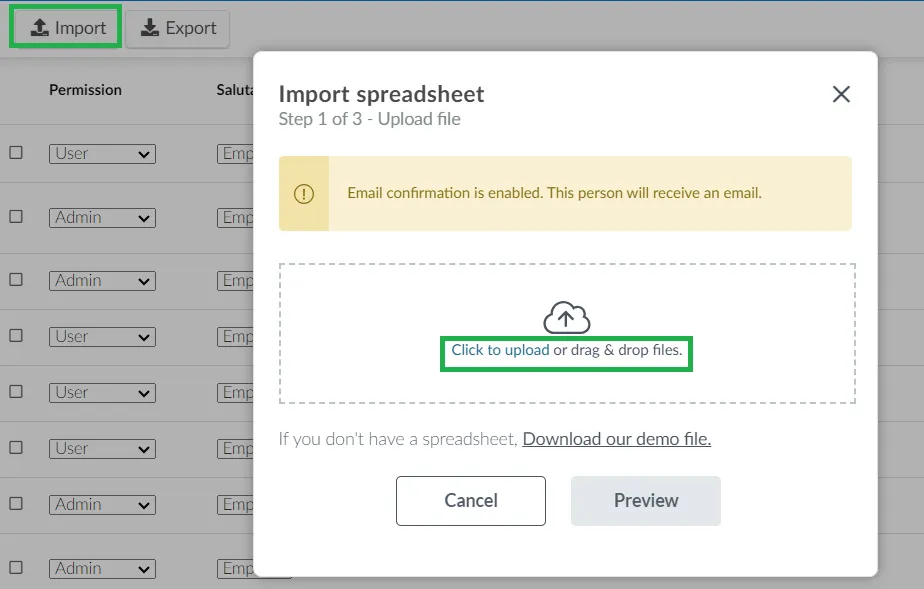
- Step 1 of 3 : Click the blue Click to upload button, select the excel file.

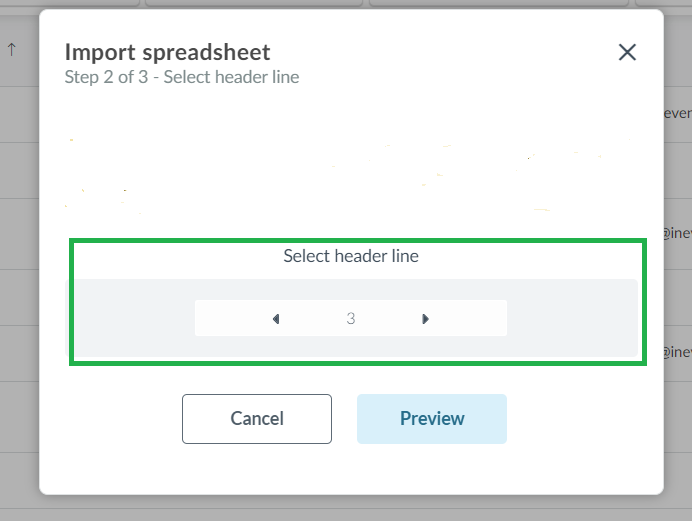
- Step 2 of 3: Click Preview and then click on Back to navigate to Step 2. Here, select the header line number (which matches the column titles: name, username, email, etc., in your spreadsheet) using the arrows. This ensures accurate mapping of the data to corresponding fields in the platform.
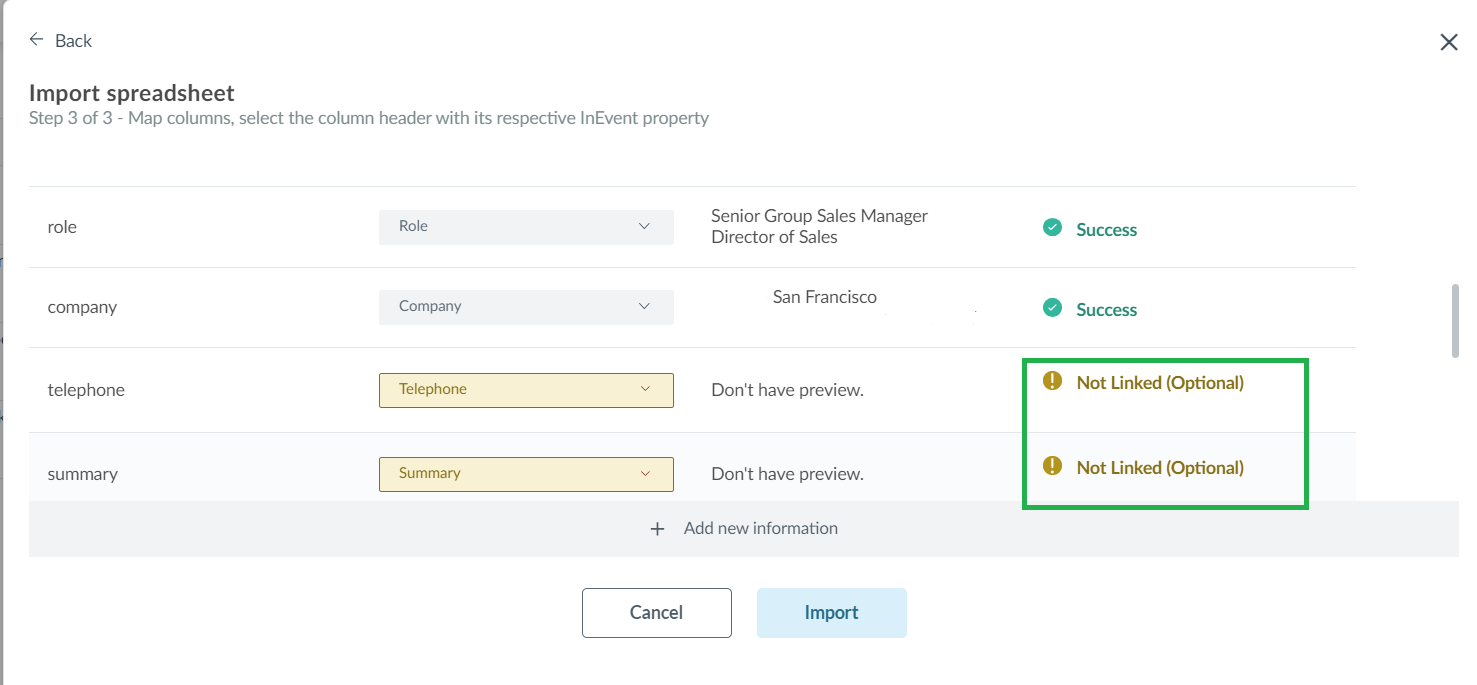
- Step 3 of 3: Click Preview again to preview the data that will be uploaded and click on Import once done.
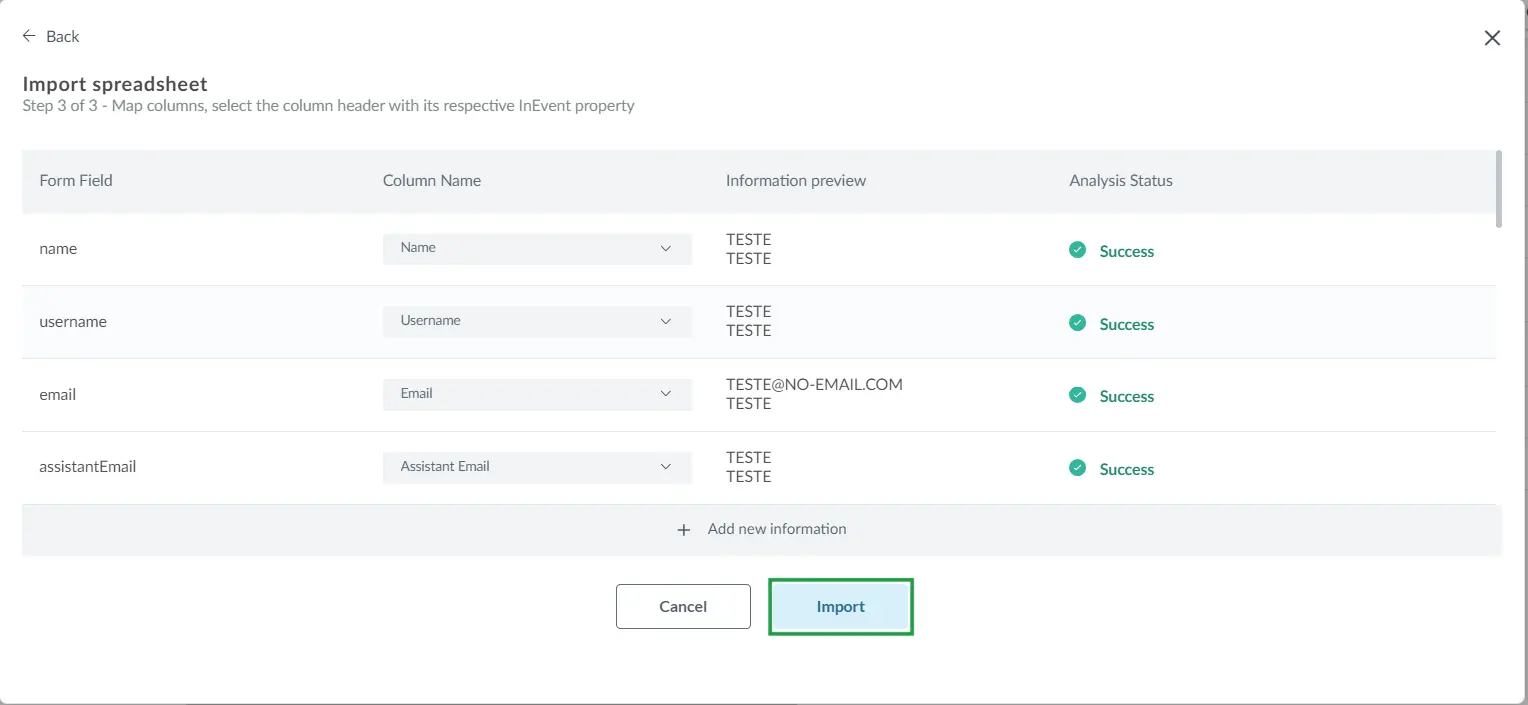
When a column is not completely filled, the Not Linked (Optional) message will appear beside the column.

Automatic attendee data updates via spreadsheet importation
InEvent facilitates automatic synchronization of imported attendee data onto the platform using auto-mapping. This means that if changes are made to specific attendee columns (such as salutation, name, role, email, password, etc.) in a row of information within a spreadsheet, and the spreadsheet is re-uploaded to the platform, the existing attendee data related to these columns for that particular row on the platform will be updated with the new information from the re-uploaded spreadsheet.
Using your own spreadsheet
To import your own spreadsheet, press Edit in the upper right corner, then click Import in the upper left corner of the screen. Then, click the blue button Click to upload and select the excel file you wish to import and press Preview.
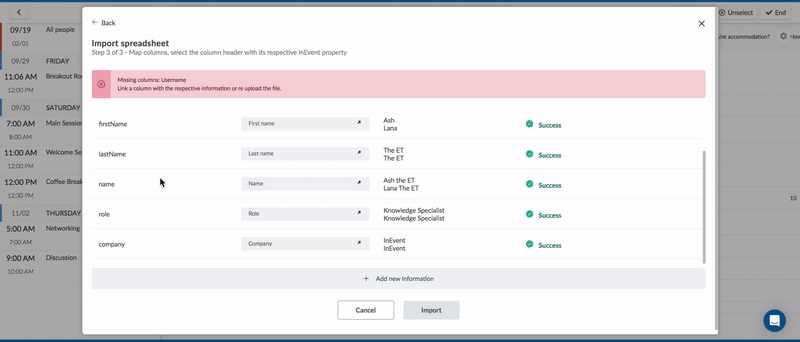
The text in red will specify errors made. Missing columns will tell you all the required fields that haven't been added yet. Once you have matched all the fields, press Import.
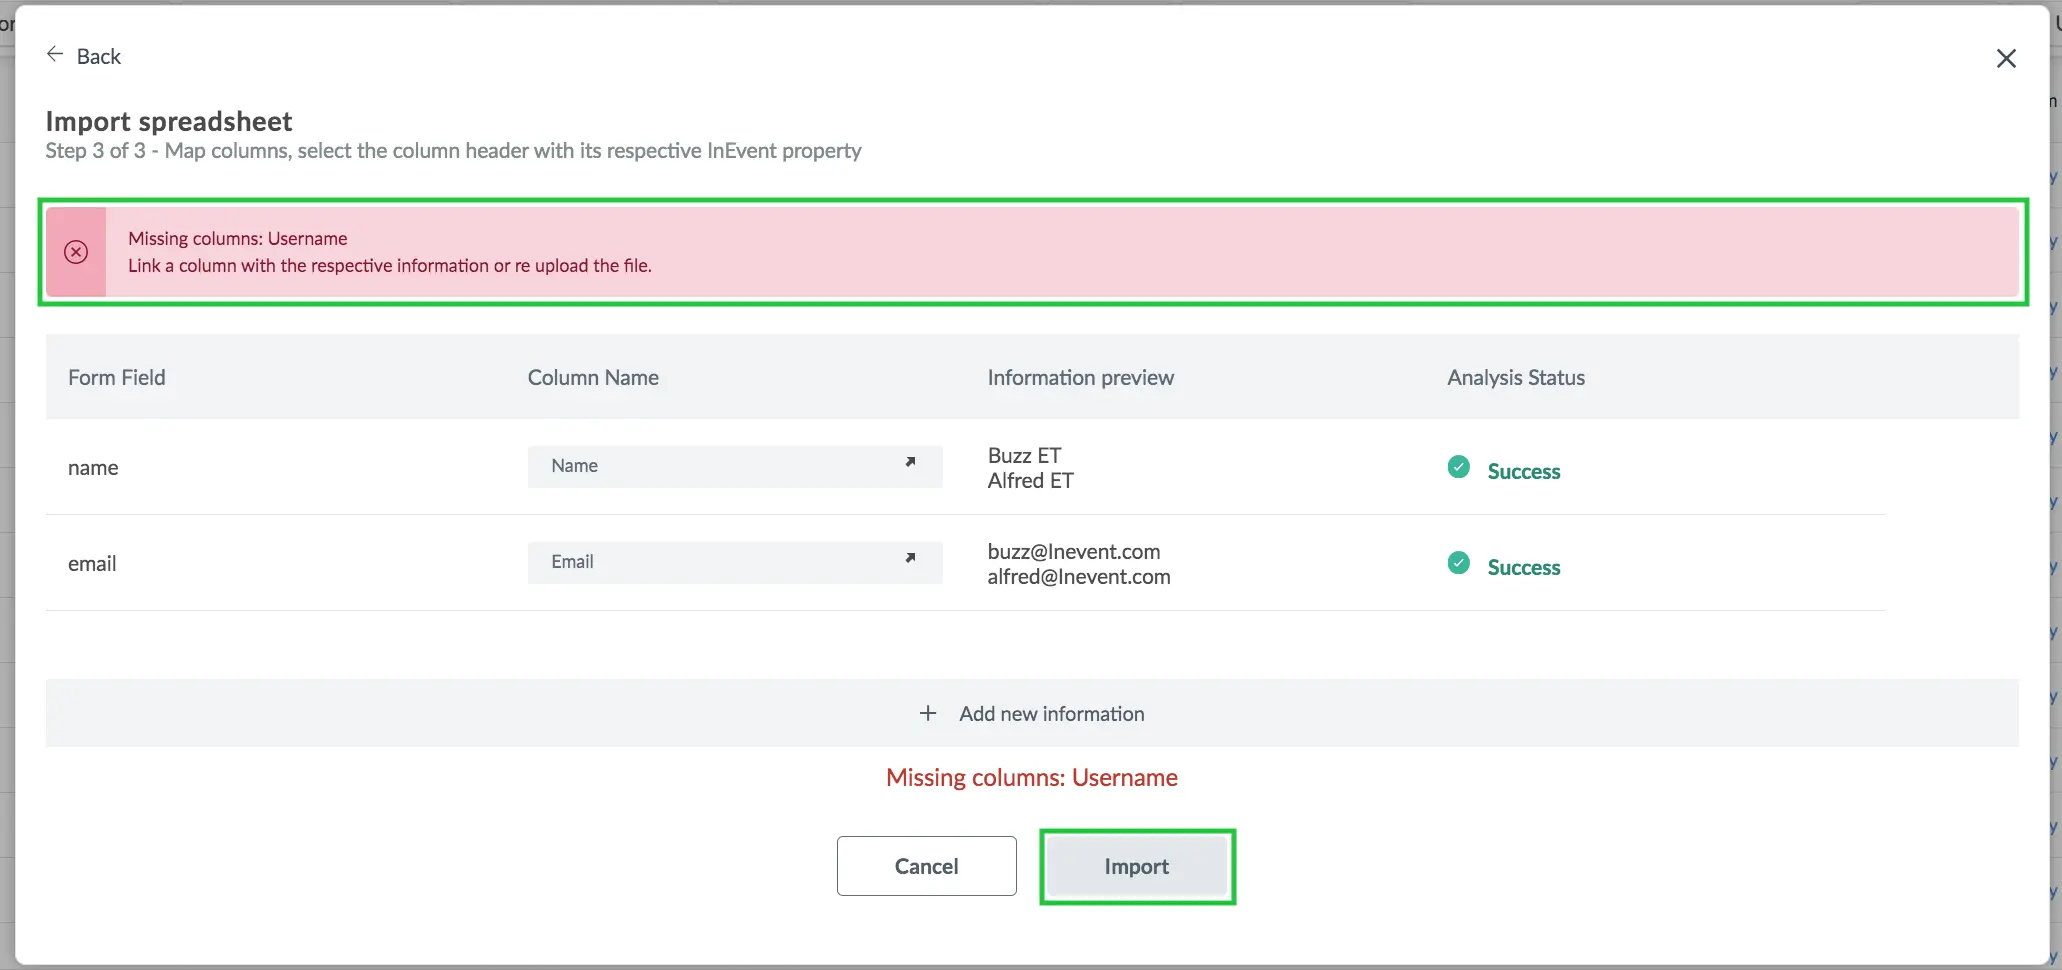
If a column is not completely filled in all rows within the spreadsheet, the message Not Linked (Optional) will appear beside the column.
Add new information
The import feature identifies fields in your own spreadsheet (Form Field) which are present in InEvent demo files and matches them automatically to fields InEvent is familiar with (Column Name).
Some fields are not identified because of the difference in label, you can manually add those fields and match them with fields InEvent is familiar with to ensure data is identified correctly.
To do so, click on + Add new information and click on the drop down menu, which contains fields that already exist on your spreadsheet, and select the desired field.
Processing time for importing spreadsheets
The processing time for importing spreadsheets will depend on how long your spreadsheet is, since it takes 1 second per row. For example, if you are uploading an attendee's spreadsheet containing information about 100 attendees, it should take less than 1 minute and 40 seconds.
While the spreadsheet is being uploaded, you will see a message informing you that your excel sheet is being processed:


Besides this pop-up message confirming that the excel sheet has been imported successfully, you will also receive an email:

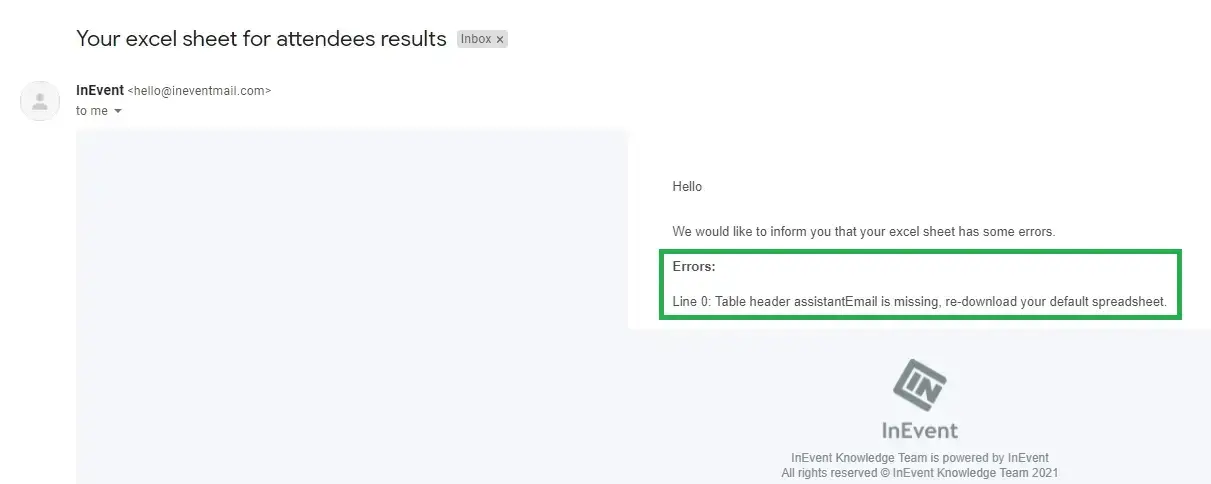
In case your spreadsheet couldn't be imported, an email will let you know the error.
Most common errors when importing attendees
Here we list the main errors that may take place when importing the attendee's list:
- Changes in the spreadsheet structure: deleting or inserting new columns or editing any of the spreadsheet’s headings makes it not recognizable by the platform. To fix it, download the Demo file and do not change its structure.
- Spacing at the e-mail column, formulas or special characters on the cells: when filling the e-mail column, check if any spacing or special characters like semicolons were not copied to the cell. This can also happen in other cells, when formulas are inserted (like VLOOKUP). The platform will not recognize the info and will import the file. To fix it, clean the spreadsheet (paste the values) before uploading it to the platform. Eliminate all spacing and special characters from the e-mail field. Also, eliminate special characters from the name field.
- Badges and Accreditation functionalities enabled: certain plans have the Badges and Accreditation features (My QR Code, Access control, Check-in) available. These features require the filling of the Role and Company fields in the attendee’s spreadsheet. Therefore, you should disable these features at your event tools previously to the importing of the spreadsheets if you do not wish to send this info to the platform. You can also properly fill in these data when building your attendee's spreadsheet to prevent this importing error from occurring.
- Confirmation e-mail disabled and no password filled at the spreadsheet: when you choose to disable the confirmation email in your event, it is necessary to set a password on the spreadsheet before importing it to the platform. This is a security measure from our side since it would not be possible for the attendees to access their individual accounts without a confirmation email or password.
- Registration date of the event hasn't begun or has ended: before importing an attendee's spreadsheet, make sure to check the begin and end of enrollment date at the event details. For further information, check the event details article to learn how to set the enrollment dates.
- Different list name than the platform: Make sure that when you add a list, it's name should be the same as in the platform, otherwise the user will not be added to the list.
- Semicolons with no list following: If you add a semicolon to the end of your lists and no list that follows then the user will not be added to the list.
Importing tags, sponsors, and speakers to activities
When adding tags, speakers, and sponsors to activities' spreadsheets, you can separate it by using commas.
Also when adding tags, speakers, and sponsors to activities' spreadsheets, if the provided tag, speaker, or sponsor hasn't been previously added to the platform, the system will create it automatically.

Exporting a spreadsheet
The InEvent platform also offers an export function for you to extract data from the platform. Refer to the Analytics: Viewing and extracting event reports article to learn how to extract and view reports.
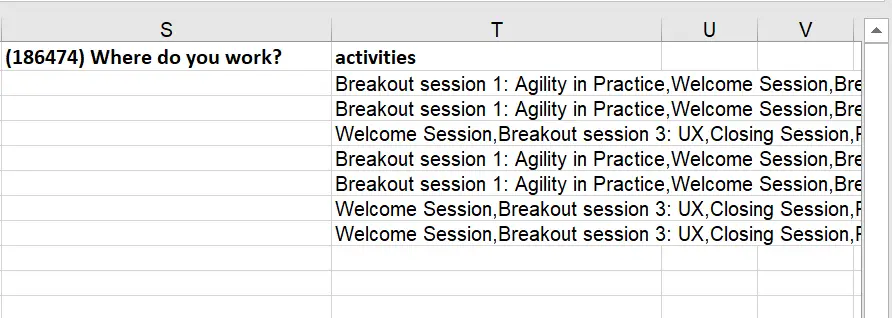
Reports displaying which activities the attendee is enrolled in
You can see all the activities in the spreadsheet reported from the Attendees and Leads page. To do that, go to Settings > Tools page and make sure you enable the Excel sheets with activities tool from the Extra section.
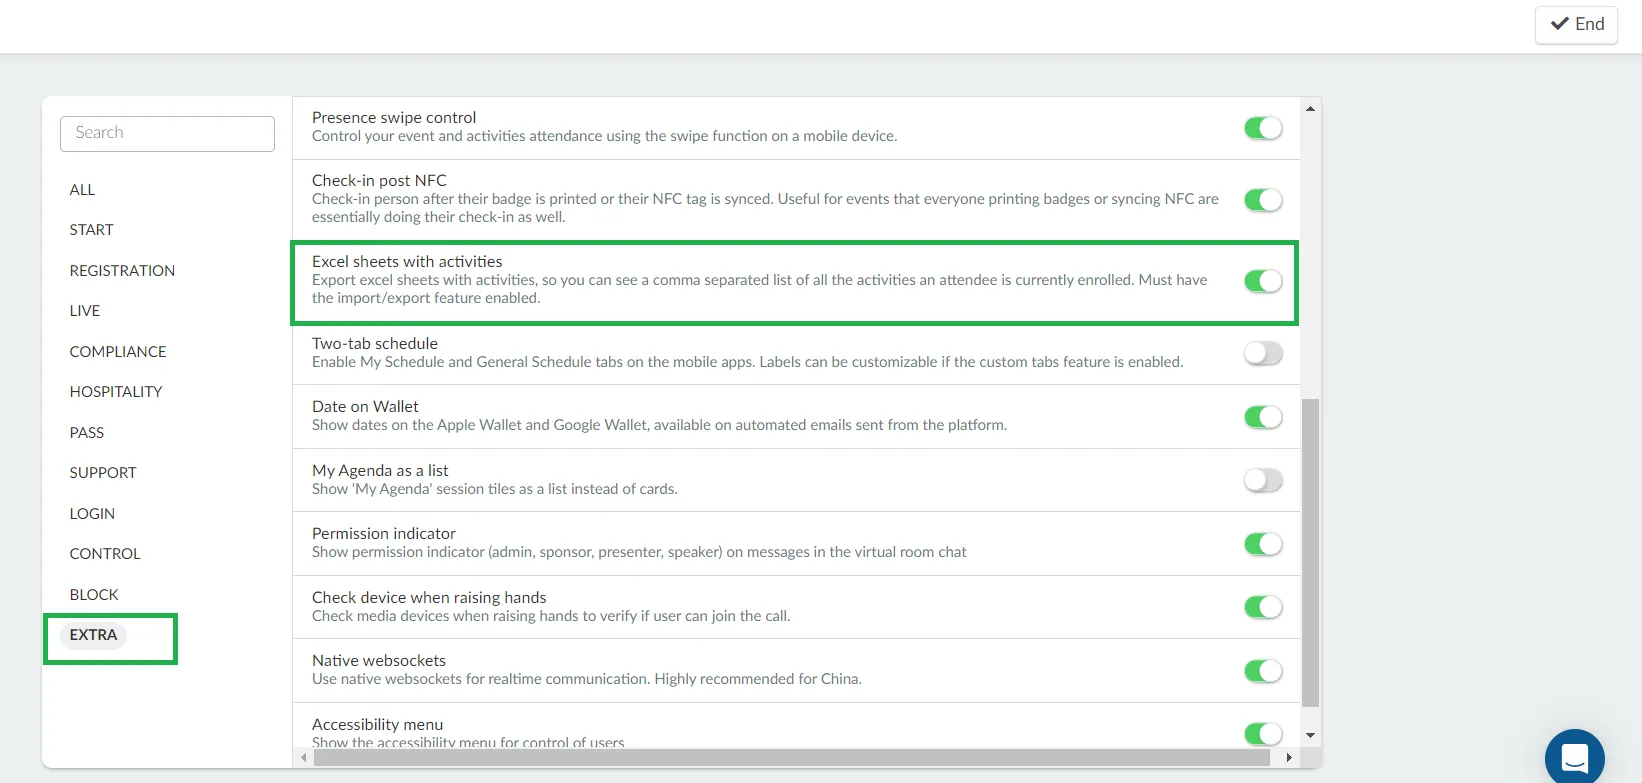
Once you activate this feature, you will see a column on the report sheet with all the activities, separated by a comma.