Webhooks Integration
 Updated 7 months ago
by
Caleb Kotey
Updated 7 months ago
by
Caleb Kotey
InEvent offers a Webhook integration solution that allows you see and manage real-time webhook notifications when certain actions are carried out on the platform.
In this article, we will be showing you how to integrate your webhook on InEvent's platform in order to receive real-time information when specific actions are carried out.
Webhooks
Webhook
Getting Started
To use Webhooks on InEvent, you will need to create a Webhook endpoint. A Webhook endpoint is a URL that InEvent will send your Webhook updates to.
After creating your Webhook endpoint (or URL), you will be able to integrate the webhook with InEvent at the company level and event level.
Webhook events supported by InEvent
Below is a table showing the webhook events that can be triggered from InEvent's platform.
To learn more about each of the webhook event and its JSON data, refer to the Webhook events - JSON data type article.
Webhook event | Description | Action being triggered |
Event created This webhook event can be found only at the company level. | Triggers when an admin creates an event | Admin creates an event at the company level. |
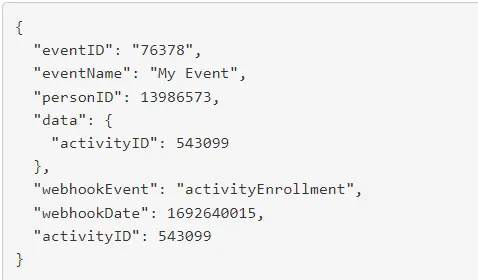
Activity enrollment | Triggers when a user registers into an activity. | Attendee pins an activity in the My Agenda tab or joins an activity. Or admins add users to an activity from the platform. |
Activity dismissal | Triggers when a user deregisters from an activity. | Attendee unpins an activity in the My Agenda tab. |
Event edited | Triggers when an admin edits an event on the Event > Details page. | Admin edits event from the Event > Details page such as, event fields, event name, description, etc. |
Event enrollment | Triggers when a user registers into the event | Attendee registers into the event via the Registration form. |
Event enrollment update | Triggers when a user updates their registration information in the event. | Attendee updates their registration profile in the My Account tab or by admins in the People > Attendees page. |
Event dismissal | Triggers when a user deregisters from the event. | Attendee is deleted from the event. |
Person checks in to the event | Triggers when a user checks in to the event. | Attendee is checked into the event, or checked as Present on the platform by an admin. |
Person checks out of the event | Triggers when a user is checked out of the event. | Attendee is checked out of the event or unchecked as Present from the platform by an admin. |
Person checks in to an activity | Triggers when a user checks-in to an activity. | Attendee is checked into an activity/or virtually joins an activity. |
Person checks out of an activity | Triggers when a user checks-out of an activity. | Attendee is checked out/ removed from an activity. |
Activity created | Triggers when an admins creates an activity. | Admin creates an activity in the platform. |
Activity edited | Triggers when an admin edits an activity. | Admin edits an activity in the platform. |
Activity removed | Triggers when an admin removes an activity. | Admin removes an activity from the platform. |
Speaker created | Triggers when a speaker is added to an event. | Admin adds a speaker to the event. |
Speaker edited | Triggers when a speaker information is edited. | Admin or Speaker edits the speaker's information. |
Speaker removed | Triggers when a speaker is removed from an event. | Admin removes speaker from the event. |
End of event | Triggers when an event is over. This is a timed webhook, it will only execute once per resource. | Event comes to an end. |
Ticket accepted | Triggered when a transferred ticket is accepted by the recipient. | Transferred ticket is accepted by recepient. |
Adding Webhooks at the Company level
To add webhooks at the company level follow these steps:
- Go to Integrations > Webhooks.
- Click on +Add webhook and a new window will appear.
- Select the webhook event using the drop-down.
- Paste the webhook URL.
- Click on Create.
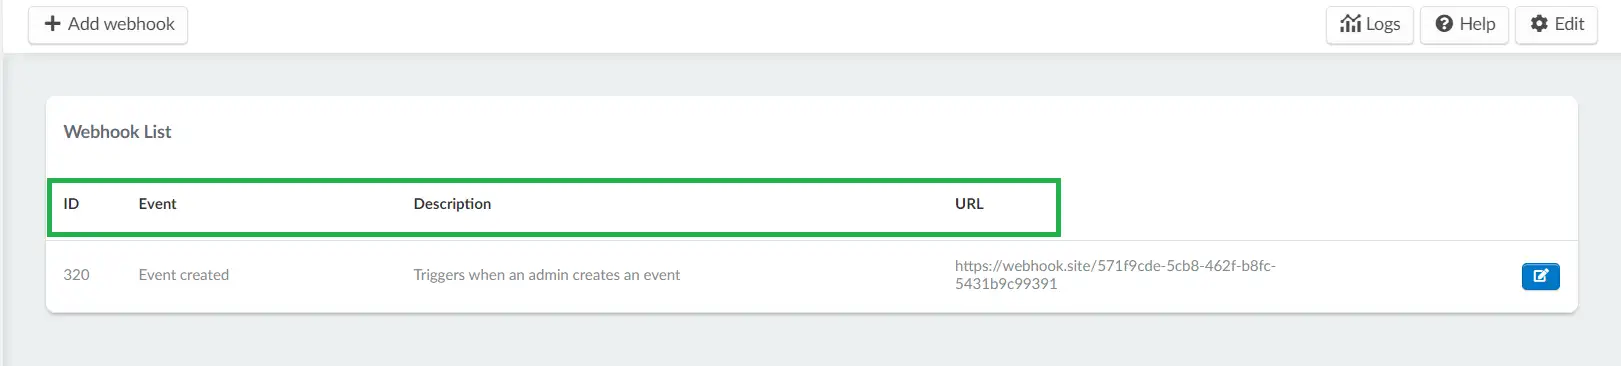
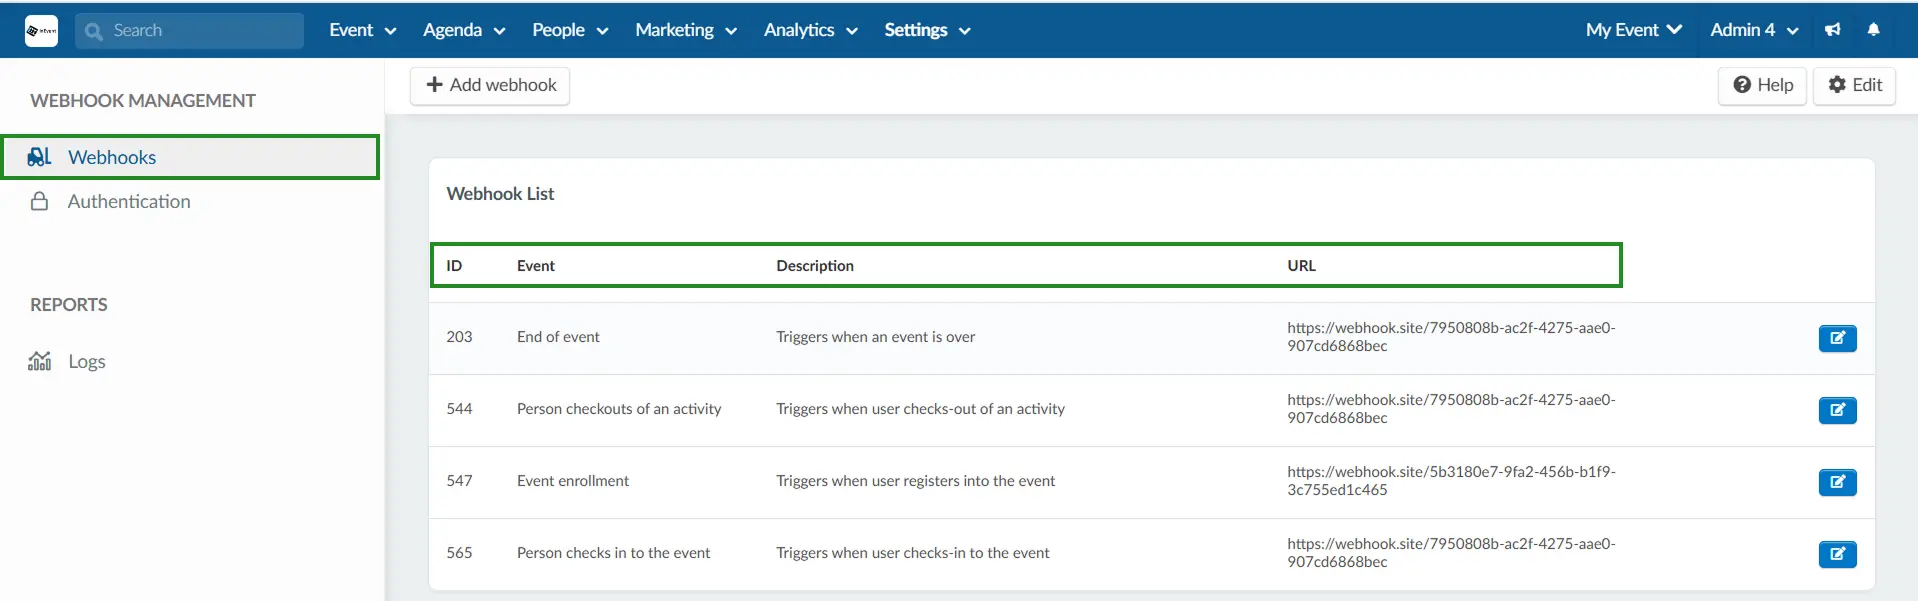
After creating your webhooks, it will be displayed on the Webhook dashboard. It will show the following:
- ID: The Id of the webhook.
- Event: The specific action being triggered.
- Description: The description of the webhook event.
- URL: The webhook URL.
To edit company webhooks, follow the instructions given here, and to remove a webhook, follow the instructions given here.
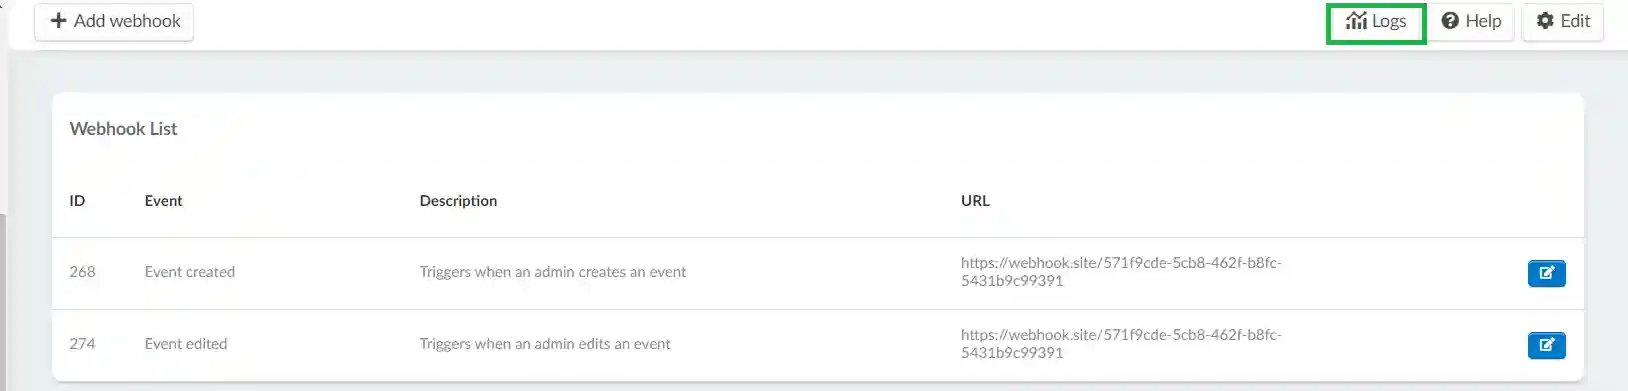
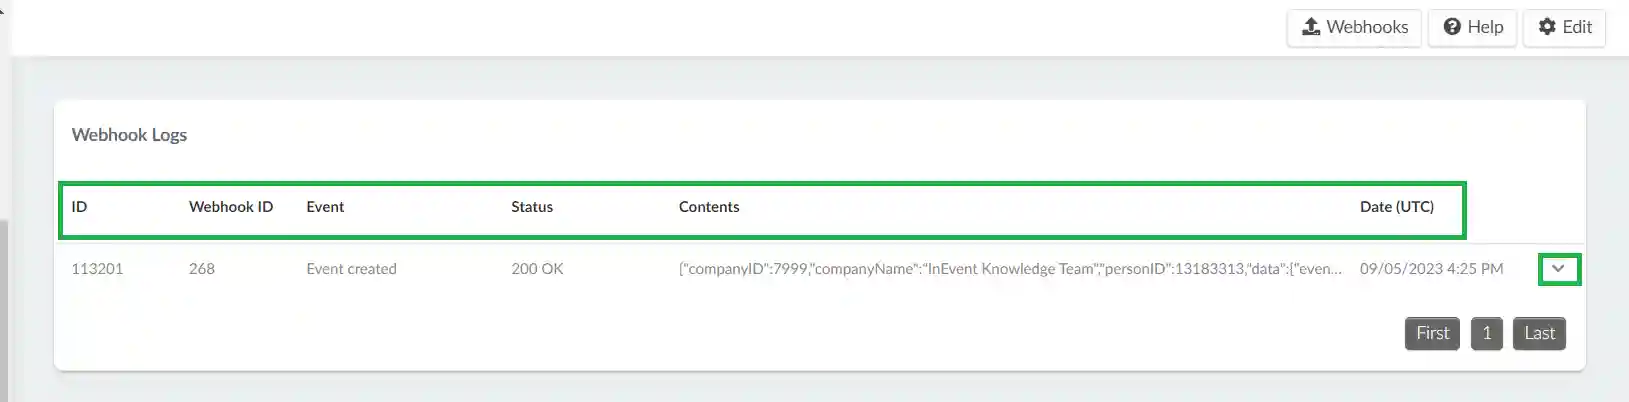
Viewing webhook logs at the company level
Once a webhook event has been acted upon/triggered, the information will appear in the Logs dashboard. To access it, click on Logs at the top right corner of the page.
You will see the following information:
- The log ID
- The Webhook ID
- The webhook event
- The Status
- The content - details of the log
- The Date and time the event was carried out.
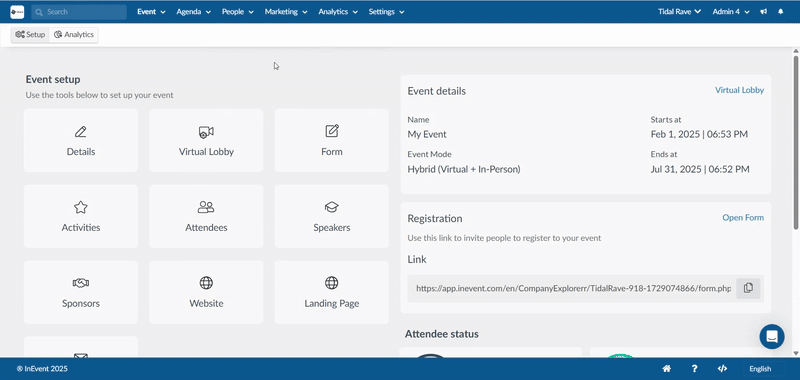
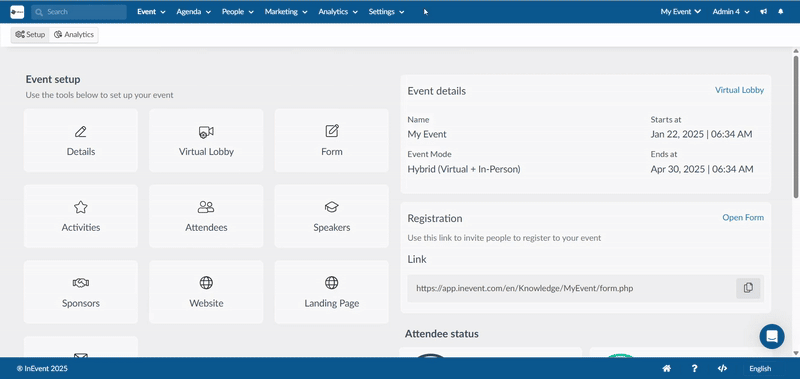
Adding webhooks at the Event level
To add your webhooks at the event level, follow the following steps:
- Go to Settings > Integrations > Webhooks.
- Click on Webhooks from the menu on the left.
- Click on +Add webhook and a new window will appear.
- Select the webhook event using the drop-down.
- Paste the webhook URL.
- Click on Create.
After creating your webhook, you will see it displayed on the Webhook dashboard. It will show the following:
- ID: The Id of the webhook.
- Event: The specific action being triggered.
- Description: The description of the webhook event.
- URL: The webhook URL.
Webhooks authentication via Salesforce unique key
If you're integrating InEvent with Salesforce, you have the option to include a unique key in your webhook setup. This unique key enables Salesforce to validate incoming webhook payloads before accepting and processing them.
This helps ensure that only legitimate updates from InEvent are ingested by your Salesforce system, improving data integrity and security. To enable this at the company level:
- Go to Integrations > Webhooks at the company level.
- Select Authentication.
- In the designated API field, input your unique API key (provided by your Salesforce admin or system integrator). Refer to the Salesforce help article for more information.
- Click on End to save changes.
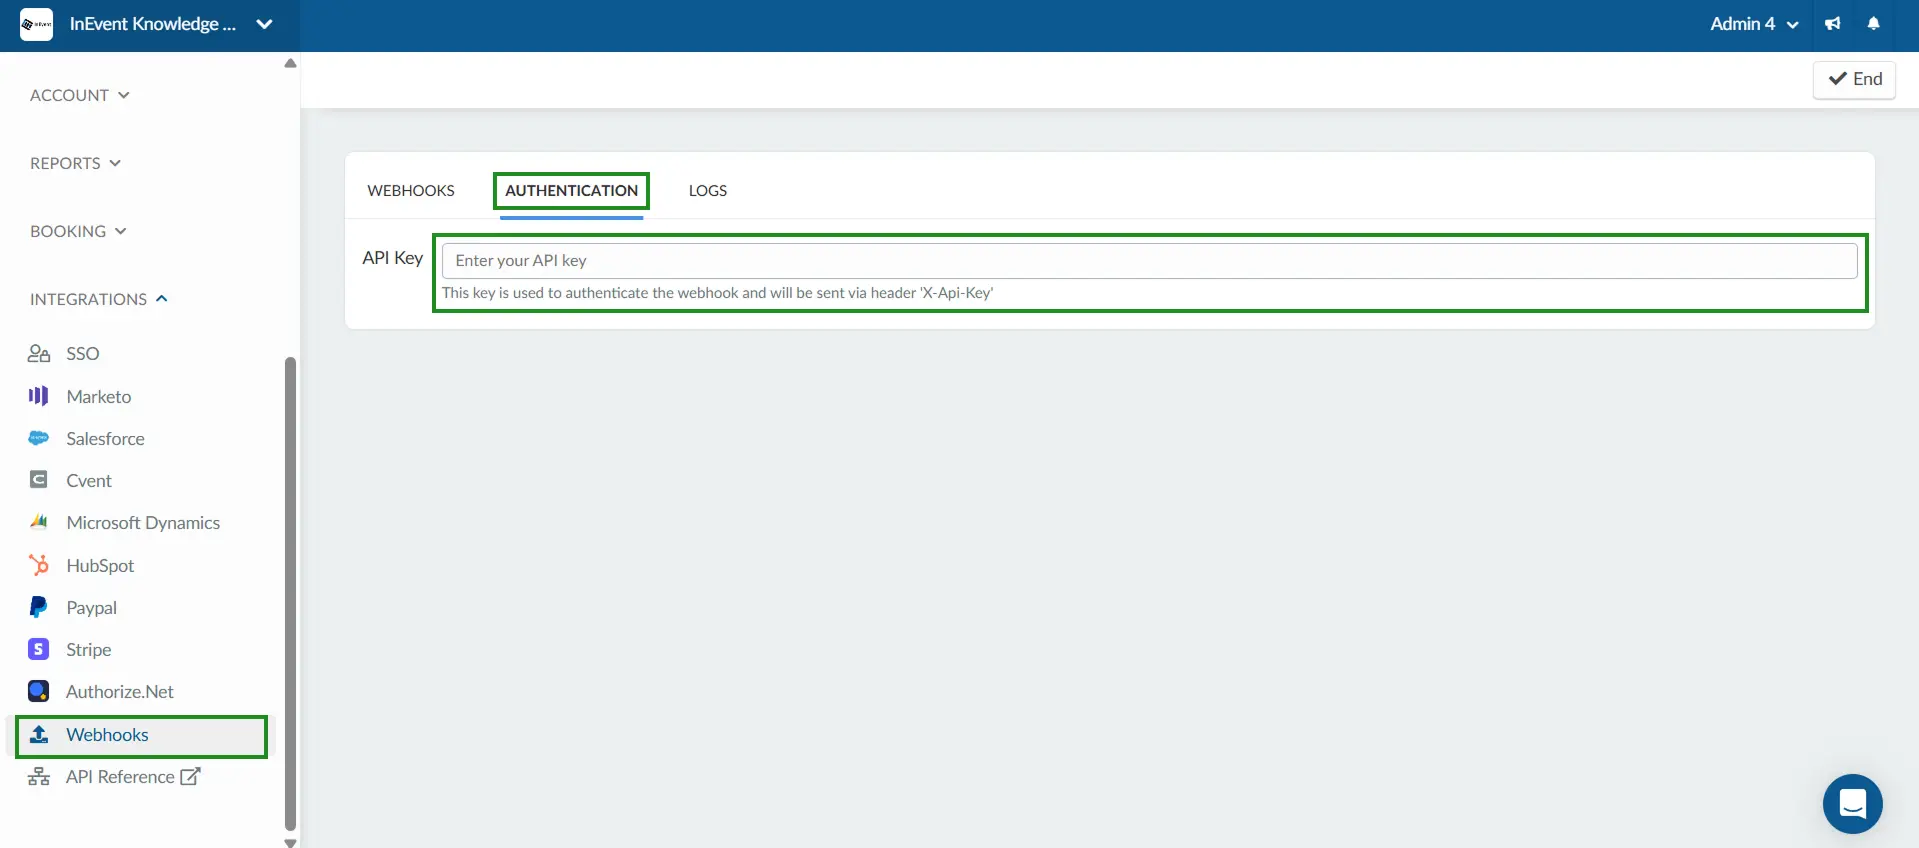
Once saved, this key will be passed along in the webhook payload, and Salesforce can verify the request before accepting it.
To enable this at the event level, follow the steps below:
- Go to Settings > Integrations > Webhooks.
- Select Authentication.
- In the designated API field, input your unique API key (provided by your Salesforce admin or system integrator).
- Click on End to save changes.
Editing the webhooks
After creating the webhooks, you can modify them. To do this, simply click on the blue button beside a webhook and a new window will appear at the right. Click on Edit, and you will be able to:
- Change the webhook event by clicking on the drop-down and making a new selection.
- Change the webhook's URL.
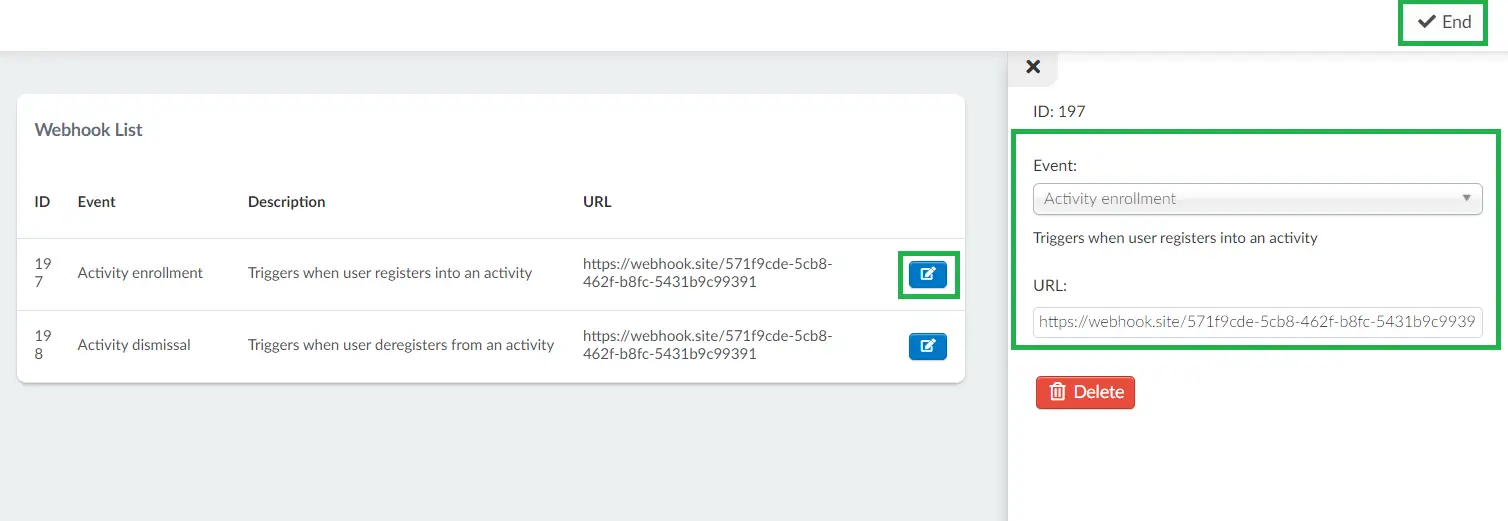
Click on End to save your changes.
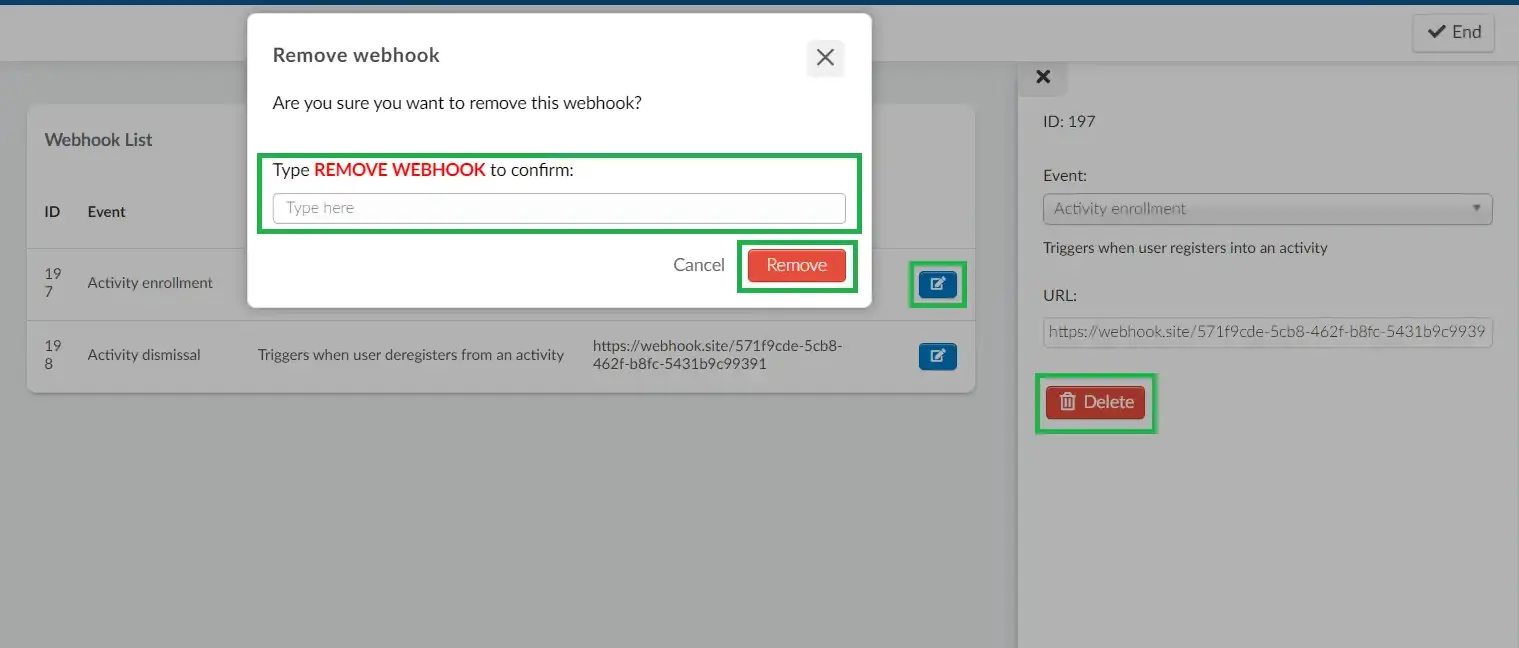
Removing a webhook event
To remove a webhook, click on the blue button beside the webhook event you wish to remove. Click on the Delete button, and a confirmation window will appear. Type REMOVE WEBHOOK to confirm and click on Remove.
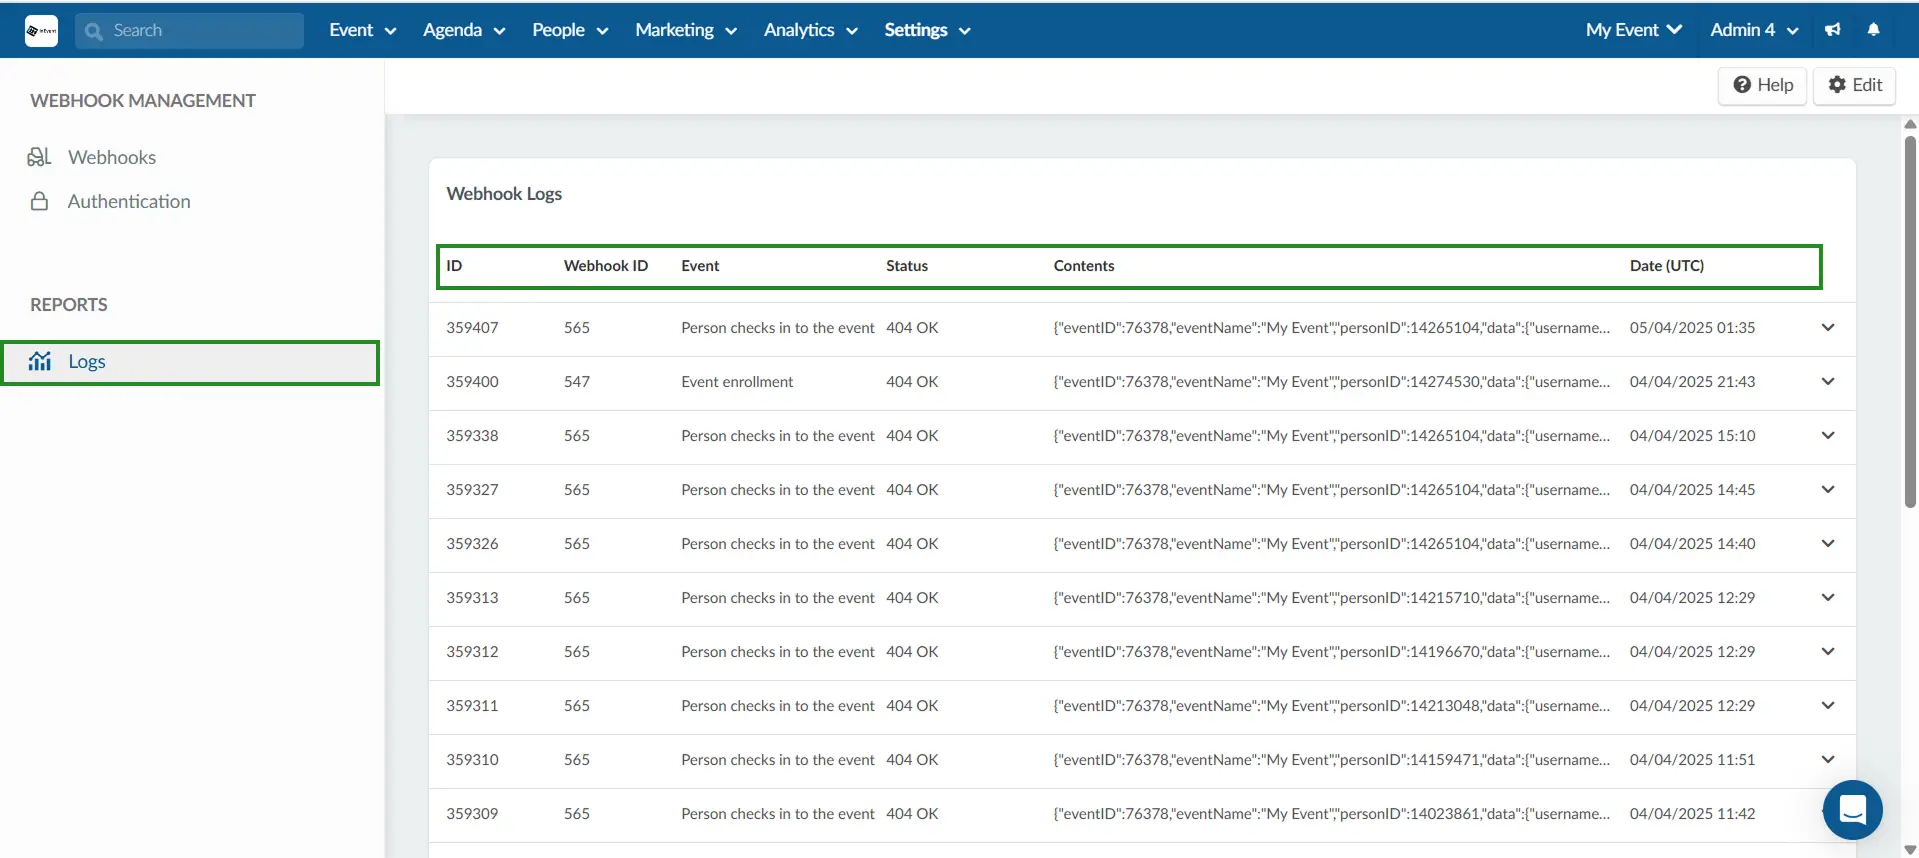
Viewing webhook logs at the event level
Once a webhook event has been acted upon/triggered, the information will appear in the Reports > Logs section.
On the Logs dashboard, you will see the following information:
- Log ID
- Webhook ID
- Webhook event
- Status
- Content details
- Date and time of the logged event
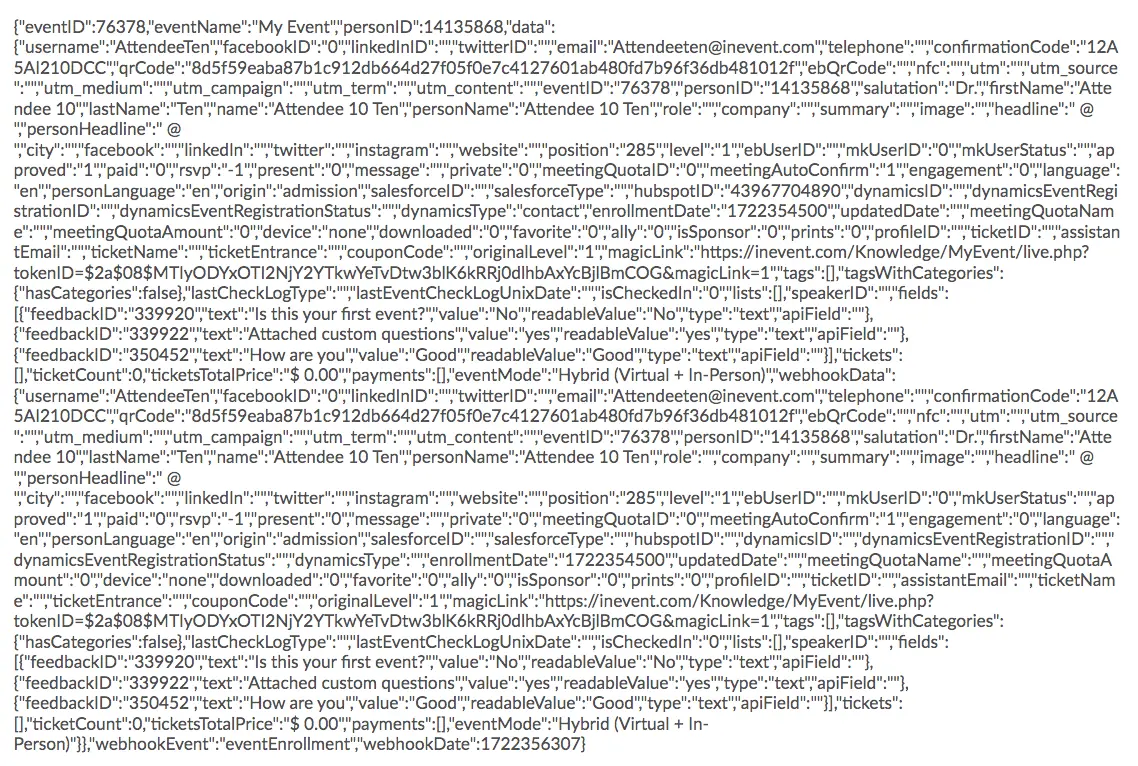
The Event enrollment log contains various types of data about the event and the attendee. This data covers a broad spectrum from personal attendee details to event-specific information and custom feedback responses.
The data includes: Event Information, Attendee Information, Confirmation and Codes, Status and Metadata, Custom Fields and Questions, Other Identifiers, Device and Engagement Data, Lists and Tags, Ticket and Payment Information and Webhook Metadata.
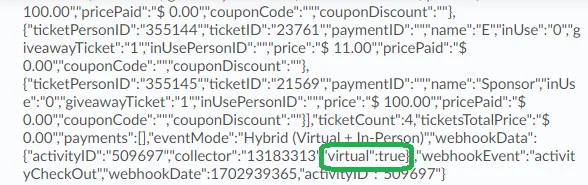
In the Person checks into activity and Person checks out of activity logs, you can easily find out the check-in origin by clicking on the arrow beside any of these logs.
It will display "virtual":true at the bottom of the log for users who checked-into activities they weren't marked as Present. Or who were checked in or checked out by an admin/ data collector.
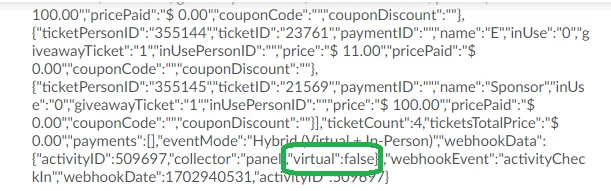
It will display "virtual": false for users who were manually checked in by admins by ticking the Present checkbox and checked out by removing them from the activity.
In the case of Speaker created and Speaker edited webhooks on the company or event level, a MemberID or PersonID will be generated for created speakers which have linked attendees. The created MemberID will be visible in the logs, in content details as shown below:

All webhook events on the platform will be automatically sent to the designated webhook URL and can be converted into JSON format.