Scheduled Meetings: Managing and Monitoring Meetings
 Updated 26 minutes ago
by
Caleb Kotey
- Setting a meeting status
- Clearing a meeting
- Viewing and managing the locations of meetings within your event
- Viewing the hosts' calendar
- Removing an attendee's restrictions in bulk
- Swapping meeting times
- Deleting a meeting
- Deleting all scheduled host meetings
- Deleting all meetings from one place
- Displaying or projecting meeting times on a television or projector
- Creating a meeting form
- Notifying participants about their meetings
Once your meetings are set up, you can use the Scheduled Meetings dashboard to keep them running smoothly: update their status, reschedule or delete them, notify participants, display them on a screen, collect feedback, and track outcomes with reports.
This guide covers how to manage and monitor meetings. If you haven't created your meetings yet, start with the Scheduled Meetings: Setup and Scheduling Guide for Event Organizers article.
Setting a meeting status
After creating a meeting between participants, you can select a status for your meeting. To do this, simply click on Edit, click on the dropdown beside the scheduled meeting slot, and select a status.
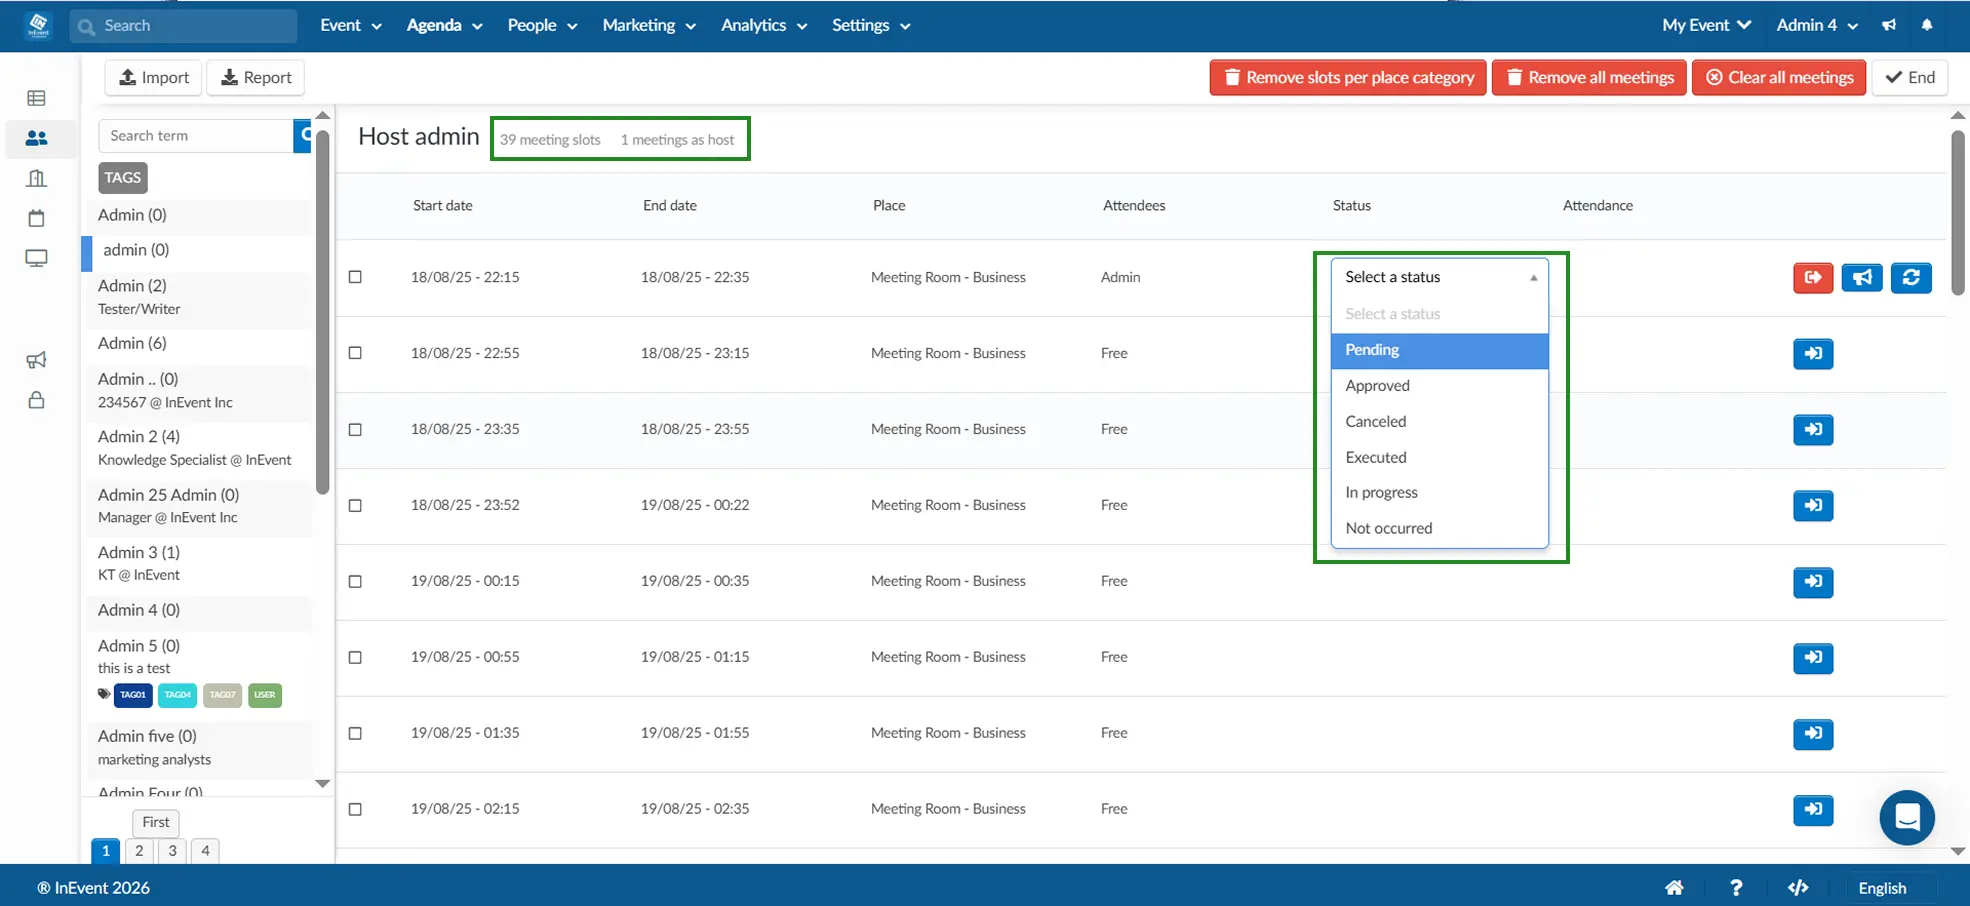
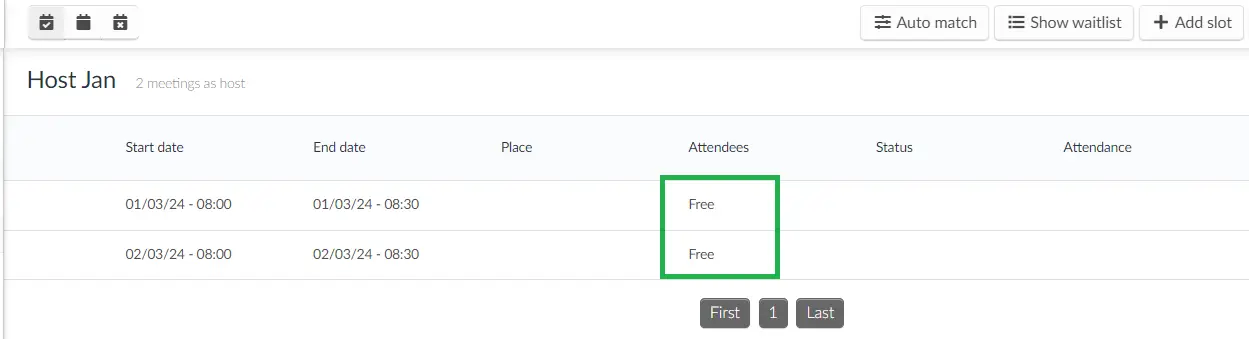
At the top of the Scheduled Meetings dashboard, you can see the number of meeting slots available for the selected host and the number of meetings they are hosting.
For example:
- 39 meeting slots: The total number of meeting slots available for the selected host.
- 1 meeting as host: The number of meetings the selected host is hosting.
The available statuses are:
- Pending
- Approved
- Canceled
- Executed
- In progress
- Not occurred
Clearing a meeting
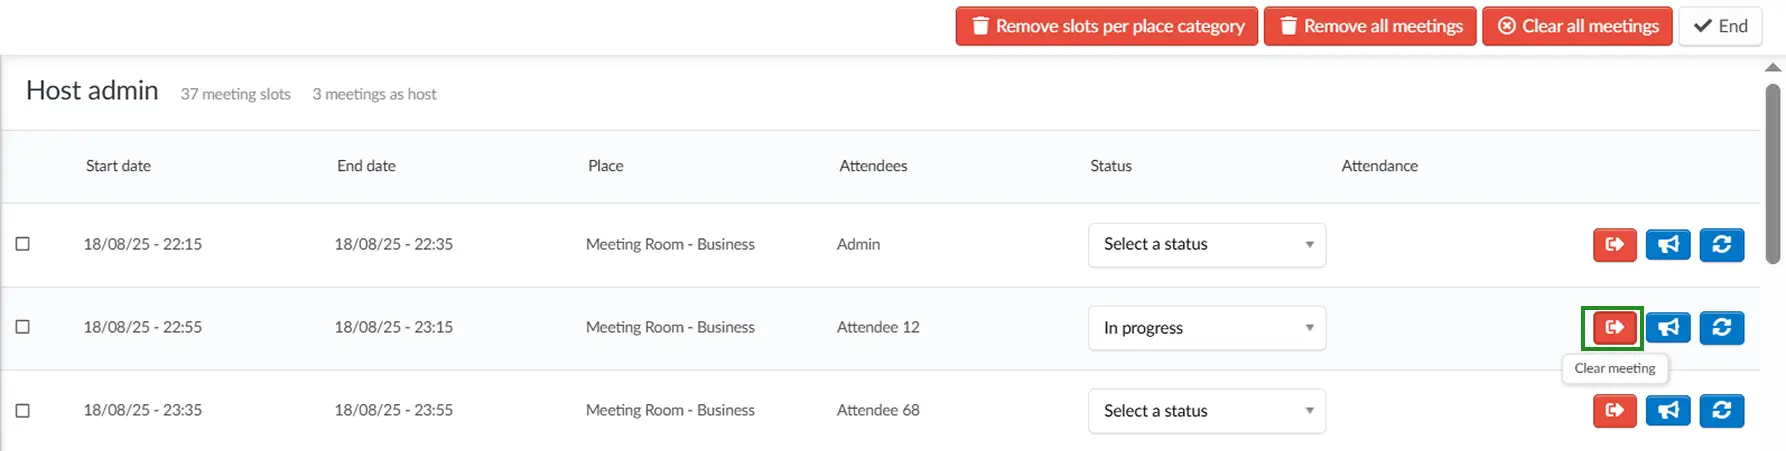
To clear a meeting, simply click on Edit and press the orange icon beside the meeting slot you wish to remove. The meeting will automatically be cleared from the participant's agenda, and the slot will become free.
Viewing and managing the locations of meetings within your event
You can easily view all scheduled meetings and slots through the Scheduled Meetings Per room dashboard. On the dashboard, you will see the following details:
ID, Host, Guests, Location, Date, Duration, and Status.
Here’s what you can do on this page:
- View Meetings by Room: You can view your meetings organized by the Place selected when creating your meeting timeslots.
- Manage Meeting Status: You can select or edit the status of Scheduled Meetings. This includes meetings scheduled by event admins for participants and meetings participants scheduled themselves in the Virtual Lobby.
- Respond to meeting Feedback forms: You can respond to meeting forms by clicking on the blue icon next to the scheduled meeting.
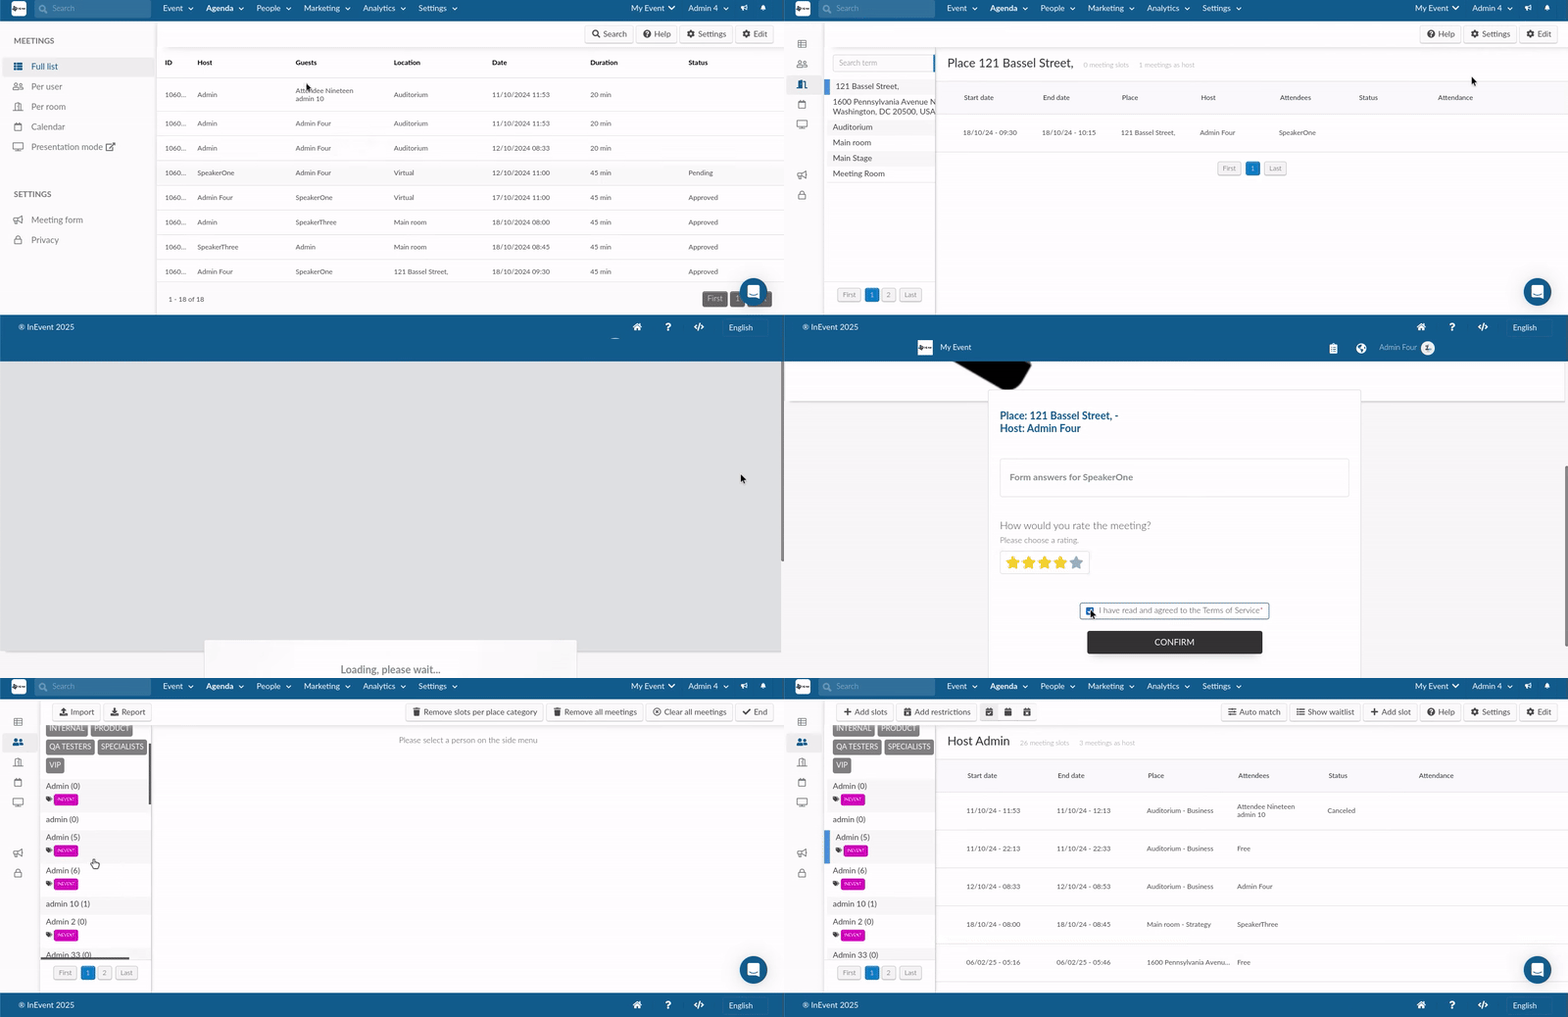
This facilitates effective management and tracking of all the scheduled meetings/ meeting time slots for your event and organizes and locates any meetings you've created.
Viewing the hosts' calendar
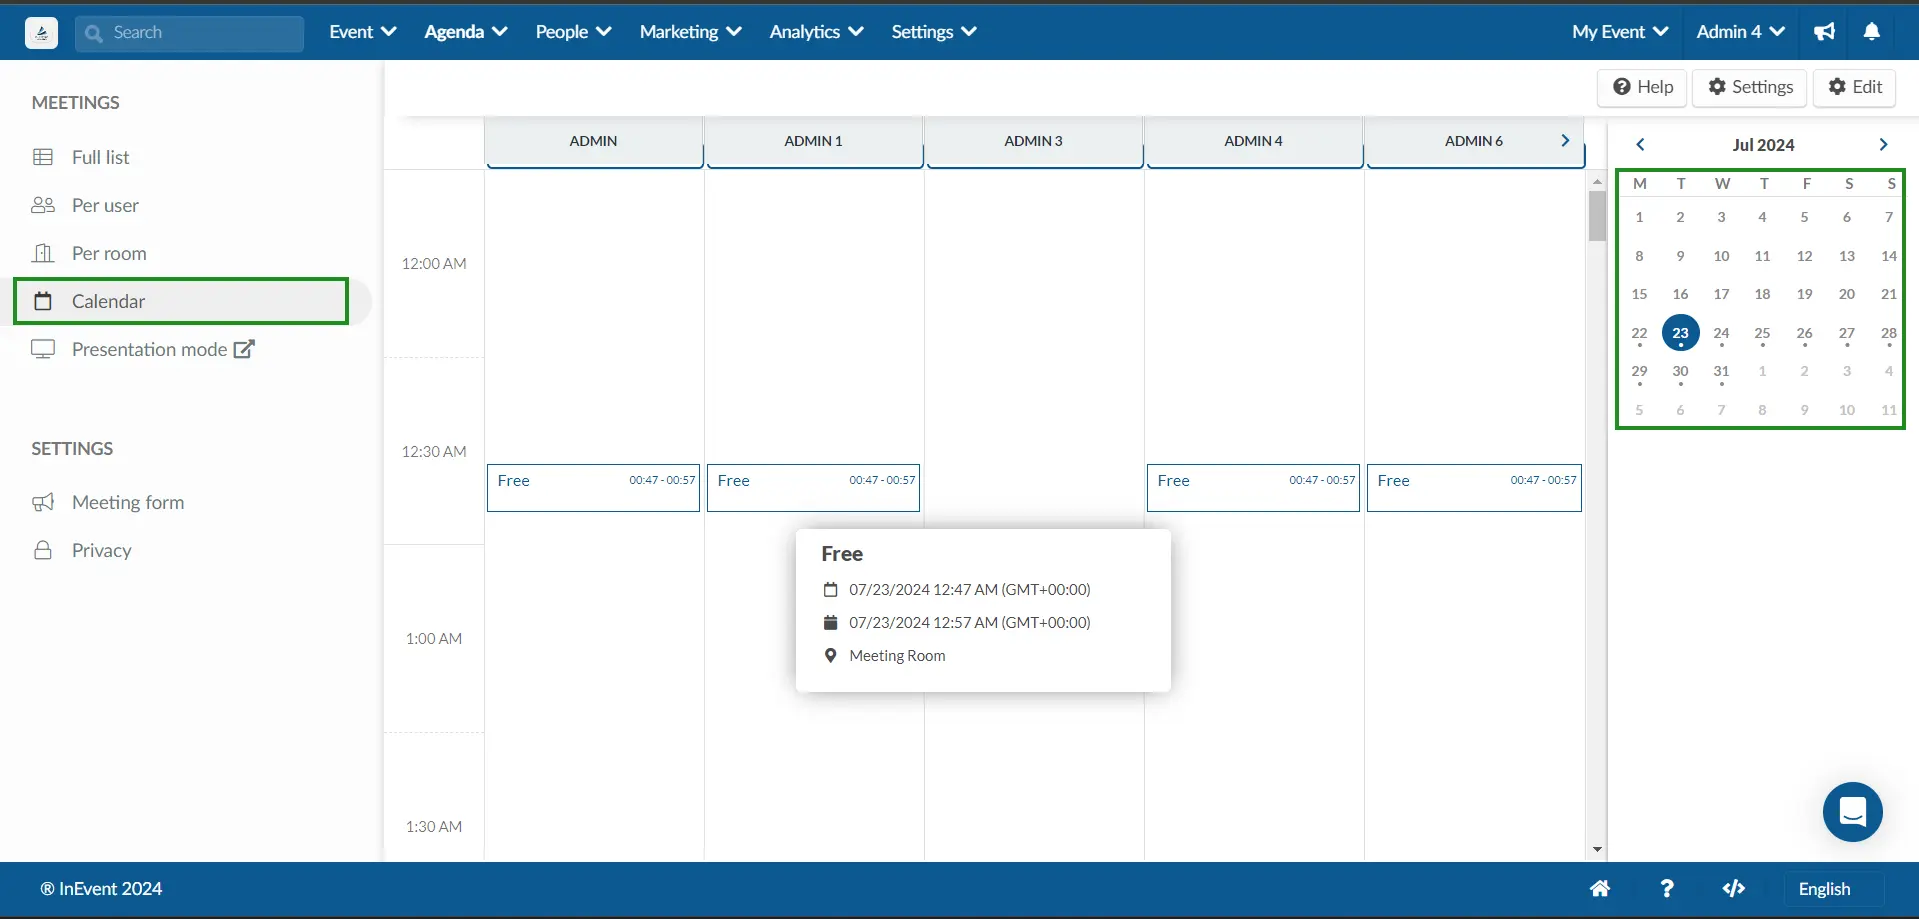
To view the meeting slots of hosts, go to the Calendar option in the left menu. Here, you'll find both the free and booked meeting slots of hosts. The Calendar page lists all meeting hosts along with their meeting schedules. To navigate to a specific date, use the date picker located on the right side of the page.
Removing an attendee's restrictions in bulk
You can select single or multiple restrictions to be removed from an attendee, or remove all of your attendee's restrictions at once. To do so, follow the steps below:
- Select an attendee from the left panel.
- Click on the Show restrictions button on the toolbar.
- Click on Edit on the top right corner.
- Select the restrictions you wish to remove by checking the boxes of the restrictions you wish to remove.
- Click on Remove selected to remove the restrictions you have selected. A confirmation pop-up box will be displayed.
- Click on Remove on the confirmation pop-up box.
- Click on End to finalize.
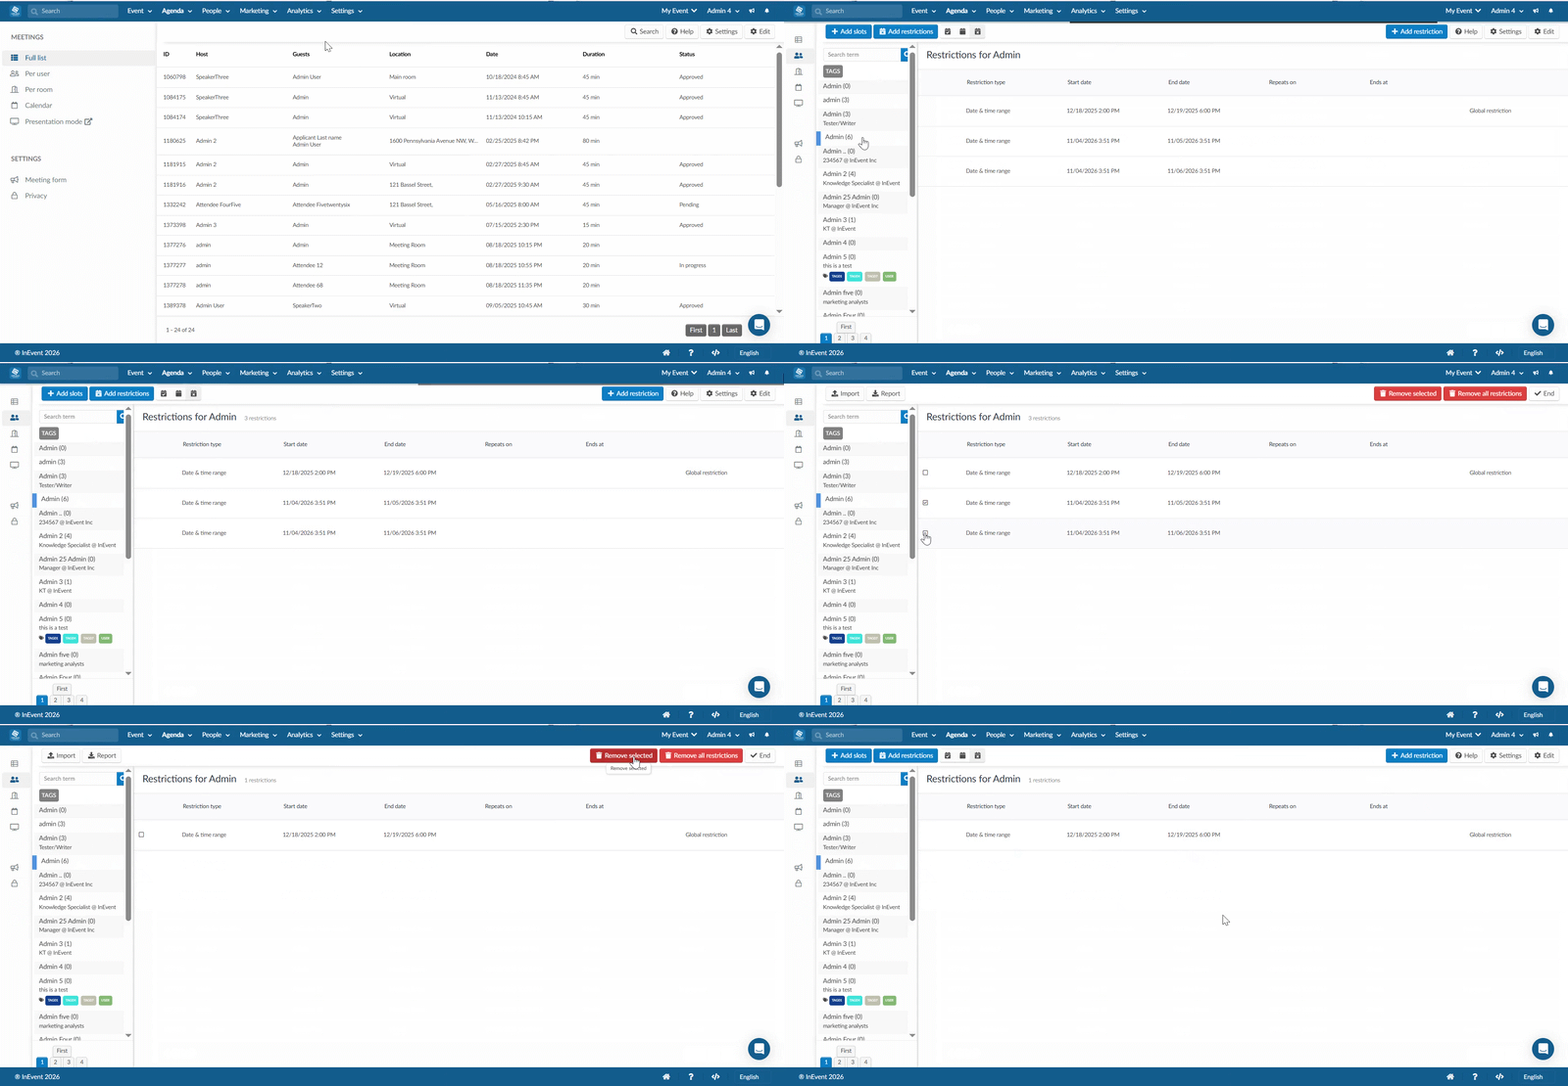
Once you have completed the steps above, the selected restrictions or all restrictions associated with the selected attendee will be removed.
Swapping meeting times
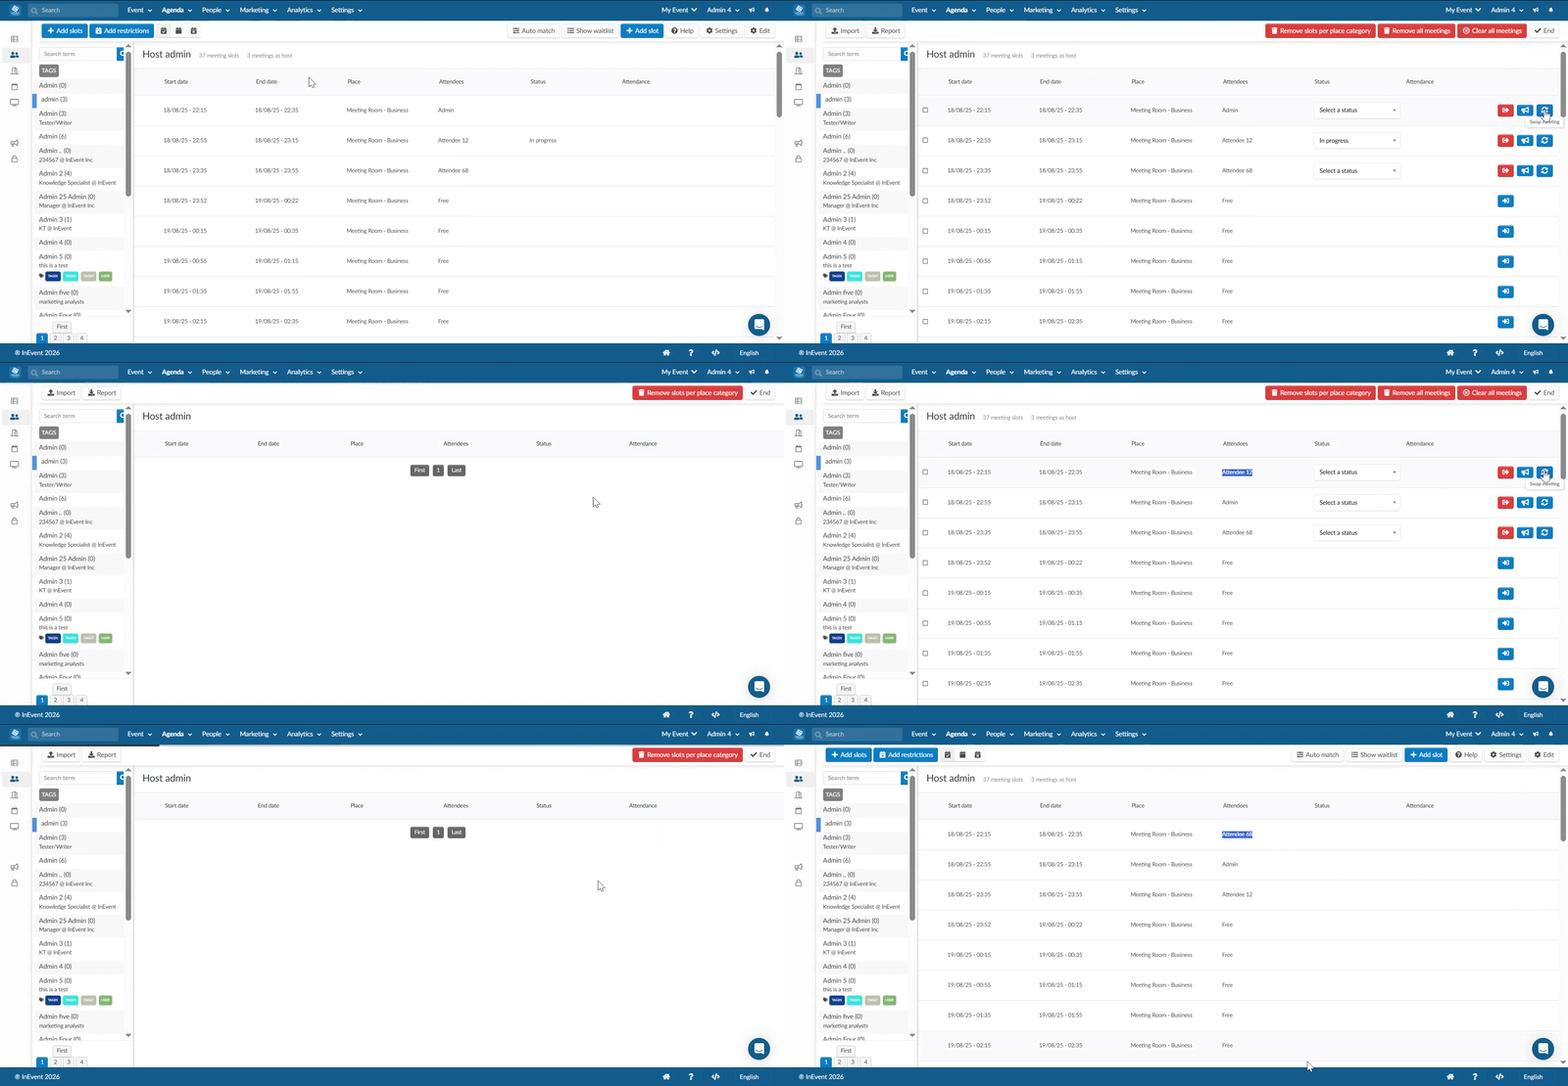
To do this, follow these steps:
- Click on Per user in the left menu and then select the host of the meeting, ensuring that prior to this step you have created meeting time slots.
- Ensure you are in the Show meetings as host view, press Edit and click on the Swap meeting icon.
- Select the Swap meeting icon next to the time you wish to reschedule the meeting.
Deleting a meeting
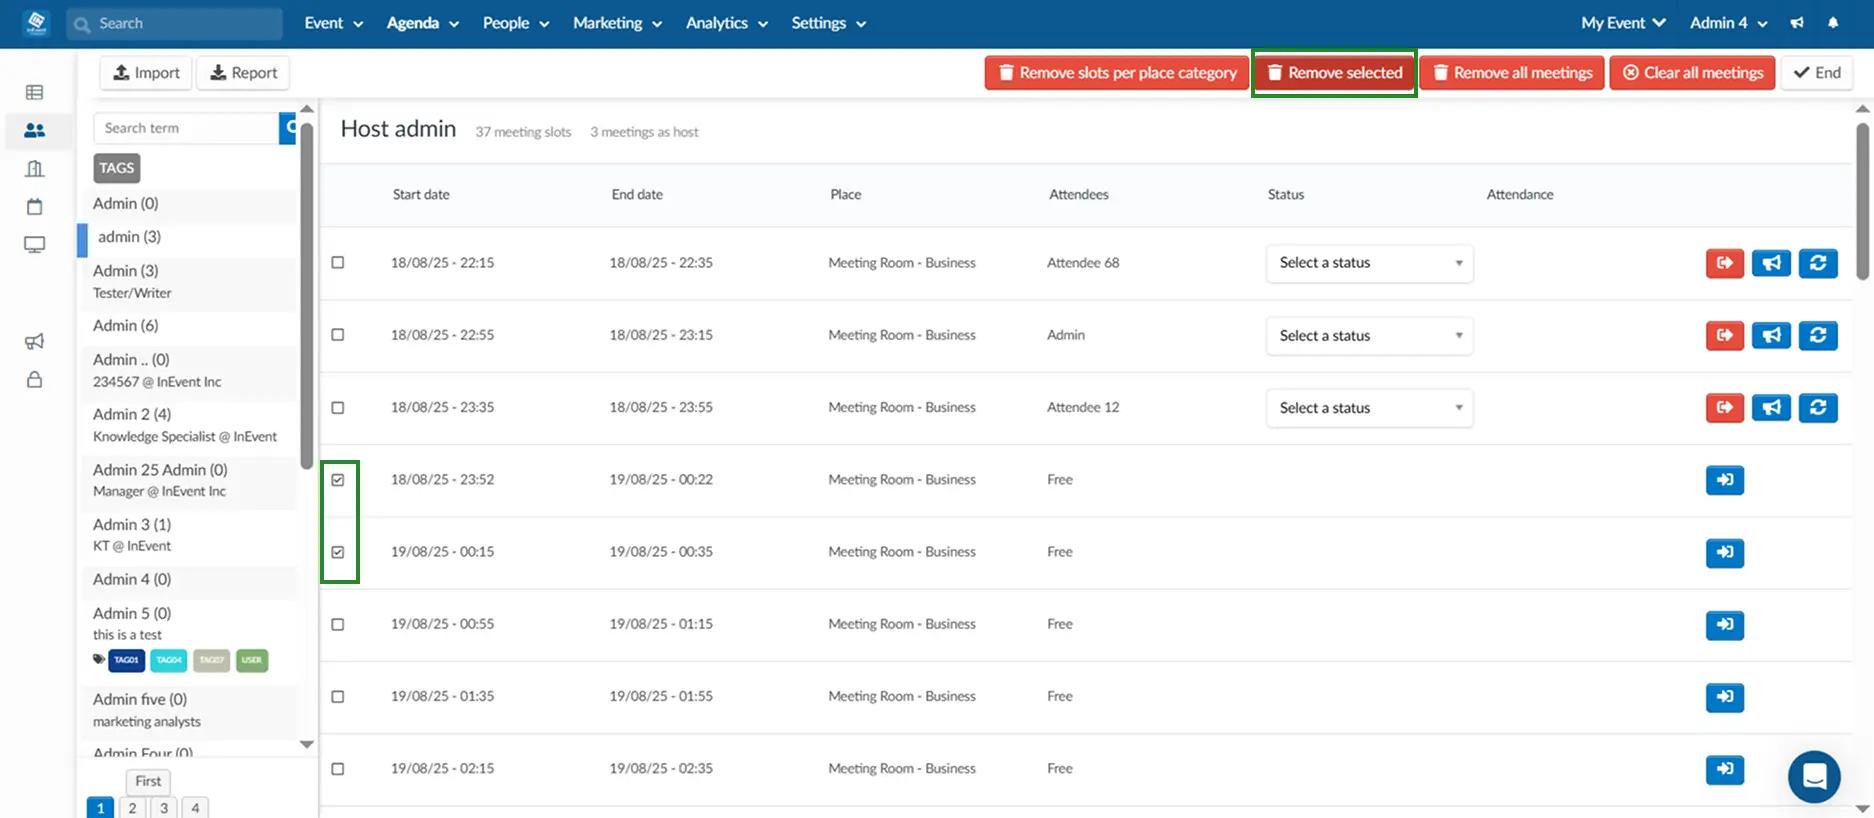
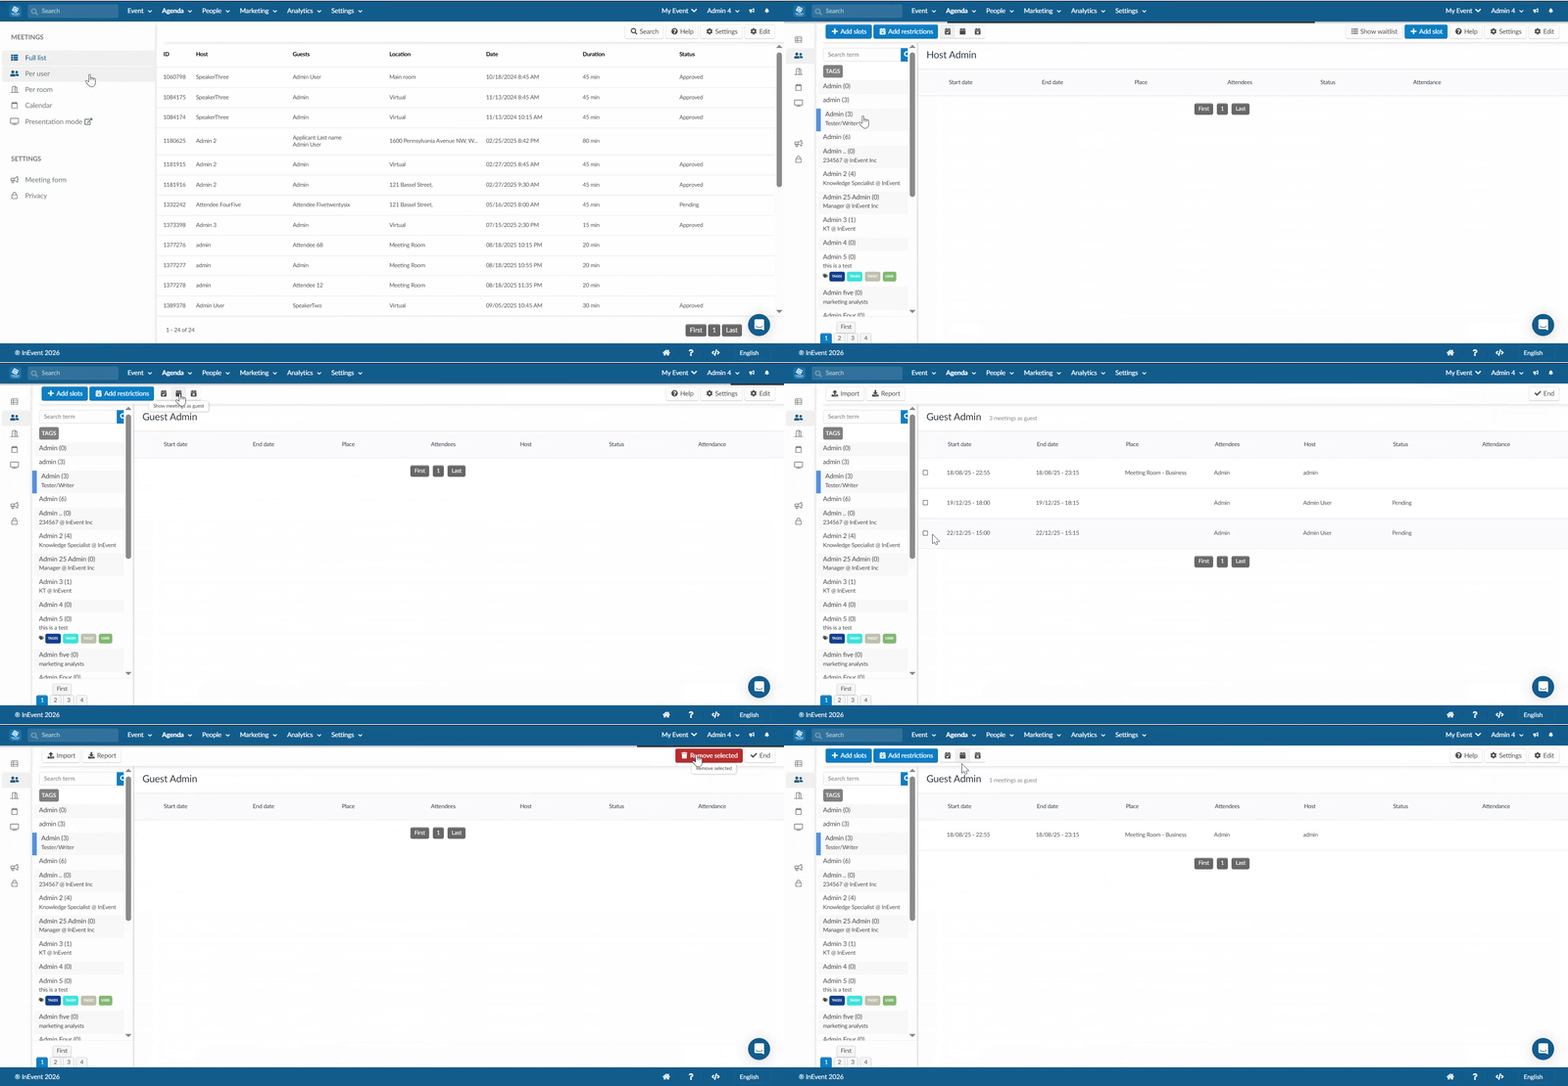
Click on Per user from the left menu and select the attendee:
- Removing a host's meeting: Click the Show meetings as host icon, tick the checkbox of the meeting you wish to delete and press Remove selected.
- Removing a guest's meeting: Click the Show meetings as guest icon, tick the checkbox of the meeting you wish to delete and press Remove selected.
Deleting all scheduled host meetings
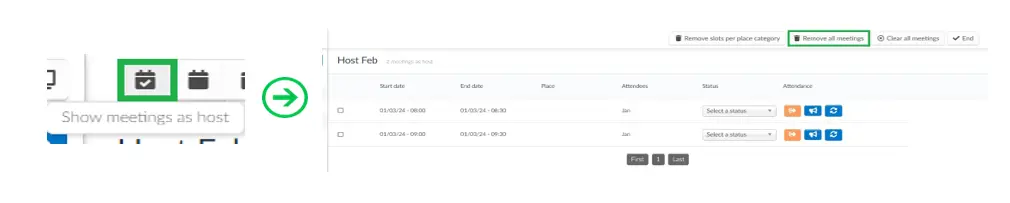
Navigate to Agenda > Meetings and filter or search for a host and select the attendee. Click the Show meetings as host and press Remove all meetings.
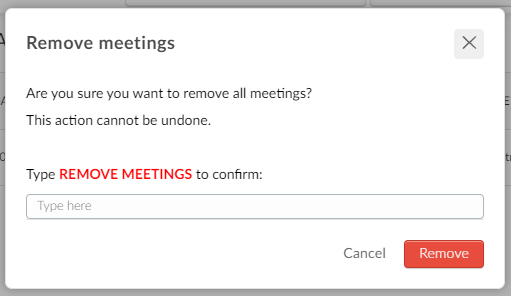
A confirmation box will appear. Type Remove meetings to confirm your action and select Remove.
Deleting all meetings from one place
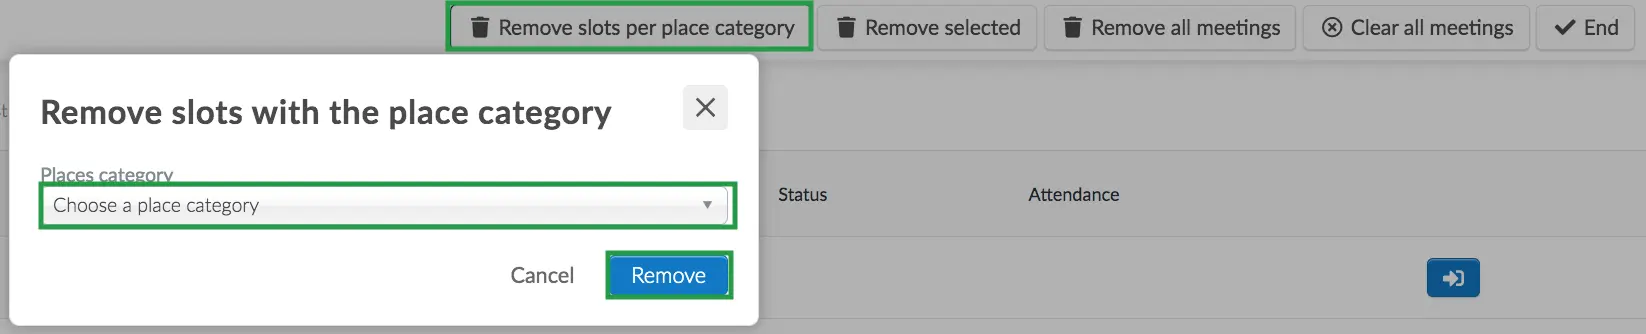
Navigate to Agenda > Meetings > Edit > Remove slots per place category > select the place you wish to remove from the drop down menu > Remove.
Clearing all meeting slots from a host
Navigate to Per user and select the attendee. Ensure you are on the Show meetings as host page, click on Edit and press Clear all meetings.

Displaying or projecting meeting times on a television or projector
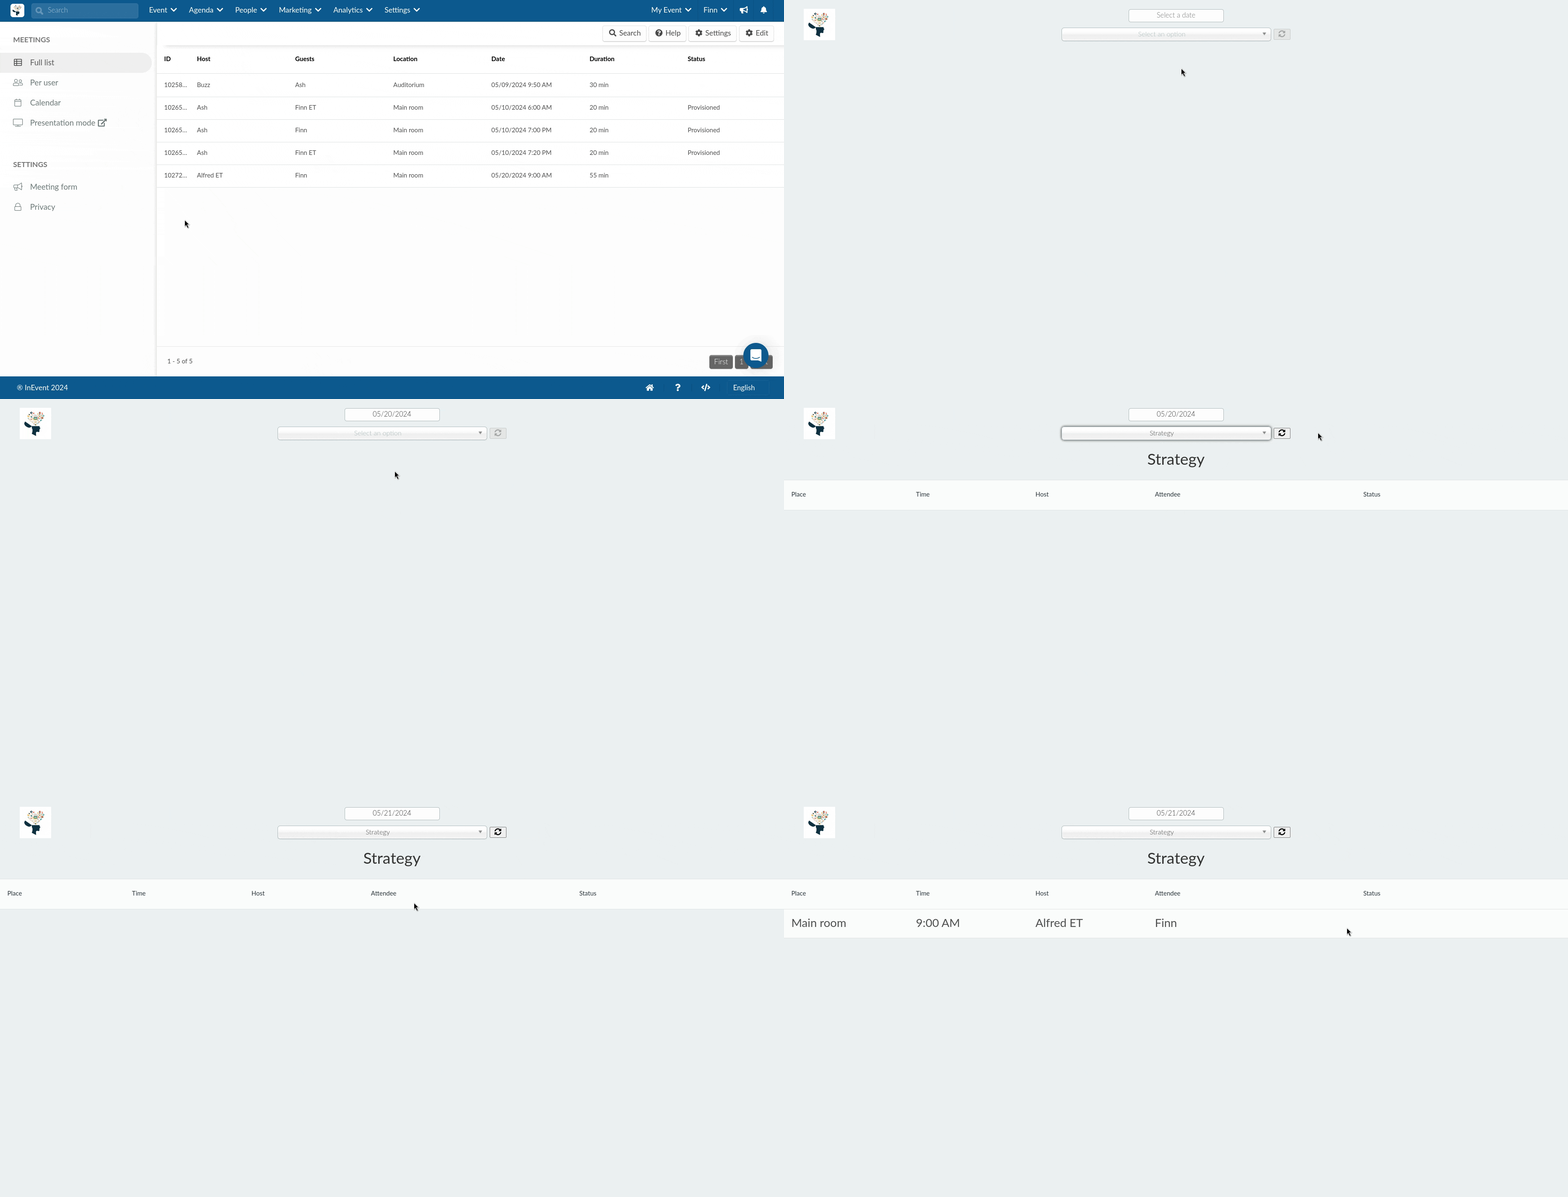
You can display meetings times on a television or projector or even your computer by clicking on the Presentation mode button.
Click on Presentation mode in the left menu. A new window will appear that you can use to project meeting times on a television or projector.
- Select the date of the meeting from the date selector.
- Select the meeting location from the drop down menu and then click on the circular arrows icon to load the meetings:
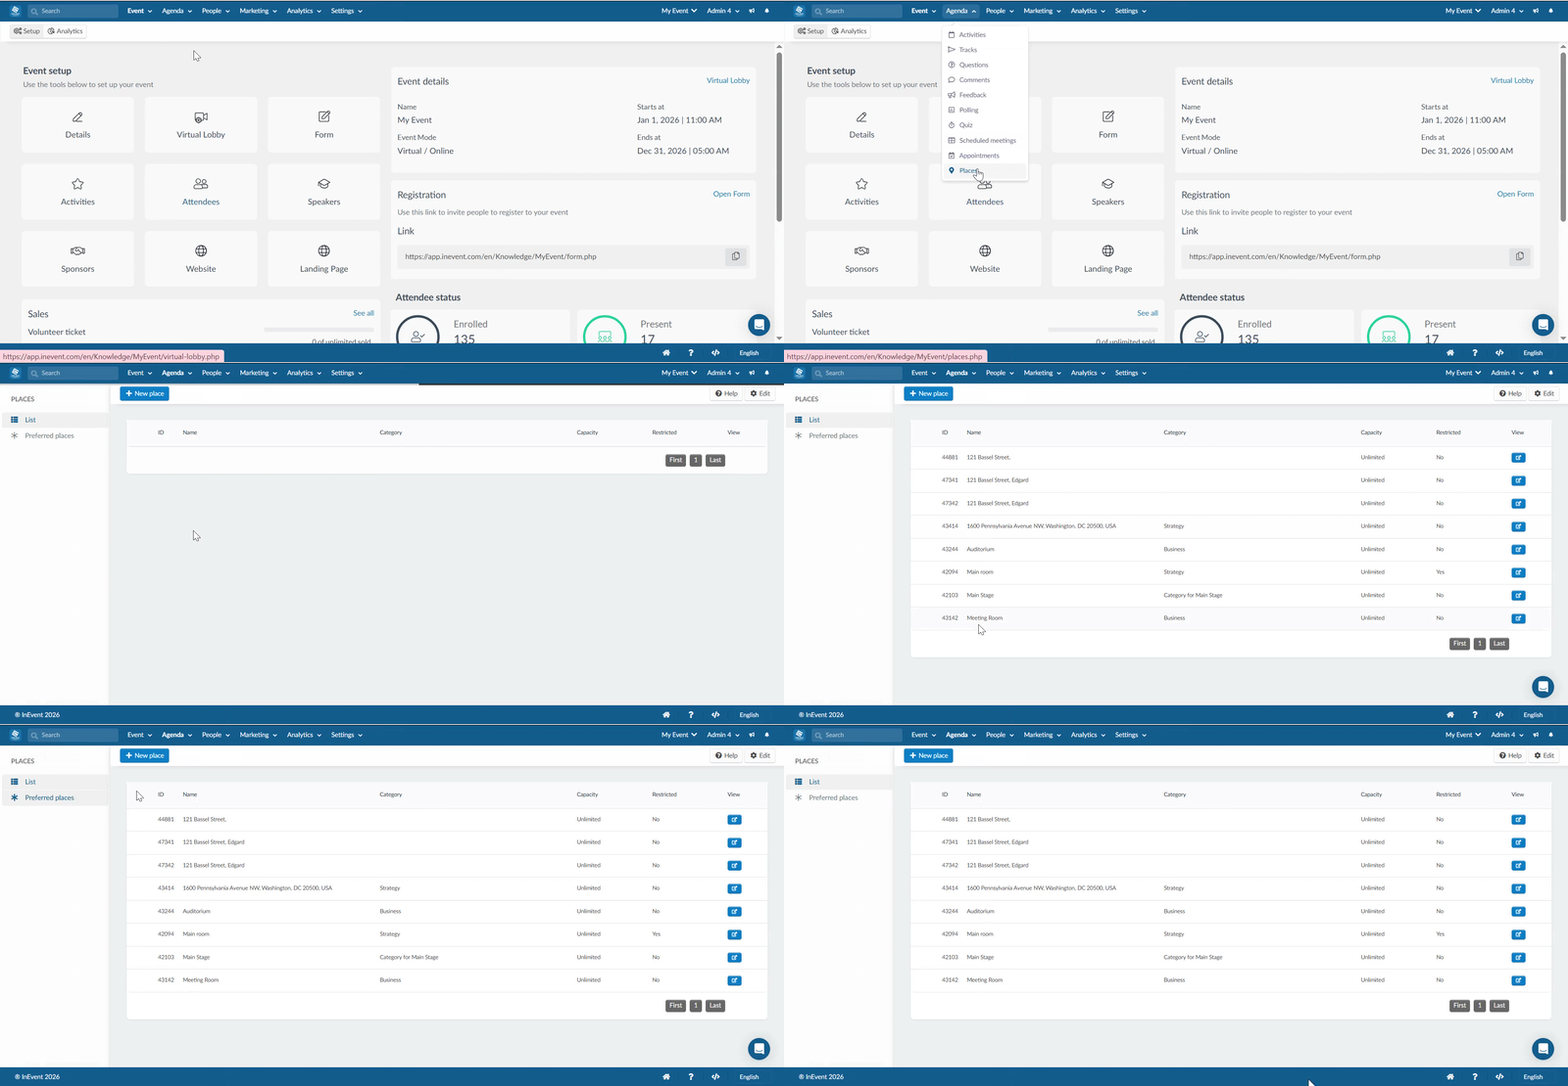
You can learn about creating a new place by referring to the article Places.
Creating a meeting form
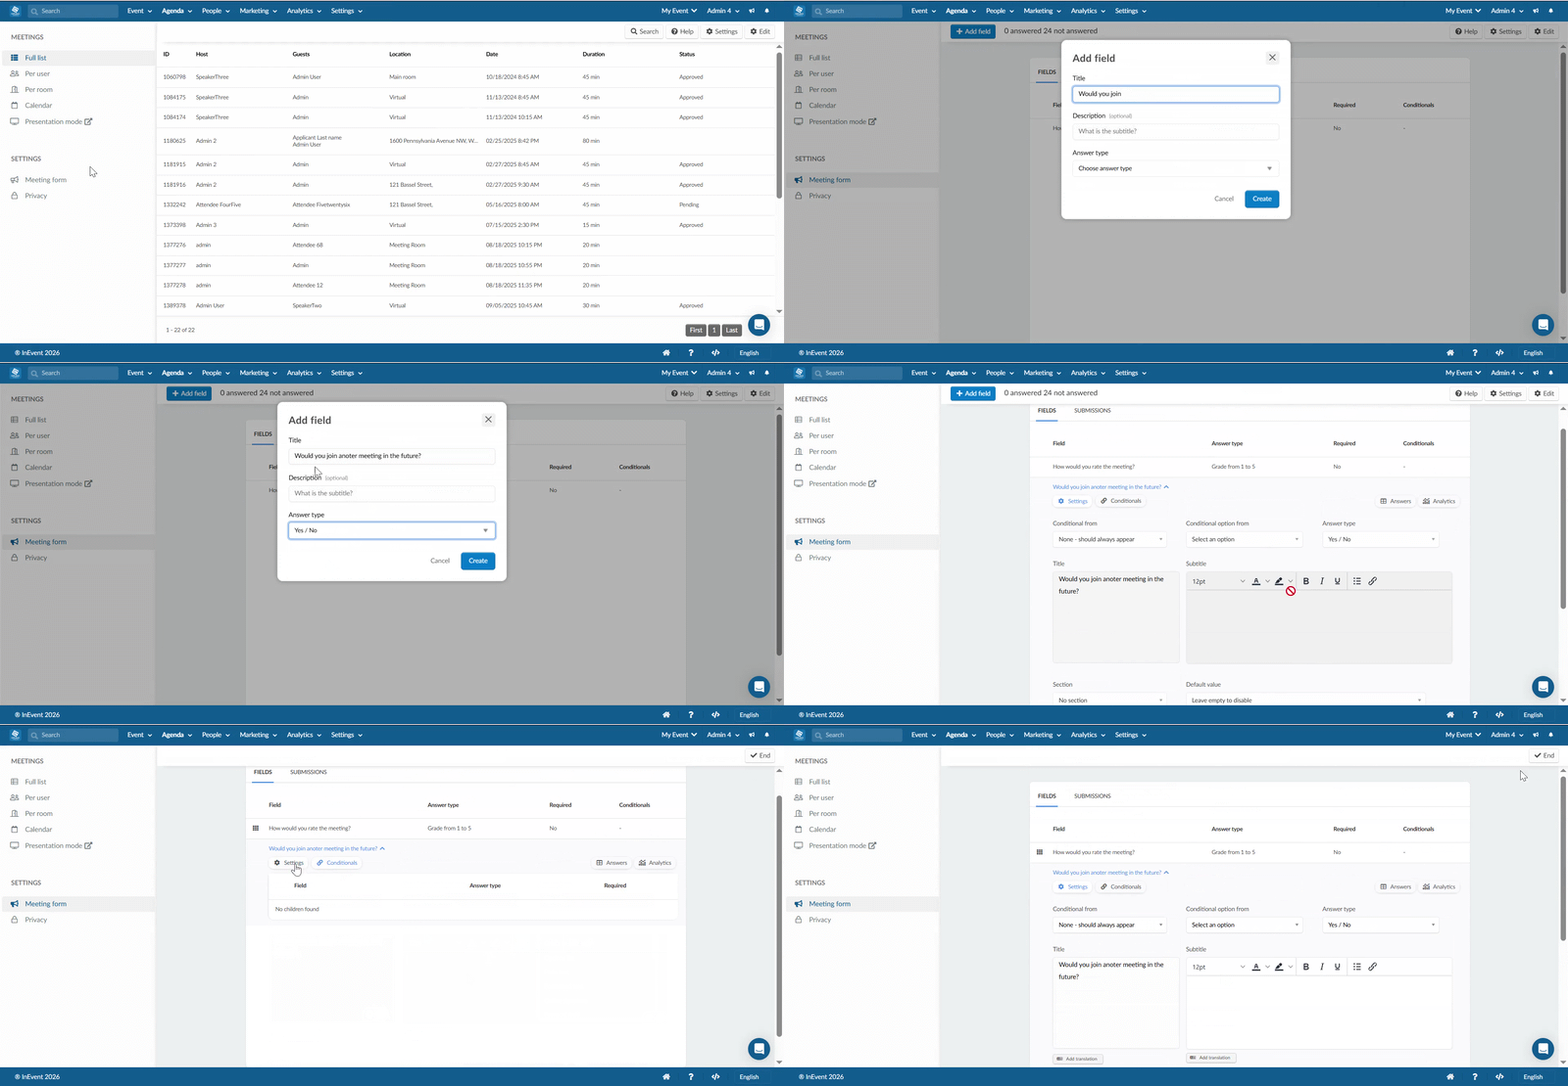
To create a meeting form that can be answered by meeting participants, follow these steps:
- Navigate to Meeting form in the left menu.
- Click on +Add field.
- Enter the field's title and choose an answer type.
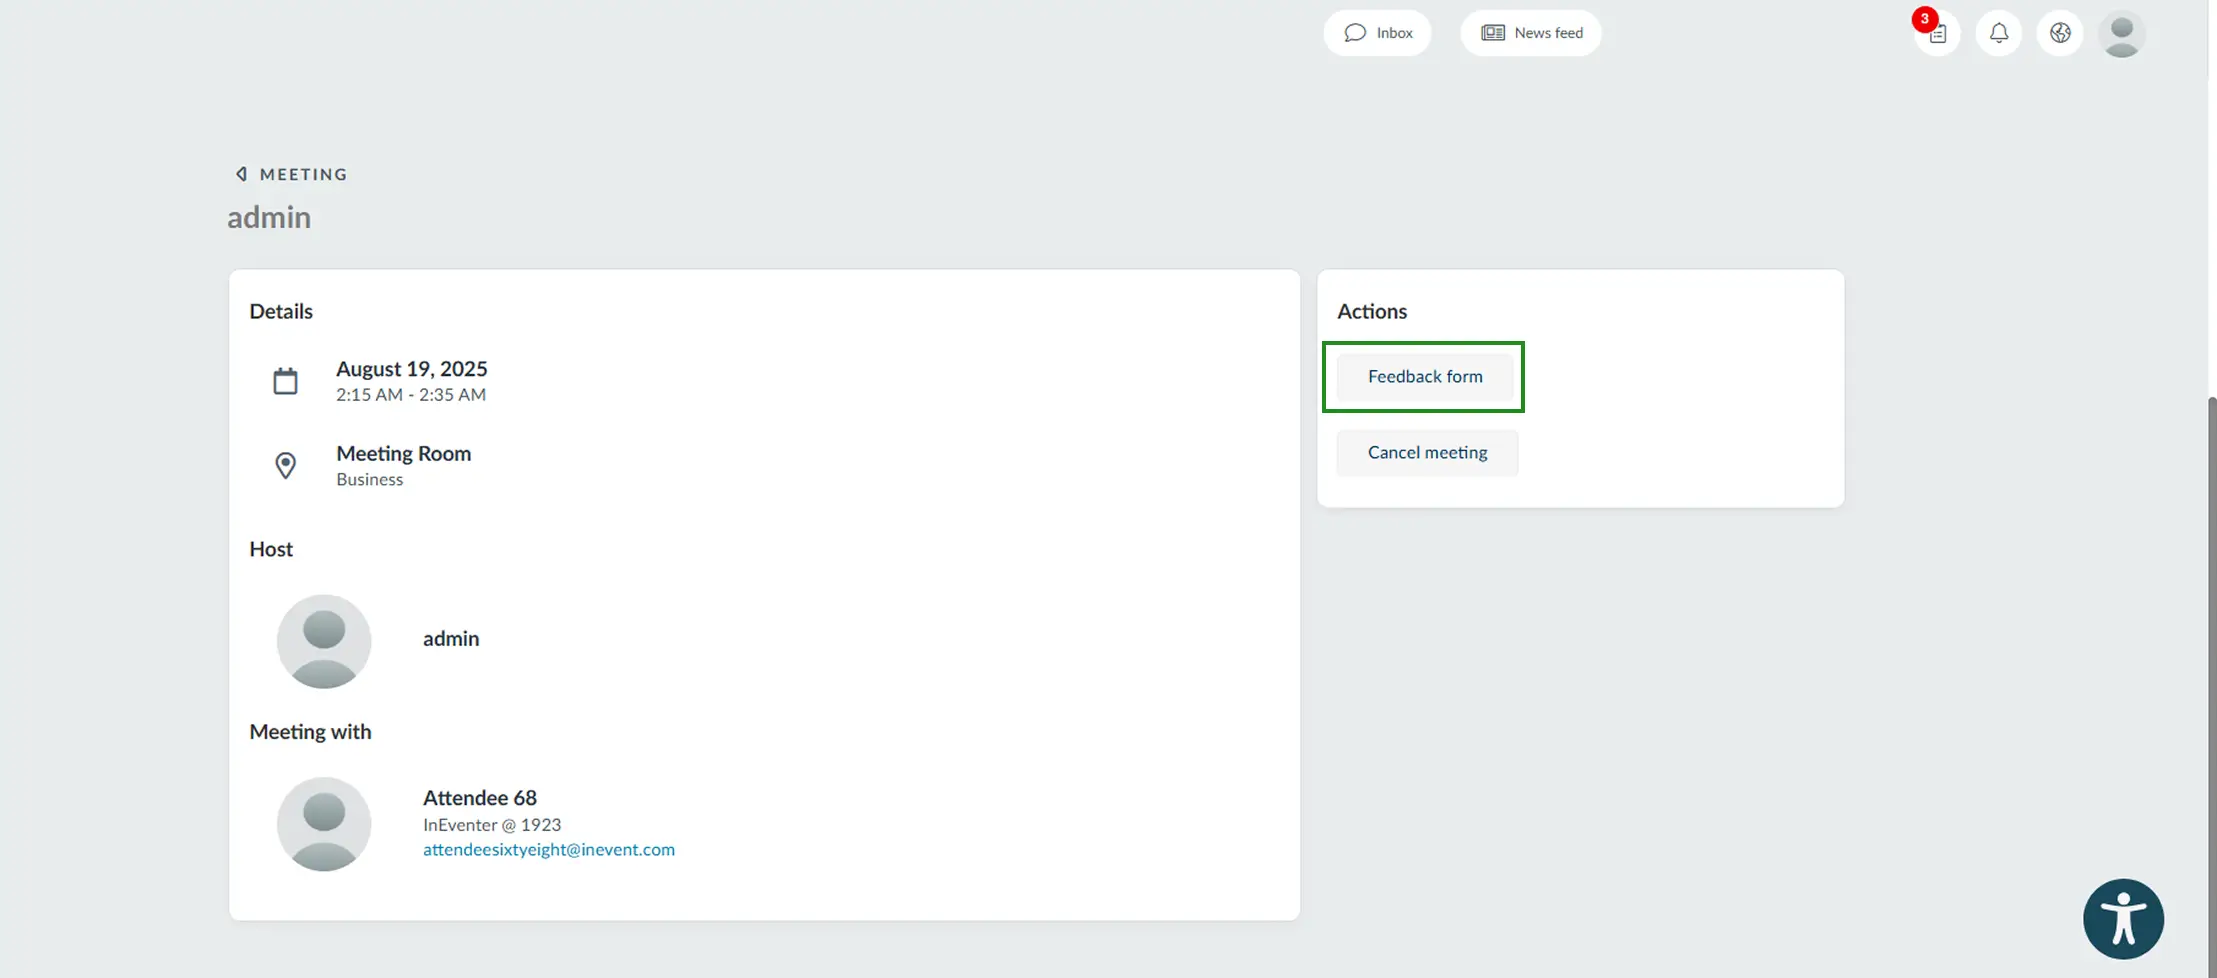
The meeting feedback form can be accessed from the meeting details section on the My Agenda > Meetings page of the Virtual Lobby. Participants will find a Feedback form button within the meeting details. Clicking on this button will redirect them to the feedback form where they can submit their responses
After participants have filled out the form, their answers will be displayed in the Submissions field of the meeting form on the platform. To view a participant's answer, simply click on the participant's name

Notifying participants about their meetings
Virtual Lobby notifications
When the event admin creates a meeting between two or multiple participants, the meeting guest(s) will receive a Virtual Lobby notification informing them that they have a meeting. The meeting slot will also appear in the main page of the Virtual Lobby and in the My agenda tab.

Automatic meeting email
If attendees book meetings themselves directly from the Virtual Lobby, they will receive meeting-related emails. For this to happen, the Meeting email tool must be enabled (it is usually enabled by default). When active, each meeting consumes two email credits, as both participants receive an email with the meeting details.
Send a .ics file attached to the meeting confirmation email
The .ics file will be attached to the confirmation email if the event admin has enabled the ics file on meeting confirmation tool (usually enabled by default), allowing the participant to save the meeting on their calendars.
Sending meeting notification manually
If you had scheduled the meetings in the backend or allowed participants to schedule themselves in the Virtual Lobby, either way, you can send emails with their individual Meeting tables. It's very simple and easy:
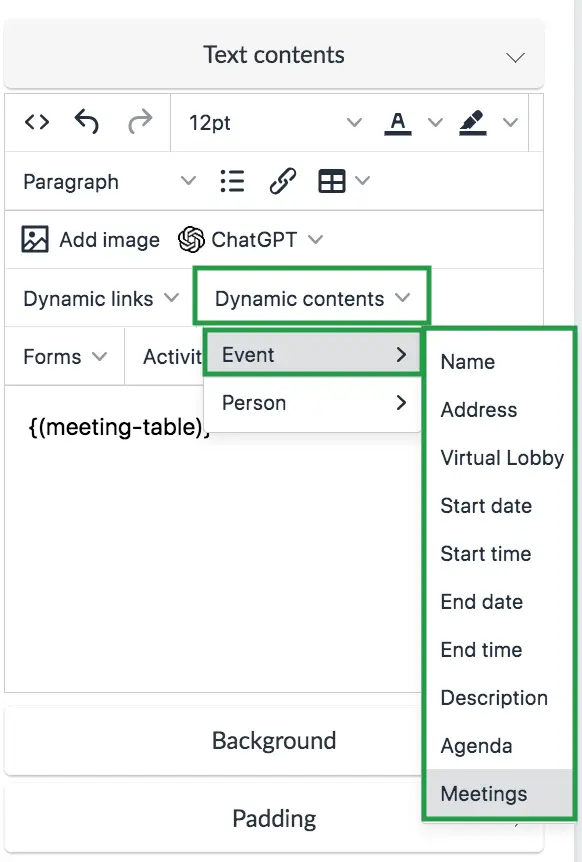
- First, you need to follow the instructions on How to add dynamic content to my email.
- Then on Dynamic contents > select Event > Meetings.
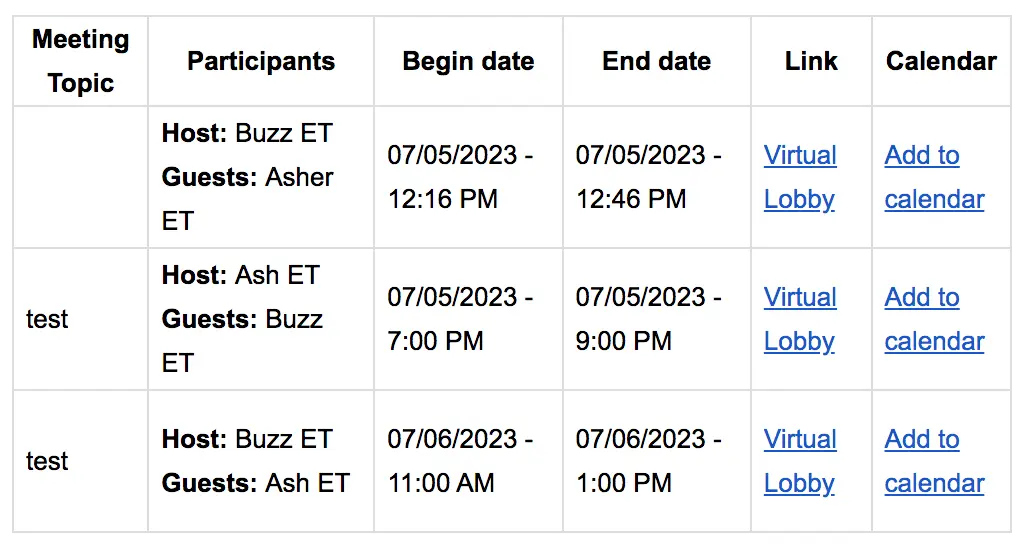
- And the participant will receive an email with a Meeting table looking like this:
Managing meeting requests between attendees
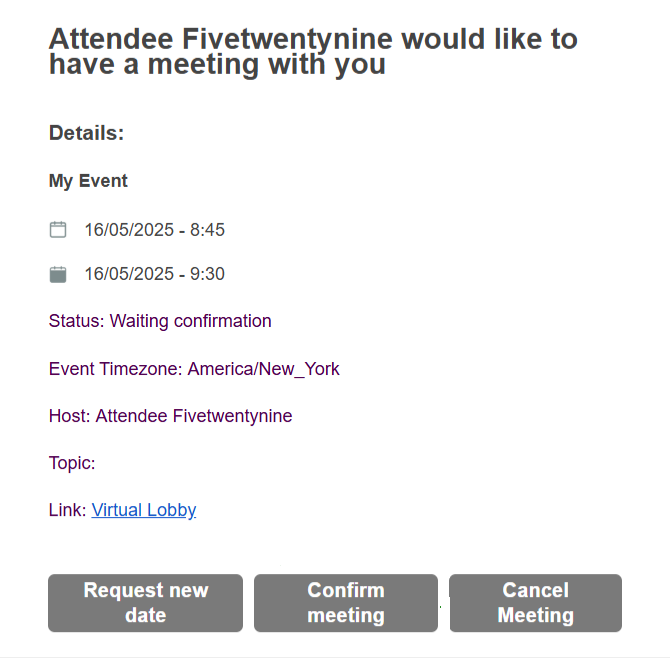
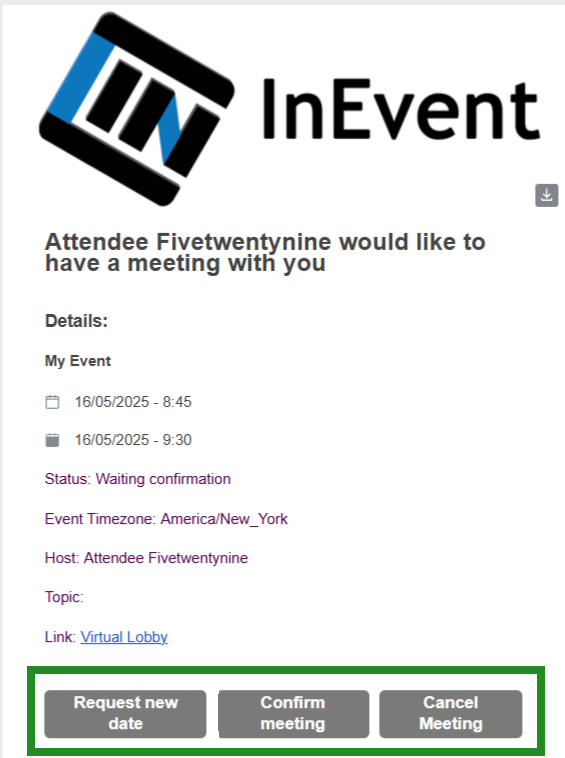
Once an attendee (host) schedules a meeting with another attendee (guest), the invited attendee (guest) will receive an email notification with all the details i.e. proposed time, date, and topic.
From there, they can confirm, decline or request new date for the meeting based on their availability. In the email, the invited attendee will be able to click on one of three buttons: confirm, cancel or request new date.
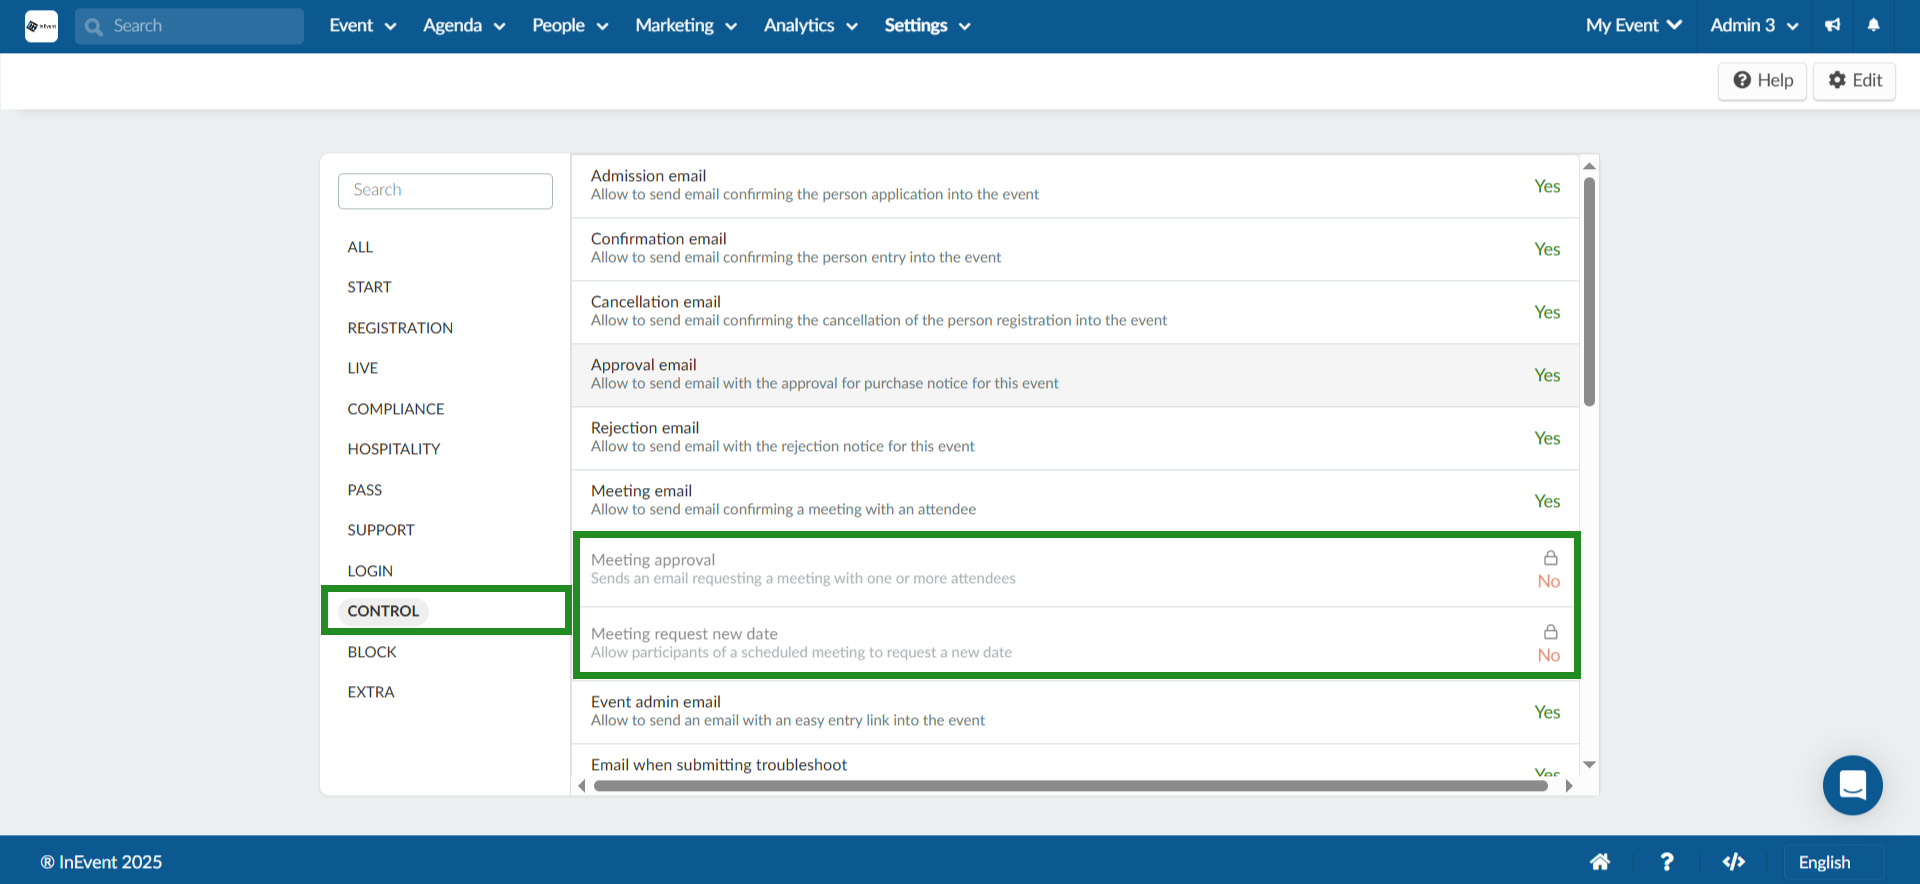
To enable the Meeting Approval tool, follow these steps:
- Go to Account > Tools at the company level.
- Select Control.
- Click on Edit.
- Locate Meeting Approval.
- Toggle on the corresponding button.
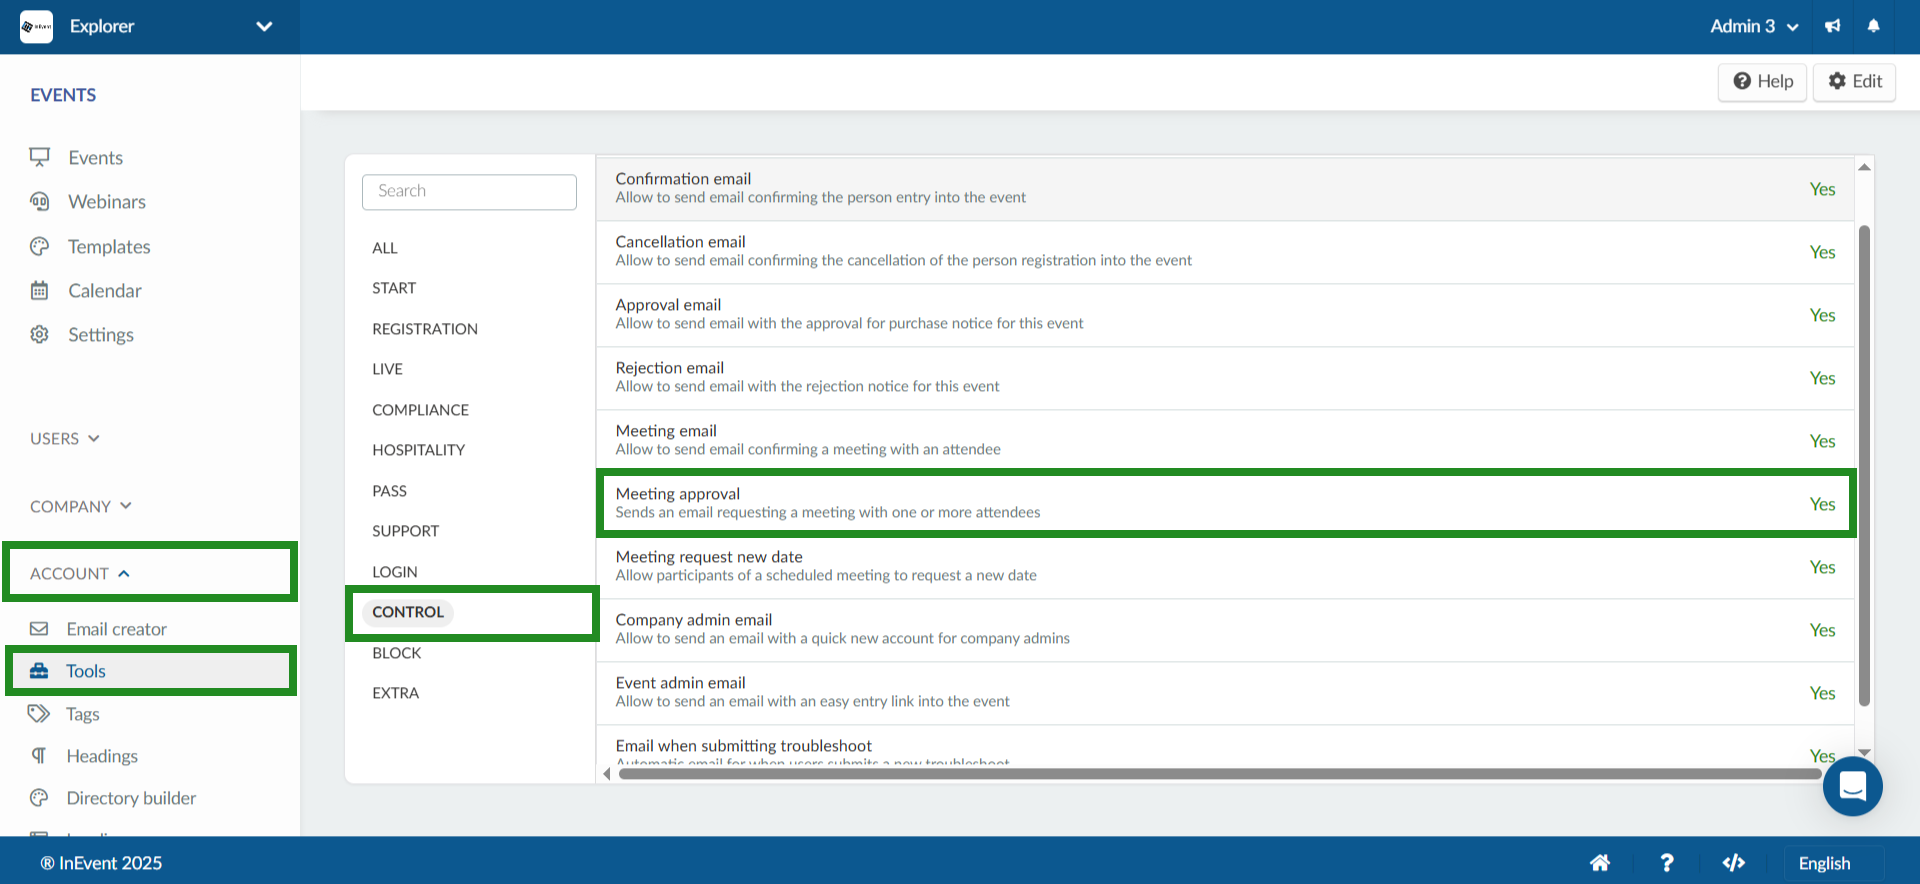
Once you are done enabling the Meeting approval tool at the company level, navigate to your event Settings > Tools select Control and toggle on the corresponding button for Meeting approval to enable the Confirm button in the email.
To enable the Meeting request new date tool, follow the same steps by first enabling the tool at the company level and then at the event level. The attendee will then be able to see the confirm, cancel and request new date button as shown below.
To know more about requesting new date for meetings, refer to our Meetings: Guide for participants article.
Checking the Meetings' report
You can get an Excel report on the meetings created by clicking on Edit > Report at the top left corner of the page.

An Excel sheet will be sent to your email containing:
- Information on the meeting such as: IDs (meeting,person,host,guest), PlaceID, reason, type, placeName, placeCategory, Capacity, dateBegin, dateEnd, totalTimeSpent, dateBeginTimezone, dateEndTimeZone.
- Information on the host and guest: names, roles, companies, images, status, check-ins, emails, telephones and hostPersonheadline.
- Attendance: You can check the meeting attendance by looking at the check-in columns in the report.
To find out if the host attended the meeting view hostCheckIn, if the field contains a yes, it means the host attended, if the field contains a no, then it means the host did not attend the meeting.

To find out if the guest attended the meeting, view guestCheckIn. Once again, if the field contains a yes, it means the guest attended, if it contains a no, it means the guest did not.

- Duration: To find out the duration of the meeting, check the column totalTimeSpent:

Live Performance
To check the analytics of the Meetings that took place, you can go to Analytics> Virtual Lobby reports. Under the Live Performance, at the column name you can see the Meeting room #
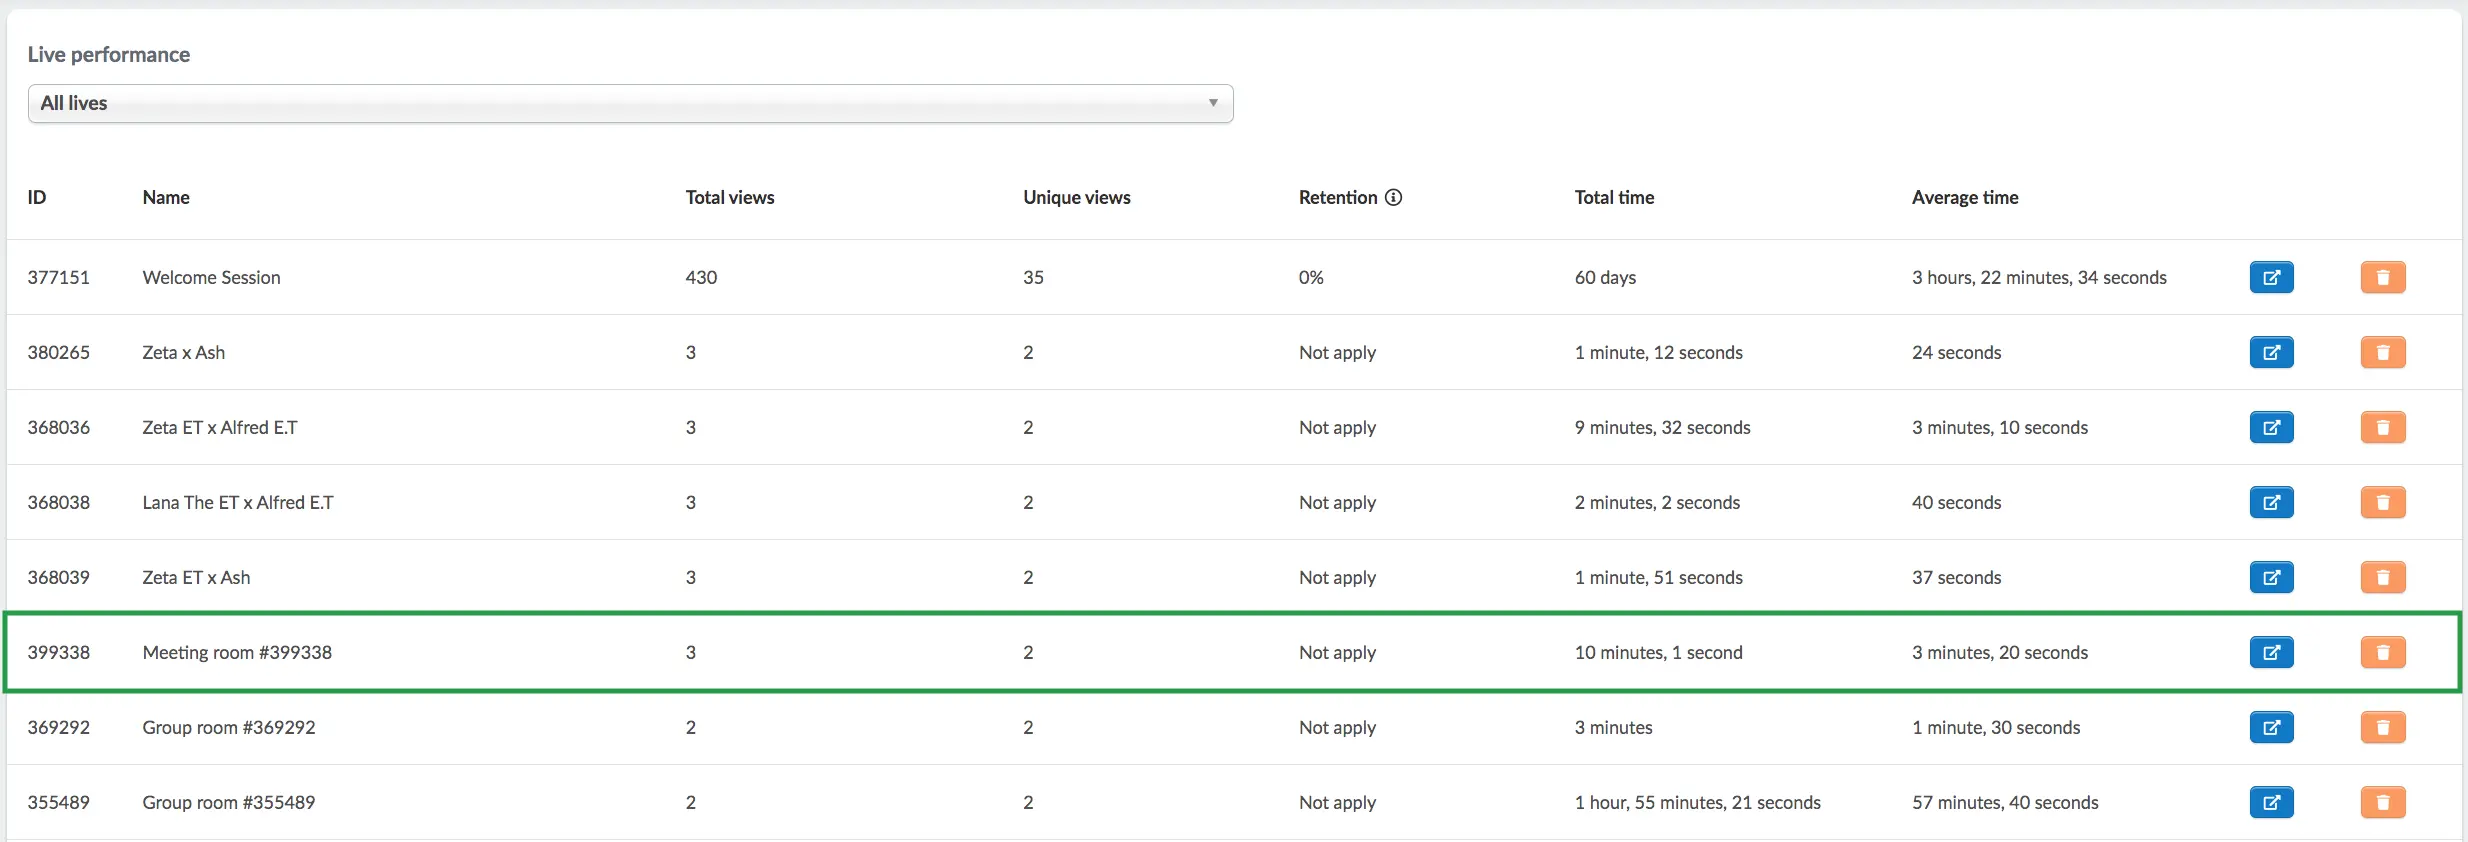
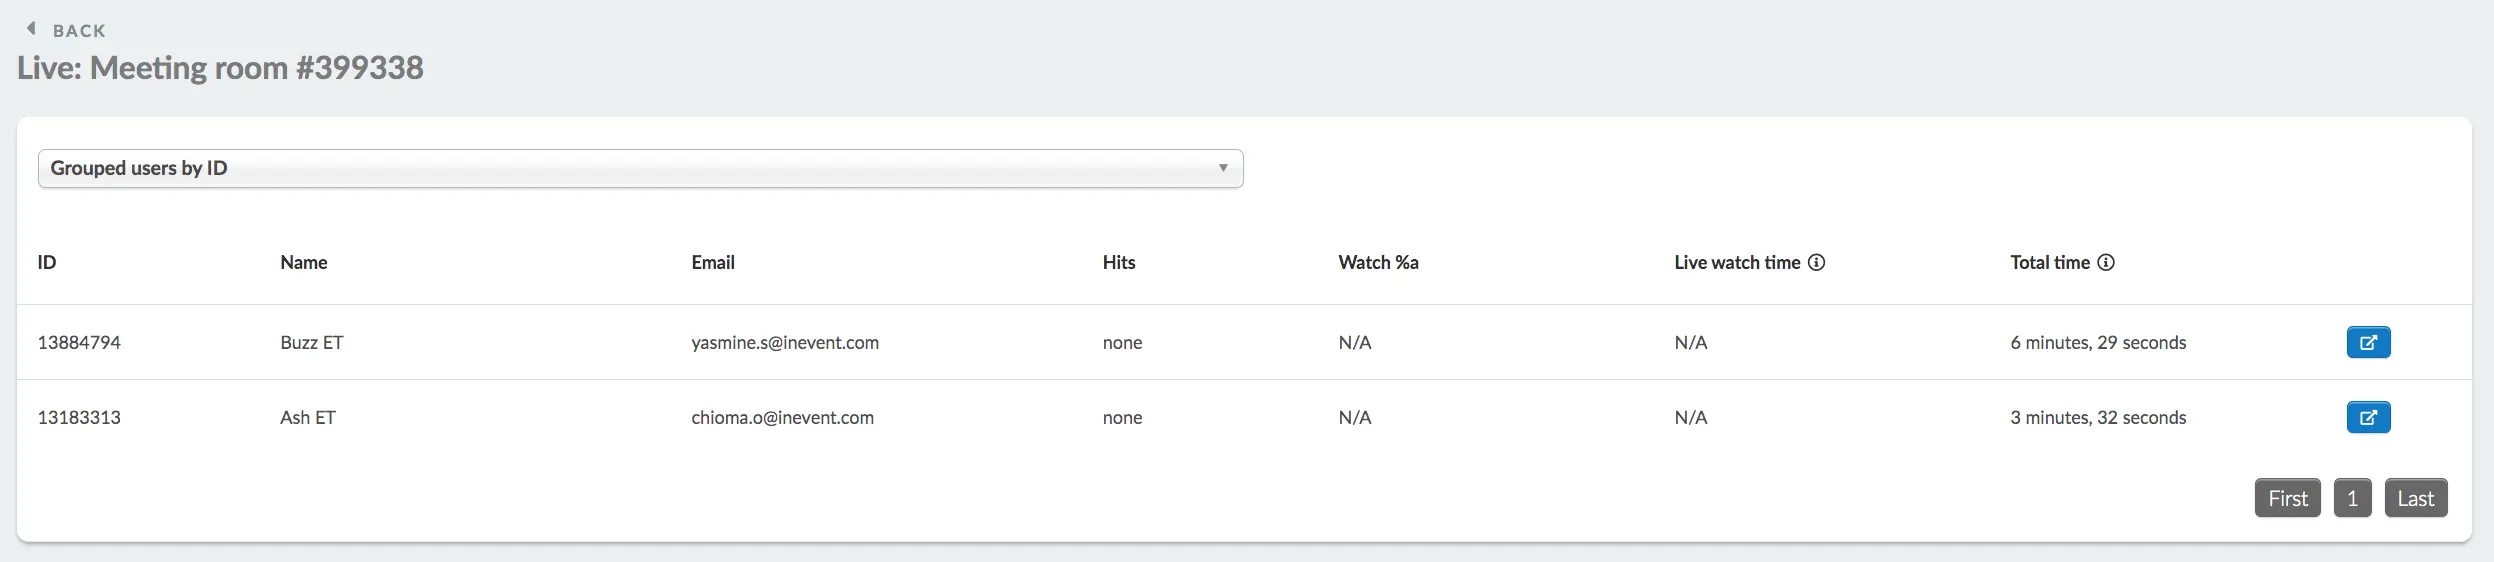
By clicking on the blue button on the far right, you can find more details such as the participants, the time spent inside the room, etc.
Instructions for participants
If you are an attendee and you wish to learn how to find out about your meetings, how to answer feedback surveys about your 1x1s, and much more, refer to our Meetings: guide for participants article.
