Filtering attendees
This article intends to help you filter the attendees' list of your event so you can find your target participants according to specific parameters.
If you wish to learn how to add attendees to your event, refer to the Attendees' list: registering participants in your event article.
Filtering attendees
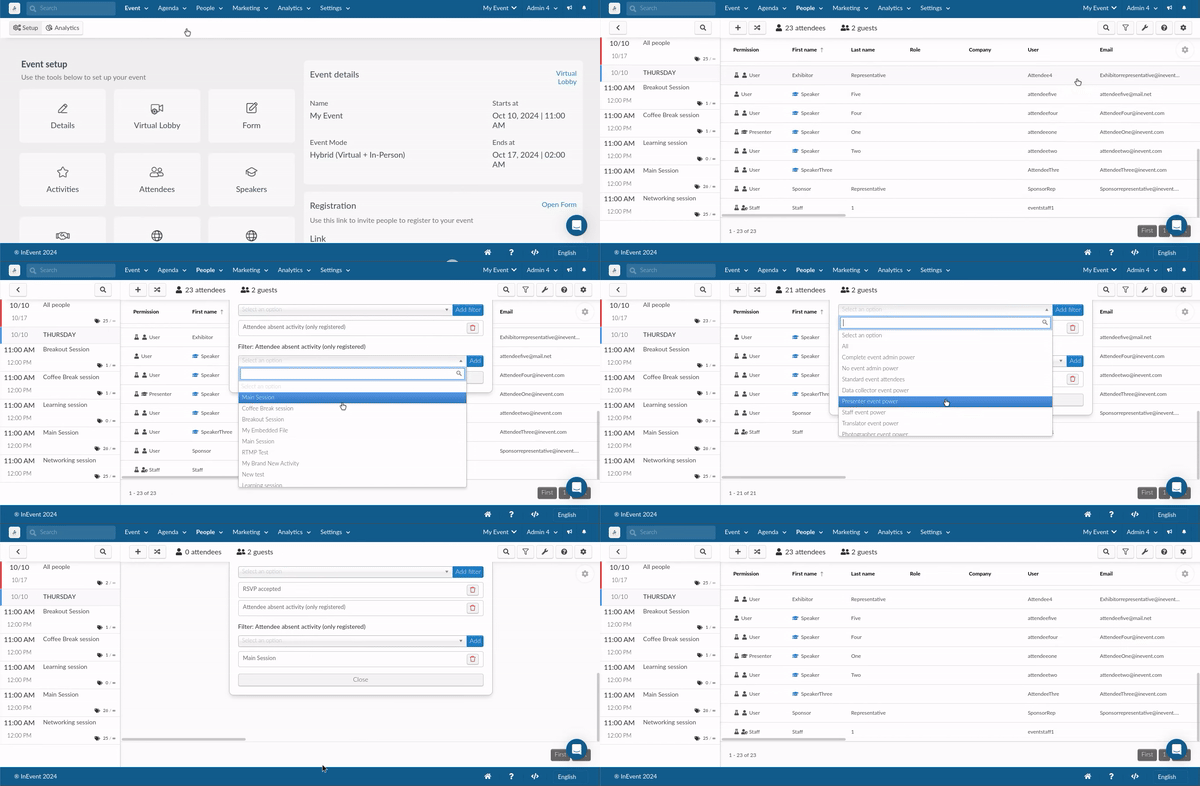
Go to People > Attendees, and once you have your attendees' list ready, follow the steps below:
- Click on Filter and select the parameters that will be used to segment your attendees' list.
- Click on Add Filter.
You can use more than one filter to further narrow down the results.
- Click on Close to view the filtered results.

To remove a filter from your search, click on the trash icon on the right-hand side of the filter you wish to remove, as shown above.
Filters
InEvent currently offers various filters and you can select as many filters as you need. Check below all filters we offer:
- Complete event admin power: It shows attendees with event admin permission.
- No event admin power: It shows attendees who are not the event admin.
- Standard event attendees: It shows attendees with user permission.
- Specific event power: It shows attendees with different specific permissions for the event - Presenter, Staff, Translator (Interpreter), Photographer.
- Linked speakers: It shows attendees who have speaker permissions in specific activities.
- Custom list: This filter shows attendees who belong to one or more Custom lists. It brings out a second filter layer that allows you to specify the Custom list(s).
- Tags: This filter shows attendees who have selected or have been assigned one or more Tags. It brings out a second filter layer that allows you to specify the Tag(s).
- Tickets: This filter shows attendees who have purchased or have been assigned one or more Tickets. It brings out a second filter layer that allows you to specify the Ticket(s).
utm_source: Salesforce's auto-generated Campaign Source UTM parameter. This parameter needs to be specified using the second layer of filter.utm_medium: Salesforce's auto-generated Campaign Medium UTM parameter. This parameter needs to be specified using the second layer of filter.utm_campaign: Salesforce's auto-generated Campaign Name UTM parameter. This parameter needs to be specified using the second layer of filter.utm_content: Salesforce's auto-generated Campaign Content UTM parameter. This parameter needs to be specified using the second layer of filter.
For more information on integrating Salesforce with InEvent, refer to our Integration with Salesforce article. For more information on Salesforce's auto-generated UTM parameters, refer to the official Salesforce documentation on UTM Parameters.
- Browser: It shows a list of attendees who registered for the event using any of the browsers selected under the filter's options.
- Operational system: It shows the list of attendees using any of the operational systems selected under the filter's options.
- E-mails sent: It shows attendees who have received the confirmation e-mail.
- E-mails not sent: It shows attendees who have not received the confirmation e-mail.
- Troubleshoot submitted: It shows attendees who have submitted a troubleshooting report.
- Troubleshoot not submitted: It will display attendees who have not submitted a troubleshooting report after experiencing issues with the platform.
- NFC synced: It shows attendees whose profiles are synchronized with the NFC bracelets for in-person events. To learn how to synchronize an attendee with the bracelet click here.
- NFC not synced: It shows attendees whose profiles are not synchronized with the NFC bracelets for in-person events.
- Badge printed: It shows attendees who have received a printed badge after having their NFC bracelets synchronized at in-person events. To learn more about this process click here.
- Badge not printed: It shows attendees who have not received a printed badge yet.
- RSVP accepted: It shows attendees who have confirmed their presence at the event using the RSVP form.
- RSVP declined: It shows attendees who have declined their presence at the event using the RSVP form.
- RSVP waiting: It shows attendees who have not filled in the RSVP form.
- App downloaded: It shows attendees who have downloaded the app.
- App not downloaded: It shows attendees who have not downloaded the app.
- Missing role, company or image: It shows attendees whose profiles are either missing the role, company or image field.
- Attendee present in-person: It allows you to see the list of attendees who have attended the in-person event. Once attendees check in using the QR code, they are counted as attendees present in-person.
- Attendee absent in-person: It allows you to see the list of registered attendees who did not show up for the in-person event.
- Attendee present online: It allows you to see the list of attendees who have joined a session in the Virtual Lobby. Once attendees join any session in the Virtual Lobby, they are counted as attendees present online.
This filter counts attendees who join external link activities as well.
- Attendee absent online: It allows you to see the list of registered attendees who never joined any session in the Virtual Lobby.
- Attendee present activity: It allows you to see the list of registered attendees who are present in an activity
- Attendee absent activity (only registered): It allows you to see the list of registered attendees who are absent from an activity.
- Attendee present online right now: It allows you to see the list of attendees who are in the Virtual Lobby at the time of filtering.
- Attendee opened the Virtual Lobby: It allows you to see the list of attendees who have opened the Virtual Lobby.
- Attendee never opened the Virtual Lobby: It allows you to see the list of attendees who have never opened the Virtual Lobby.
- Attendee public for chats: It shows attendees who have set their profiles as Visible when registering.
- Attendee private for chats: It shows attendees who have set their profiles as Private when registering.
Searching for attendees
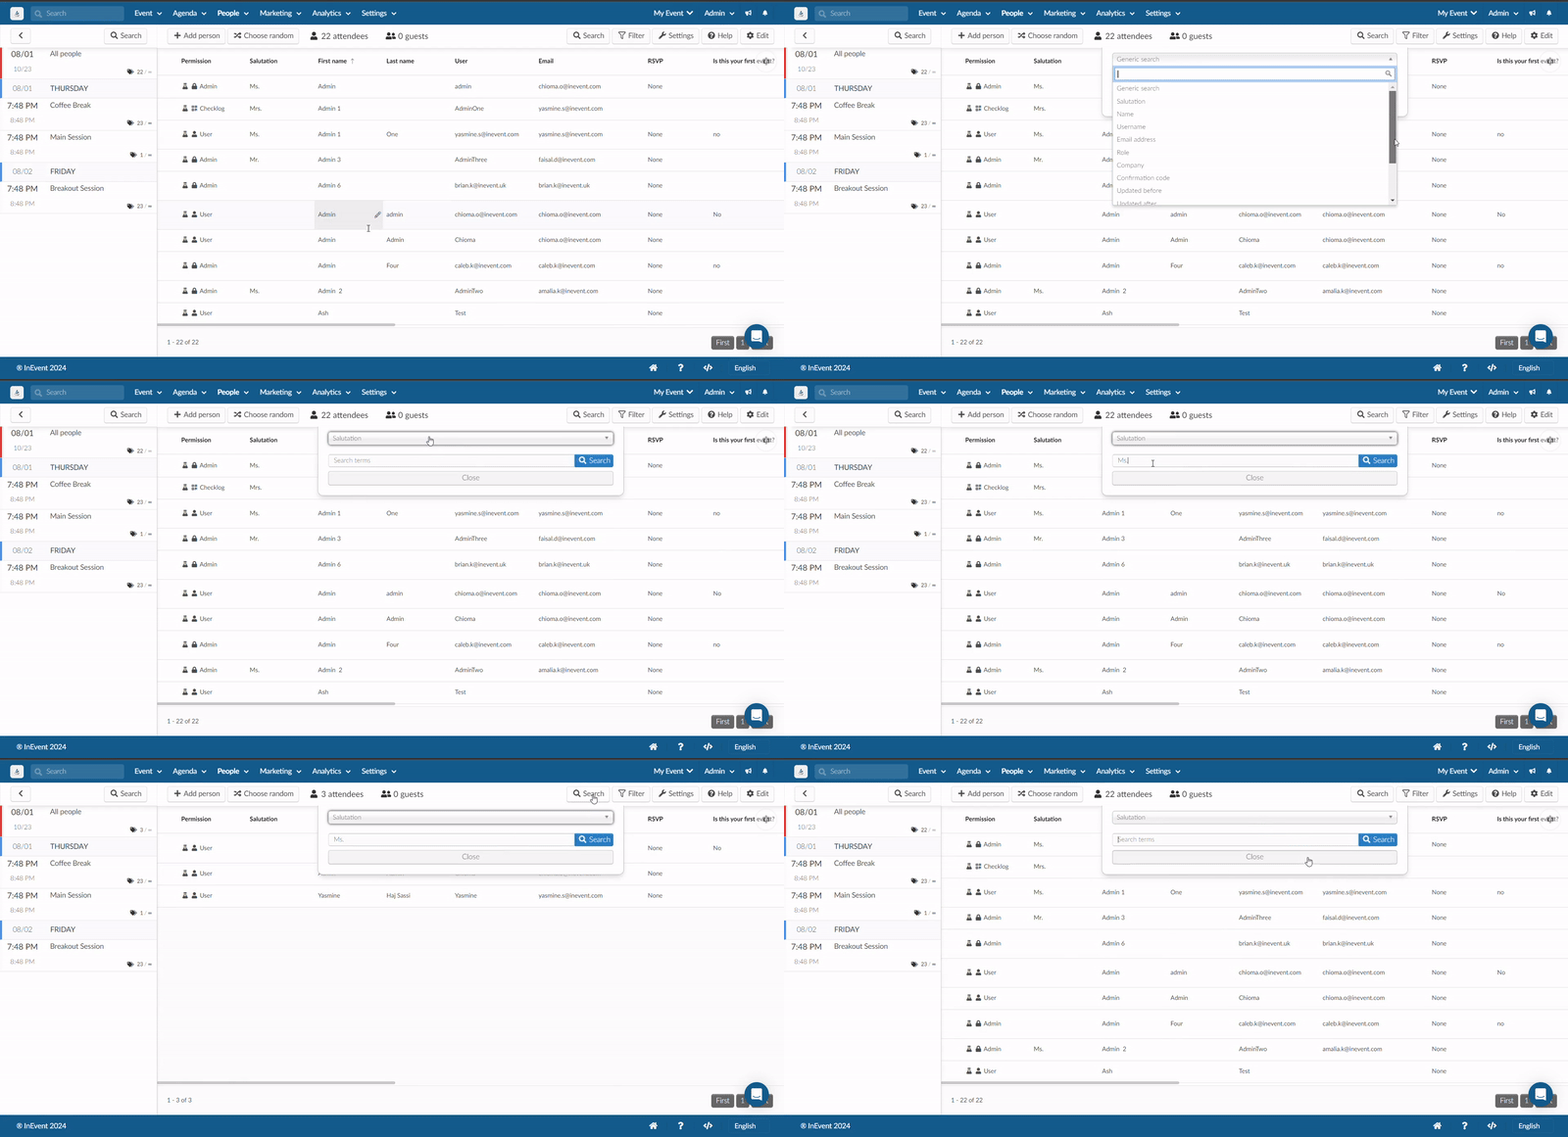
If you want to find attendees using specific information you already know about them, you can use the Search button.
- Click on Search and select the parameter that will be used to segment your attendees' list. (For example, Name). The available parameters are as follows:
- Generic search
- Salutation
- Name
- Username
- Email Address
- Role
- Company
- Confirmation code
- Updated before
- Updated after
- Ticket
- QR code
- Registration form custom fields
- Write the term you are looking for.
When using either the Updated before or Updated after parameter, you will see the Select a date field, for you to select the specific date you need. When using the the Ticket parameter, you will see a drop down to select a specific ticket.
- Click on Search and then Close.


