Integration with Salesforce
 Updated 3 months ago
by
Amalia
Updated 3 months ago
by
Amalia
- Set up OAuth 2.0 for Salesforce Integration
- Data integration between InEvent and Salesforce
- Integrating InEvent with Salesforce
- Configuring synchronization at the Event level
Integrating InEvent with Salesforce can shape a whole new way of creating a customer-centric view of your event attendees that will help you get more results out of your customer database, mitigate risk and enable a frictionless sales process. This integration works two ways, so data that is synchronized to your Salesforce database will also appear on the InEvent platform.
Set up OAuth 2.0 for Salesforce Integration
InEvent supports connecting to Salesforce through OAuth 2.0 for secure authentication and data synchronization. If your Salesforce environment uses OAuth 2.0, you’ll need to configure a Connected App in Salesforce before linking your account.
If you’re using the built-in connection flow, by clicking Connect with Salesforce from the InEvent platform, InEvent will handle the authentication automatically allowing you to sync and transfer data securely without additional configuration.
Create a Connected App in Salesforce
- Log in to your Salesforce account.
- Go to Setup > App Manager > New Connected App.
- Fill out the basic information (name, email, etc.).
- Under API (Enable OAuth Settings), check Enable OAuth Settings.
- In the Callback URL field, enter: https://app.inevent.com/salesforce/oauth
- Under Selected OAuth Scopes, add:
- Access and manage your data (api)
- Perform requests on your behalf at any time (refresh_token, offline_access)
- Save the Connected App and wait a few minutes for Salesforce to propagate the changes.
- Copy the Consumer Key (Client ID) and Consumer Secret (Client Secret) from the app details.
Once completed, you can move on to configuring the integration within InEvent. For more information refer to the Salesforce guide on Connected Apps
Data integration between InEvent and Salesforce
Event organizers can configure and synchronize the following items between Salesforce and InEvent.
- Salesforce Campaigns with InEvent Events and Activities
- Salesforce Campaign fields with InEvent Registration form fields
- Salesforce Fields with various InEvent fields
- Salesforce Objects with InEvent Questions, Comments, Polls and UTM links
Integrating InEvent with Salesforce
Before synchronizing items between Salesforce and InEvent, you first need to integrate InEvent with Salesforce at the Company level. To do so, complete the following instructions:
- Navigate to Integrations > Salesforce.
- Click Edit.
- Press Link Production Account or Link Sandbox Account depending on the type of your Salesforce account.
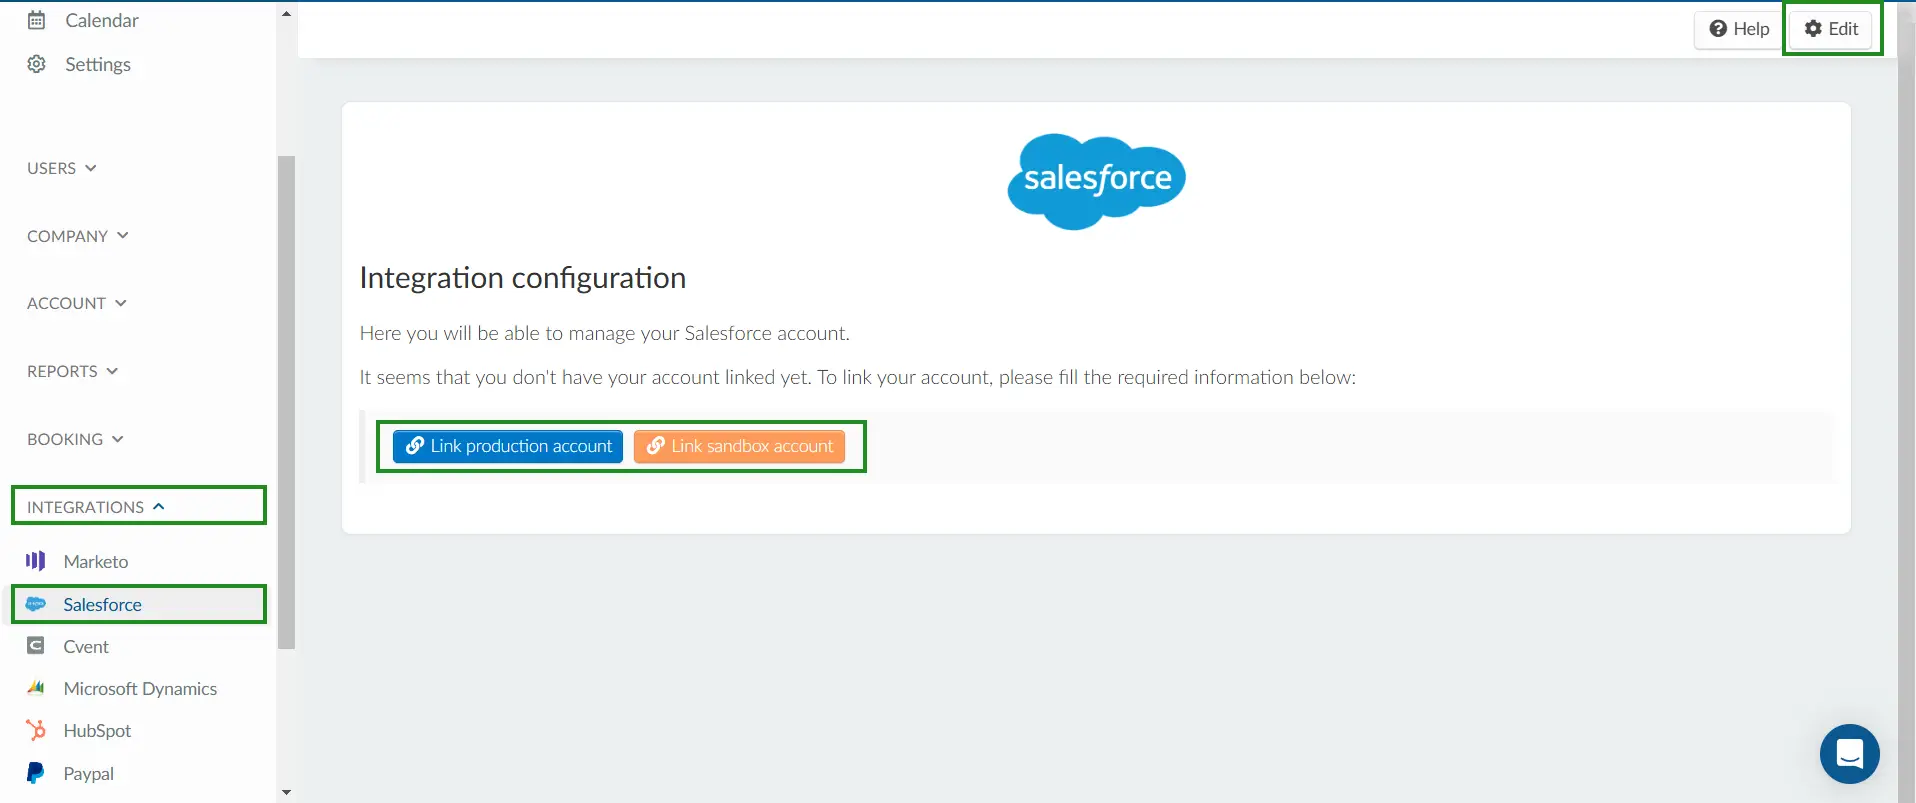
- Complete the Salesforce log-in process. Once your Salesforce account is linked with InEvent, the interface will be updated.
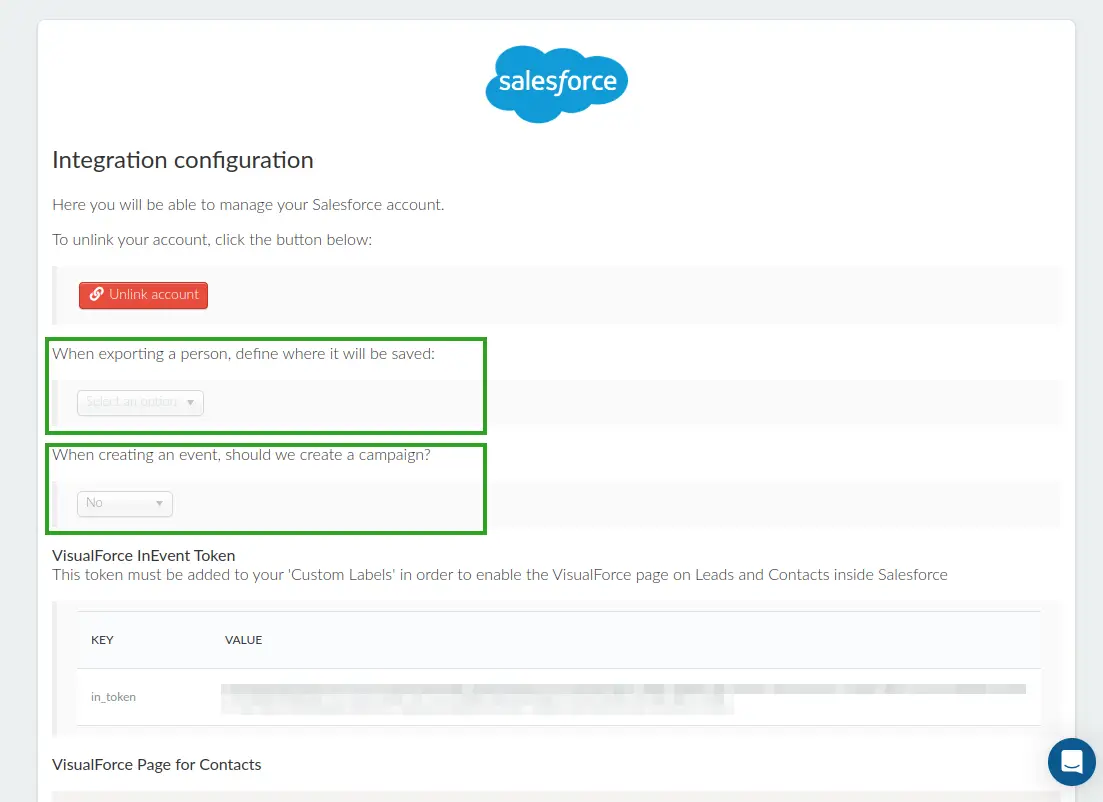
- Complete the integration configuration by using the drop-down box for the following options.
- When exporting a person, define where it will be saved: Select the target Salesforce category to be automatically synced when exporting a person from InEvent. The available options are Automatic, Contacts, and Leads.
- When creating an event, should we create a campaign?: Select whether or not to automatically create a Salesforce campaign when creating an event. The available options are Yes and No.
Salesforce custom profiles or permissions
The integration page at the Company level lists the permissions needed for the integration to fully work when using custom profiles or permission sets within Salesforce. Administrators can also opt to use minimal Salesforce profiles or permission sets with limited capabilities by only enabling select permissions. The minimum required permissions are as follows.
- System Permissions / API Enabled
- System Permissions / Connected App Oauth
In addition to the above items, ensure to also enable permissions for the desired capability, such as for accessing and/or editing Salesforce Leads, Contacts, etc.
Configuring synchronization at the Event level
This section will inform you on how to configure Salesforce synchronization with InEvent at the Event level.
The Salesforce integration configuration interface can be accessed from the Event level by navigating to Settings > Integrations > Salesforce.
Through this interface, you can configure the synchronization of the following items.
- Campaign
- Fields
- Event fields
- Activities
- Activity members
- Questions
- Comments
- Polls
- UTM
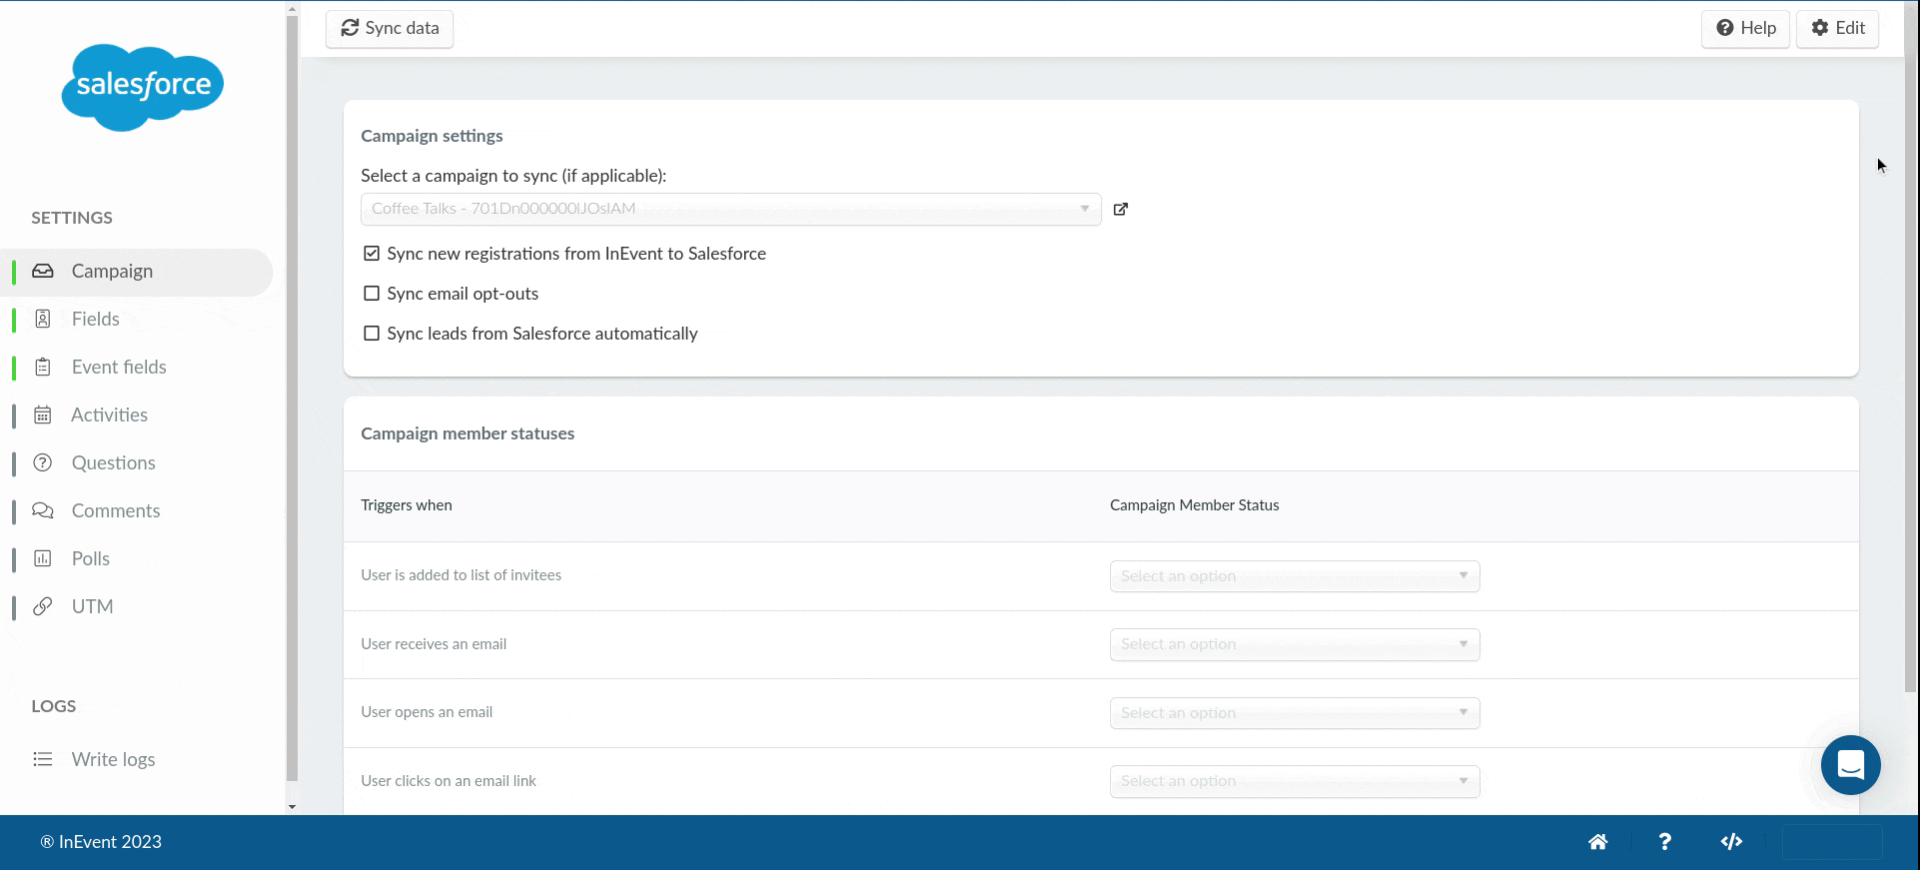
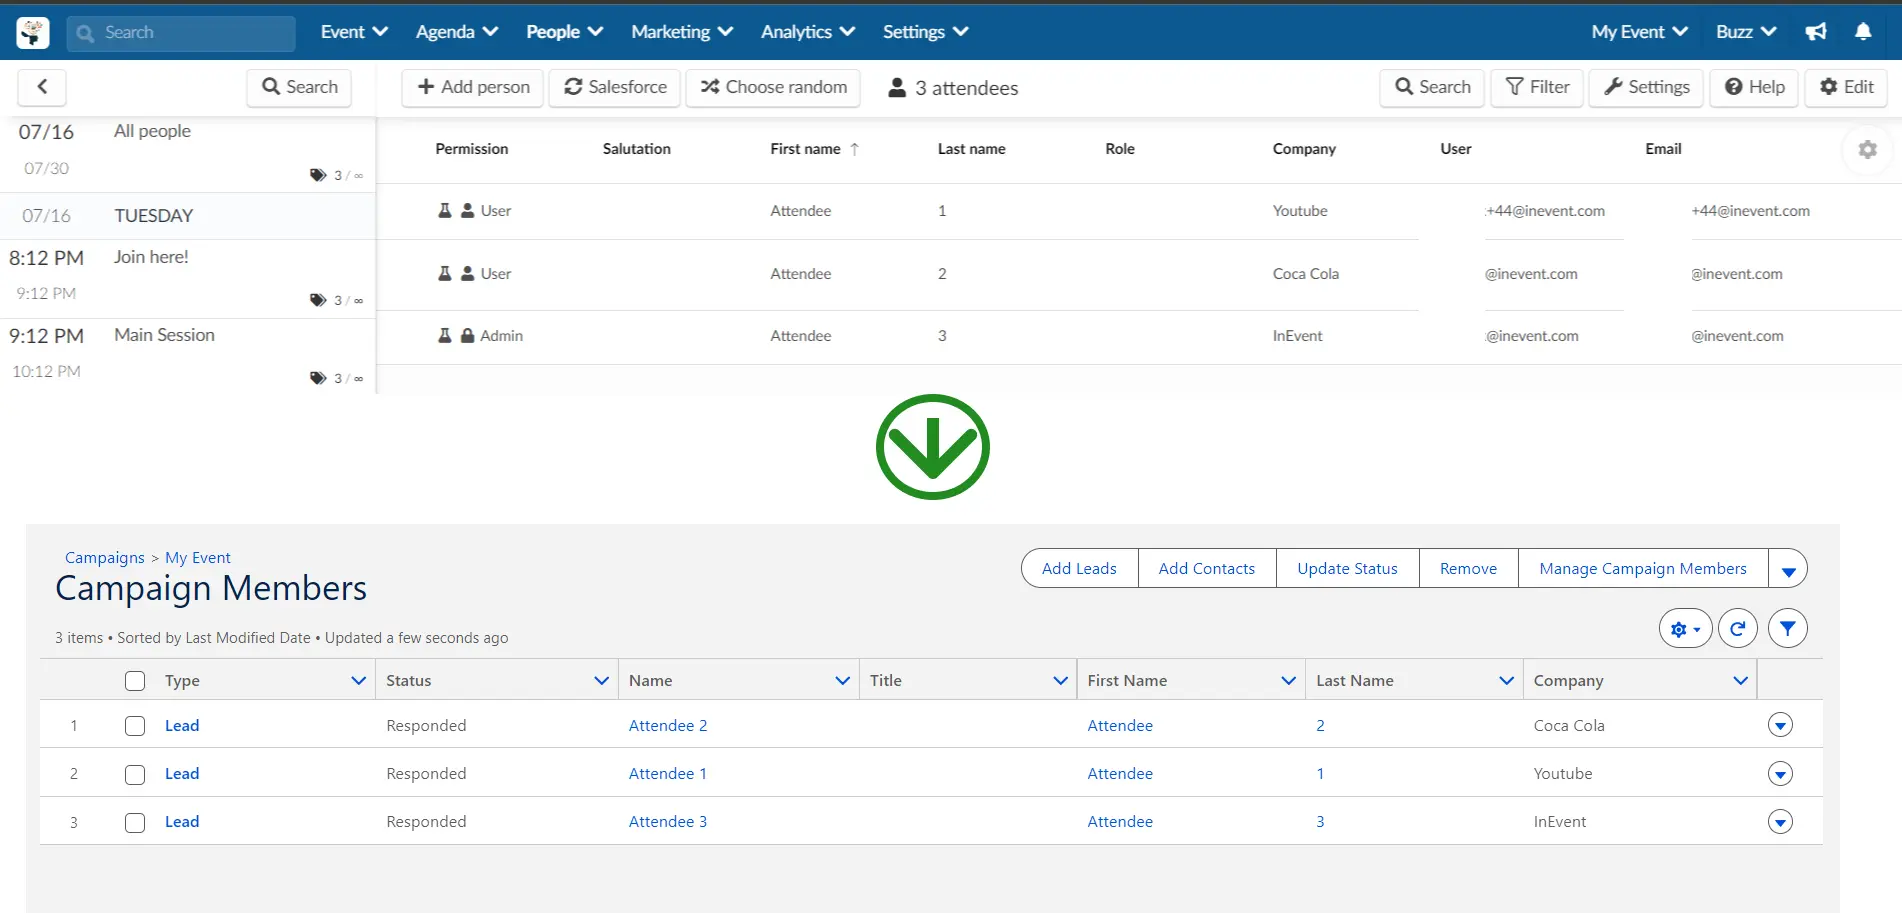
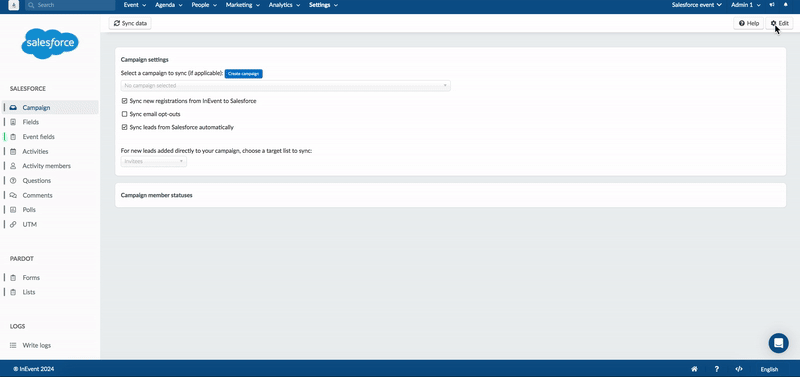
Campaign
In this section, you can manage your Campaign settings and Campaign member statuses.
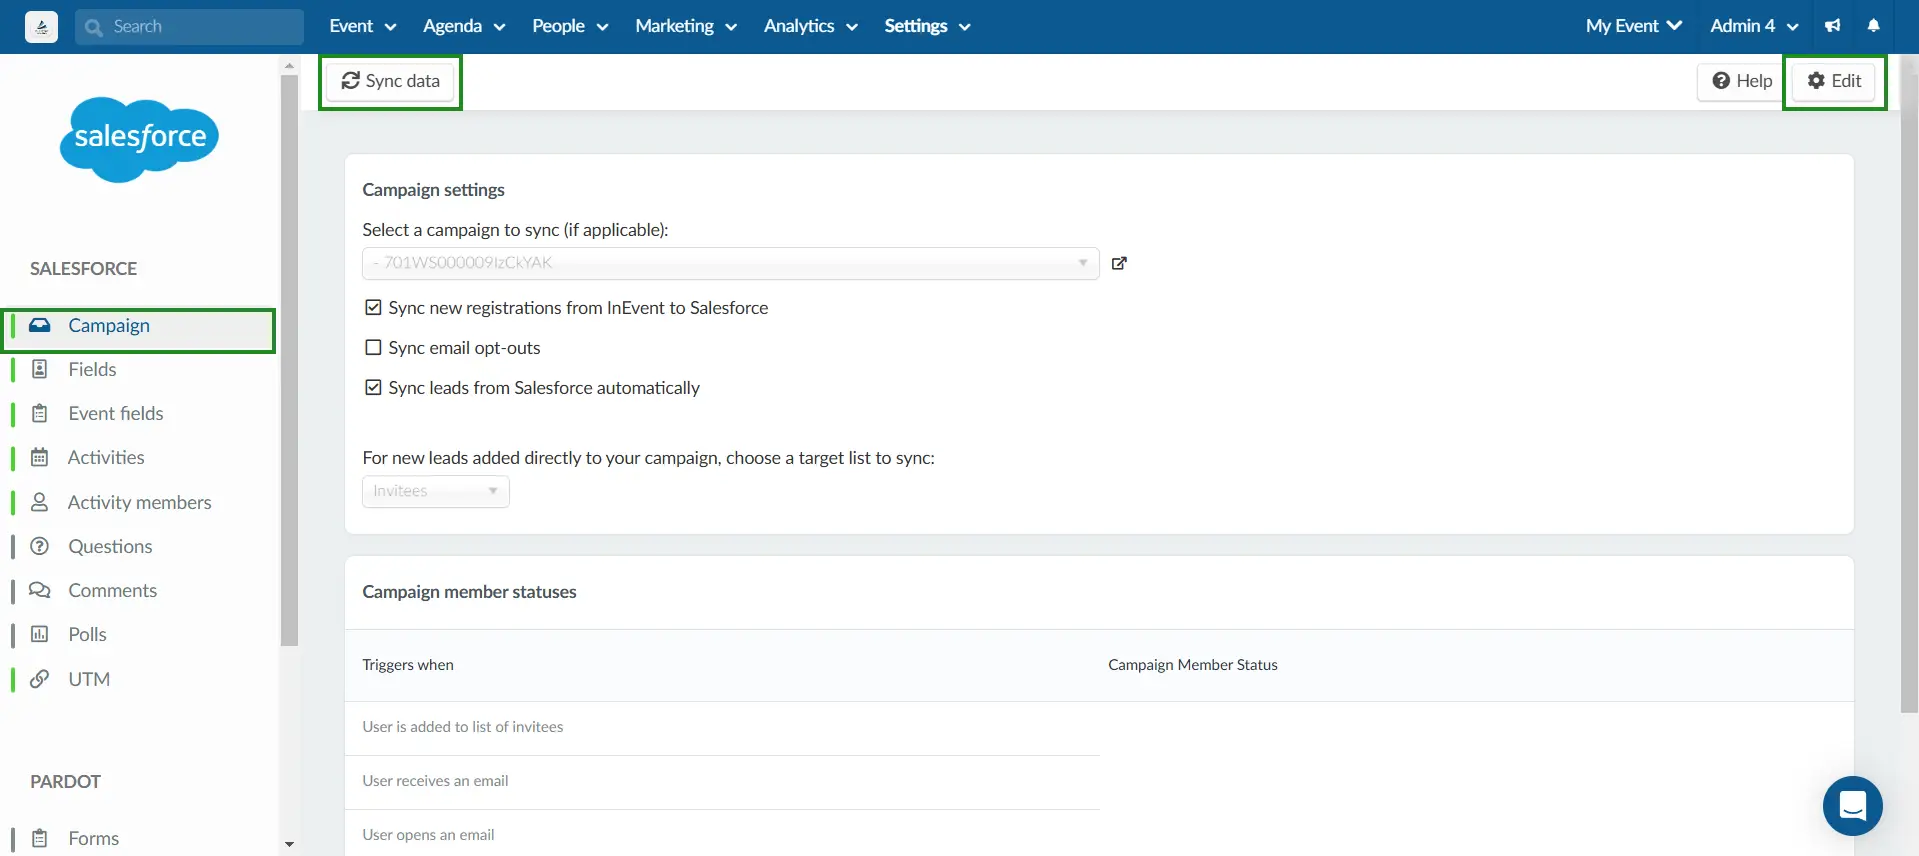
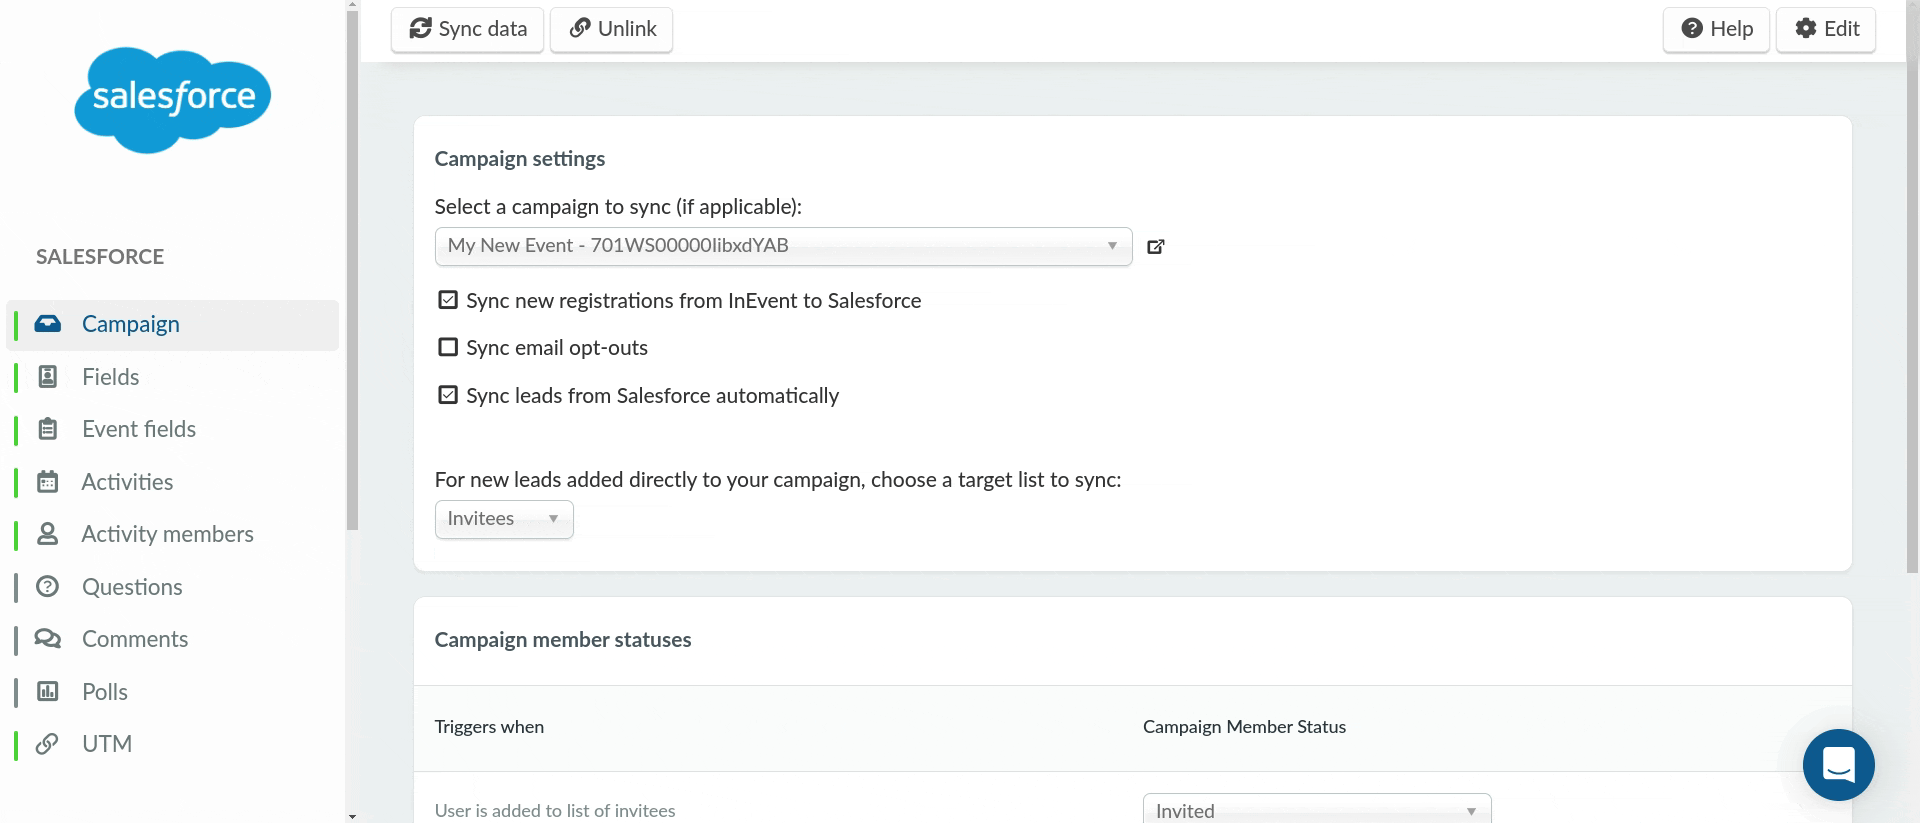
Campaign settings
Here, you can select a campaign to be synchronized with your event. Below are the available options.

- Select a campaign to sync (if applicable): Using the drop-down box, select an existing Salesforce campaign to be synchronized with your event. Once a campaign is selected, the interface will be updated to show Campaign member statuses.
- Sync new registrations from InEvent to Salesforce: Using the checkbox, enable or disable synchronization of new registrations from InEvent to Salesforce.
- Sync email opt-outs: Using the checkbox, enable or disable synchronization of email opt-outs from InEvent to Salesforce.
- Sync leads from Salesforce automatically: Using the checkbox, enable or disable synchronization of Salesforce leads to InEvent. If this tool is enabled, a new option will be displayed.
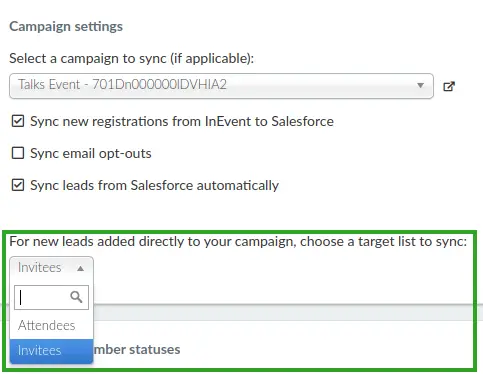
- For new leads added directly to your campaign, choose a target list to sync: Using the drop-down box, select a target InEvent list to be synchronized with new campaign leads added through Salesforce. The available options are Attendees and Invitees.
Once your campaign is linked and configured, you can manually start the synchronization process by clicking Sync data from the Campaign settings interface. Doing so will also trigger synchronization for all linked fields.
Unlinking an event from a Salesforce campaign
Administrators can completely unlink an event from the associated Salesforce campaign by clicking on Unlink on the top menu. The Unlink button will only be visible for events that are linked to Salesforce campaign.
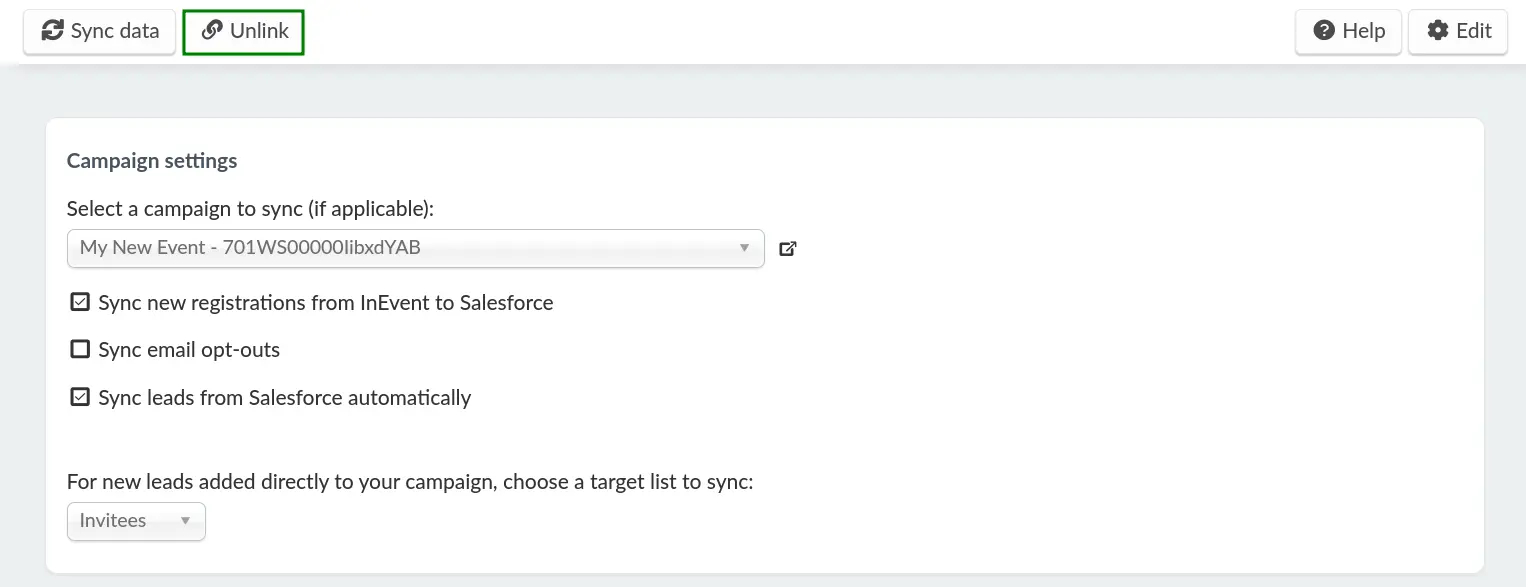
Clickng on the Unlink button will display a pop-up window to confirm the action. After confirming, event will be unlinked from the campaign and the page will automatically refresh. Administrators can then choose to link the event with a new Salesforce campaign if desired.
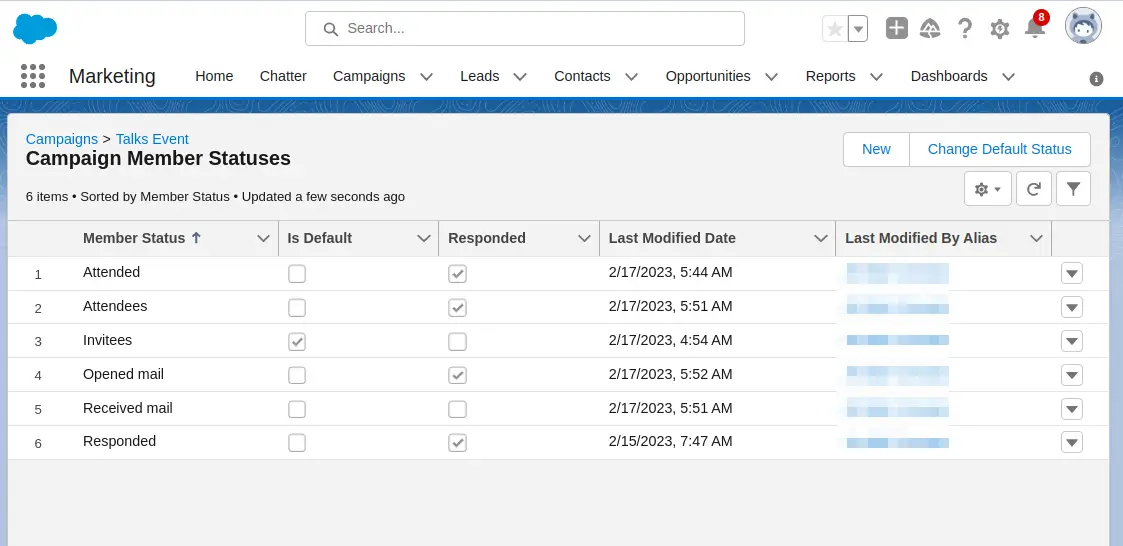
Campaign member statuses
This section will explain how you can set up automatic synchronization of Salesforce's Campaign Member Status with your event. This feature makes it easy to keep track of your invitees and attendees' interaction with your event registration and participation and automatically synchronize them to Salesforce.
Before configuring this feature in your event, ensure that you have set up your desired statuses in Salesforce.
Below are examples of custom Campaign Member Statuses on Salesforce, which will be used throughout this section.
Once you have set up your statuses in Salesforce, we can proceed to configure its synchronization with invitee or attendee interaction at the InEvent platform. To start configuring the synchronization, follow the instructions below:
- Navigate to Settings > Integrations > Salesforce > Campaigns.
- Click Edit at the top right corner of the page.
- Locate Campaign Member Statuses.
- Map each trigger on the left to the corresponding status on the right using the Campaign Member Status drop-down box. The available triggers are as follows.
- User is added to list of invitees: Automatically sync user to a Campaign Member Status on Salesforce once they are added as invitees in your event.
- User receives an email: Automatically sync user to a status once they have received an email from your event.
- User opens an email: Automatically sync user to a status once they have opened an email from your event.
- User clicks on an email link: Automatically sync user to a status once they have clicked on a link on your event's email.
- User is added to a list of attendees: Automatically sync user to a status once they are added as attendees in your event.
- User attends the event: Automatically sync user to a status once they have successfully attended your event.
- Press End to save your changes.
Once you have configured the synchronization, campaign members who complete the defined triggers will automatically have their statuses updated on Salesforce.
Fields
In this section, you can manage your Fields settings and map them to your Registration form fields and Global fields.
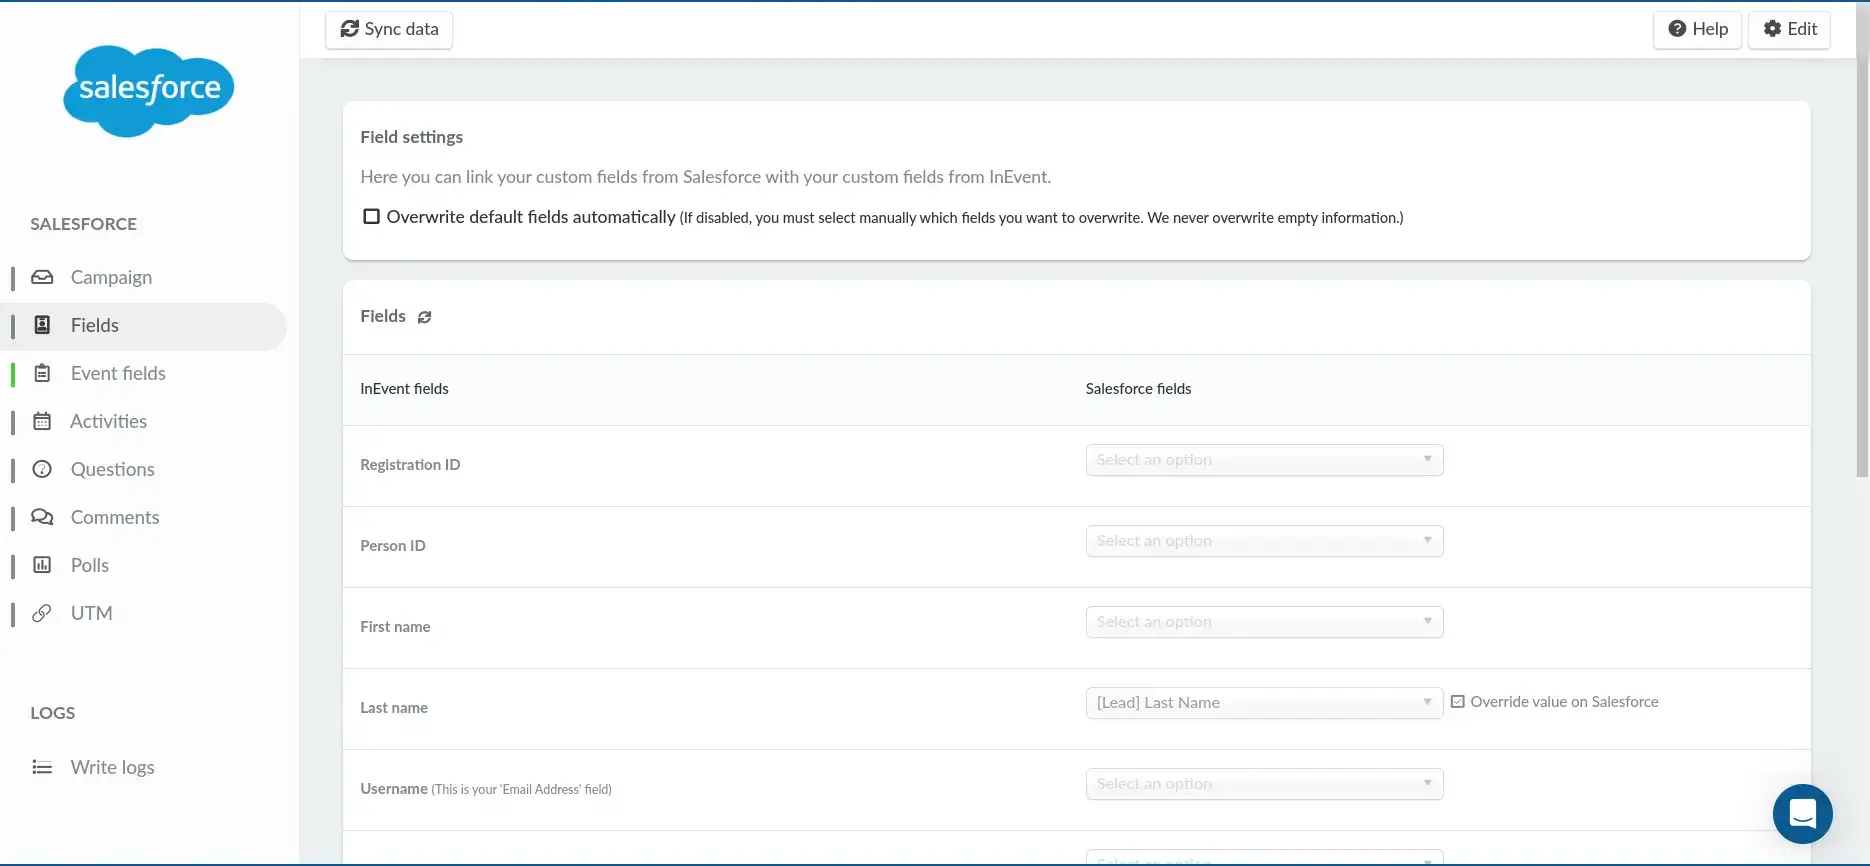
Field settings
Using the checkbox, select whether you want to automatically overwrite default fields.
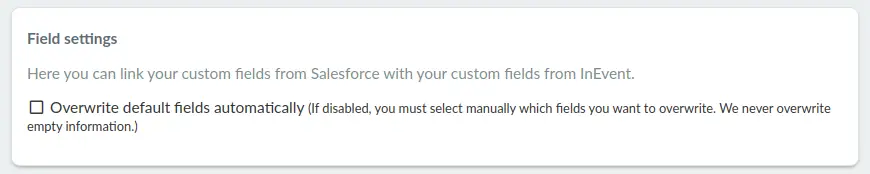
If Overwrite default fields automatically is enabled, InEvent will automatically detect and map new entries from Salesforce. Therefore, some fields will not appear in the InEvent Fields interface.
If Overwrite default fields automatically is disabled, you must manually select the fields to be overwritten.
Synchronizing Fields
You can easily map and link your Salesforce Fields, including Account, Contact, and Lead fields, of all types to InEvent Registration form fields and Global fields using the drop-down boxes.
InEvent will detect your Salesforce fields, including custom fields.
The InEvent fields you can link with Salesforce fields are listed below.
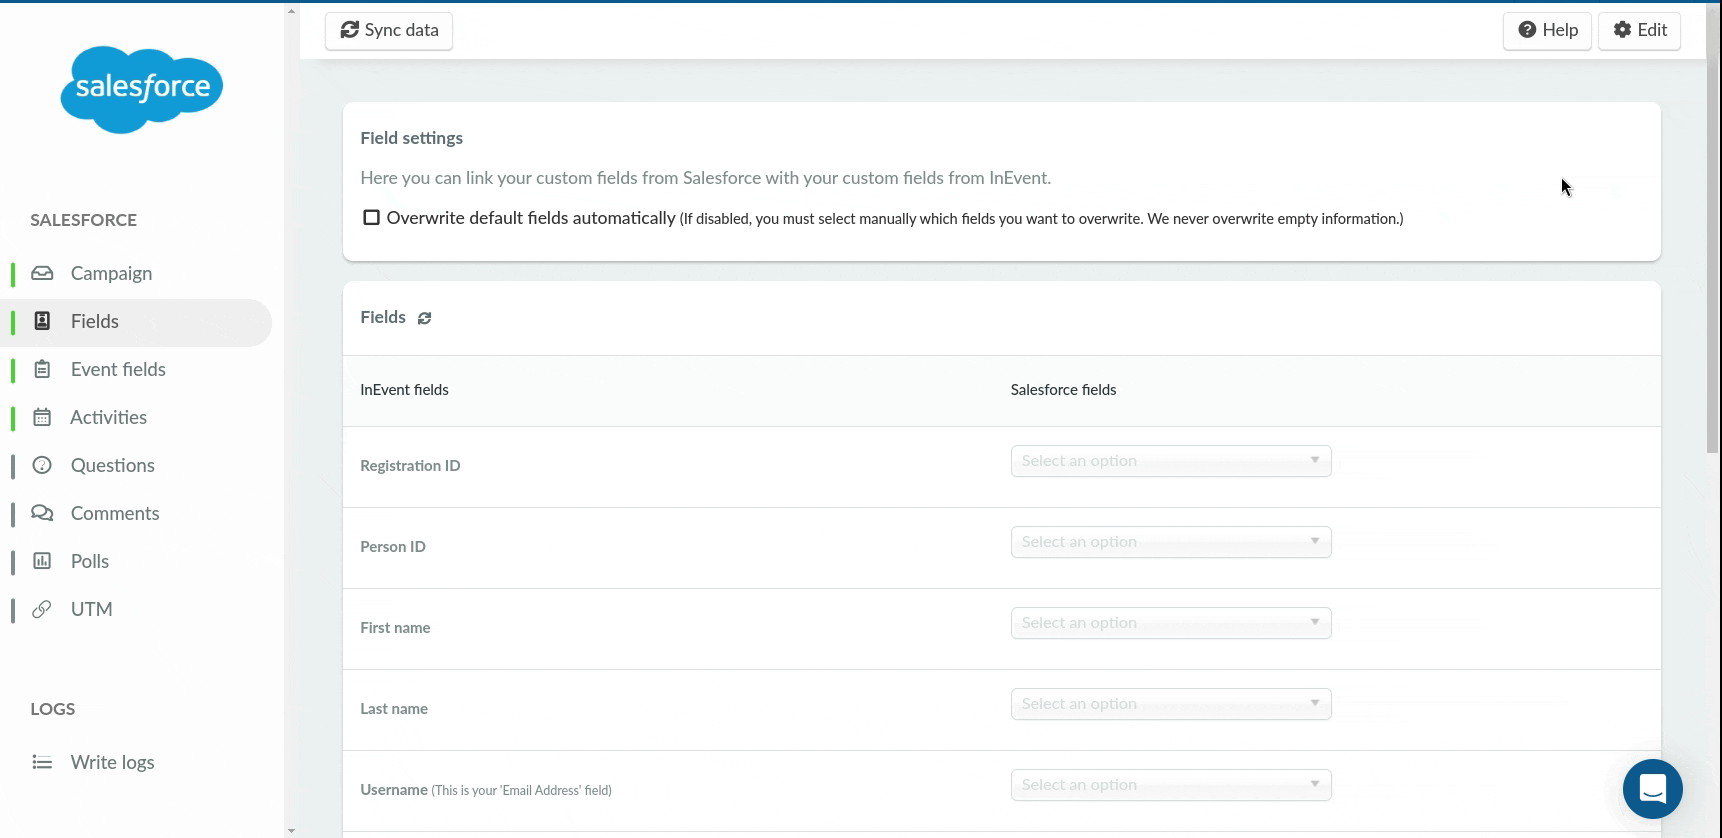
- Registration ID
- Person ID
- First name
- Last name
- Username (Email Address)
- Role
- Company
- Phone
- Magic link
- Magic link (event list)
- Enrollment date
utm_sourceutm_mediumutm_campaignutm_termutm_content- Custom questions in your Registration form
- Global fields
Additionally, you can also choose to override existing field values on Salesforce with InEvent values by checking the Override value on Salesforce box beside the desired field.
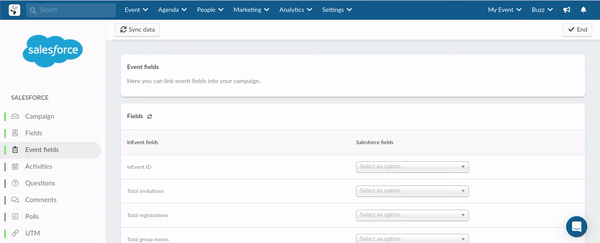
Event fields
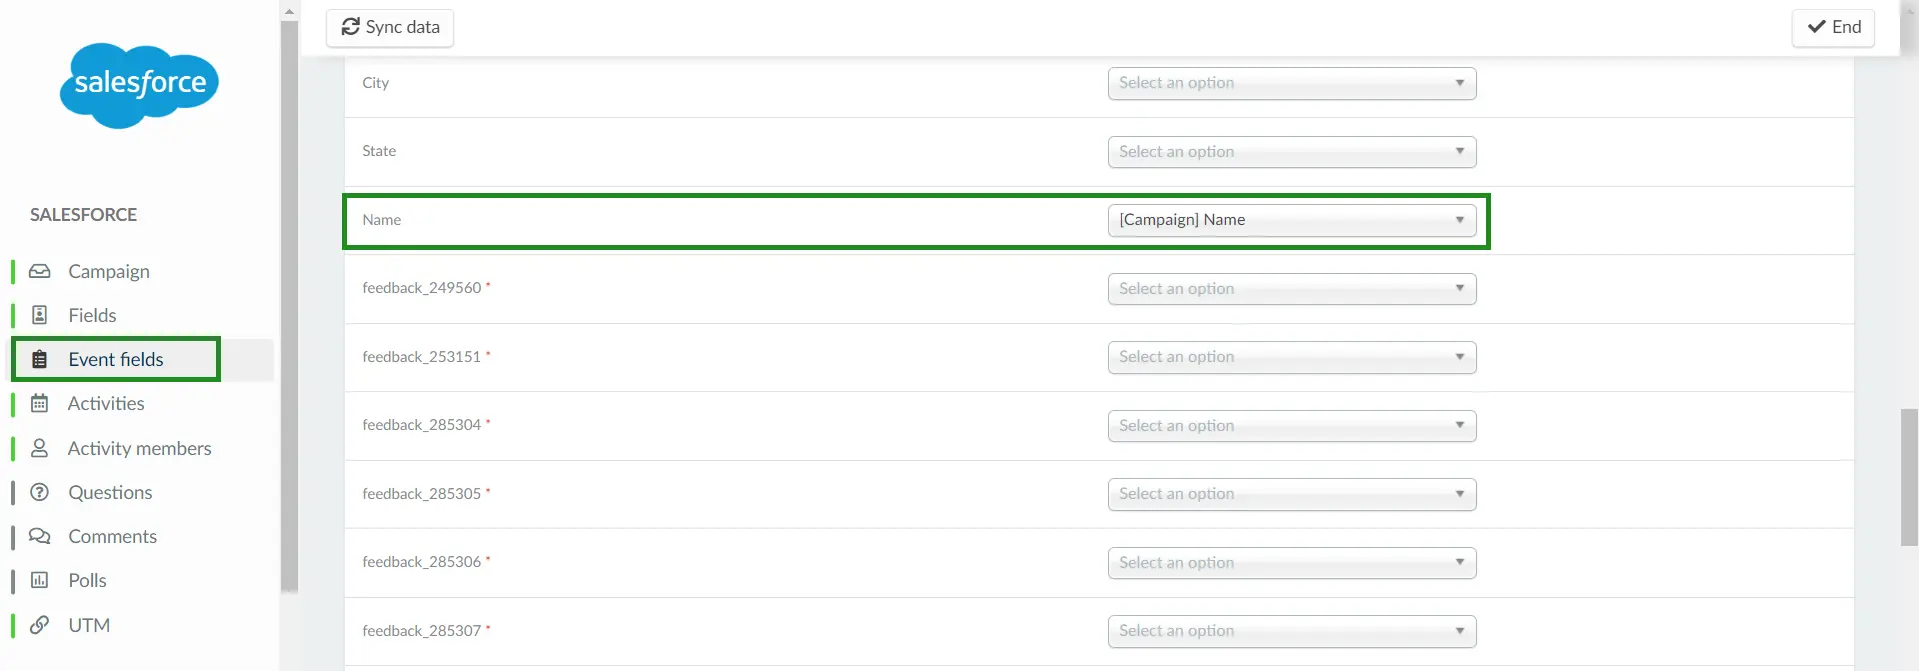
In this section, you can map and link your Salesforce Campaign fields to InEvent Event fields.
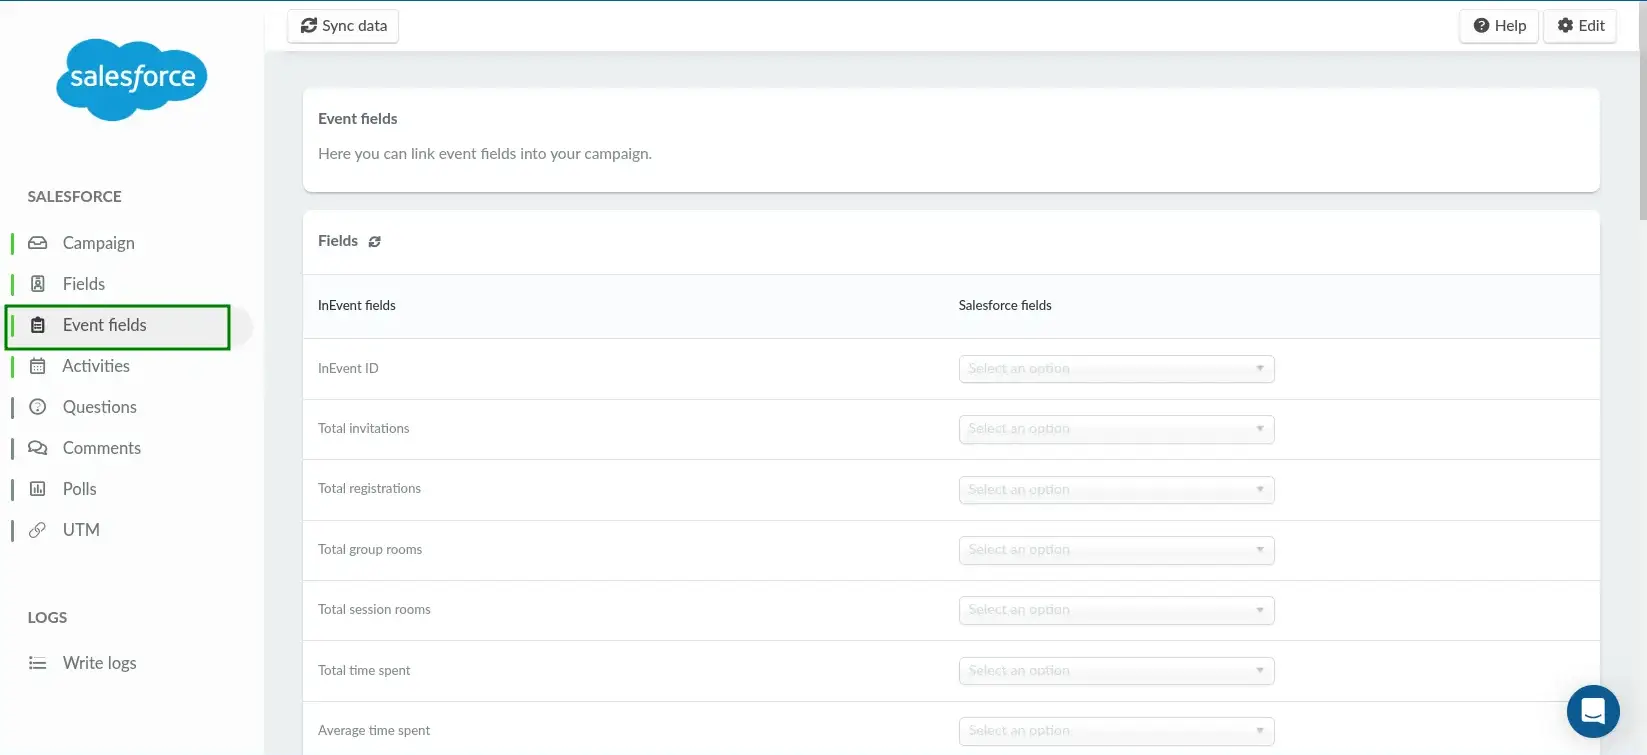
Synchronizing Event fields
You can map and link your Salesforce Campaign fields to InEvent Event fields using the drop-down boxes.
InEvent will detect your Salesforce fields, including custom fields.
The Event fields you can link with Salesforce Campaign fields are listed in the table below.
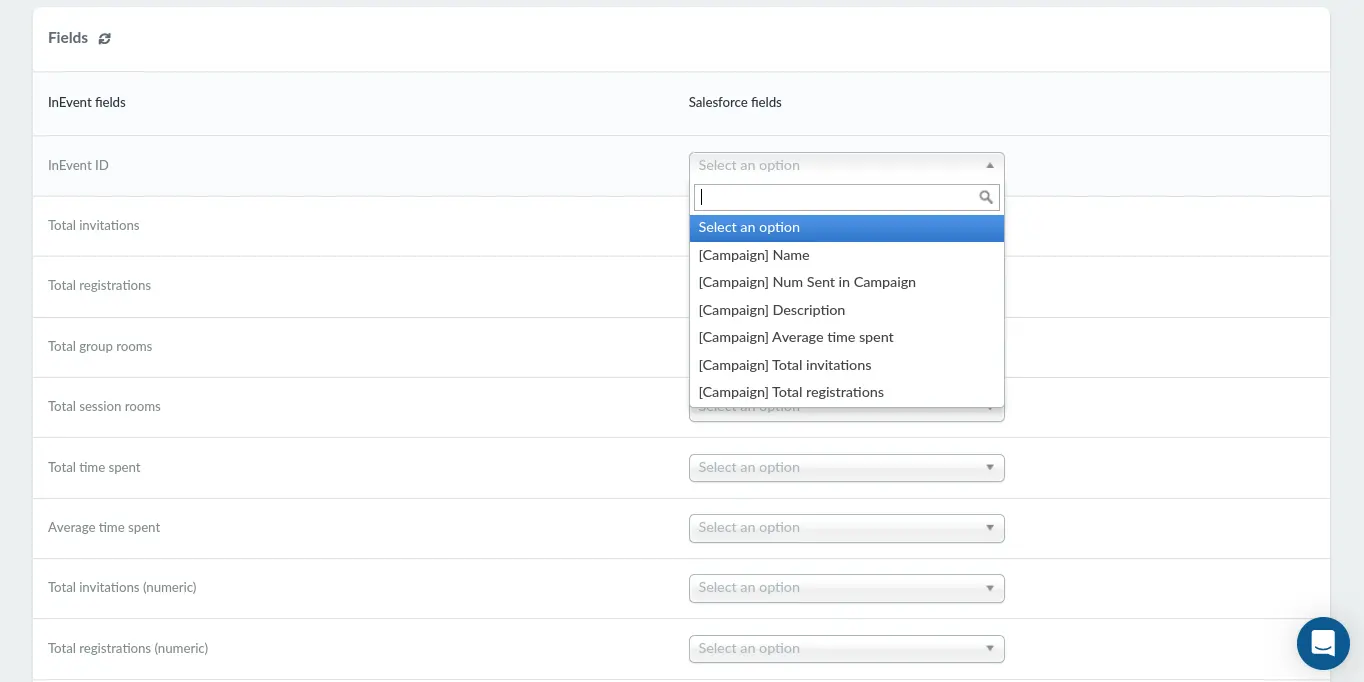
InEvent fields | ||
InEvent ID | Creator ID | Date begin |
Total invitations | Creator name | Date end |
Total registrations | Creator email | Enrollment begin |
Total group rooms | Owner ID | Enrollment end |
Total session rooms | Owner name | Enrollment open |
Total time spent | Nickname | Access end |
Average time spent | Description | Access open |
Total invitations (numeric) | Main page | Address |
Total registrations (numeric) | Content page | City |
Total group rooms (numeric) | State | |
Total session rooms (numeric) | Name | |
Total single sessions | Country | |
Total single sessions (numeric) |
| |
Total time spent (numeric, seconds) | Event Timezone | |
Average time spent (numeric, seconds) |
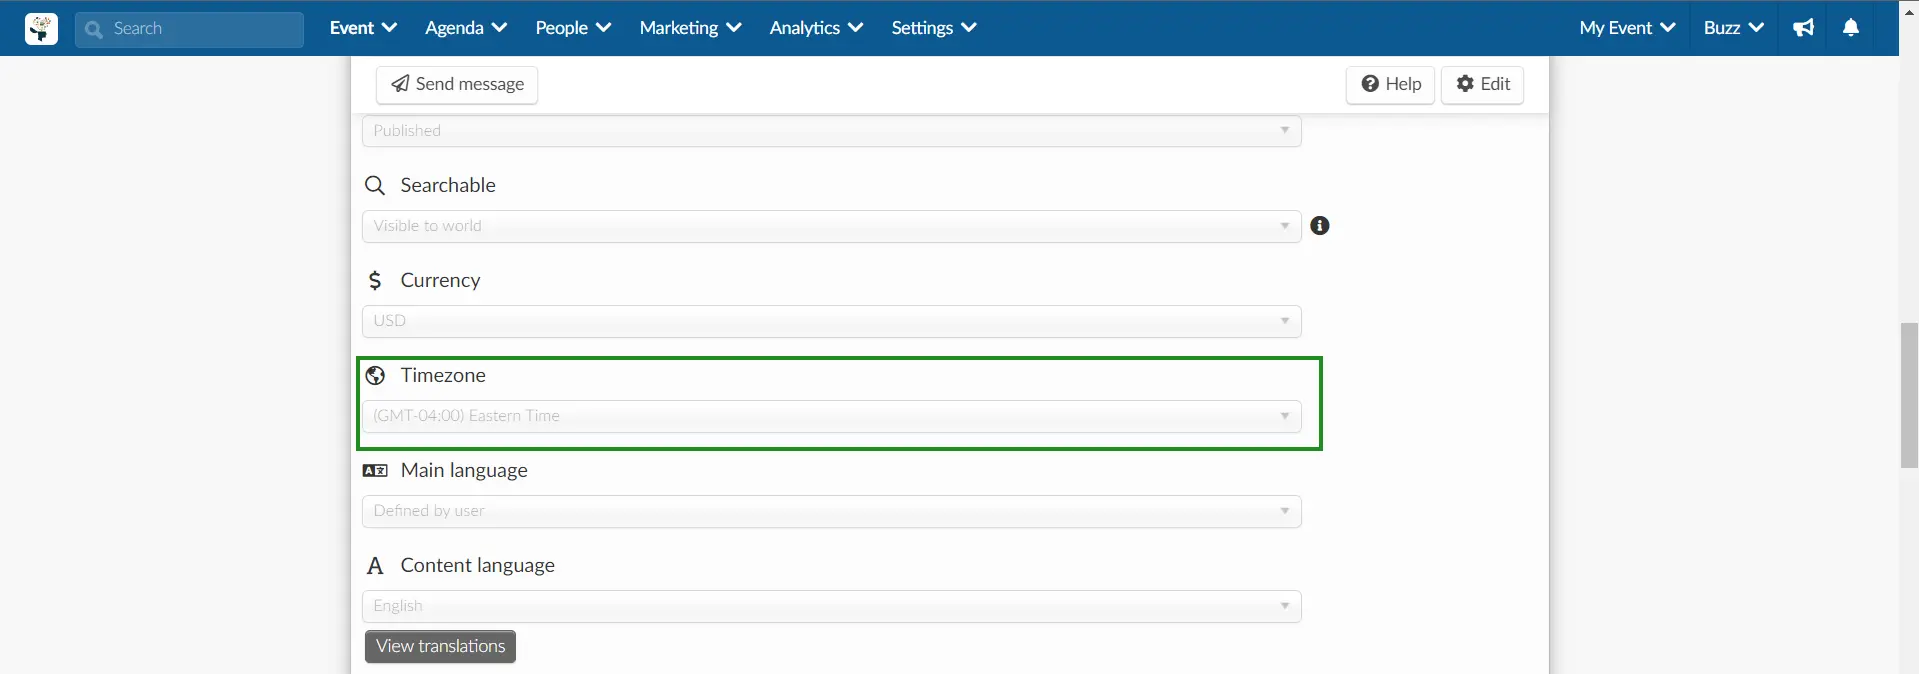
Mapping the event timezone
Mapping your event timezone ensures that your events are accurately synchronized with the appropriate time zones in your Salesforce account. To map and link your Event Timezone, you'll first need to create a custom field in your Salesforce Campaign fields. To create a custom field on Salesforce, follow the steps below.
- Log in to Salesforce.
- Navigate to Setup.
- Enter Object Manager in the Quick Find box.
- Click on Campaigns.
- Navigate to Fields & Relationships.
- Click on New to create a new custom field.
- Select the field type and click Next.
- Enter Timezone as the field label, configure other required settings, and click Save.
Once you are done creating the custom field, you can now link and map your event timezone by following the next steps.
- Navigate to Settings > Integrations > Salesforce on the InEvent platform and refresh the fields under Event fields.
- Map the InEvent Field Event Timezone to Salesforce Campaign Timezone and click on End.
- Navigate to Event > Details and select your desired timezone.
Activities
In this section, you can manage the synchronization of InEvent Activities with Salesforce campaigns. To enable synchronization toggle on the activies button.
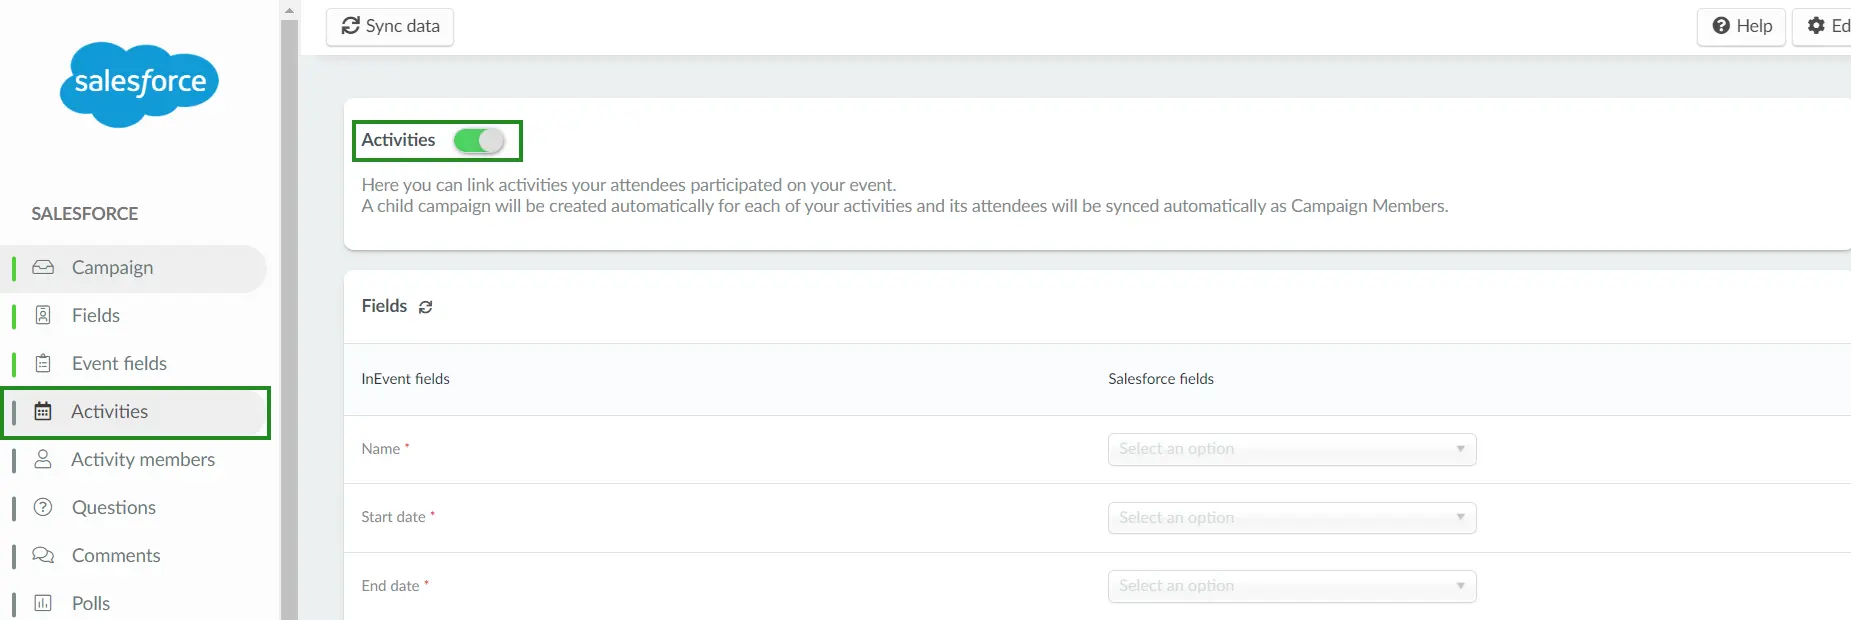
Synchronizing Activity fields
You can map and link your Salesforce Campaign fields to InEvent's Activities-related fields using the drop-down boxes.
InEvent will detect your Salesforce fields, including custom fields.
The Activities-related fields you can link with Salesforce Campaign fields are listed below.
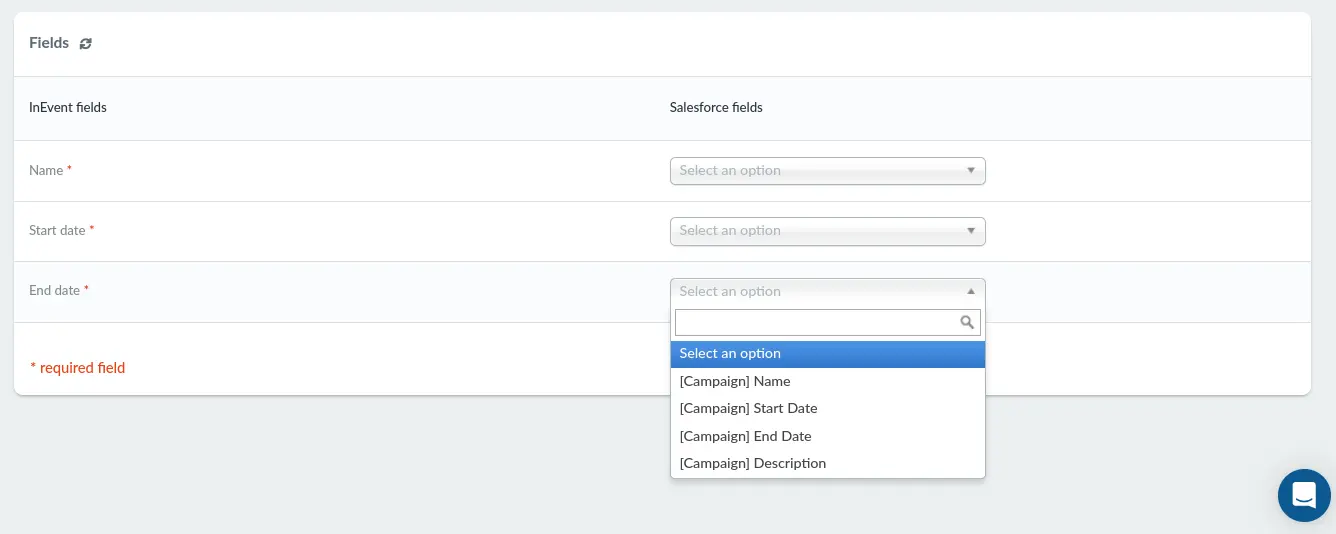
- Activity Name
- Activity Start date
- Activity End date
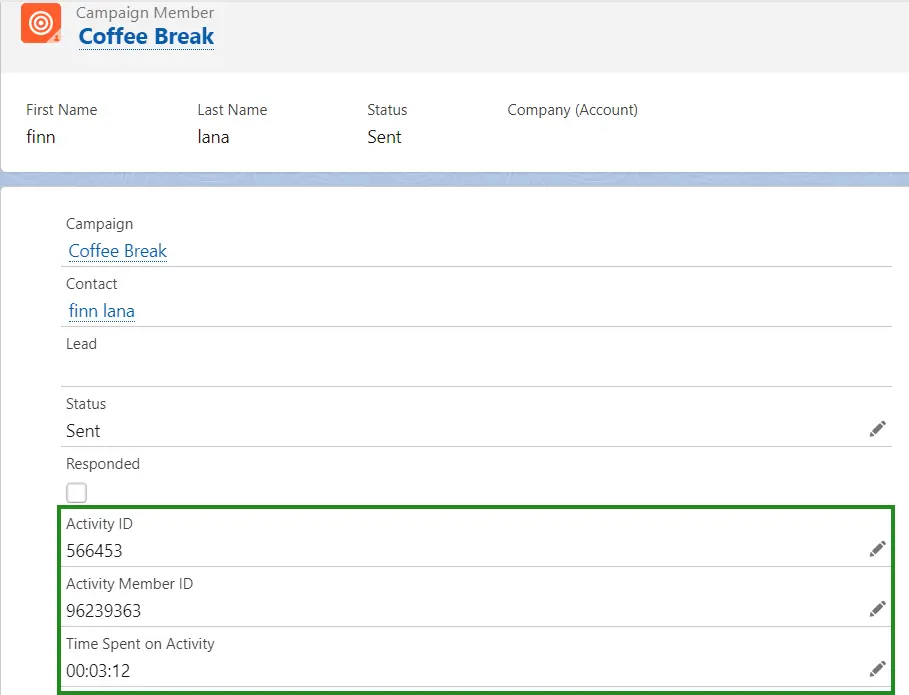
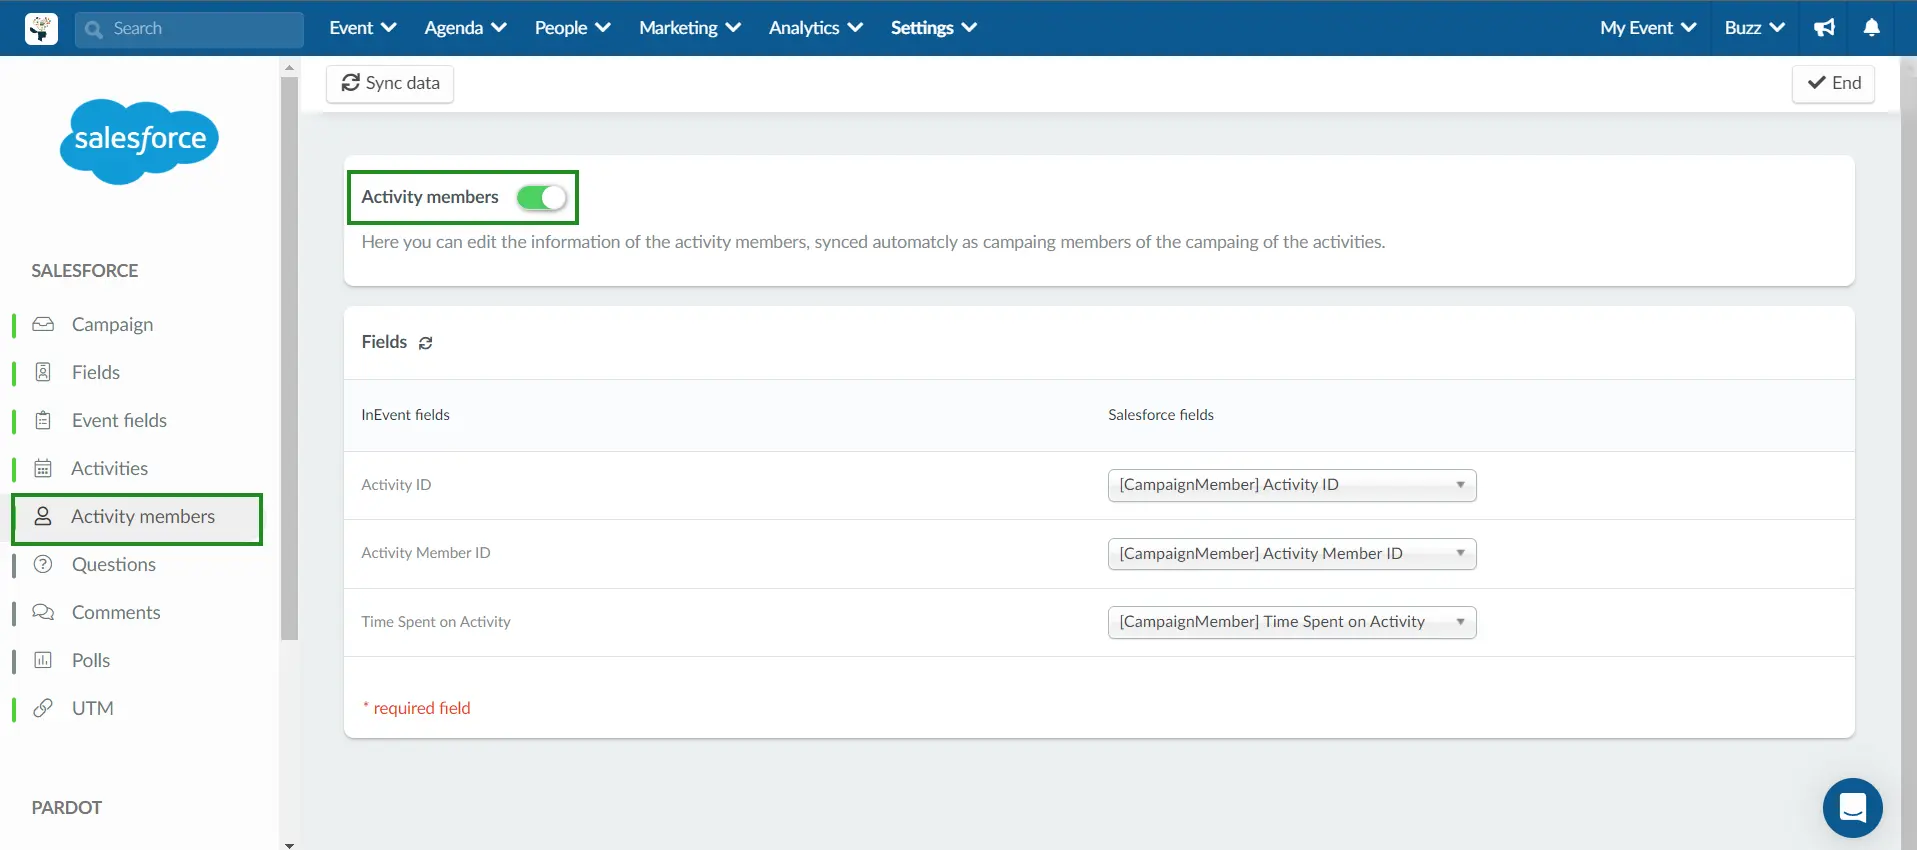
Activity members
On the Activity members page, you can map and link attendee or activity member details by matching the appropriate InEvent fields with Salesforce fields. Select the corresponding Salesforce field from the drop-down menu to align it with the InEvent field.
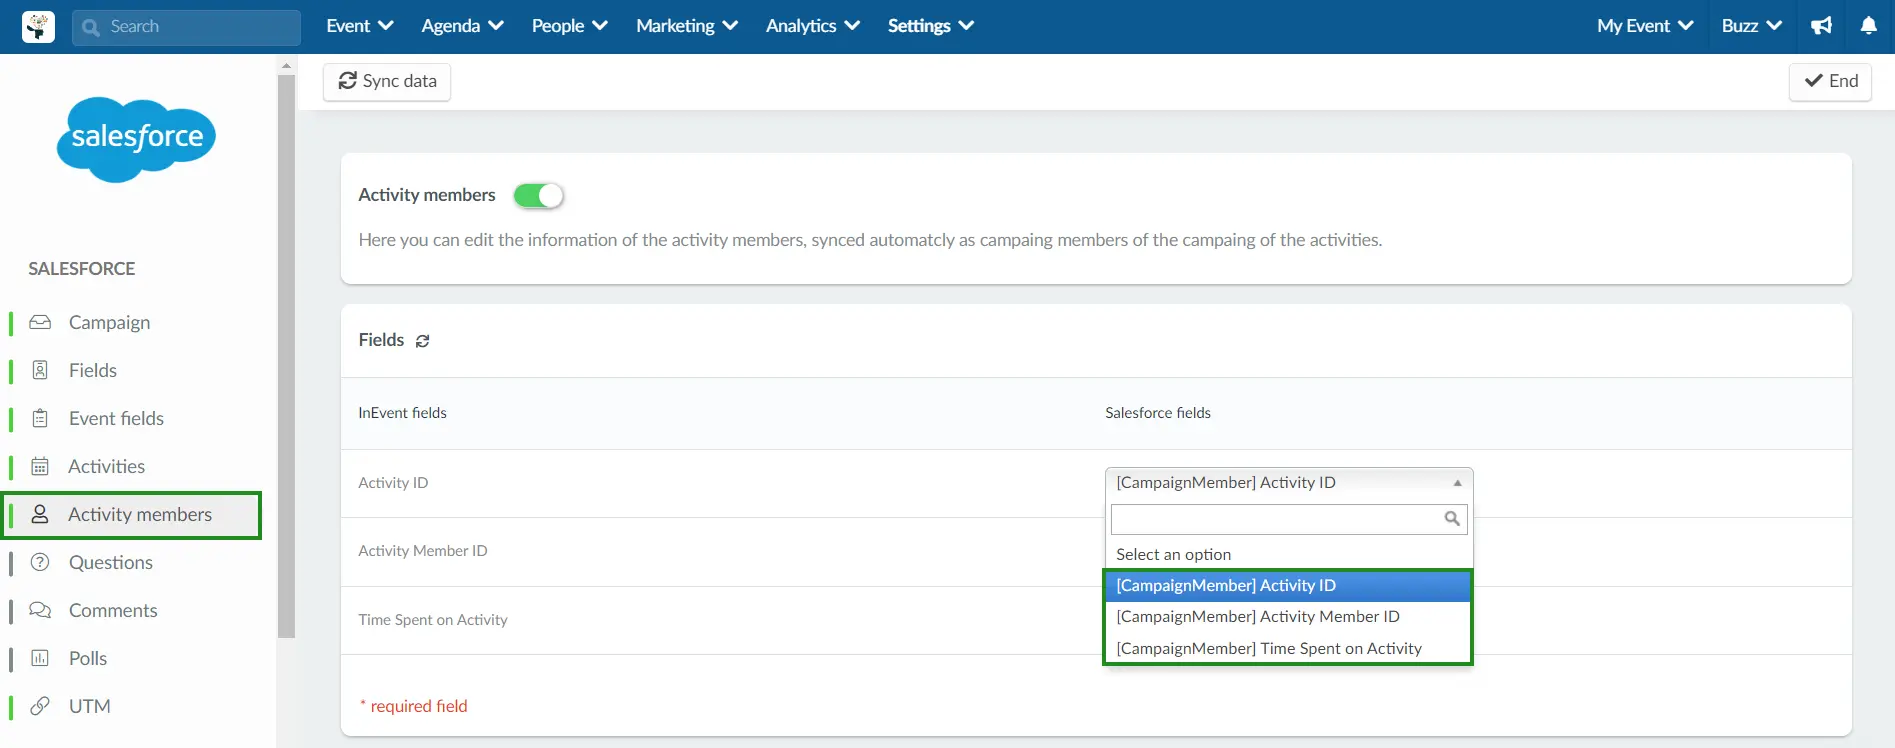
When attendees participate in activities, their details including Activity ID, Activity Member ID, and Time Spent on Activity will be automatically synced as campaign members within the associated campaign. This ensures accurate tracking of member participation across activities.
Synchronizing Activity members fields
To synchronize Activity member fields, follow the steps below;
- Create the custom Salesforce fields Activity ID, Activity Member ID, and Time Spent on Activity.
- Map and link the InEvent fields on the Activity members page with these Salesforce fields by selecting them from the drop-down menu.
Questions, Comments, Polls & UTM links
In these sections, you can manage the synchronization of Salesforce custom objects with InEvent Questions, Comments, Polls and UTM links.
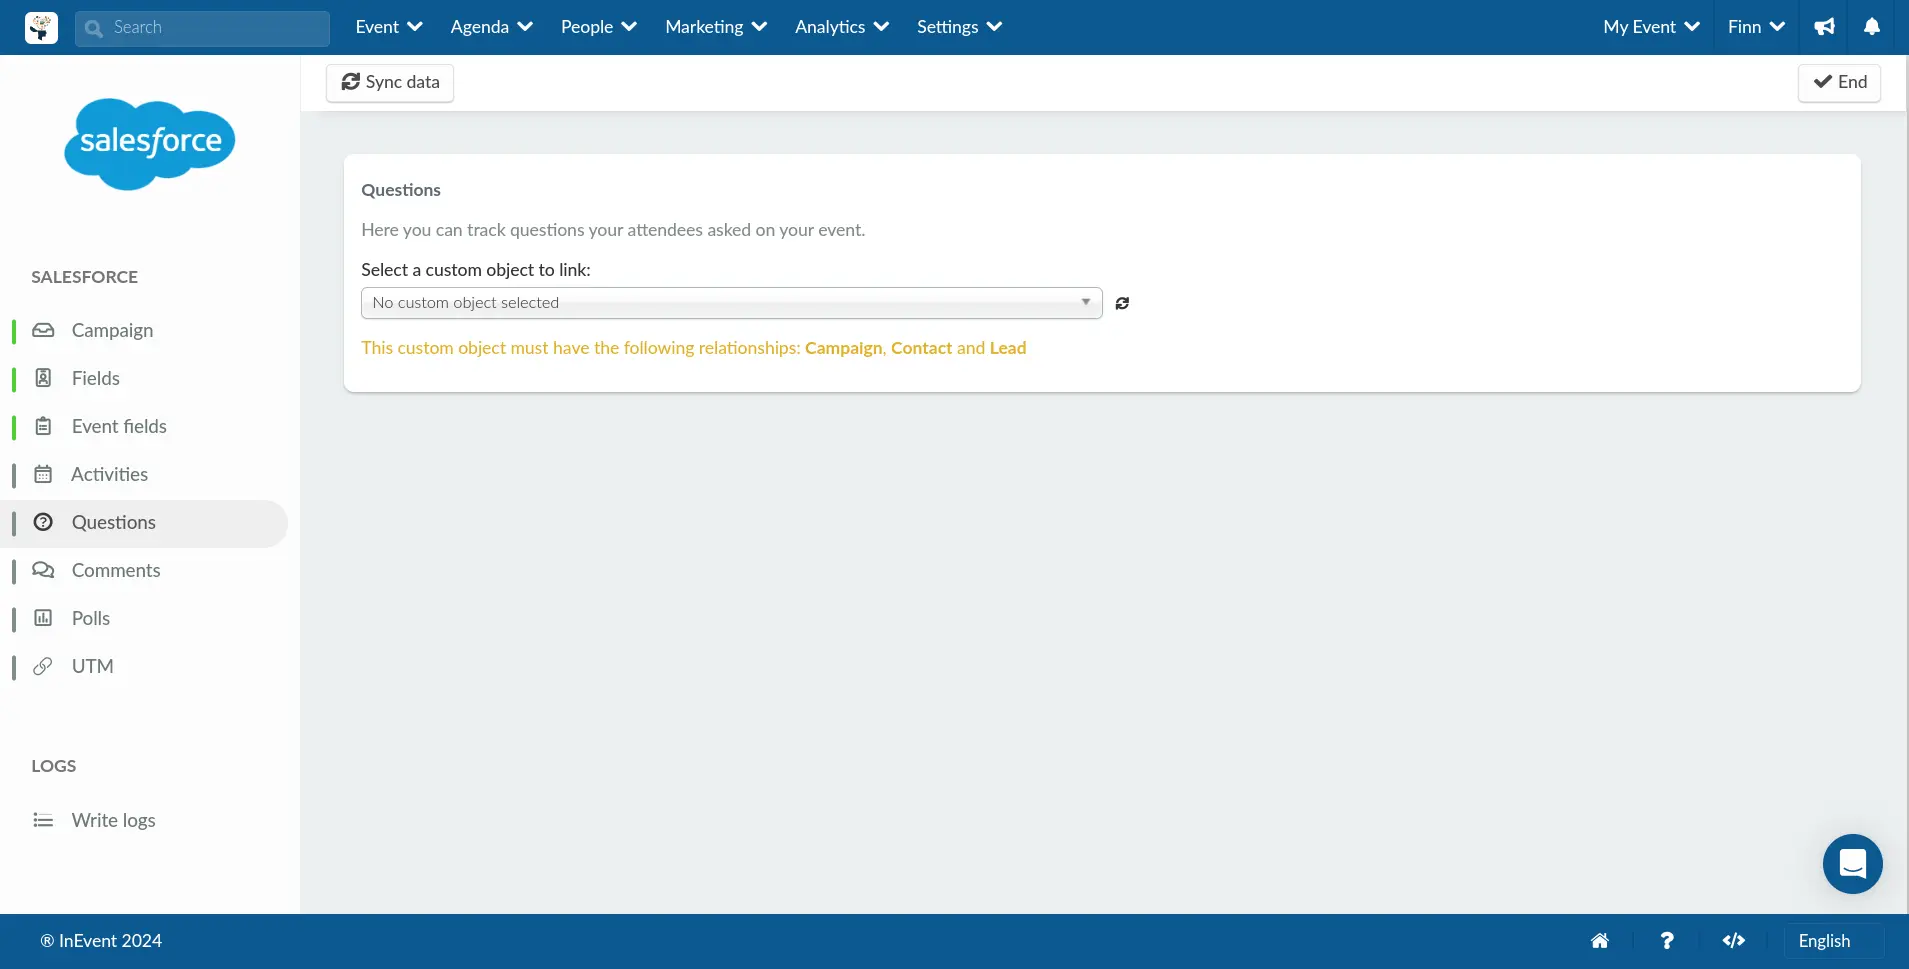
Synchronizing Questions, Comments, Polls & UTM links
You can easily map and link your Salesforce custom objects to Questions, Comments, Polls & UTM links from your event by using the available drop-down boxes.
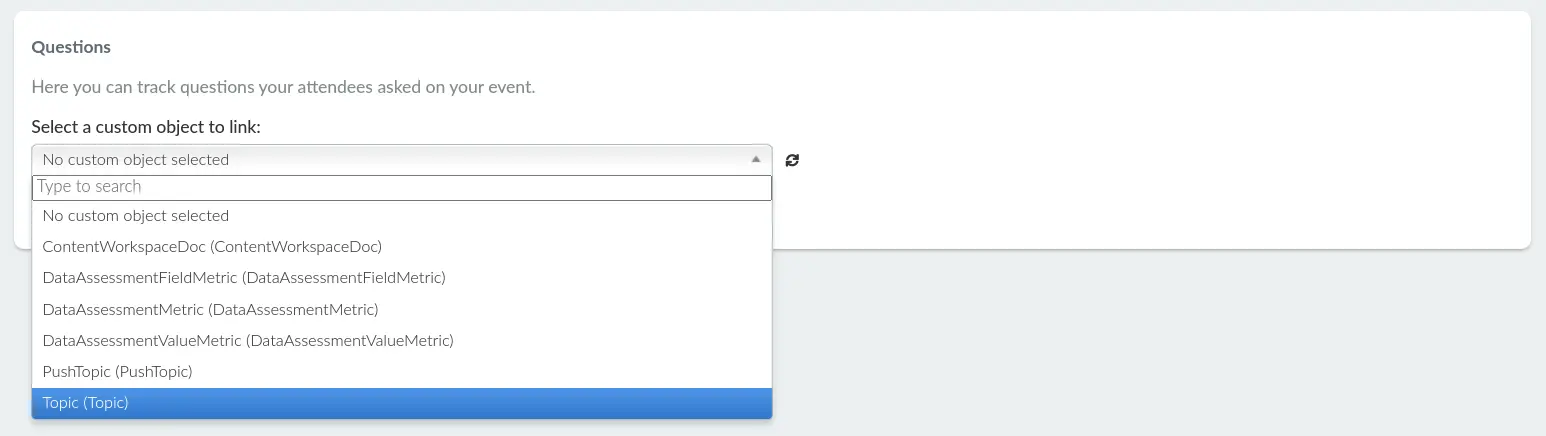
Below is a guide on mapping and linking Salesforce custom objects, using Questions as an example.
- Select a Salesforce custom object to be linked with your event Questions. Once a custom object is linked, the interface will be updated to show Fields and Default values.
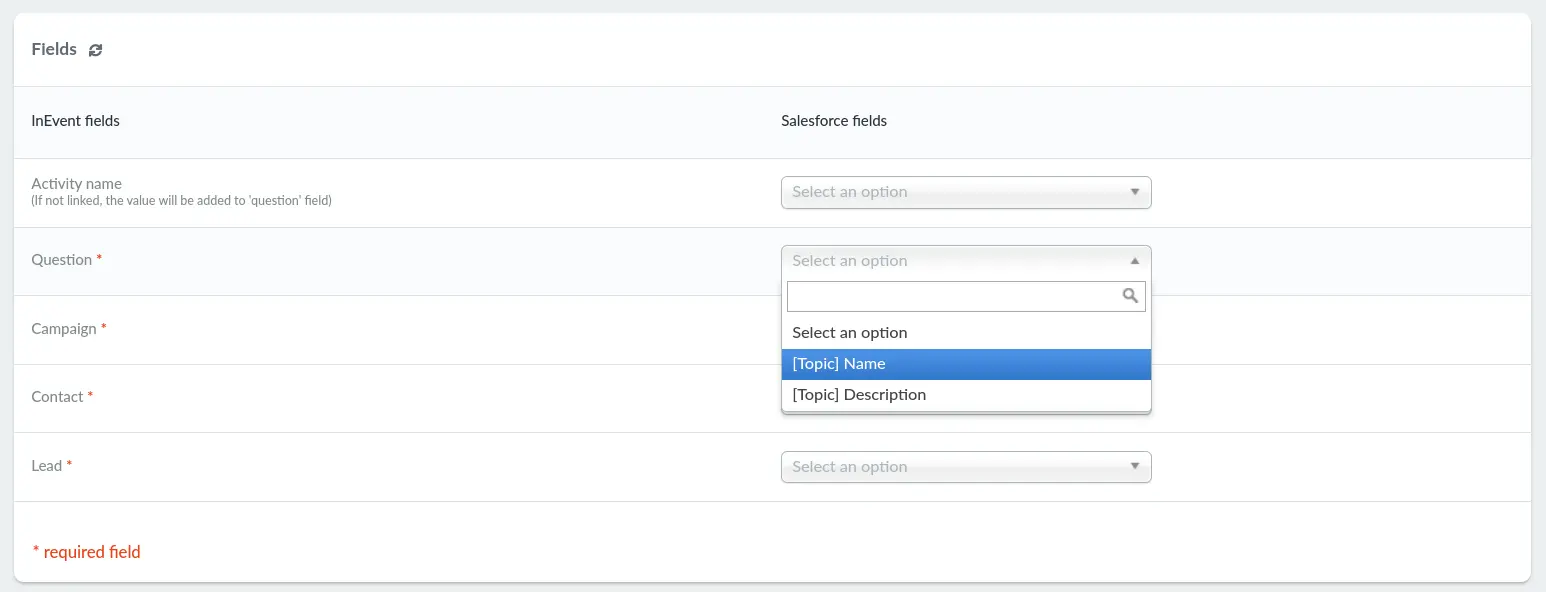
- Map your Salesforce fields on the right to the corresponding InEvent fields on the left under Fields.
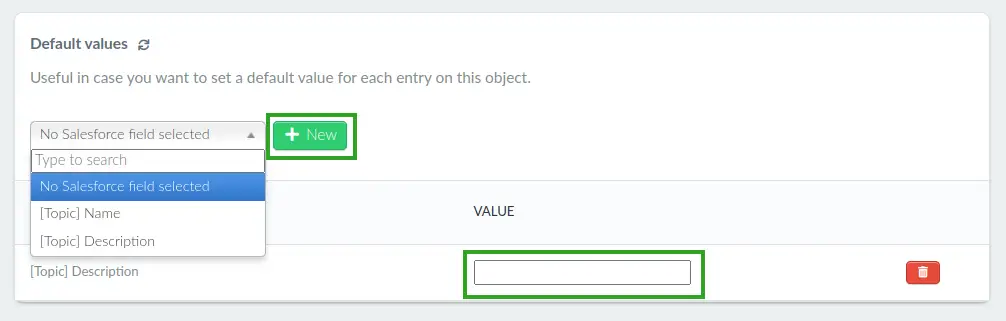
- Create new default values for your custom objects in Default values (optional).
Exporting InEvent attendees as Salesforce Leads
Event administrators can configure for InEvent attendees to be exported as Salesforce Leads. The steps to do so are as follows.
- Navigate to Settings > Integrations > Salesforce at the Event level.
- Click on Fields.
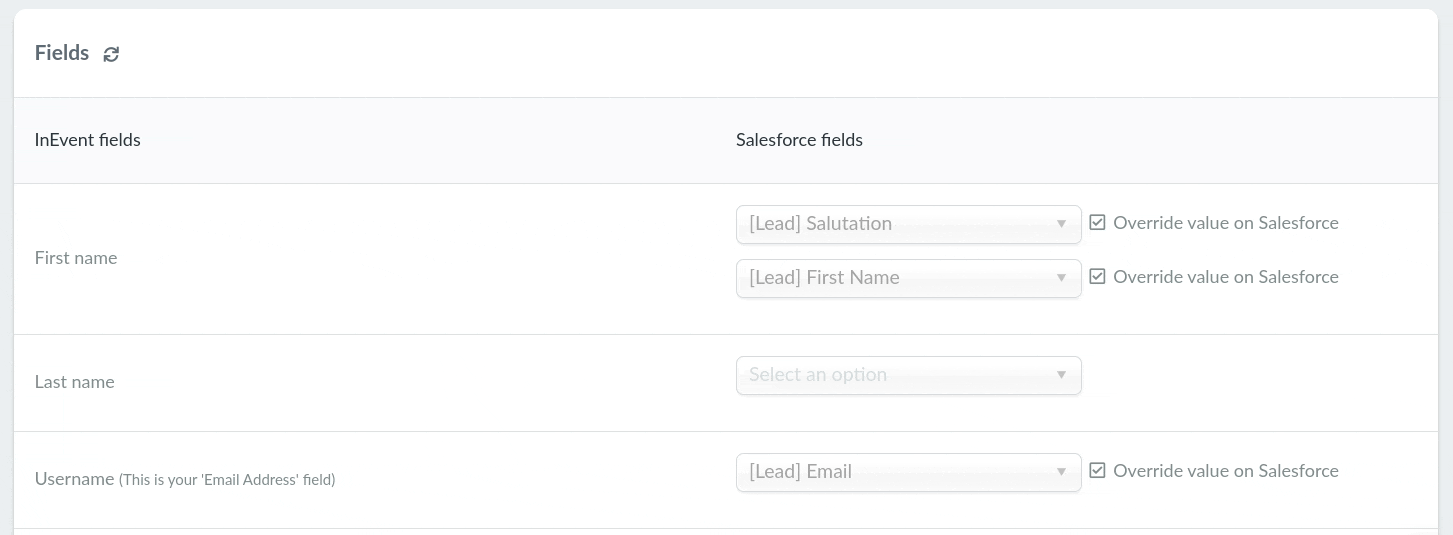
- Map the InEvent fields: First name, Last name, Username, and Company to the corresponding Salesforce fields: [Lead]First Name, [Lead]Last Name, [Lead]Email, and [Lead]Company.
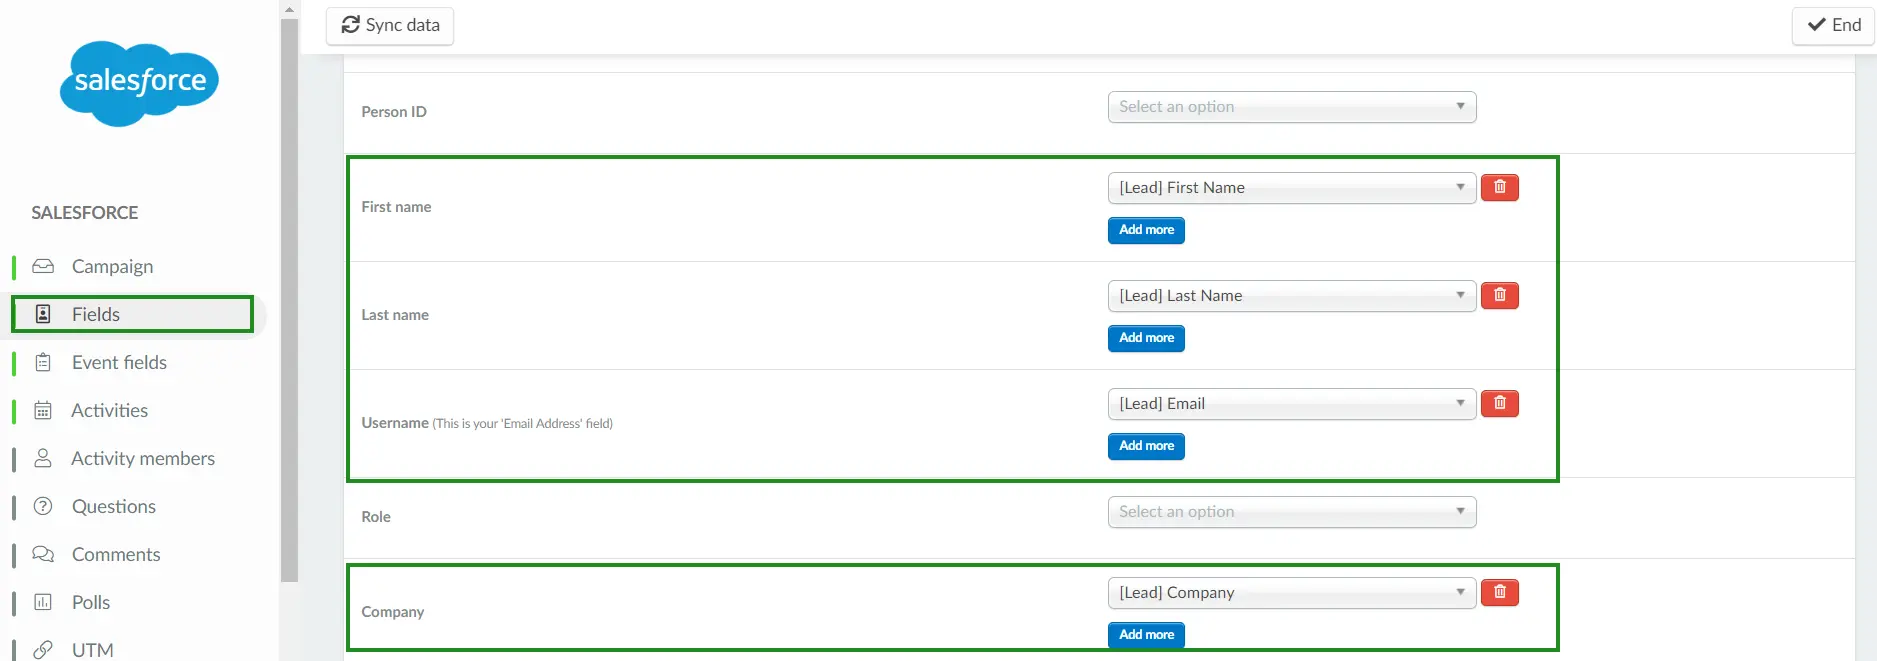
- Click on Sync data.
After completing the above steps, InEvent attendees will be exported to Salesforce, ensuring leads and contacts are up-to-date.
Synchronizing updated InEvent attendee details to Salesforce
Event administrators may need to manually edit attendee information within the InEvent platform and promptly need it synchronized to Salesforce. To facilitate this, administrators can use the Sync (Export Salesforce) functionality. To use it, follow the steps provided below.
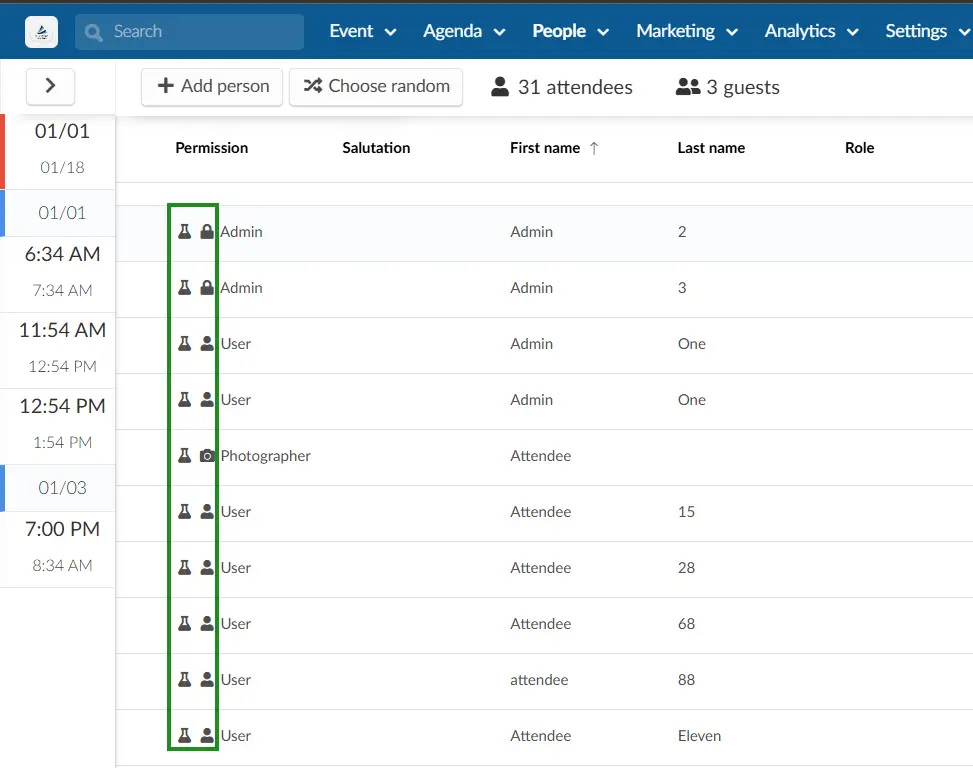
- Navigate to People > Attendees.
- Click on Edit.
- Select the target attendee. The attendee details panel will be displayed.
- Complete the edits to the attendee details.
- Click on End.
- Click on the Sync (Export Salesforce) button.
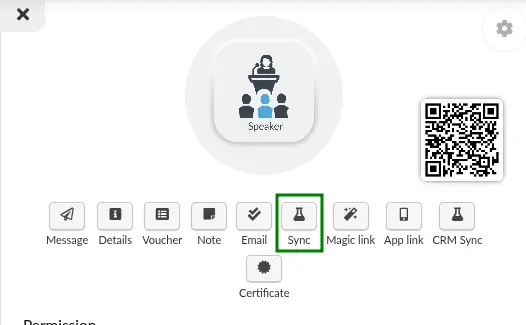
After completing the steps above, the updated attendee information will be synchronized to Salesforce.
Re-adding deleted attendee as Campaign Member on Salesforce
Event administrators may need to delete or remove attendees added to Salesforce as Leads, and then need to re-add the same attendees back as Leads. To do so, follow the steps provided below.
- Confirm that the target attendee is no longer visible in the Salesforce Campaign as Campaign Member.
- Navigate to People > Attendees within InEvent.
- Select the target attendee profile.
- Click on Sync (Export Salesforce).
- Navigate back to the Campaign page on Salesforce.
- Click on Add Leads.
- Check the box next to the target attendee name.
- Complete the details within the Add to Campaign pop-up box as desired.
- Click on Submit.
After completing the steps above, the previously removed attendee will be re-added to the Salesforce campaign.
Importing Contact Names, Leads, Lists, and Campaigns
Event administrators can import contacts, leads, lists, or campaigns to Invitees, Attendees, and Lists on the InEvent platform. To do so, follow the instructions below.
- Navigate to People > Attendees.
- Click on Edit.
- Click on Import. The Import data pop-up box will be displayed.
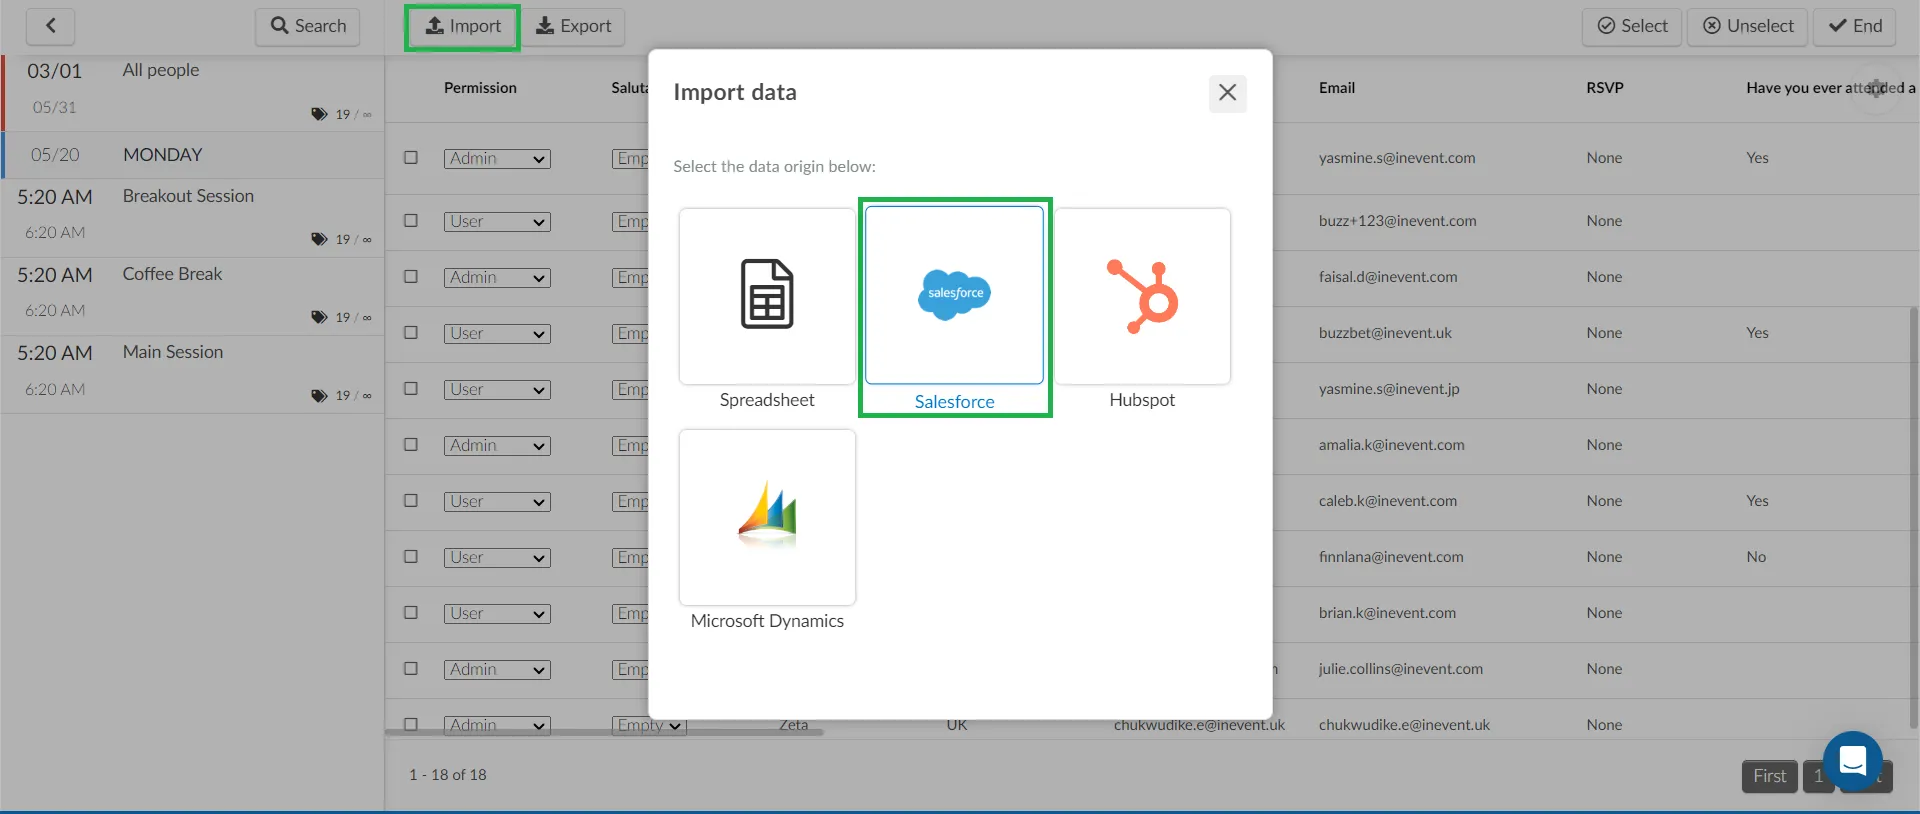
- Click on Salesforce. The Import Salesforce Contacts/Leads will be displayed.
- Select the target Salesforce list to import from. The available options are All, Contacts, Leads, and Campaigns.
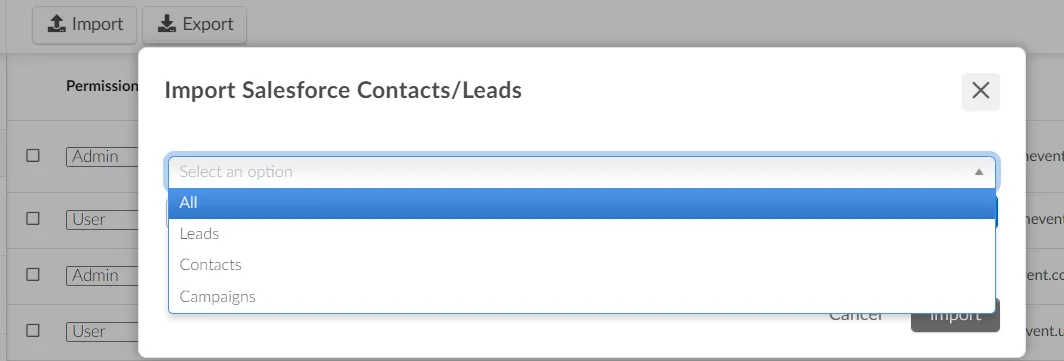
- Verify the Salesforce Leads/Contacts you wish to import.
- Click on Import.
After completing the steps above, you will be able to see all the contacts that were imported. To identify the names from Salesforce, you will see a beaker icon next to the name.
Tracking and saving event features
By selecting the custom object integration, event administrators will be able to use the following modules.
InEvent Templates with Salesforce configuration
The InEvent platform allows event administrators to create Templates for convenient and quick customized events setup. Templates can be used together with the Salesforce integration, allowing for a seamless Salesforce-ready event creation.
To create an InEvent template with Salesforce configuration, follow the steps provided below.
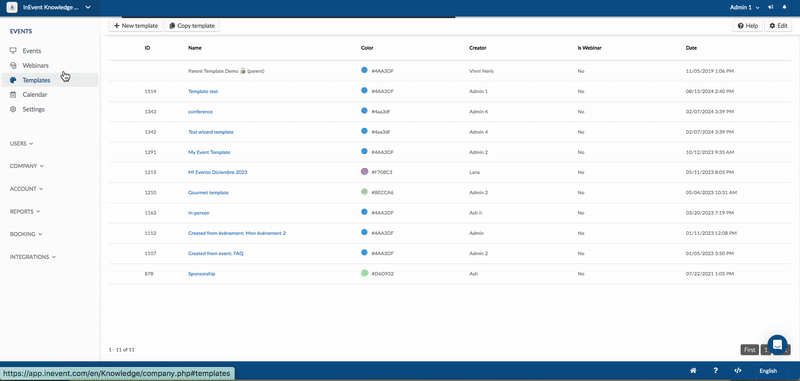
- Navigate to Company level > Event > Templates.
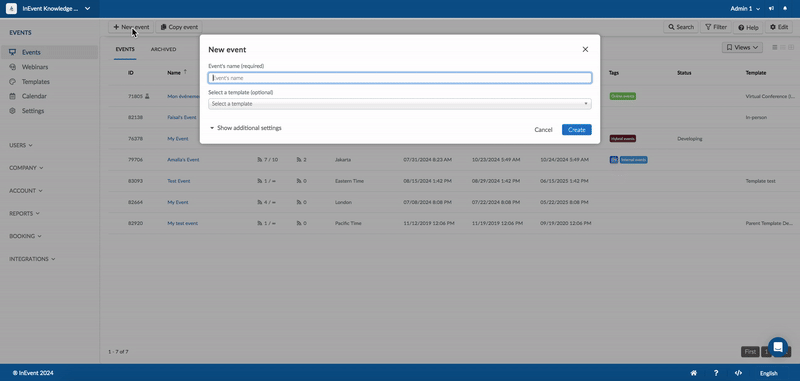
- Click on +New Template. Enter the template details as prompted. You will be directed to the template once done.
- Navigate to Settings > Integrations > Salesforce within the Template.
- Complete the desired Salesforce integration configuration.
After completing the steps above, the Template can be used when creating new events.
Reset to template
Event administrators may need to use a Salesforce-configured template for an event, make configurations to the event, and need to revert the settings back to template defaults. This can be done by navigating to the Salesforce integration page on the event, clicking on Edit, and clicking on Reset to template.
Salesforce VisualForce plugin
VisualForce is a web development framework that enables developers to build sophisticated, custom user interfaces for mobile and desktop apps that can be hosted on the Lightning Platform. Event administrators can use VisualForce to build apps that align with the styling of Lightning Experience with a unique custom interface.
For further information, refer to our Salesforce Visualforce plugin article.
Salesforce logs
Event administrators can review Salesforce-related platform events directly within the Salesforce integration page by clicking on Write logs under the Log section.
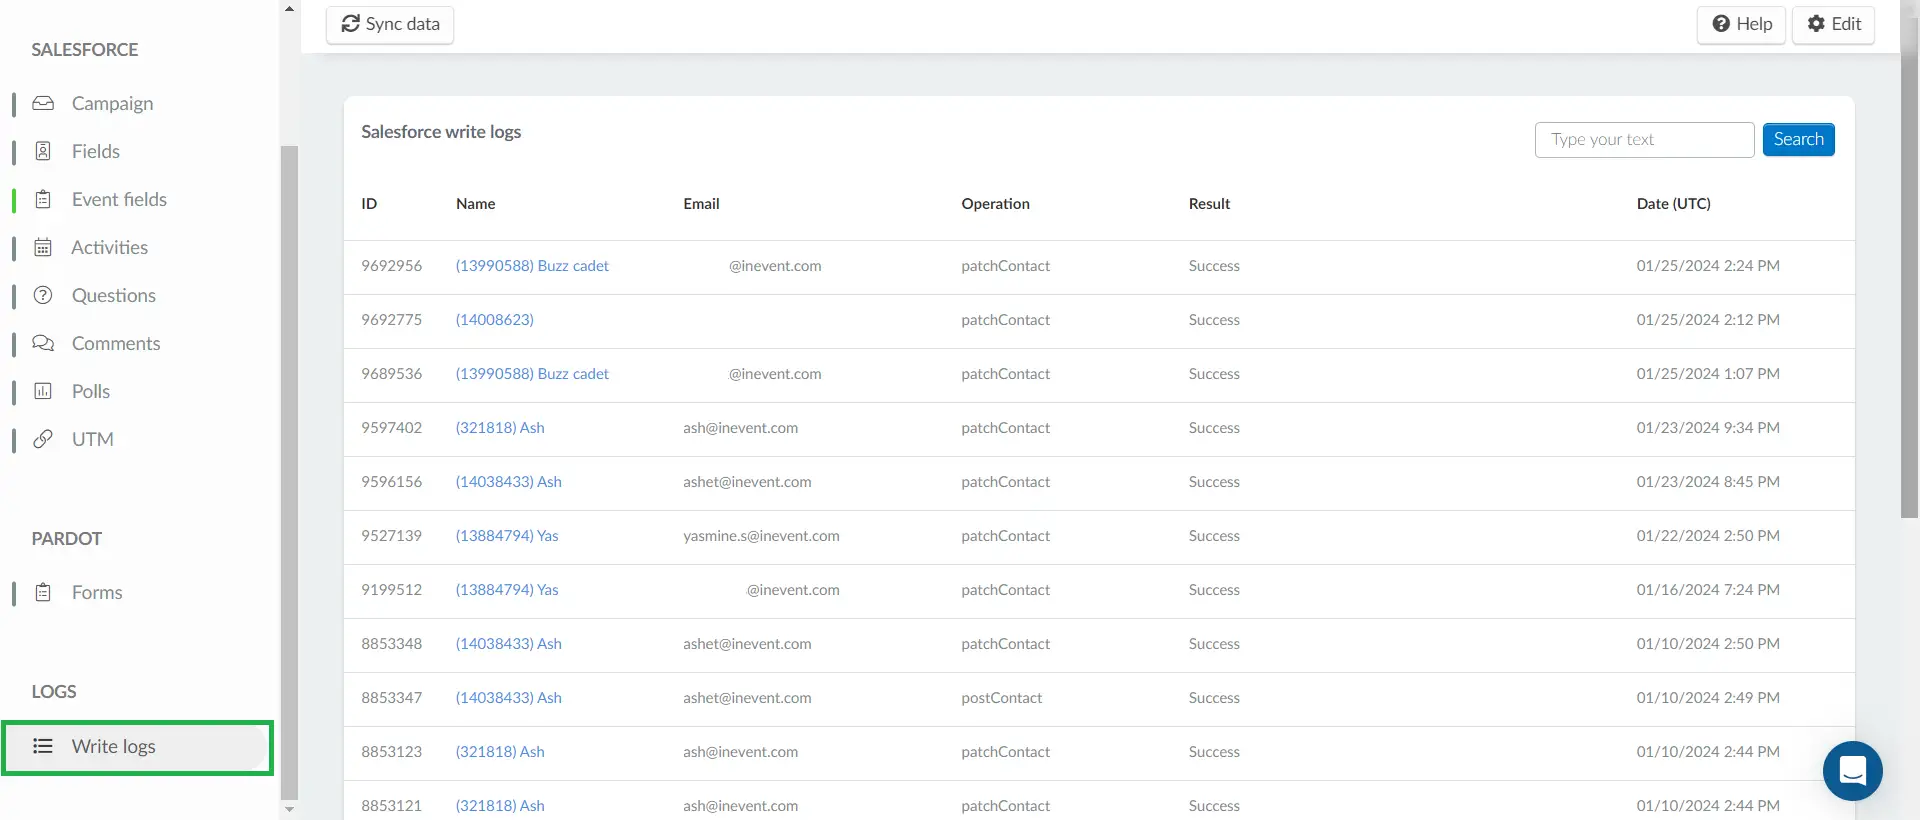
The Salesforce logs will give you the following information.
- Name: Name of the user who triggered the log event
- Email: Email of the user who triggered the log event
- Operation: Name or type of the operation
- Result: Success status of the log event
- Date (UTC): Date of the log event
Mappable Salesforce objects
Below is the complete list of Salesforce objects that can be mapped and synchronized with InEvent fields.
Object | Object |
[CampaignMember] Status | [Account] Account Name |
[CampaignMember] Activity ID | [Account] Account Type |
[CampaignMember] Activity Member ID | [Account] Parent Account ID |
[CampaignMember] Time Spent on Activity | [Account] Billing Street |
[Contact] Account ID | [Account] Billing City |
[Contact] Last Name | [Account] Billing State/Province |
[Contact] First Name | [Account] Billing Zip/Postal code |
[Contact] Salutation | [Account] Billing Country |
[Contact] Other street | [Account] Billing Latitude |
[Contact] Other city | [Account] Billing Longitude |
[Contact] Other State/Province | [Account] Billing Geocode Accuracy |
[Contact] Other Zip/Postal Code | [Account] Shipping Street |
[Contact] Other Country | [Account] Shipping City |
[Contact] Other Latitude | [Account] Shipping State/Province |
[Contact] Other Longitude | [Account] Shipping Zip/Postal Code |
[Contact] Other Geocode Accuracy | [Account] Shipping Country |
[Contact] Mailing Street | [Account] Shipping Latitude |
[Contact] Mailing City | [Account] Shipping Longitude |
[Contact] Mailing State/Province | [Account] Shipping Geocode Accuracy |
[Contact] Mailing Zip/Postal Code | [Account] Account Phone |
[Contact] Mailing Country | [Account] Account Fax |
[Contact] Mailing Latitude | [Account] Website |
[Contact] Mailing Longitude | [Account] Industry |
[Contact] Mailing Geocode Accuracy | [Account] Annual Revenue |
[Contact] Business Phone | [Account] Employees |
[Contact] Business Fax | [Account] Account Description |
[Contact] Mobile Phone | [Account] Owner ID |
[Contact] Home Phone | [Account] Data.com Key |
[Contact] Other Phone | [Account] Account Source |
[Contact] Asst. Phone | [Account] SIC Description |
[Contact] Reports To ID | [Lead] Last Name |
[Contact] Email | [Lead] First Name |
[Contact] Title | [Lead] Salutation |
[Contact] Department | [Lead] Title |
[Contact] Assistant's Name | [Lead] Company |
[Contact] Lead Source | [Lead] Street |
[Contact] Birthdate | [Lead] City |
[Contact] Contact Description | [Lead] State/Province |
[Contact] Owner ID | [Lead] Zip/Postal Code |
[Contact] Email Opt Out | [Lead] Country |
[Contact] Email Bounced Reason | [Lead] Latitude |
[Contact] Email Bounced Date | [Lead] Longitude |
[Contact] Data.comKey | [Lead] Geocode Accuracy |
[Contact] Individual ID | [Lead] Phone |
[Campaign] Name | [Lead] Email |
[Campaign] Num Sent in Campaign | [Lead] Website |
[Campaign] Description | [Lead] Description |
[Campaign] Timezone | [Lead] Lead Source |
[Campaign] Session Full Name | [Lead] Status |
[CampaignMember] Activity ID | [Lead] Industry |
[CampaignMember] Activity Member ID | [Lead] Rating |
[CampaignMember] Time Spent on Activity | [Lead] Annual Revenue |
[UTM_link] UTM link Name | [Lead] Employees |
[UTM_link] UTM Link Address | [Lead] Owner ID |
[UTM_link] Campaign Name | [Lead] Email Opt Out |
[Topic] Name | [Lead] Unread By Owner |
[Topic] Description | [Lead] Data.comKey |
[Lead] Email Bounced Date | [Lead] Email Bounced Reason |