Email creator - InEvent Webinar
 Updated 11 months ago
by
Faisal Durrani
Updated 11 months ago
by
Faisal Durrani
With InEvent, you can easily create personalized emails using the Email creator tool and send them to event invitees, attendees, and custom lists of people. In addition, you can also configure automatic emails, create customized email templates, and set up triggers to send your emails automatically.
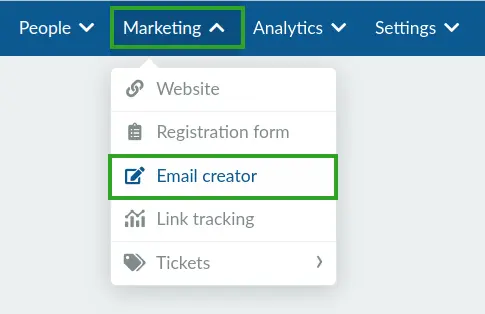
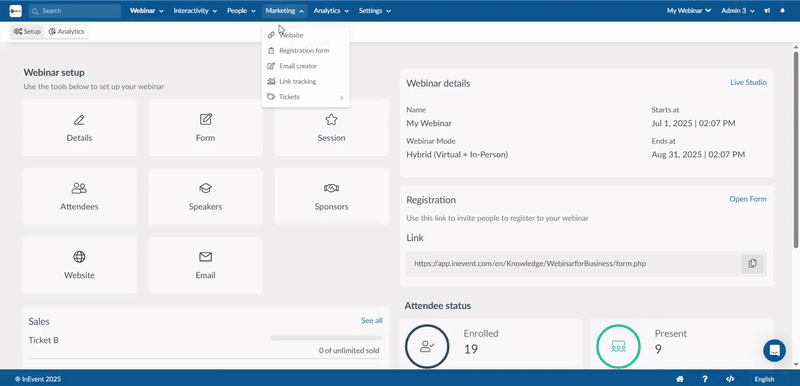
To open the Email creator, navigate to Marketing > Email creator.
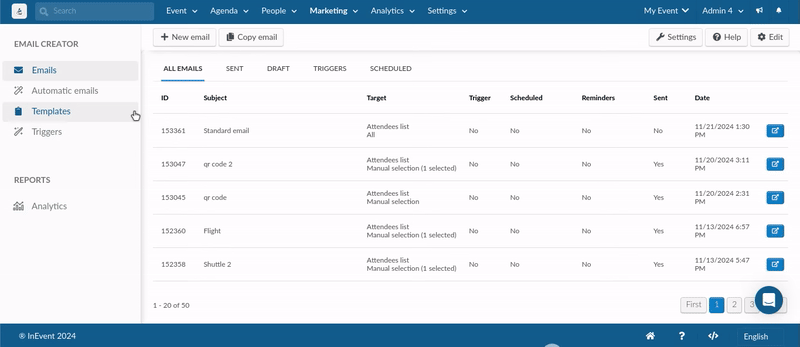
The Email creator has 4 main sections which can be accessed from the left sidebar:
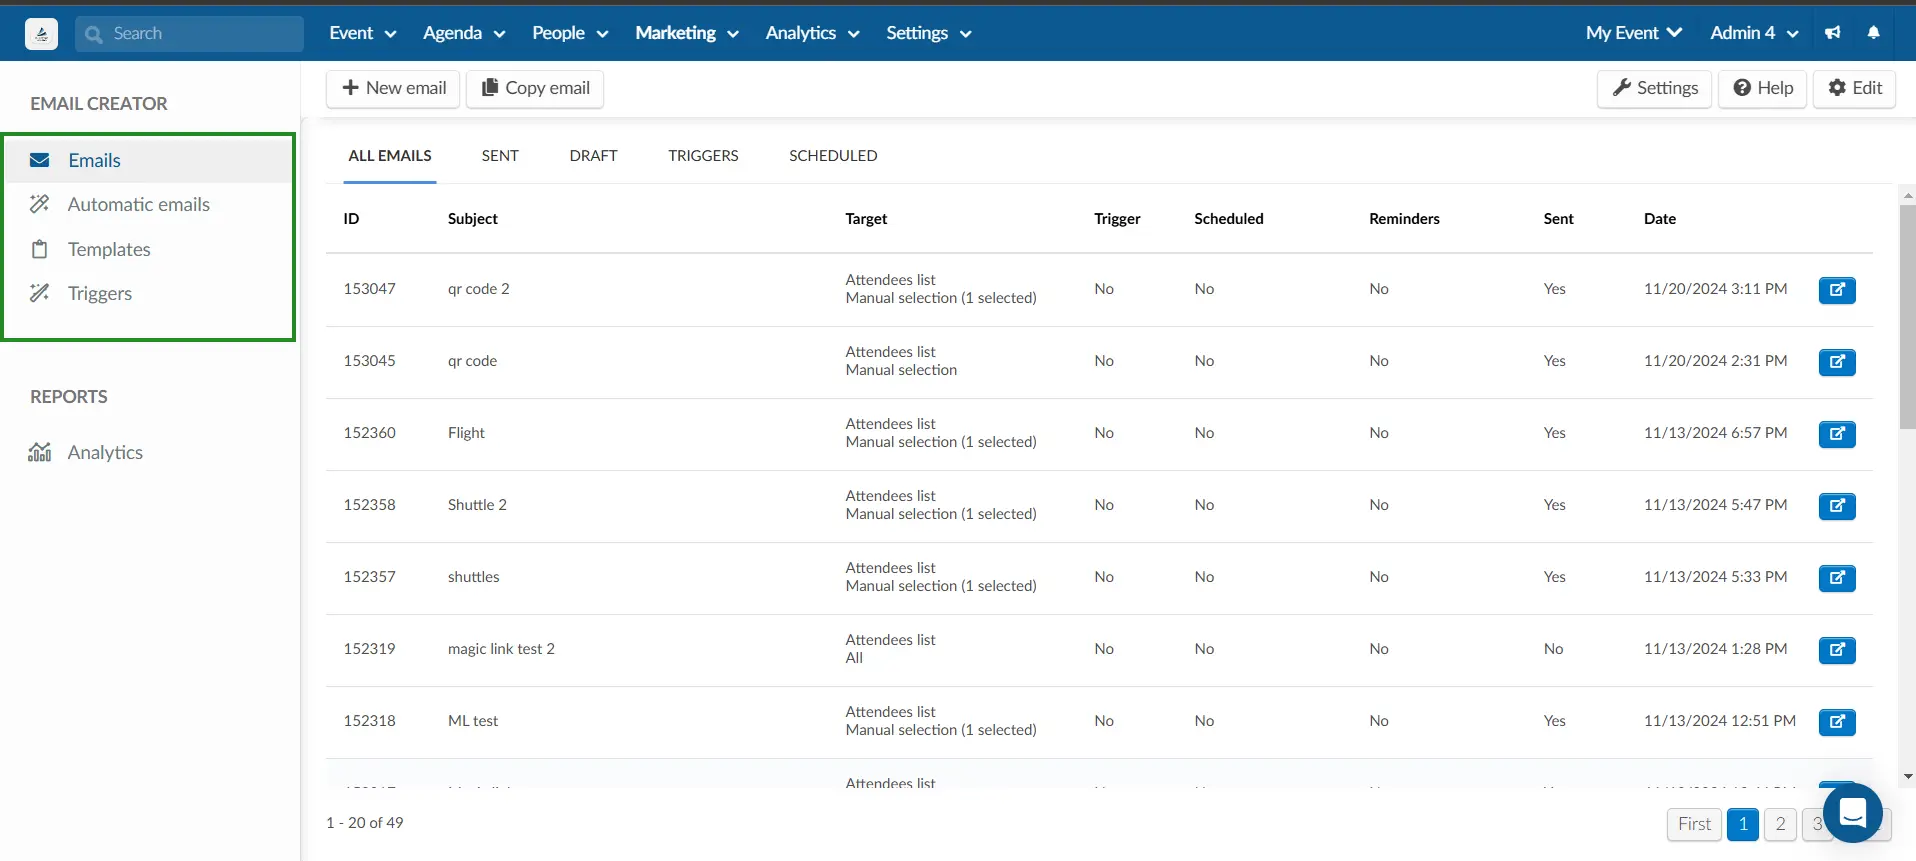
- Emails: You can create and personalize emails in this section.
- Automatic emails: You can configure and customize automatic emails in this section.
- Templates: You can create and customize email templates in this section.
- Triggers: You can set up triggers to send customized emails automatically in this section.
How do I create a customized email?
You can create a personalized email by following the steps below.
- Navigate to the Email section in the Email creator page.
- Click on the + New email button in the top left corner.
- Enter the email subject and choose a System template or click on My templates to select a custom template that you have created.
- Press the blue Create button.
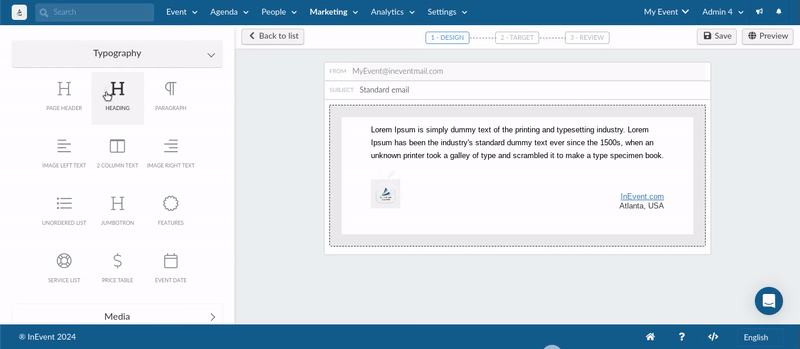
Design
After adding the subject of your email and choosing the email template, you will be directed to the design and customization page of the email.
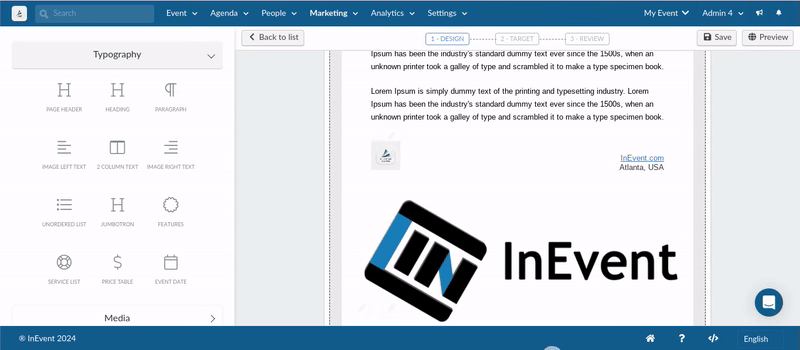
Adding sections
You will find six categories that contain different options to create sections on your email. To add a section, drag it from the left to the email on the right.
- Typography: In this section you will find headings and text templates of different font sizes and formats, with and without editable icons and buttons, lists and tables.
- Media: Here you will see options to insert images, an editable QR code, a section with all your event sponsors that you previously added under Event > Sponsors, as well as a section with all the event Speakers added under Event > Speakers. Click here for more information about the Sponsors' section on the email and its customization and here for more information on the Speaker's section on the email and how to customize it.
- Layout: Add divisions to your email sections.
- Button: Insert different buttons, such as 'App download', 'Add to Calendar' and the attendee's Digital Ticket Voucher.
- Social: Add social media links to your email. To edit them navigate to Event > Details.
- Footer: Choose between 2 footer options for your email.
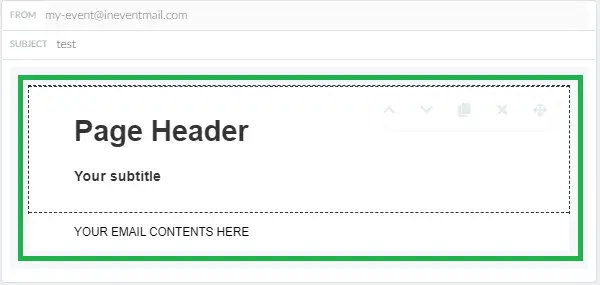
To customize the email, you must drag the chosen options from the left into the email on the right, as shown below:
To add text and links to your email click where it says: Your email contents here
Editing sections
You can reorganize, duplicate, and delete sections using the menu bar in the top left corner of each section.
You can also change icons and make them clickable as shown below.
Sections settings
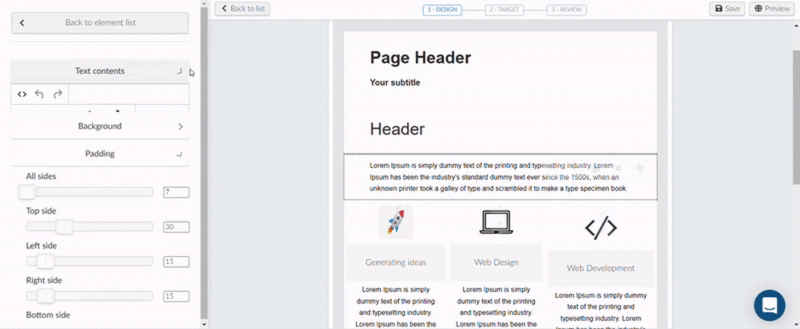
- Text contents
To add text and links to a section, click on the text and an edit box will open up on the left side. Here you can enter your Dynamic content which contains either information about your event or information about a person. You can add Dynamic links for example to your website, registration form, download page, and account page. Also, you will be able to add images, tables, links, forms and edit the format of the email.
Click here for further information on how to use the dynamic content.
- Background
You can choose the section's color on the color picker or enter the hex code of the color you would like to have. You can ask Google what hex code represents each color. For example, blue is #0000FF.
- Padding
Padding goes around all four sides of the content and you can target and change the padding for each side (just like a margin).
- Show content
You can decide whether to show or hide certain content from a section. Not all sections have this option available.
Once you have finished editing your email, you can proceed to choose the recipients of your email by clicking Target.

Generating emails with the ChatGPT Email AI
With InEvent's ChatGPT Email AI, you can easily generate an email by entering a prompt from the email builder. Below are instructions on how you can use the tool in the Email creator:
- Add a text content into the email body.
- Click on the text content to display the text editor.
- Click the ChatGPT drop-down box in the text editor.
- Select Email AI. A pop-up box will appear.
- Enter your email prompt in the Write an email for text field.
- Press Generate to start processing your request. When the process is finished, a new pop-up box will appear.
- Add the generated email by pressing Use content.
- Review the generated email and edit if necessary before saving.
Understanding ChatGPT Email AI token equivalents
ChatGPT Email AI token equivalents
One token is approximately equal to 0.75 words.
One hundred tokens is approximately equal to 75 words.
Alternatively
One to two sentences is approximately equal to 30 tokens.
One paragraph is approximately equal to 100 tokens.
1,500 words is approximately equal to 2,048 tokens.
Target audience
Once you have finished editing your email, you can proceed to choose the recipients of your email by clicking Target.

In the Target section, there are two drop-down boxes that will help you select recipients. The boxes are highlighted below:
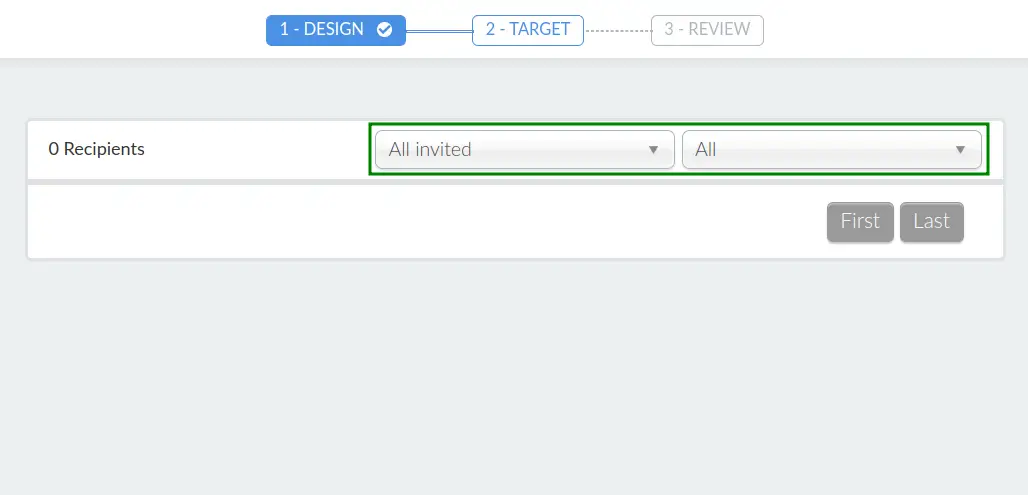
The first drop-down box allows you to choose the group of people who will receive your email, as highlighted below:
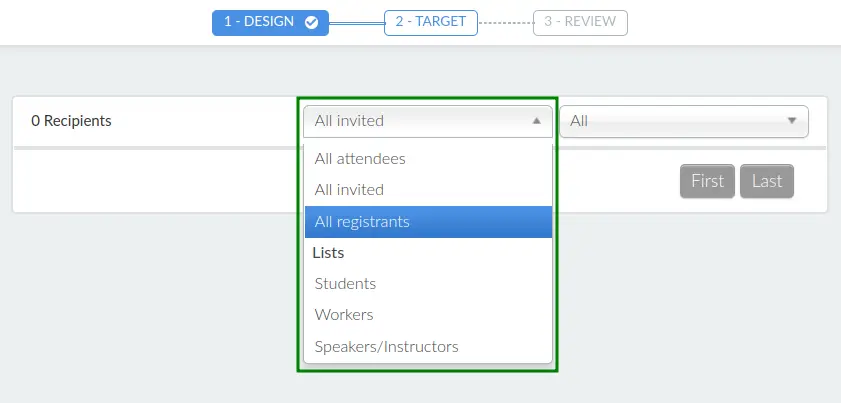
In the drop-down box above, you can choose from the following groups:
- All attendees
- All invited
- All registrants
- Members of Custom lists you have created
Afterwards, using the second drop-down box, you can select members of the chosen group as recipients or further specify them using various filters, as shown below:
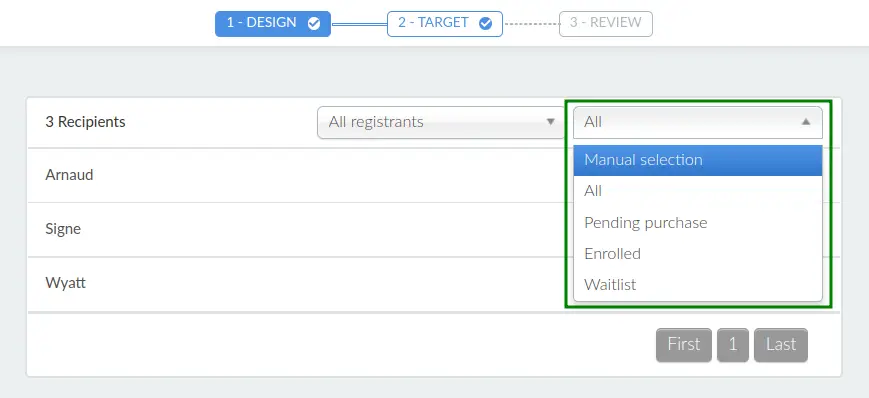
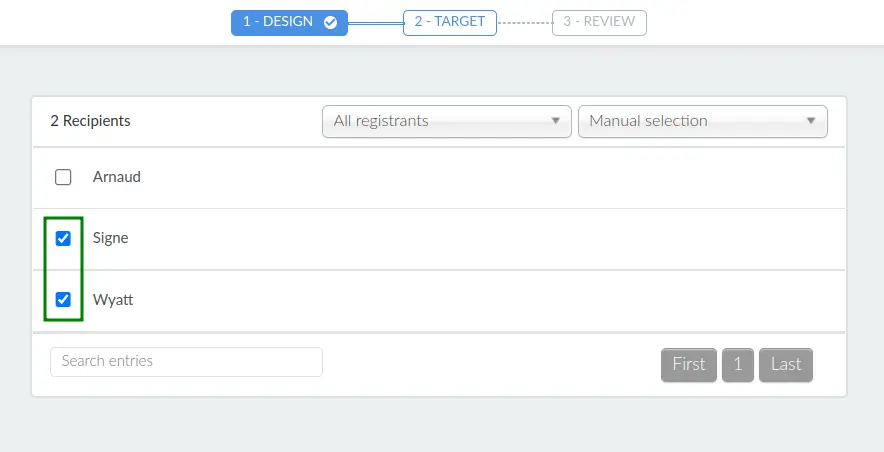
Using the drop-down box above, you can choose from several options. By choosing Manual selection, you can manually select recipients by ticking the box beside the recipient's name, as shown below:
By choosing All, you can select all group members as recipients.
Filters are available depending on the group you have chosen in the first drop-down box, with the specifics listed below:
- All attendees
- Refer to this this article for Attendee filters.
- All invited
- Refer to this this article for Invitee filters.
- All registrants
Filters available for this option are:- Pending purchase: Registrants who have not completed their purchase
- Enrolled: Enrolled attendees
- Waitlist: People who are still waiting for approval
- Members of Custom lists you have created. Only Manual selection will be available for this option.
Once you have finished selecting the recipients of your email, you can proceed to review and send the email by clicking Review.

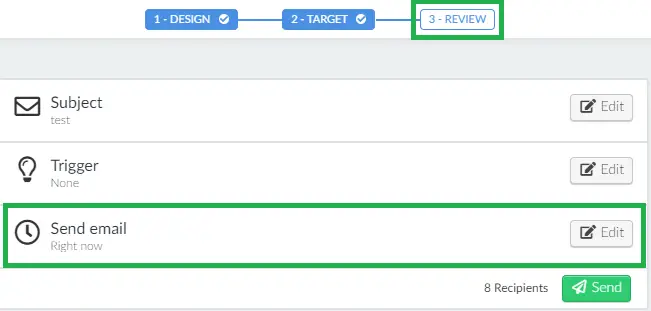
Review & Send
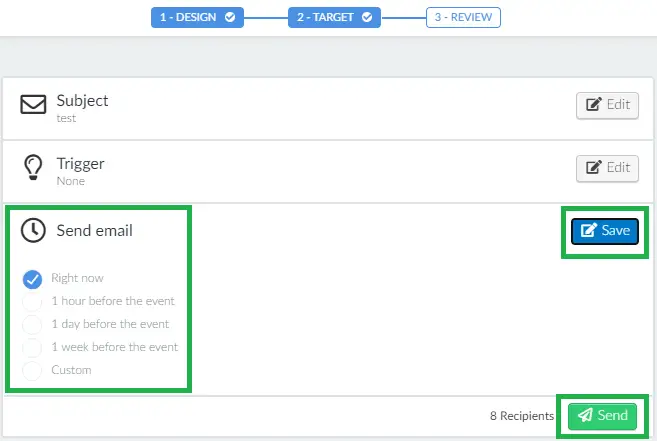
In the Review section, we can verify the subject of the email and also set the time the email will be sent. You can schedule the specific date and time that you prefer to send the email. To do this, click on the Edit button in the Send email field.
After setting this information, click on the blue Save button and then press the green Send button.
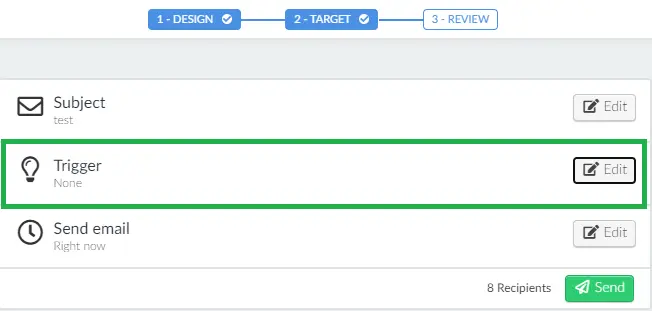
In addition, you can also create a trigger for your email, such as sending it as soon as someone responds to a specific form. To do this, click Edit in the Trigger field.
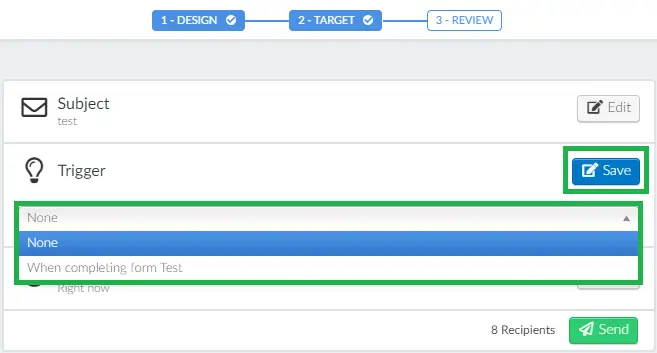
Select the form option that you want to link to the email and click the blue Save button
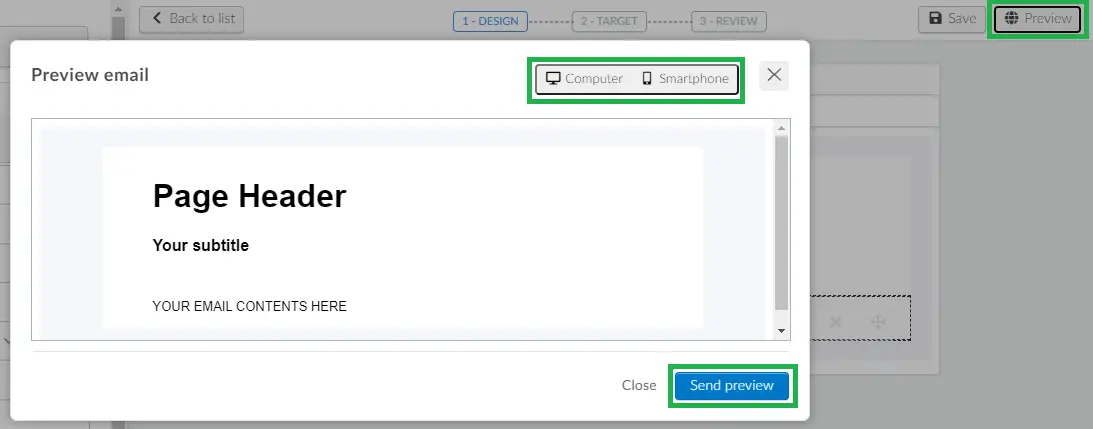
How do I preview an email before sending it?
You can preview the email on a computer or on a smartphone, or you can send a preview to your email.
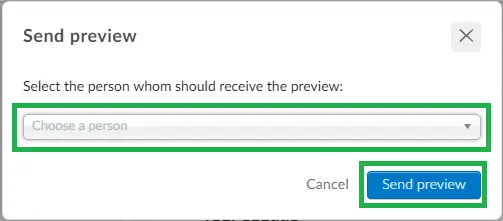
To preview the email, press the orange Preview button in the top right corner of the email creator page. Then, press the blue Send preview button if you would like to send the preview email to yourself or another user.
Choose the email address from the drop-down bar and press the blue Send preview button.
Archiving Emails
Follow the steps below to archive emails:
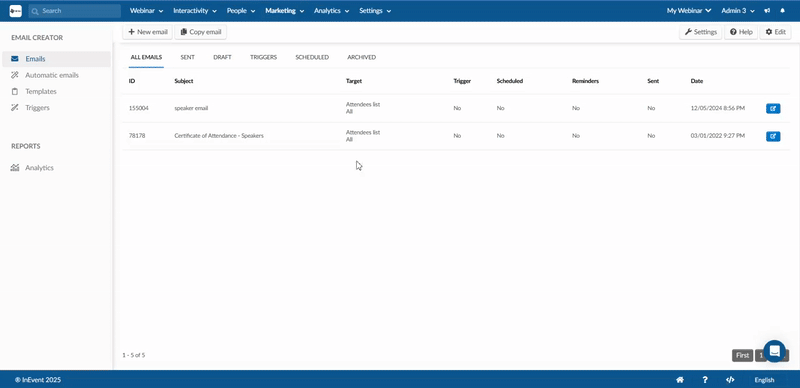
- Navigate to Marketing > Email Creator > Emails and you will see all the emails in your email creator in the All Emails section.
- Click on Edit and select the emails you wish to archive by ticking the boxes corresponding to the emails.
- Once you have selected the emails, click on the Archive button. This will move the selected emails to the Archived section of the Email Creator.
- Click End to finish and then click on the Archived section to view all the Archived emails.
Unarchiving Emails
Follow the steps bellow to unarchive emails:
- Navigate to Marketing > Email Creator > Emails, then click on the Archived tab to view all archived emails.
- Click on Edit in the top-right corner.
- Select the emails you wish to unarchive by ticking the checkboxes next to them.
- Click on the Unarchive button. This will move the selected emails back to the All Emails section.
- Click End to finish. You can now find the unarchived emails in the All Emails tab.
Configuring automatic emails
In the Automatic emails section, you can disable or enable automatic emails using the Status toggle. You can also customize the design of automatic emails by pressing on the blue Open email editor button that corresponds to the automatic emails. Then, you will be able to customize the email subject, layout, and design.
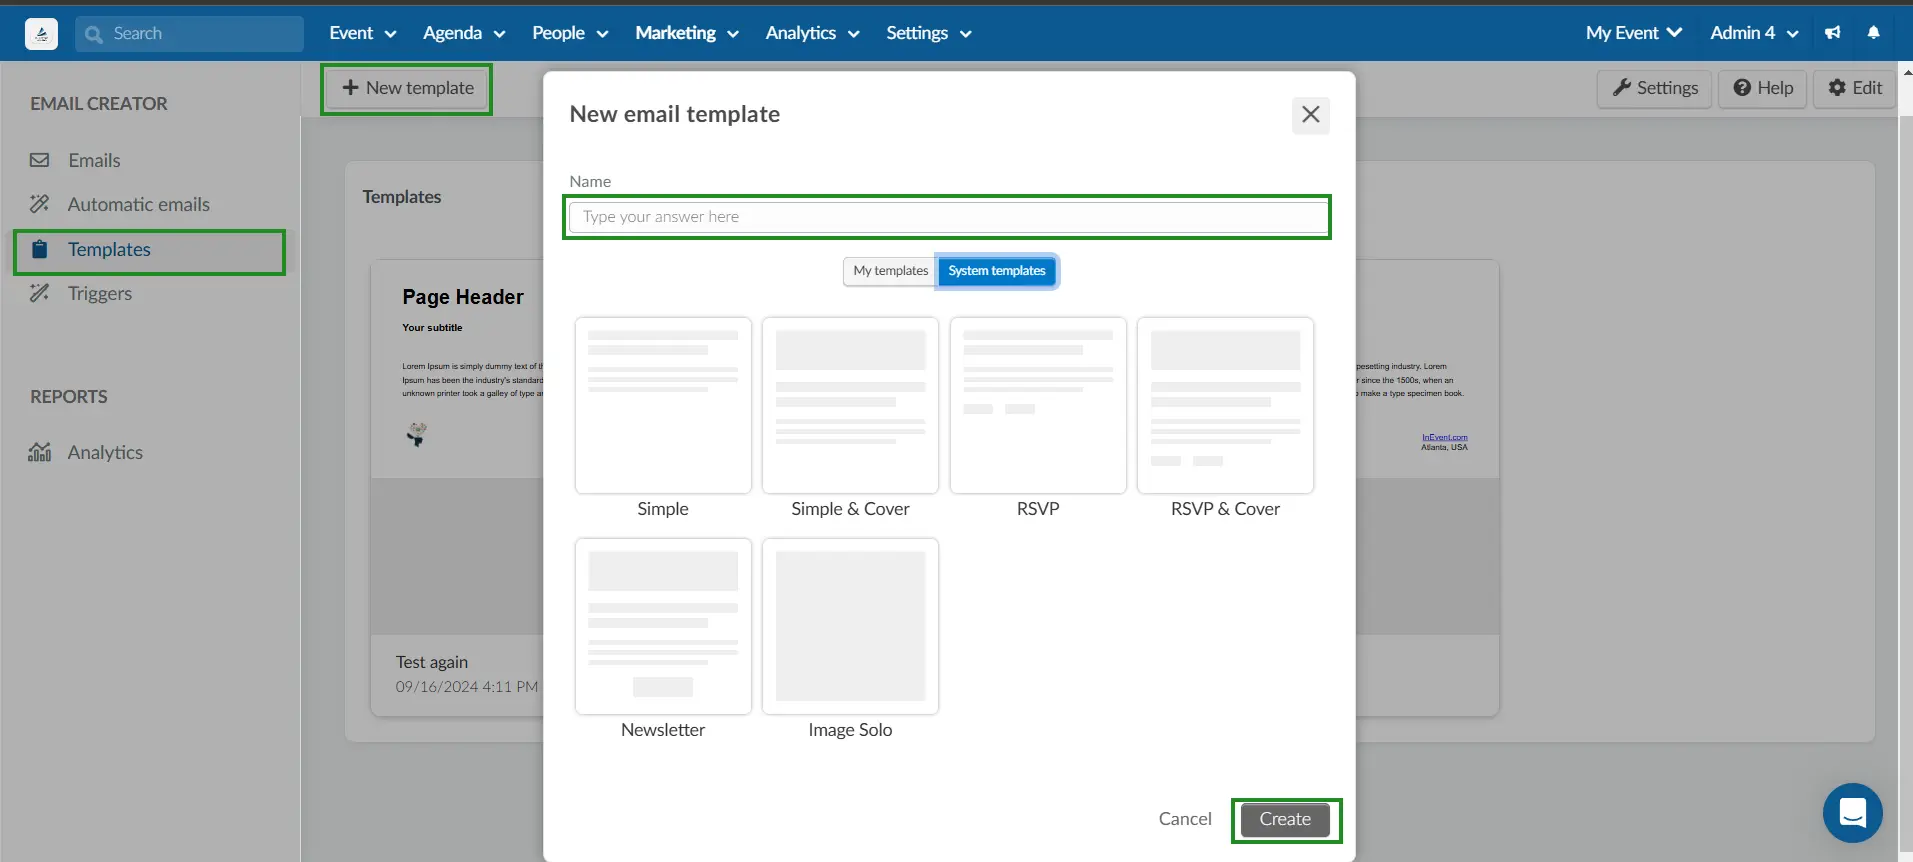
Creating custom templates
In the Templates tab, you can create custom templates off the available system templates available for your emails. To create a custom template, follow the steps below:
- Click on Templates from the left menu of the Email creator interface.
- Click on +New template.
- Type the name of your template under the Name text box.
- Click on System templates and select the desired system template.
- Click on Create.
Once you have created the custom templates, they will appear in the Templates tab and will be available for you to select from My templates when creating an email.
To remove a custom template, simply click on Edit and tick the checkbox of the template you want to remove, click on the Remove button at the top right corner of the page. A confirmation pop-up will appear, click on Remove again to confirm the action.

Setting up email triggers
In the Triggers section, you can set up and configure triggers to send your custom emails automatically using custom templates.
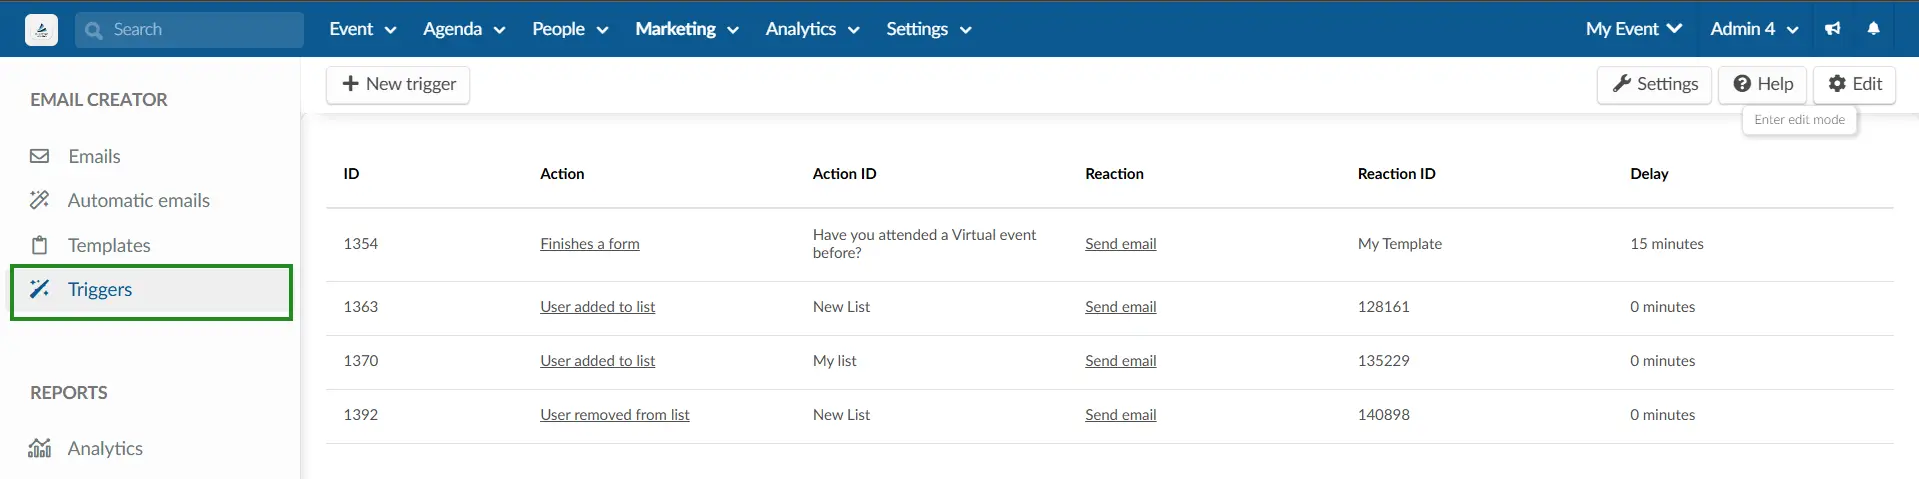
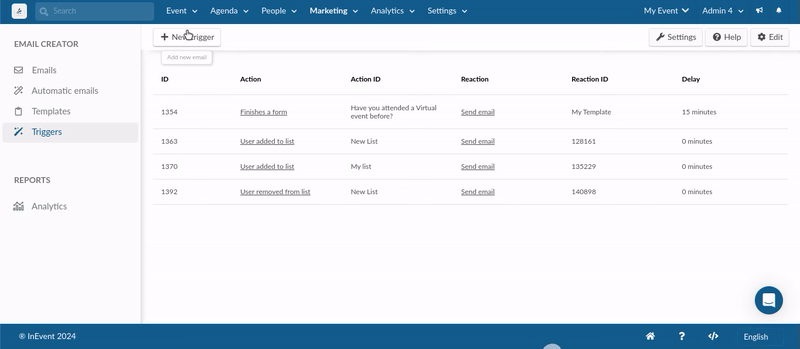
To set up a new trigger, follow the steps below:
- Click on the New trigger button on the top left corner. The New trigger pop-up box will be displayed.
- Select an Action using the drop-down selector. The available options are as follows:
- Finishes a form: Set so that the email is sent when an user finishes a form.
- User is in the waitlist: Set so that the email is sent when an user is added to the waitlist.
- Users with purchase unfinished: Set so that the email is sent when an user has an unfinished purchase.
- User is added to list: Set so that the email is sent when an user is added to a list.
- User removed from list: Set so that the email is sent when an user is removed from a list.
- Select a custom template using the Select an email template drop-down selector.
- Enter the amount of minutes this trigger should be delayed for using the Delay text box. When adding a delay, the system will check if the action still fits the trigger criteria before dispatching the email.
- Press the Create button.
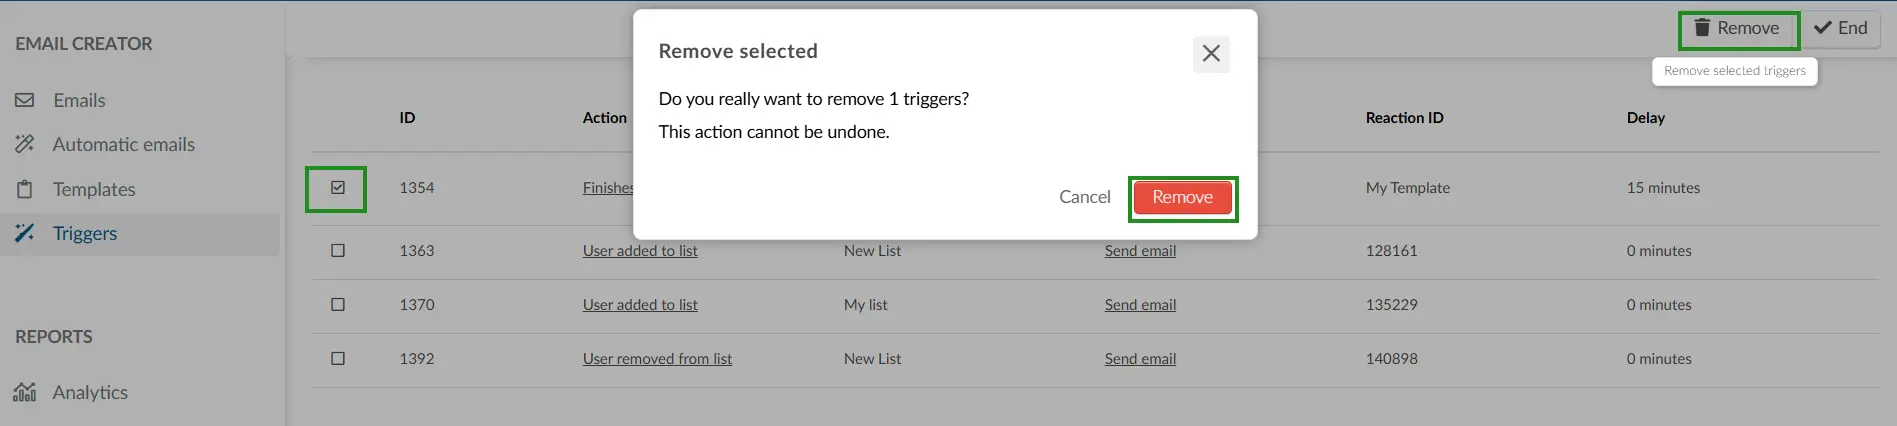
Removing an email trigger
To remove an email trigger, click on the Edit button. Then, select the trigger(s) to be removed using the corresponding checkbox, and click the Remove button.
Settings
You can access the relevant tools of the Email creator by navigating to Marketing > Communication > Email creator. Click on the Settings button in the top right corner. A pop-up will appear with the tools that will help you customize your email settings.
To enable or disable a tool, click on the switch next to it as shown below:
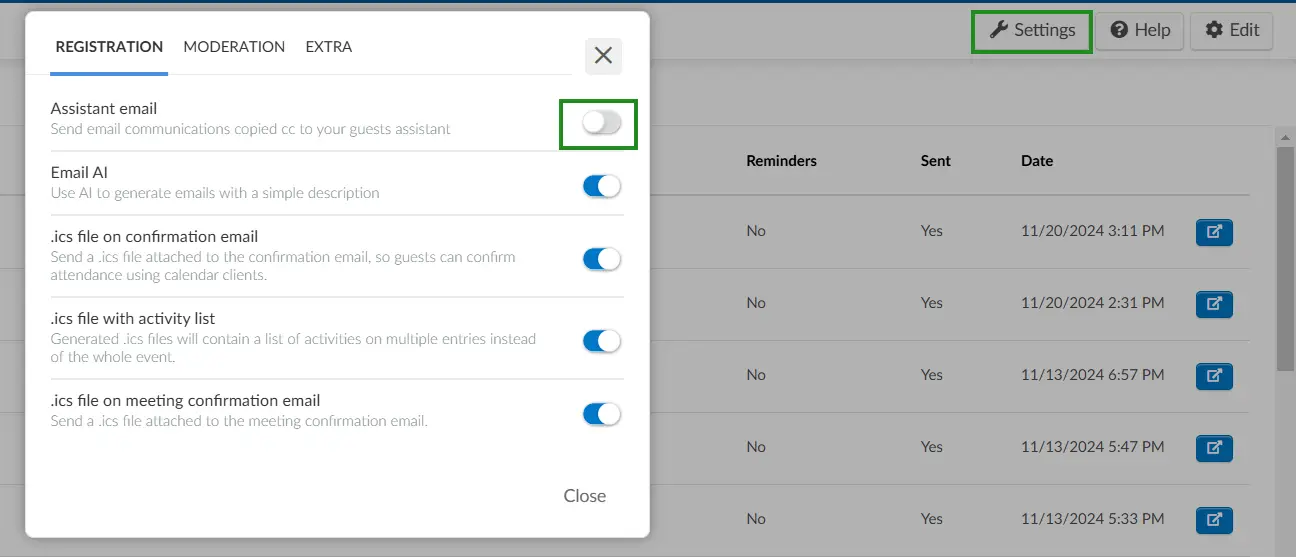
Alternatively, you can access these tools from the Tools page (Settings > Tools). Click here to learn how.
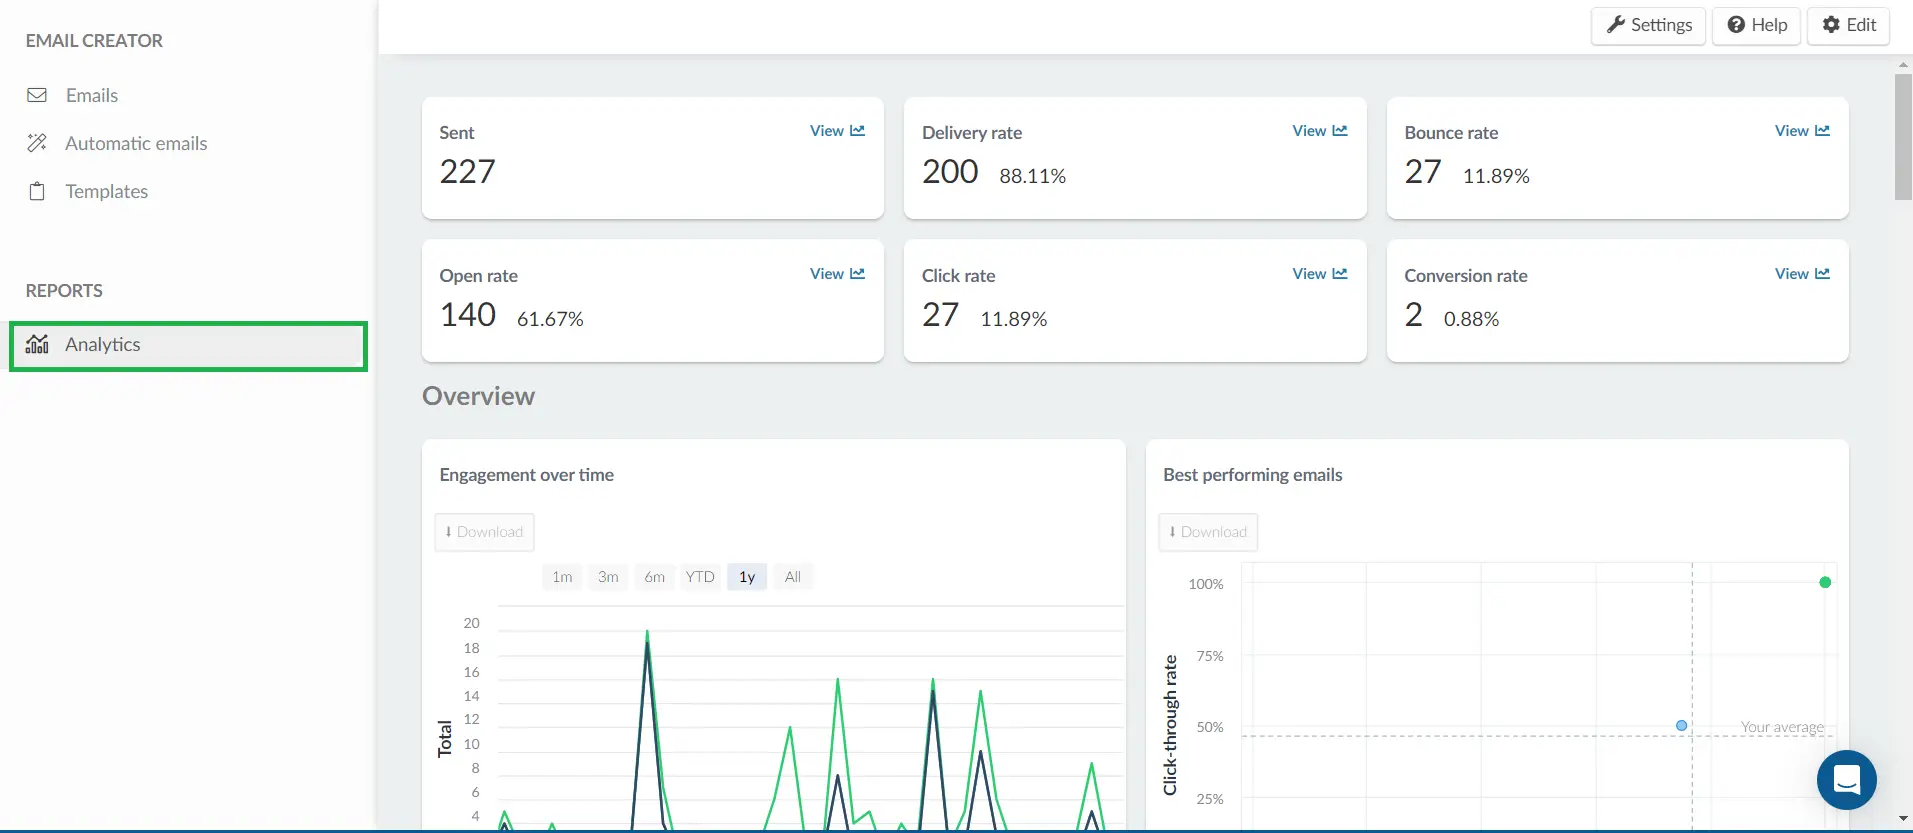
Email Analytics
To see a full analytic report of your emails, click on Analytics from the left menu under the Report section. This section will show all the statistics of your emails. To learn all about the analytics report, refer to the Email Analytics.
- If you wish to white label your event app as well as have custom emails, take a look at our Custom email article.
- To prevent your event's email quota from being blocked due to a high bounce rate check out our Reducing your email bounce rate article.