Intensive support guidelines for on-site agents
 Updated 20 hours ago
by
Amalia
Updated 20 hours ago
by
Amalia
InEvent recognizes the importance of supporting event organizers, as clients, before, during, and after the procession of their event. It is important that event organizers and attendees experience a smooth, seamless, and worry-free in-person events.
InEvent also recognizes the importance of equipping supporting on-site agents and technicians with the appropriate information and knowledge about the InEvent platform so that they are able to fully and comfortably assist event organizers during events. In accordance to that, supporting on-site agents and technicians will find the necessary information to effectively and efficiently assist event organizers with their in-person events, ensuring a great experience for all parties.
This article encompasses the information on the required hardware specifications; information on operating the InEvent platform, web app, and native mobile app; ensuring that events are set to in-person mode; operating InEvent's key in-person features, such as Access Control and Badge printing; seeking advanced support; guide questions for supporting on-site agents and technicians.
Required hardware specifications
For the best event experience, InEvent recommends event organizers fulfill the following hardware specifications. This section contains the hardware specifications for use within the Virtual Lobby, native mobile app, and the web app, as well for other in-person features such as Access Control and Badge Printing.
Hardware device
For use with computers, InEvent recommends the following hardware device specifications:
- Intel Core i5, 2.5 GHz CPU with dual cores or higher for single screen use
- Intel Core i7, 2.6 GHz CPU with quad cores or higher for use with two or more screens
- Apple M1 chip or higher for devices running macOS
- lRAM of 8 GB or more for optimal experience
The requirement for mobile or tablet devices are listed as follows.
- Android: Minimum of Android 8.0 (Oreo)
- iOS/iPadOS: Minimum of iOS/iPadOS 13.0
Web browser version
The web app is compatible with the following web browser versions.
Platform | Browser name | Minimum browser version | Recommended browser version |
macOS, Windows, Linux | Google Chrome and Chromium-based browsers | 56 | Most recent (best experience) |
macOS, Windows, Linux | Mozilla Firefox | 44 | Most recent (recommended alternative) |
macOS | Safari | 11 | Most recent (recommended experience) |
Android | Google Chrome | 80 | Most recent |
iOS, iPadOS | Safari | 11 | Most recent |
Internet connectivity
InEvent advises the following connection speeds for a smooth experience. Users can verify their internet speeds using InEvent's Troubleshoot utility in the Web app, or use a third party speed measurement utility.
Device connectivity
Below are the recommended specifications for internet speeds per device.
- Browsing: 1 Mbps upload & download
- Video: 3 Mbps upload & download
- Video conferencing for speakers: 10 Mbps upload & download
- 1080p Full HD streaming: 15 Mbps upload & download minimum
- Best Virtual Lobby experience and results: 20 Mbps upload & download speed recommended
Event venue connectivity
At in-person events, reliable and stable internet connectivity is essential for all parties, including the event organizers as well as the attendees. InEvent recommends the following specifications for internet speeds at in-person event venues, depending on the scale of the event and typical use.
Small-scale events, or events with less than 50 attendees, are recommended to have a minimum internet speed of 10-25 Mbps download and 3-5 Mbps upload. This is ideal for events that require lightweight connectivity, such as for receiving and sending e-mails or instant messaging and accessing the InEvent mobile app. Events with intense connectivity needs, such as live streaming, real-time interactions, and file downloads may require higher download speeds.
Large-scale events, or events with more than 50 up to over 500 attendees, are recommended to have a minimum internet speed of 50-200 Mbps download or more and 10-50 Mbps or more upload. Events with intense connectivity needs may require higher download speeds of 200-200 Mbps or more.
Badge printing
The exact required specifications for badge printing may vary depending on event organizers' needs and preferences. Event organizers can opt to set up self-service badge printing stations, or provide promoter-assisted accreditation stations.
InEvent advises the following specifications for badge printing use.
Type of Accreditation | Self-service | Promoter-assisted accreditation stations |
Supported printers |
|
|
Hardware | Mobile or tablet devices running Android 8.0 or above, or iOS/iPad OS 13.0 or above For the best experience and results, latest operating system versions are recommended. | macOS Big Sur (version 11.0) or above with the InEvent printing plugin Windows 7 or above with the InEvent browser extension for printing, running Google Chrome or Chromium-based browsers version 56 or above For the best experience and results, latest operating system & browser versions are recommended. |
Internet speed | Basic Printing: Printing directly from a computer connected to the same network as the printer usually does not require a high-speed internet connection. The speed of the local network (Wi-Fi or Ethernet) is more relevant for basic printing tasks. Remote Printing: If event organizers plan to use remote printing features, such as printing from a mobile device or sending print jobs over the internet while away from the printer, a stable and reasonably fast internet connection is necessary. The required speed may vary depending on the size and complexity of the print jobs. | Basic Printing: Printing directly from a computer connected to the same network as the printer usually does not require a high-speed internet connection. The speed of the local network (Wi-Fi or Ethernet) is more relevant for basic printing tasks. Remote Printing: If organizers plan to use remote printing features, such as printing from a mobile device or sending print jobs over the internet while away from the printer, a stable and reasonably fast internet connection is necessary. The required speed may vary depending on the size and complexity of the print jobs. |
Number of Promoters | 1 promoter for every 3 accreditation stations | 1 promoter per accreditation station |
E-mail client
For efficient management of event organizer's e-mails, InEvent recommends the following e-mail clients.
- Microsoft Outlook (browser version)
- Thunderberd version 45.0 or most recent
- Apple Mail for macOS Big Sur 11 or most recent
VPN
InEvent encourages event organizers to ensure that their VPN providers support full connectivity and compatibility.
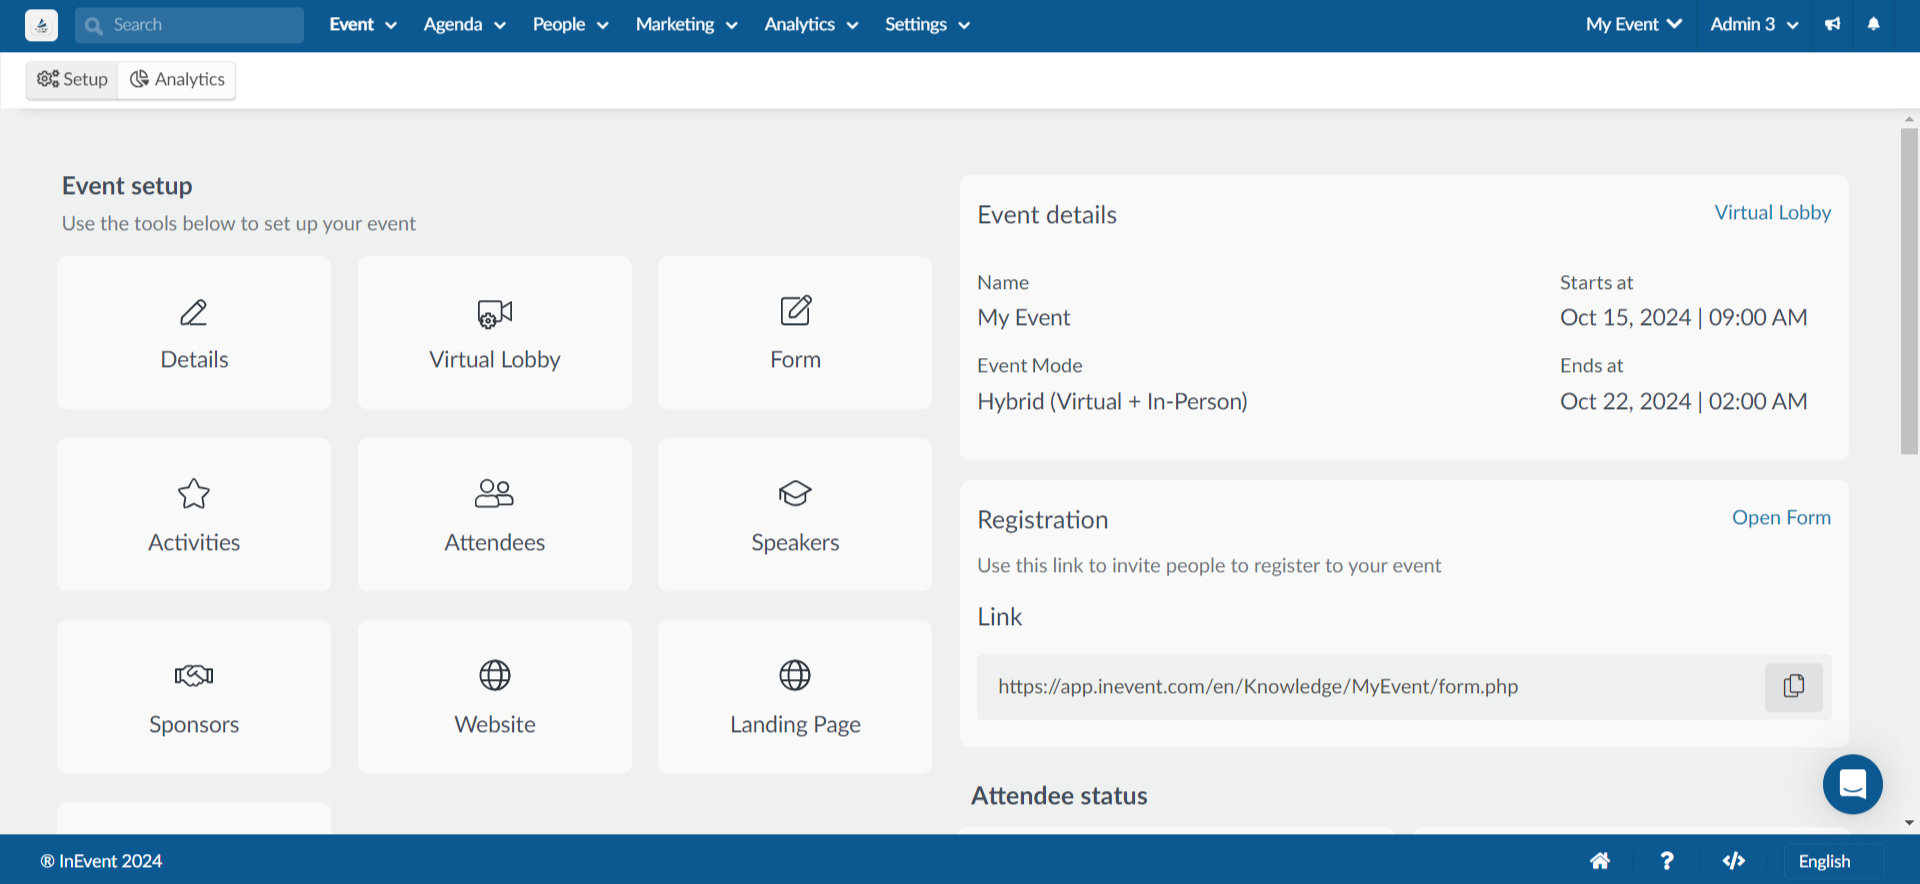
The InEvent platform
The InEvent platform refers to the web interface in which event organizers, including administrators, staffs, and other supporting parties create, configure and manage their events. The InEvent platform consists of two levels: the Company level and the Event level.
The Company level is used to refer to the event organizer's company or organization management panel. At this level, event organizers can create events, manage settings for all events within the same company, manage memberships and fixed attendees, and more. Administrators who are privileged to operate at this level are referred to as Company administrators.
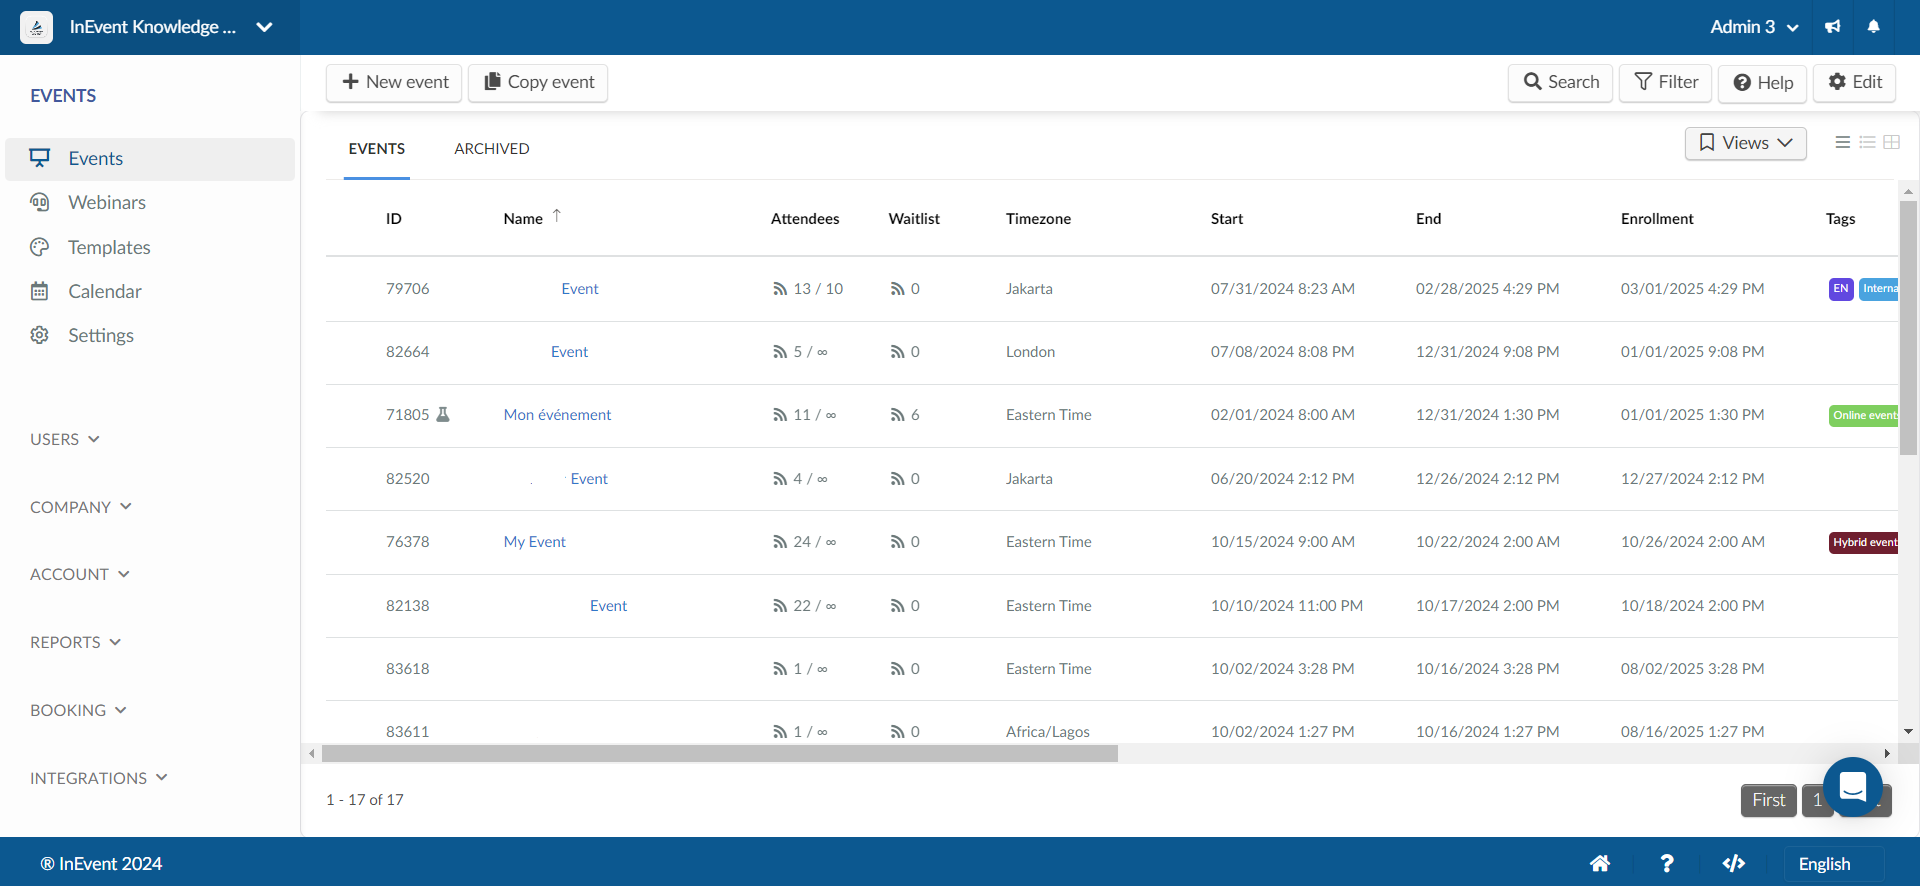
The Event level is used to refer to a specific event's management panel. At this level, event organizers can modify and manage the specific event's details, settings, attendees, tickets, badges, activities, real-time interactions, and more. Administrators who are privileged to operate at this level are referred to as Event administrators.
Complete information on the platform levels can be found in the Company and event levels article.
Importing spreadsheets
Event organizers and administrators can import spreadsheets into the InEvent platform, allowing for efficient addition and processing of invitees, attendees, tickets, activities, and much more. The platform also provides the ability to extract and export reports in the form of spreadsheets for external review use.
The InEvent platform accepts importing of spreadsheets in the .XLS and .XLSX formats.
Complete information about importing and exporting spreadsheets can be found in our article on Importing and exporting spreadsheets.
Importing spreadsheets into the InEvent platform
Administrators are encouraged to first download InEvent's provided demo file, populate it with the event organizer's required information, and finally upload the modified demo file to the InEvent platform. This is to ensure the full compatibility of the imported spreadsheet with InEvent's importing system.
Demo files can be downloaded directly from the target page's Import spreadsheet pop-up window. The steps to do so are as follows, using the Attendees demo file as an example.
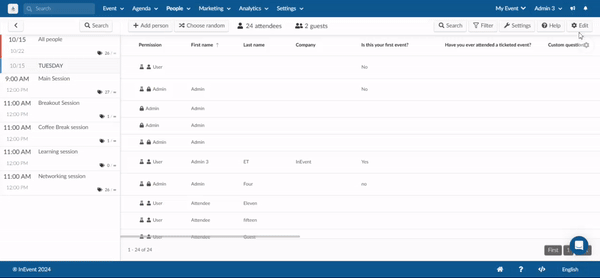
- Navigate to People > Attendees.
- Click on Edit.
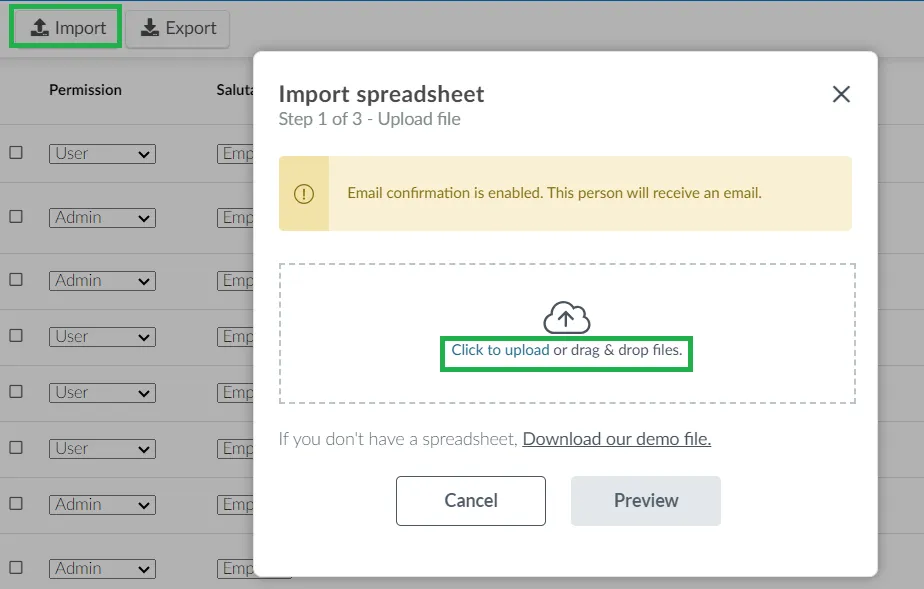
- Click on Import. The Import spreadsheet pop-up window will be displayed.
- Click on Download our demo file or Download demo file.
After completing the steps above, the file will be downloaded to the computer, ready for editing.
Once the demo file is populated with the desired information, administrators can import the file to the InEvent platform by following the steps below, using the Attendees demo file as an example.
- Step 1 of 3 : Click the blue Click to upload button and select the spreadsheet.
- Step 2 of 3: Click Preview. Then, click Back to navigate to Step 2. Here, select the defined header line in the spreadsheet file using the provided arrows. This ensures accurate mapping of the data to corresponding fields in the platform.
username, title, email, and other cells.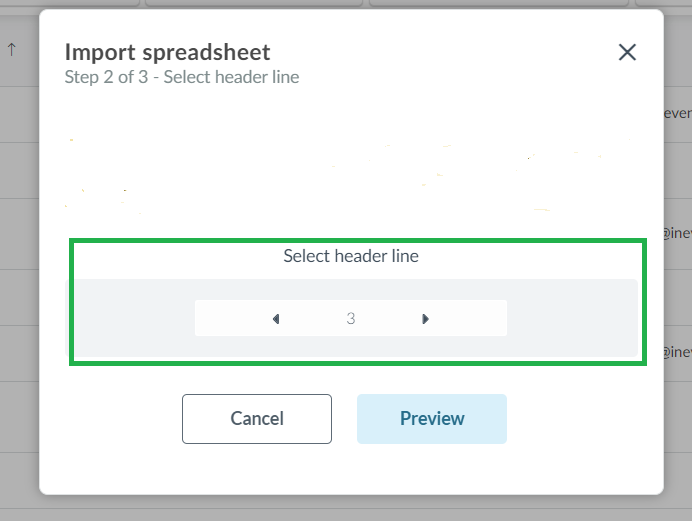
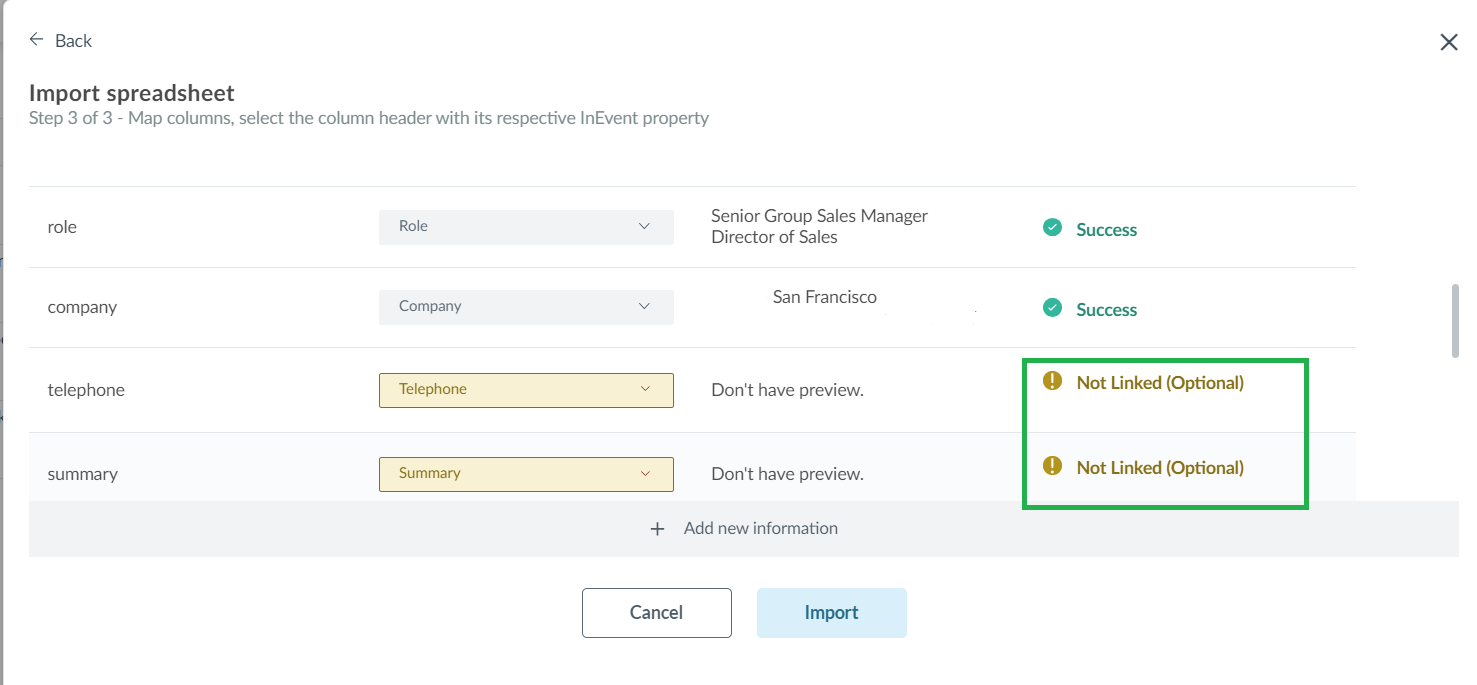
- Step 3 of 3: Click on Preview again to review the data that will be imported to the platform. Once done, click on Import.
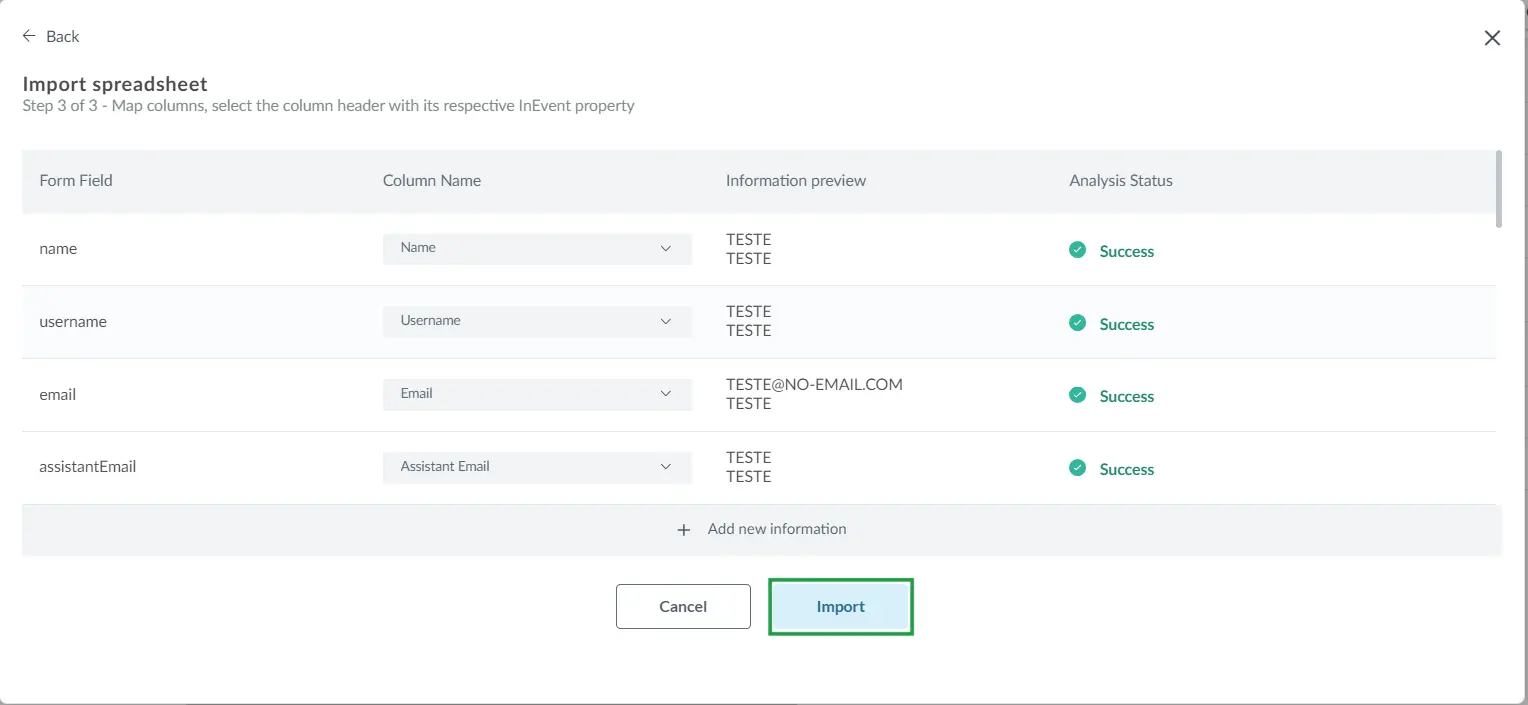
When a column is not completely filled, the Not Linked (Optional) message will appear beside the column.
Processing time for importing spreadsheets
The processing time for importing spreadsheets will depend on the amount of entries contained within the spreadsheets. In general, the platform takes about 1 second to process one row of entry. This means that, for example, a spreadsheet that contains information about 100 attendees will take roughly 100 seconds, or 1 minute and 40 seconds, to complete processing.
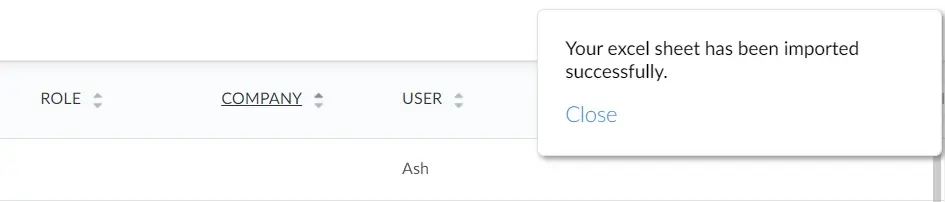
Administrators will see the following notification banner during the process.

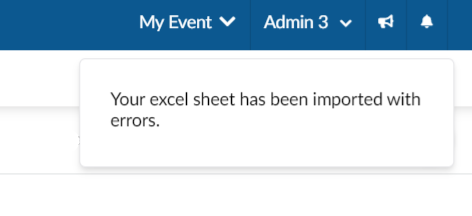
The following toast notification will be displayed after the import process is finished.
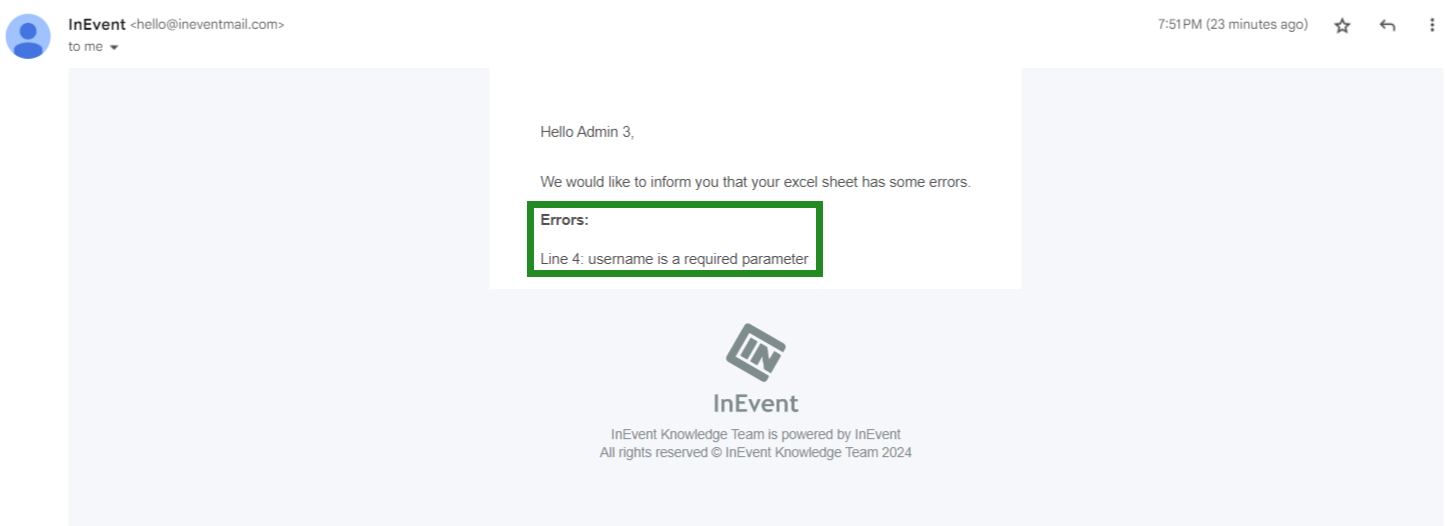
In addition, administrators will also receive an e-mail notification.

In the case that the platform encounters errors during the import process, administrators will receive an email such as displayed below.
Exporting reports as spreadsheets
The platform also provides the ability to extract and export reports in the form of spreadsheets for external review use. For more information about extracting event reports as spreadsheets, refer to our article on extracting and viewing event reports.
Web app
InEvent offers web app that can be accessed over the internet using a web browser. The web app can be accessed using a desktop computer or laptops as well as tablet and mobile devices. When an event is set to In-person mode, attendees will also have access to the event's web application.
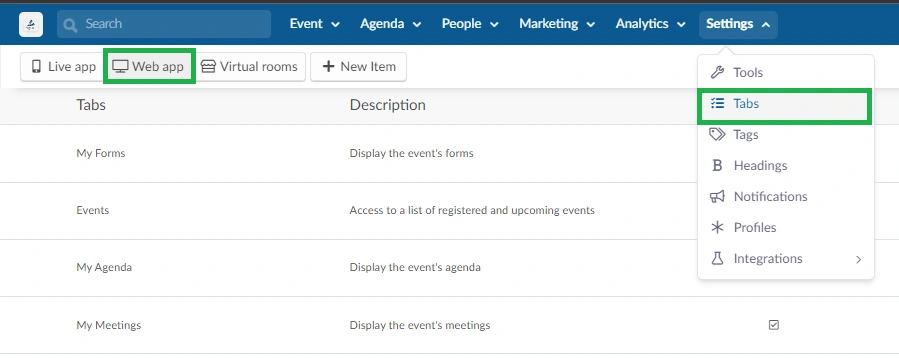
Customizing web app pages
In addition, event organizers can also customize the web app to fulfill their in-person event needs, such as by displaying My Agenda, My Account, Event Photos, Networking, and other useful pages under Settings > Tabs > Web app.
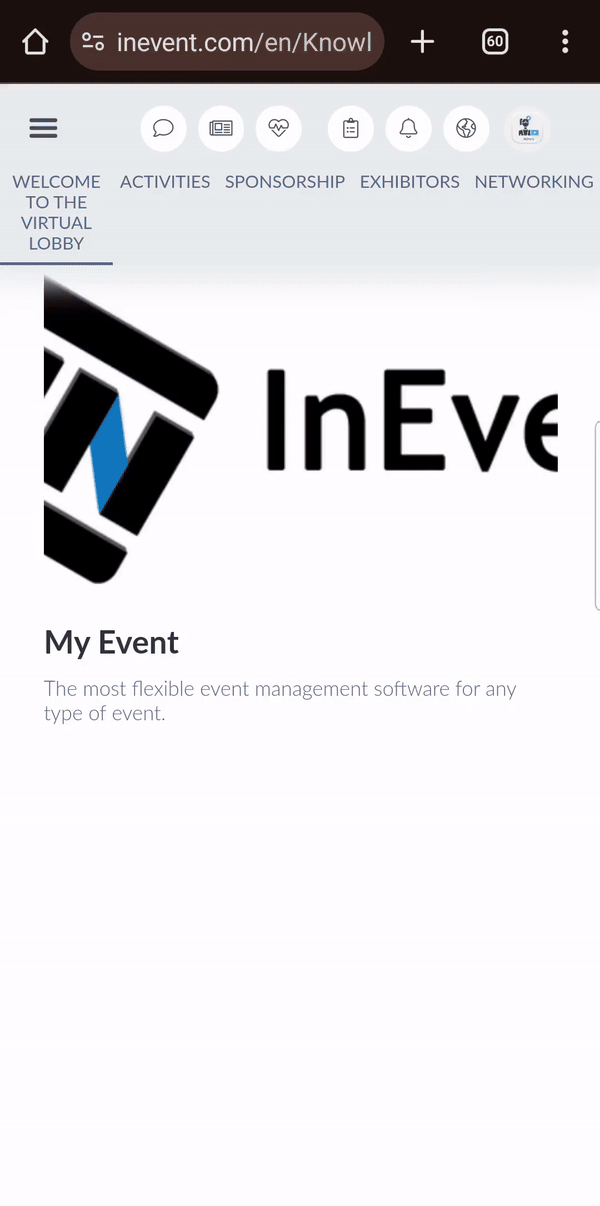
Accessing the web app from a mobile device
The InEvent web app can be accessed from a mobile web browser using the link. All of the tabs that has been configured to be visible on the mobile app will be accessible from the left menu bar.
Adding a home screen shortcut for the web app
The web app can be added as a home screen shortcut on Android mobile devices. In order to achieve this, the Allow users download app as PWA tool must be enabled at the Event level.
Enabling the Allow users download app as PWA tool
To enable the Allow users download app as PWA tool, follow the steps below.
- Navigate to Settings > Tools at the Event level.
- Locate the Allow users download app as PWA tool under the Start section.
- Click on the Edit button.
- Toggle on the corresponding button to enable the tool.
- Click on the End button to save the changes.
After completing the steps above, attendees can add the web app to the home screen of their Android devices.
Adding the web app shortcut to the home screen of Android devices
Attendees can add the web app shortcut to the home screen of their Android device by following the steps provided below.
- Access the web app using the attendee's unique magic link from their mobile device.
- Locate and tap the Add to Home Screen notification banner at the bottom of the screen. The Install app pop-up box will be displayed.
- Tap on Install. The app will start being installed by the mobile browser, and the attendee will be notified when it is finished installing.
- Navigate to the device's home screen or app drawer and locate the web app icon.
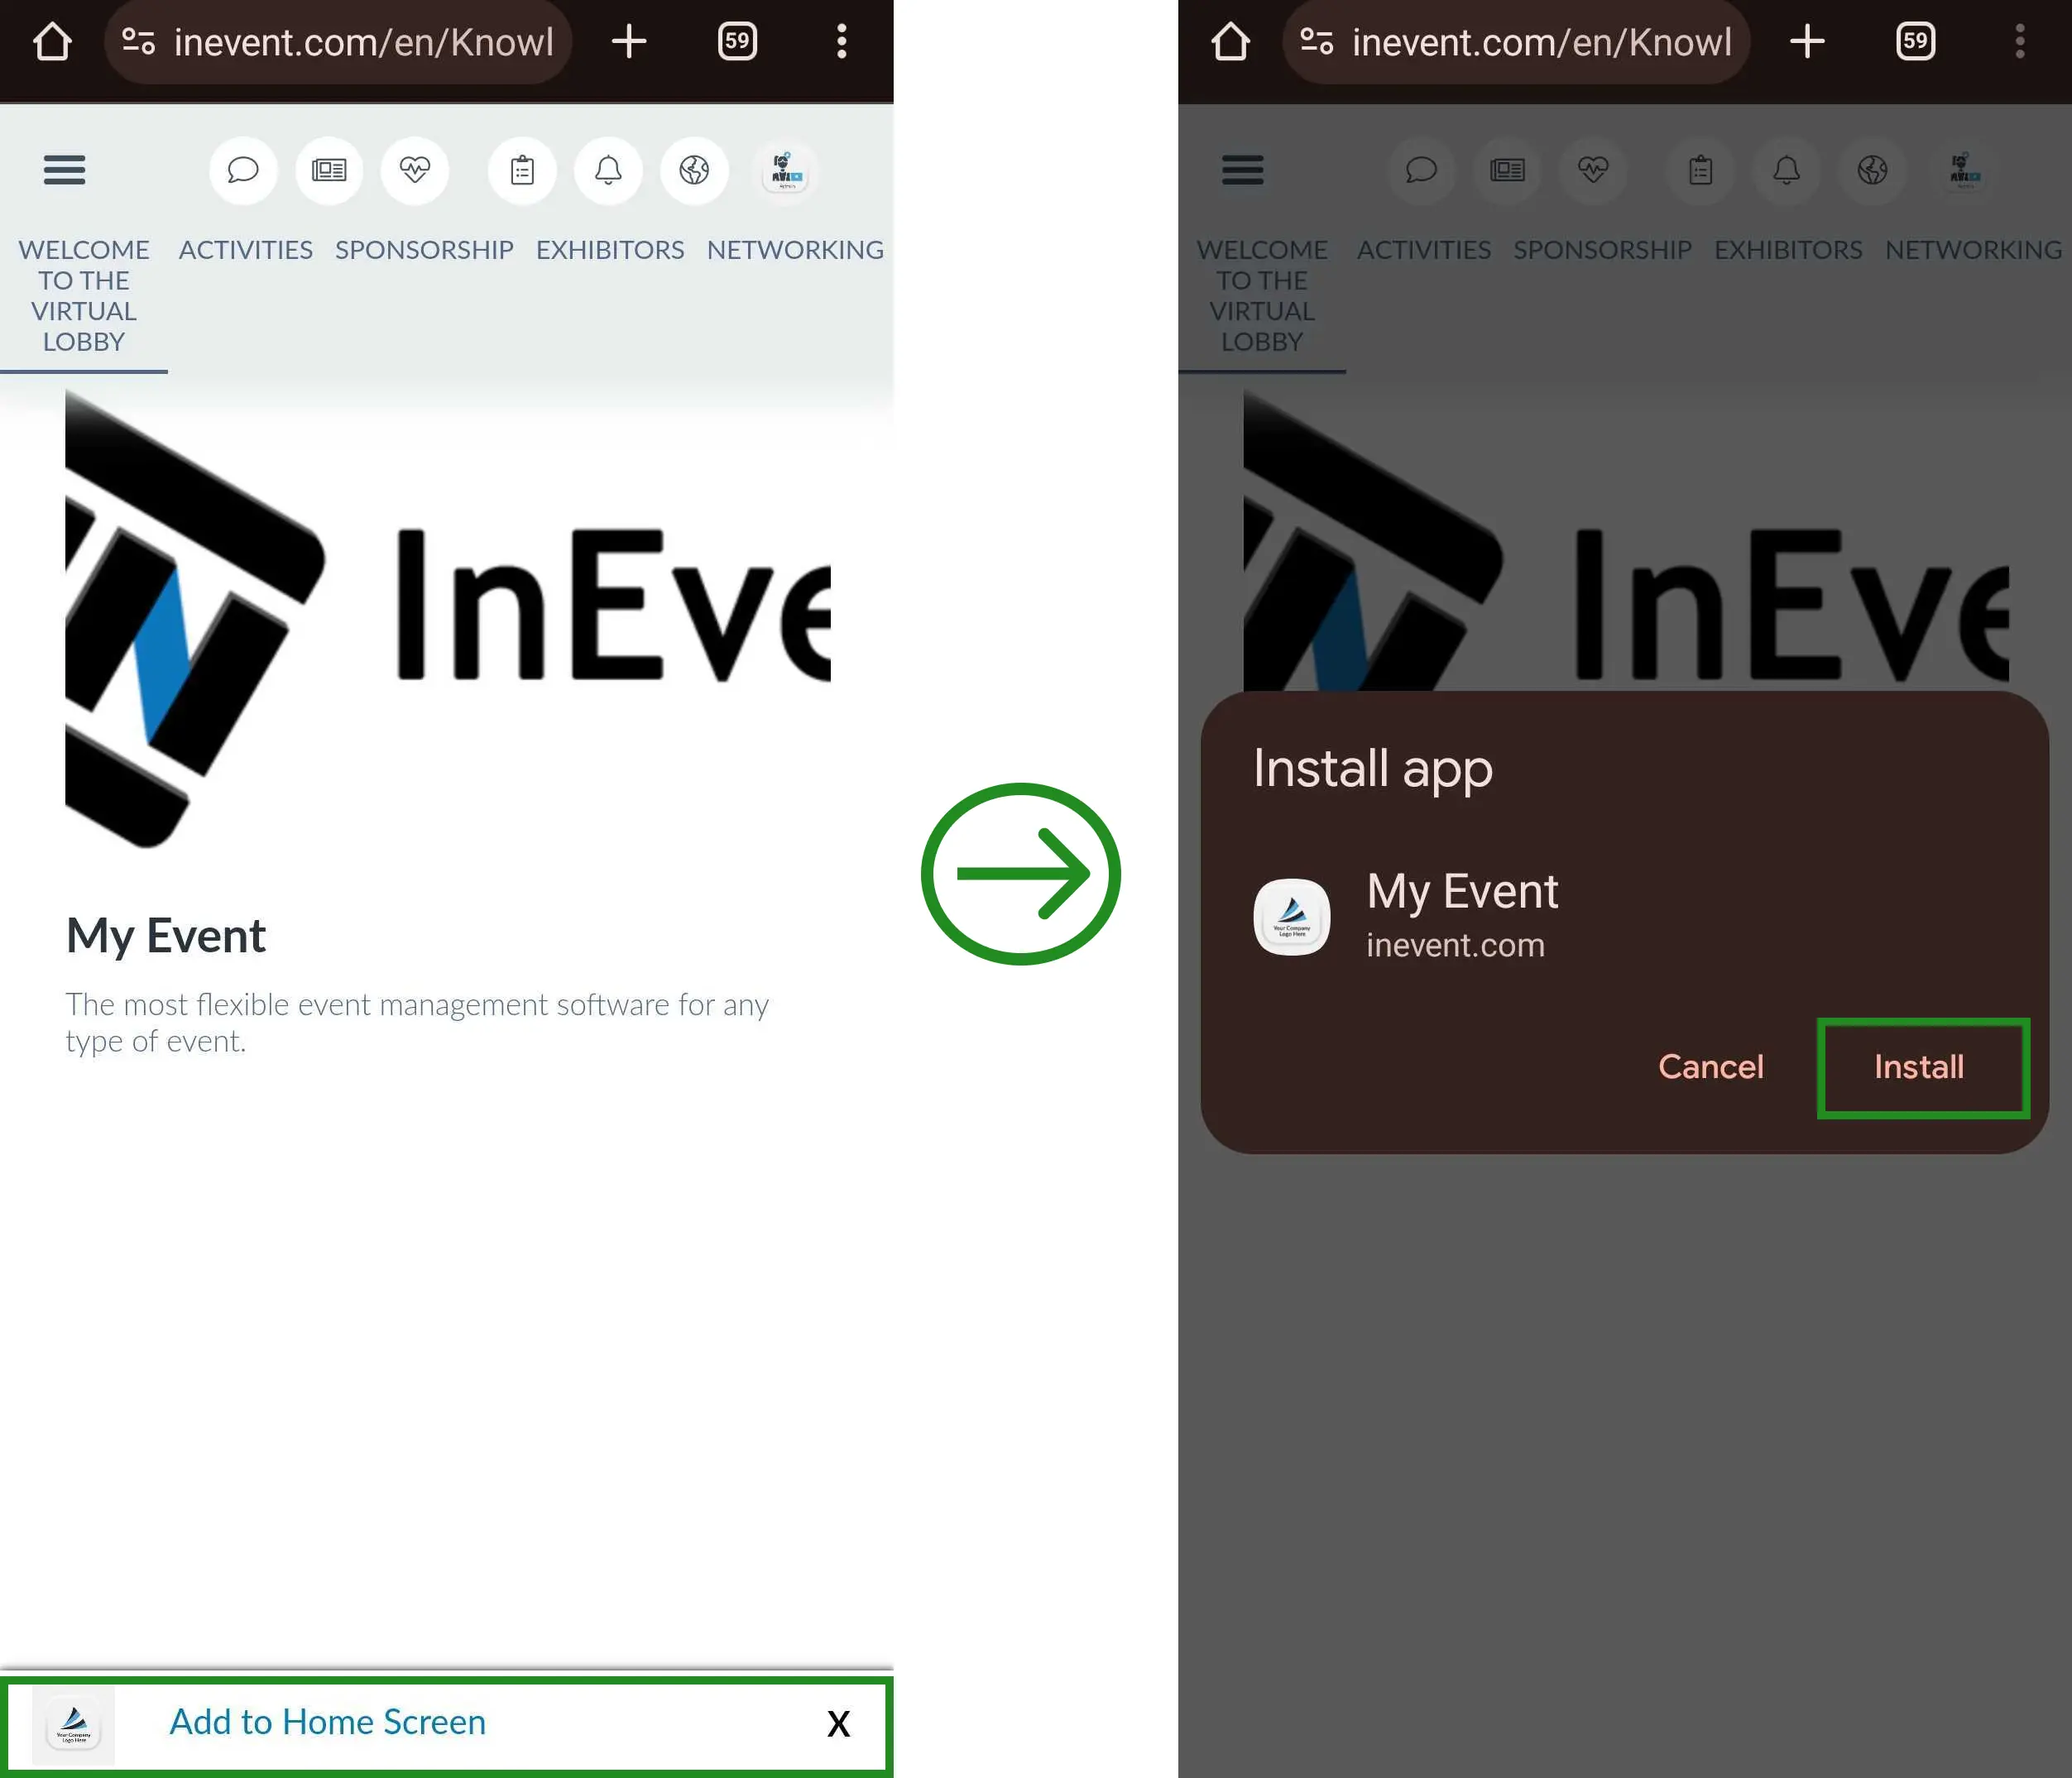
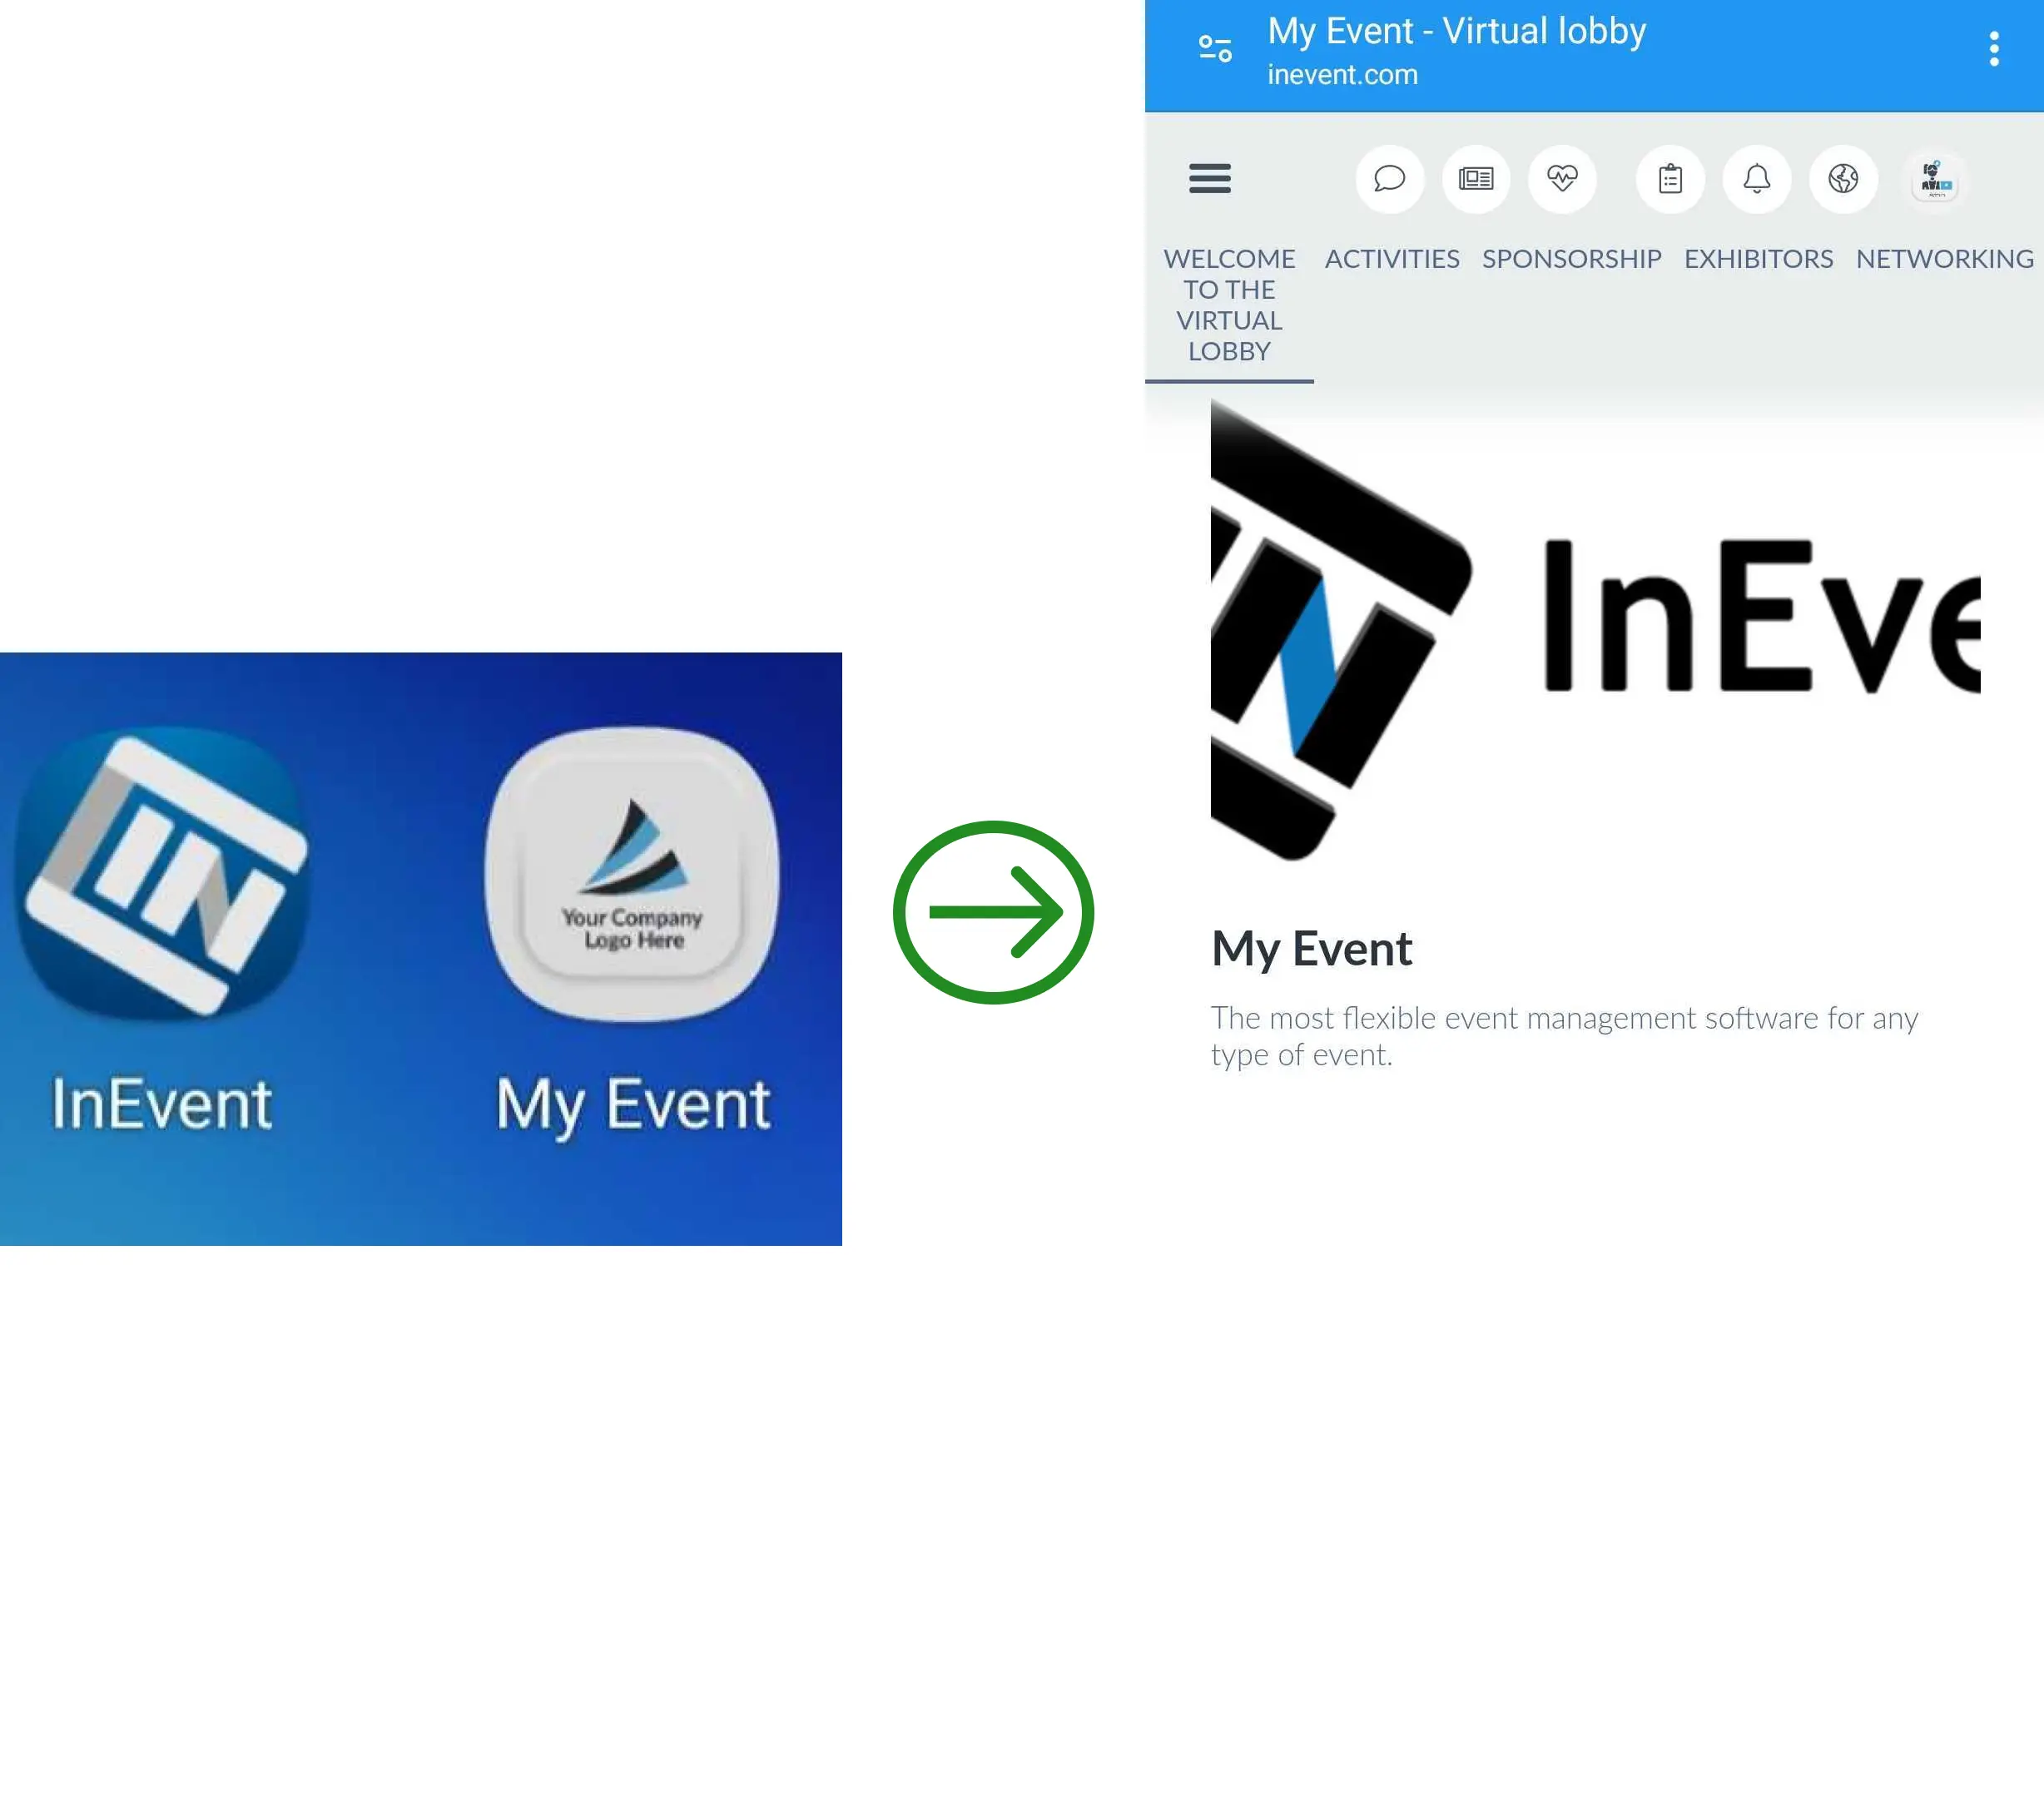
Once the attendee has completed the steps above, the web app will be accessible directly from their device's home screen or app drawer.
Mobile app
InEvent offers a native mobile app for both Android and iOS/iPadOS devices. The mobile app offers varying functionalities, such as for checking attendees in and out of events and activities, printing preconfigured badges for attendees upon check in, provide useful details about activities, sharing information and media using the News feed, and connecting with other event attendees.
The InEvent mobile app is compatible with the following mobile operating system versions:
- Android: Android 8.0 (Oreo) and above
- iOS/iPadOS: iOS/iPadOS 13.0 and above
The InEvent mobile app is available for download from Google Play and Apple App Store.
Entering the company code in the mobile app
When launching the InEvent mobile app for the first time, app users will be prompted to enter a 5-digit code. App users will need to enter the appropriate company code. Event organizers can locate the code by navigating to Company > Details from the Company level, or by navigating to Event > Details from the Event level.
It is important for the event organizers to correctly inform attendees of their event's 5-digit company code, such as via event e-mails.

Switching between companies in the mobile app
Mobile app users can switch companies to access events from different event organizers.
The necessary steps to switch companies differ between the Android version and the iOS/iPadOS version. To switch between companies in the Android app, follow the steps provided below.
- Navigate back to the event page.
- Press the funnel icon on the top right corner.
- Press the hamburger menu icon on the top right corner.
- Press Switch company.
To switch between companies in the iOS/iPadOS app, follow the steps provided below.
- Navigate back to the event page by pressing Menu > Search events.
- Press the funnel icon on the top right corner.
- Press Change events on the top right corner. The app will close.
- Launch the mobile app once again. The app will prompt the user to enter a 5-digit code.
- Enter the appropriate company code.
After doing the steps provided above, the app will allow the user to access events from the target company's event directory.
Entering the event access code for private events in the mobile app
When an event's privacy settings is set to Private, attendees will have to enter a 4-digit access code to the event when registering. The 4-digit access code is set by event administrators, and can be found by navigating to Event > Details and locating it under Access password.

An event's privacy settings can be modified by following the steps provided below.
- Navigate to Event > Details from the client's event.
- Click on Edit.
- Locate the Event privacy drop-down menu.
- Select Public.
- Click on End to save the change.

After completing the steps above, the event will no longer prompt attendees to enter the 4-digit access code. It is important for the event organizers to correctly inform attendees of their private event's 4-digit company code, such as via event e-mails.
In-person event mode
It is important that the event is set to In-person mode to ensure all in-person functionalities are activated.

To set an event to In-person mode, follow the steps provided below.
- Navigate to Event > Details from the Event level.
- Click on Edit.
- Locate the Event mode drop-down menu.
- Select In-person.
- Click on End to save the change.

After completing the steps above, the event will be set to the In-person mode, and in-person event features will be available for use.
Access Control
The Access Control feature allows for an efficient management and monitoring of attendee entrance and exit at in-person events. Each attendee will be associated with a unique QR code, which will be scanned when attendees enter and leave the event. This enhances the security of the event and reduces fraud entries.
To use this feature, ensure that the Access control tool is enabled within Settings > Tools at the Event level.
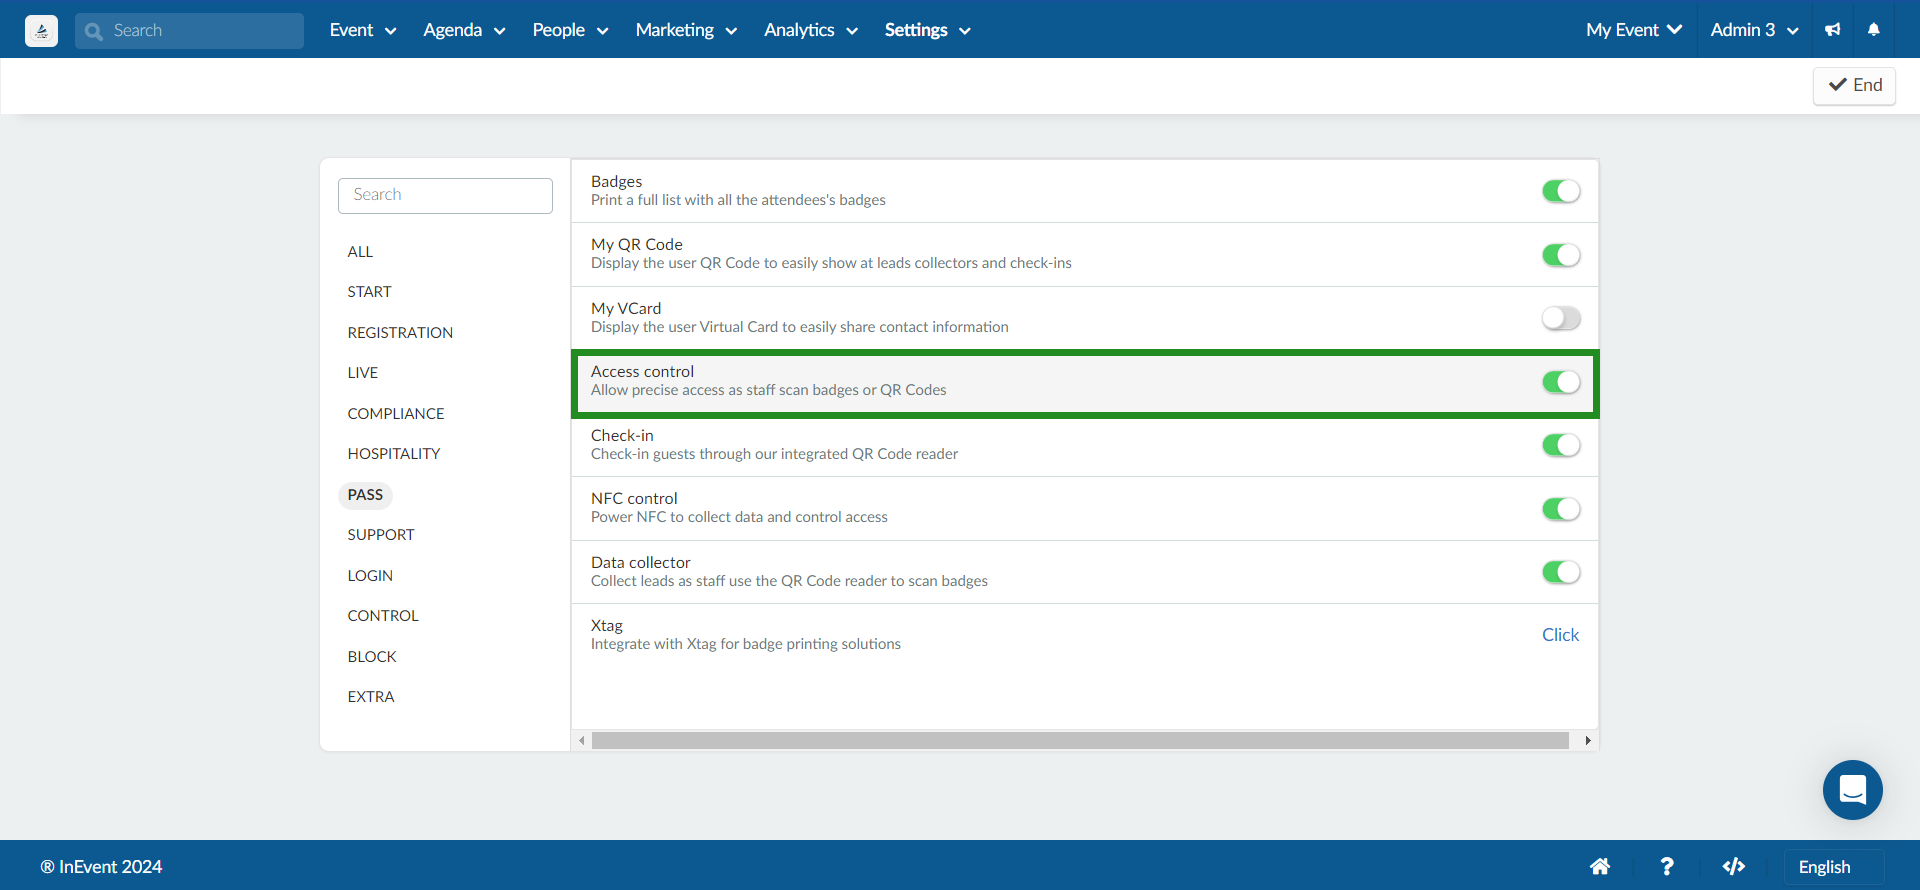
Additionally, it is possible to set QR codes to be for one-time use/scan or for multiple use/scans. This will depend on the event's security needs.
Required technical specifications
In order to effectively utilize the Access Control feature, ensure that the following specifications are fulfilled.
- Internet speed: Minimum of 1 Mbps per reading device
- Hardware: Mobile or tablet devices running Android 8.0 or above, or iOS/iPad OS 13.0 or above. For the best experience, most recent OS versions are recommended.
Simultaneous mobile app login per profile
A profile can be logged in at multiple devices simultaneously. The number differs depending on account on privilege type. The complete list is as follows.
- Company administrator: 5 devices
- Event administrator: 2 devices
- Checklog: 10 devices
- User: 1 device
Registering the Checklog profile
In order to start using the Access Control feature, ensure that a Checklog profile is present in the list of event attendees. The Checklog profile is required for the purpose of checking attendees in and out of the event.
To create a Checklog profile, follow the steps provided below.
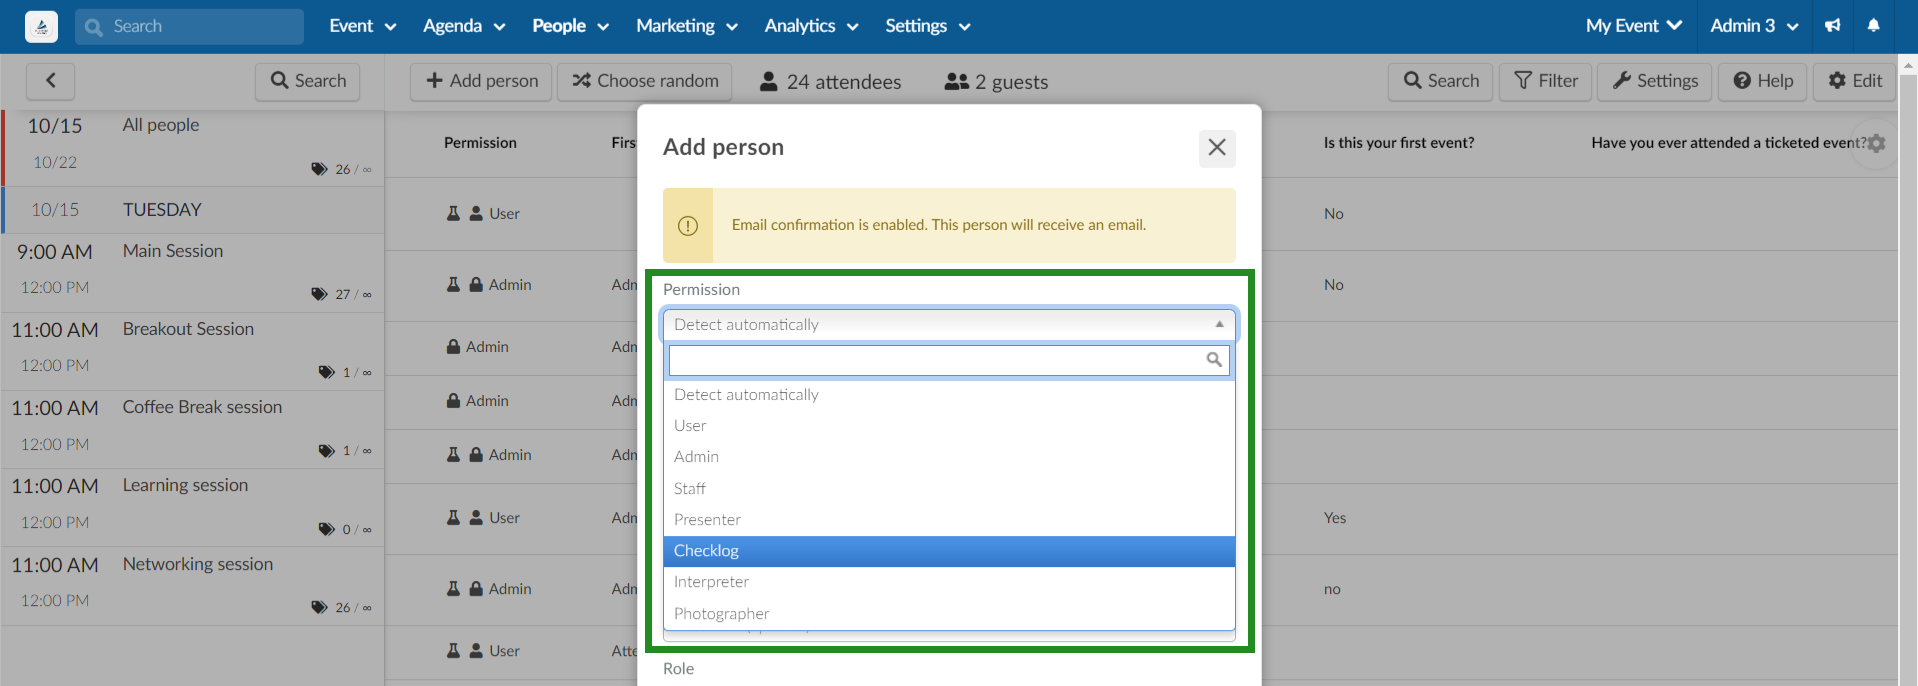
- Navigate to People > Attendees from the Event level.
- Click on + Add person on the top left menu.
- Select Checklog on the Permissions drop-down menu.
- Complete the remaining profile details.
- Click on Create to finish creating the profile.
After completing the steps above, the Checklog profile will be created. Logging in to the mobile app using the Checklog profile will give access to the access control mode, and allows for checking in and out of event attendees.
Access Control settings
InEvent offers two options related to reading or scanning the QR codes, which are as follows.
- Reading the QR codes only once: burning the credential.
- Reading QR Code repeatedly: no credential burning.
Reading the QR codes only once: burning the credential
By default, the QR code can only be read once at the entrance of the event/activity. For it to be read other times, the attendees would need to perform the check-out before.
This option is recommended for event organizers who prefer to have a stricter control and security in their event by not allowing multiple entries using the same QR code.
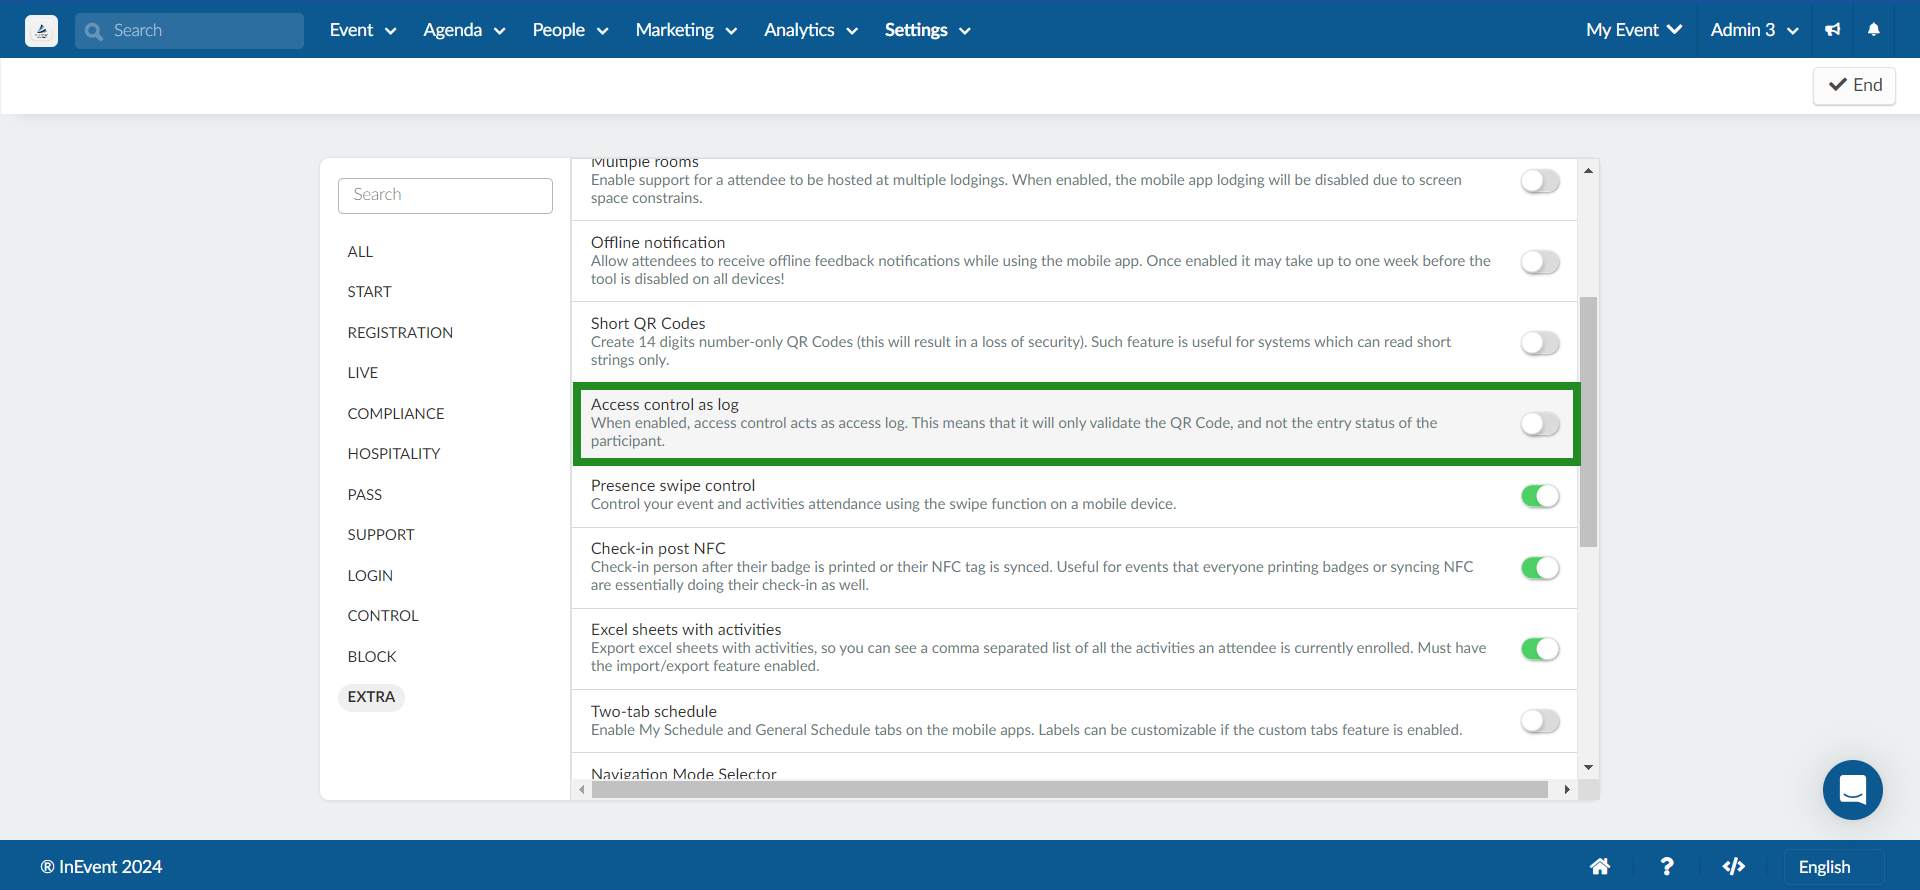
Reading QR Code repeatedly: Access control as log
In this option, the same QR code can be scanned multiple times without affecting the attendee's entry status. This option is ideal for events where attendees' entry is not restricted by their QR codes.
To use this feature, enable the Access control as log tool within Settings > Tools at the Event level.

Switching from repeated use of QR codes to one-time use of QR codes
If the event has Access control as log enabled, and the event organizer wants to revert to the default behavior of one-time QR code use/burning the credential, extra steps need to be made to ensure the switch is applied correctly. The exact steps are provided below.
- Navigate to Settings > Tools at the Event level.
- Click on Edit.
- Disable the Access control as log tool using the toggle.
- Press End to save the changes.
- Log out of the mobile app in all reading/checking devices.
- Log back into the mobile app using the appropriate credentials.
After completing the steps above, the relevant Access Control settings will be reset back to its default default behavior.
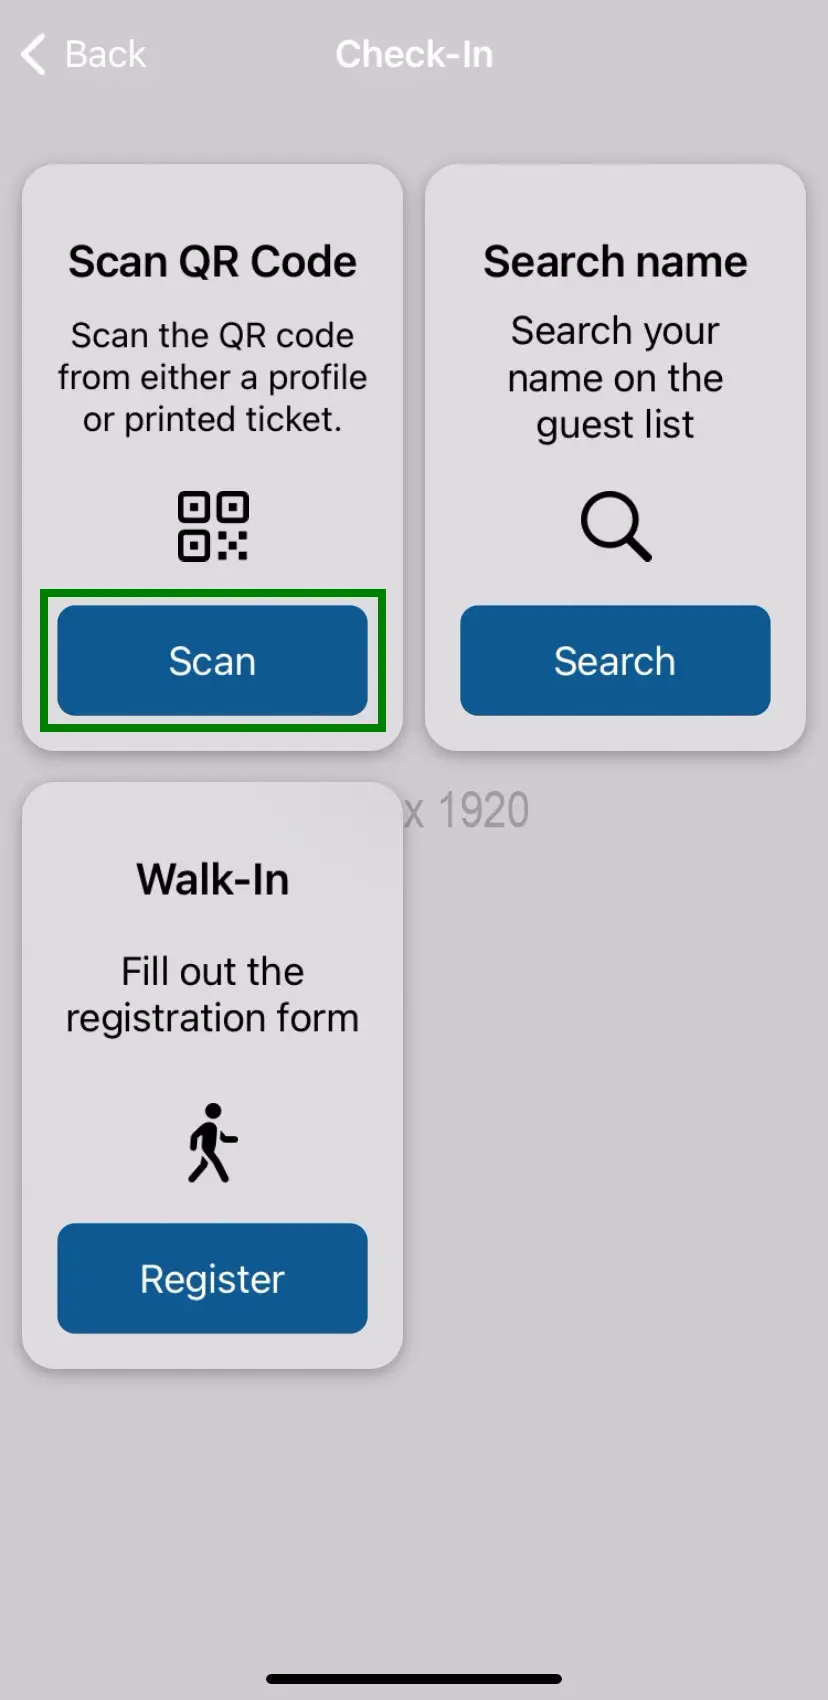
Performing attendee check-in & check-out
The Access Control feature allows for checking attendees in and out of the event and activities using QR codes. The scanning feature can be accessed from Menu > Access Control in the InEvent mobile app if it is logged in to a Checklog profile.
Event check-in & check-out
Checking in of attendees into and out of the event can be performed by pressing Check-In & Check-Out under Event in the Session Scanning menu. Doing so will activate the device camera to start scanning attendees' QR codes for event entrance and exit.
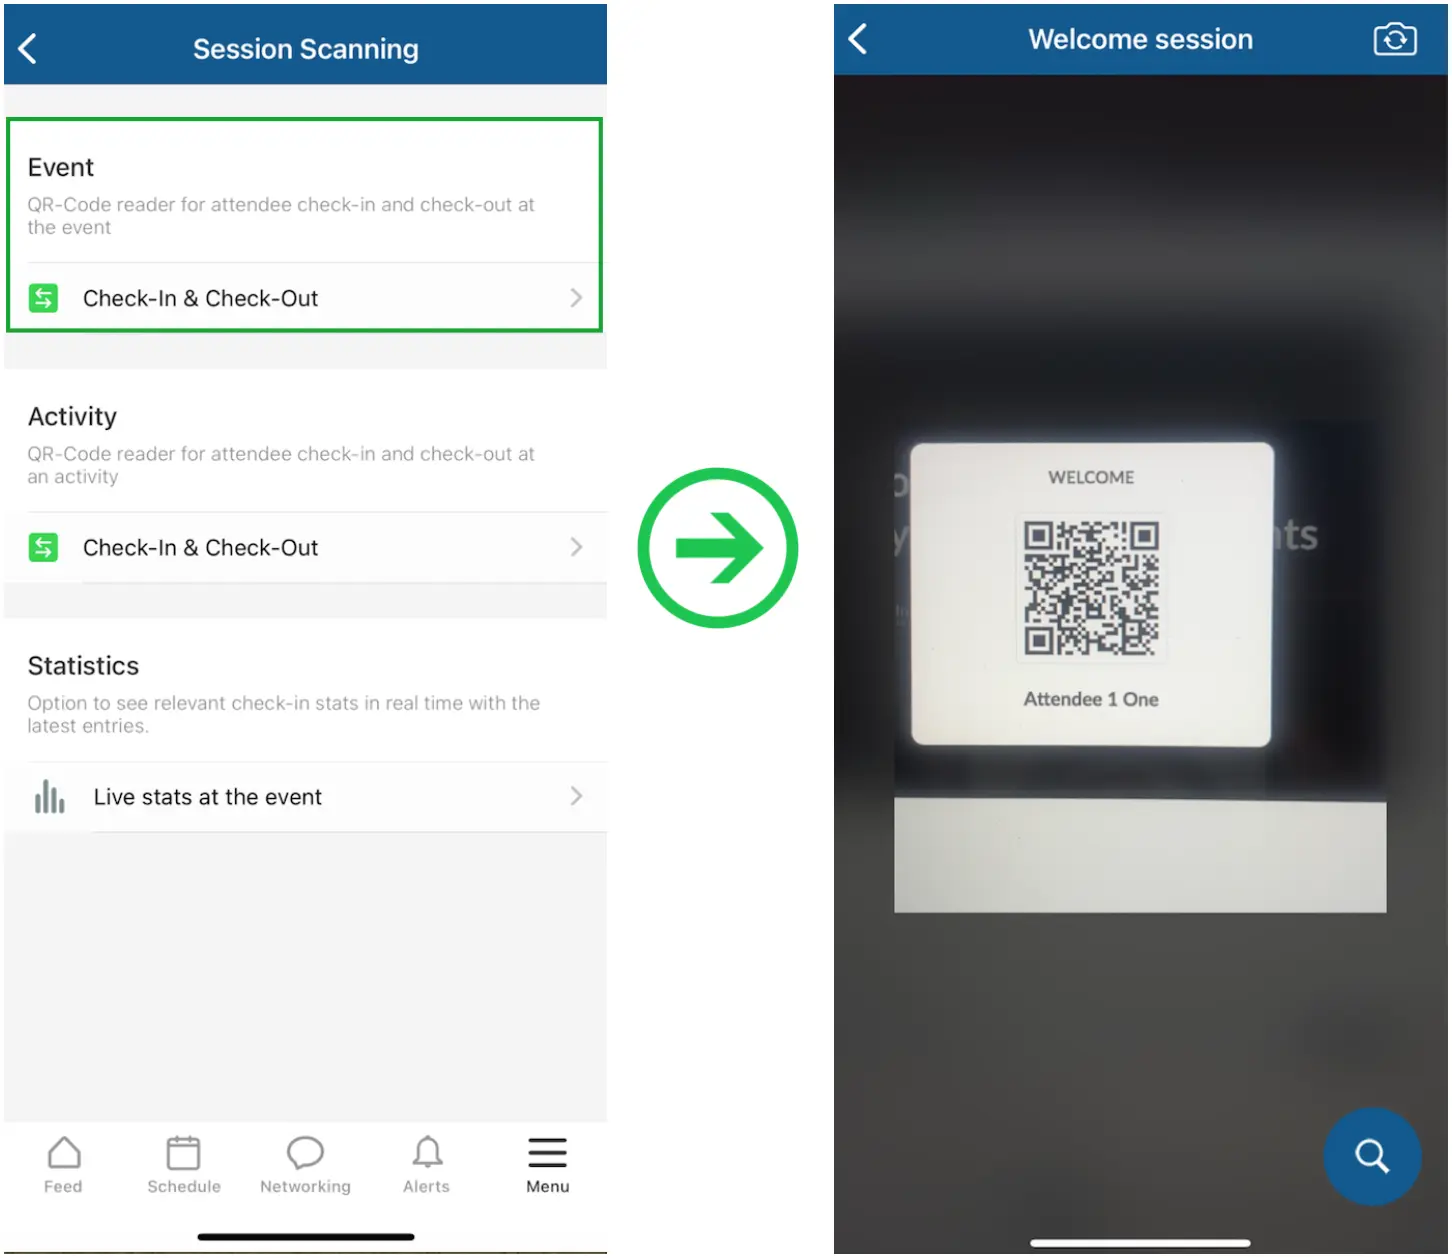
- Check-in for event: Controls the entry of attendees for the entire event.
- Check-out for event: Controls the exit of attendees for the entire event.
Activity check-in & check out
Checking in of attendees into and out of the event can be performed by pressing Check-In & Check-Out under Activity in the Session Scanning menu. Doing so will activate the device camera to start scanning attendees' QR codes for activity entrance and exit.

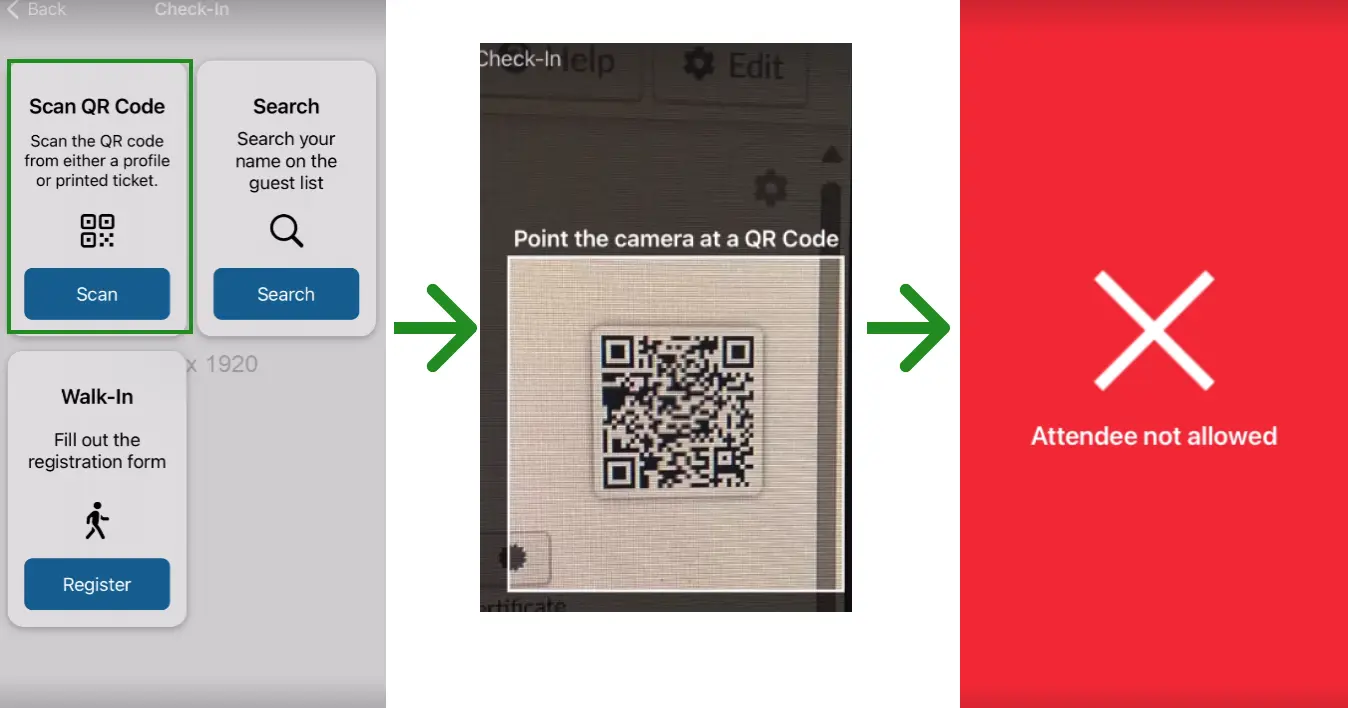
Check-in & check-out confirmation screens
Upon scanning attendee's QR codes, a green or red confirmation screen will be displayed.

A green confirmation screen indicates that the relevant attendee's check-in or check-out process is successfully conducted.

A red confirmation screen indicates failure in check-in or check-out, such as failure in finding an attendee associated with the scanned QR code.
Manual check-in & check-out of attendees
The InEvent mobile app also allows for manually checking attendees in and out of events/activities. Manual checking is achieved by using the Presence list instead of QR codes.
The steps for manual check-in & check-out on the Android version of the mobile app is as follows.
- Press the hamburger menu icon on the top right corner of the QR code reader.
- Press Manual. The Presence list will be displayed, which shows attendees' name and check-in status.
- Press the name of the target attendee. The check-in confirmation pop-up box will be displayed.
- Press OK.
The steps for manual check-in & check-out on the iOS/iPadOS version of the mobile app is as follows.
- Press on Manual on the top right corner of the QR code reader. The Presence list will be displayed, which shows attendees' name and check-in status.
- Press the name of the target attendee. The check-in confirmation pop-up box will be displayed.
- Press Yes.
After completing the steps above, the attendee will be successfully checked in or out of the event/activity.
Attendees who have been added to the Check-in block list will still be visible within the attendees list. However, they cannot be successfully checked in to the event, and the following error message will be displayed if check-in is attempted.
Badge Printing
Badge printing is an important event management feature, as it greatly improves attendee identification, enhances event security, and facilitates networking by making it easier for attendees to recognize each other. InEvent recognizes this and provides a feature to create, design, and define specific badges for groups of attendees. In addition, this also greatly helps event organizers streamline the check-in and badge printing process during in-person events.
Enabling the Badges feature
To enable the Badges feature, follow the steps provided below.
- Navigate to Settings > Tools.
- Click on Edit.
- Locate Badges under the Pass section.
- Click on the corresponding toggle to enable the tool.
- Click on End to save the changes.

After completing the steps above, the Badges feature will be enabled at the event.
Managing event badges
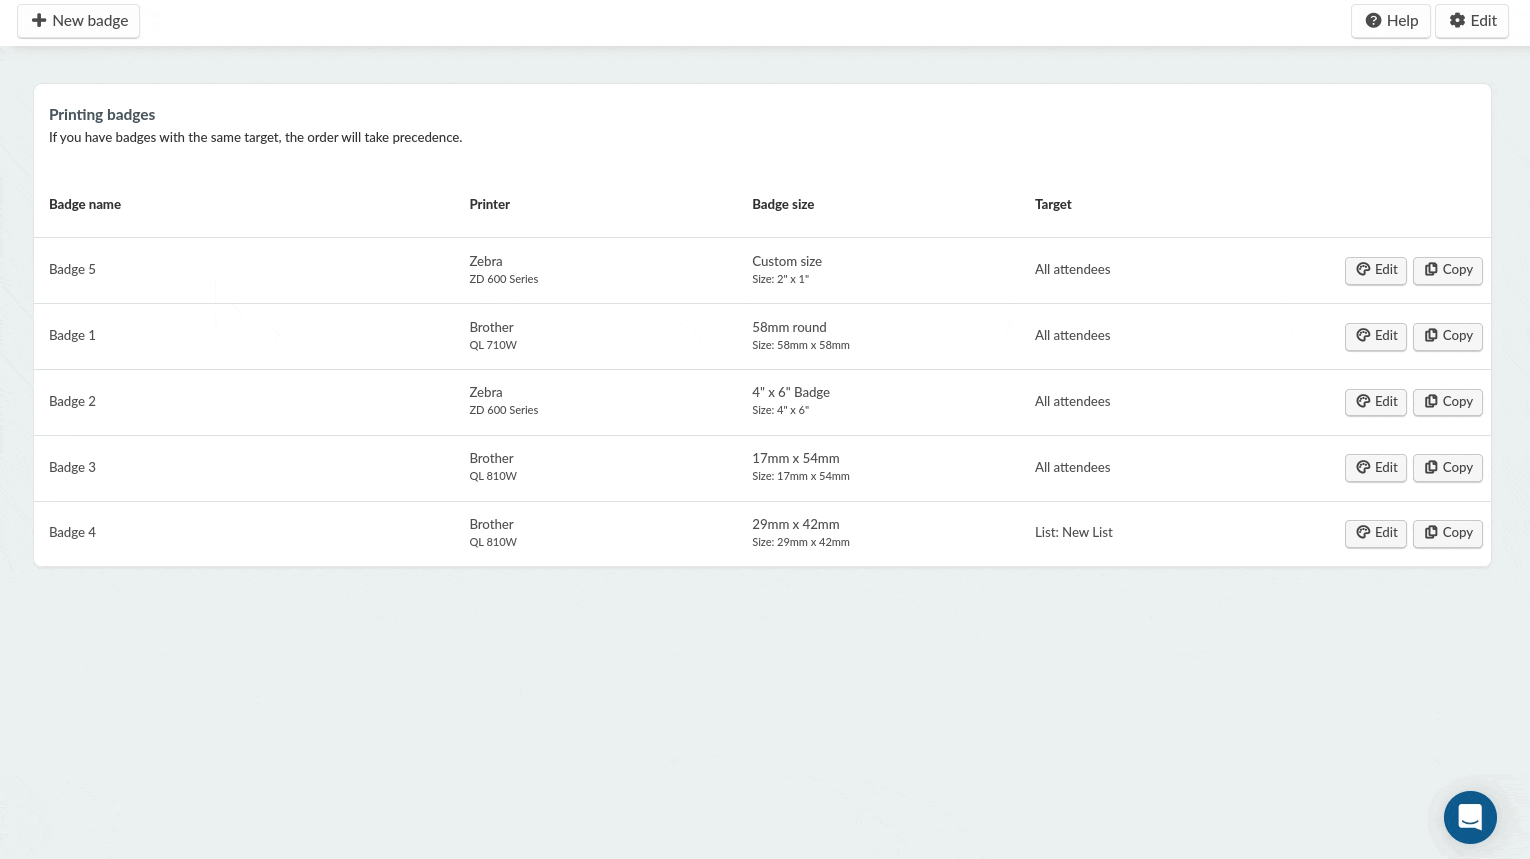
The Badge Printing page can be accessed by navigating to Marketing > Registration > Badge Printing from the Event level.
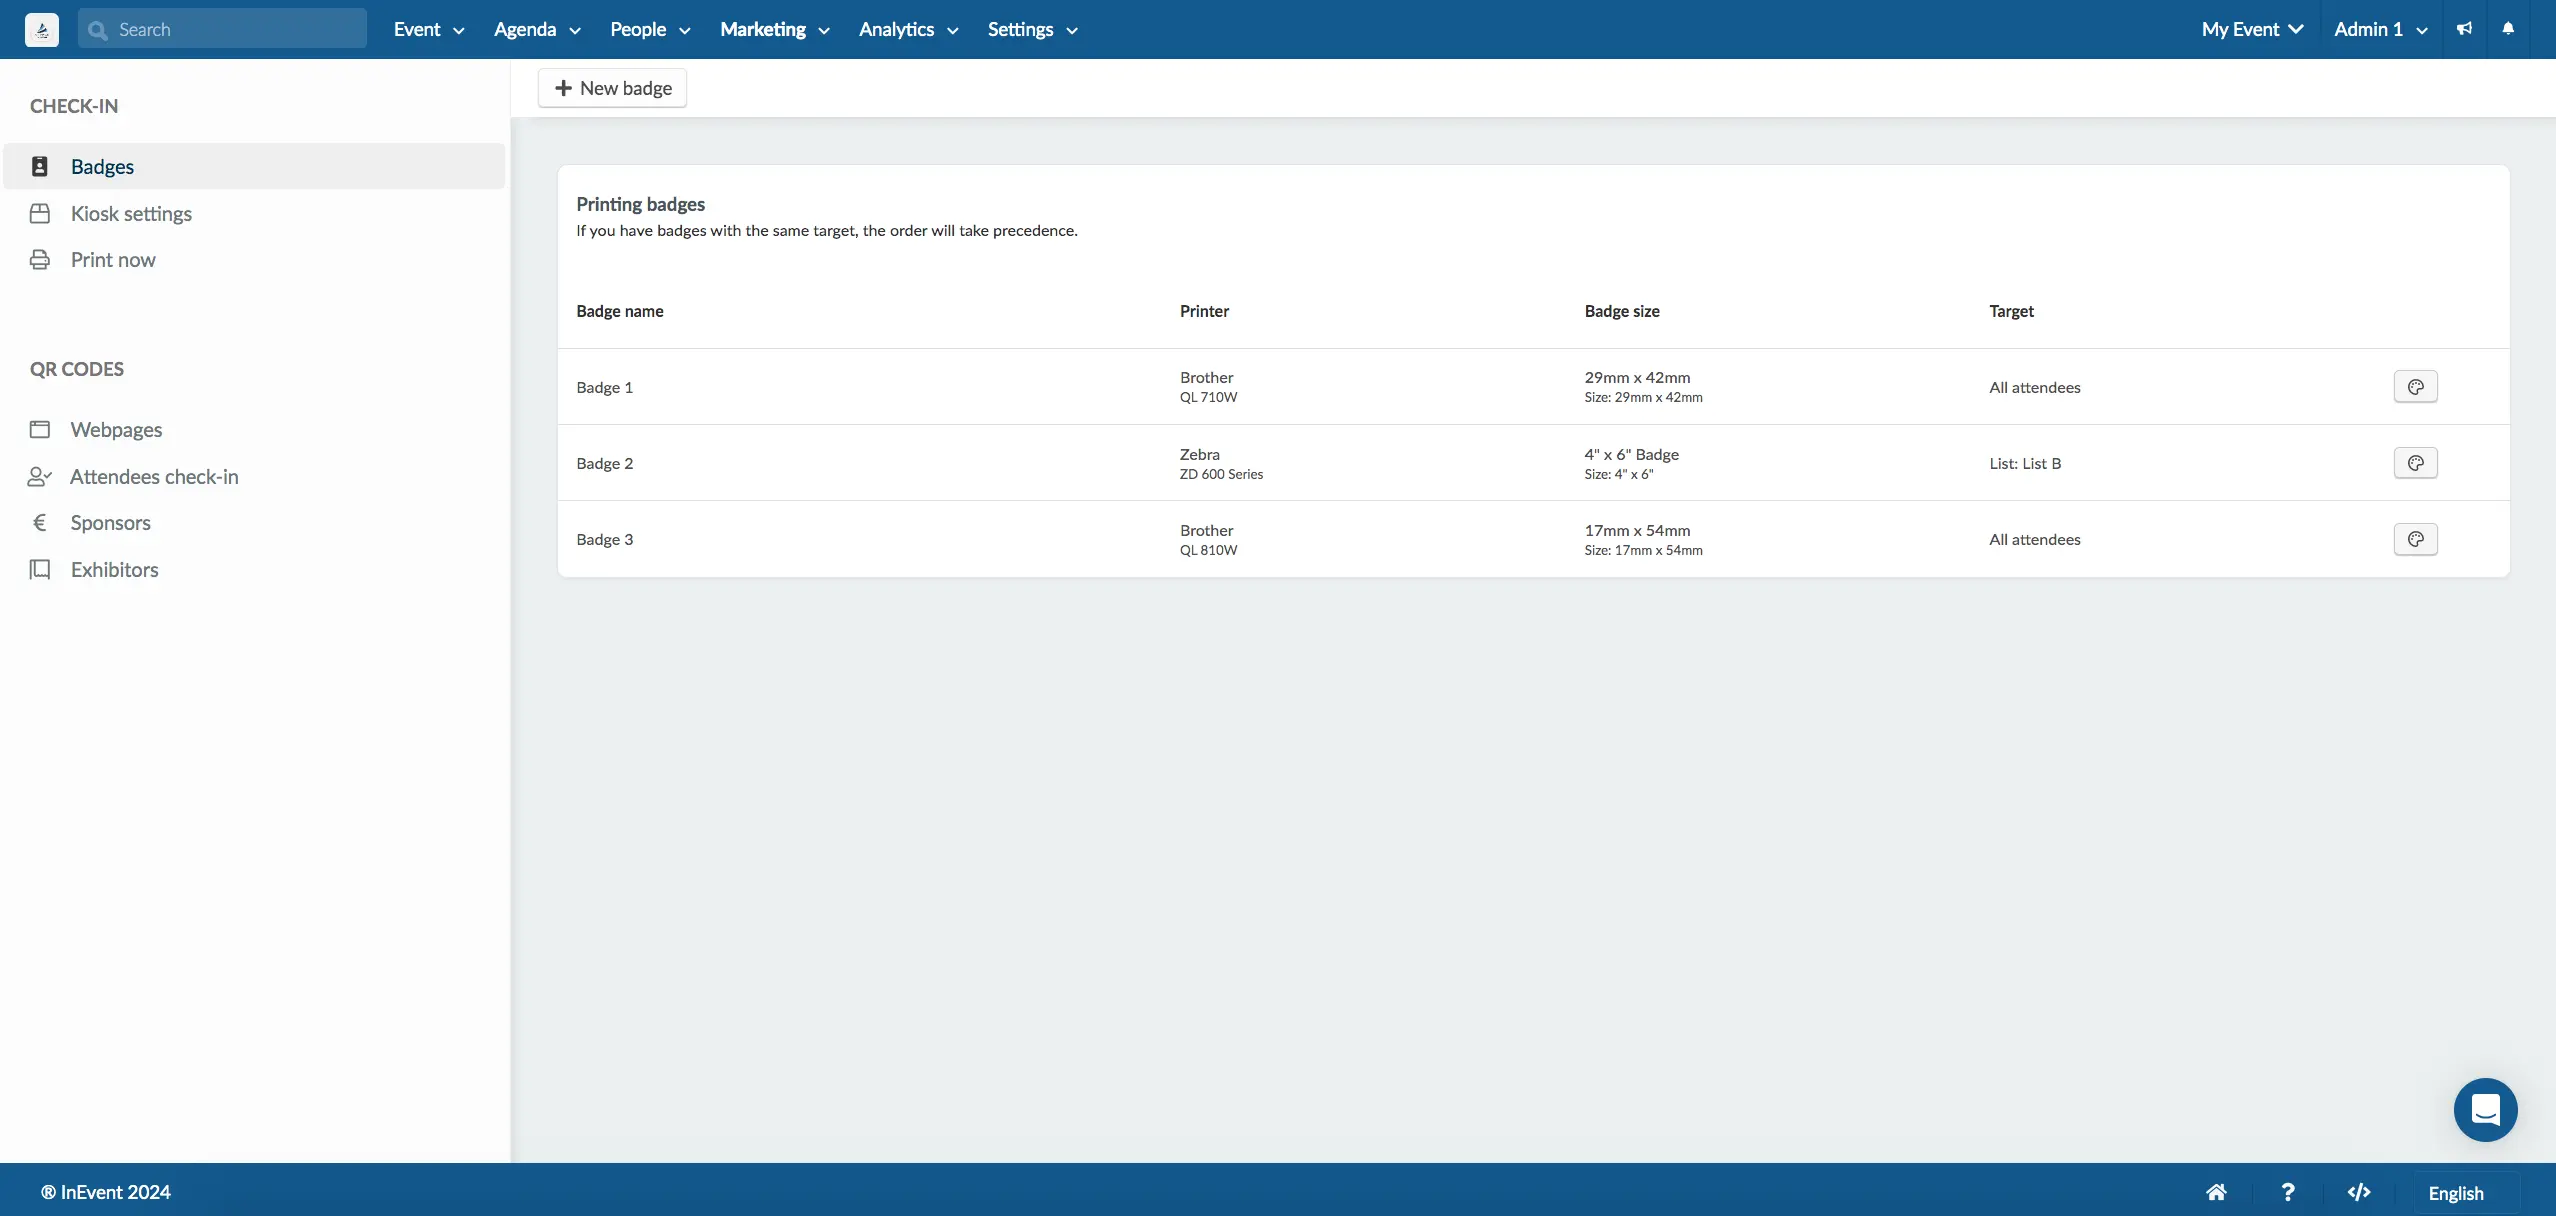
The Printing badges section is where event organizers can create, configure, and review the created printing badges. The interface displays information on the badge's name, printer type, size, and target attendees.
Creating a new event badge
Event organizers can create a new printing badge by following the steps below:
- Click on the New badge button on the top left corner of the Printing badge section. The Printing badge pop-up box will be displayed.
- Enter the desired Badge name.
- Select the list of attendees for which the badge will be created using the Target drop-down box. The available options are:
- All attendees
- Any of the existing Custom list
- Select the printer using which the badge will be printed using the Printer drop-down box. The available options are:
- Brother
- Zebra
- Select the printer model.
- Supported Brother printer models: QL 710W, QL 720NW, QL 810W, QL 820NWB
- Supported Zebra printer models: ZD 200 Series, ZD 400 Series, ZD 600 Series
- Select the label type on which the badge will be printed using the Label type drop-down box.
The available options for Brother printers are:
- 17mm x 54mm
- 17mm x 87mm
- 23mm x 23 mm
- 29mm x 42mm
- 29mm x 90mm
- 38mm x 90mm
- 39mm x 48mm
- 52mm x 29mm
- 62mm x 29mm
- 62mm x 100mm
- 12mm
- 29mm
- 38mm
- 50mm
- 54mm
- 62mm
- 60mm x 86mm
- Black/Red 62mm
- 54mm x 29mm
- 12mm round
- 24mm round
- 58mm round
The available options for Zebra printers are:
- 4" x 3" Badge
- 4" x 6" Badge
- 4" x 12" Badge
- Custom size
- Click on Create to finish creating the printing badge.
After completing the steps above, the new blank badge will be created. It is necessary to add and include the desired elements to the badge, as well as customize its appearance, using the badge editor.
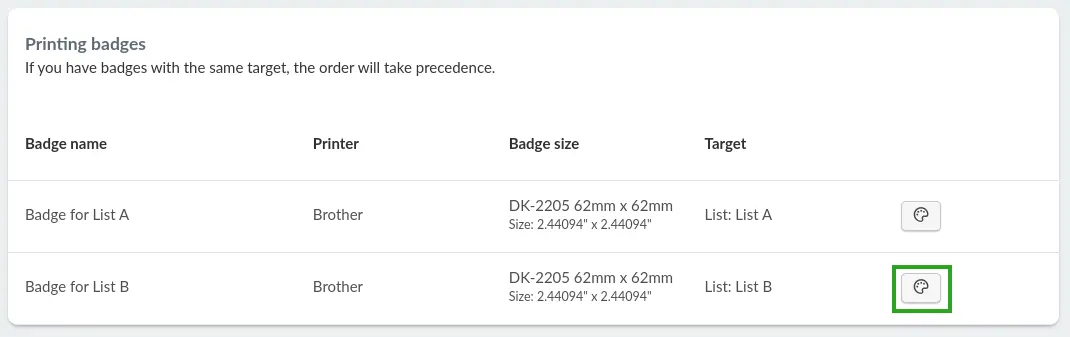
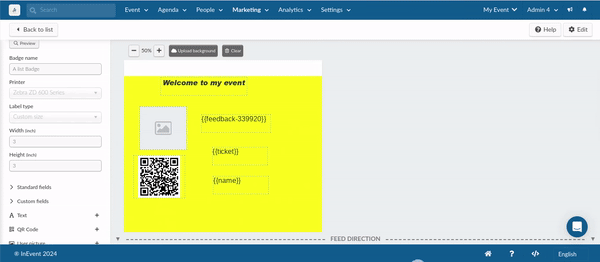
Customizing a printing badge using the badge editor
After a blank event badge is created, it is necessary to add the desired elements, such as attendee name, email, and QR code, to the badge. It is also possible to customize the appearance of the badge. To do so, click on the Palette icon next to the printing badge. The Badge editor will be opened.
To start adding and editing the items in the Badge editor, click on the Edit button.
The left side of the editor includes items that can be added to the badge by clicking on the + button. The items are as follows:
- Standard fields: Standard fields associated with event attendees. The available fields are Name, First name, Last name, Email address, Role, Company, and Ticket.
- Custom fields: The event's Custom fields associated with event attendees.
- Text: Custom text.
- QR Code: QR Code associated with an event attendee.
- User picture associated with an event attendee.
The top left corner of the main editor area contains the following options:
- Grid: Show grid lines in the badge area.
- Zoom controls: Zooms the view of the badge area in or out.
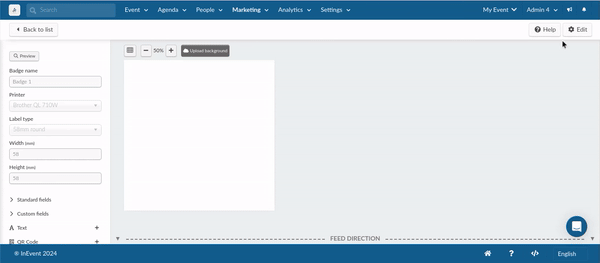
The top side of the editor contains the following options:
- Preview button: Click on the Preview button to see a clean preview of the badge. You will then be prompted to select an attendee to preview their badge in the Preview badge pop-up box.
- Badge name field: Edit the name of the badge in this field.
- Printer drop-down box: Change the printer using which the badge will be printed using the drop-down box.
- Label type drop-down box: Change the label type on which the badge will be printed using the drop-down box.
- Width and Height fields: Configure the width and height of the badge.
Configuring and troubleshooting Zebra printers for badge printing
Event organizers are encouraged to preconfigure their Zebra printers before the event to ensure all printers are functional throughout the entire event. The following guide will assist in configuring Zebra printers, using the ZD620 model as an example.
- Power on the Zebra printer after ensuring it is connected to the appropriate power source. The printer start-up and initializing process may take some time.
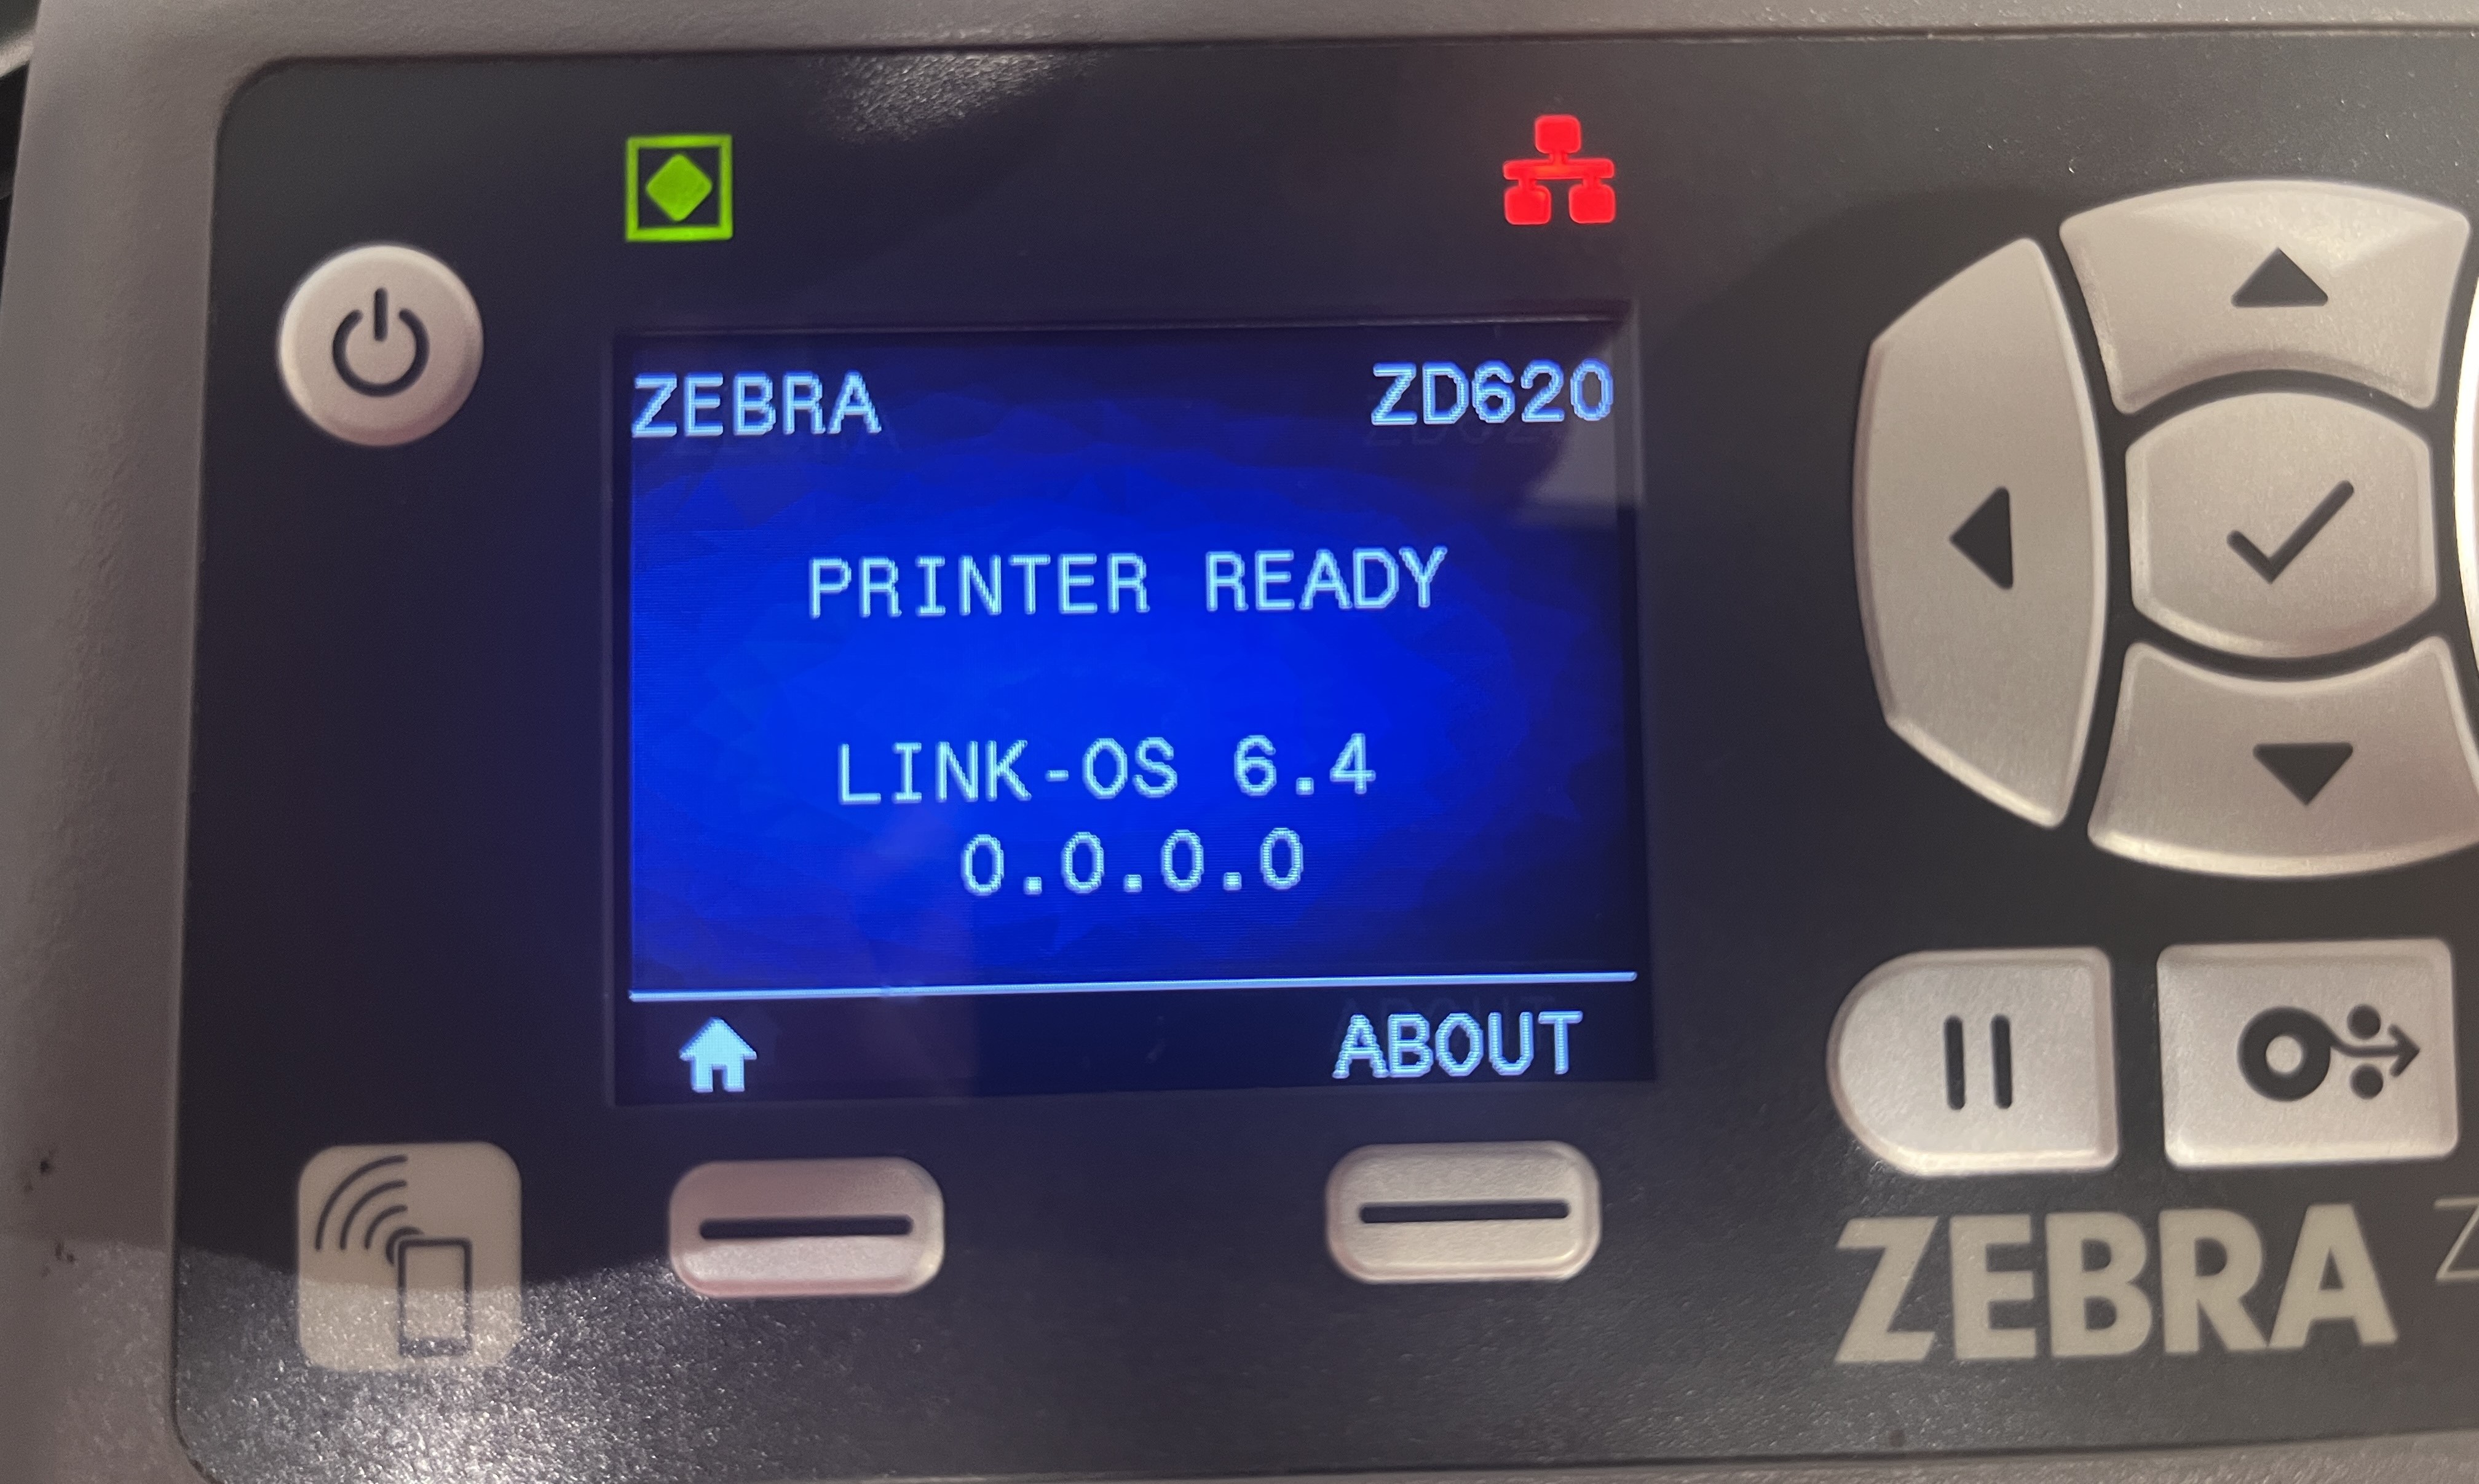
The red connection icon on the top right corner indicates that the printer is not yet connected to any network connection.
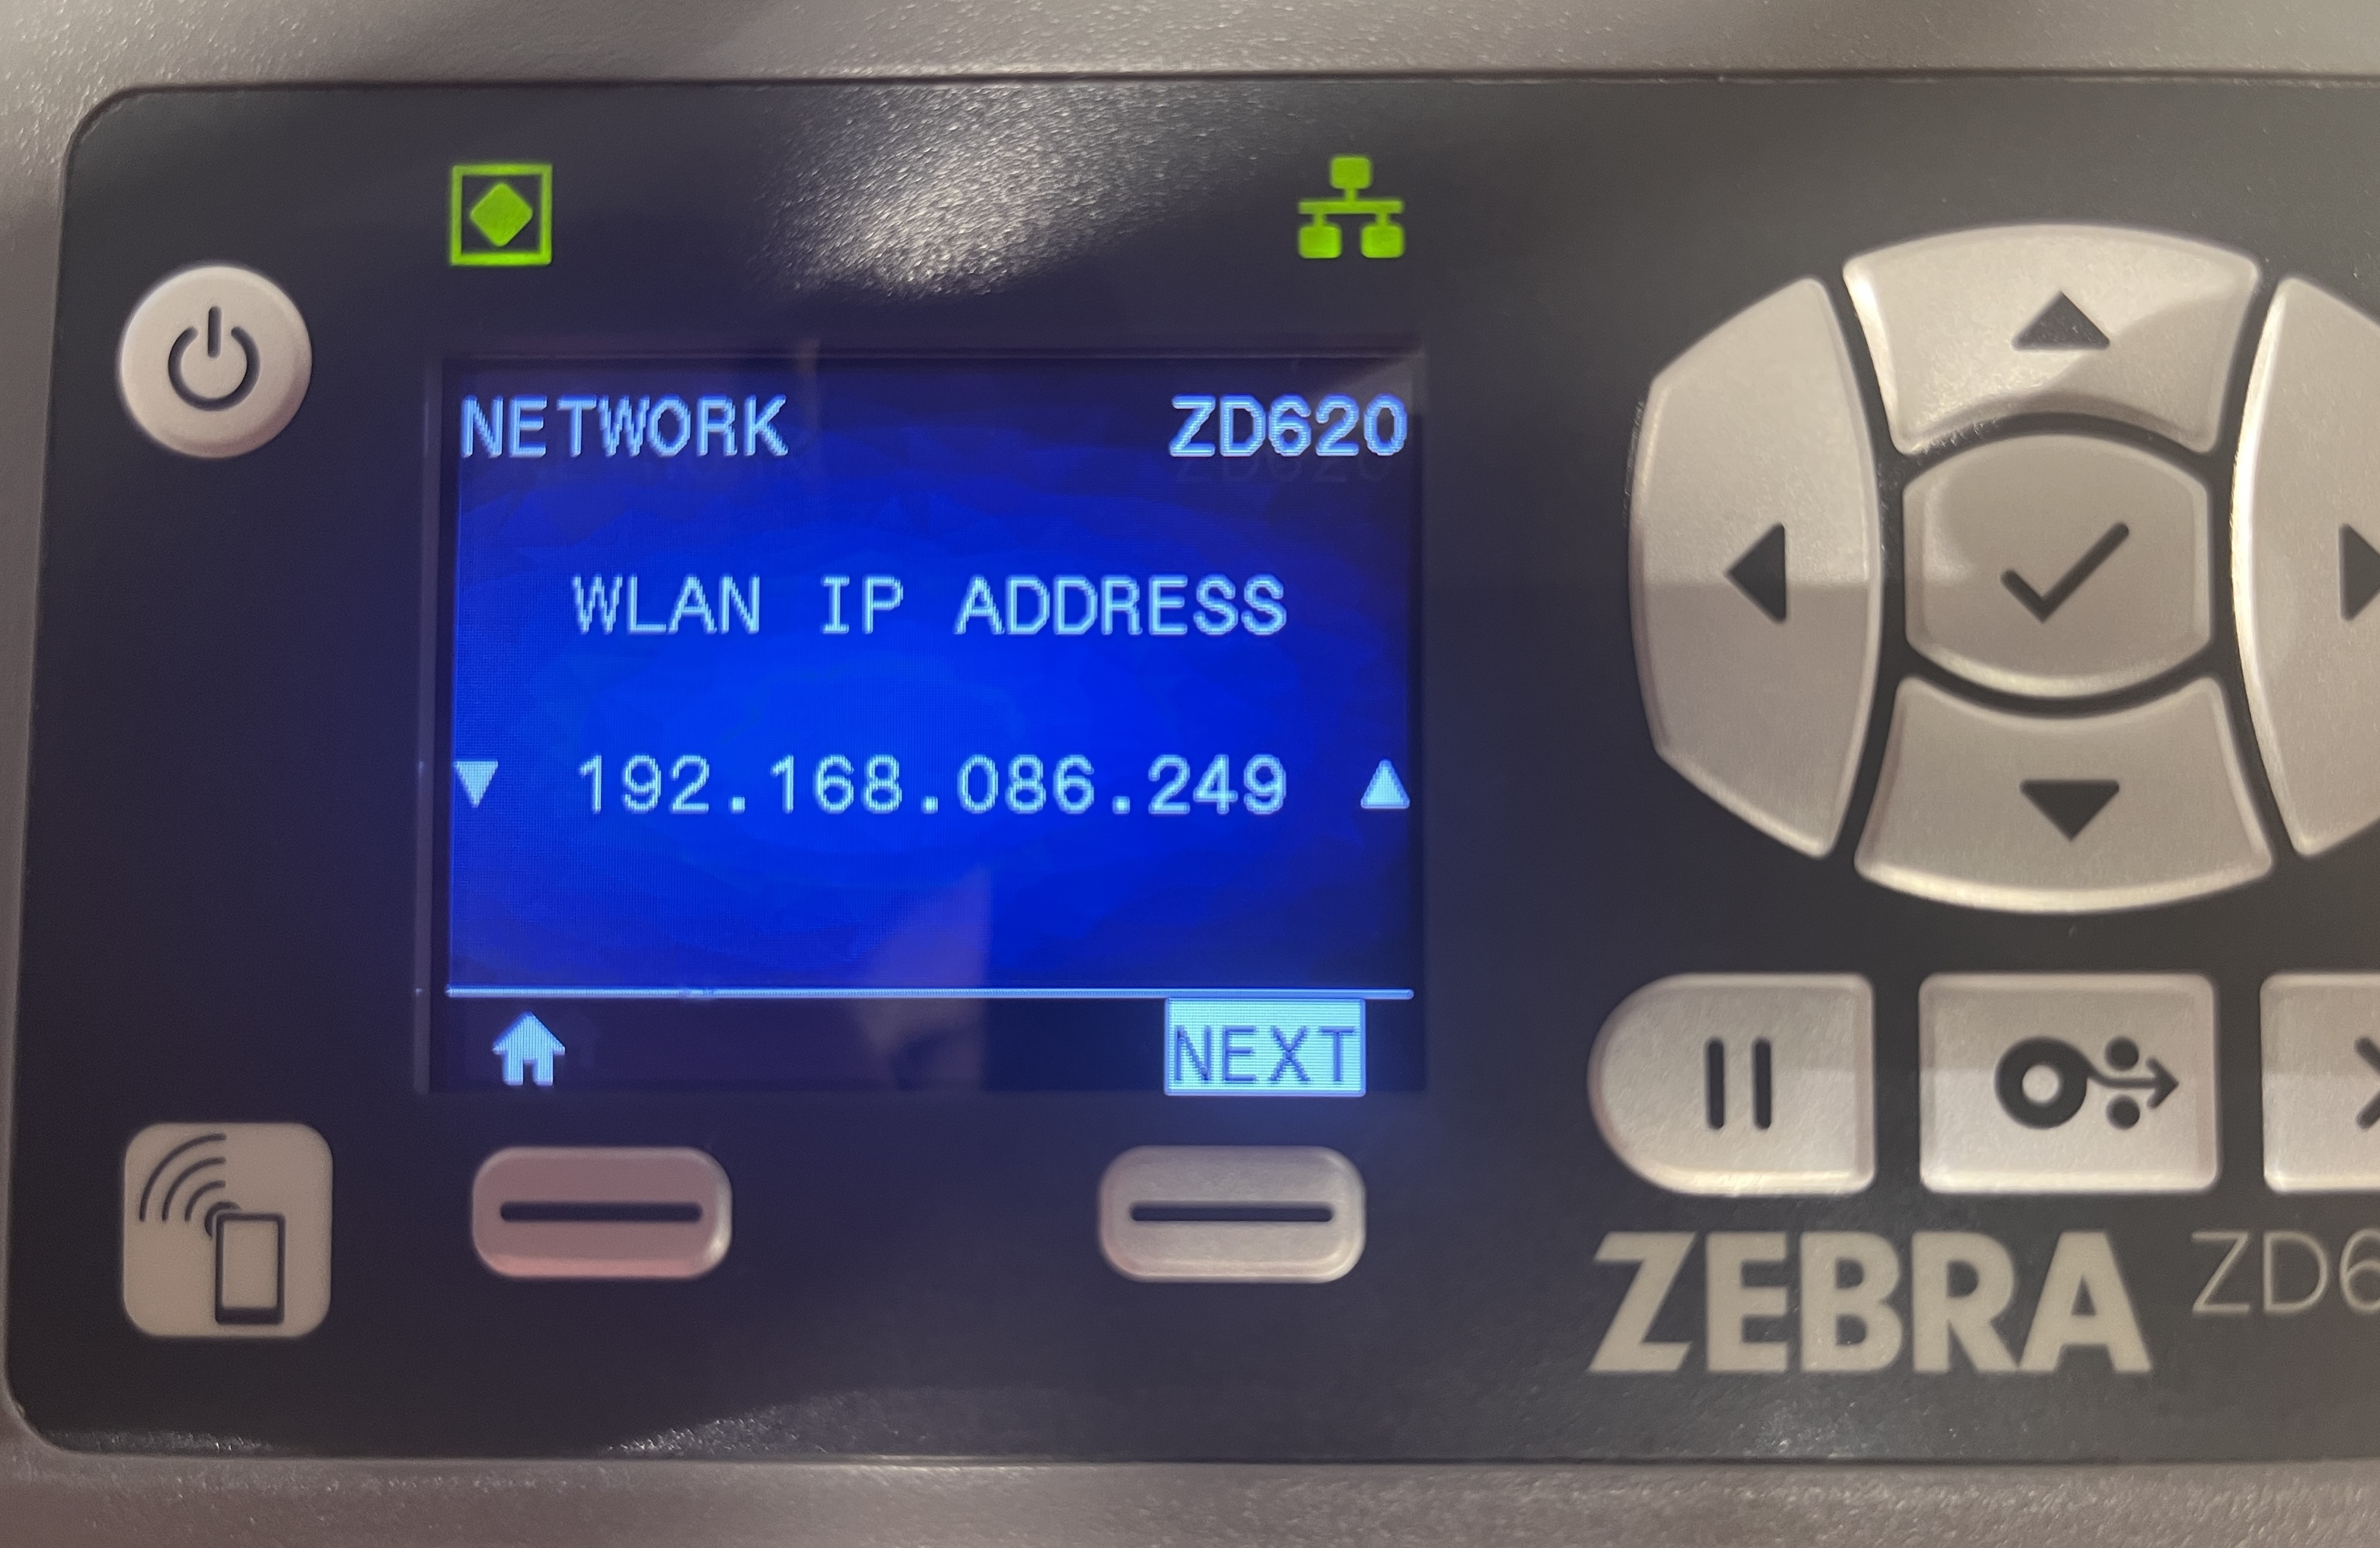
- Connect the printer to the event's network connection. If the connection is successful, the printer will display a yellow connection icon on the top right corner, as well as the device's IP address on the local network, as shown in the example below.
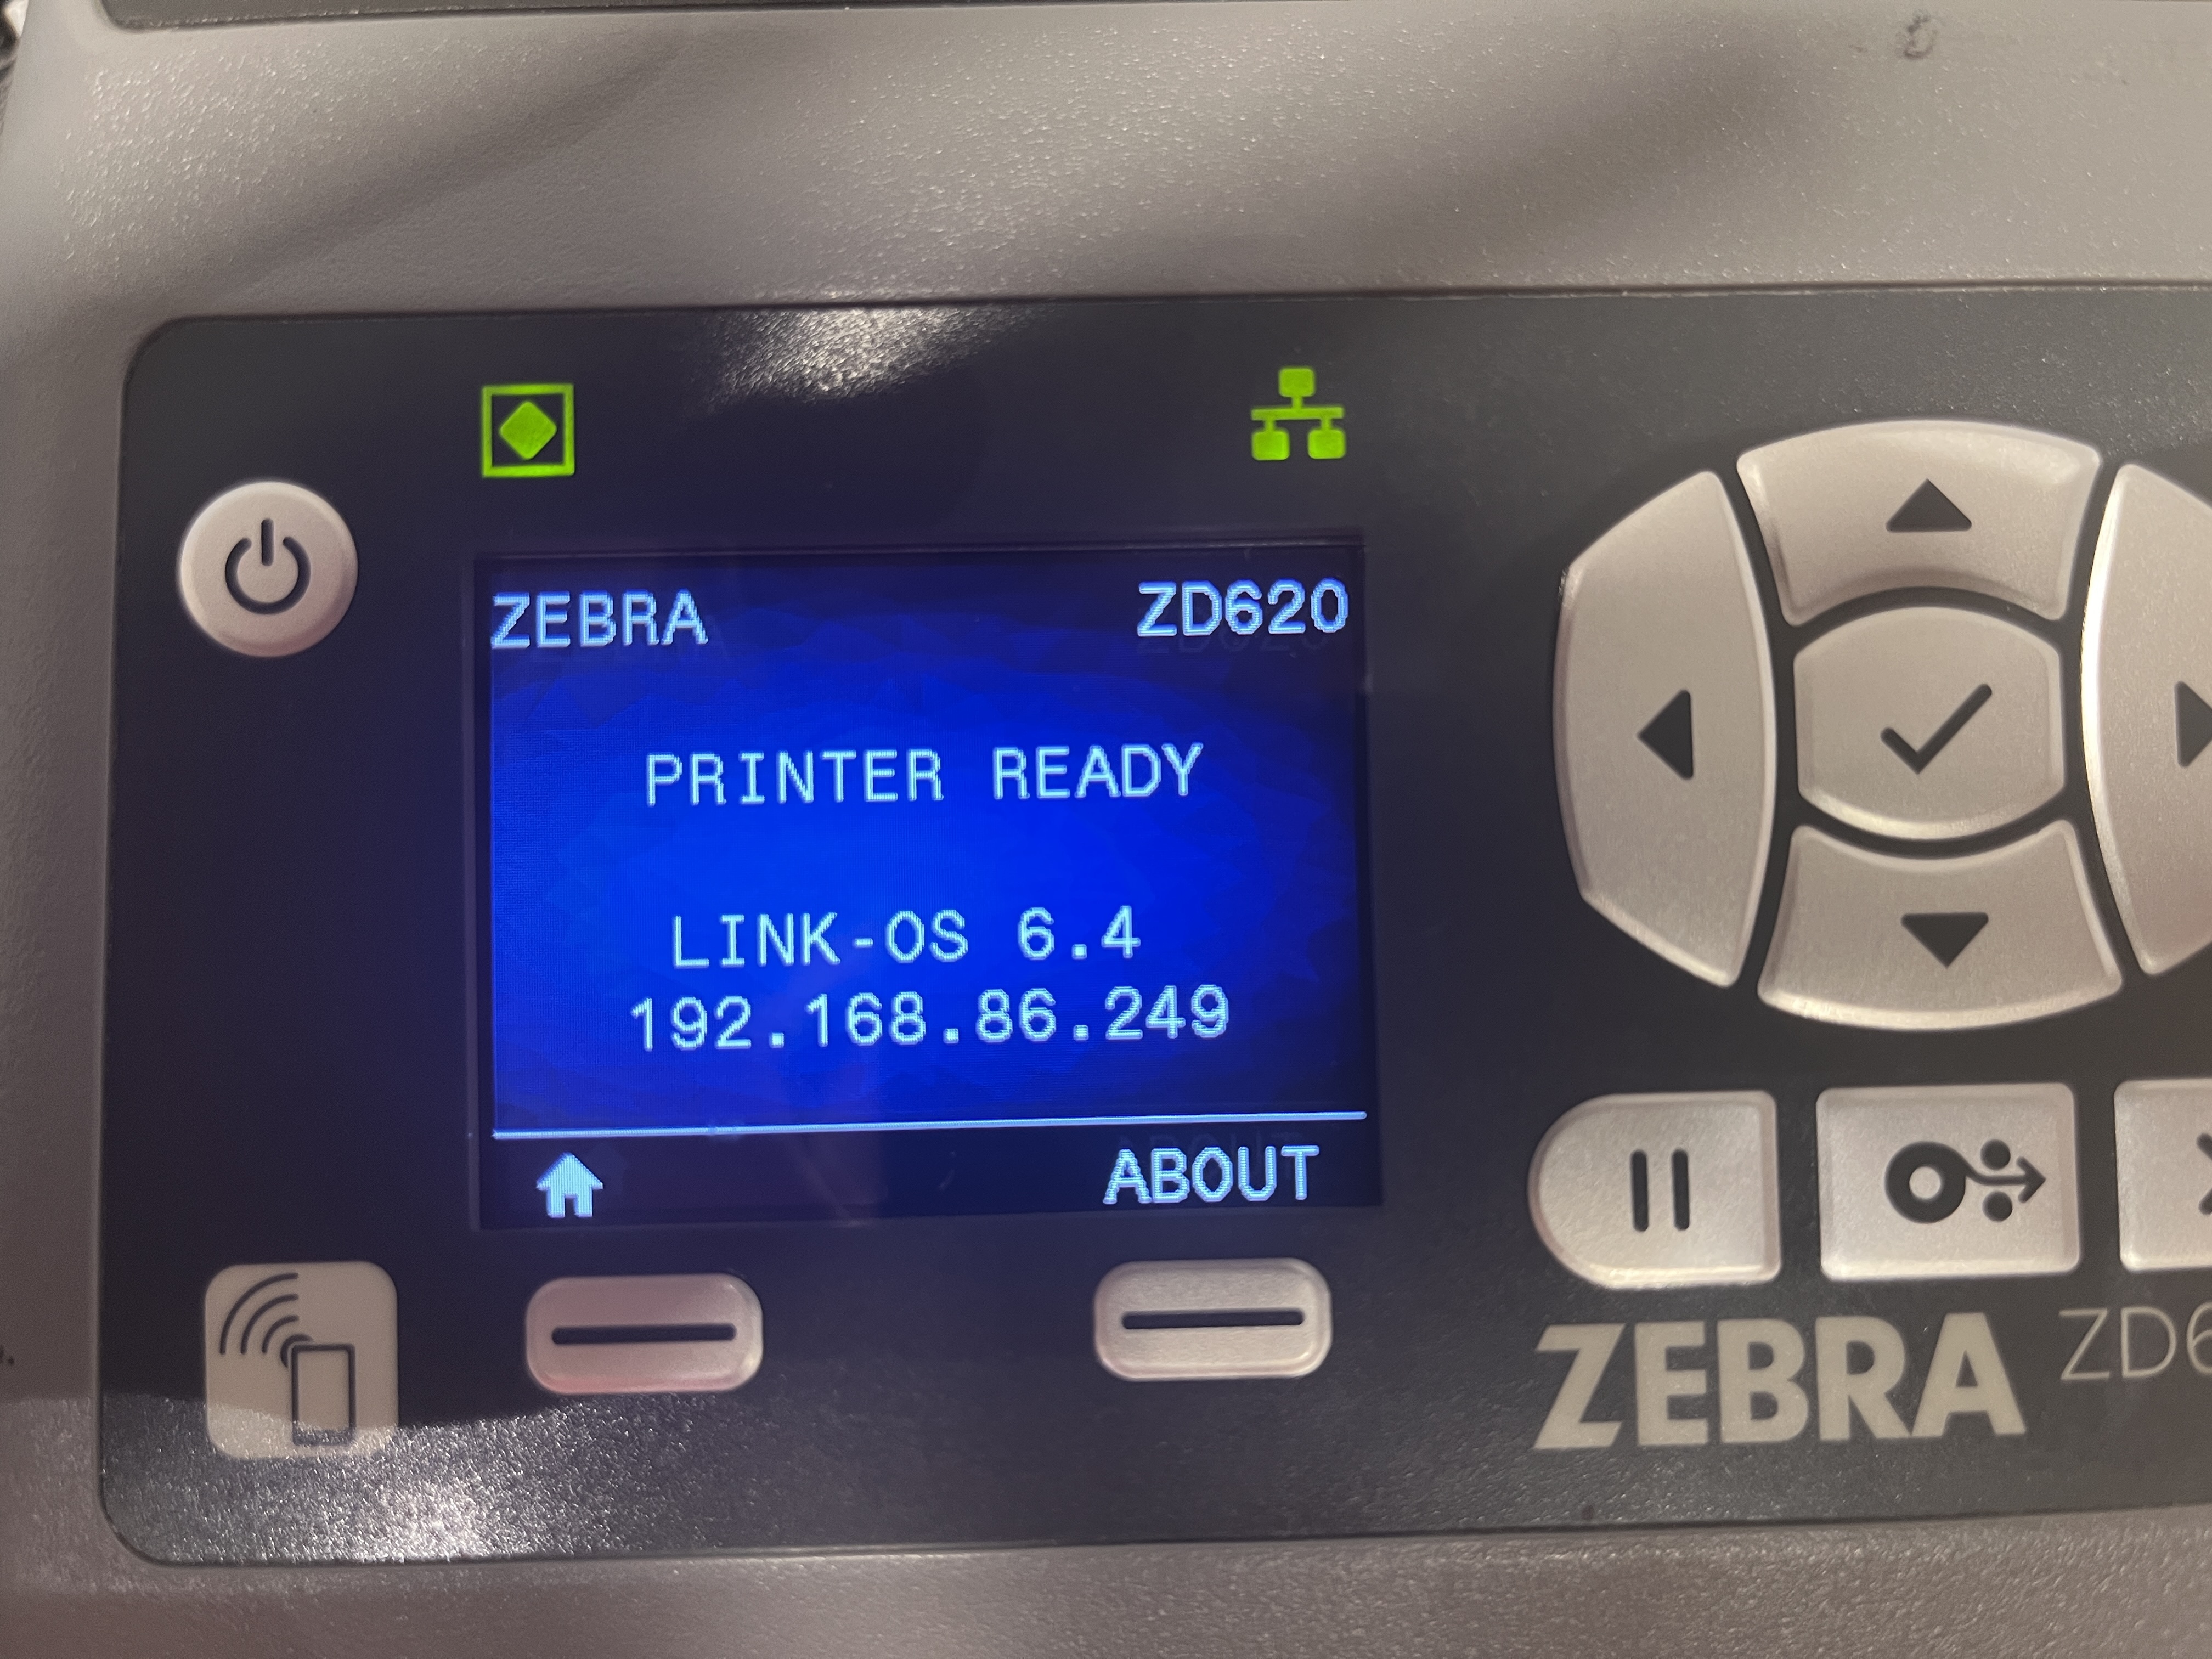
After the printer connects, ensure that the IP address shown on the printer matches the IP address within the Kiosk settings on the InEvent mobile app.
Printer fails connecting to the network
If the printer fails to connect to the event network, continue following the steps below.
- Navigate to the printer's Home Menu > Network.
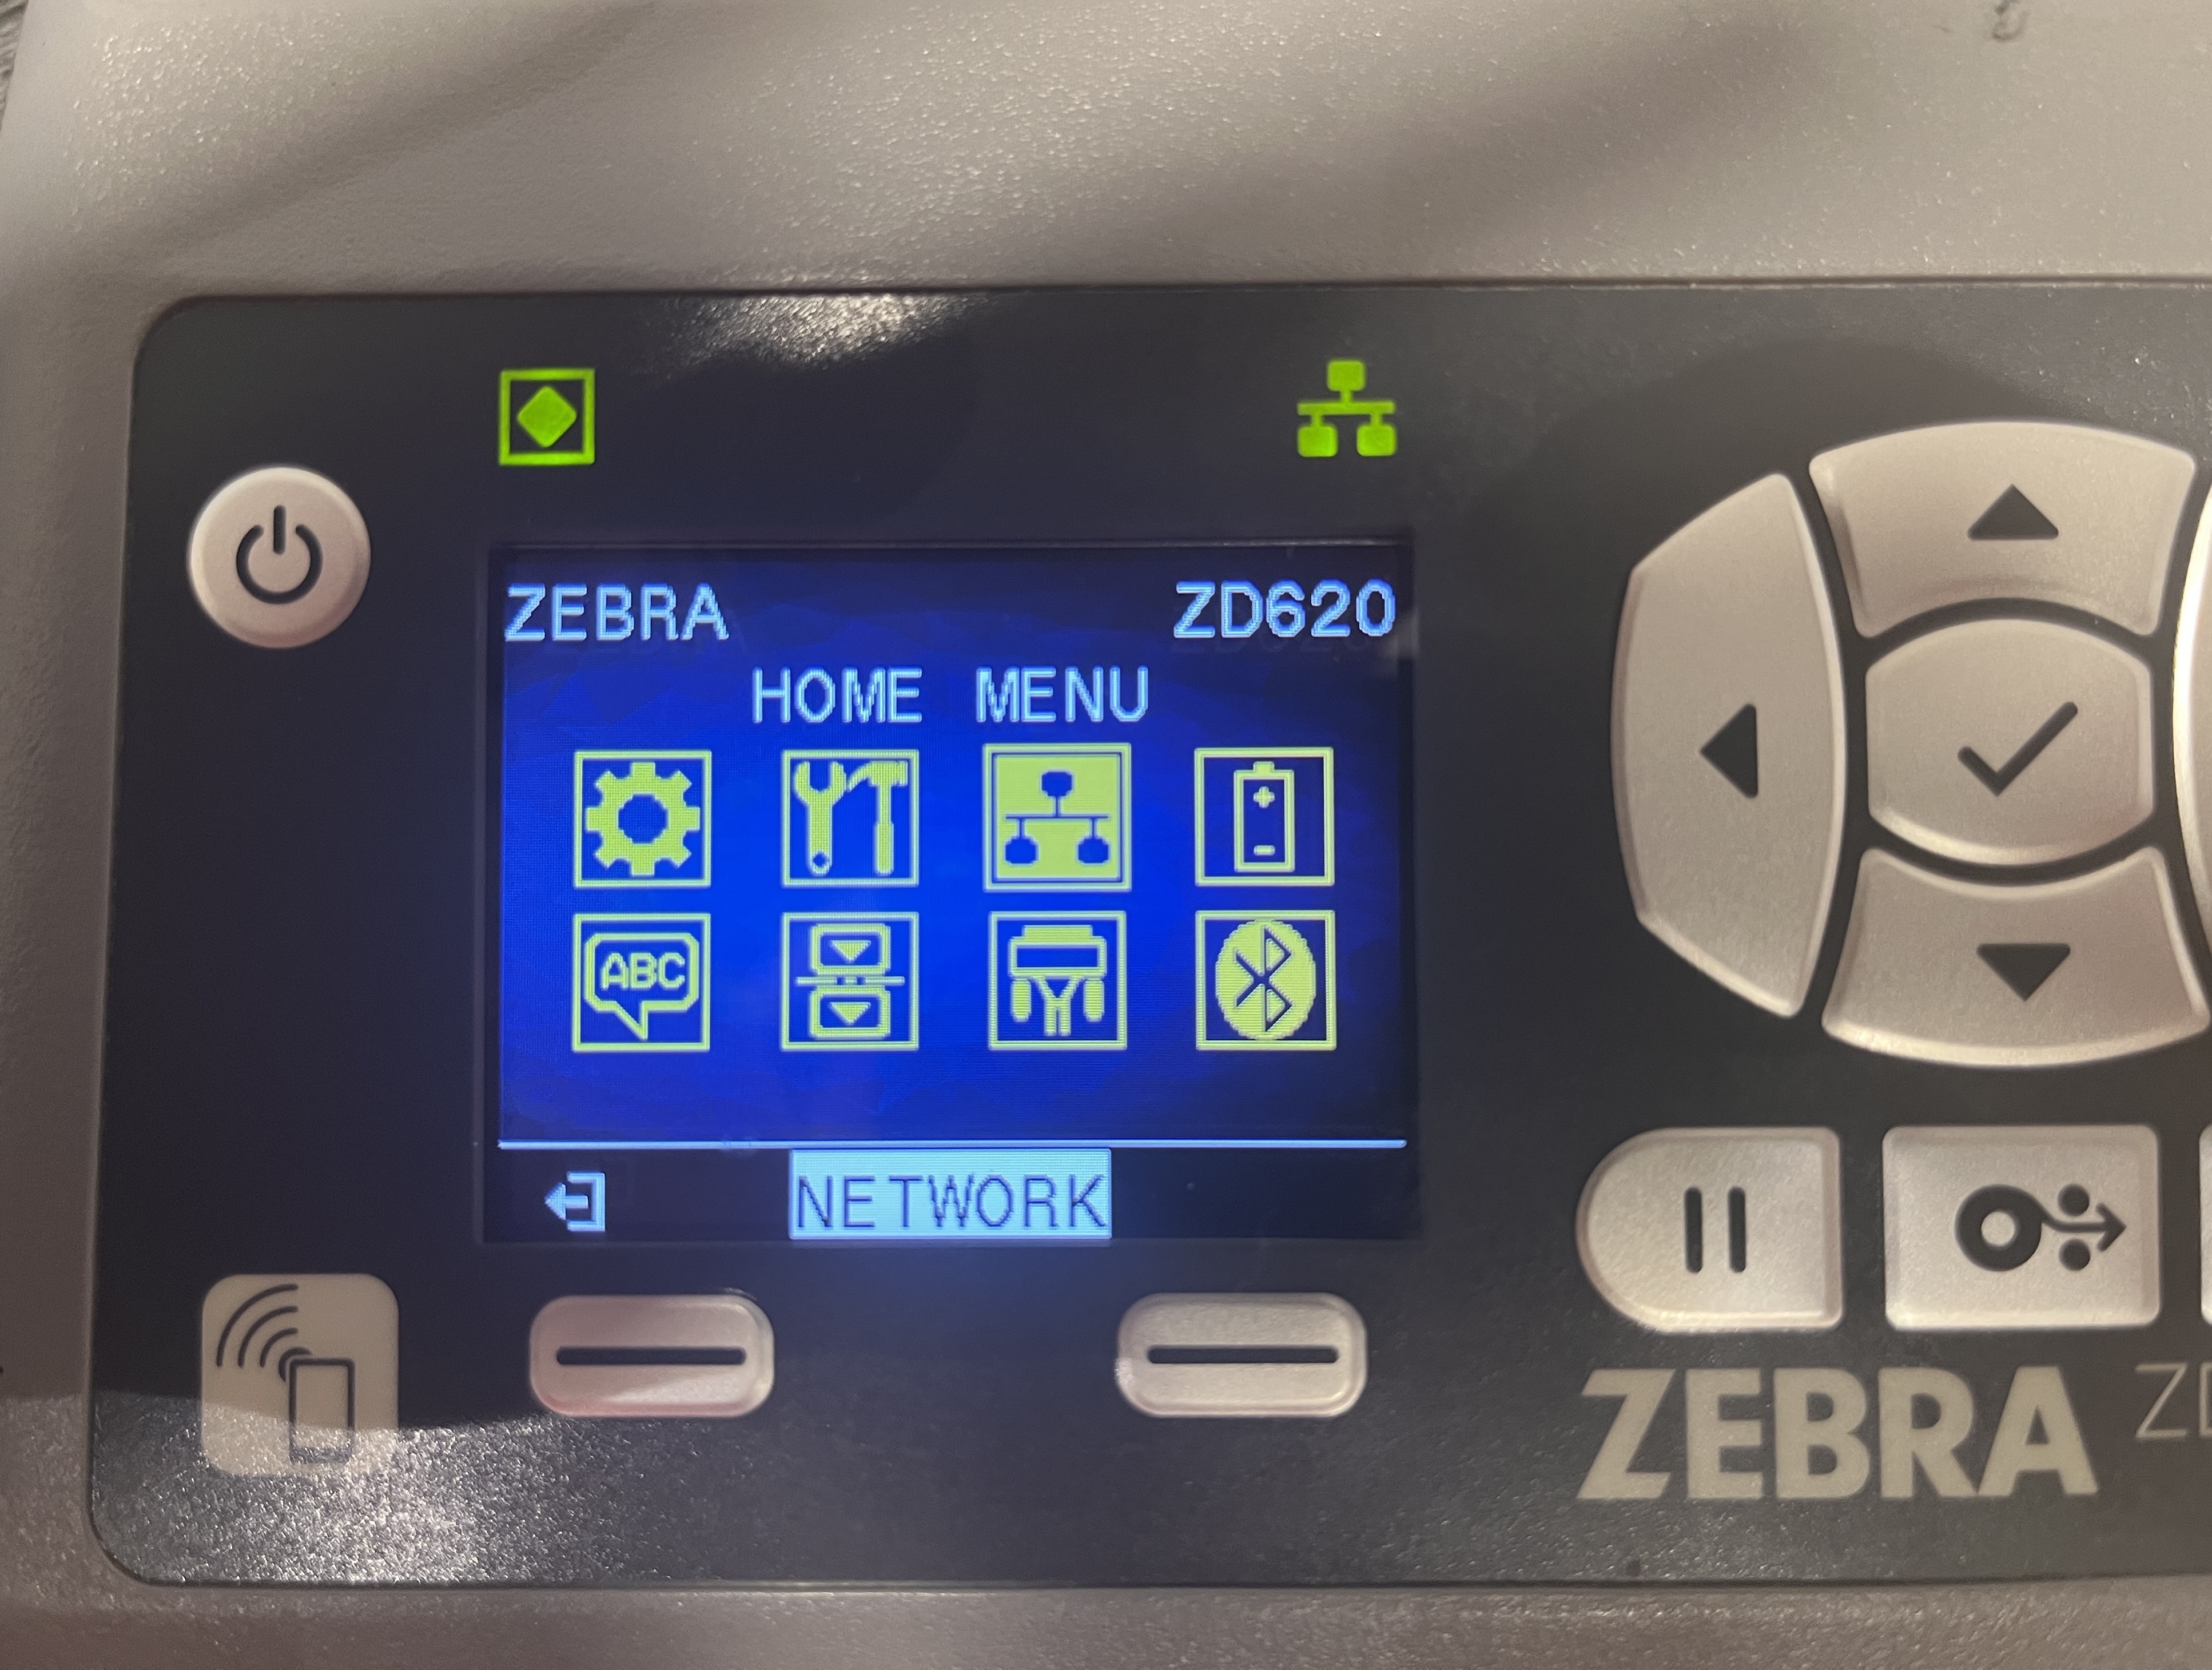
- Ensure that the PRIMARY NETWORK mode corresponds to the preferred connection mode. The available options are WIRED and WIRELESS.
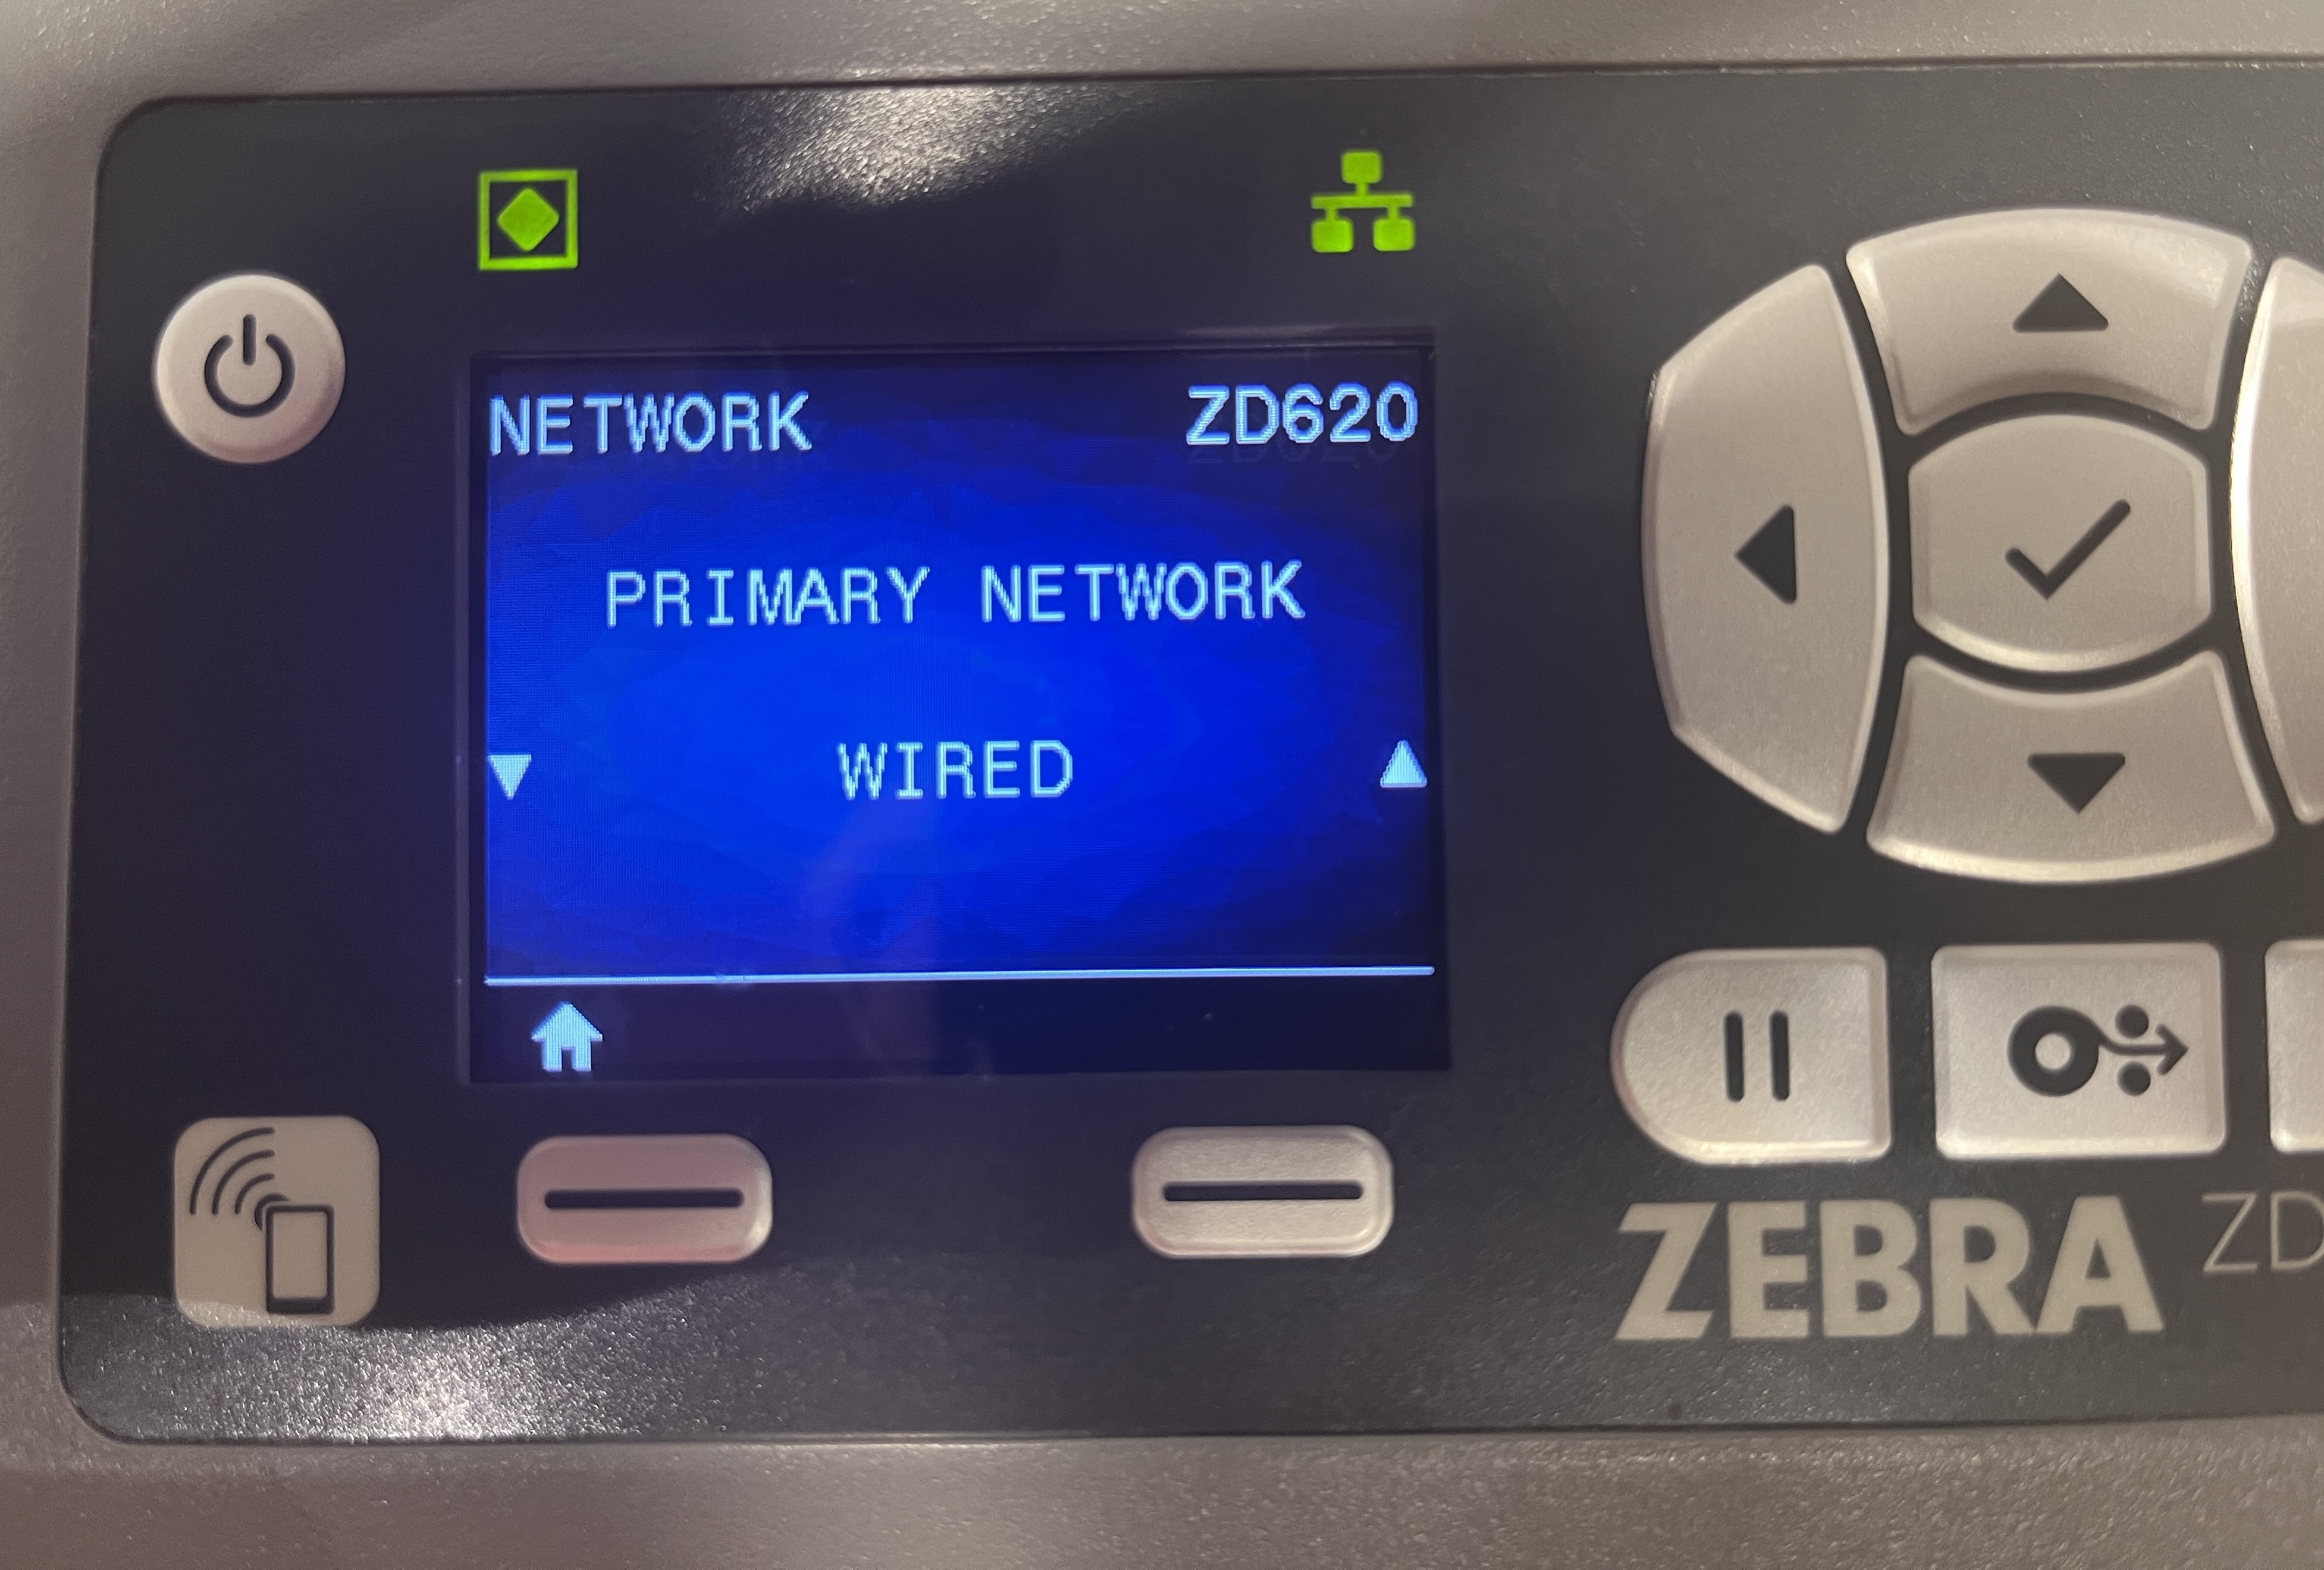
When WIRED is selected for wired (Ethernet) connection, the device's WIRED IP ADDRESS must display all zeroes (0000.0000.0000.0000) due to automatic detection.
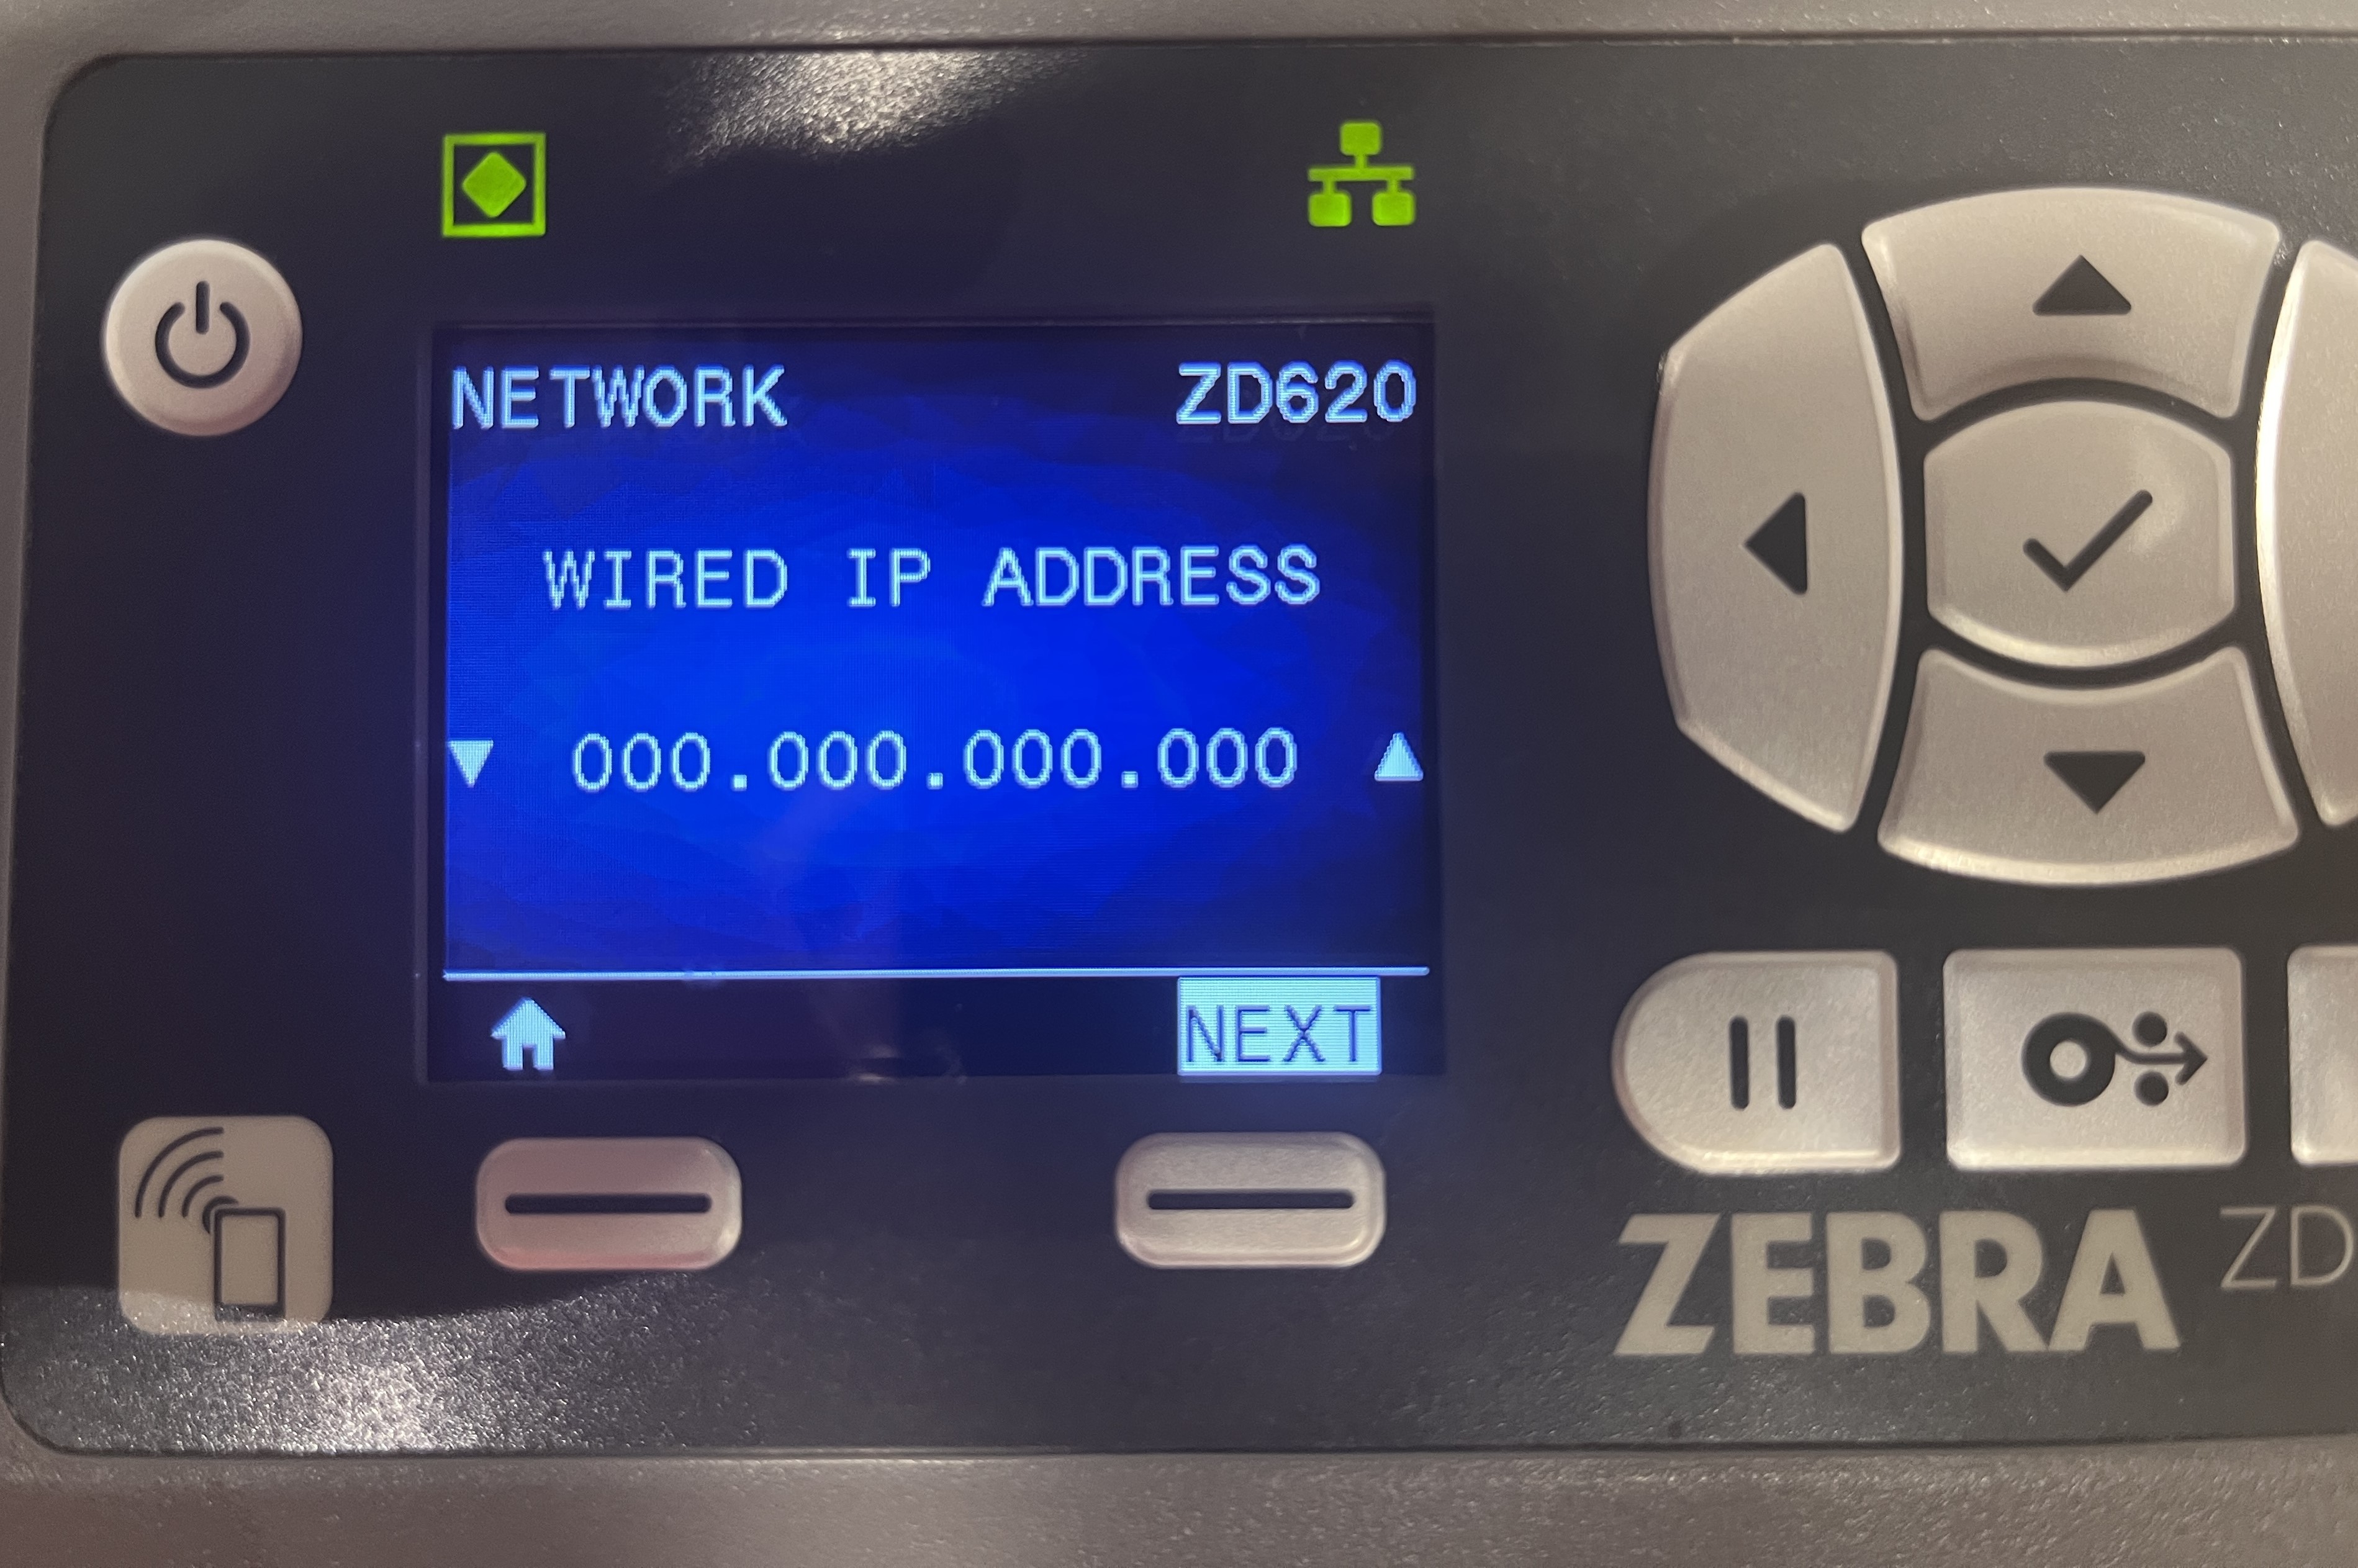
Ensure that the WIRED IP PROTOCOL is set to DHCP.
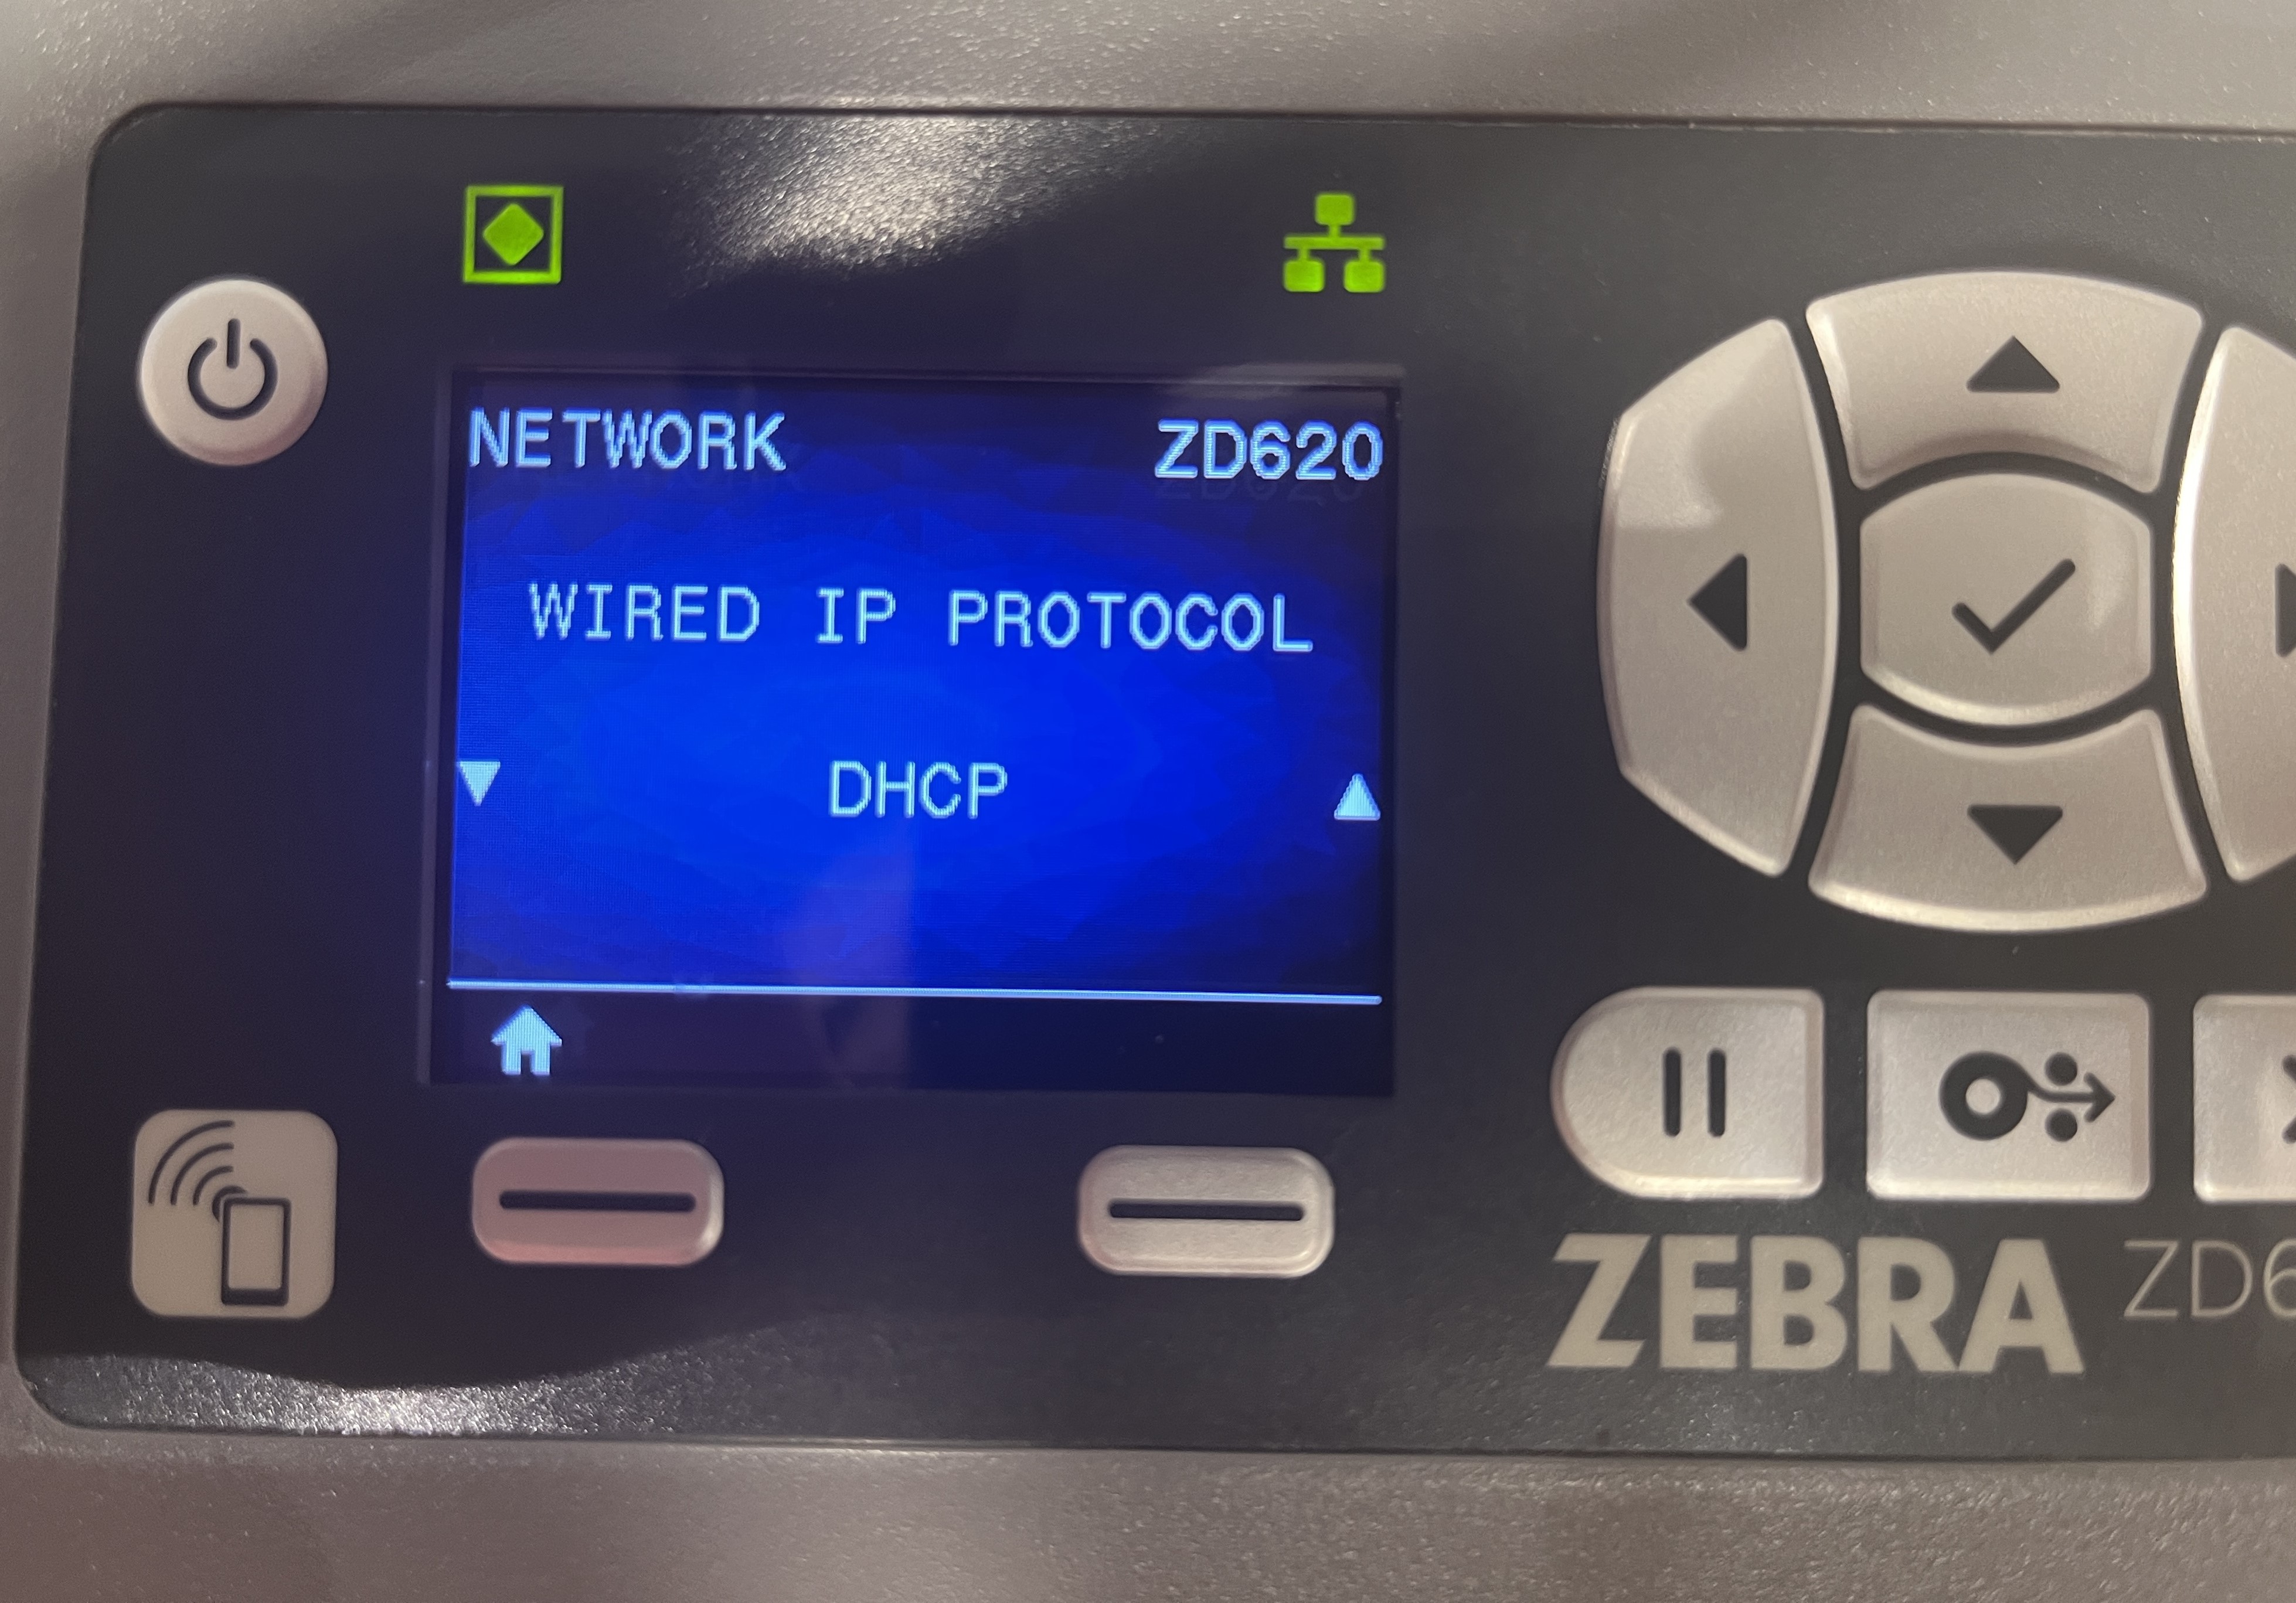
Also verify that the IP address shown under WLAN IP ADDRESS matches the IP address shown on the printer's main display screen. The printer's exact IP address must also match the IP address within the Kiosk settings on the InEvent mobile app.
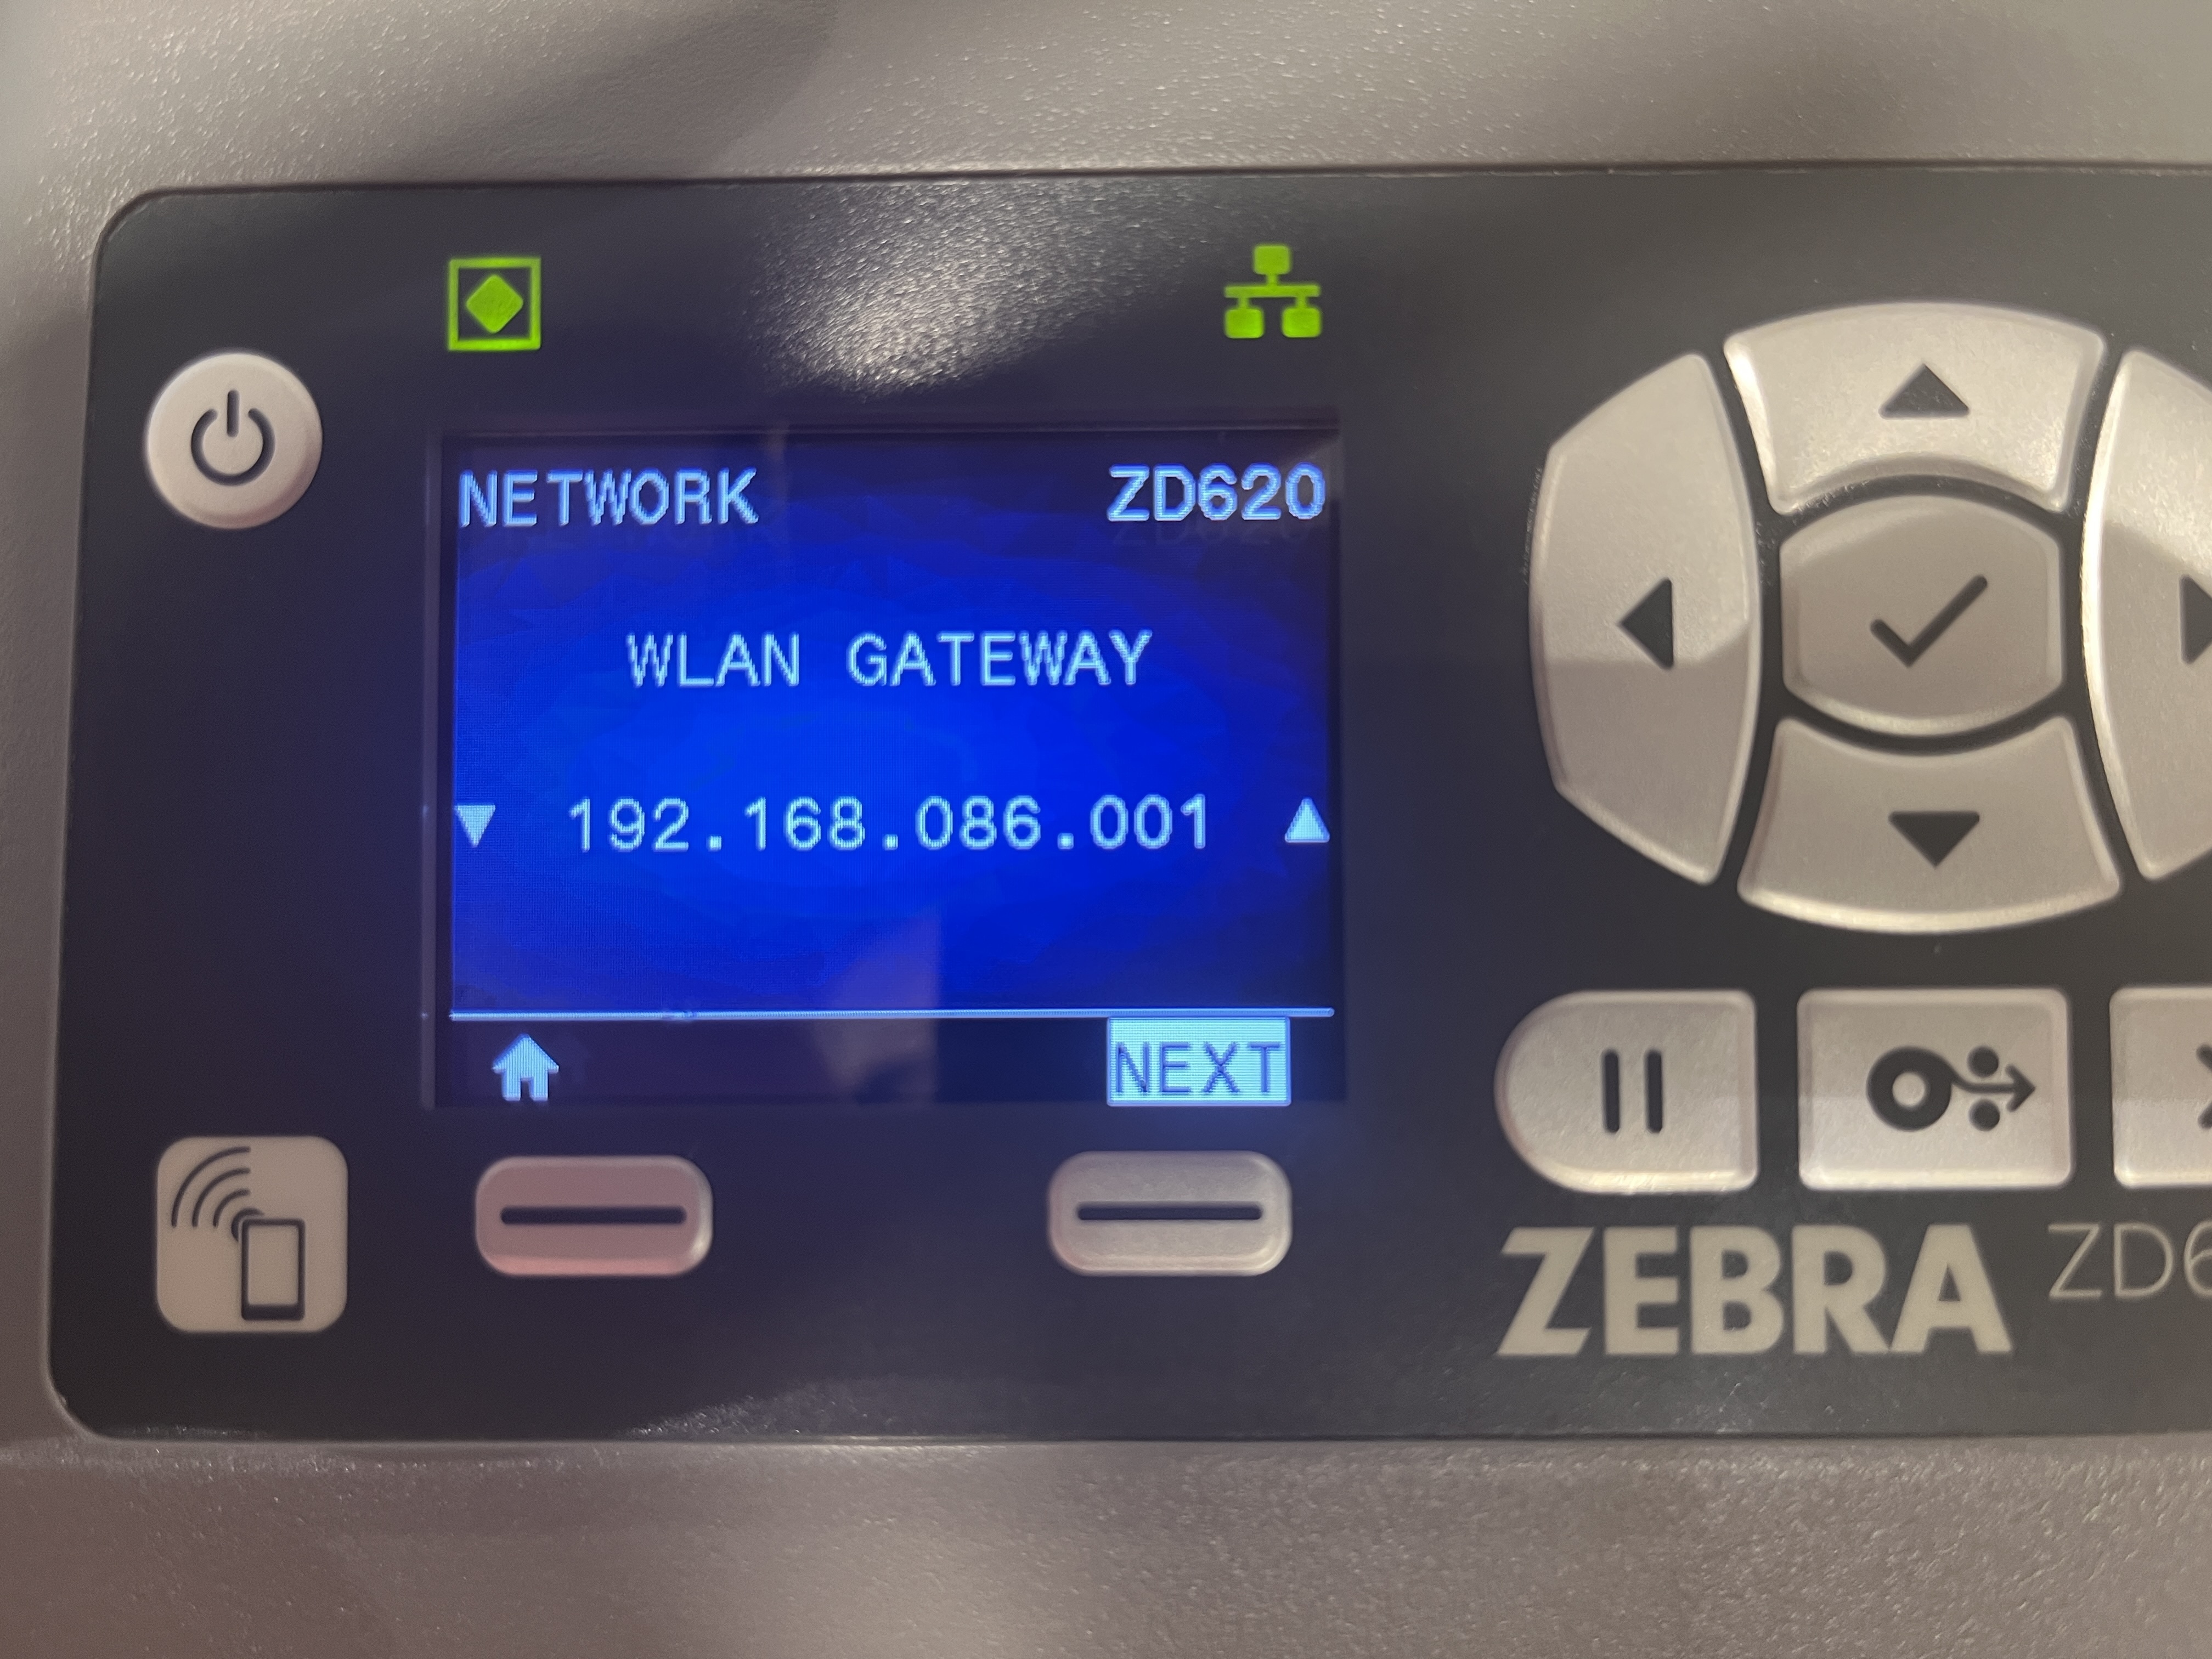
Printer not listed in the InEvent app
If the printer is not listed or displayed at the InEvent mobile app, follow the steps provided below to troubleshoot.
- Navigate to Settings > Wi-Fi on an iOS/iPadOS reading/checking device.
- Tap the blue ⓘ icon next to the currently connected wireless network.
- Verify that the first three digits of the IP address match those of the WLAN GATEWAY address displayed on the printer's NETWORK settings. If the three digits match, the reading/checking device and the printer are connected to the same network. Otherwise, ensure to connect both devices to the same network.
Printing badges on the InEvent platform
The Print now section allows event organizers to directly print their attendees' event badges from the platform using the InEvent Badge Printer plugin.
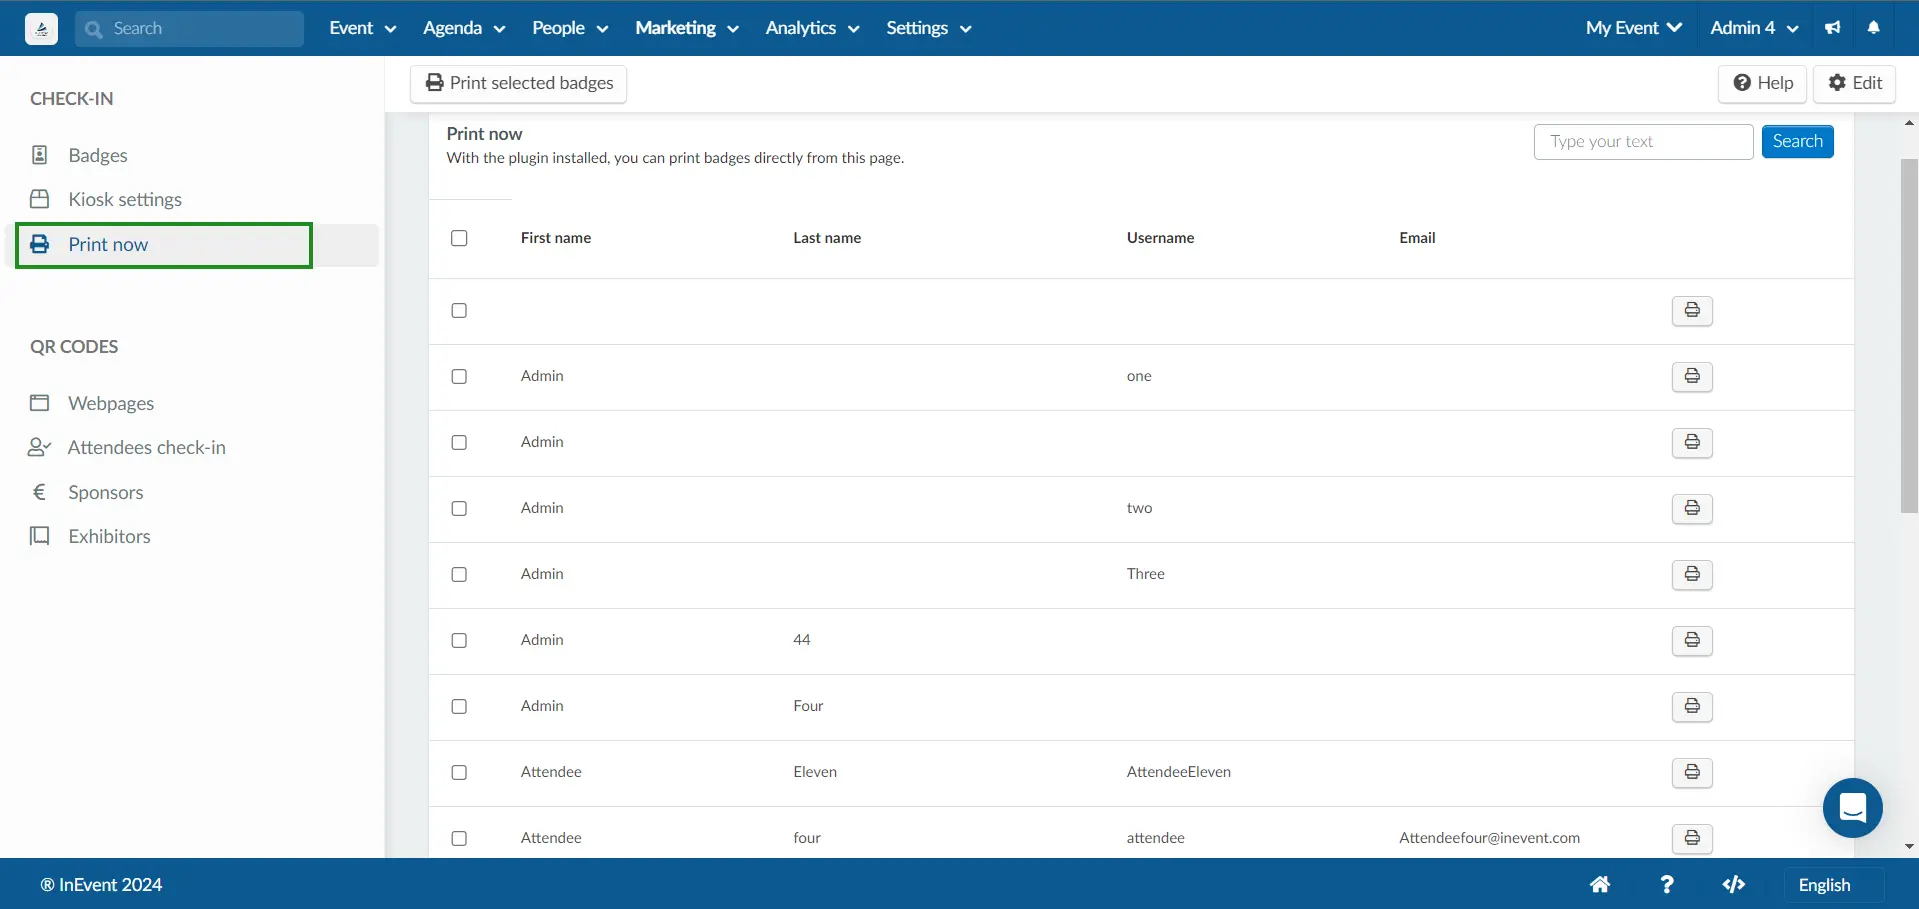
To start printing an attendee's badge, follow these steps provided below.
- Click on the Print button next to the target attendee's entry in the Print now interface.The Print badge pop-up box will be displayed, from which you can select to print or download the badge.
- Click on Print to start the badge printing process.
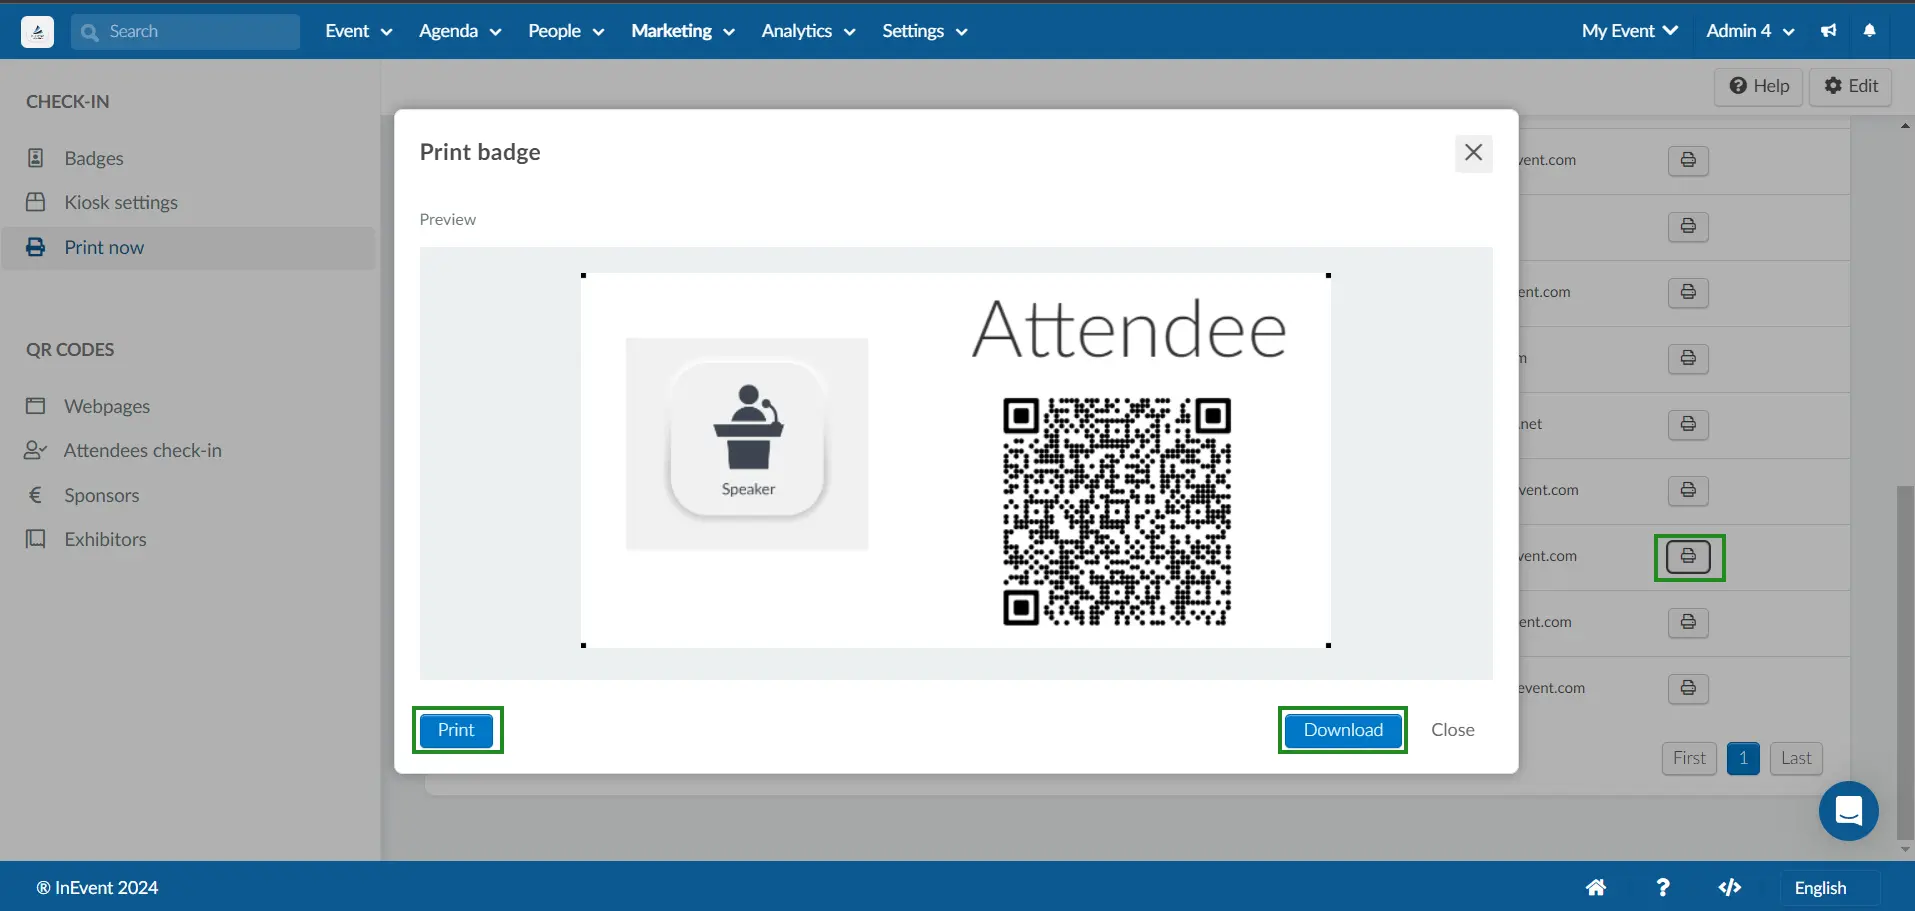
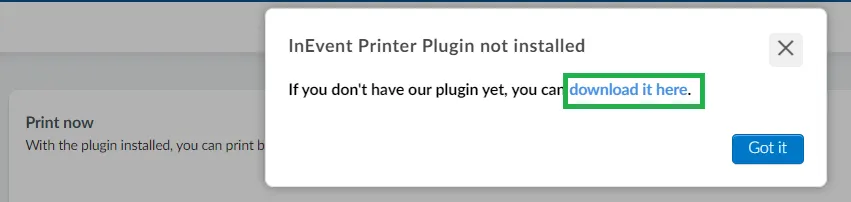
- Click on Print. The platform will attempt to connect to the InEvent Badge Printer plugin. If the plugin is not yet installed on the browser, you will be prompted to download and install the plugin from the Chrome Web Store.
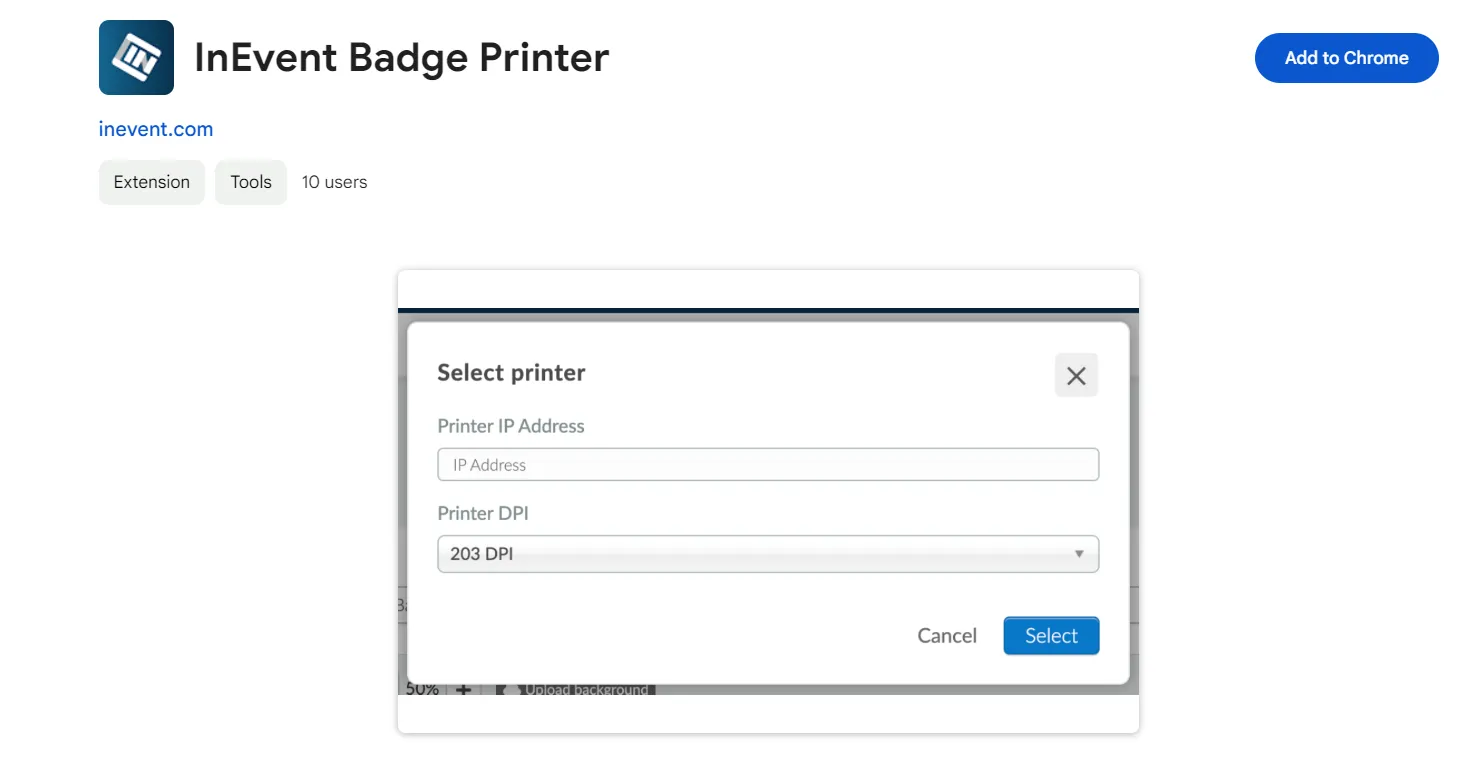
- Refresh the page and click on the Print button again. You will be prompted to:
- Enter the IP Address and select the Printer DPI if the badge is connected to a Zebra Printer.
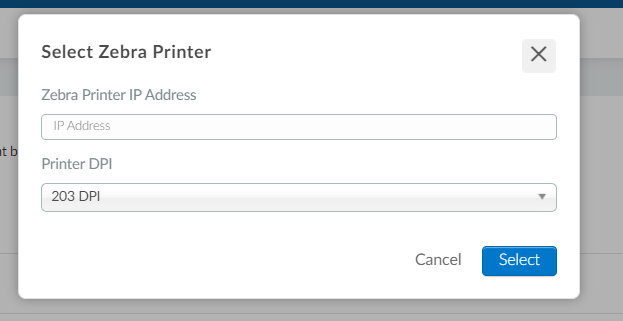
- Enter the IP Address if the badge is connected to a Brother Printer.
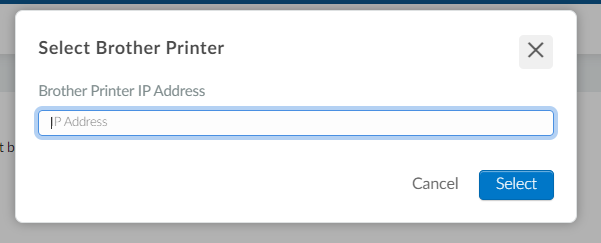
- Press Select.
After completing the steps provided above, the target attendee's badge will start printing.
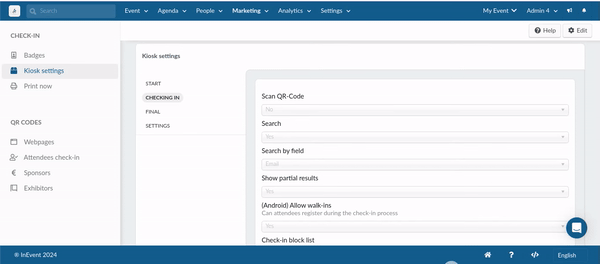
Kiosk settings
The Kiosk Settings section allows event organizers to customize how their Kiosk looks and functions in the InEvent mobile app. The Kiosk Settings are separated into four tabs: Start, Checking in, Final, and Settings.
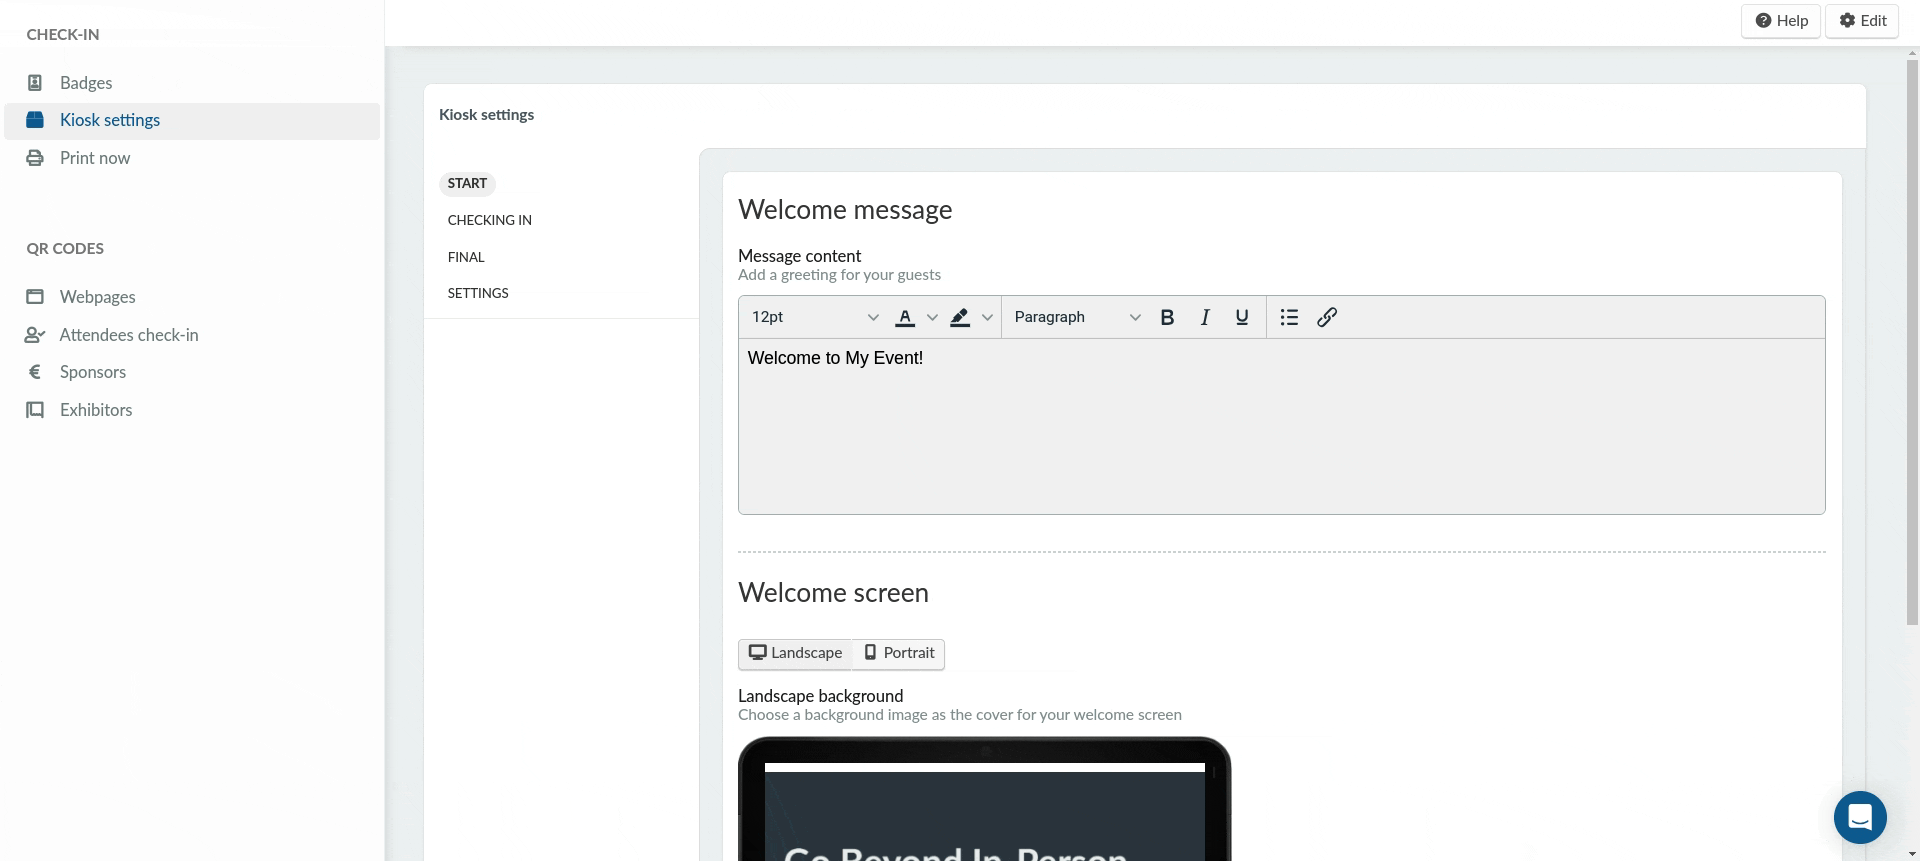
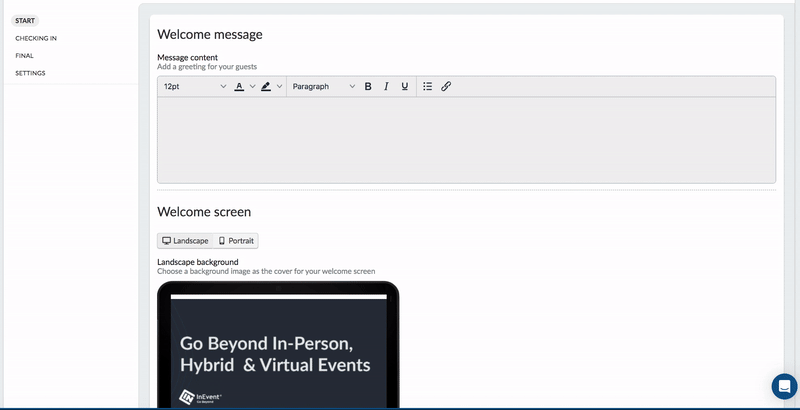
Start
In the Start tab, event organizers can set up the appearance of the Kiosk Welcome screen in the mobile app. The following items can be customized:
- Welcome Message: Define the message which will be displayed on the welcome screen.
- Screen Orientation: Choose between landscape or portrait mode for the welcome screen.
- Background Image: Set the background image for either landscape or portrait orientation.
Checking in
In the Checking in tab, event organizers can adjust how the Kiosk operates during the check-in process in the mobile app. The following options can be configured using drop-down menus:
- Scan QR Code: Enable or disable QR code scanning for badge printing. Select Yes to allow attendees to check in by scanning their QR codes. Choose No to disable this option.
- Search: Determine if attendee data can be searched from the Kiosk.
- Search by field: Specify the field used for searching attendee data. Options include Email, Name or Email, and Username.
- Show partial results: Decide if partial matches should be shown during searches. Selecting No will display only exact matches.
- Allow walk-ins: Set whether attendees can register on the spot during the check-in process.
- Check-in block list: Attendees on this list will appear on the attendees' but cannot be checked in.

- Ask for user photo using Kiosk Camera: Choose whether to take attendees' photos during check-in. When set to Yes, it enables the User Picture feature in the badge editor and allows operators to take the attendee’s picture with the kiosk camera during check-in.
- Enable consent form: Require attendees to complete a consent form before their badge is printed. If set to Yes, a Custom form can be selected from from the Choose a Form menu.
Final
In the Final tab, event organizers can customize the Thank You Title and Thank You Message that will appear after an attendee completes check-in.

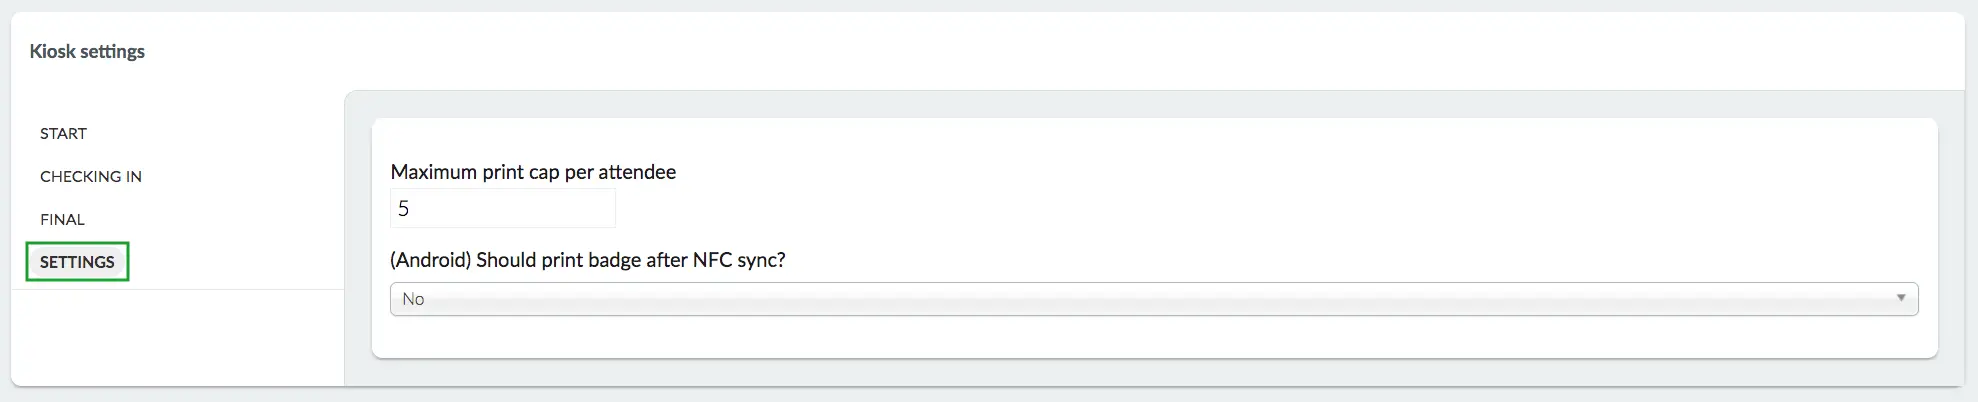
Settings
In the Settings tab, event organizers can configure the following items:
- Maximum print cap per attendee: Set the maximum amount of badge that can be printed per attendee.
- (Android) Should print badge after NFC sync?: Set whether or not badges should be printed after an attendee has completed NFC sync.
Printing badges on the InEvent mobile app
After configuring the Kiosk, operators can log in to the mobile app on the reading/checking devices to begin printing badges. Follow the step provided below to connect to a printer.
- Log in to the mobile app.
- Navigate to Badge printing from the menu.
- Press Kiosk mode.
- Press Select when the No Printer dialog box is displayed.
- Enter and submit the 5-digit company code when prompted.
- Press Select Printers on the Kiosk mode settings page.
- Select the target printer from the list. A pop-up window will be displayed.
- Press OK.
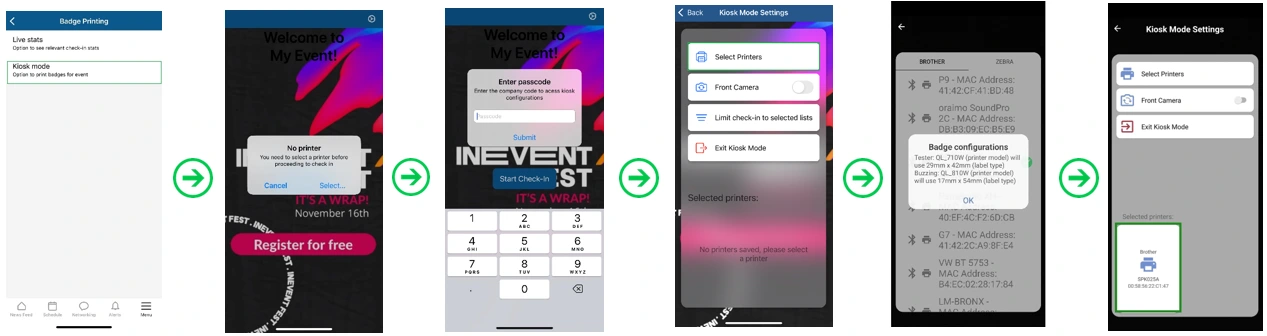
After completing the steps above, printer(s) that have been selected will be automatically connected when accessing the Kiosk mode.
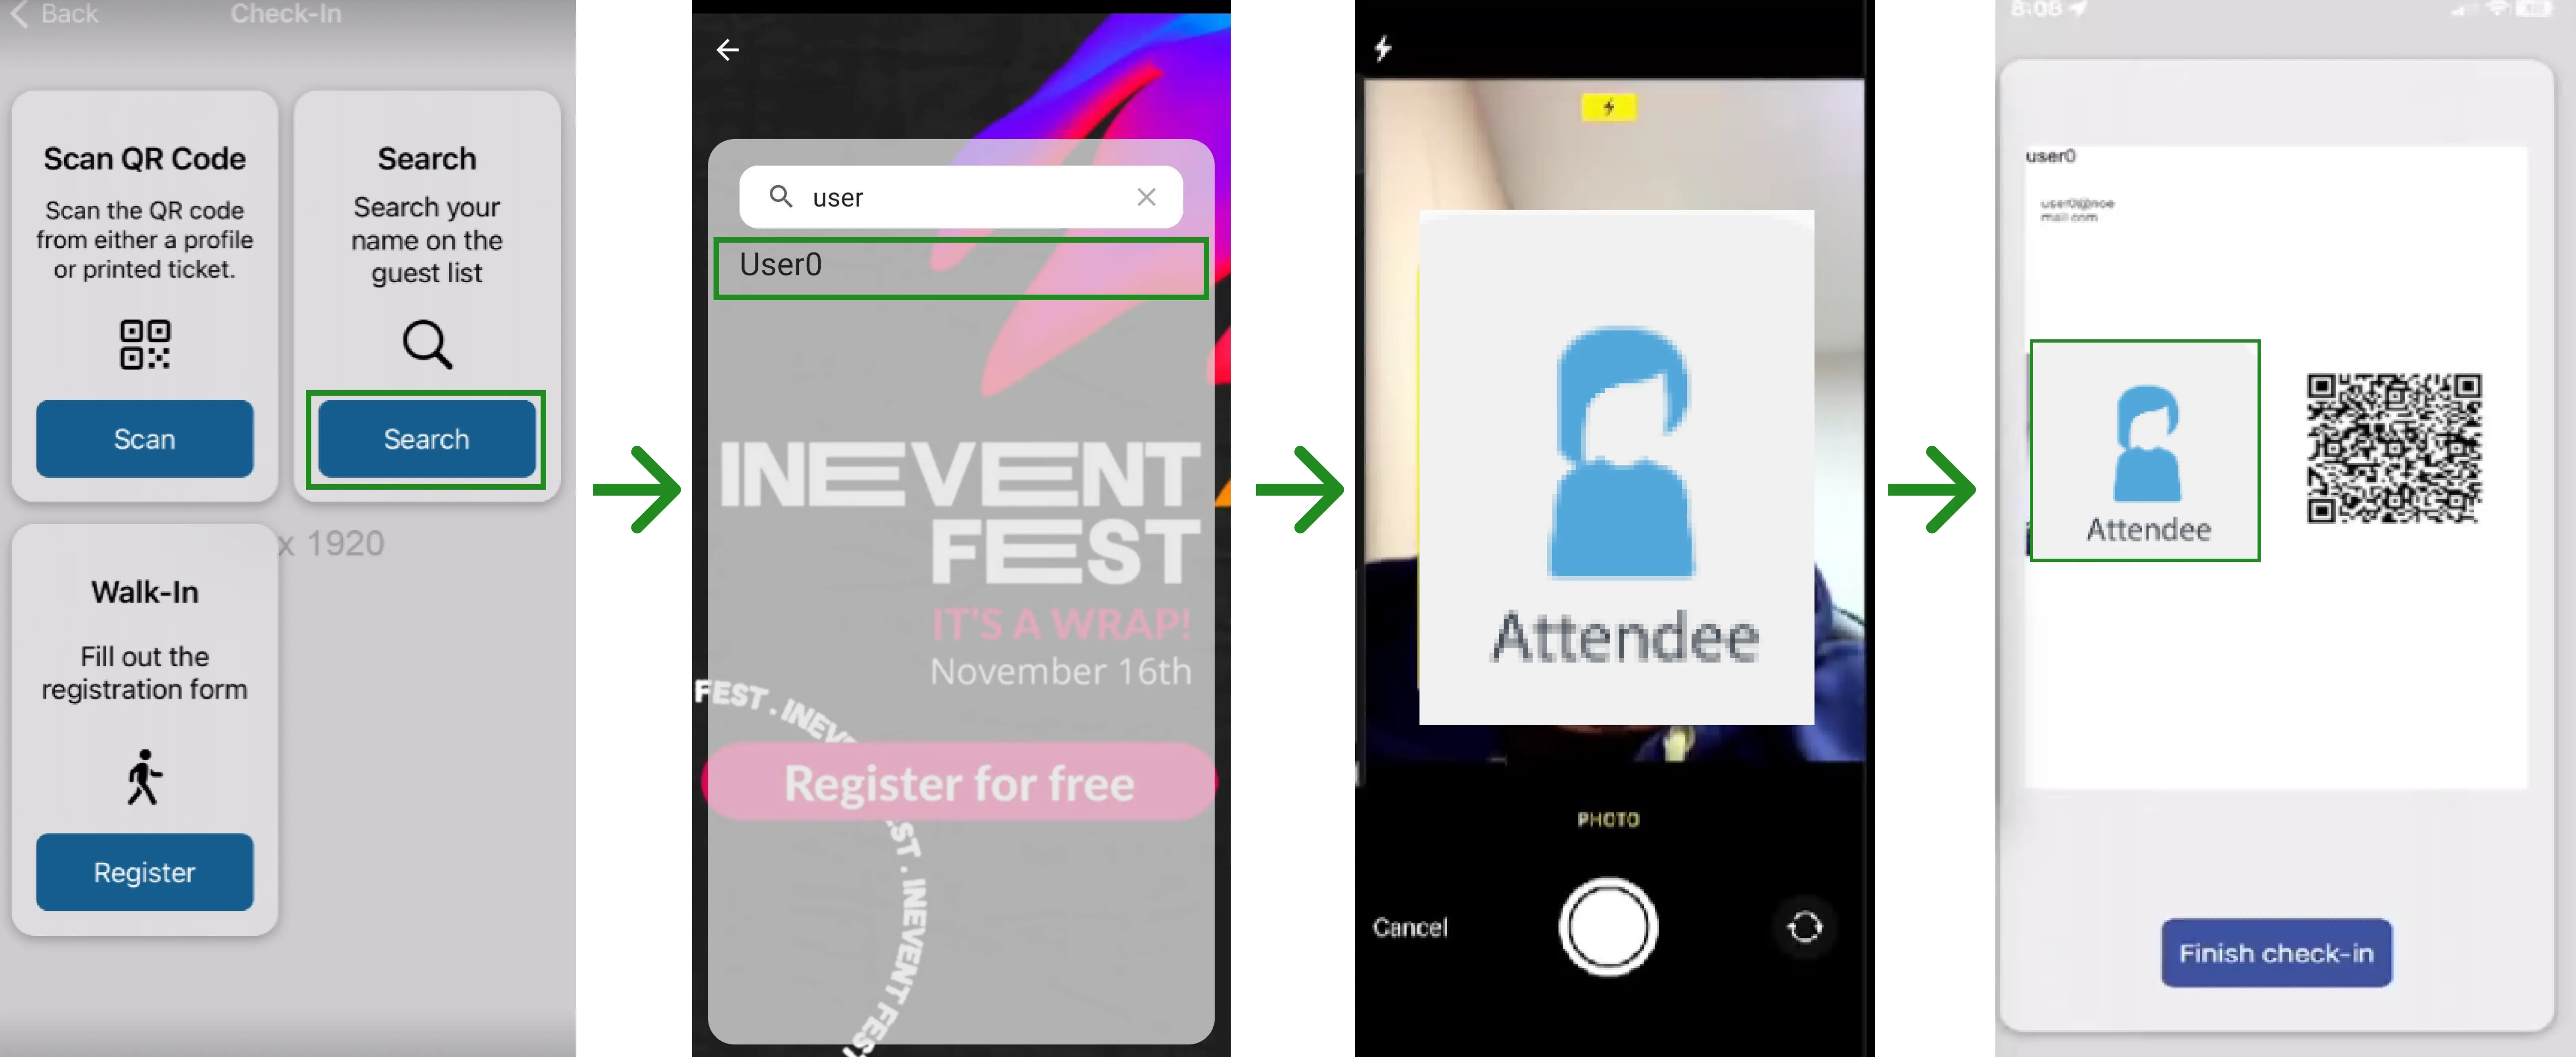
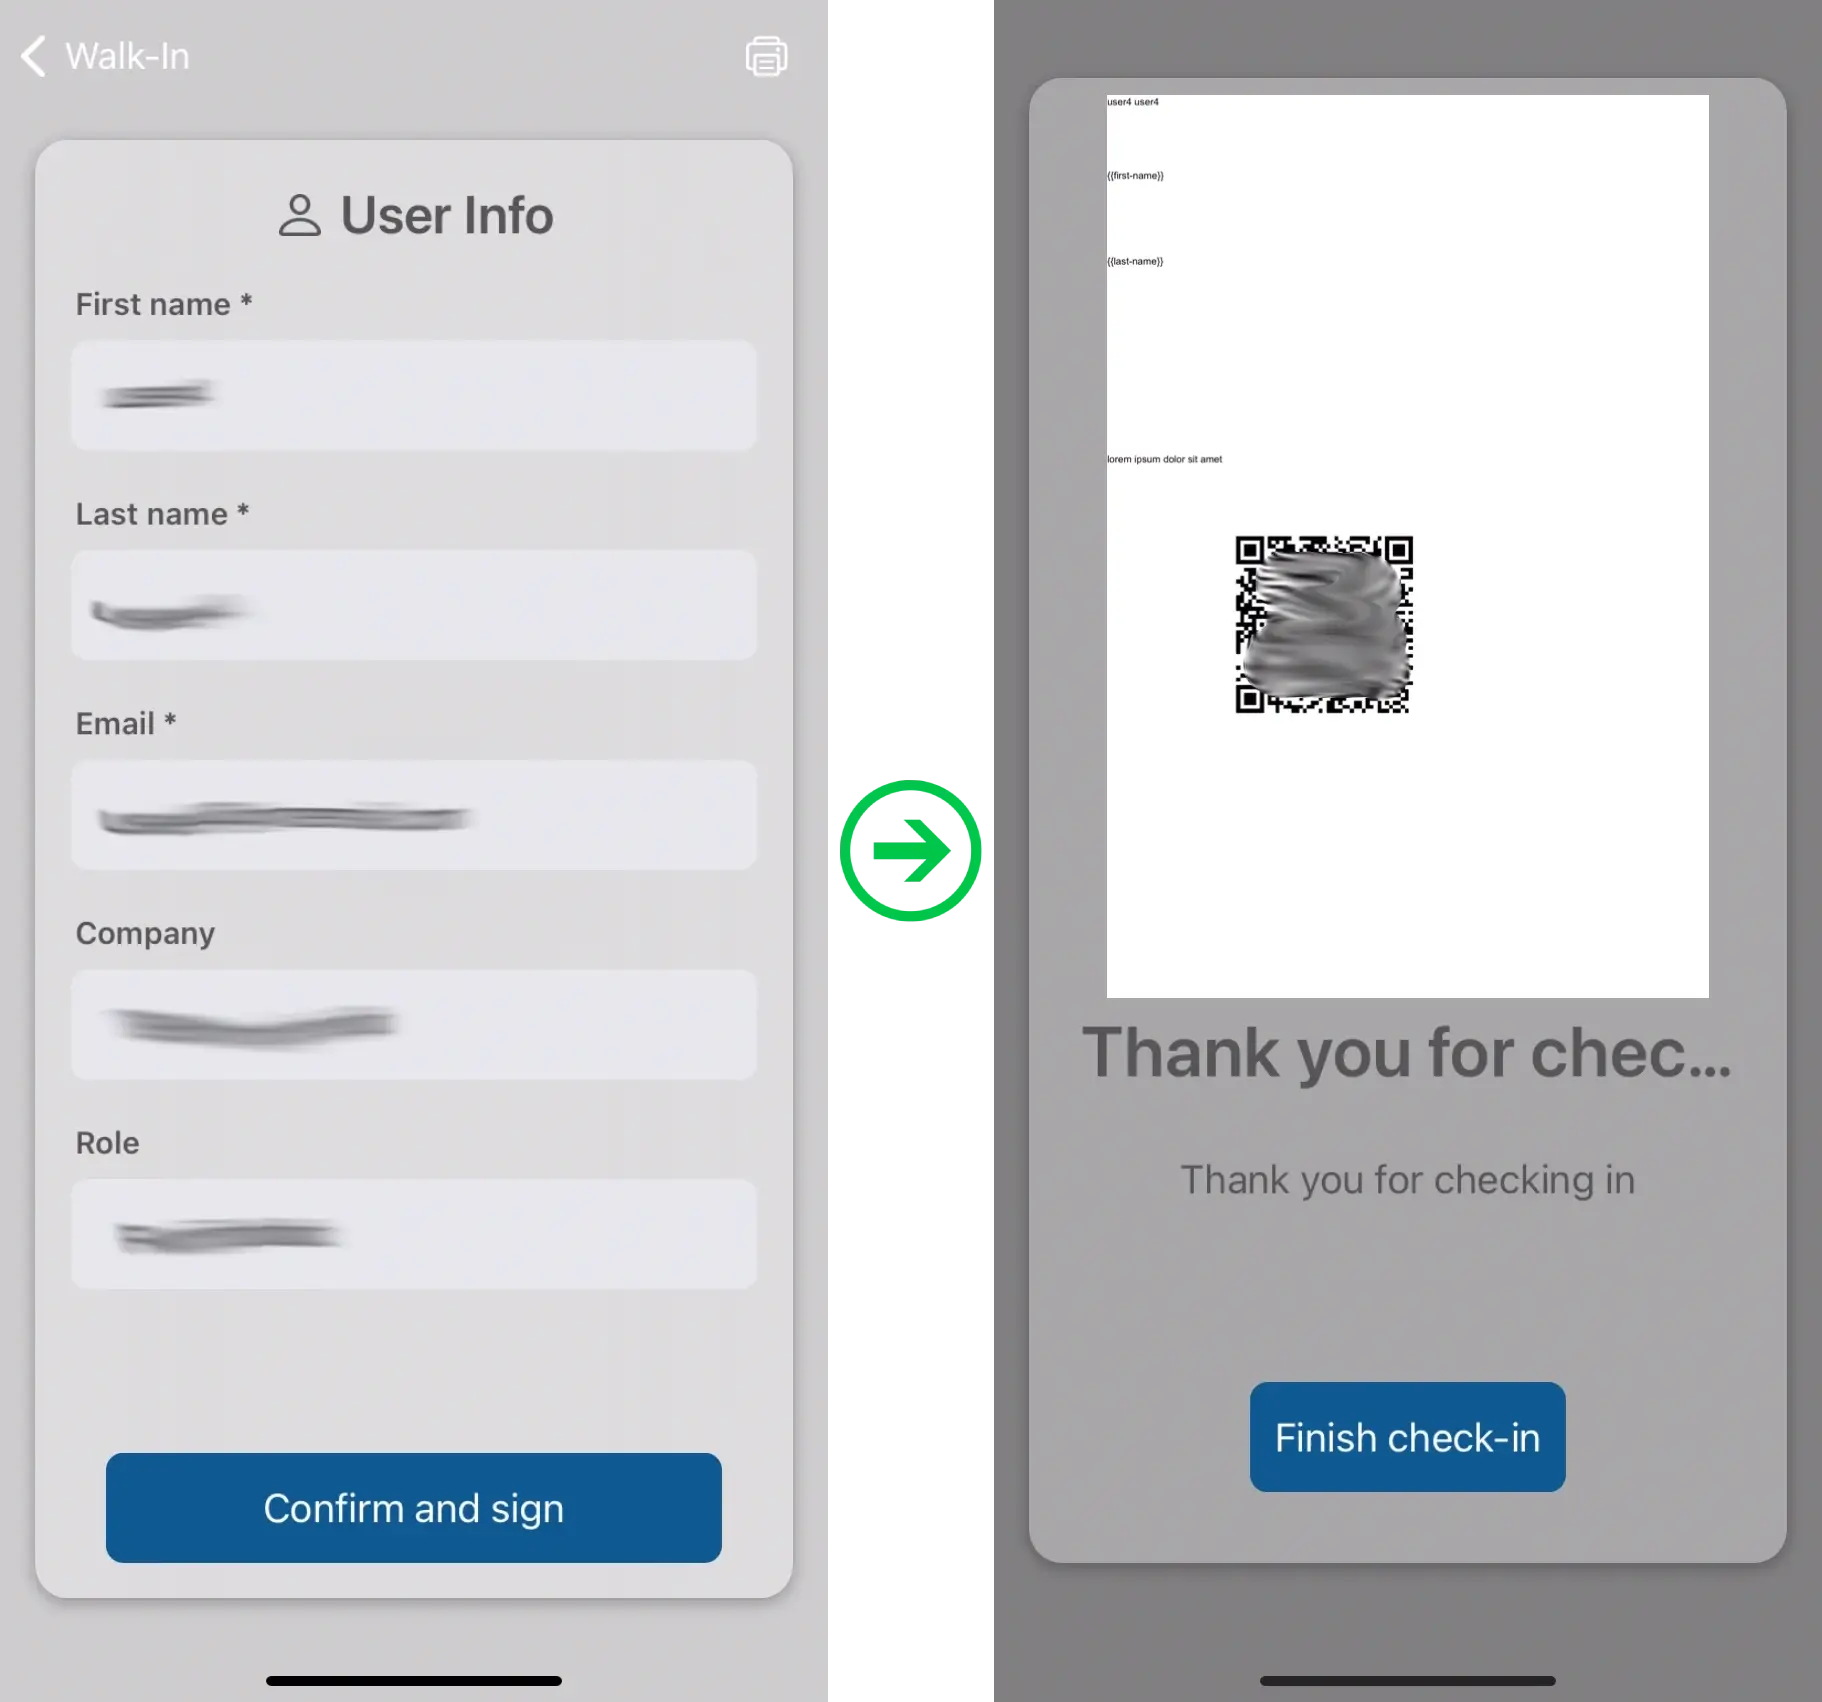
Attendee check-in procedure
To start checking in event attendees to the event using the mobile app, follow the steps below:
- Launch the official InEvent app.
- Navigate to Menu > Badge printing > Kiosk mode in the InEvent app.
- Tap on Select printer to select the printer with which the badges will be printed.

- Tap Start check-in.
- Tap on the Scan button under Scan QR Code to start scanning attendees' QR codes. Alternatively, select Search attendee to manually search for the attendees.
- Review the attendees' details as shown on the Kiosk.
- Tap on Confirm and sign. The badge will start printing.
- Tap on Finish check in to finalize the attendee's check-in process.
After completing the steps above, the attendee will be checked in to the event, and their badge will also be printed.
Enabling photo capture before badge printing
Event organizers have the option to take an attendee photo during the check-in process and have the photo directly added to their printed badge. To do so, the Ask for user photo using Kiosk Camera setting within Kiosk settings must be set to Yes. Once it is configured, ensure that the customized badge features a User image element, which is added using the badge editor.
To achieve the described behavior, follow the steps provided below.
- Tap Start check-in.
- Tap the Scan button under Scan QR Code to start scanning attendees' QR codes. Alternatively, select Search attendee to manually search for the attendees. The device camera will activate, allowing a photo of the attendee to be taken.
- Finish taking the photo and select Use photo. The screen will preview the attendee's badge, including their photo.
- Click on Finish check-in.
After completing the steps above, the attendee will be checked in to the event. In addition, their badge will also be printed with their photo.
Changing printers
Event organizers may want to change or switch between the available printers. In order to do so, follow the steps provided below.
- Navigate to Menu > Badge printing > Kiosk mode in the InEvent mobile app.
- Tap on Select printer.
- Select the target printer.
After completing the steps above, the newly selected printer will print upcoming attendee badges.
Previewing badges before printing
Event organizers who opt to use Android mobile devices as their event's reading/checking device can preview attendee badges before they are printed. In order to do so, follow the steps provided below.
- Tap the Scan button on the Check-in Kiosk to start scanning attendee's QR codes. Alternatively, tap Search attendees to manually search and select an attendee. The attendee's details will be displayed for confirmation.
- Tap the Confirm button after reviewing the attendee's details. The app will display the Badge Preview interface, from which the badge can be reviewed.
- Tap the Print button to print the badge and finish the check-in process.
Filtering attendees during event check-in
Event organizers are able to filter and limit attendees who are allowed to check-in to in-person events. This is achieved using Lists.
In order to limit attendee check-in by List, follow the steps provided below.
- Navigate to Menu > Badge Printing > Kiosk mode in the InEvent mobile app.
- Tap Limit check-in to selected lists/Filter by list in the Kiosk mode settings interface. A pop-up will appear showing all of the existing Lists.
- Select the List of attendees to be allowed for check-in. You will then be directed to the check-in page for the selected List.
- Tap on Start Check-in to start scanning attendees' QR codes or manually selecting them from the Presence list.
After completing the steps above, the reading/checking device will only accept the check-in of attendees who are included in the specified List.
Timeout during the check-in process
Due to inactivity during the attendee check-in process, operators of the reading/checking device may be returned to the Start Check-in interface. This ensures the security of the check-in process by preventing unauthorized check-ins on idle devices, as well as efficiency by not holding out the check-in of one attendee for to long.
To avoid being timed out, ensure that operators respond to the Are you still here? confirmation pop-up boxes by tapping Yes, I'm here. If operators fail to respond, they will be returned to the Start Check-in interface and will need to restart the attendee check-in process.

Operators are highly encouraged to complete the attendee check-in process as efficiently as possible.
Consent form before badge printing
Event organizers can make it mandatory for attendees to complete a consent form before their badges are printed. By doing so, event organizers can ensure their attendees understand the terms and conditions for their in-person event, as well as obtain any necessary consent or permission, such as for potential photographing, video recording, and featuring on social media or press releases. After completing consent form, attendees will be able to proceed with the check-in and receive their badges.
The Consent form before badge printing functionality can be enabled from within the Kiosk Settings > Check-in Tab, as outlined in the Checking in section.

Walk-in registration
Event organizers can also opt to allow walk-in registrations for new attendees who have not registered to the event. The Allow walk-ins functionality can be enabled from within the Kiosk Settings > Check-in Tab, as outlined in the Checking in section.

The process of walk-in registrations is as described below.
- Launch the Kiosk mode on the InEvent mobile app.
- Tap Start Check-in.
- Tap the Register button under Walk-in. The Registration form will load.
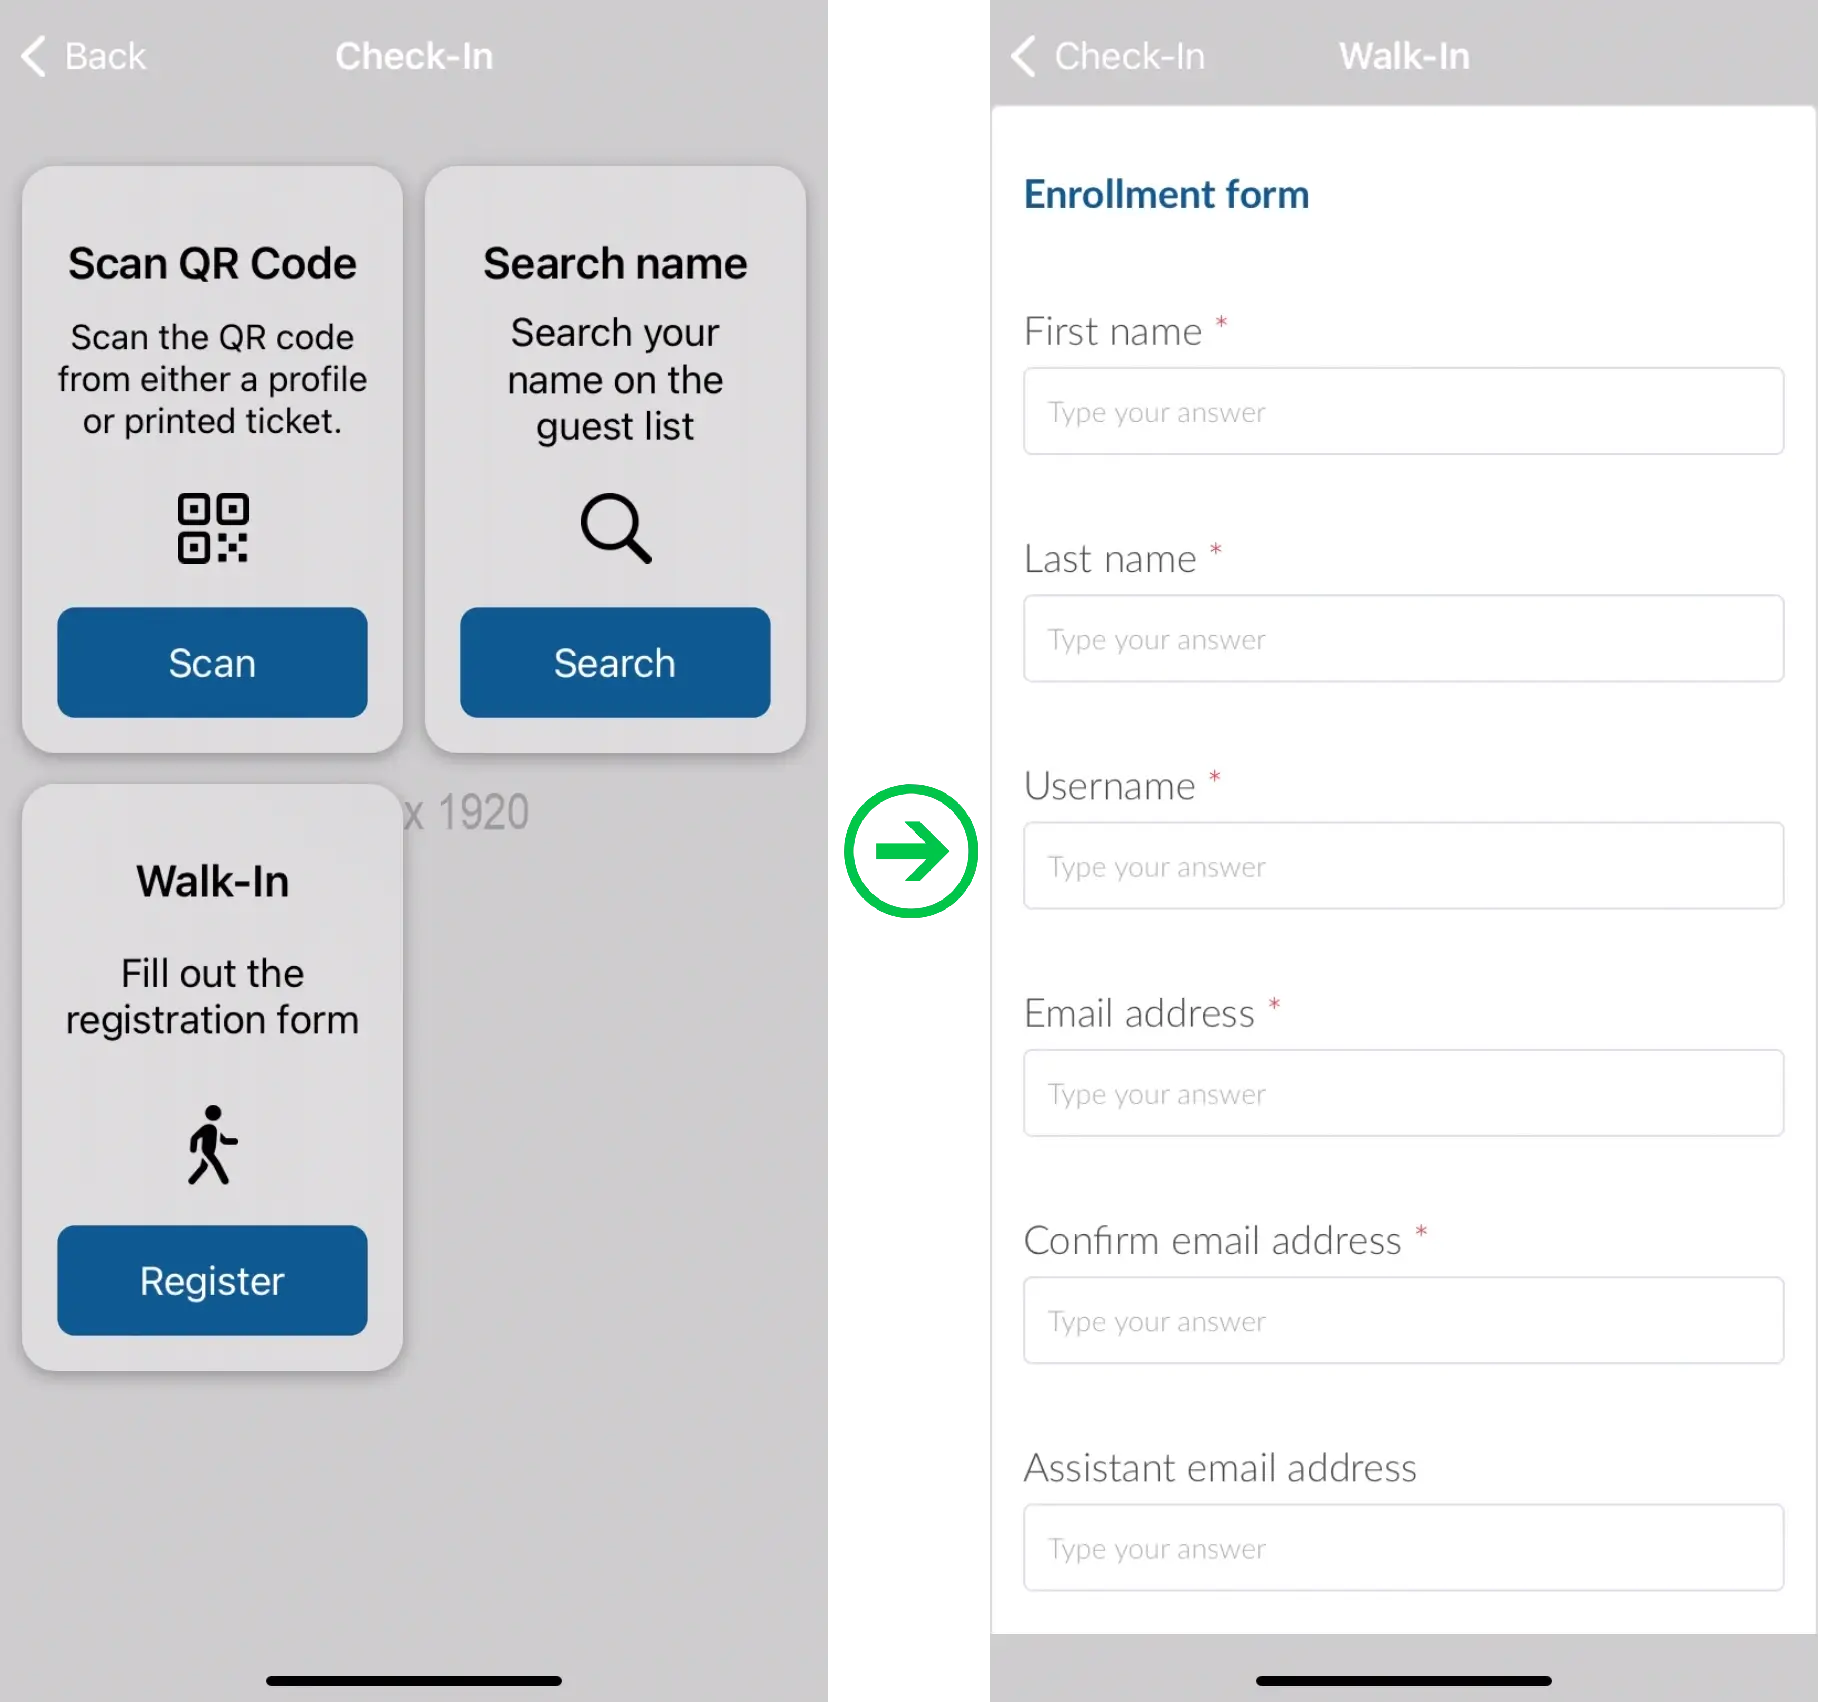
- Complete the registration form for the new attendee.
- Tap the Confirm and sign button to start the attendee check in process. The QR code will be automatically loaded.
- Tap on Finish check-in.
Advanced support
Event organizers as well as the client, may require live support before, during, and after the event. In such cases, it is essential for them to reach out to their Account Project Manager as soon as the situation allows. As their supporting on-site agent, you can reach out to the Account Project Manager directly via e-mail, or by contacting your contact representative from Partners at InEvent.
It is very important that the event organizers place trust on the supporting on-site agent as a member of InEvent itself. Therefore, InEvent strongly recommends you to conduct some tests if you are ever in doubt, or if you are facing challenges, and to also reach out to InEvent members for help if necessary.
In addition, a meeting between the Partner and the Account Project Manager is needed to take place before the event date, so that all necessary details and information can be coordinated appropriately.
Guide questions for on-site agents
This section contains questions to guide supporting on-site agents. They should be shared and/or communicated with the event organizer, as the client, as soon as possible to ensure adequate preparation time. These questions act as a pointers, and additional questions to clarify may be necessary depending on the situation. Ensure to tailor your inquiries to suit each event as well as to cover all relevant details.
Venue-related questions
This section contains questions to verify the required information related to the event venue.
- Is there a required arrival time for the event?
- Is there a specific departure time we need to adhere to?
- Is there a designated entrance for InEvent staff?
- Who is the main contact person upon our arrival at the venue?
- Is there a dress code for the on-site technician?
- Are there any conduct guidelines the technician needs to follow?
- Can you provide the event's schedule or timeline?
- Are there any key technical requirements or potential blockers we should know about?
- Is a wireless network available? If so, what are the access details?
- Will there be a dry run or test before the event? Does the technician need to attend?
- Is the setup location for technical equipment the same as the regular attendee entrance?
- Are there any loading or parking restrictions we should be aware of?
- Where are the power sources located?
- Is there a backup system for power or connectivity failures?
- How will communication be managed during the event (radio, phone, app, in person)?
- Are there any health or safety protocols the technician must follow (e.g., COVID-19)?
- Can you provide emergency contact numbers the technician should have?
Event and InEvent platform setup questions
This section contains questions to verify the required information related to the event itself, as well as the client's event set up at the InEvent platform.
- What is the event date and time? Please include the time zone.
- How does the client update their attendee database? Is it done via a spreadsheet?
- How will the on-site technician access any updated attendee lists? Will changes be sent to the Account Project Manager as well?
- How will check-in and check-out be managed?
- Will registration be available at the venue, or is it only for pre-registered attendees? If available, how will walk-ins be handled (e.g., through InEvent badge printing or backend platform updates)?
- Are check-in and check-out required for individual activities, or just for the event as a whole?
- Will attendees need to sign a Consent Form before badge printing?