Attendees' list: registering participants in your event
 Updated 1 week ago
by
Faisal Durrani
Updated 1 week ago
by
Faisal Durrani
This article intends to show you how to add attendees to your event, either manually or in bulk, as well as how to remove people from your event.
Adding attendees to an event
You can manually add attendees or you can add attendees by using a spreadsheet. Besides that, you can also import attendees from CRMs such as HubSpot and Salesforce.
Adding attendees manually
On the InEvent platform, attendees are people who will be attending the event. We can add attendees to the InEvent platform in several ways.
To insert a new attendee, go to People > Attendees > click on + Add Person. Then, insert the attendee's information and confirm the action by clicking Create.
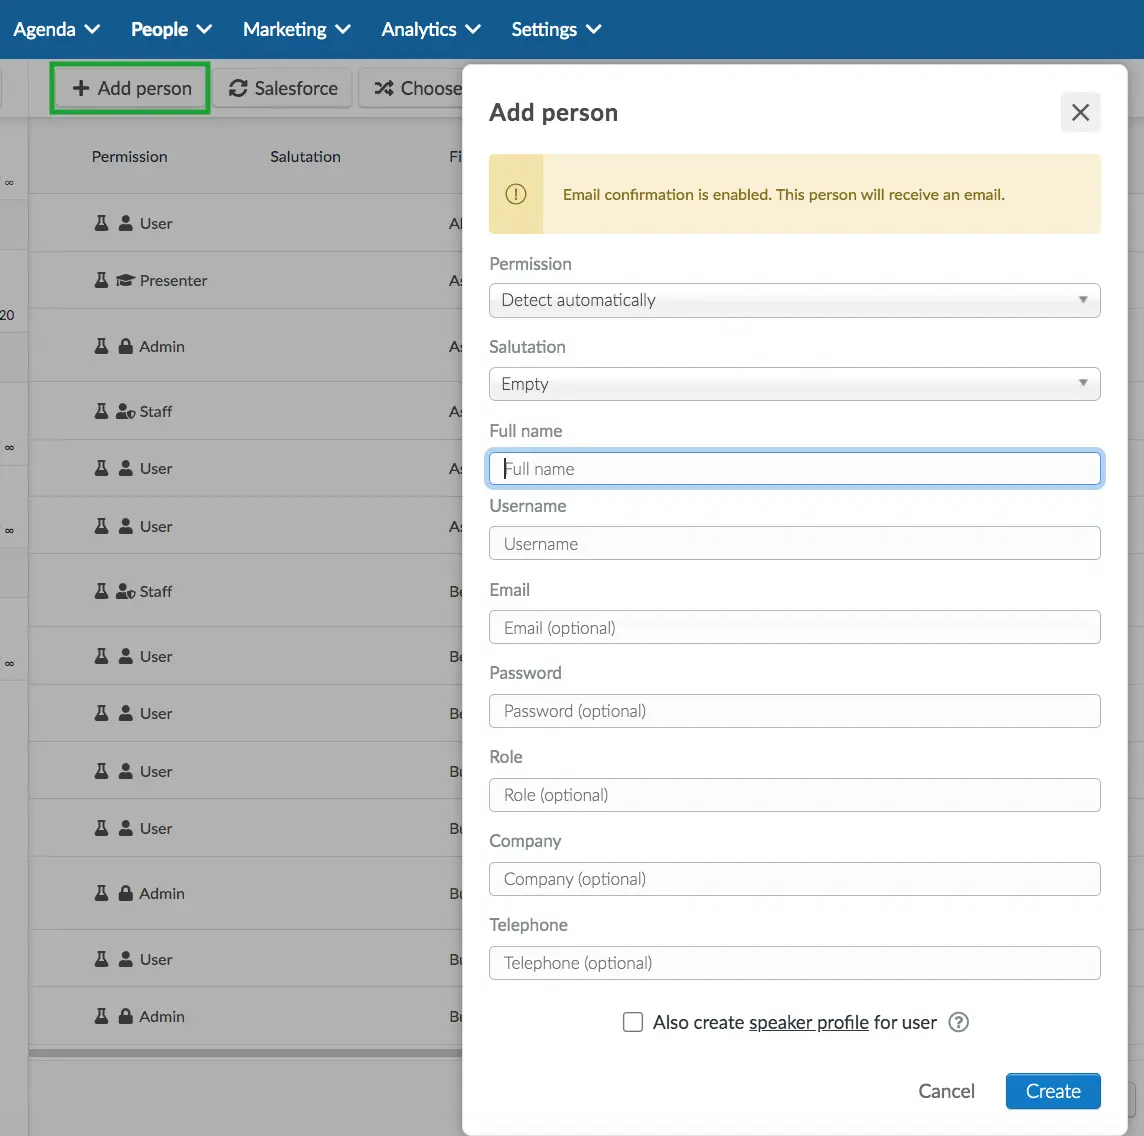
You can create a speaker profile for this new user if you select the box Also create speaker profile for user at the bottom of this window. To learn more about speakers, refer to the Speakers article.
Adding attendees via spreadsheet
The import spreadsheet tool allows event organizers to efficiently add a large volume of attendees onto the platform in one go. The spreadsheet encompasses detailed attendee information, including username, password, role, company, telephone, registration form custom fields, and more.
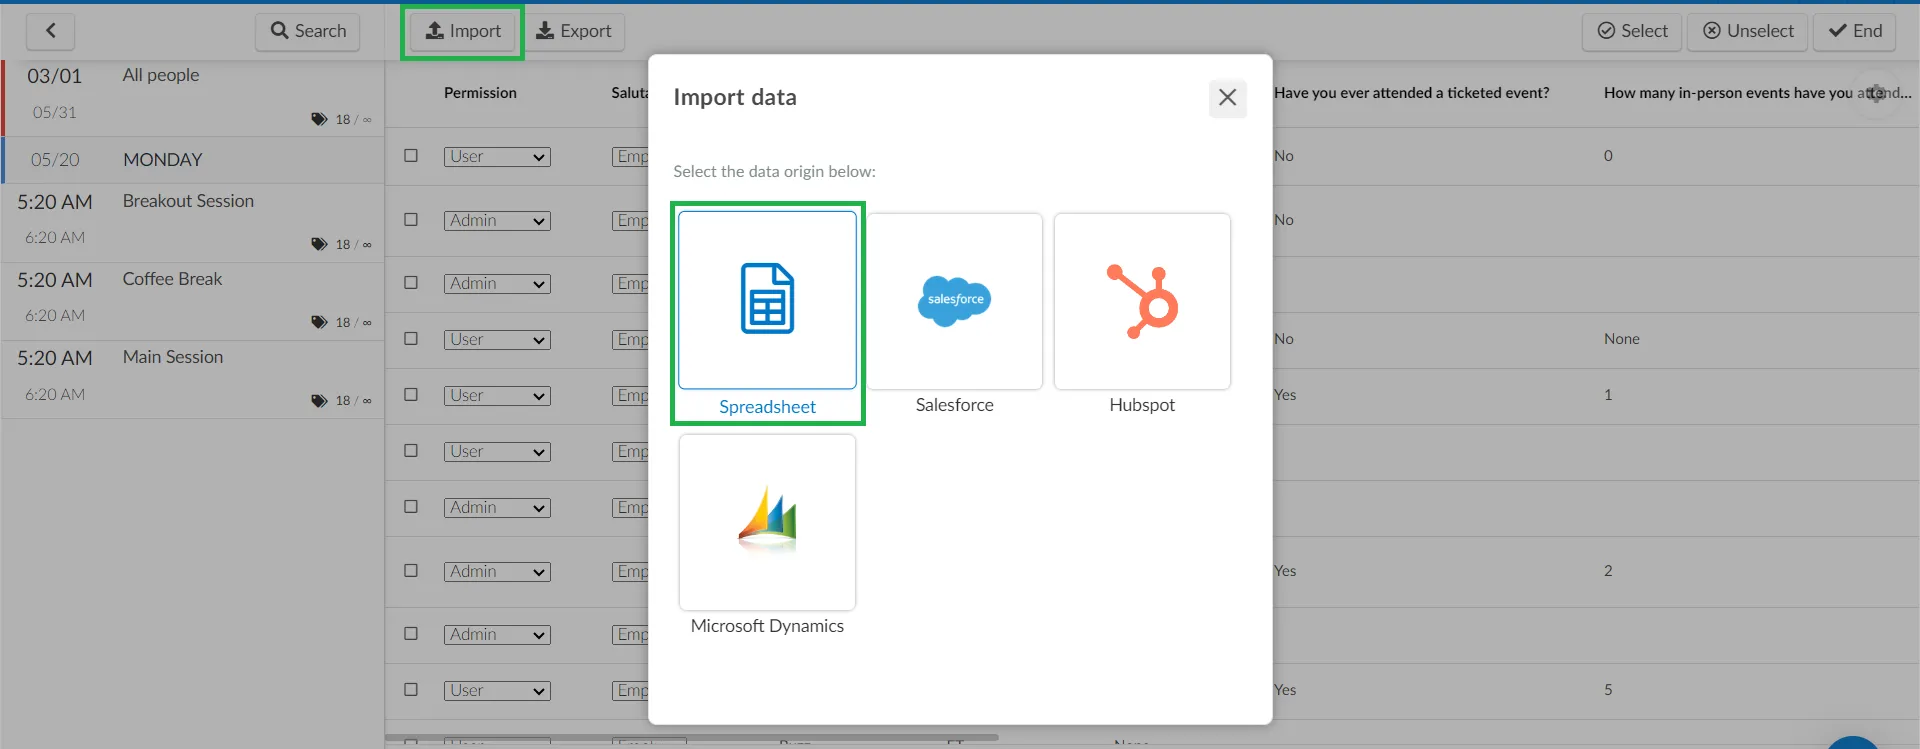
To use the Import feature, click on Edit > Import and select Spreadsheet as your data origin.
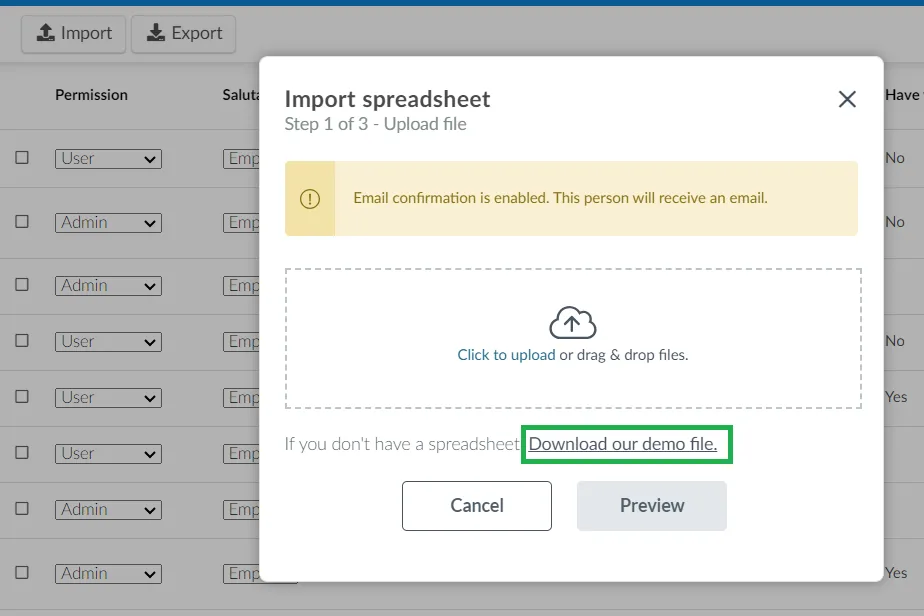
When importing attendee data, you can either utilize the demo file provided by InEvent or use your own pre-prepared spreadsheet. To use the demo file, simply click on the Download our demo file button.
The demo file contains the following columns:
Column | Description |
| FIrst name of the attendee. To be used with |
| Last name of the attendee. To be used with |
| Full name of the attendee, containing their first name and last name. To be used as a standalone name column, and not to be used with If an event's attendee list has firstName and/or lastName columns populated, and an attendee spreadsheet is then uploaded with the name column, the existing firstName and lastName columns may cease to be displayed. The columns can be returned by re-uploading the spreadsheet with the firstName and lastName columns correctly. |
| Identifying username of the attendee. If left blank, the username will be randomly generated. Attendees will be asked for their usernames when logging in to events. When using a randomly generated username, attendees may be encouraged to log in using their Magic link instead. |
| E-mail address of the attendee to receive event communications and e-mail notifications The e-mail address field is optional. InEvent follows international policies in order to guarantee the best solutions globally. Our policy determines that mailing lists with 5% or more rejection will be automatically blocked from our system. If you add various participants using invalid or unknown emails, send them emails, and the 5% bounce rate is reached, your email quota will be blocked. Refer to our article on E-mail health for more information. |
| E-mail address of the attendee's assistant |
| Password which will be used by the attendee to log in to the event |
| Attendee's role information |
| Attendee's company information |
| Summary or short description of the attendee |
| URL of attendee's profile image. The image must already be hosted by InEvent. |
| Privacy status of the attendee's profile. To set the profile to private, enter a value of |
| The language set for the attendee, in ISO 639. |
| Tag(s) associated with the attendee, split by semicolon |
| List(s) associated with the attendee, split by semicolon |
| Defines whether or not a Speaker profile should be created automatically for the attendee. To automatically create a Speaker profile for the attendee, enter a value of |
| Exclusive message that should be received by the attendee |
| Ticket identifier of the ticket that is assigned to the attendee. The ticket identifier information is available in the Tickets page. For more information, refer to the Ticket Management article. |
| Custom fields that have been created for the event. The accepted value may differ, depending on the fields' answer types. To learn more about Custom fields and answer types, refer our article: How to configure fields for forms. |
To import the spreadsheet into the InEvent platform, refer to our article on importing and exporting spreadsheets
Uploading a spreadsheet without password information
If you upload a spreadsheet with no password information, the platform will create random passwords for each attendee that was added to the event.
Once the upload is finished, if the confirmation email is enabled, an automatic email will be sent to the users with the event access information. The confirmation mail will contain the magic link with which users can access the Virtual Lobby and make changes to their password from the My account tab.
Importing spreadsheets and updating existing attendee information
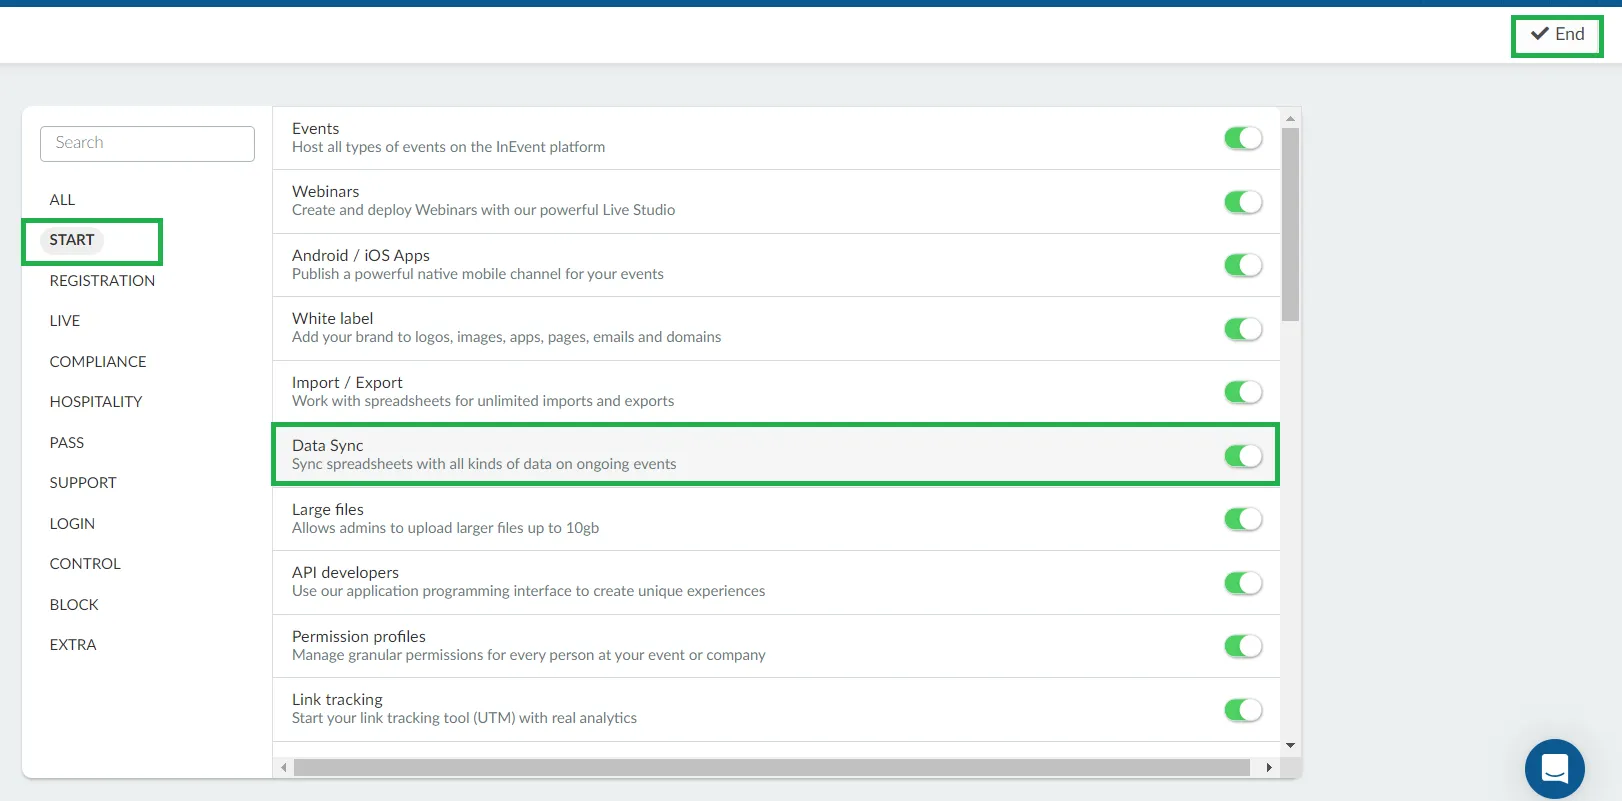
To update the data of attendees who are already enrolled, you need to have the feature Data Sync enabled on the event tools. To do so, go to Settings > Tools > Start section, press Edit, and locate Data Sync tool. Enable the tool by toggling on its corresponding button.
In this case, you must complete the user/email field in the standard spreadsheet, in the same way as previously registered. After that, complete the columns with the new information and upload it to the platform. It is possible to change all the information, except for username/email (when this is the login).
Importing attendees from CRMs
You can import attendees from CRMs such as HubSpot and Salesforce.
- Refer to the Integration with HubSpot article to learn how to import attendees from HubSpot.
- Refer to the Integration with Salesforce article to learn how to import attendees from Salesforce.
Editing attendee data
For more information on editing and further managing attendee data, refer to our Managing Attendees article.
Adding attendees to the event without e-mail address
If you do not have or cannot use the email address of your participants, you can register them by using a username. For further information, refer to our Usernames article.
Removing attendees from an event
Click on Edit > Select the checkbox next to that Attendee > Remove.

Exporting and downloading attendee reports
You can export and download attendee data reports at people > Attendees. The platform offers two modes for creating user data reports: Automated Report and Custom Report.
Automated reports
Automated reports are reports that have been tailored by InEvent and contains attendee information based on the category, in addition to general attendee information, such as the attendees' personal details, social media details, user tags, and status at the event. To extract an Automated report, follow the steps below:
- Click on the Edit button on the Attendees page.
- Click on the Export button. A pop-up box will be displayed, select Spreadsheet.
- Select one or more Automated reports you would like to extract using the toggle button under the Automated report tab. The available Automated reports are:
- System fields: This report contains predefined fields such as NFC, SalesforceID, and FacebookID associated with each attendee.
- Custom fields: This report contains your attendees' answers to custom questions on the Registration form.
- Hotel fields: This report contains your attendees' hotel details, such as hotel name, check-in and check-out dates, and booking number.
- User activities: This report shows all the activities the user has in their agenda.
- User assigned lists: This report contains the lists in which your attendees belong.
- User tickets: This report contains your attendees' ticket information, such as their available tickets, in-use tickets, on-hold tickets, other held tickets, and ticket giver.
- Magic links: This report contains your attendees' magic links. In addition, it also includes your attendees' hotel details, such as hotel name, check-in and check-out dates, and booking number.
- Click on the Generate button. A blue notification banner will be displayed at the top of the page. Once the spreadsheet is processed, it will be sent to your e-mail.
Custom reports
In the Custom Report section, admins can fully tailor the report by manually selecting the columns to be included. This flexibility allows for highly specific data exports based on organizational or event needs.
- Click on Edit at the Attendees page and then Export.
- A pop-up will appear, select Spreadsheet.
- Select Custom report tab from the new pop-up.
- Click on Add columns to include fields from various categories. The available categories are as follows:
- Standard fields: This category contains attendees' standard fields, such as personal information, business information, social media information, QR code, and magic link.
- Custom fields: This category contains the custom questions that have been added to your registration form.
- Tickets: This category contains your tickets' ID and name.
- Tickets questions: This category contains ticket related questions.
- Lists: This category contains your custom lists.
- Guests: This category contains attendees' guest information, such as name and email.
- Custom fields (Guests): This category allows you to display further specific guest-related information in custom reports.
- Event Feedback: This category will display feedback associated with the Event.
- Activity Feedback: This category will display feedback associated with a specific activity or if you wish to add all the activity feedbacks, you can use the Select all button, which will add all the activities feedback of the event.
- Polls: This category will display polls answer status.
- Quizz: This category will display quizz answer status.
- Activity check-in/check-out: This category will display checklog status of the selected activities.
- Check the box(es) next to the information you want to generate a report of. The column will automatically be added to the report preview.
- Click on the Generate button. A blue notification banner will be displayed at the top of the page. Once the spreadsheet is processed, it will be sent to your e-mail.
After completing the steps above, you will find your Custom report showing only the columns you selected.
Recurring report
You can set up recurring reports to automate the generation of your reports and have them sent to your email. This allows you to select or create a time interval for generating reports automatically. To know more, refer to our Managing Attendees article.