Headings
 Updated 1 month ago
by
Caleb Kotey
Updated 1 month ago
by
Caleb Kotey
You can personalize the user experience in your event from the first contact they will have until the last impression while using our platform! The standard message, fields and buttons on the forms, on the app, on the event's agenda, and even on the Virtual Lobby, all these values can be tailor-made to make your event special.
Company level
With the company headings, you can personalize your standard message and fields and these values will be made default for all events created within your company.
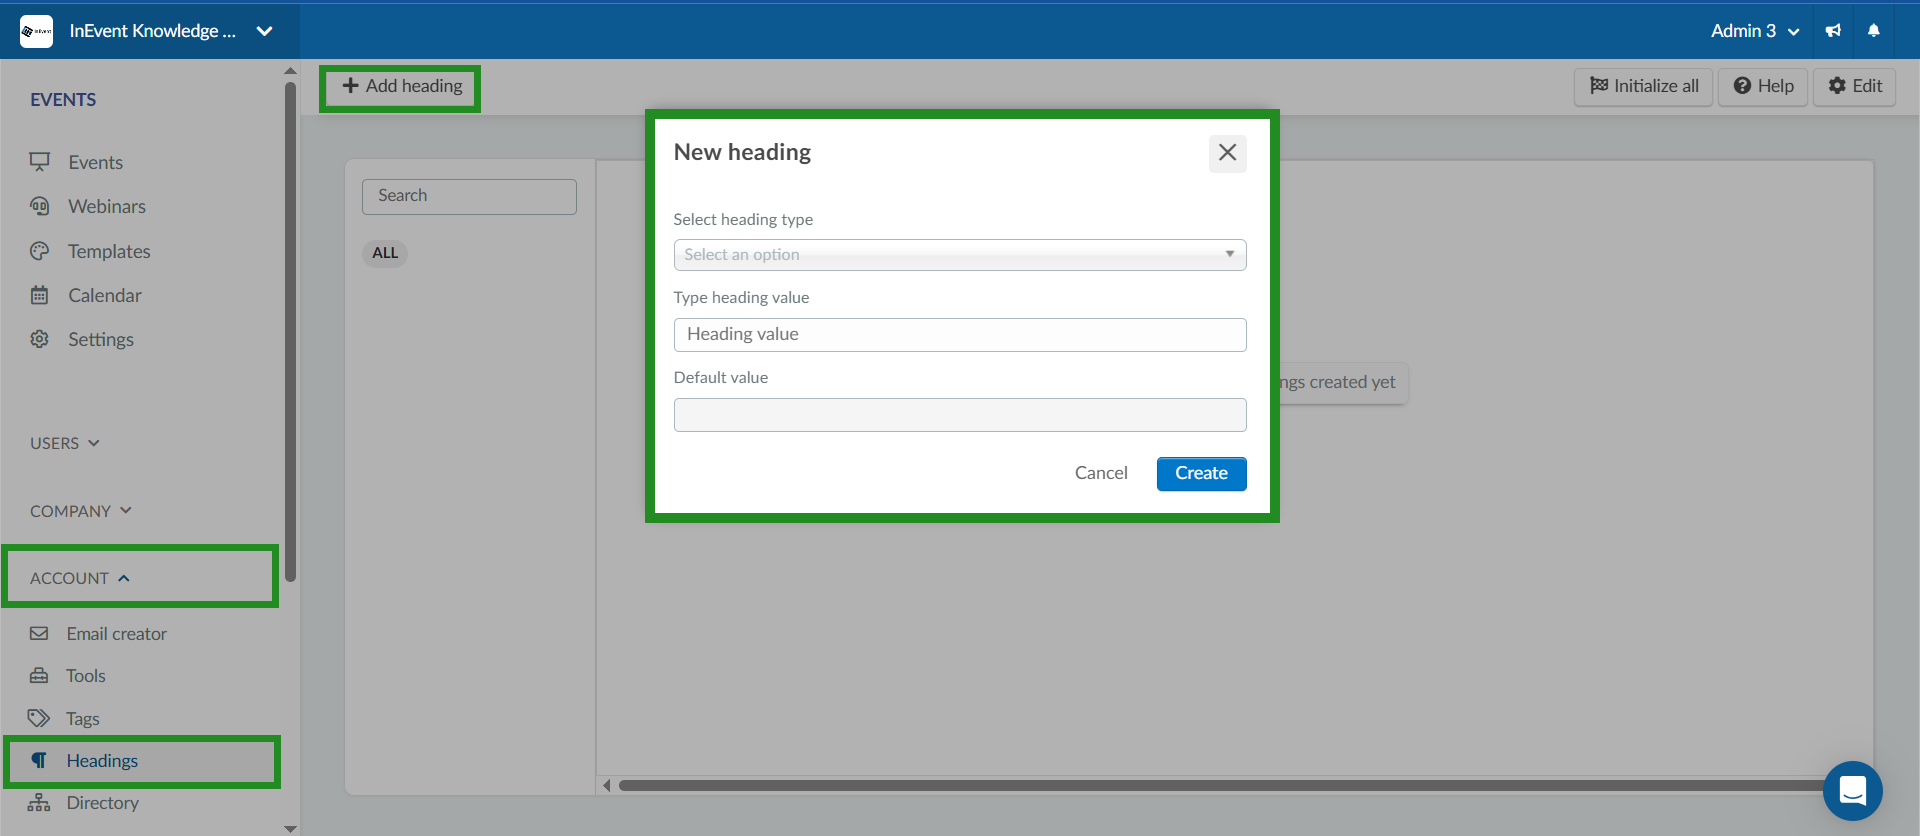
Adding company headings
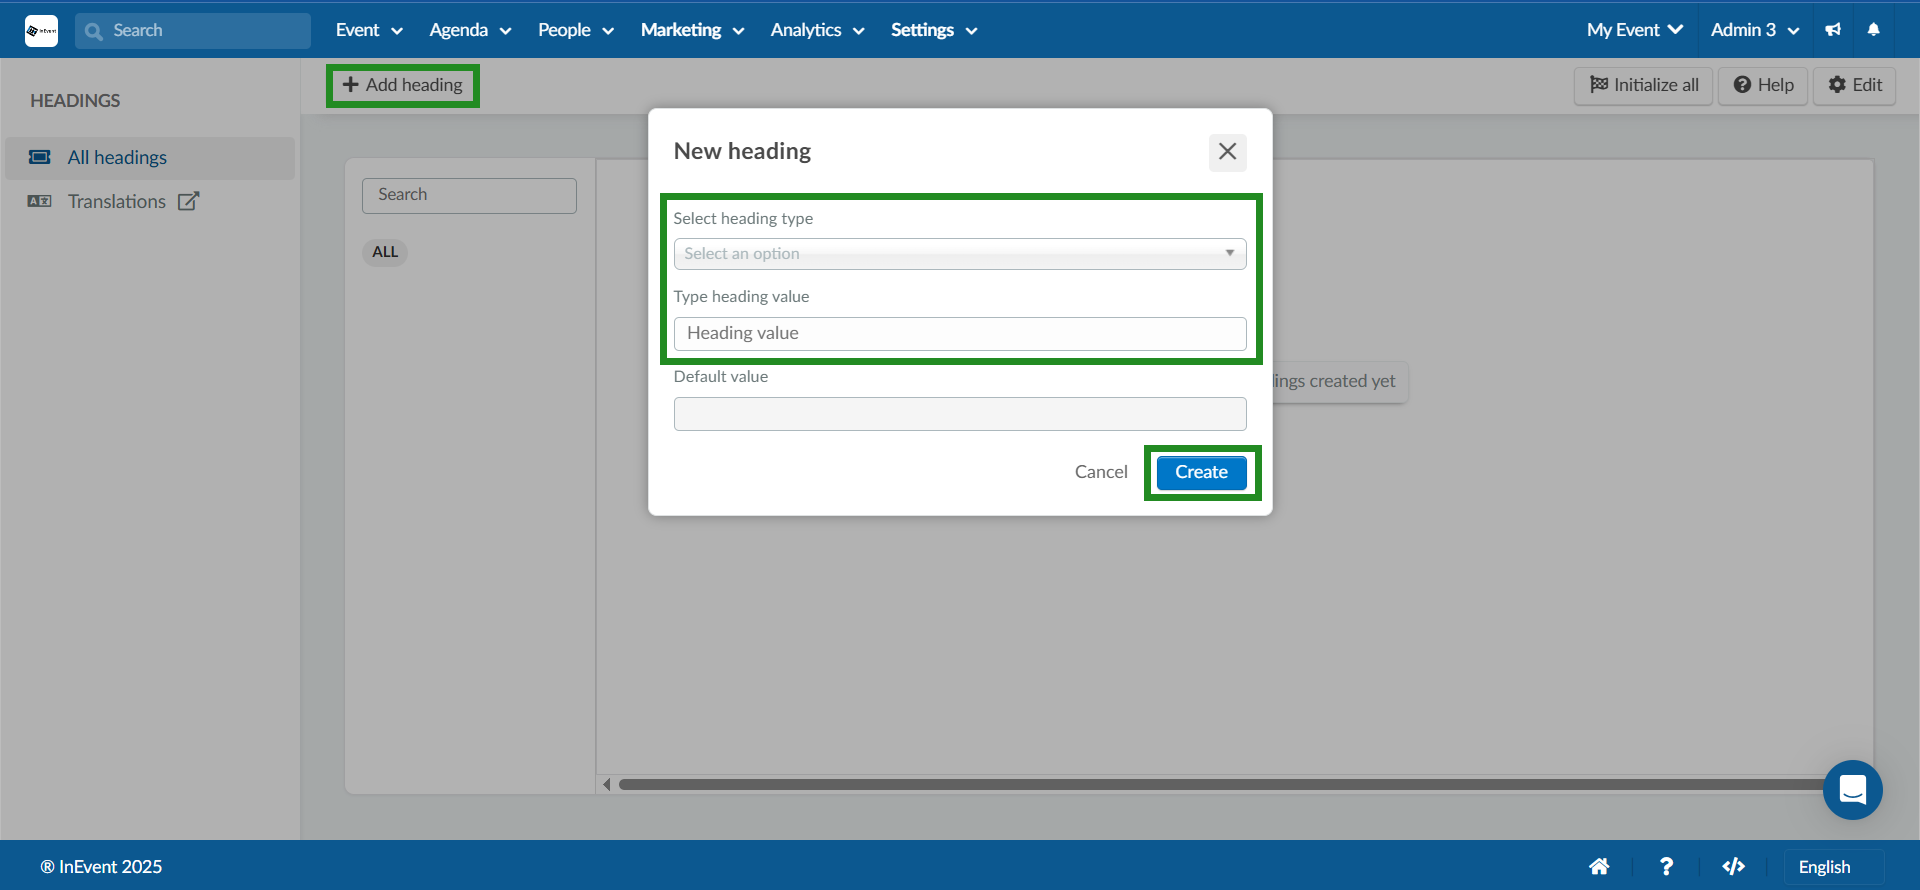
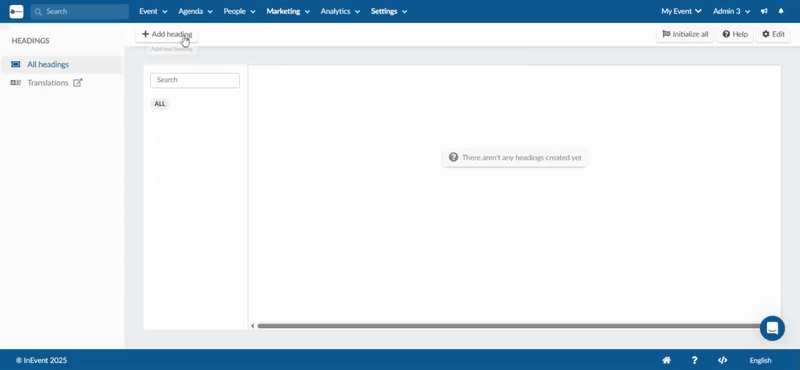
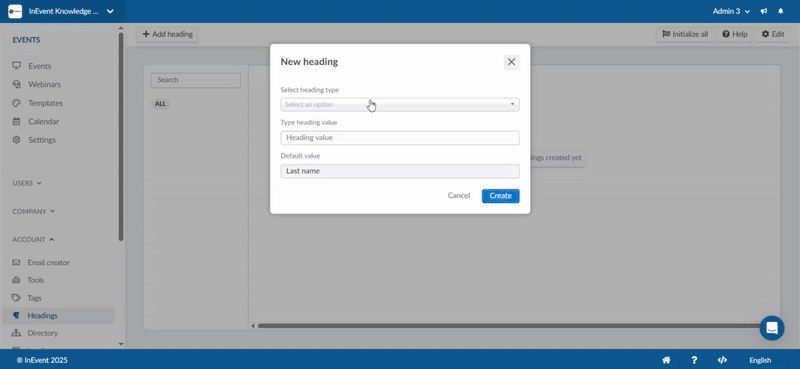
Follow the steps below to add company headings:
- Navigate to Account > Headings from the Company level.
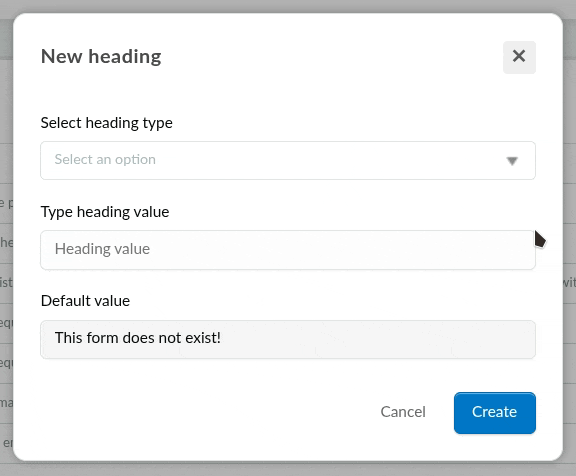
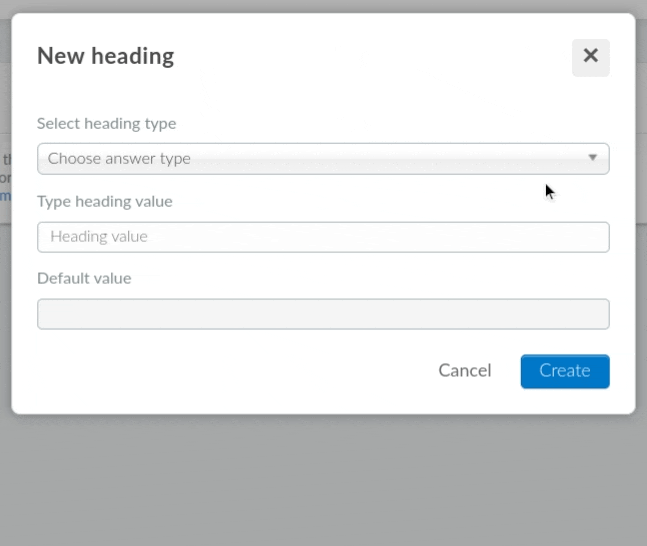
- Press the +Add heading button. The New heading pop-up box will be displayed.
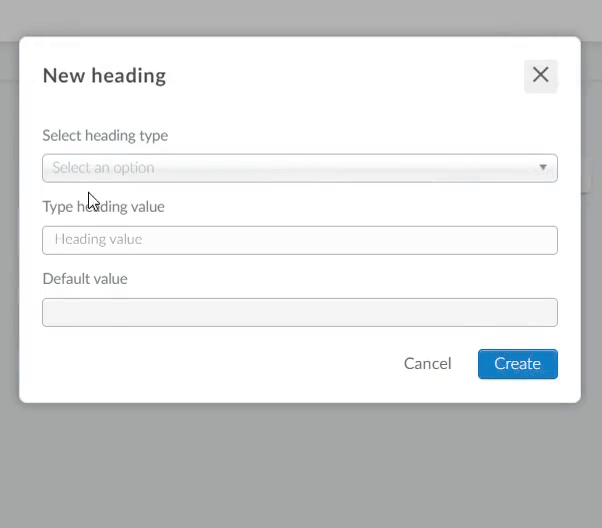
- Select the heading you would like to change using the Select heading type drop-down box.
- Enter the new value to replace the default value in the Type heading value field.
- Press Create.
Editable company headings
At the Company level, you can personalize the placeholders that will be shown on Registration forms, App, Event booking forms, Custom forms and Membership forms. Editing headings from the Company level will affect the headings of all events within the same company.
Forms
You can edit headings related to the following forms:
- Registration form, inclusive of the RSVP form.
- Custom forms such as Terms of Service, Confirm button, Success.
- Membership forms such as Terms of Service, Label Already a Member.
- Booking forms such as Event name, Time zone, Start date, End date, Terms of service.
Editing form headings at the Company level will affect the related headings of all events within the same company.
For faster results when searching for forms, type the following keywords in the search box:
- Booking for headings related to booking form.
- Membership for headings related to membership form
- Custom for headings related to custom form.
App
You can edit headings related to the mobile app such as App - Login name, Login username, Login password, App Download - Title, etc.
Editing and removing company headings
To remove a heading you have created simply click on the Edit button and then select the heading you wish to delete and press Remove.
To modify the headings, click on the heading to open a new window on the right and then press Edit to make the changes. You can change the heading Type using the drop-down box and edit the heading Value using the text field. Click End when you are done.
Below is a GIF showing both options:

Initialize all headings
The Initialize all button essentially generates every heading type with its default value in one central location, organized into their respective groups. This feature streamlines the setup process by organizing each heading into its respective group category, which will appear in the side menu under the search bar. To initialize all heading types follow these steps:
- Navigate to Account > Headings from the Company level.
- Click on the Initialize all button. A pop-up window will appear where you can confirm if you want to Initialize all headings by entering I UNDERSTAND.
- Click on the blue Initialize button to finish.
Event level
At the event level you can customize the headings for specific events.
Adding event headings
Follow the steps below to add event headings:
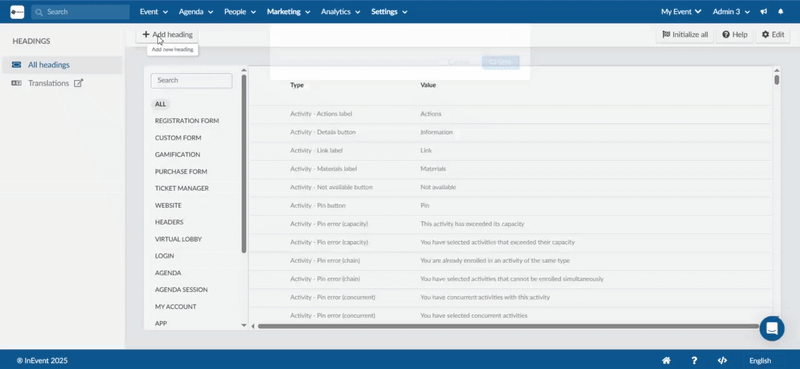
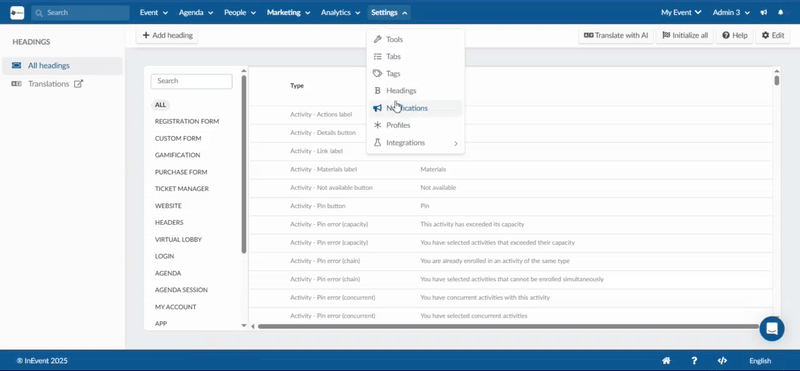
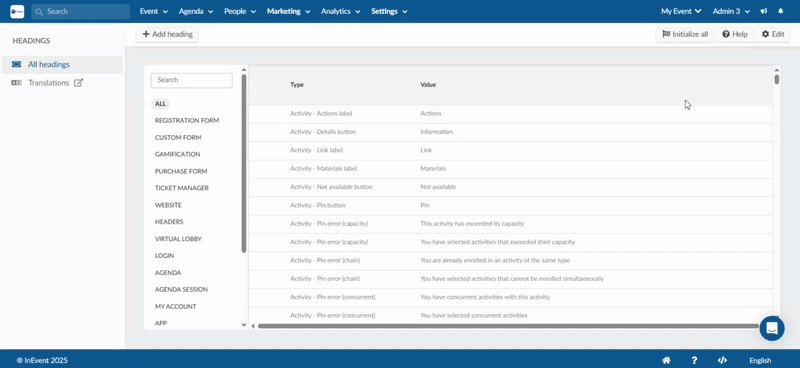
- Navigate to Settings > Headings or Marketing > Registration > Headings from the Event level.
- Press the +Add heading button. The New heading pop-up box will be displayed.
- Select the heading you would like to change using the Select heading type drop-down box.
- Enter the new value to replace the default value in the Type heading value field.
- Press Create.
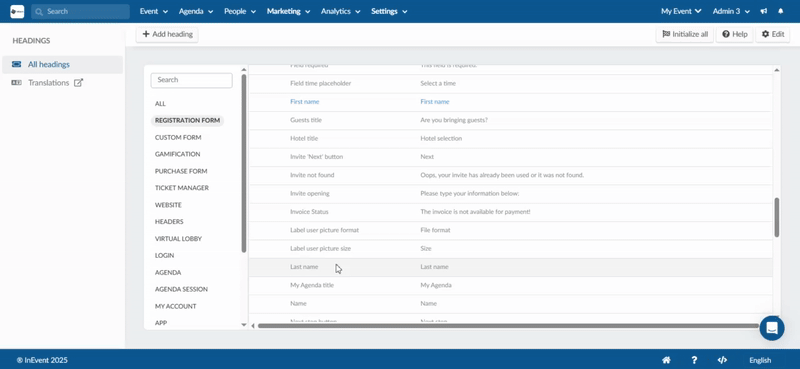
Once you have added headings it will be displayed in its respective categories under the search bar on the headings page. Below is an example of how the category is automatically created after adding a heading related to the registration form and another heading related to the agenda sessions in the event.
Editable event headings
There are several options to personalize the Forms, Purchase form, Activity, Agenda, My Account, My Photos App, Gamification and the Virtual Lobby.
Forms
You can edit headings related to the Registration form, including RSVP form, Purchase form, and Custom forms (Terms of Service, Confirm button, Success). Editing Form headings at the event level will affect the headings at that event only.
Form heading options related to Registration form and Custom forms are the same at the Company and Event levels.
- Labels and buttons
You can find several options to customize the labels and buttons on the Form.
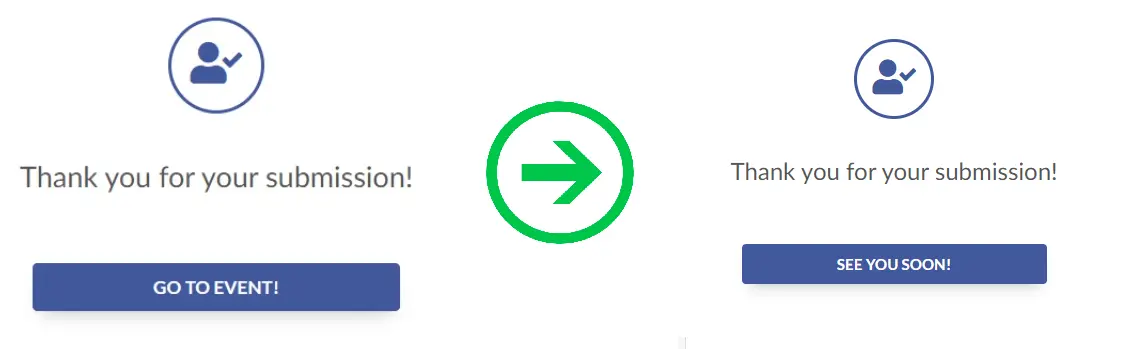
- The option to personalize the 'Go to event' button that appears when the user completes the form can be very useful. One example is to make it looks like there is nothing to be clicked:
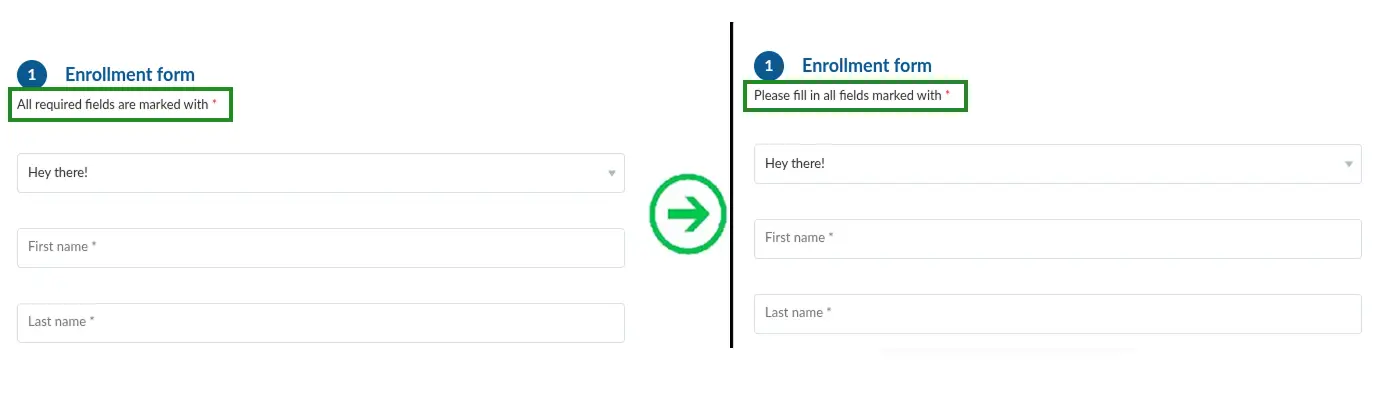
- The option to personalize the 'All required fields are marked with' label that appears before the user fills in the registration form:
- Option to modify the 'Loading, please wait' label shown upon loading the registration form page

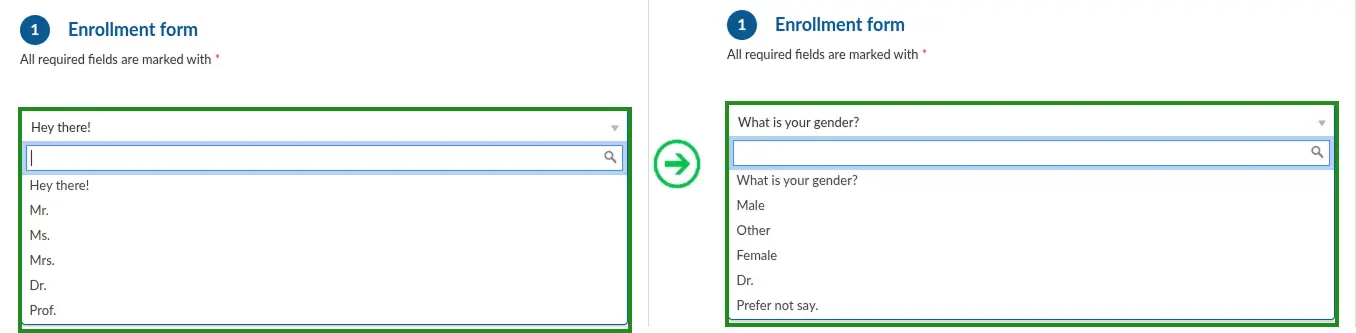
- Option to modify the salutation and salutation options label shown in the drop-down list
- Option to customize the 'Select all options' label displayed when users are required to choose multiple answers:

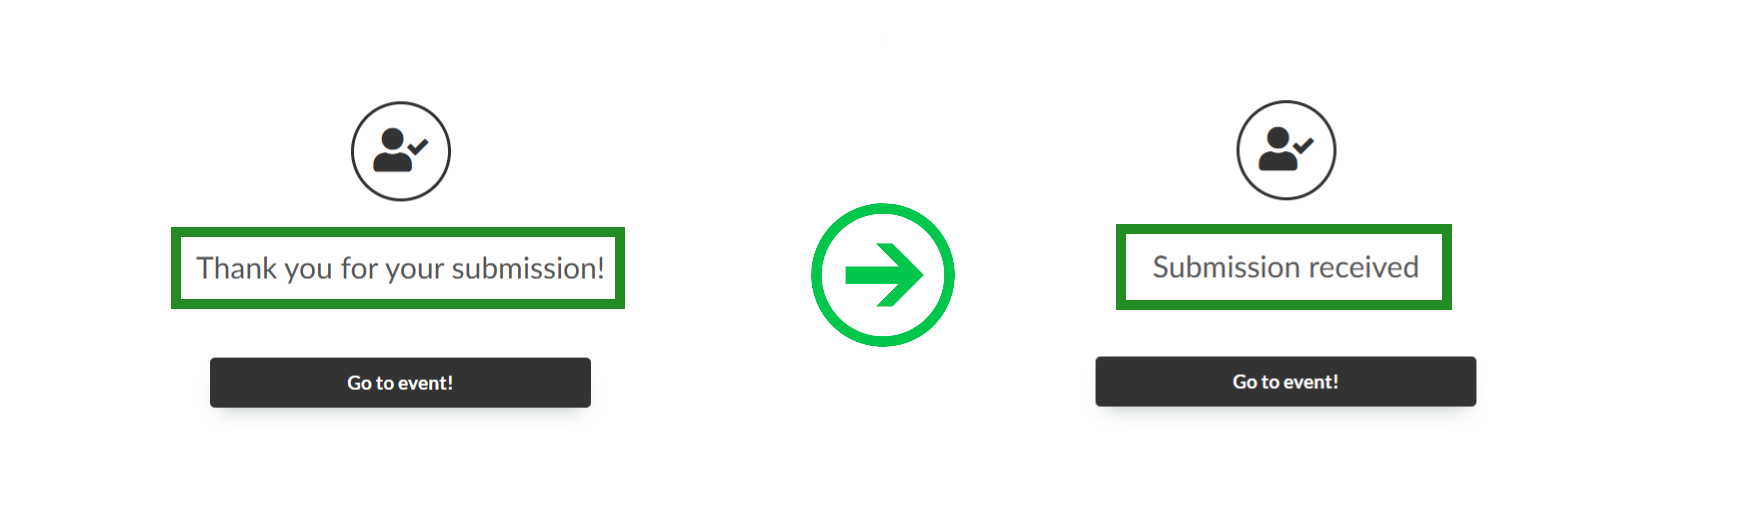
- The option to personalize the 'Thank you for your submission' label that appears when the user completes the registration form:
- The option to customize labels and buttons on RSVP forms as seen below:
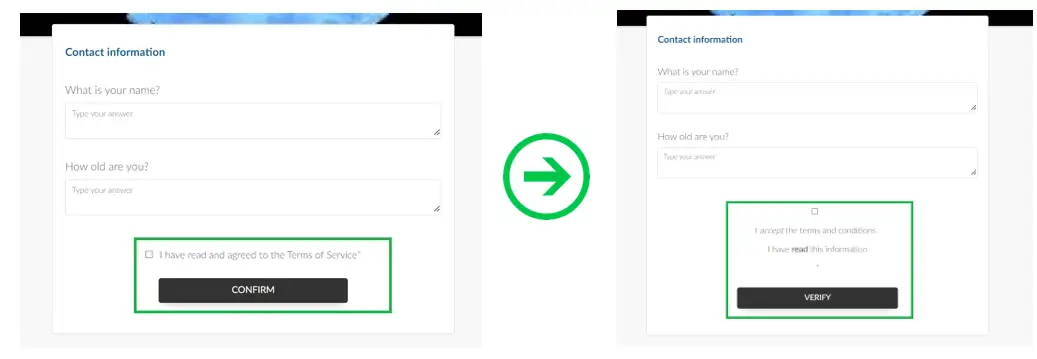
- The option to customize labels and buttons on Custom forms as seen below:
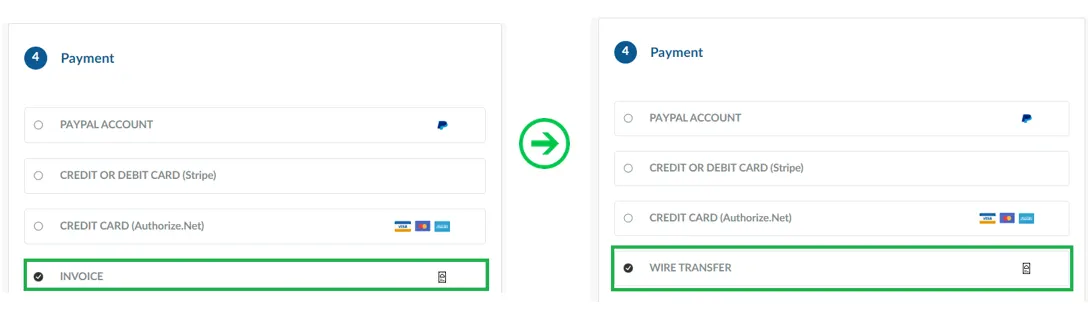
- The option to customize the Invoice label.
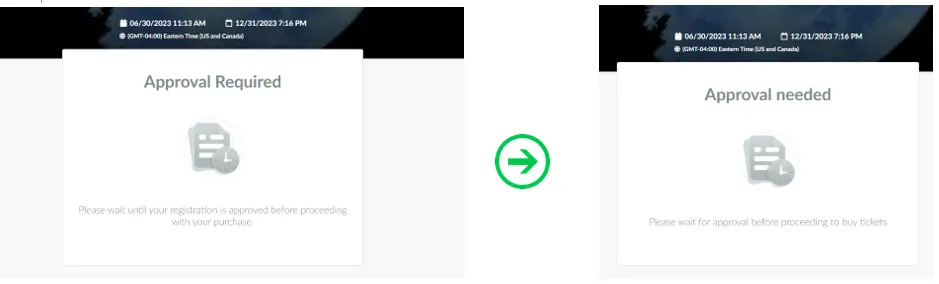
- The option to customize the message when an Applicant is waiting for approval before purchasing tickets.
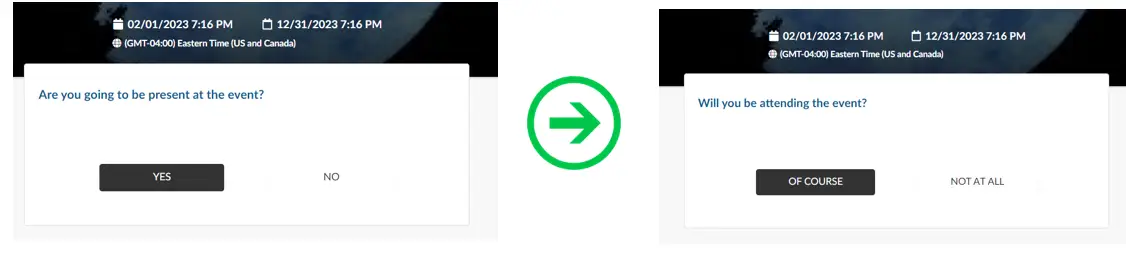
- Questions
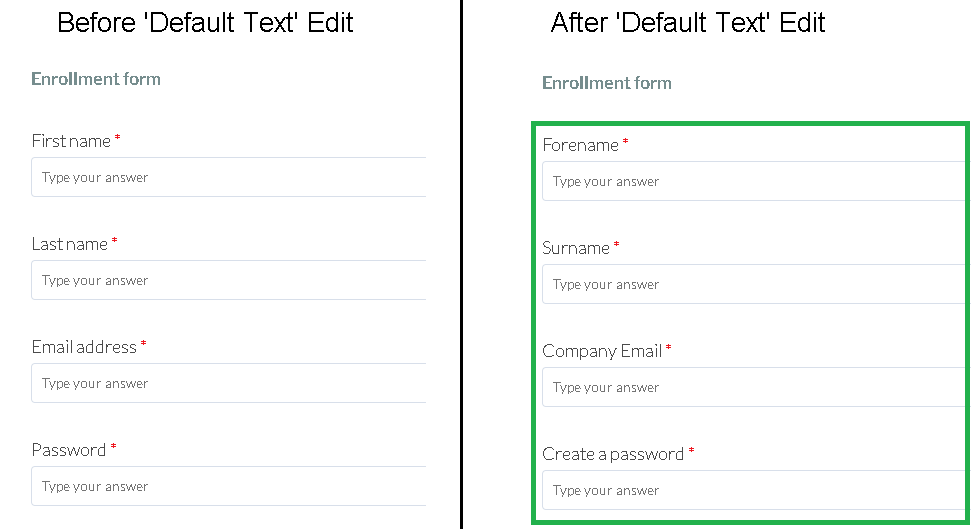
The Registration Form solution has previously defined text for the mandatory questions. You can change the standard questions as described in the Registration Form or change them in the Default Text screen along with the other messages.
Below is an example of "before and after" image of the registration form questions, edited using the Default text.
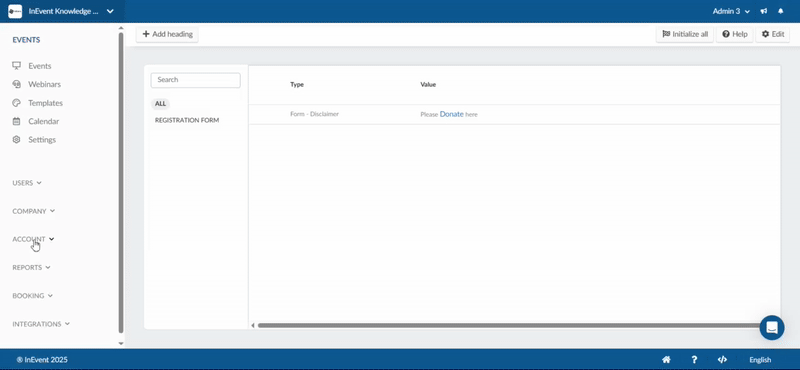
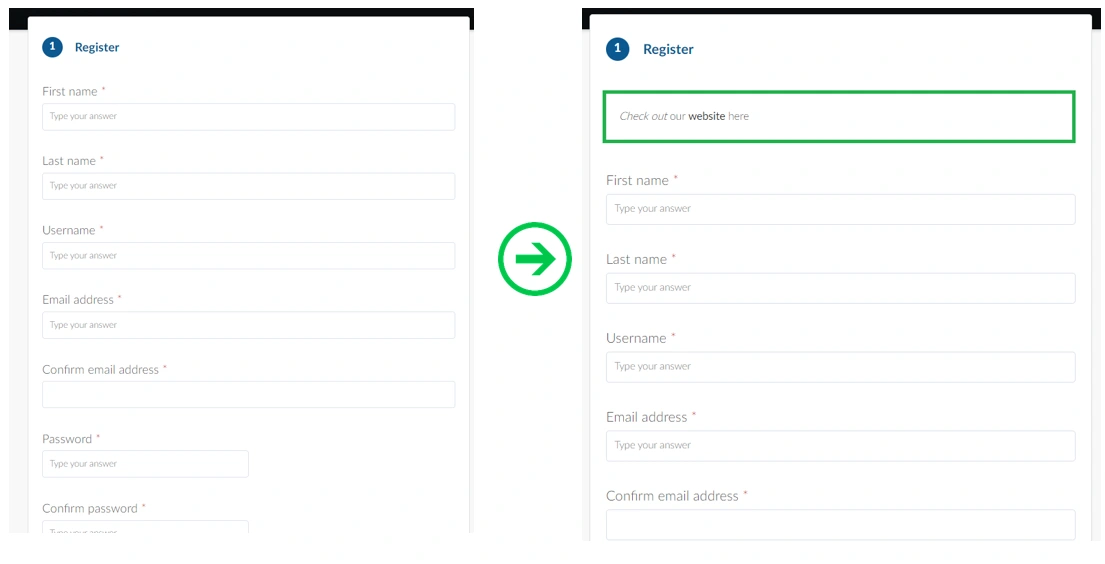
- Adding a link to the Form
- Form - Disclaimer : To add a Form - Disclaimer link to the registration form follow these steps:
- From the Select heading type dropdown, select Form - Disclaimer.
- Enter the disclaimer in the Type heading value text box.
- Highlight the specific part(s) of the heading values you wish to hyperlink and click on the Insert/edit link icon.
- A new window will appear where you can paste the link, add a title, and choose whether the link should open in the current window or a new window.
You can add more than one hyperlink.- If you select new window, it will open in a new tab.
- If you select current window, the form page will be redirected to the page link.
You can also format the heading values using options like bold, italicize, add source codes, or clear formatting using the related icons provided in the text box.- Click Save and then Create to finalize your changes.
Below is an example of the Registration form before and after adding the Form- Disclaimer heading.
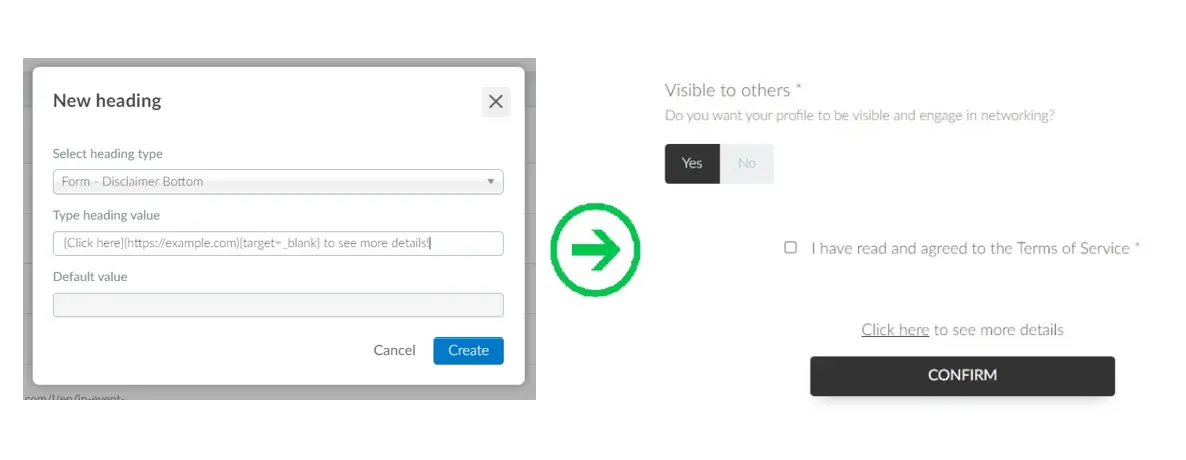
- Form - Disclaimer Bottom: To add a link at the bottom of the registration form. Under Type heading value, you should add the Markdown support as shown in the image below. Example:
[Click here](https://example.com){target=_blank} to see more details.
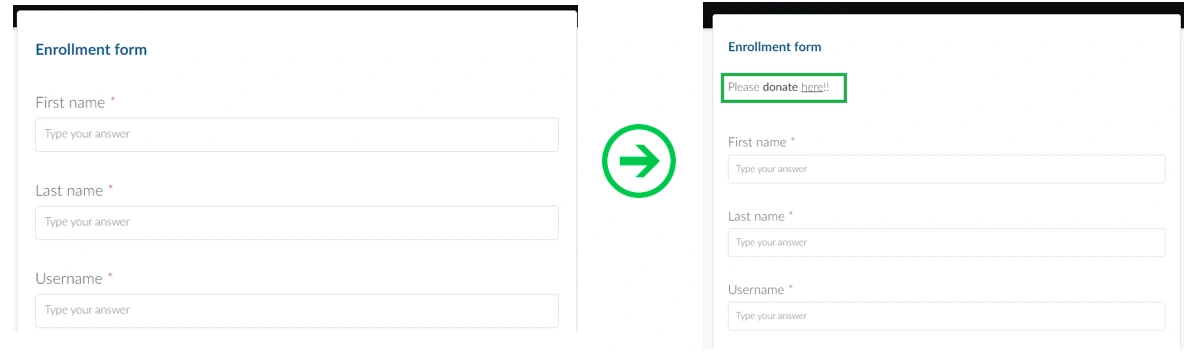
- Purchase - Register disclaimer: To add a link to the purchase form, follow the steps given here. Below is an example of the Purchase form before and after adding the Purchase - Register Disclaimer heading.
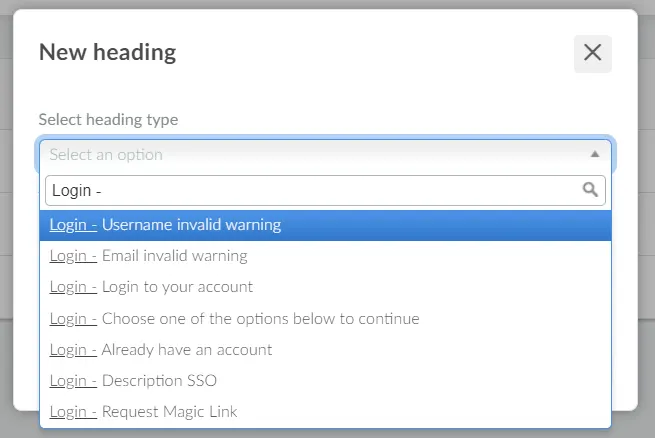
Login
For the login page, there are few options to change the default text. A very functional example would be customizing the 'Request Magic Link' button to login at the InEvent platform as company administrators.
App
You can edit headings related to the mobile app such as App - Login name, Login username, Login password, App Download - Title, etc.

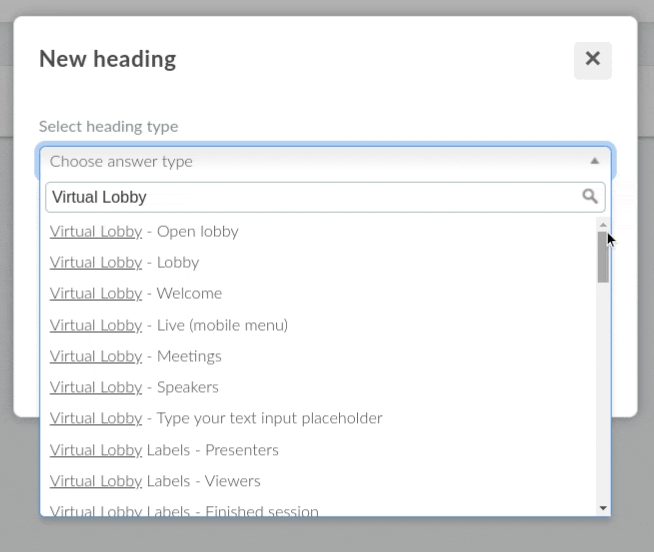
Virtual Lobby
The options to change the Virtual Lobby's label and buttons can be done via Headings.
- Networking space
When the networking space has no active users, the following default headings will be displayed on the screen:
- The networking lobby is empty.
- You will be notified when a new user joins the lobby.
These messages inform attendees that the space is currently unoccupied and that they’ll receive a notification when someone joins. If you wish to customize the messages in your networking space, you should select either:
- Virtual Lobby - Networking lobby is empty
- Virtual Lobby Labels - Notify when users join the virtual lobby
Below is how the change will appear in the Networking Space when no users are currently present, with the default headings on the left and your customized values on the right

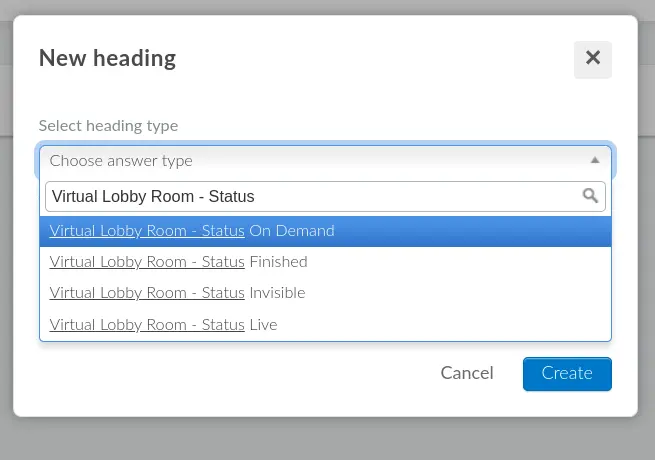
- Room status label
Depending on its room video mode, settings, start and end time, each room will display a status tile in its upper left corner.
The existing status are: On Demand, Live, Finished and Invisible.
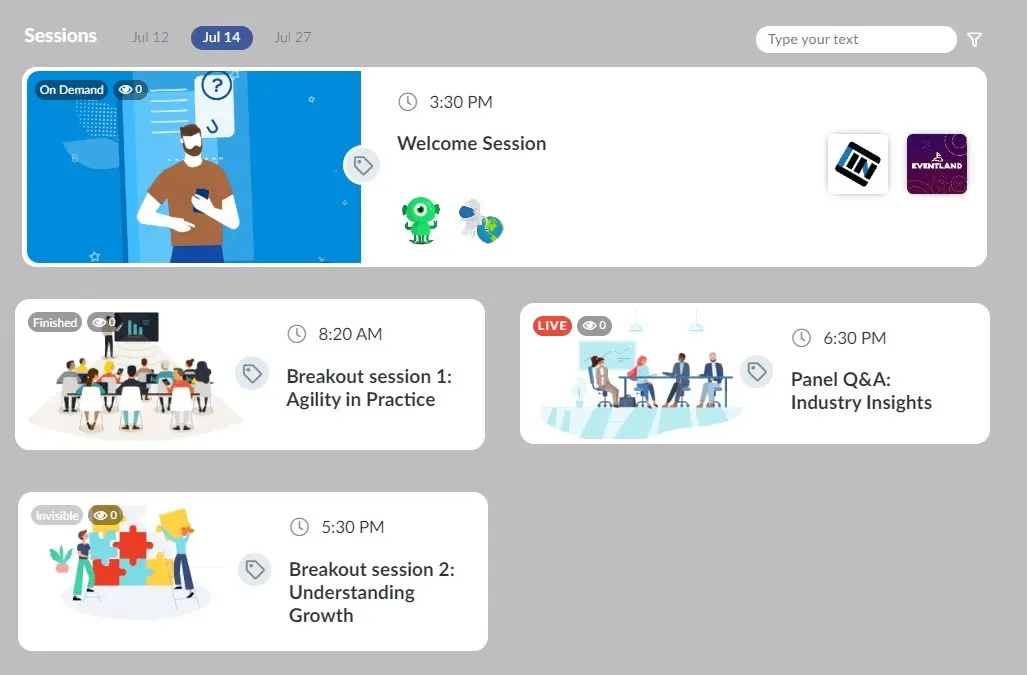
If you wish to customize the room status label, under Select heading type you should select either:
- Virtual Lobby Room - Status On Demand
- Virtual Lobby Room - Status Finished
- Virtual Lobby Room - Status Invisible
- Virtual Lobby Room - Status Live
You can also manually change each room label status. Refer to the Setting up your online activities article for further information.
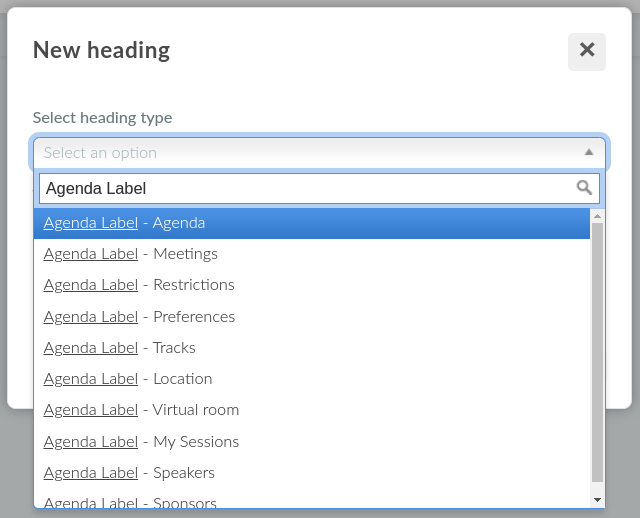
- My Agenda
Agenda labels are found on the My Agenda page.
You can change the text of the following items on the My Agenda page:
- Agenda Label - Agenda
- Agenda Label - Meetings
- Agenda Label - Restrictions
- Agenda Label - Preferences
- Agenda Label - Tracks
- Agenda Label - Location
- Agenda Label - Virtual room
- Agenda Label - My Sessions
- Agenda Label - Speakers
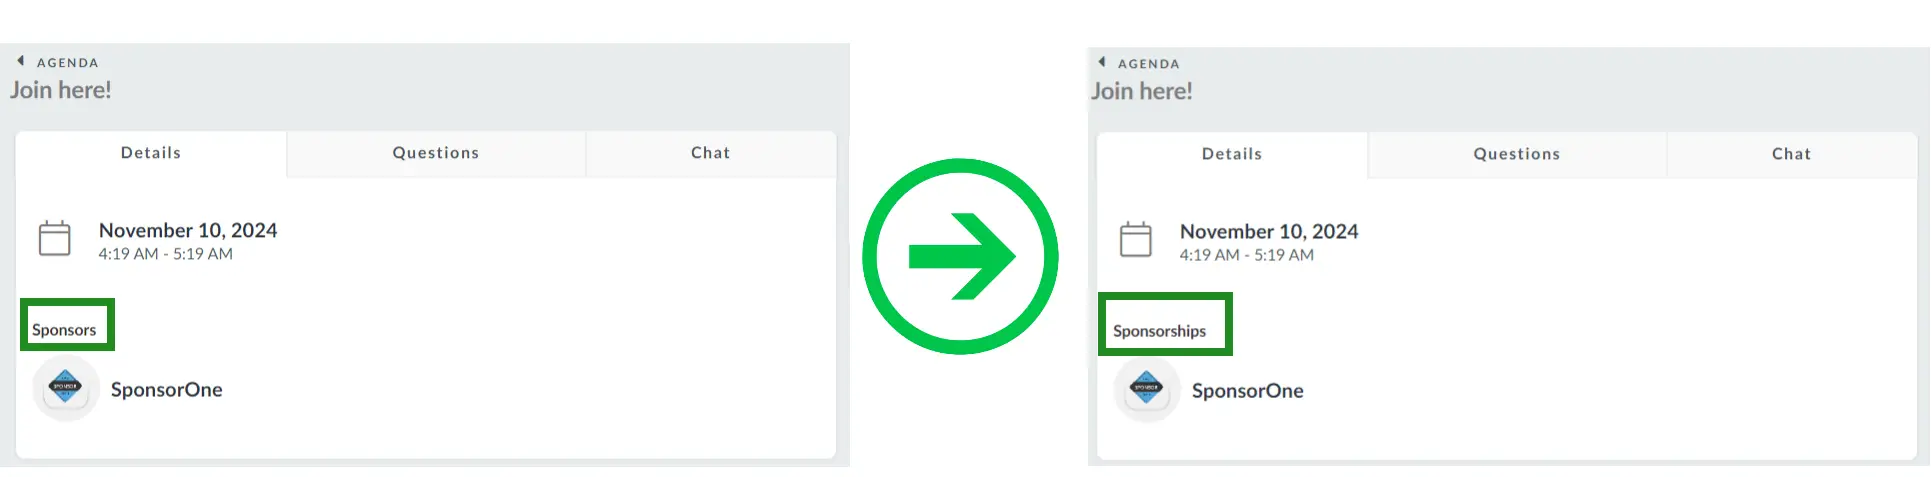
- Agenda Label - Sponsors
Below is how the change will look like on the Agenda tab inside the activity, with the default Agenda label - Sponsors heading value on the left and the edited value Sponsorships on the right.
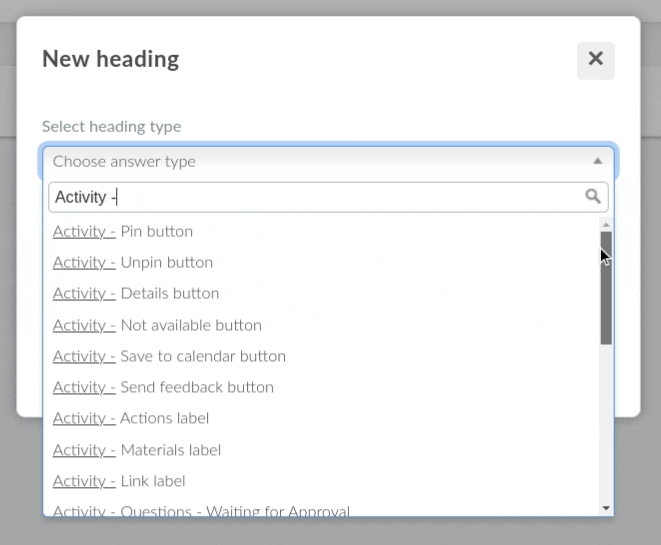
- Activities
There are many possibilities for customizing the Text of the activities. Here are some of the most used Headings to change the attendees' agenda buttons in the application:
- Activity - Registration button: When the activity registration is not automatic (to know more, see Agenda Management) the participant must click this button to be linked to the activity.
- Activity - Dismiss button: Necessary for the participant to withdraw from the activity in which they are enrolled. For Calendar Block in events, found in (Event tools). This button will have no textual content.
- Activity - Detail button: You can click on it to view more activity information, submit questions, and download materials.
- Activity - Not Available button: This term will appear in the activity card in the My Agenda tab if there are no more vacancies, if the activity is part of a chain, or if there are simultaneous activities and the concurrent schedule tool is disabled.
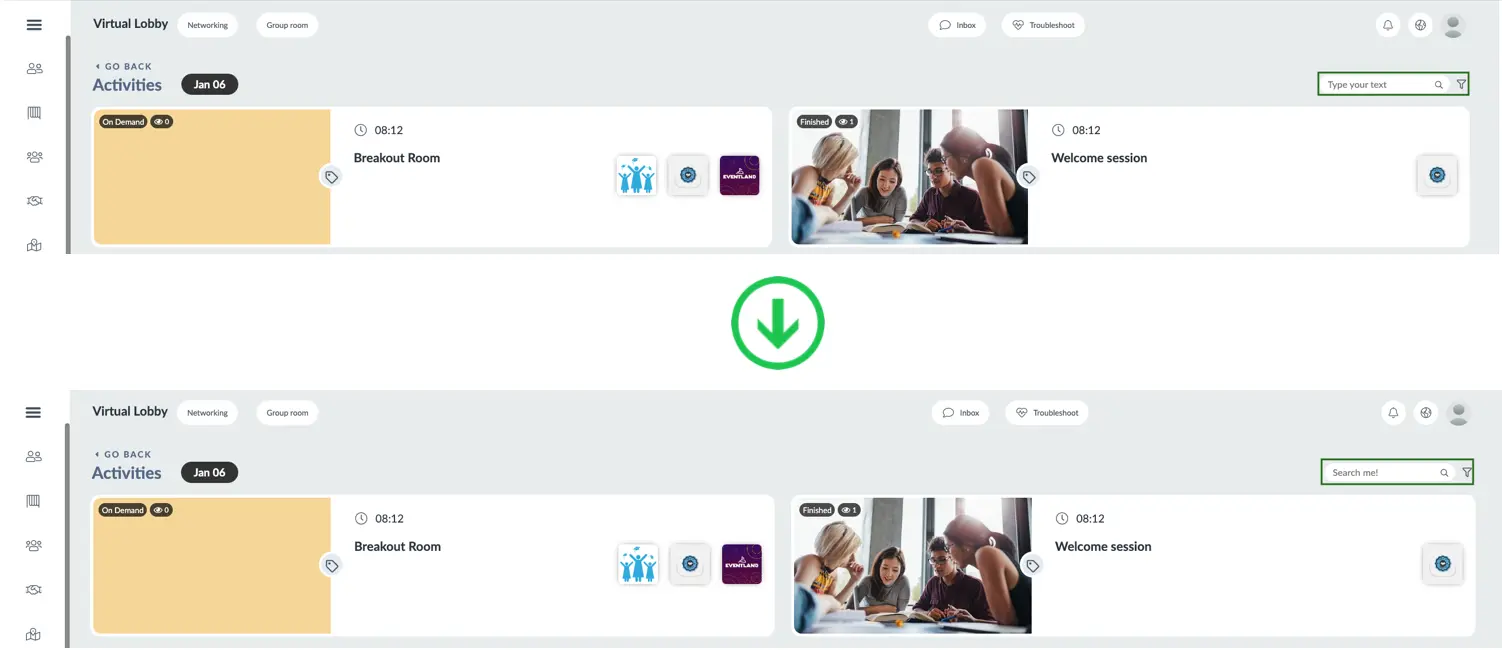
Additionally, you can change the text which appears in the search box of the Activities page in the Virtual Lobby of the Web app by changing the value of the heading Virtual Lobby - Type your text input placeholder.
- My Account
You can customize the headings and labels on the My Account page to better suit your preference. Below is a list of headings available for personalization on the My Account page
- Form - Phone
- Form - Edit button
- Form - Field placeholder
- Form - First name
- Form - Tags
- Form - Summary
- My Account Button - Upload File
- Form - RSVP No answer
- Form - Field option placeholder
- Event Map
You can customize the headings and labels displayed on your event map to better match your event’s needs. Below is a list of the headings available for personalization on the event map.
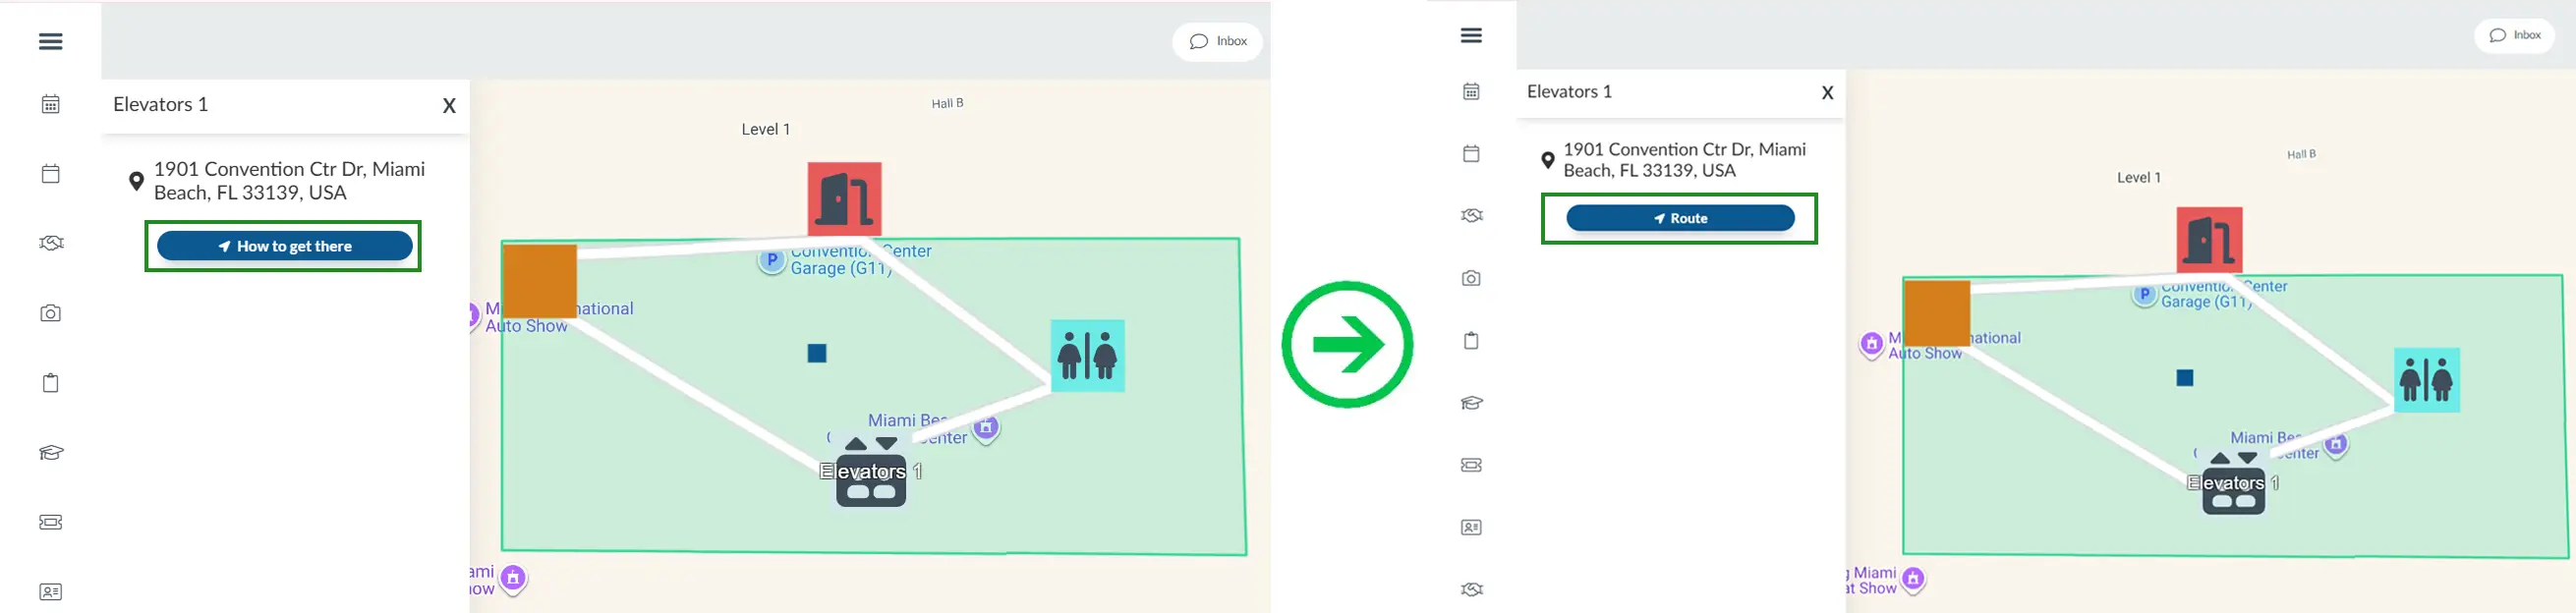
- Virtual Lobby - Event map 'How to get there'
- Virtual Lobby - Event map search
Below is how the change will look like in your event map;
Website
You can edit the heading values for the buttons, labels, and text that appear on the Website.
Below is how the change will look like on the Website, with the default Website Texts - The event has started heading value on the left and the edited value on the right.

Below is an example of the default Website Labels - Tags heading value on the left and the edited value on the right.

Email Subscription
You can modify the heading, button labels, and text that appear on the Unsubscribe confirmation page when attendees choose to opt out of receiving emails from a specific sender.
You can change the text of the following items:
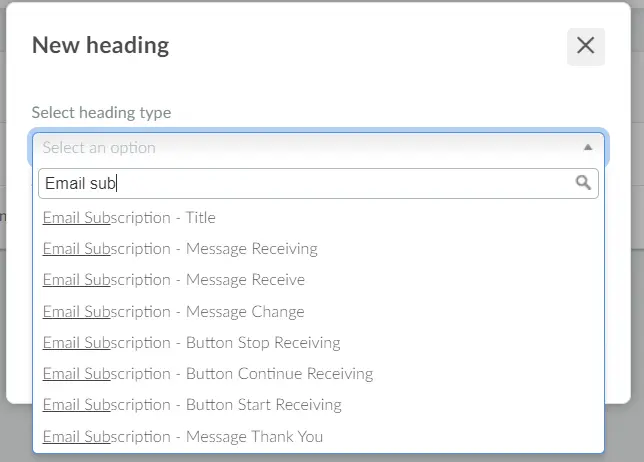
- Email Subscription - Title: This option allows you to edit the title of the confirmation message.
- Email Subscription - Message Receiving: Edit the default paragraph for the message when attendees choose to unsubscribe.
- Email Subscription - Message Receive: Edit the default paragraph for the message when attendees choose to re-subscribe.
- Email Subscription - Message Change: Edit the default paragraph for the message.
- Email Subscription - Button Stop Receiving: Edit the text on the default Stop Receiving button.
- Email Subscription - Button Continue Receiving: Edit the text on the Continue Receiving button.
- Email Subscription - Button Start Receiving: Edit the text on the Start Receiving button when attendees choose to re-subscribe to the email list.
- Email Subscription - Message Thank You: Edit the feedback message displayed after confirming unsubscription.
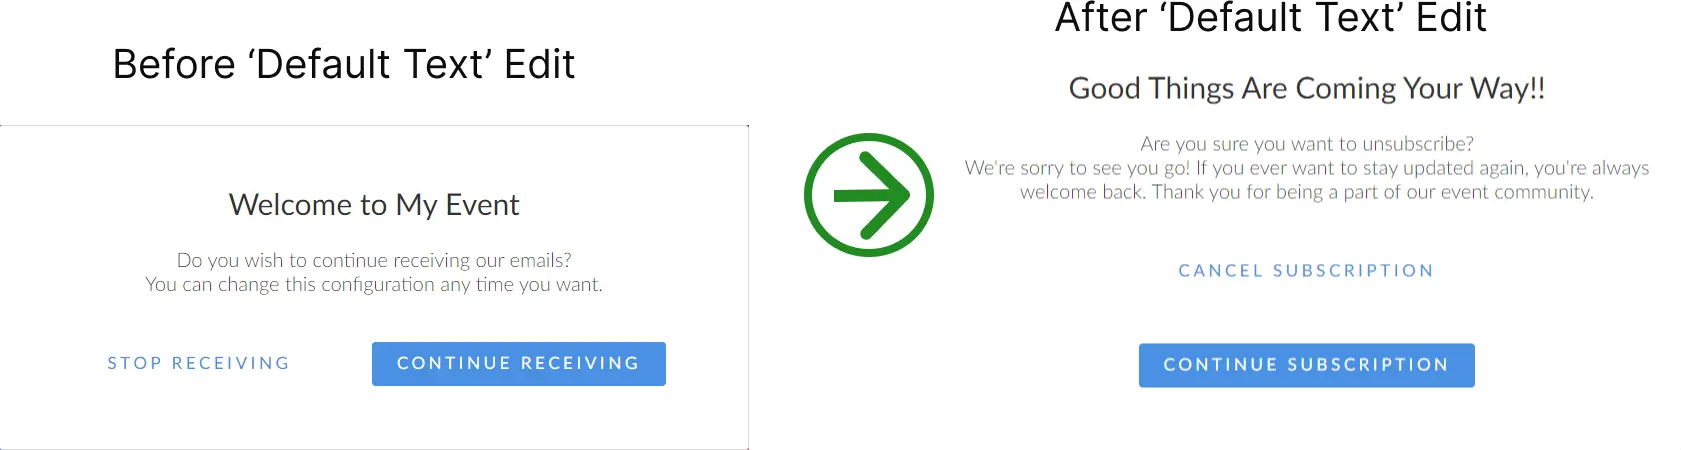
Below is an example showing the email subscription message before and after editing.
Internal
You can modify the following headings of the internal menu bar: (Internal Bar - Attendees, Invitees, Waitlists, Approvals and Leads)
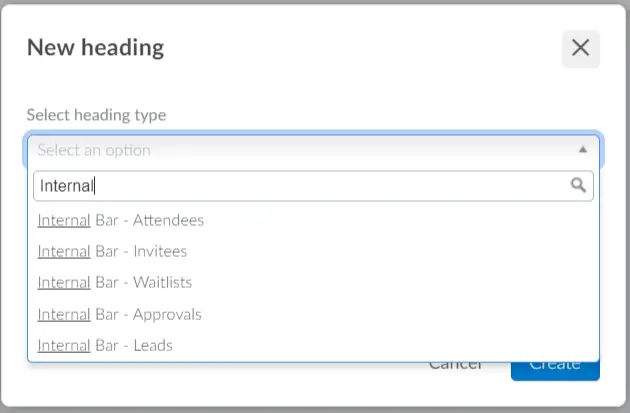
- Navigate to Settings > Headings or Marketing > Registration > Headings.
- From the Select heading type field, choose the heading you wish to change from the drop-down menu.
- From the Type heading value field, enter the label you wish to replace the default heading with, then click on Create.
- Refresh your browser and navigate to the internal menu bar that you have edited. You will notice the value of the heading is changed to the value that was set.
Editing and removing event level headings
To remove a heading you have created simply click on the Edit button and then select the heading you wish to delete and press Remove.
To modify the headings, click on the heading and a new window on the right will open Press Edit to do the changes needed. You can change the heading Type using the drop-down box and edit the heading Value using the text field. You can also add translations to the heading Value b. Click End when you are done.
Below is a GIF teaching you how to edit and remove headings:
Adding heading translations
The InEvent platform allows translating headings used throughout your event interface by:
- Utilizing the Translate with AI feature to automatically generate translations for all headings.
- Manually translating headings by selecting each heading field individually.
Translate with AI
The Translate with AI feature allows administrators to automatically translate all heading fields into the languages added to the event. This functionality enhances multilingual support and significantly reduces manual translation efforts. Located on the top right of the Headings interface, the Translate with AI button utilizes artificial intelligence to generate translations for all visible and initialized headings.
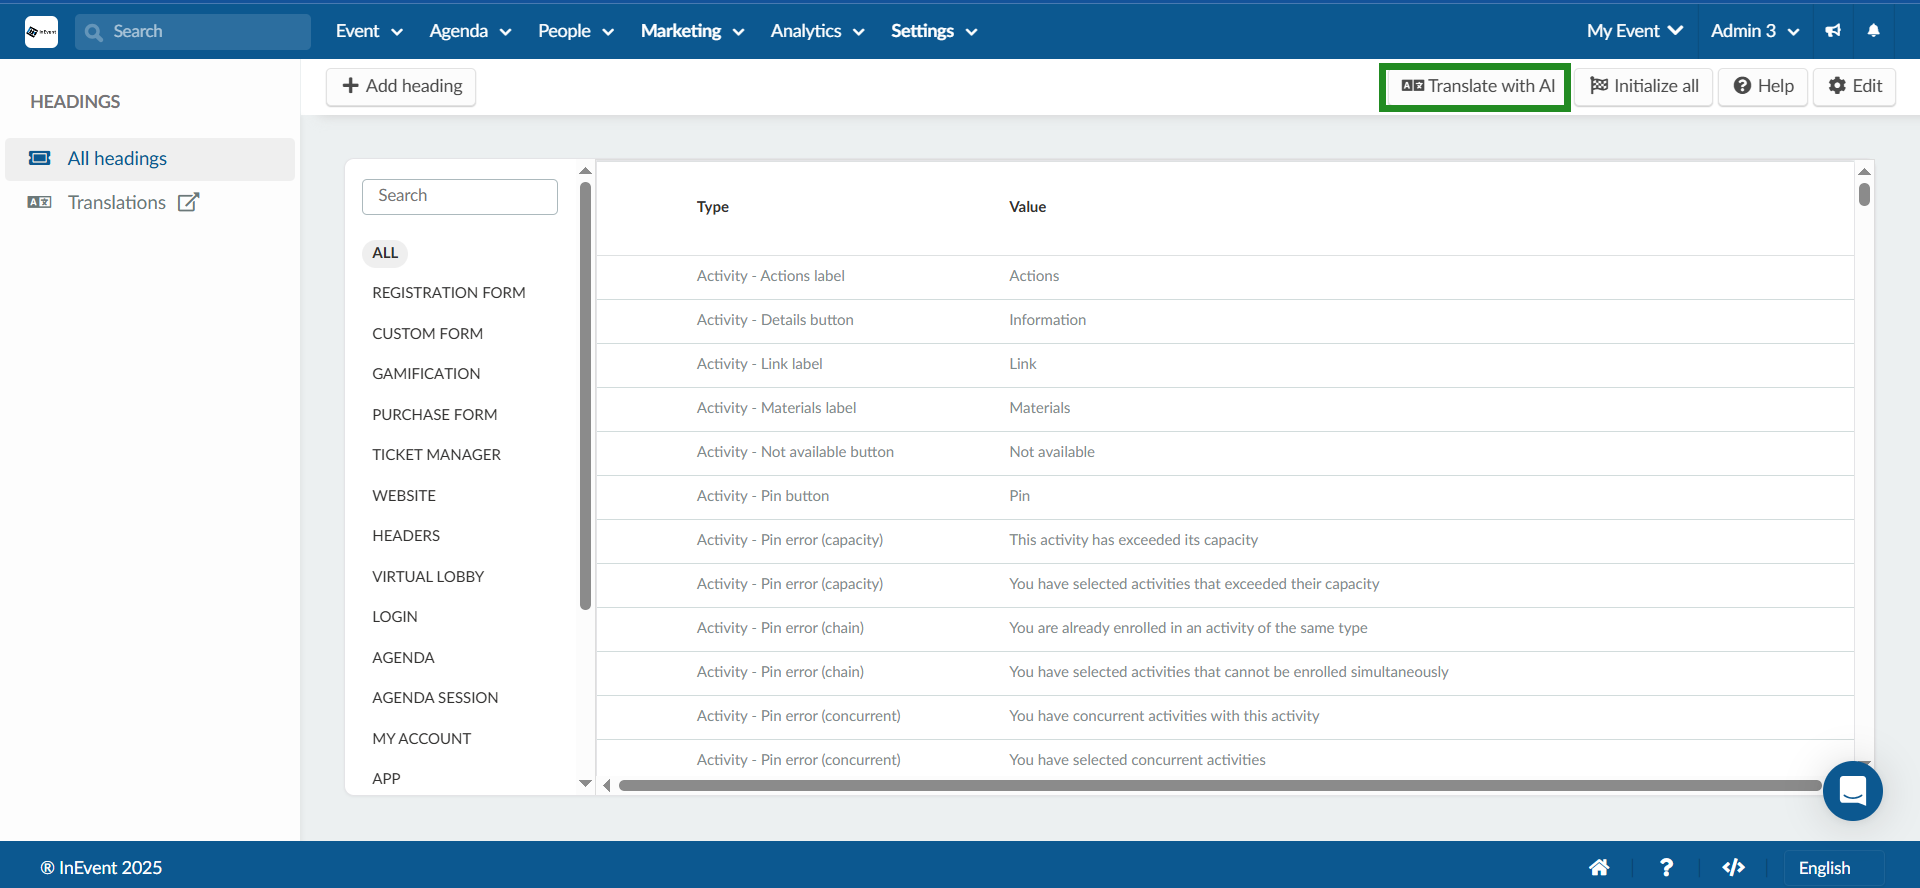
Follow the steps below to use the Translate with AI feature:
- Navigate to Settings > headings.
- Click the Translate with AI button located at the top-right corner. A pop-up window will appear asking for confirmation to translate all headings.
- Select one or more languages from the Languages to translate drop-down menu..
- Click on the blue Translate button to finish.
A notification message will appear on the top of the platform informing that the translations will be processed and ready soon. You will notice that now all headings will have translations added to them in the languages selected.
Manually translating headings
Once you've created custom headings, follow these steps to add translations:
- Navigate to Settings > Headings.
- Locate and click on the heading you want to translate. New details panel will open from the right side of platform.
- Click Edit in the top right corner of the details panel.corner.
- Click the Translation icon at the top of the heading value.
- Add translations for the desired languages.
Field mask
By using field mask, you can define the format of answers your participants must use when registering for your event. You can do so by limiting the type and maximum allowed number of characters allowed as a valid answer to specific fields. For more information, refer to our Field mask article.