In your agenda, you can add all activities, lectures, and sessions from the event. The number of activities is unlimited and you can add in each of the information about location, speakers, sponsors, exclusive materials, and even build content tracks for your participants.
With the new agenda management page, you will be able to streamline the process and look at the activities from a wider point of view.
This article is for the new agenda management page. For information about the legacy Agenda management, refer to the Agenda Management article.
Creating an activity
To hold sessions in the event, such as seminars, discussions, or other types of sessions, event organizers can create Activities on the platform. Each Activity can have a specific purpose, and an event can host numerous activities.
Events that host 100 or more activities can be more resource-demanding. It is recommended for administrators, hosts, and attendees to access such events with modern and more capable devices, such as a computer or laptop with a quad-core processor. For further information, refer to InEvent's technical requirements.
Activities can be created manually or in bulk.
Manually
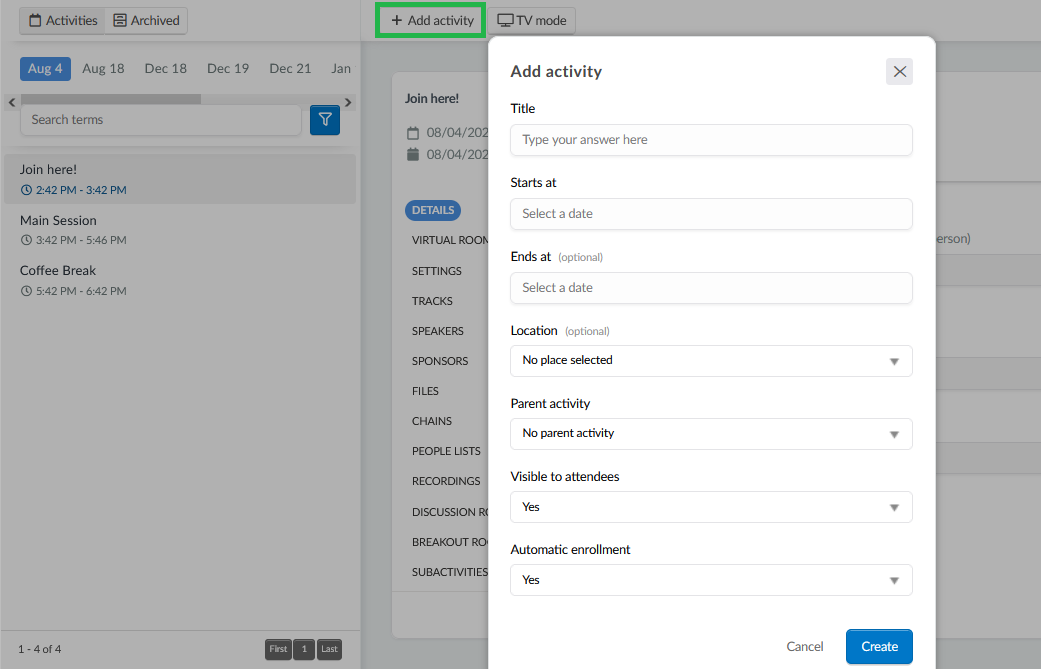
Navigate to Agenda > Activities and click on the + Add activity button in the top left corner. The Add activity pop-up box will be displayed, in which you will be prompted to enter the following details:
Title: Title of your activity
Starts at: Starting date and time of your activity
Ends at: Ending date and time of your activity
Location: Location of your activity as added in Places
Automatic enrollment: Whether or not to enable Automatic enrollment for your activity
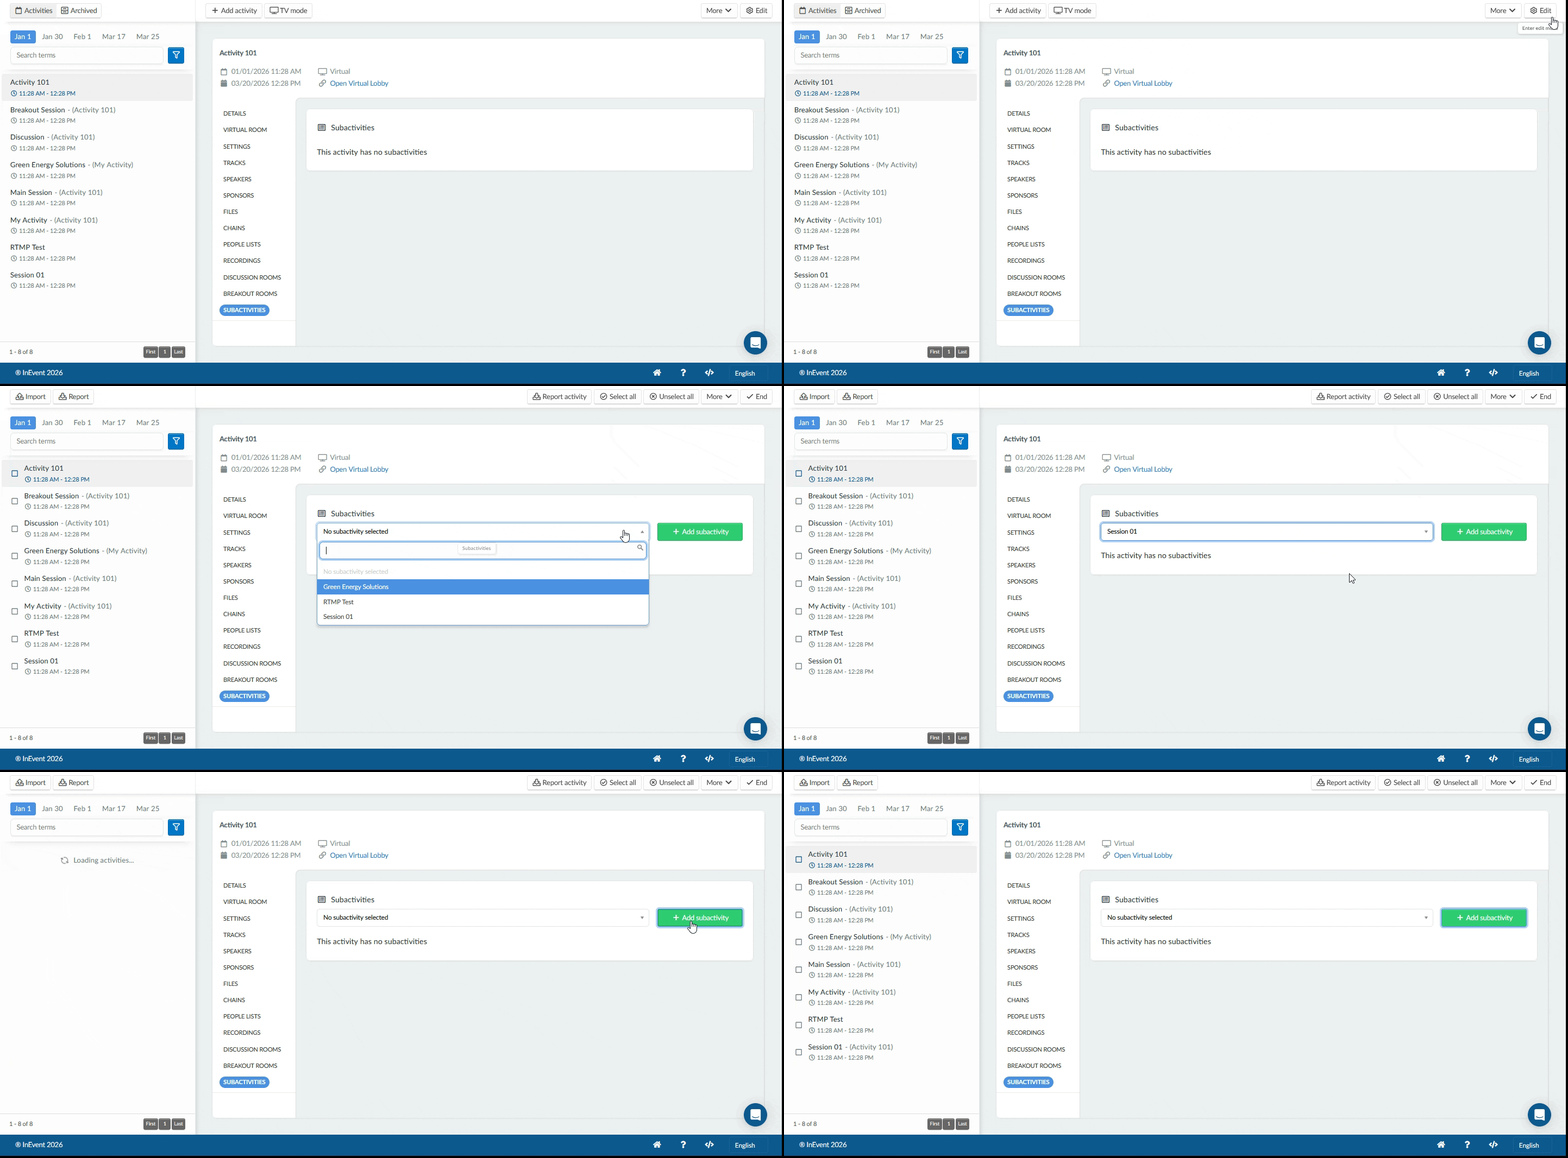
Parent activity: Define a parent activity for the newly created activity
For more information, refer to the Subactivities section.
After entering the details, click Create.
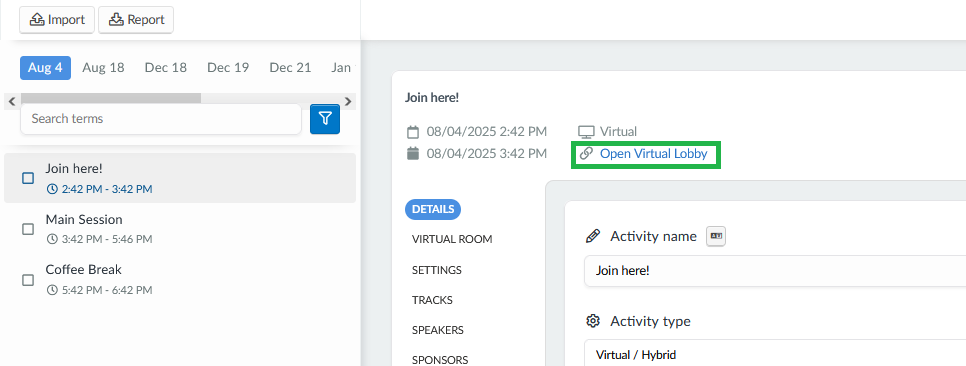
After activities are created, a Virtual Lobby link will appear on the activity's tab when you click on it. Clicking on this link will open the Virtual Lobby on that specific activity.
In bulk
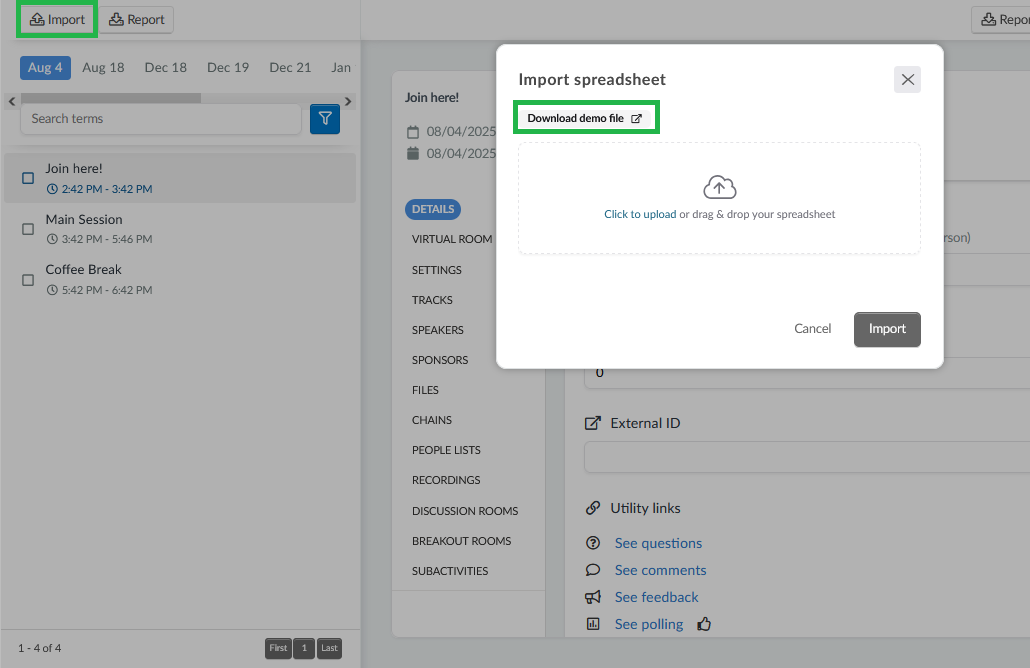
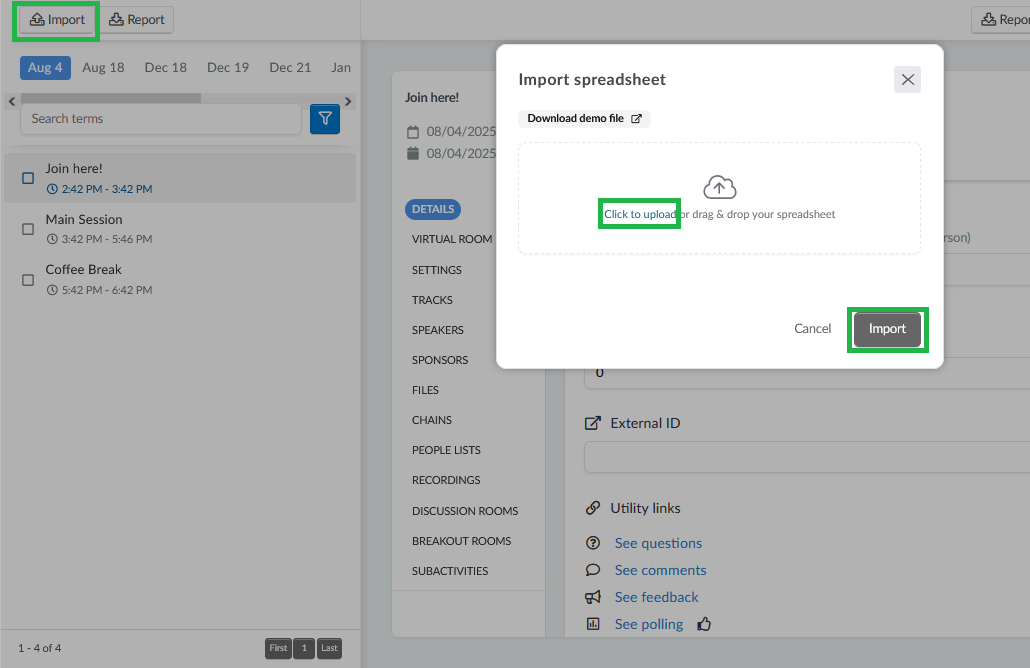
Activities can also be created in bulk by uploading and importing a populated spreadsheet file. To start with this process, navigate to Agenda > Activities, click Edit > Import, and click Download demo file.
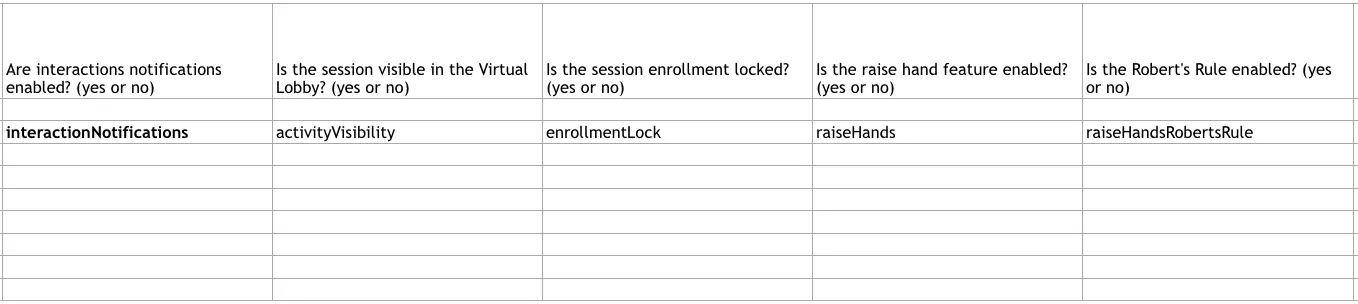
Once you download and open the demo file, the following columns can be filled, following the instructions in the header row: name, description, address, location, place, start and end time, capacity, general, highlight, lists, tags, sponsors and speakers.
Ensure to complete the fields following the provided instructions. Failing to do so may cause errors when importing the spreadsheet into the platform.
Ensure that dates follow the MM/DD/YYYY format, and that time follows the HH:MM:SS AM/PM format.
To add various speakers/sponsors via spreadsheet, add the names separated by a comma (,).
Do not enter values in the chain column. Chains must be added to activities after they are imported to the platform.
You can also fill in information about the activity room: virtualRoom,roomVideoMode, roomHost,roomCoHost.
More fields regarding the activity room that allow you to tailor the experience are: closedCaptionsAndSubtitles, followUpSession, askForFeedback, feedbackPopupTitle, onDemandUrl, onDemandFrame, sessionCardSize, interactionNotifications, activityVisibility, enrollmentLock, raiseHands, raiseHandsRobertsRule.
To enable automatic enrollment while creating your activities via spreadsheet, under the H column type in 1, and to disable the automatic enrollment type in 0.
You can also enable any hide options: hideActivities, hideSponsors, hideExhibitors, hideMeetings, hideGroupRooms, hideNetworking, hideQuestion, hideQuiz, hidePeople, hideBreakoutRoom, and hideSpeedNetworking. The hide options can be enabled or disabled via the spreadsheet by simply answering yes or no in the corresponding fields.
Enter the exact text for columns like roomVideoMode, followUpSession, and sessionCardSize to avoid errors. Mistakes or typing errors will be treated as empty entries. As these fields are not mandatory, the import will succeed and the content will be ignored.
Once the spreadsheet is completed, click the highlighted text to upload the completed spreadsheet file, or drag and drop the file and press Import.
Uploading activities results in failure
When adding activities in bulk using the spreadsheet import, there may be errors within the spreadsheet itself, such as entries that are not recognized by the platform. For more information, refer to our article on importing and exporting spreadsheets.
Virtual Lobby link
Editing an activity
Activities have different feature categorized into different segments.
Details
This allows you to edit key details of your activity.
ActivityName: You can change the activity's name and also add translations.
Activity type: Whether the activity is In-person or Virtual / Hybrid.
Place: Assign in-person places. For more information, refer to the article on Event Places.
Start, and end time: Set the start and the end time of the activity.
Description: Add a description about your activity. You can use bullet lists on the WYSIWYG editor, as well as add translations.
Address: Enter the address of your activity. (Useful for In-person events).
Registration Cap: Set the maximum limit of people that can enroll in the activity. This is a hard limit on how many people can enroll in the virtual room at any given time. Once this number is reached, no more participants can join. This applies to both Virtual and In-person events.
It is advised to first disable Automatic enrollment before setting a capacity. You will be unable to edit the capacity of the activity if Automatic enrollment is enabled.
Venue Capacity: Define the maximum number of participants allowed to check in to a session.
External ID:
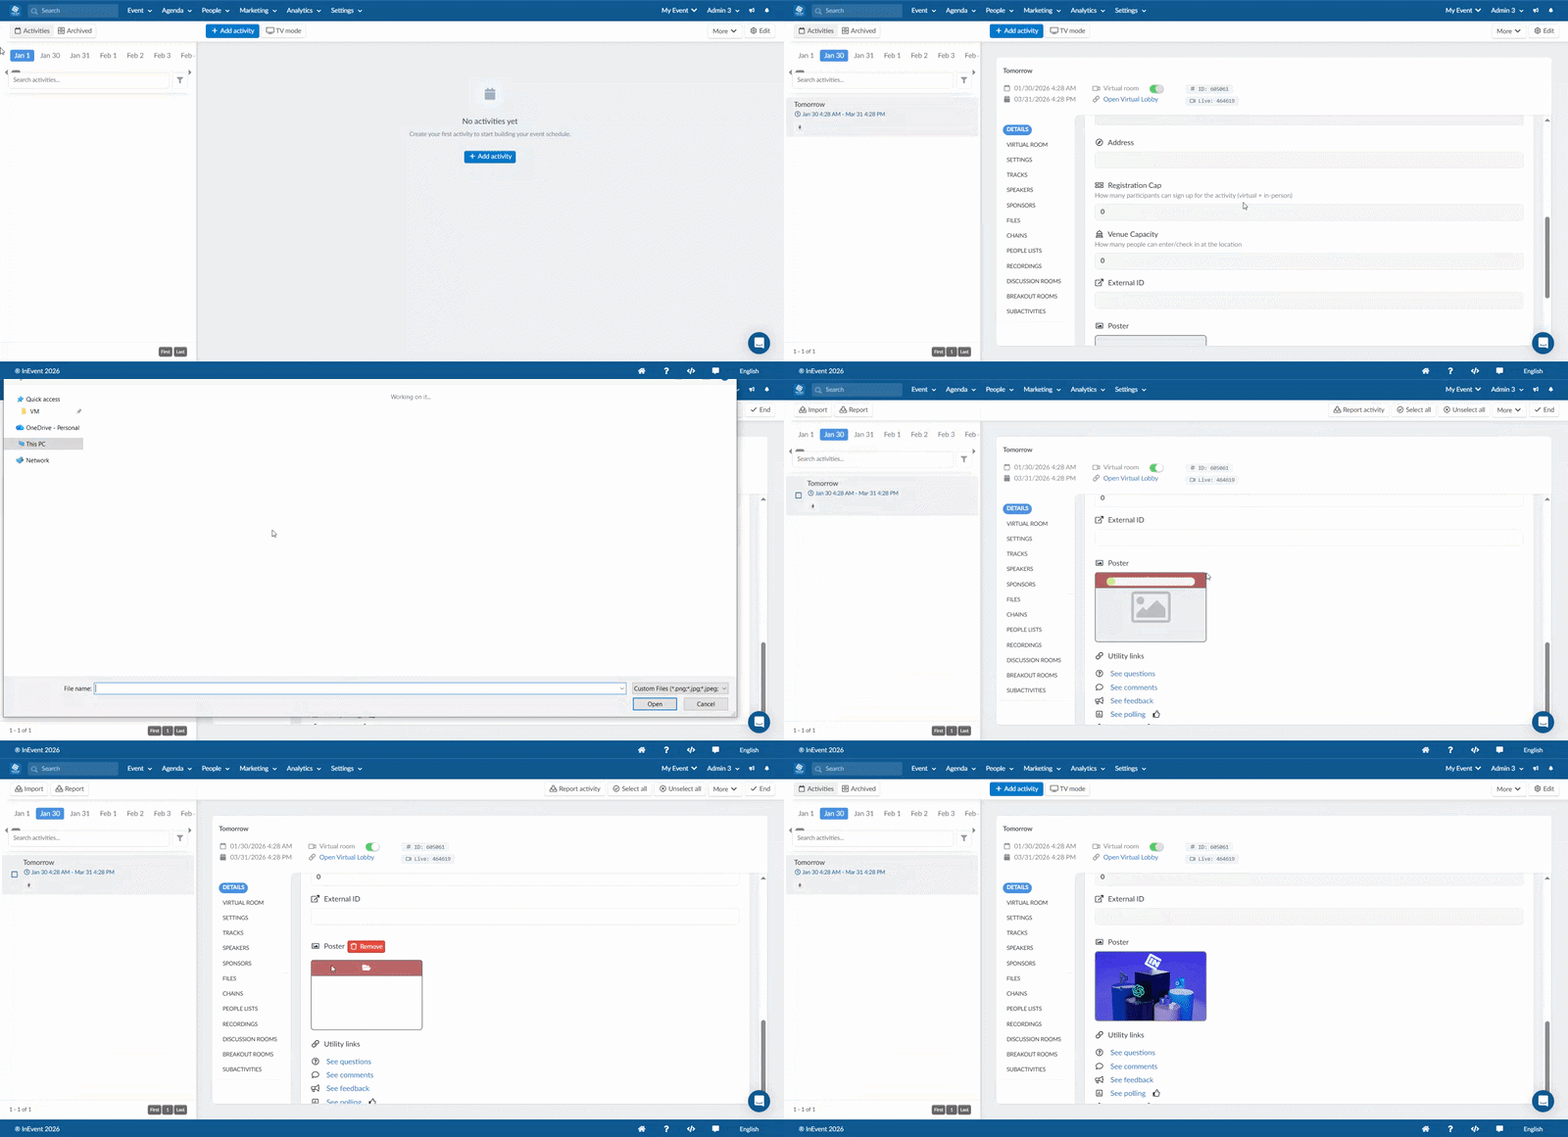
Poster: For in-person and hybrid events, instead of a virtual room, activities will include a cover poster. This poster will be displayed in the activity details section of the web app's My Agenda tab. This poster provides attendees with relevant visual and informational content about the session. To upload a cover poster for an activity:
Go to Agenda > Activities.
Click on the Details section and scroll down.
Click on Edit, then uncheck the Virtual room checkbox
Upload the file to the Poster field.
The following file formats are supported for cover posters: .pdf, .png, .jpeg, .jpg, .mp4.
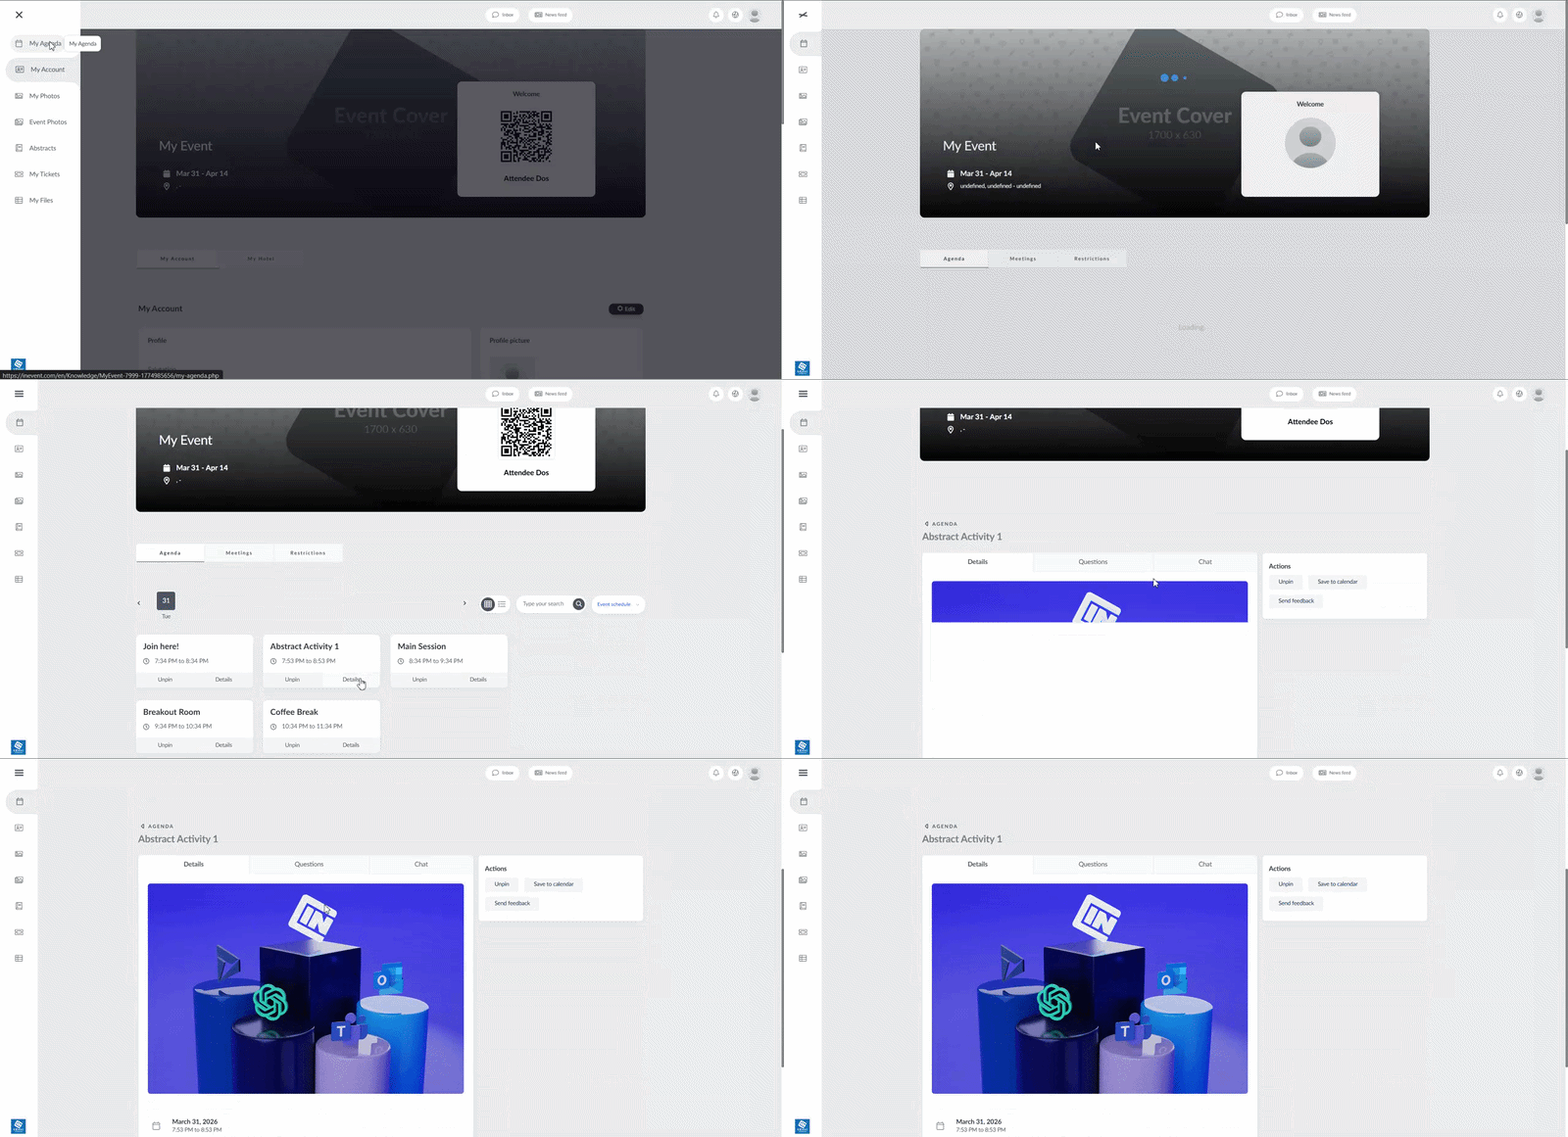
Once uploaded, the poster will be visible to attendees in the Activity details section of the My Agenda page in the web app for in-person events, as shown below:
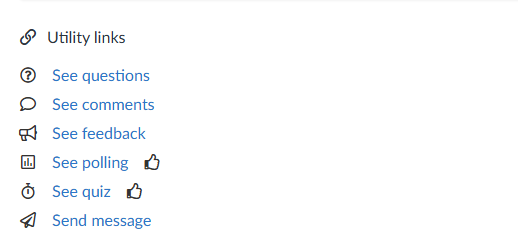
Utility links
See questions: Click the link to open the questions page for the activity. This will display all questions asked within the activity.
See comments: Click the link to open the comments page for the activity. This will display all comments within the activity.
See feedback. Click the link to open the feedback page for the activity. You can create feedback questions and see submissions.
See polling: Click the link to open the polling page for the activity. You can create polls and see submissions.
See quizzes: Click the link to open the quiz tab for the activity. You can create quizzes for your activity and see submissions.
Send message: Click on this button to create and send push notifications to attendees within your activity. Refer to the Push notifications article for more information.
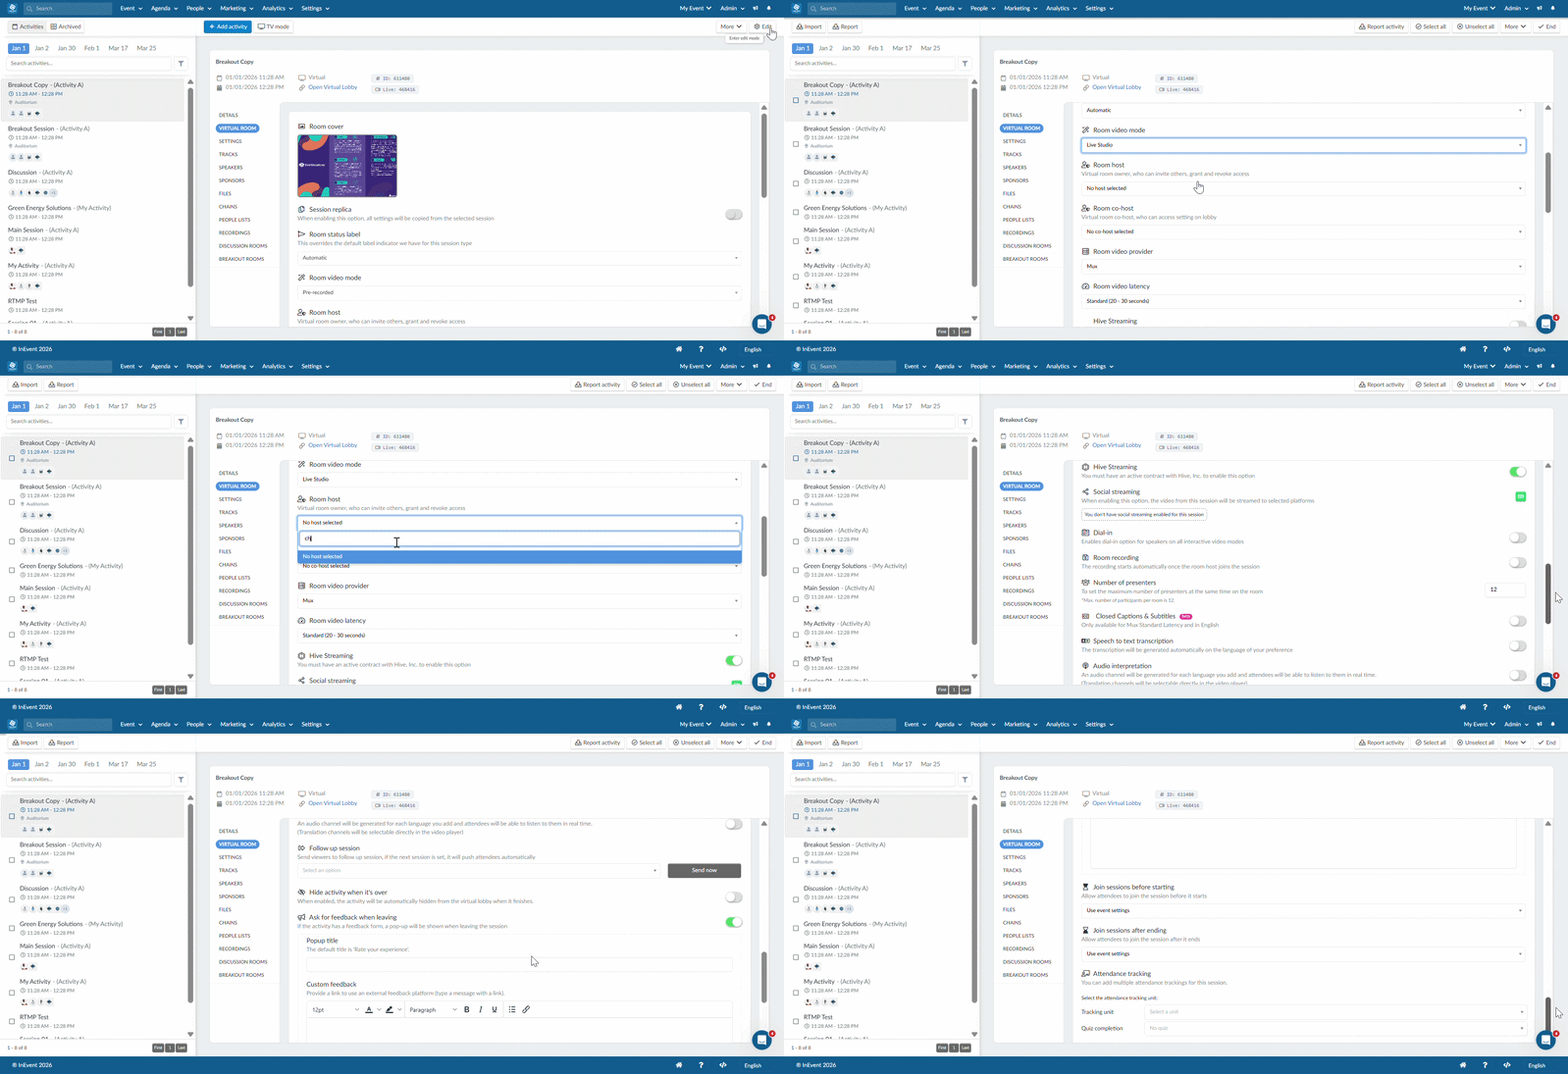
Virtual rooms
This tab will be displayed automatically if the Activity type is set to Virtual / Hybrid, otherwise, it will not appear.
Room cover: The desired size is 280 x 160 px.
Session replica: If you wish to replicate an activity settings, refer to the Session replica section.
Room status label: Each room will display a status label in its upper left corner.
You can remove social streaming from your activity details by navigating to Settings > Tools, clicking on the Live tab and finding the tool labeled Social streaming on activities. Toggle off the corresponding button to hide social streaming from the Agenda > Activities > Details.
Dial-in: Enable the dial-in option for speakers. Refer to our article on dial-in for further information.
Room host: Define the room host. For further information, refer to our article on permissions.
Room co-host: Define the room co-host. For further information, refer to our article on permissions.
Room recording: You should check this box if you'd like your activity to be recorded. For further information, refer to our article on Room recording.
Number of active cameras: Specifies how many presenter cameras can be enabled and displayed at the same time during a live session. A Live Studio activity can include up to 12 presenters, and up to 12 cameras can be active simultaneously.
Closed Captions & Subtitles: Enable closed captions for your sessions. For further information, refer to our Accessibility article.
Speech-to-text transcription: The transcription will be generated automatically in the language of your preference. You will be able to select the speech-language and a translation option language. For further information, refer to our article on live interpretation and translation.
Follow-up session: Define a follow-up session. When a follow-up session is set, attendees will be automatically moved to the defined session.
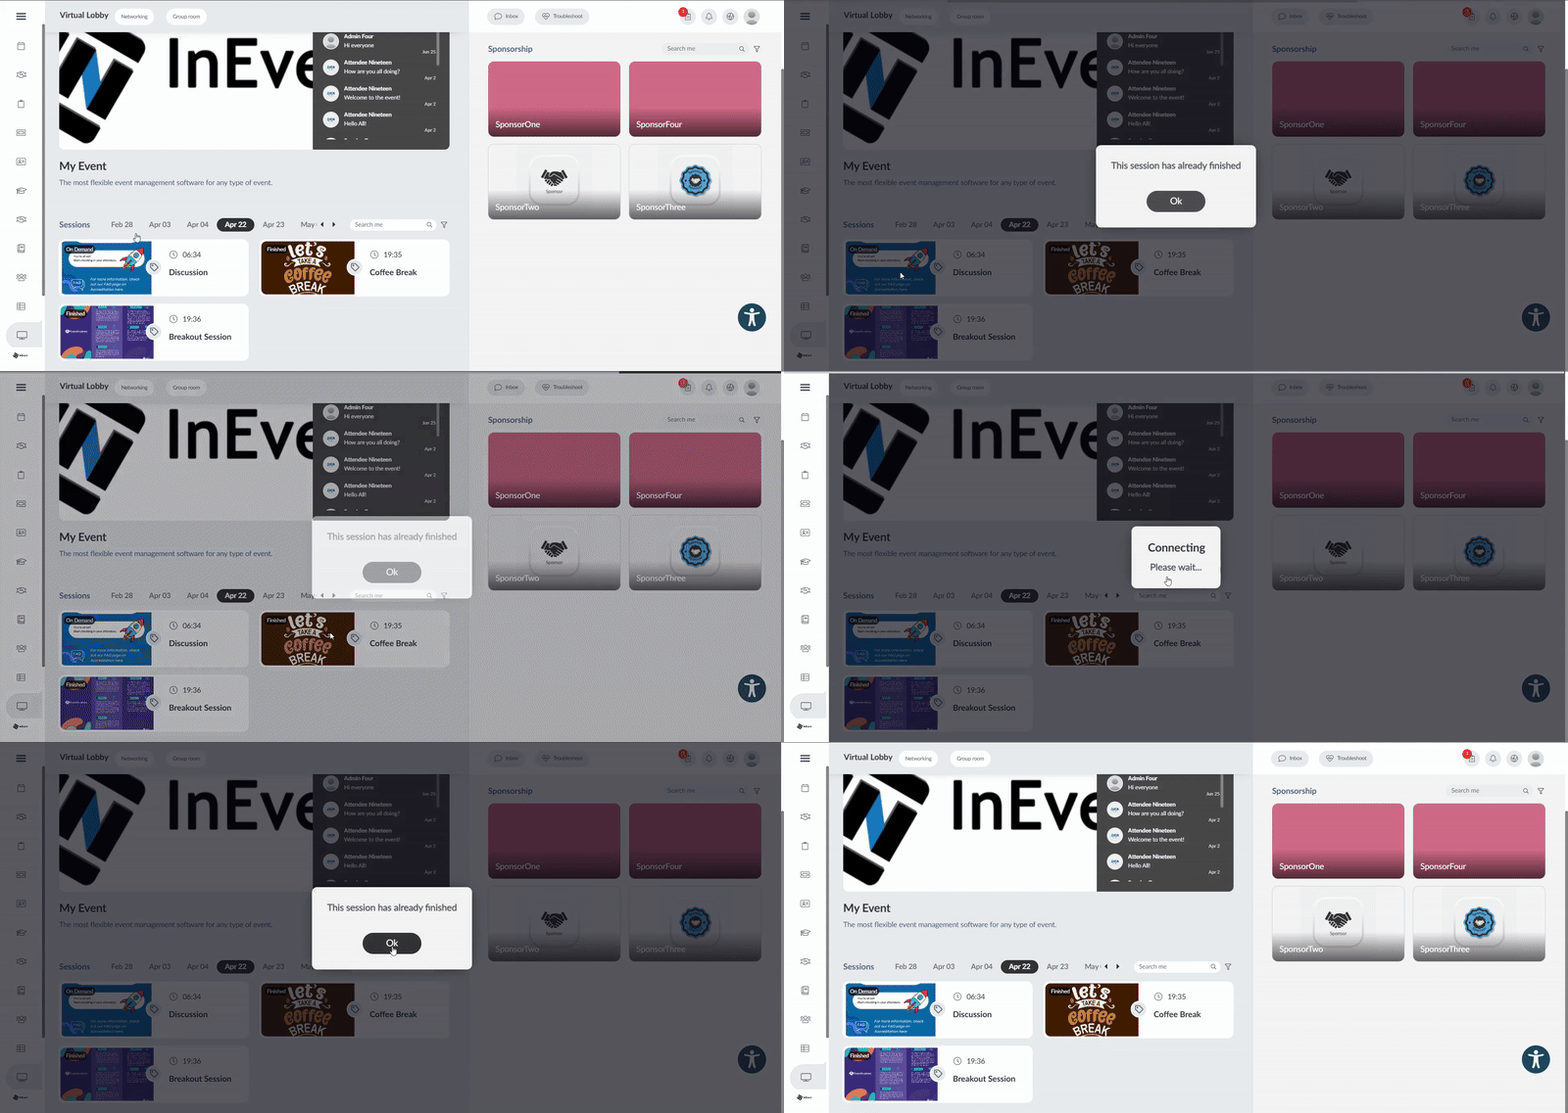
Hide activity when it's over: When enabled, this option hides the activity card from the Virtual Lobby after the session ends. In addition, attendees will automatically be moved to the defined Follow-up session if configured, or to the next available session when the Follow-up session is not configured.
Attendees can still access the hidden activity by navigating to My Agenda.
Ask for feedback when leaving: if the activity has a feedback form, a pop-up will be shown when leaving the session. For further information, refer to our Feedback article.
Attendance tracking: To set up attendance tracking within your activity, refer to the Attendance tracking article
Access policy
Define whether you would like the attendees to be able to join activities before their start time and after their end time.
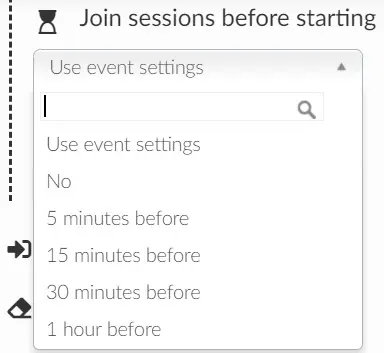
Join sessions before starting
If you select No, the attendees will not be able to join an activity before its scheduled start time.
If you would like attendees to be able to join a room before the activity starts, you will be given the option to decide if they should be able to join 5, 15,30 minutes or 1 hour prior to the activity's start time.
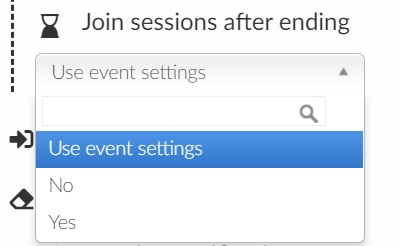
If you select No, the attendees will not be able to join an activity after its scheduled end time.
If you would like attendees to be able to join a room after the activity ends, select Yes.
If you would like to configure an access policy for the entire event instead of configuring it for each session, you can do so as well. Refer to our article on Access policy or further information.
Settings
Here you will be able to configure your activities by controlling the visibility of the following fields in your activity:
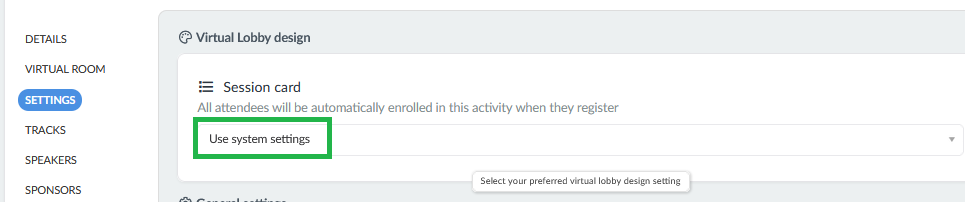
Virtual Lobby design
This field will only appear if you have selected the Neo layout as your Virtual Lobby layout type.
In this section, you can select the layout type for the activity room cover in the Virtual Lobby. To do this, simply click Edit and select the desired layout type from the Session card drop-down box. If you select Use system settings, the activity room cover will follow the layout type defined for all activities in the Event > Virtual Lobby > Layout page.
To learn all about the activity layout types, refer to our Virtual Lobby layout article.
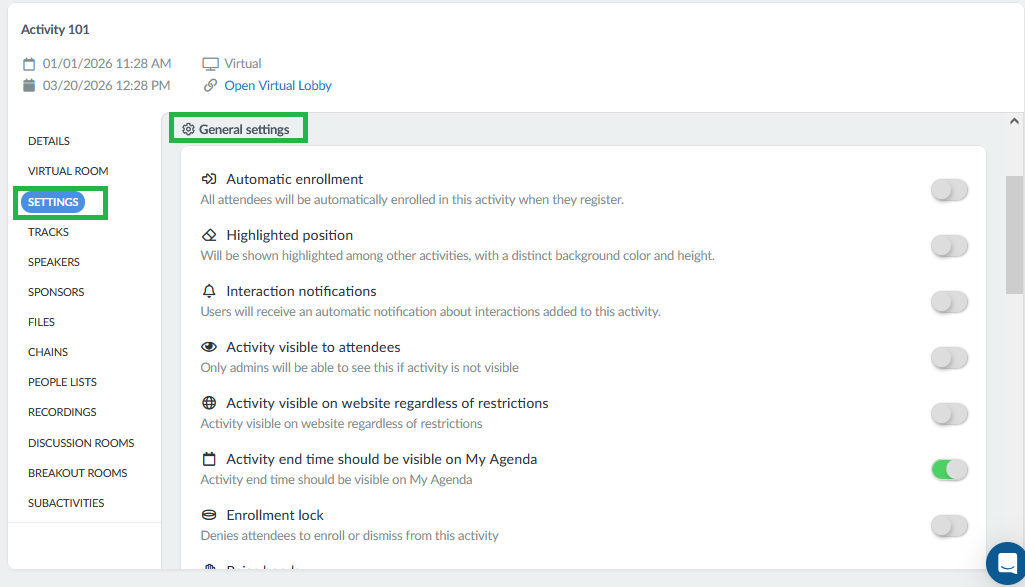
General settings
Automatic enrollment: All attendees from the event will be automatically enrolled in the activity when registering to the event.
Enabling Automatic enrollment on activities together with Activities on form on the Registration Form and setting Number of vacancies may cause errors when checking attendees into the event. It is advised to use either Automatic enrollment or Activities on form with Number of vacancies.
Requires Approval: Attendees registering for the event and activity will require approval from the event admins or people linked to sponsors. Below you can see that when this setting is enabled, an additional option Sponsors can approve is displayed, which allows sponsors linked to the activity to approve or reject attendee enrollment for this activity.
This tool is incompatible with Automatic enrollment. When enabled, Automatic enrollment will be automatically disabled if it was previously turned on. The Requires Approval feature is also incompatible with Ticket requirement and will not be visible if this tool is turned on.
Highlighted position: The activity's room cover will appear in the Large layout in the Virtual Lobby, regardless of whether you are using the Small or Medium activity layout type.
The activity's name will be underlined on the platform to indicate that the activity is highlighted.
Interactions notifications: notifications (questions, polling, feedback) from this activity will appear under Alerts.
Activity visible toattendees: if enabled, the activity will be visible to the attendees. If disabled, only administrators will see the invisible activity and there will be a tag that says Invisible to let the admins know that the activity is invisible to everyone else.
Activity visible on website regardless of restrictions: If enabled, list-restricted activities will be displayed on the Agenda section of the Website. If disabled, list-restricted activities will not be displayed on the Website.
Activity end time should be visible on My Agenda: If enabled, the end time of activities will be displayed alongside their start time on the My Agenda web page and website Agenda section. If disabled, only the activity's start time will be displayed.
Enrollment lock: The enrollment operations will be locked and attendees will not be able to register in this activity anymore.
Raise hands: By enabling this feature attendees will be able to click on the Raise hands icon during this session.
Robert's Rule of Order: This feature is dependent on the Raise hands feature to function. The Raise hands feature must first be enabled, to have it appear. For more information, refer to our article on Robert's Rule of Order.
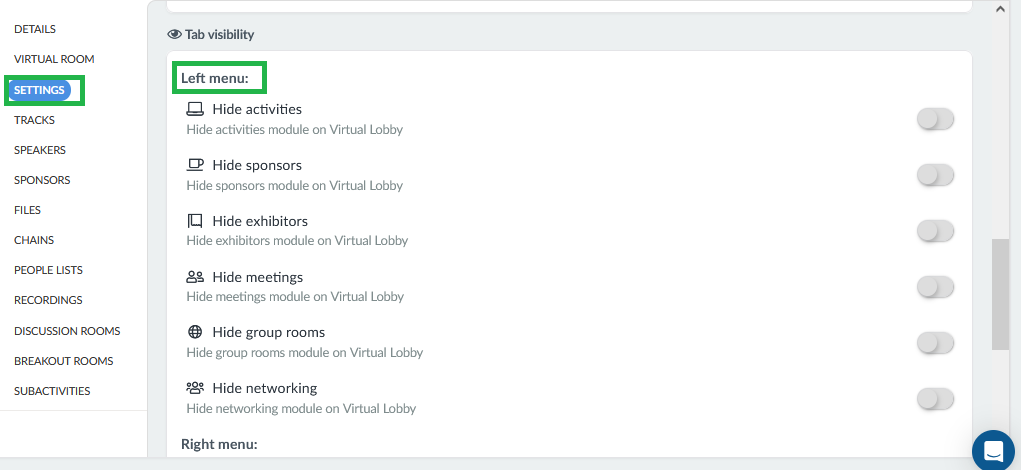
Tab Visibility - Left menu
You can configure the visibility of the following tabs that appear on the left menu inside your activity in the Virtual Lobby :
Hide sponsors: It will hide the sponsors tab inside the activity.
Hide exhibitors: It will hide the exhibitors tab inside the activity.
Hide meetings: It will hide the meetings tab inside the activity.
Hide group rooms: It will hide the group rooms tab inside the activity.
Hide networking: It will hide the networking tab inside the activity.
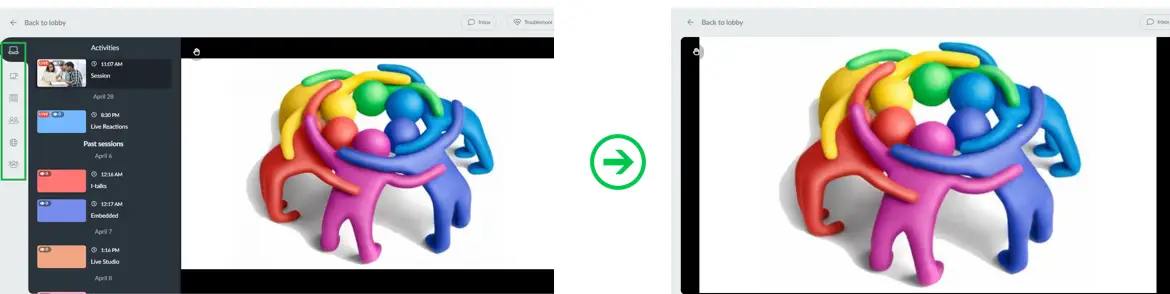
This is how attendees will see the activity in the Virtual lobby before and after the left menu tabs are hidden:
Tab visibility - Right menu
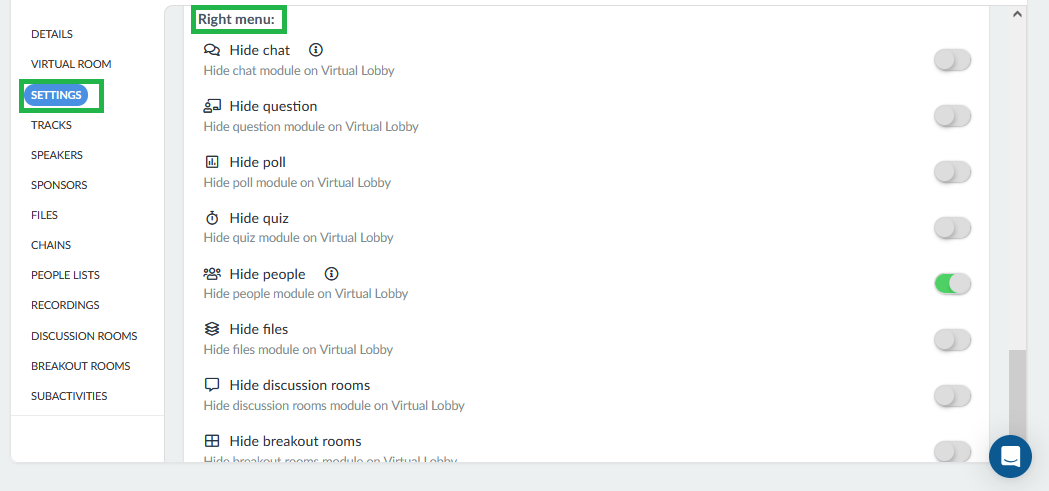
You can configure the visibility of the following tabs that appear in the right menu of your activity in the Virtual Lobby:
Hide chat: It will hide the Chat tab in this activity.
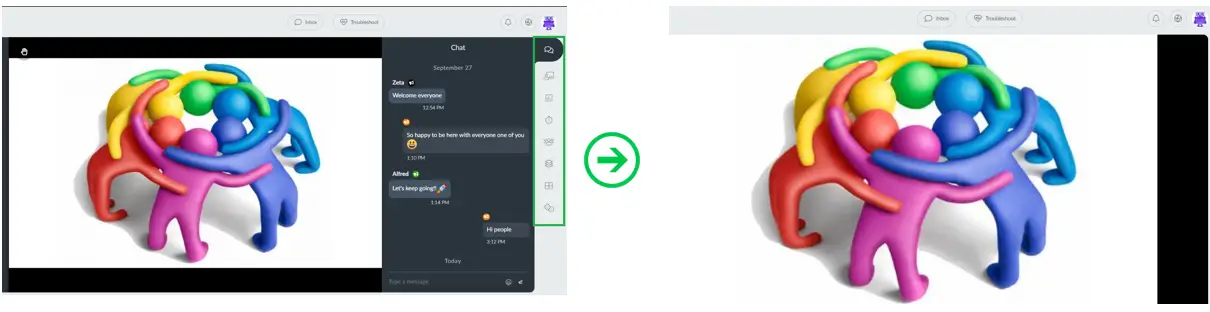
If you enable the option Hide chat, the public chat the users use to communicate with each other will disappear, but the private chat will still be available in the room for speakers, admins, staff, and room host.
Hide poll: It will hide the Polling tab in this activity.
Hide quiz: It will hide the Quiz tab in this activity.
Hide questions: It will hide the Questions tab in this activity.
Hide files: It will hide the Files tab inside this activity.
Hide discussion rooms: It will hide the discussion rooms inside this activity.
Hide breakout rooms: It will hide the Breakout rooms tab inside the activity.
Hide Speed networking: It will hide the Speed networking tab inside the activity.
This is how attendees will see the activity in the Virtual lobby before and after the right menu tabs are hidden:
You can also disable tabs across all activities from the Settings > Tabs > Virtual rooms page. To learn how to do so, take a look at the article Tabs.
Content
Detailed information about activity content configuration and management can be found in the following dedicated articles.
To create trails of content using tracks, refer to our article on Event Tags and Tracks.
To associate activities with speakers, refer to our article on Speakers.
To associate activities with sponsors, refer to our article on Sponsors.
To insert files in the activities, refer to our article on Files and documents.
To create chains between activities, refer to our article on Chains.
To associate activities with people lists, refer to our article on Lists.
To create discussion rooms, refer to our article on Discussion rooms
To create breakout rooms, refer to our article on Breakout Rooms.
Creating subactivities
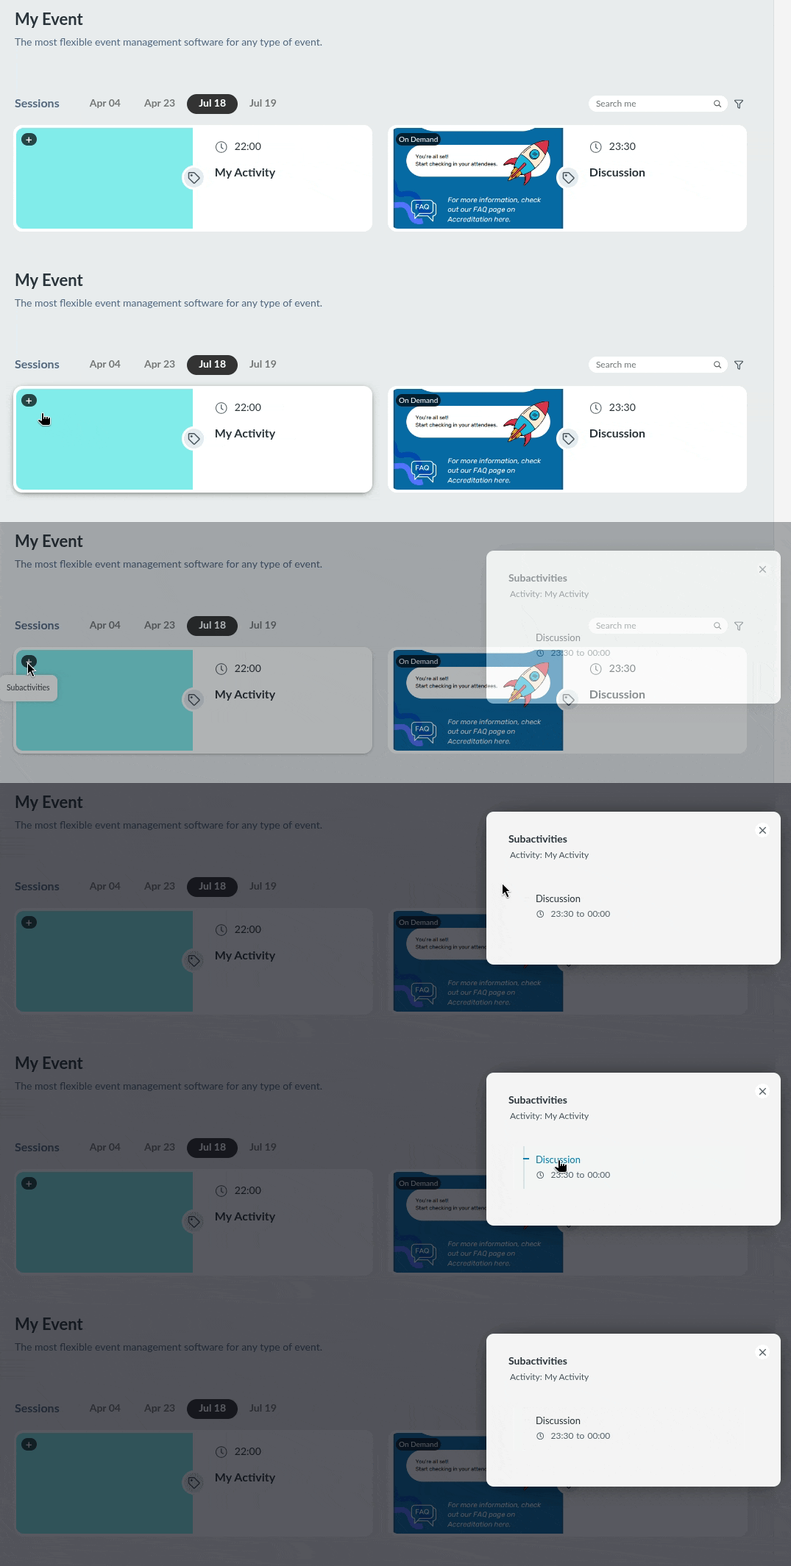
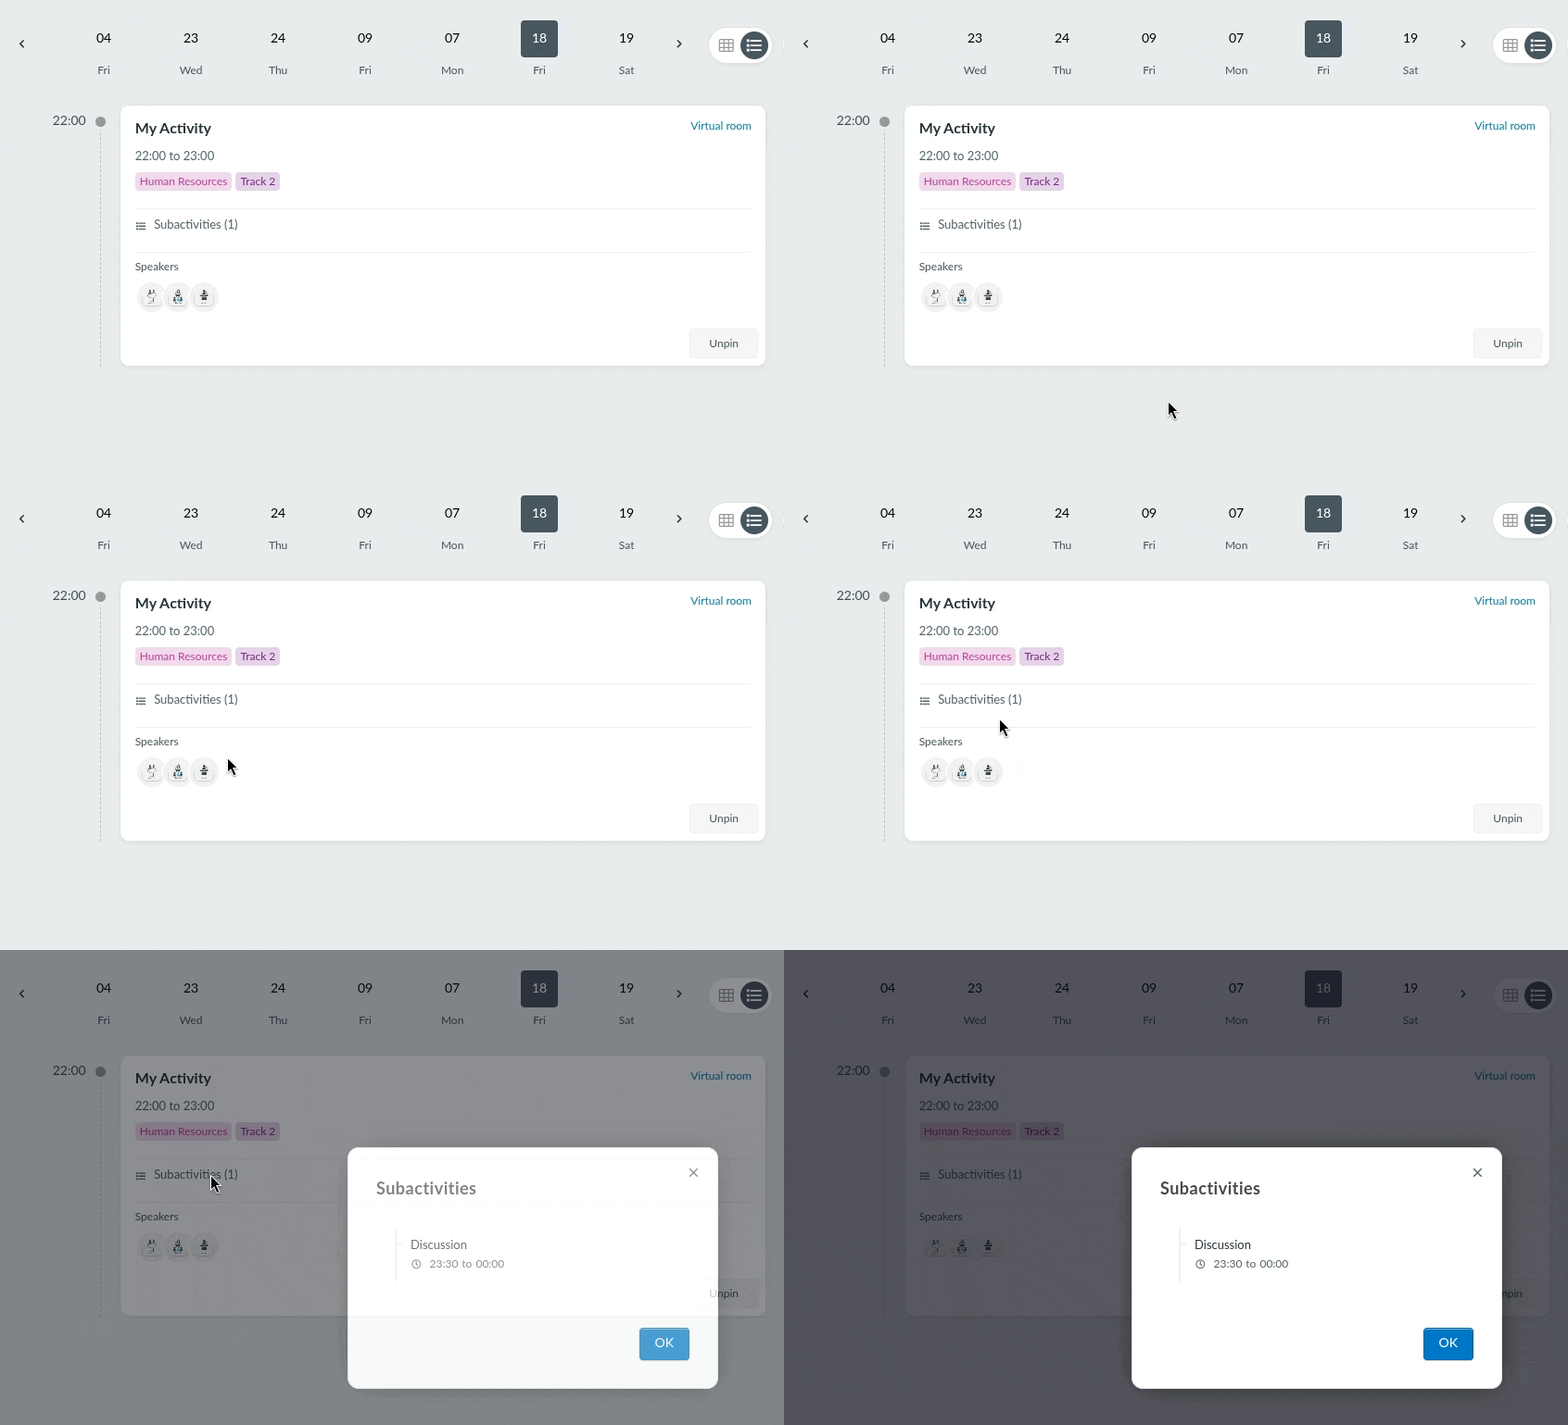
In the Subactivities tab, event organizers can see subactivities linked to the main activity. They can also create more subactivities. This allows for easy management and display of activities that are part of each other.
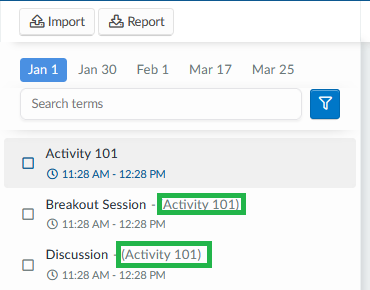
On the platform, Subactivities, or activities with a parent, will be marked with the parent activity name in parentheses next to it.
In the Virtual Lobby, subactivities are displayed on the parent activities' session cards and agenda entries, as shown below.
Parent activities' session cards and agenda entries will show Subactivities that take place within the same day as the parent activities.
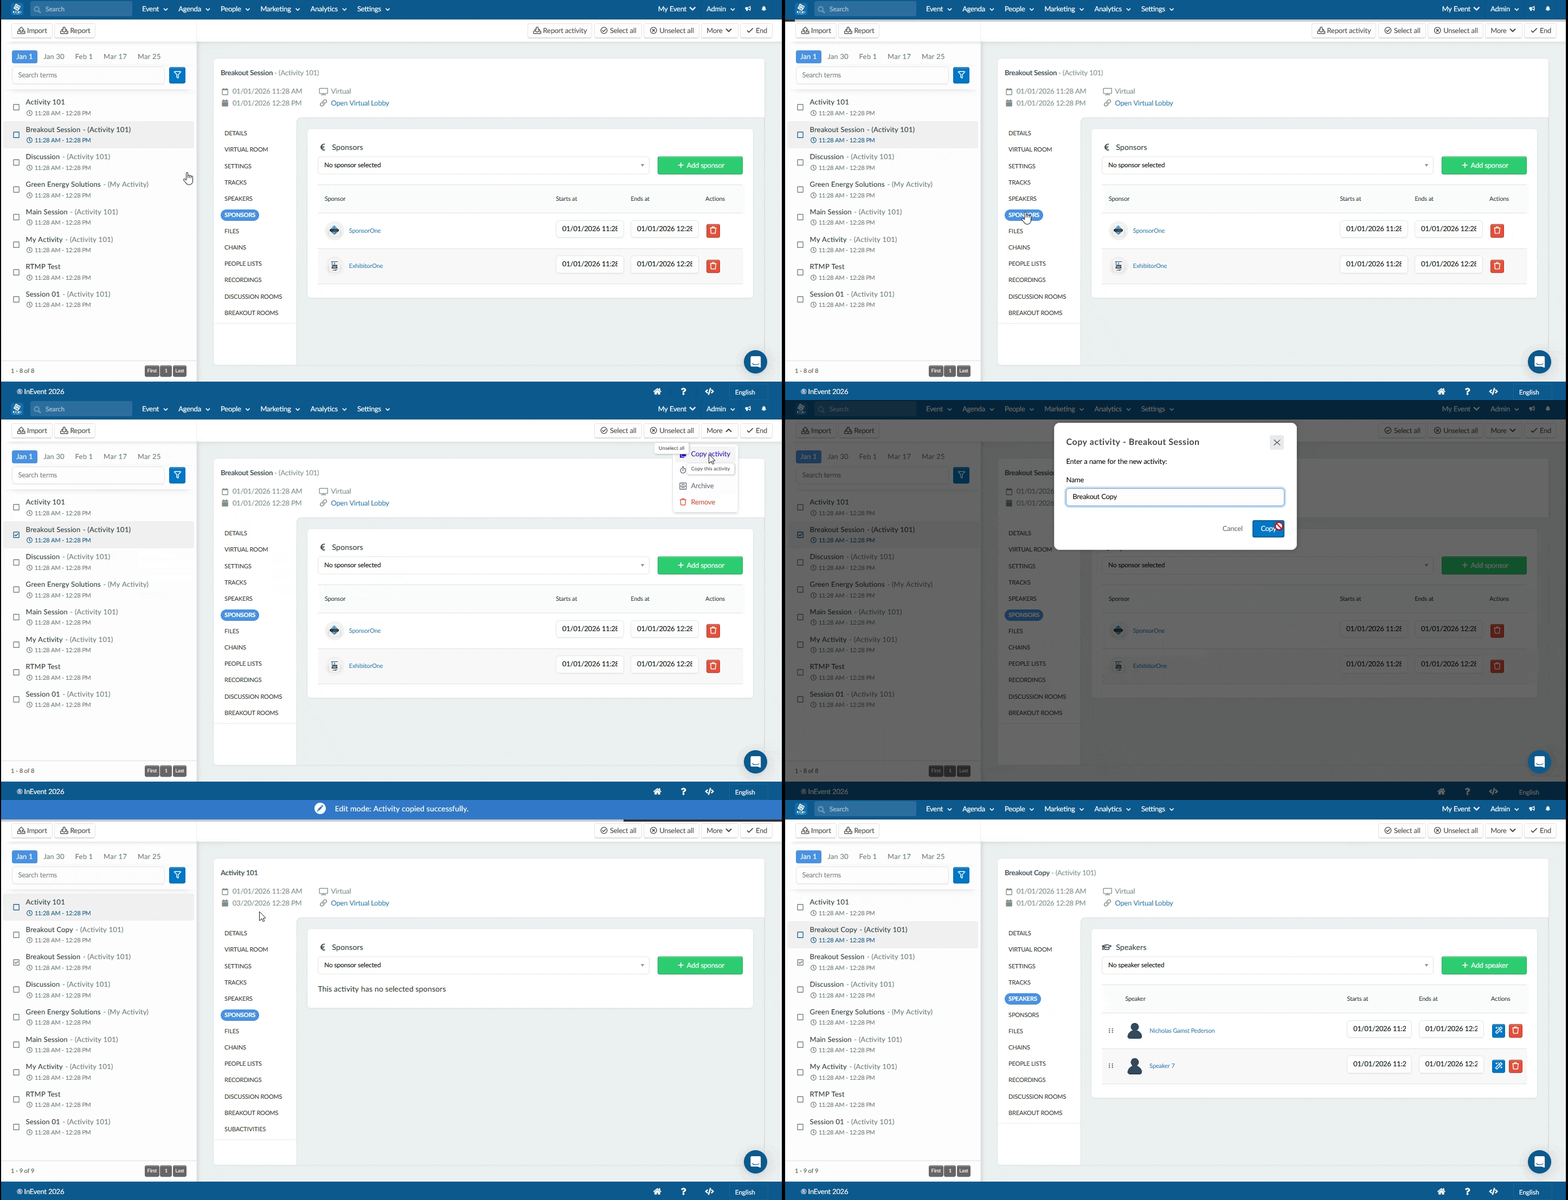
To copy activities, including their details and settings, follow these steps:
Navigate to Agenda > Activities
Click on Edit.
Select the activity you wish to copy, which contains the details and settings you wish to replicate by ticking the corresponding checkbox.
Click on Copy activity at the top right corner of your screen.
Enter a name for the target new activity in the Copy activity pop-up box.
Click on Copy and then click on End.
This ensures that all details and configurations from the selected activity are accurately duplicated to the new activity.
When copying activities, note that you cannot copy them to an existing activity. You can only copy the details and configurations of an activity to new activities. If you need to apply these settings to an existing activity, you will need to manually update that activity.
Delaying activities
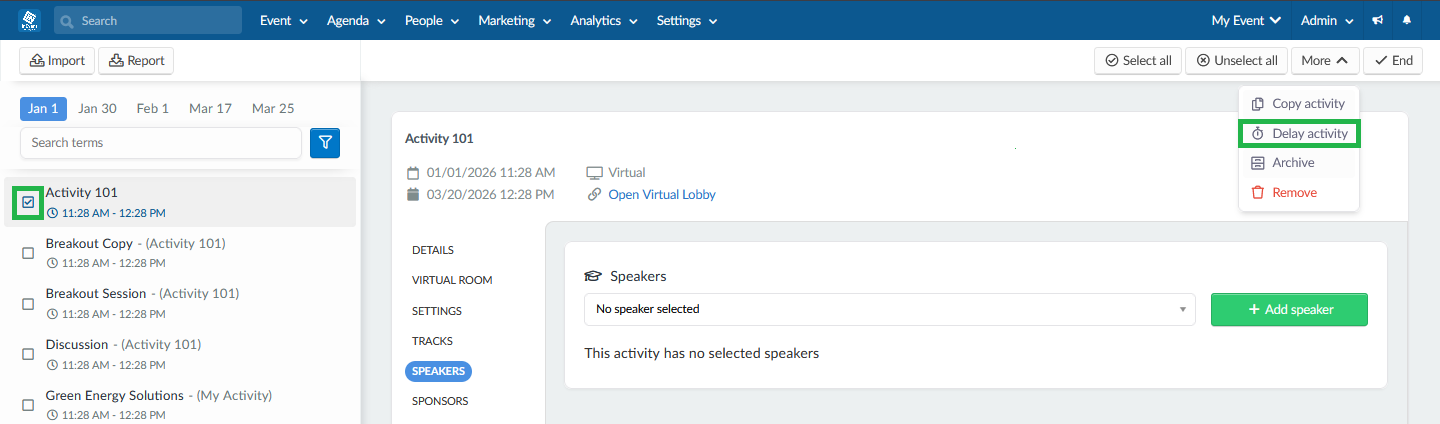
To delay an activity, press Edit, and select the activity you would like to delay. Then, press Delay activity and confirm by clicking Delay.
Delaying an activity, will also cause a delay in following activities.
Defining display order of activities
InEvent's agenda respects alphabetical and numerical ordering. So, if you need to determine a specific sequence, you can make use of the following options:
Numerical order: place a number in front of the activity name, such as 1) Activity name; 2) Name of the activity; 3) Name of the activity.
Alphabetical order: put a letter in front of the activity name, such as A) Activity name; B) Name of the activity; C) Name of the activity;
Temporal order: register the activities with sequential schedules to determine their order, such as 08:00:01; 08:00:02; 08:00:03.
Additional Settings
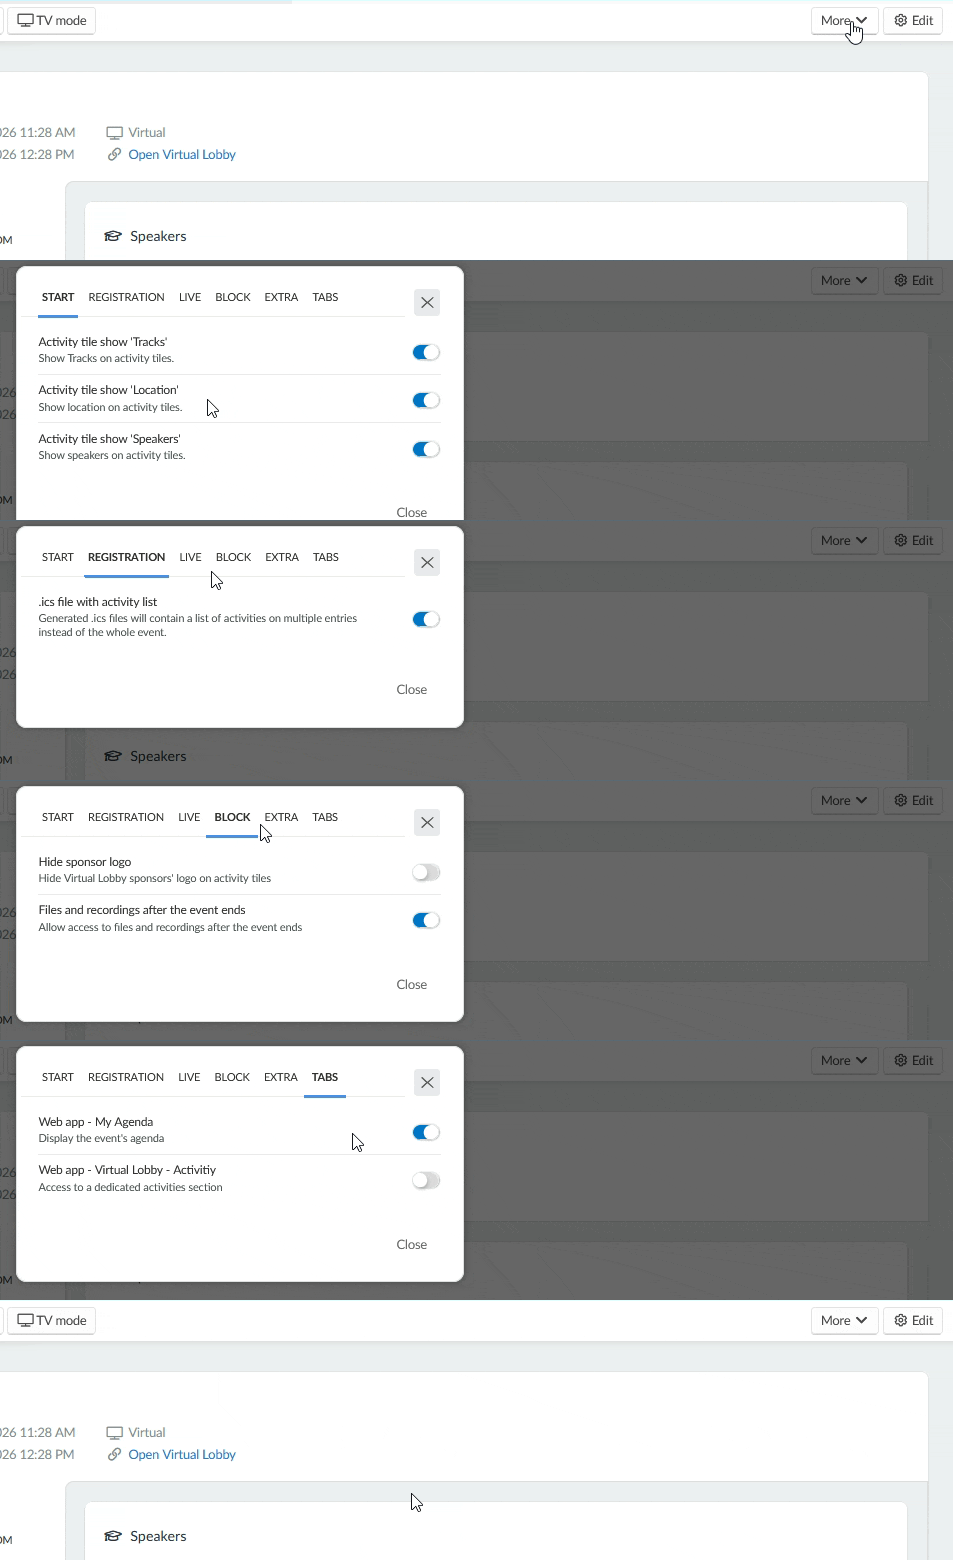
In addition to adjusting settings for individual activities, you can also manage tools that impact all activities from the same page. Simply click on the Settings button located in the top right corner. This will open a window where you can enable or disable the tools across their various sections.
To learn more about each tool in detail, refer to the Set Event Tools article. To learn more about Tabs, refer to the Tabs article.
Restricting content access after event's end
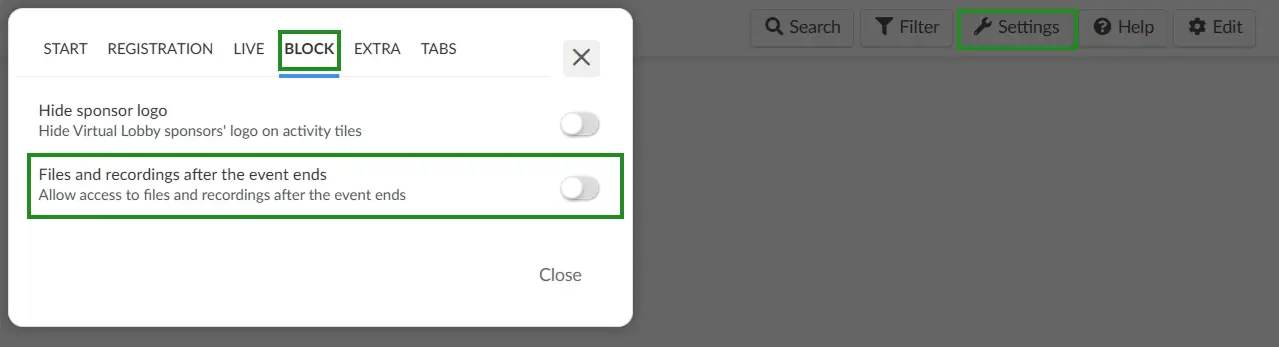
To prevent users from accessing files and session recordings once the event has ended, you can disable the Files and recordings after the event ends tool. This ensures that shared content is no longer accessible after the event concludes.
This setting only takes effect after the event ends. To configure your event's end date, refer to the Event Time and Date article.
Follow the steps below to disable the tool:
Click on Settings at the top right corner of your screen.
Alternatively, you can go to the settings > tools page and follow the steps below.
Select the Block tab from the settings panel.
Locate the option Files and recordings after the event ends.
Toggle the button off to disable access once the event has ended.
By default, the files and recordings after the event ends tool is automatically enabled, allowing users to access event content such as files, photos, and session recordings.
This will prevent users from accessing event content such as activity session recordings, files and photos.
Users with admin permissions will still have access to event content such as files, photos, and activity sessions even after this tool has been disabled. Staff and Presenters can still access session recordings but will no longer have access to files or eventphotos.
Creating simultaneous activities for different attendees
Event organizers can create multiple activities or sessions, held at the same time, for different sets of attendees. To do so, you can associate Lists with activities as needed. For further information, refer to our article on associating activities with a group of attendees.
To save activities in PDF format, you can add an Agenda section to your hot site and, while viewing the website in the browser on a PC, press CTRL + P on the keyboard or on ⌘ + P on Mac devices. Select the destination printer as Save as PDF and press Save.
Adding a hotsite section to extract Agenda in PDF will only be possible if there is a hotsite tool in the package purchased with InEvent.
Checking attendees' activity enrollment status
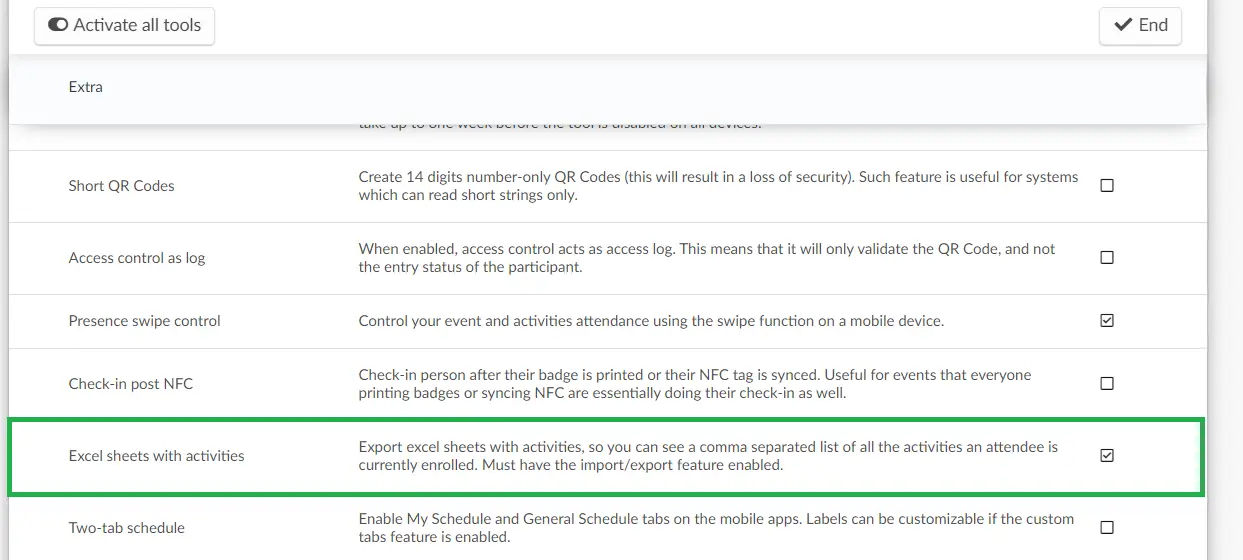
Go to Settings > Tools > scroll down until the Extra section and enable Excel sheets with activities.
Download the attendee's report. In the report, locate the filledSchedule column. The filling options are 0 and 1, where 0 indicates that the attendee hasn't enrolled in any activity, and 1 indicates that the attendee has enrolled in one or more activities.
Enrolling attendees in activities
There are numerous possibilities to register participants in their activities. For more information, refer to our article on enrolling attendees in activities.
Sending push messages to attendees enrolled in an activity
Event organizers can send push messages to attendees enrolled within a specific activity. For more information, refer to our Push Notifications article.
Approving attendees into activities
When Requires approval is enabled for an activity, administrators and sponsor representatives (optional) must explicitly approve attendees to complete their enrollment. They can also reject the attendee's enrollment if needed.
Approving people via the People > Attendees page
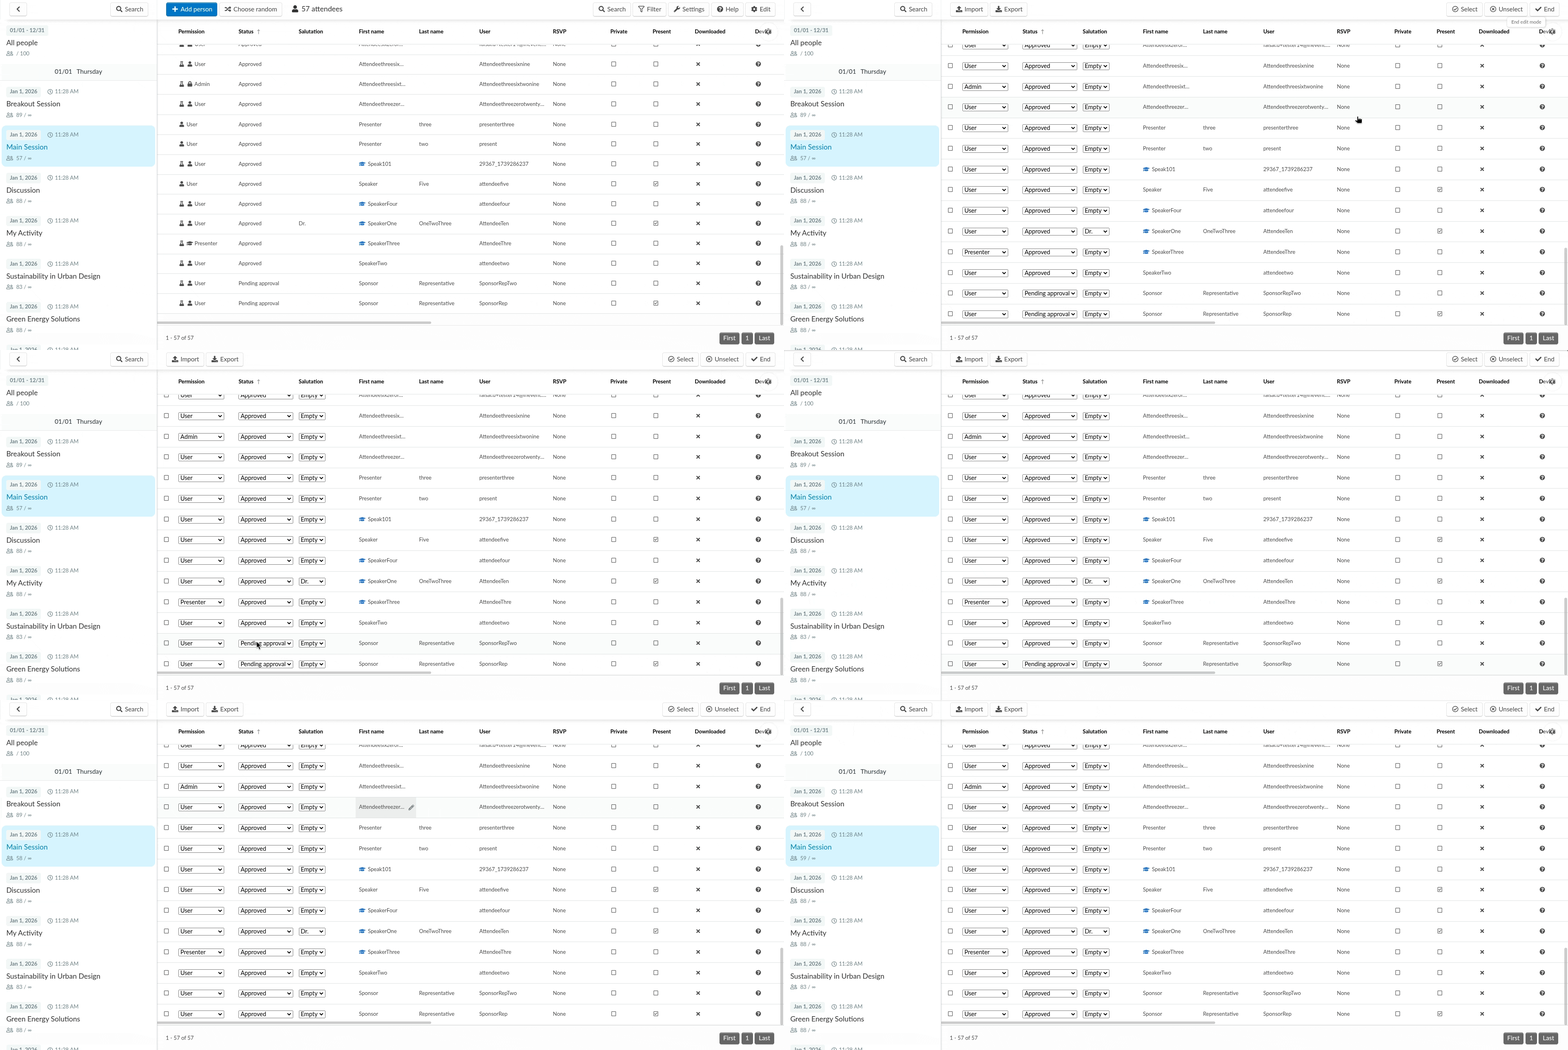
Admins can approve attendees into activities by navigating to People > Attendees and clicking on the target activity tab on the left menu. Then, click Edit and locate users with the Pending approval status. Clicking on the drop-down menu allows you to either Approve, Reject, or maintain the Pending approval status.
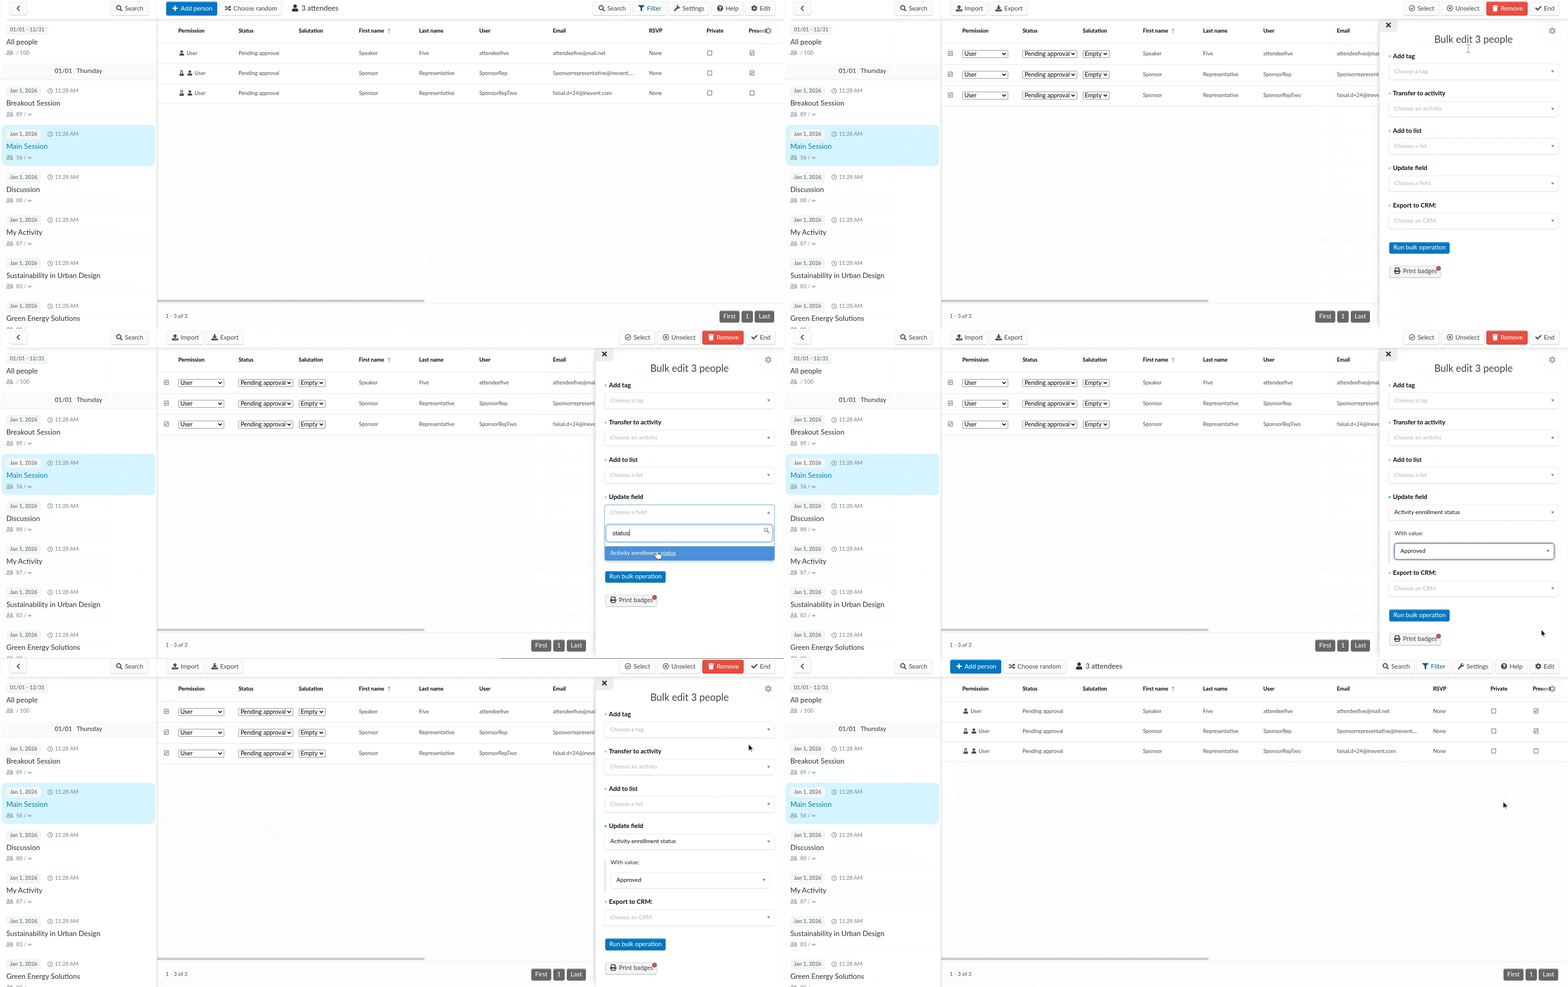
Enrollment status changes can also be done in bulk. To do so, click Edit and click Select. Doing so will select all available attendees for the page. Then, click the Update field drop-down menu and locate Activity enrollment status. Click the With value drop-down menu and select the desired status. Once done, click Run bulk operation and confirm your action on the pop-up window.
You can use the Filter feature to only display attendees with certain enrollment statuses to streamline the attendee view, such as Pending approval. You can also manually select attendees for bulk operation by manually clicking on the target attendee's checkboxes on the left.
Approving attendees into activities via the Web app
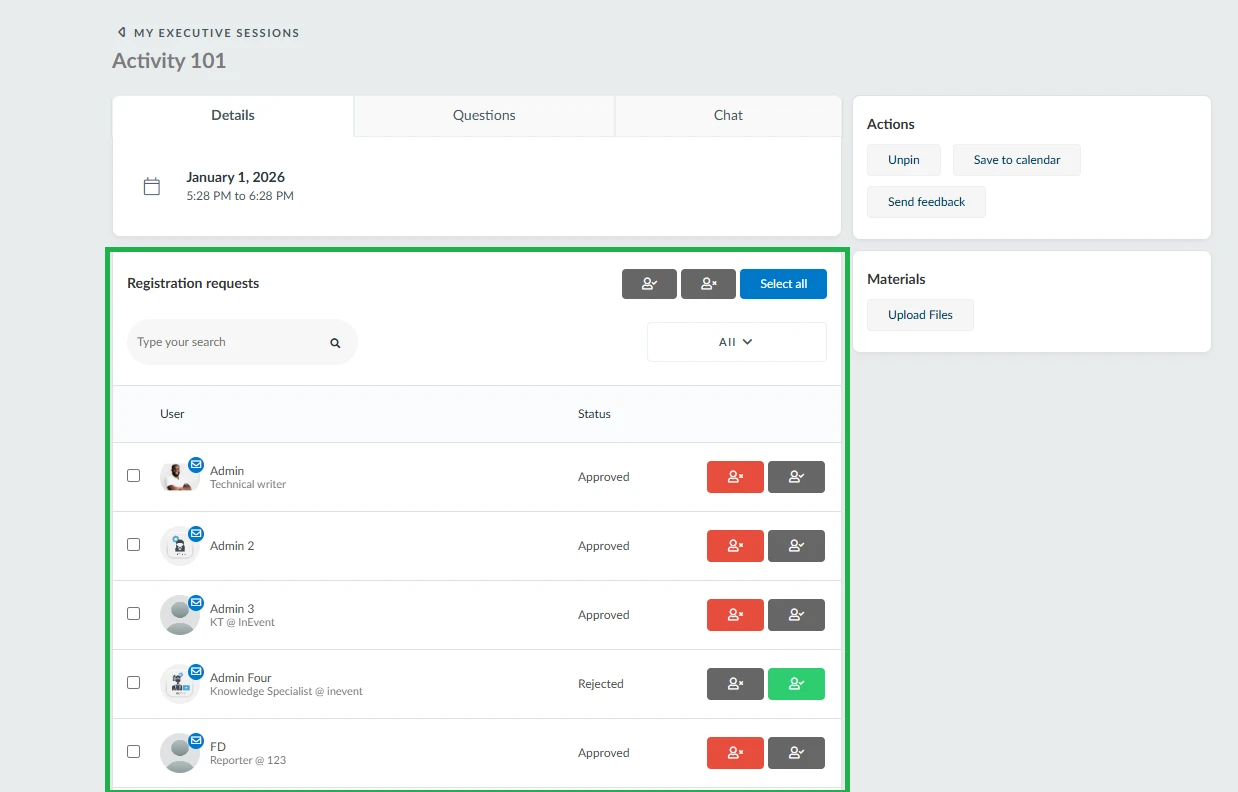
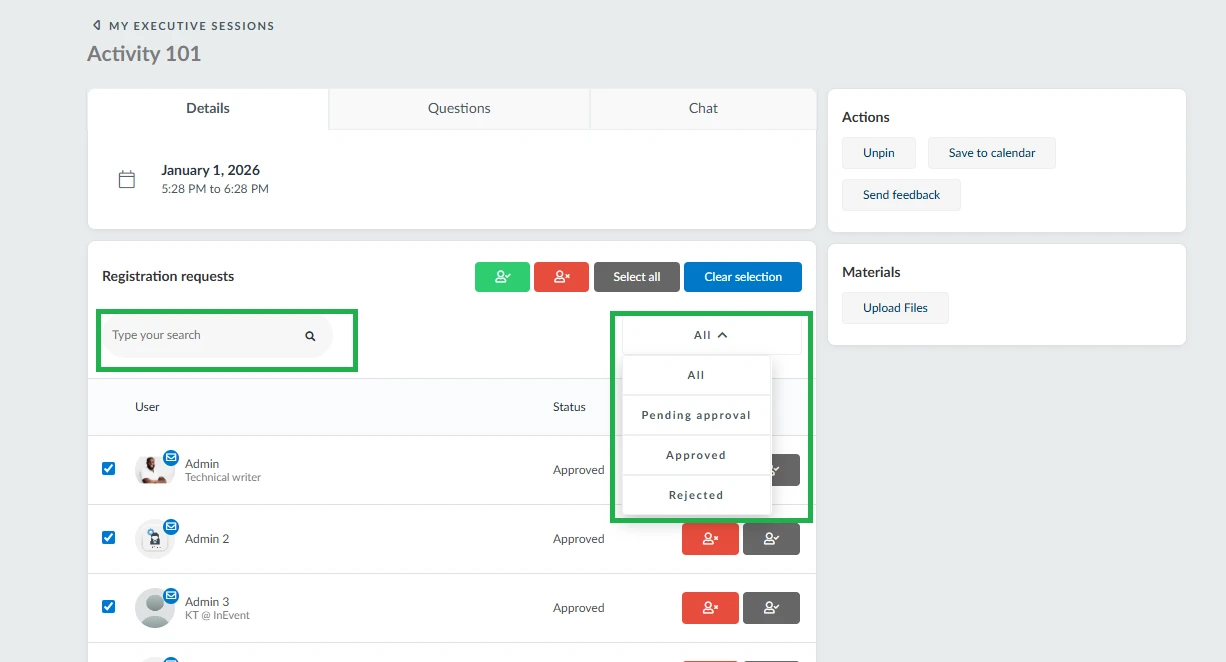
Administrators or sponsor representatives can also approve or reject an attendee's activity enrollment by navigating to My Agenda tab in the web app and clicking the Details button of the specific activity. The web app's activity view allows for reviewing the list of attendees and their enrollment status, as well as approving or rejecting enrollment.
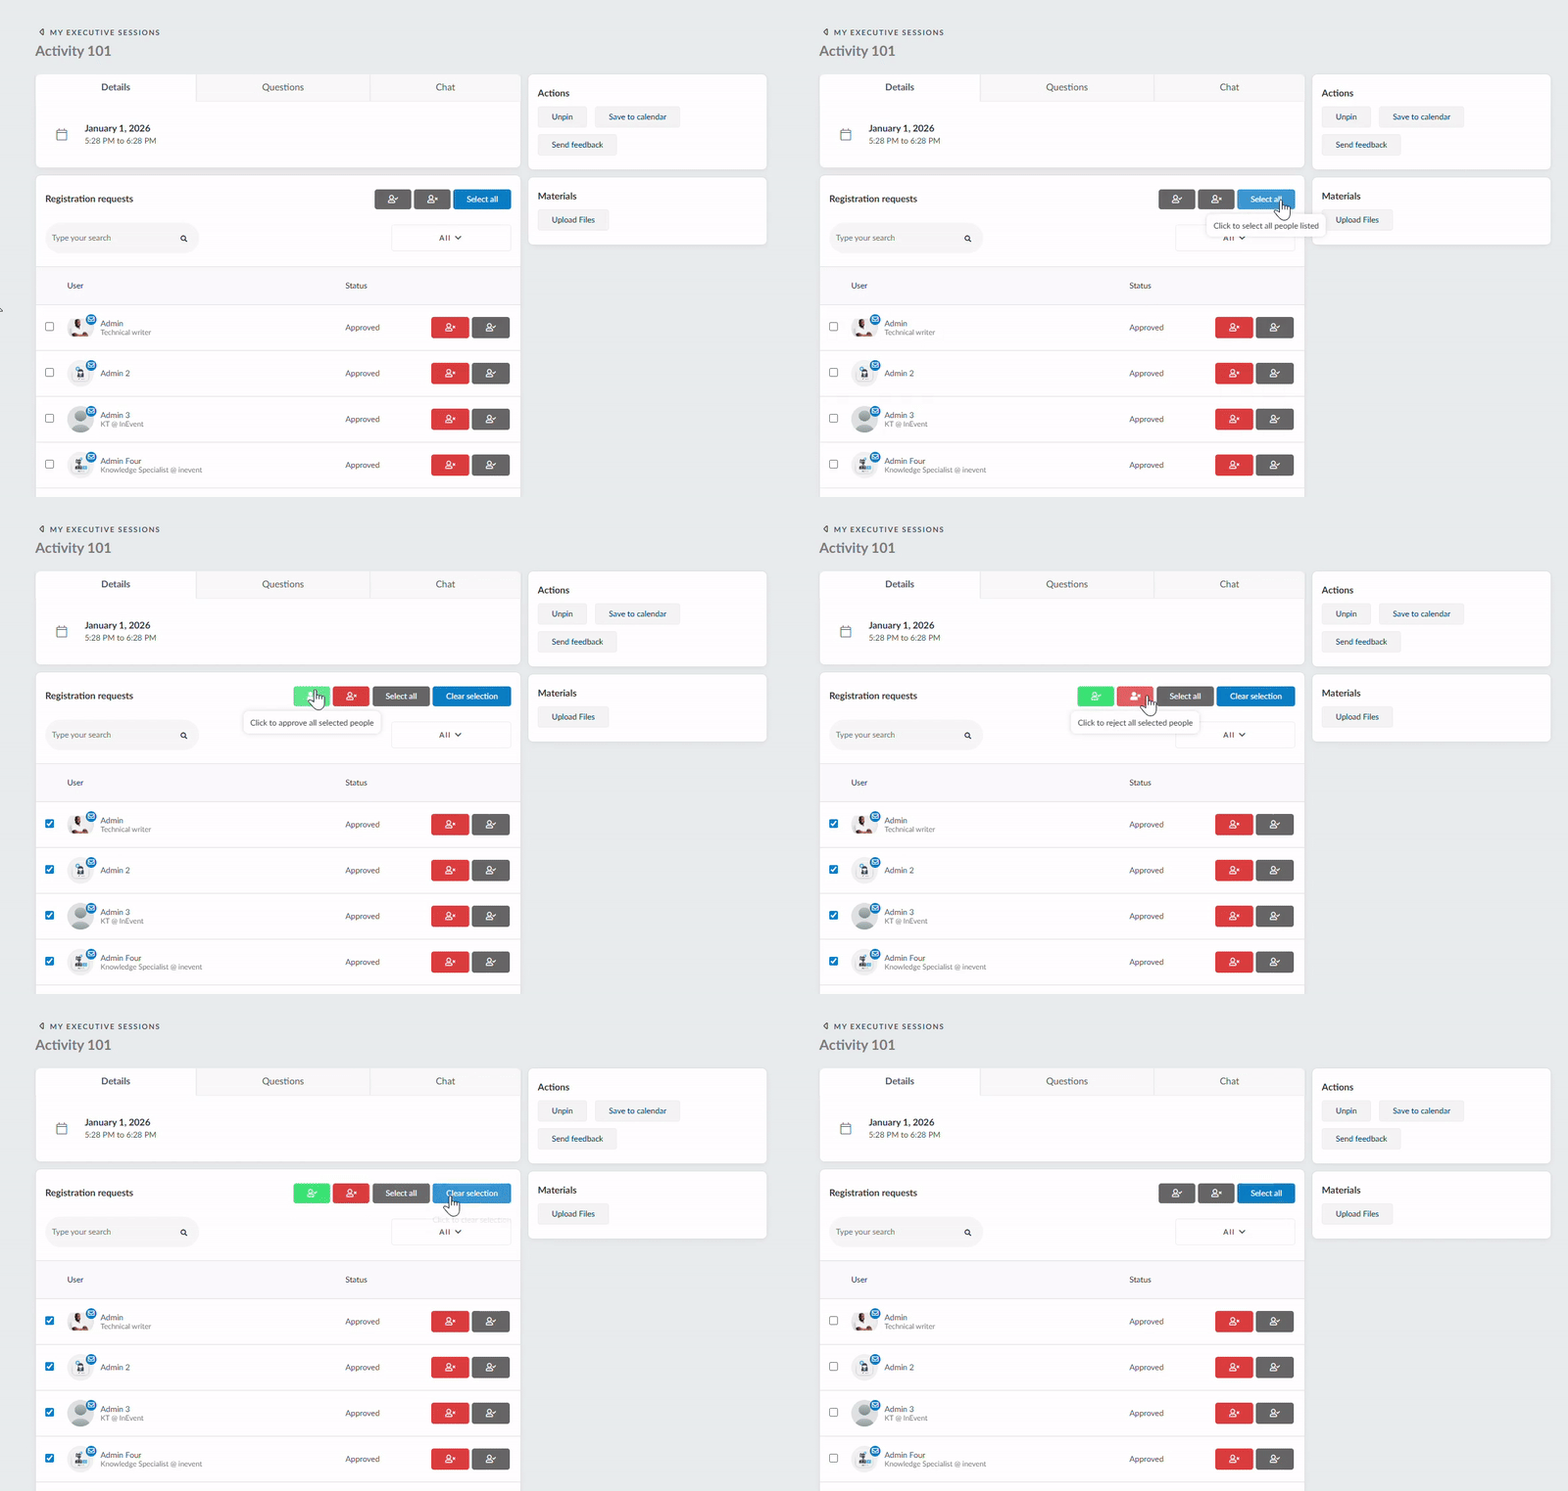
Enrollment status changes can also be done in bulk. Click Select all to select all attendees, then choose the desired status (Approve or Reject). Click Clear selection to remove the selection.
You can also search for a specific attendee using the search box and use the All dropdown to filter by status: Pending approval, Approved, or Rejected.
Once an attendee is approved or rejected, they will receive an automatic approval or rejection email. For more information, refer to our Confirmation email and other automatic emails article.
Archiving activities
By archiving activities, event organizers can manage their agenda easily. Organizers can hide or archive activities from My Agenda, Virtual Lobby and Website without having to delete them.
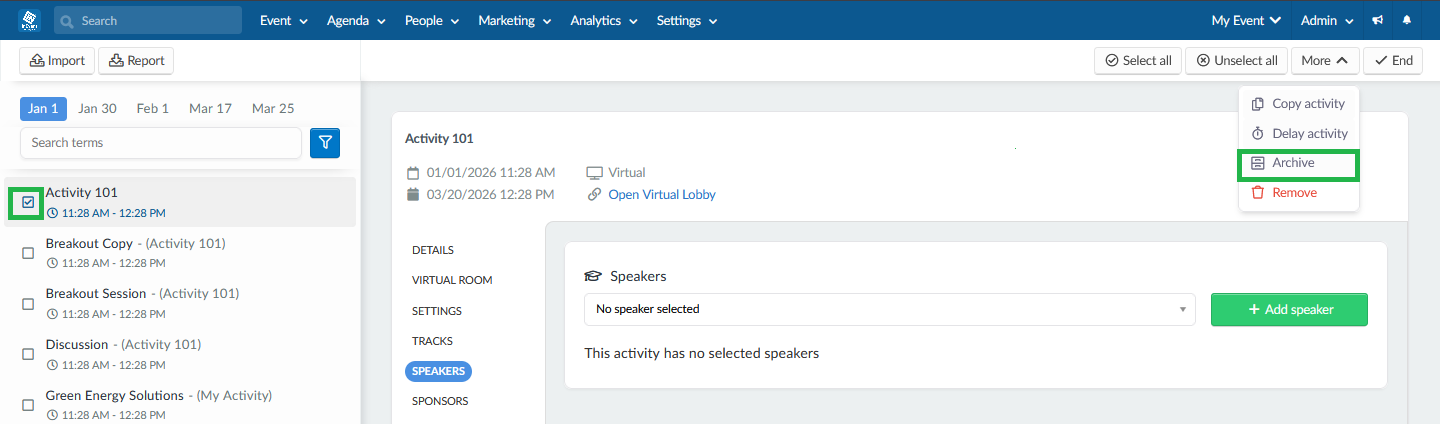
To archive an activity, complete the following steps:
Navigate to Agenda > Activities.
Click Edit on the top right corner of the page.
Check the box next to the activity(ies) you wish to archive.
Click on Archive.
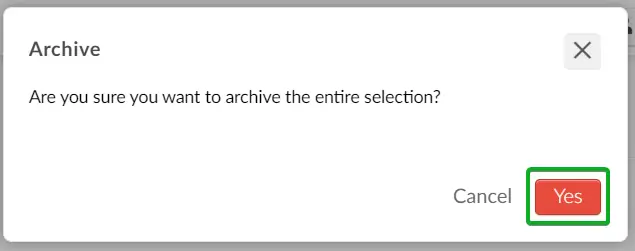
A pop-up window will appear. Click Yes on the pop-up window to confirm.
Press End to save your changes.
Archived activities will no longer be visible from the Virtual Lobby, My Agenda, and Website.
Viewing archived activities
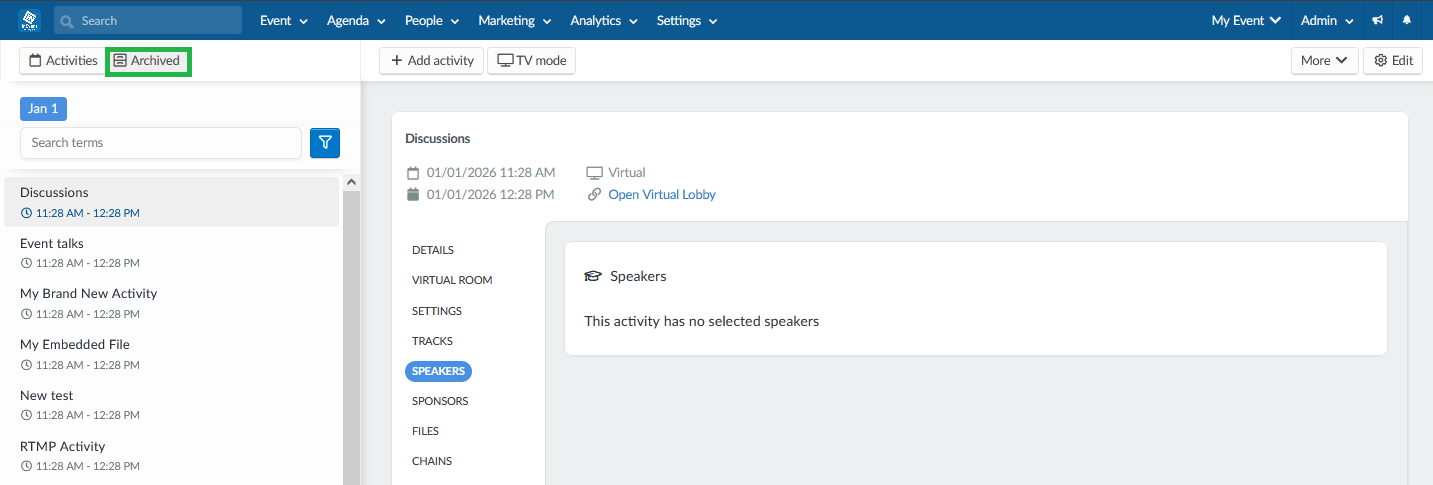
Event organizers can view the list of archived activities by navigating to Agenda > Activities and clicking on the Archived button on the top left corner of the page.
Unarchiving activities
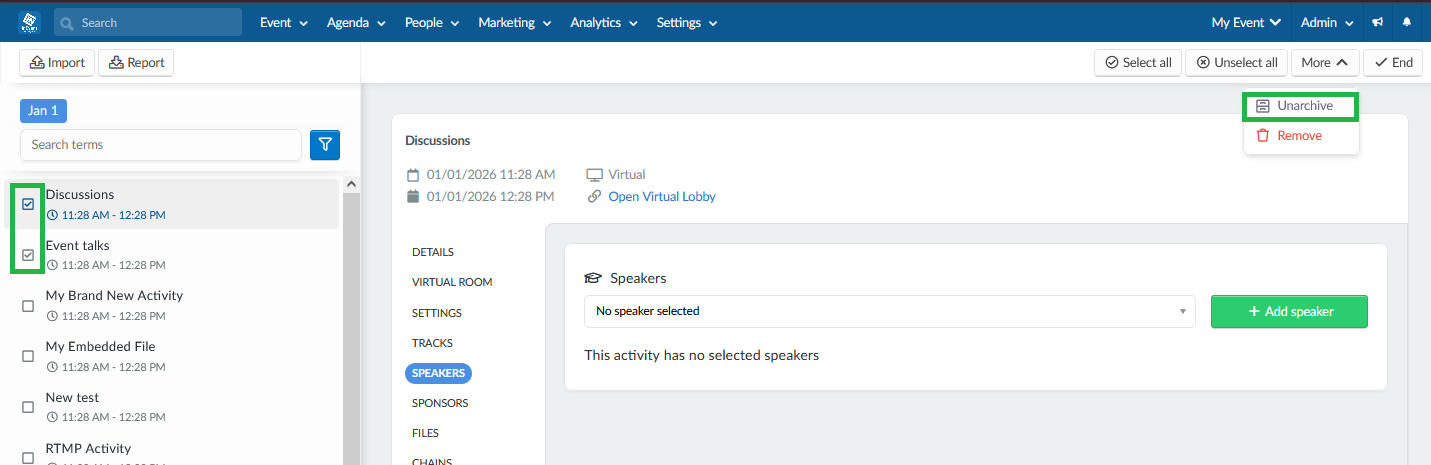
Archived activities can be made visible again by unarchiving them. To unarchive an activity, complete the following steps:
Navigate to Agenda > Activities.
Click on the Archived button on the top left corner of the page.
Click on Edit.
Check the box next to the activity you wish to unarchive.
Click on More, then Unarchive.
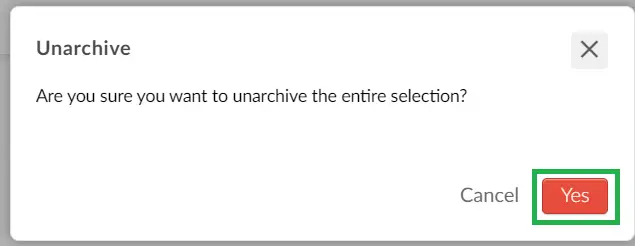
A pop-up window will appear. Click Yes on the pop-up window to confirm.
Press End to save your changes.
Unarchived activities will be visible in the Virtual Lobby, My Agenda tab, and Website.
Removing activities
If you wish to delete one or more activities you can simply follow the next steps. Bear in mind that you will see a different pop-up message to confirm the action depending on the activity (if it has a recording or not).
Activities with no recording
Go to Agenda > Activities > press Edit
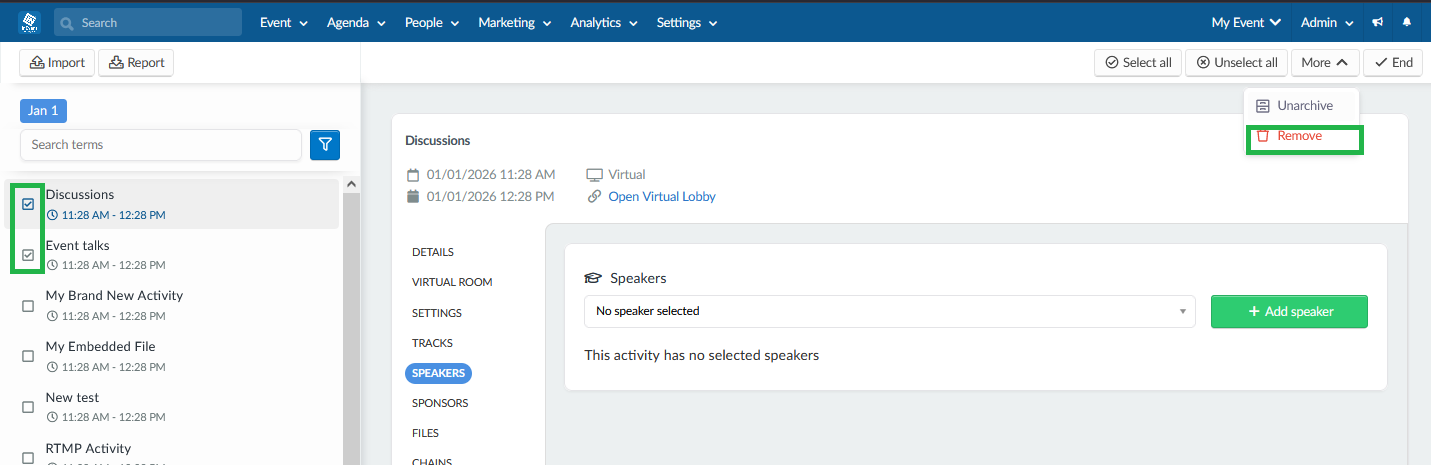
Select the activity you wish to remove and press Remove
Press Remove again in the pop-up message
Click End.
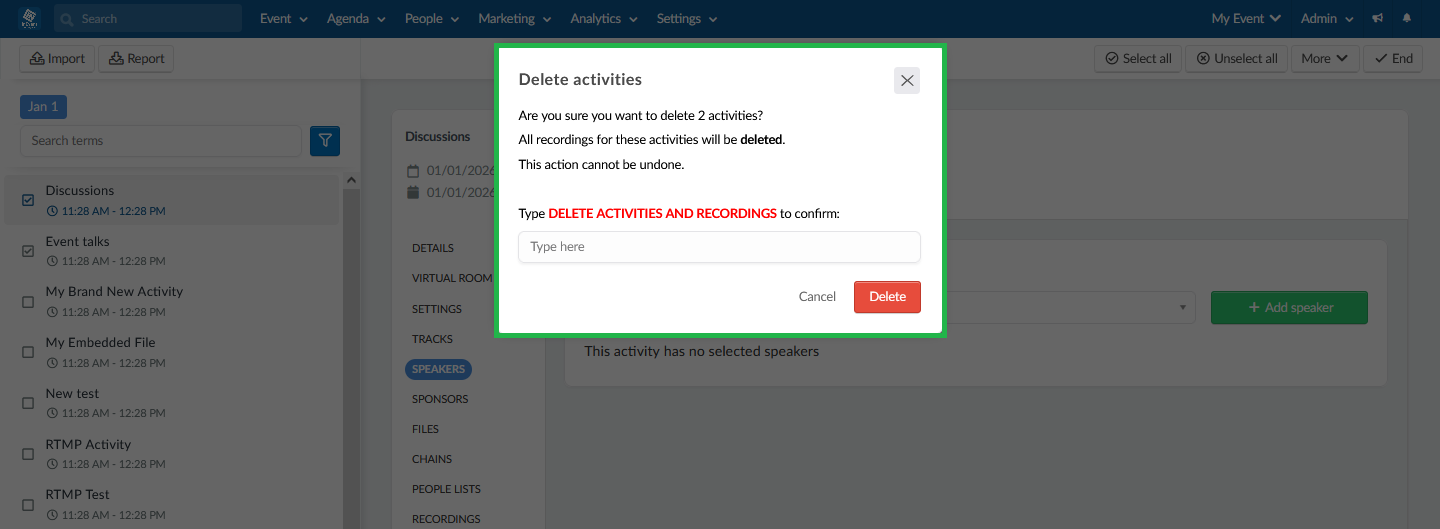
Activities with recording
Go to Agenda > Activities > press Edit.
Select the activities you would like to remove and press Remove.
Type in the corresponding field: DELETE ACTIVITY AND RECORDINGS.
Press Delete to confirm the action > press End.
Searching activities
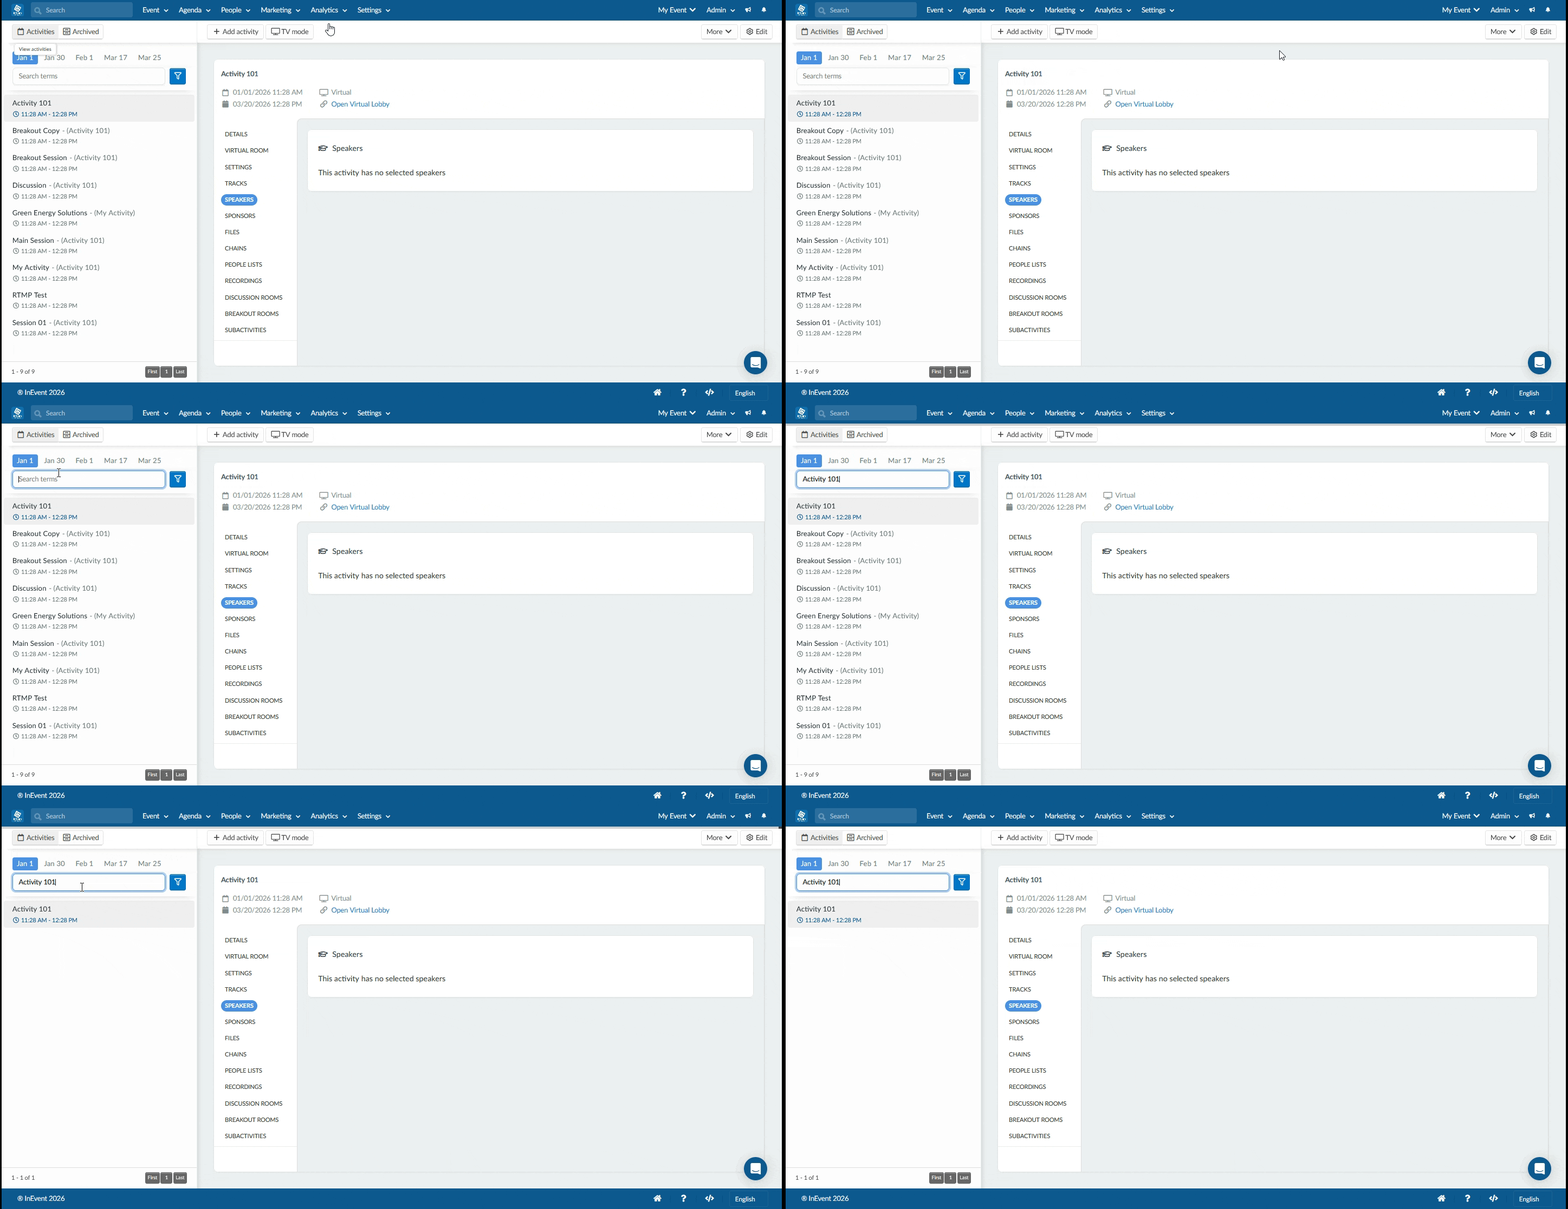
To quickly find a specific activity on the Agenda > Activities page, use the Search button. Simply click the Search button and type in a keyword from the activity's title, then press the blue Search button. This will automatically display the activities that have the key word you have typed, helping you locate the specific activity you're looking for faster.
Filtering activities by lists
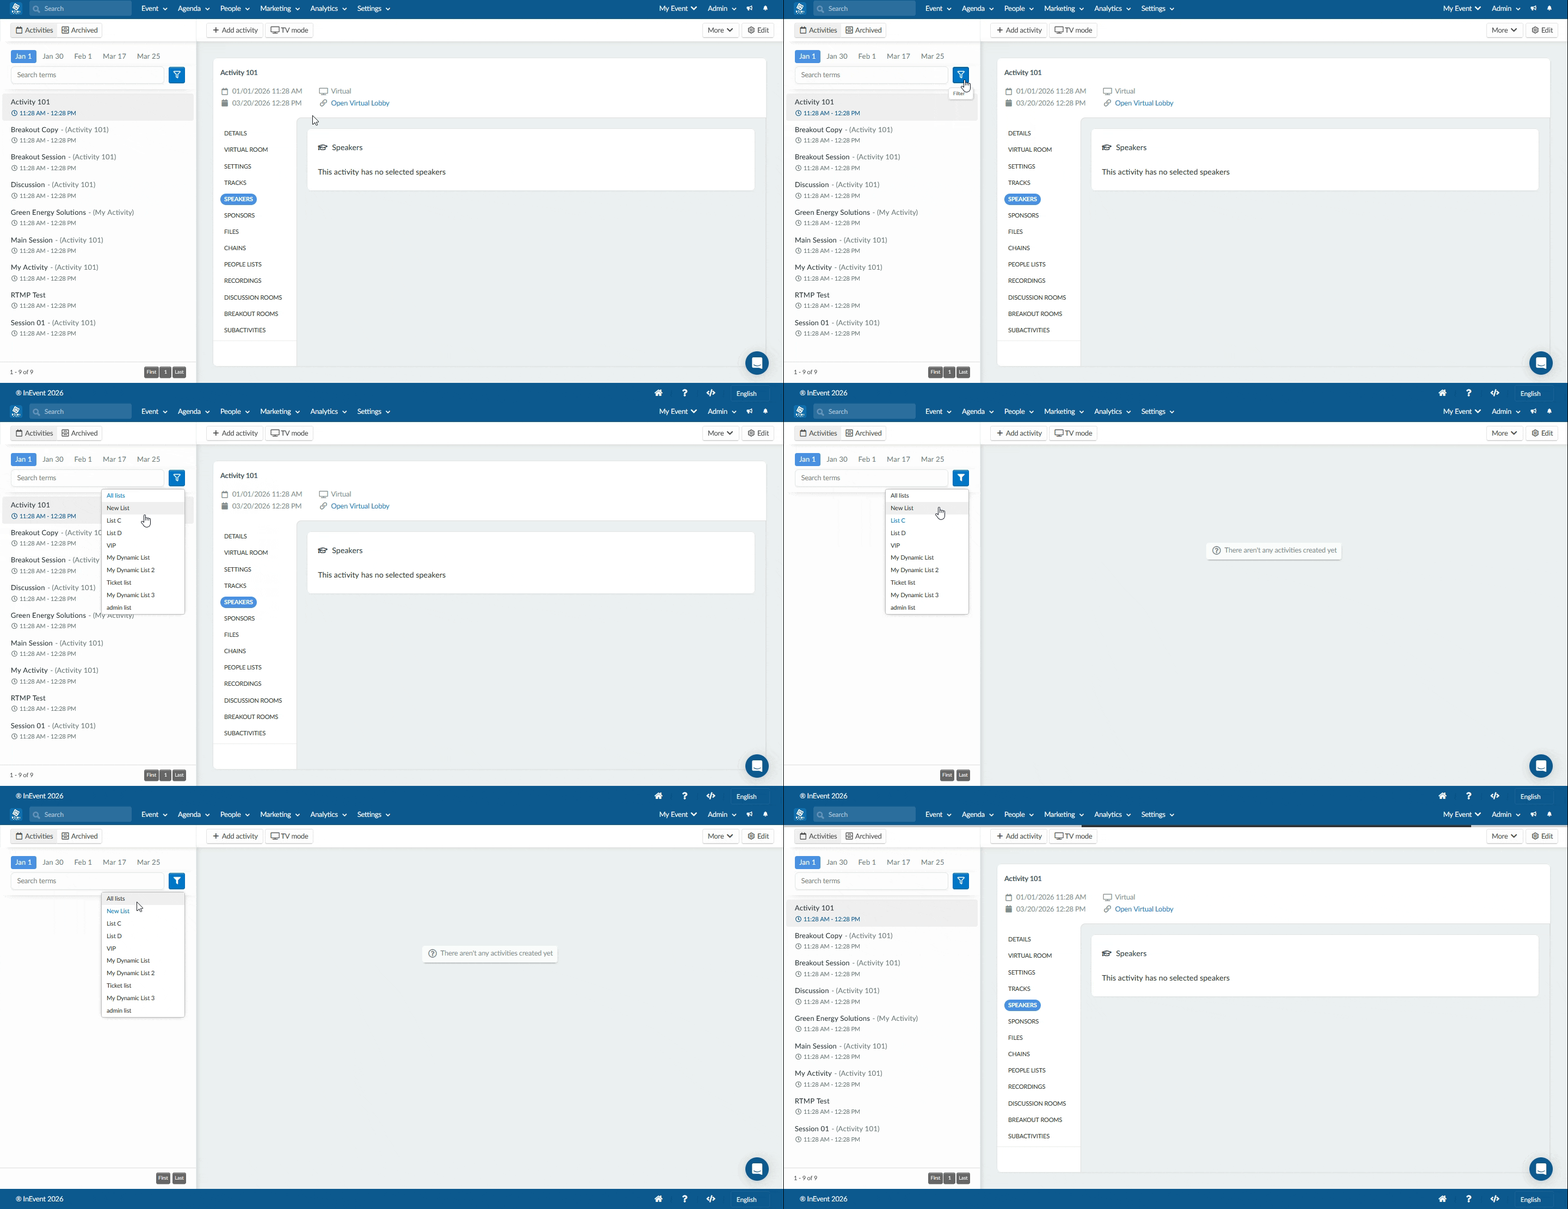
The filter feature in the Activities page allows you find activities that have been linked to a list. By clicking on the Filter button, it will display the lists available in your event. Click on a specific list and the activities associated with that list will be displayed.
Select All from the drop-down to remove a filter.
Activity reports
The InEvent platform provides multiple means to extract activity reports, both for specific activities and in bulk, as well as one-time and recurring reports.
Extracting reports of all activities
To extract a report of all activities, follow the steps below;
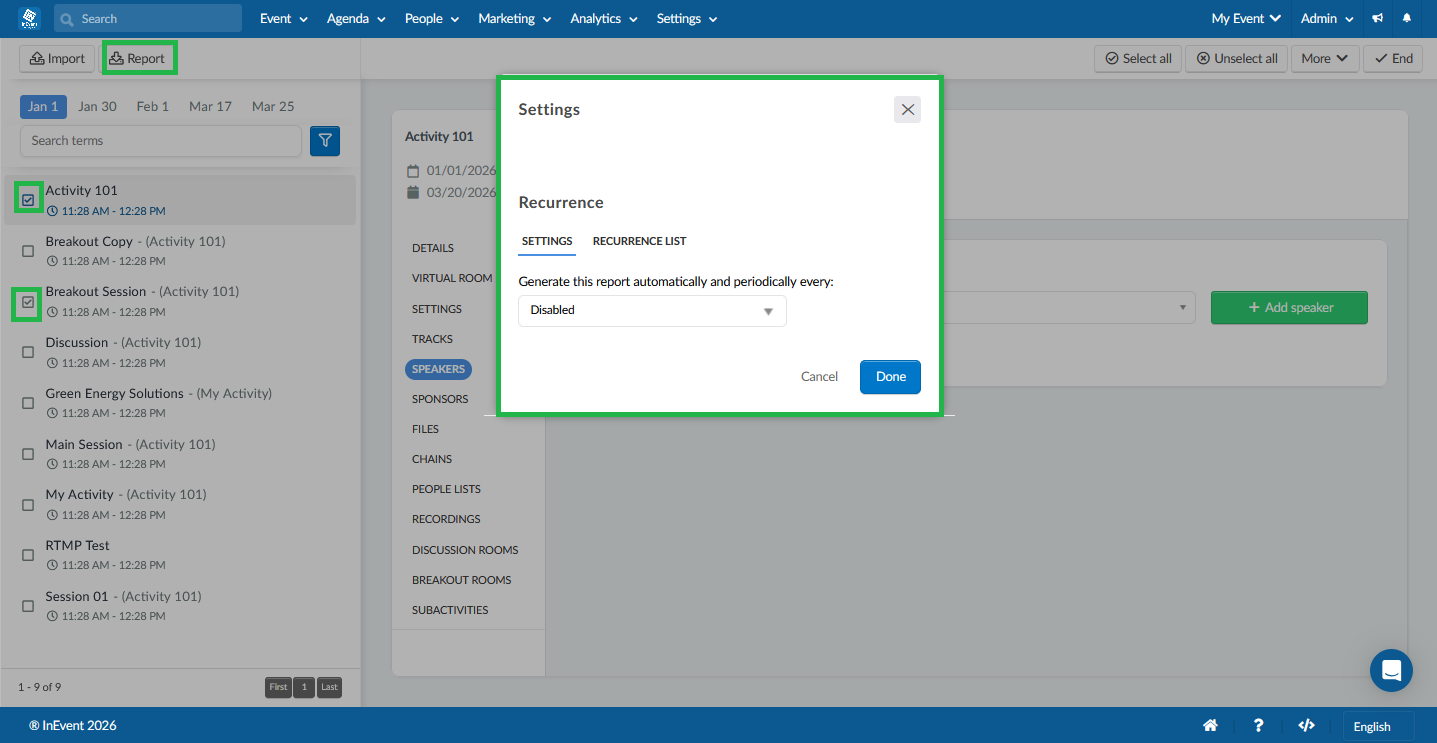
Press the Edit button.
In the upper left corner, click on the Report button.
From the pop-up box, click Done.
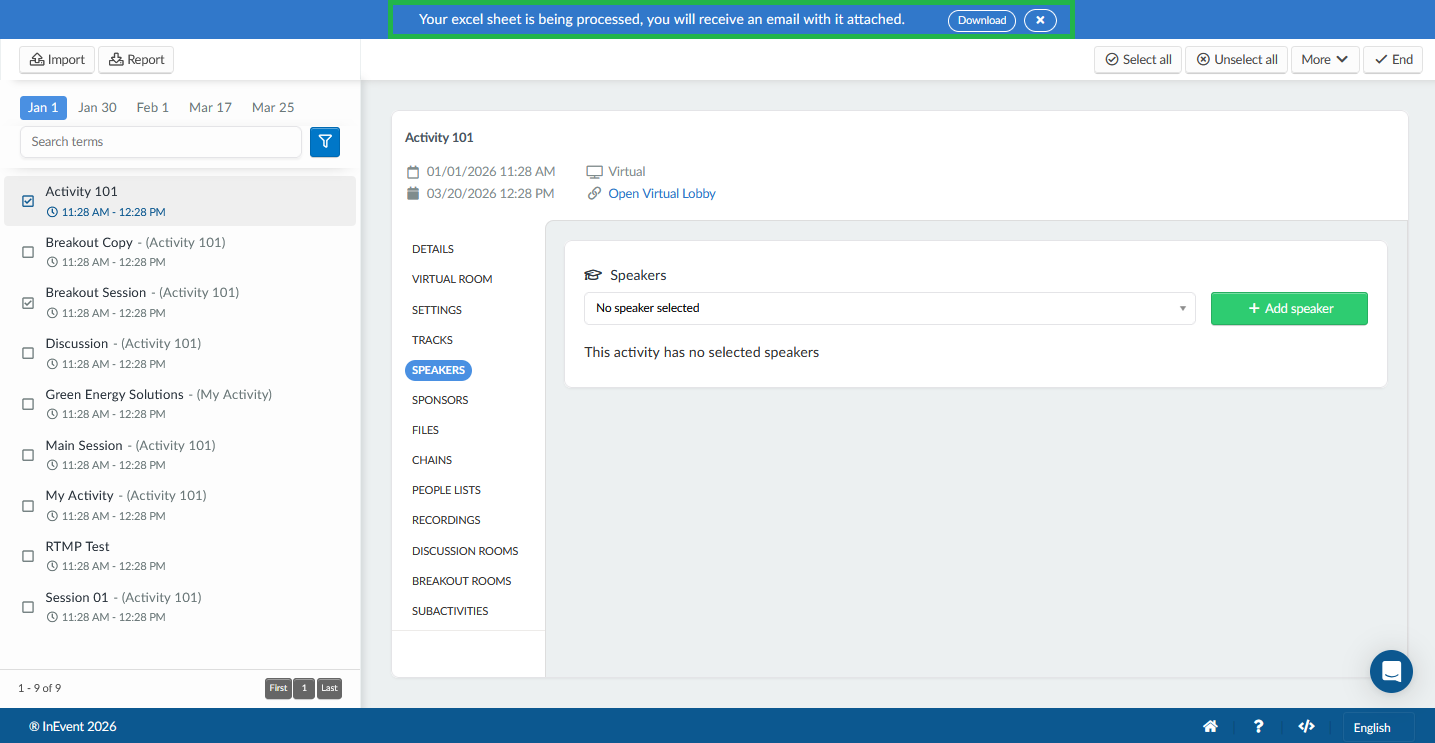
You will receive an email with the report and a download request will also appear in the blue notification banner.
By clicking on the Download button in the blue notification banner, you will be redirected to the All Reports > Activities page where you can preview or download the report.
This report will be for all your activities and will contain information such as: activityID, eventID, placeID, liveID, mktolistd, msdSessionId,name, description, latitude, longitude,location, dateBegin, dateEnd, dateBeginTimezone, dateEndTimezone, timezone, capacity, oversize, general, highlight, notify, visible, hide settings, tags, lists, etc.
Activated columns will display 1.
This report will also have columns for RTMP activities which displays the keys and URLs related to the activity. You will see the following fields: streamingKey, streamingFailoverKey, streamingLowLatencyKey and rtmpAlternateTracks.
Extracting reports of an activity
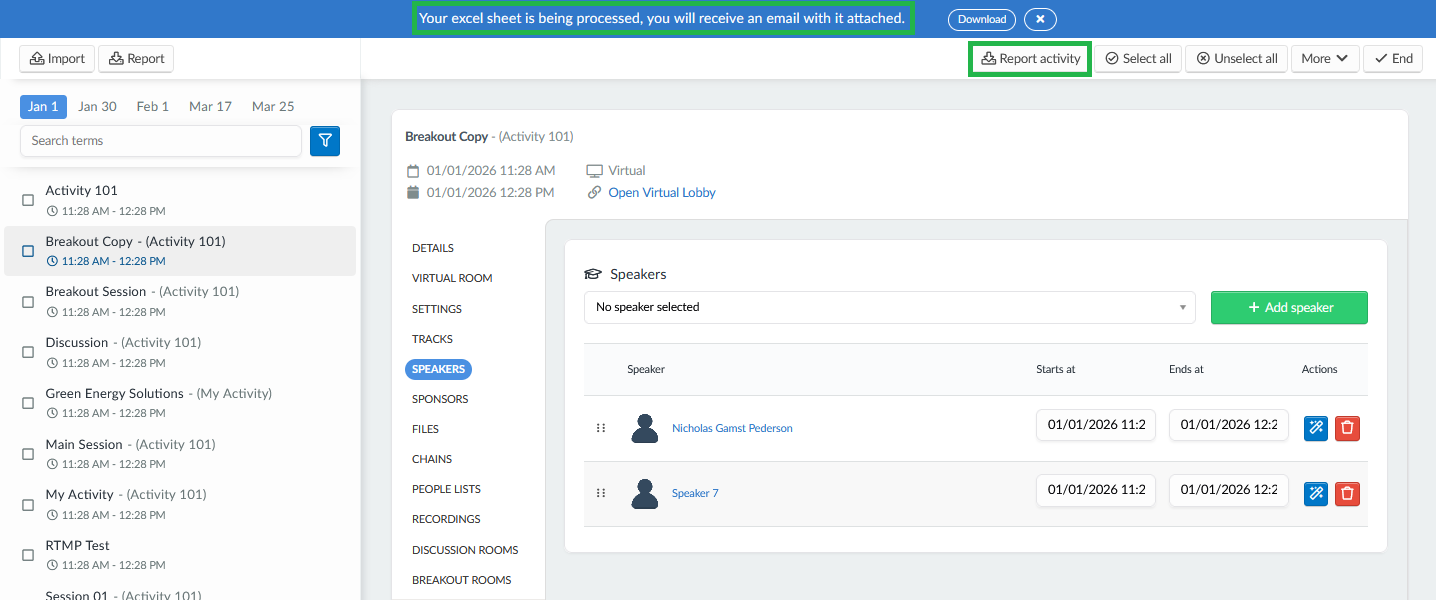
If you wish to generate reports for specific activities, click on the activity, press Edit and you will see a Report activity button at the upper right. Click on it and you should receive an email with the activity's report.
By clicking on the Download button in the blue notification banner, you will be redirected to the All reports > Activities page where you can preview or download the report.
This report will be for a specific activity and contain more detailed, targeted and focused information on attendees and their participation in the activity such as: personID, username, name, email, role, company, activities, groupRooms, totalViews, uniqueViews, dateJoined, dateUpdated, totalTimeSpent, avgTimeSpent, watchTimeSpent, Polls, Questions, etc.
This report will also have columns for each reaction added in a live stream activity. Each reaction column will display the amount of times a user clicked on that reaction. To identify each reaction, its name will be enclosed in brackets within the respective column, as shown below:
The Reactions feature can only be used when the activity is set to Live studio. Refer to the Live Studio article for more information.
Automating your report downloads
You can automate you report downloads by creating a Recurring report. To do this, follow the steps below;
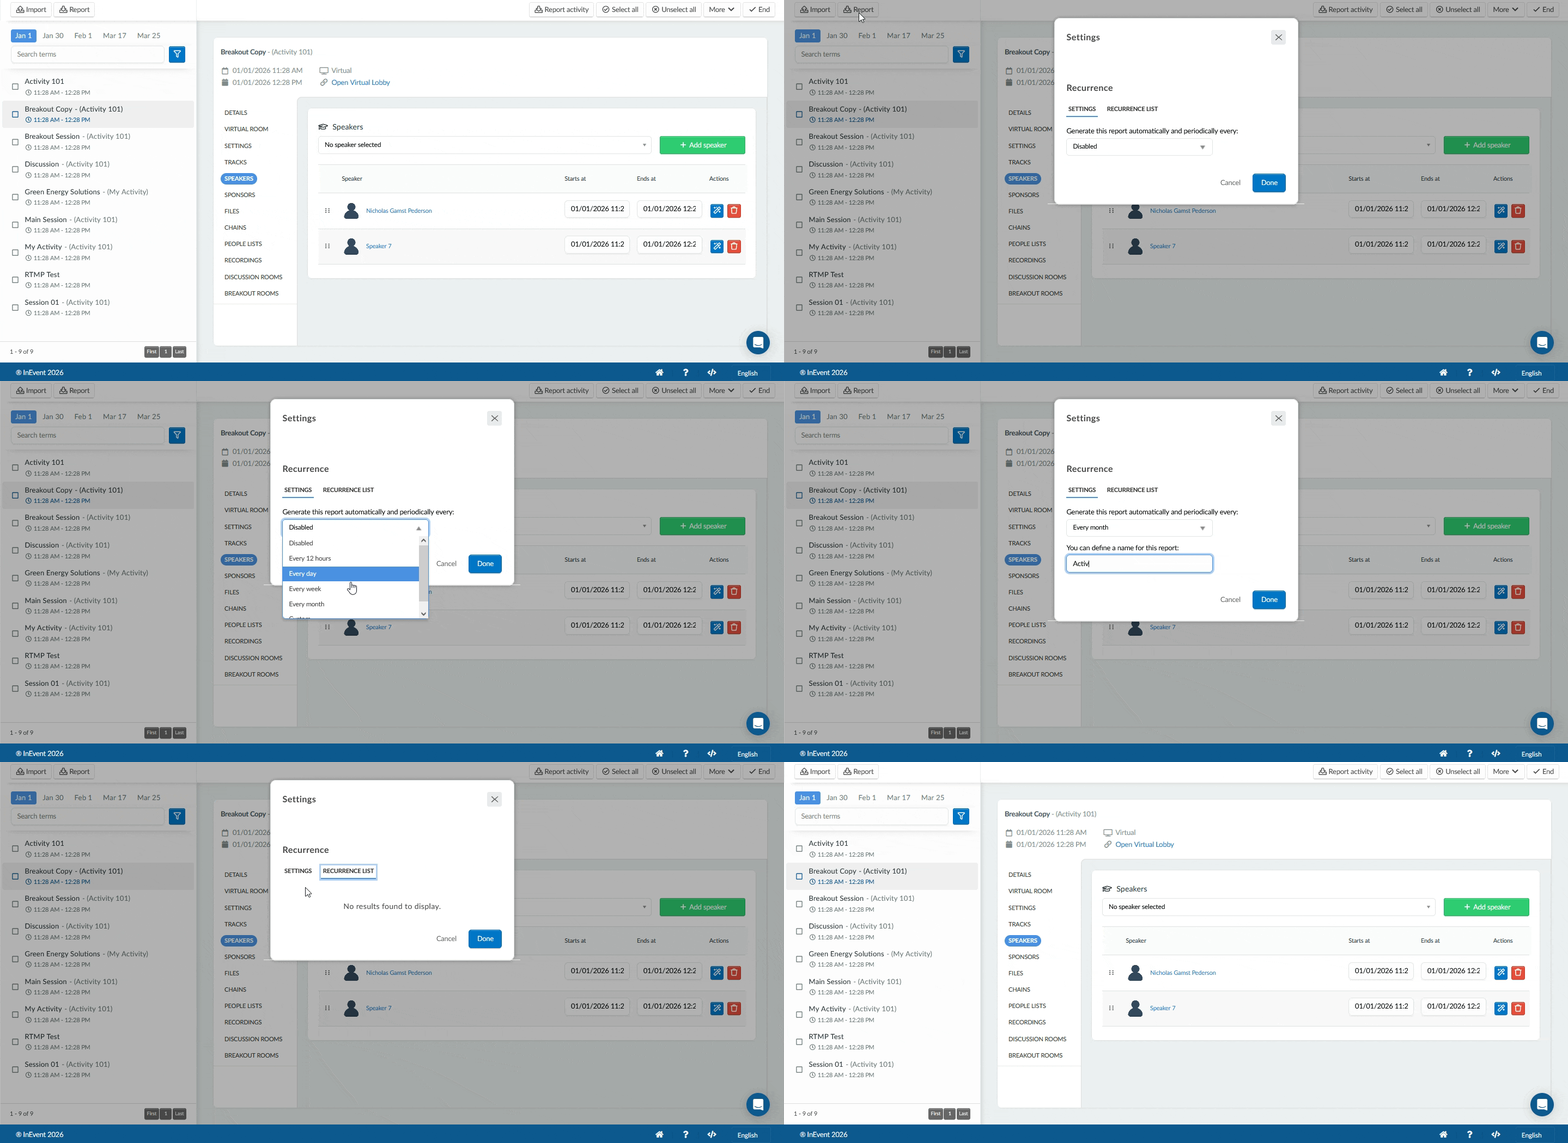
Press Edit and click on Report in the upper left corner, this will trigger a pop up window to appear.
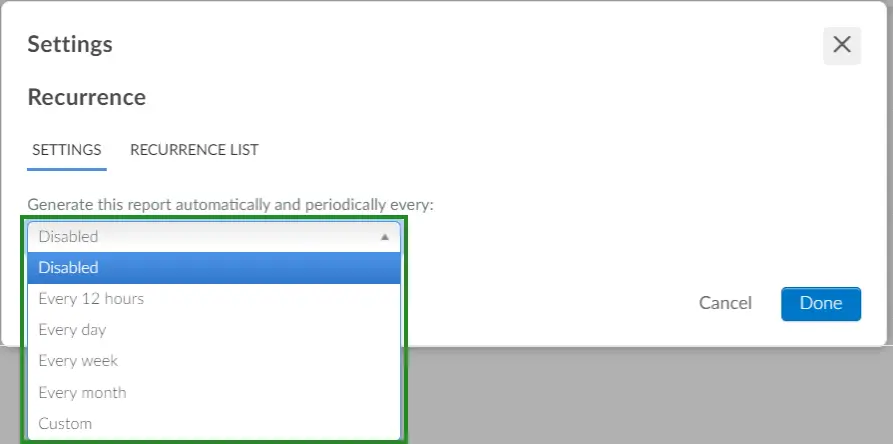
Click on the drop-down list in the Settings pop-up box and select your desired period to generate your report periodically.
You can choose the period for automating report downloads by selecting one of the following options from the drop down menu: Every 12 hours, Everyday, Every week and Every month. You can also choose to create a custom period for generating reports.
Enter the name for the report
Click on Done to generate your recurring report.
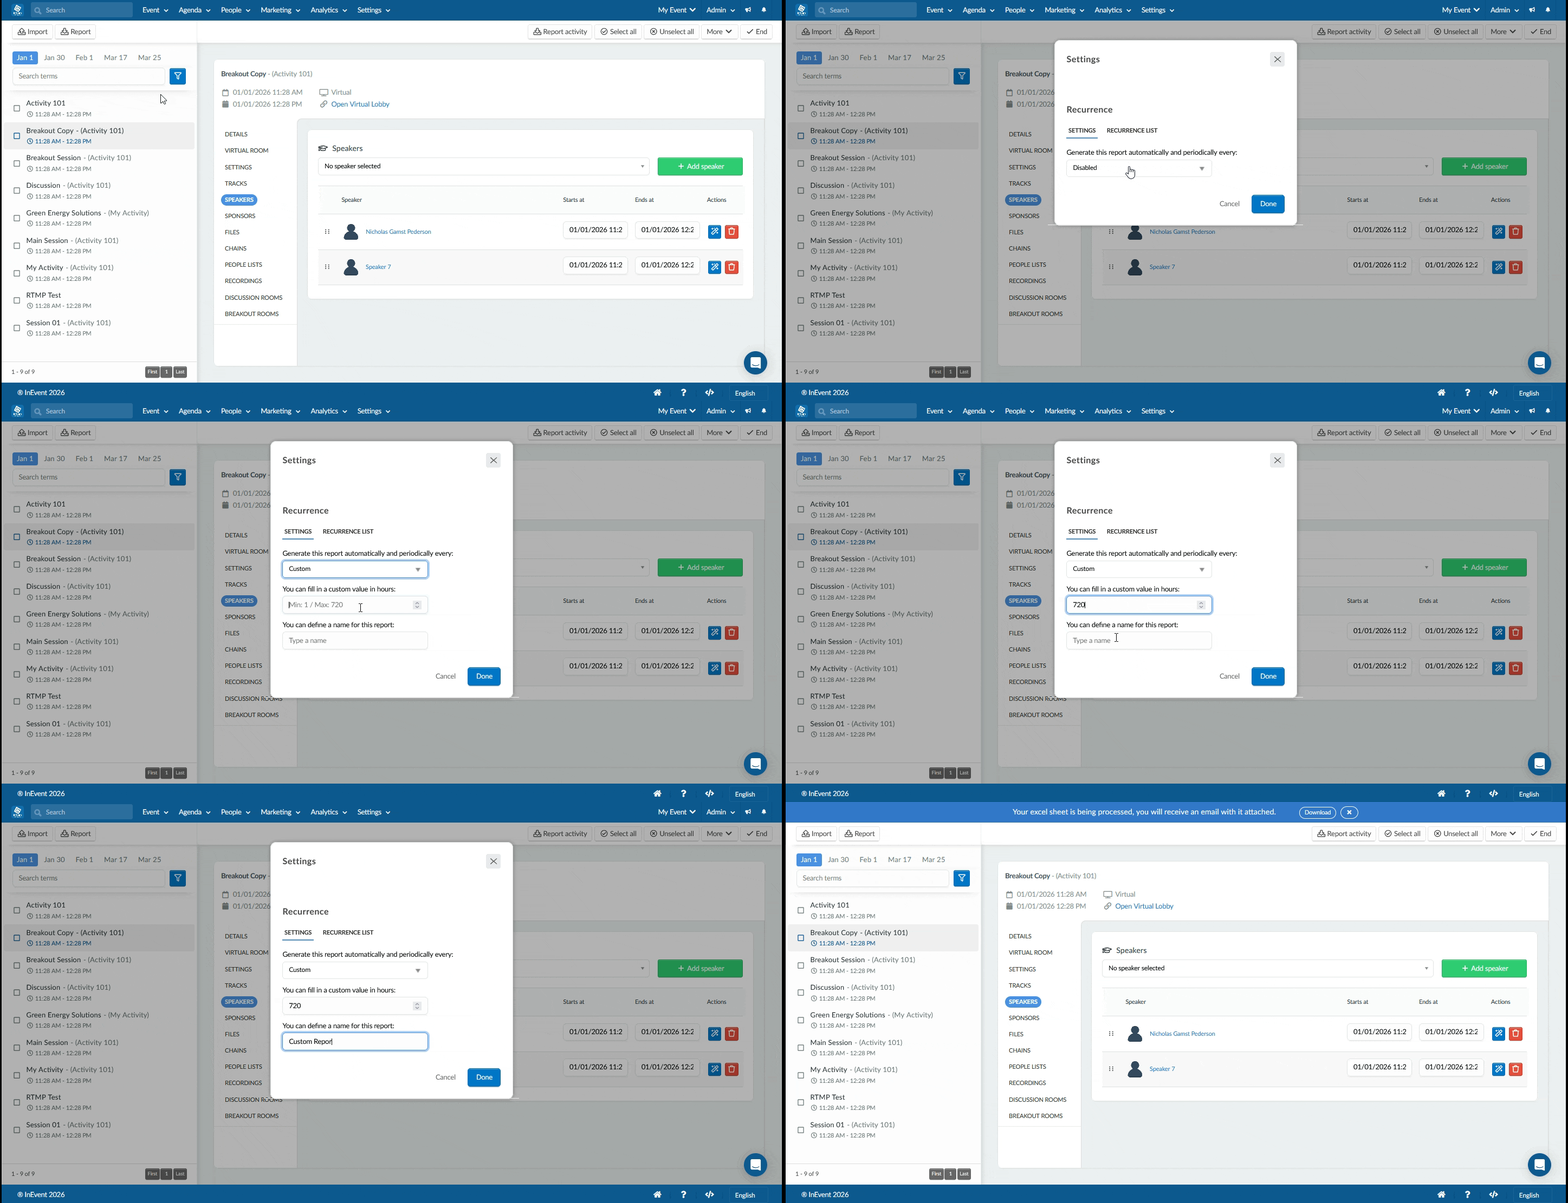
To create a custom recurring report follow the steps below:
Press Edit and click on Report in the upper left corner. A pop up window will appear.
From the pop up window, click on the drop-down list and select Custom.
Enter your desired period for generating your periodic reports.
Define a name for the report and click on Done.
Editing recurring report settings
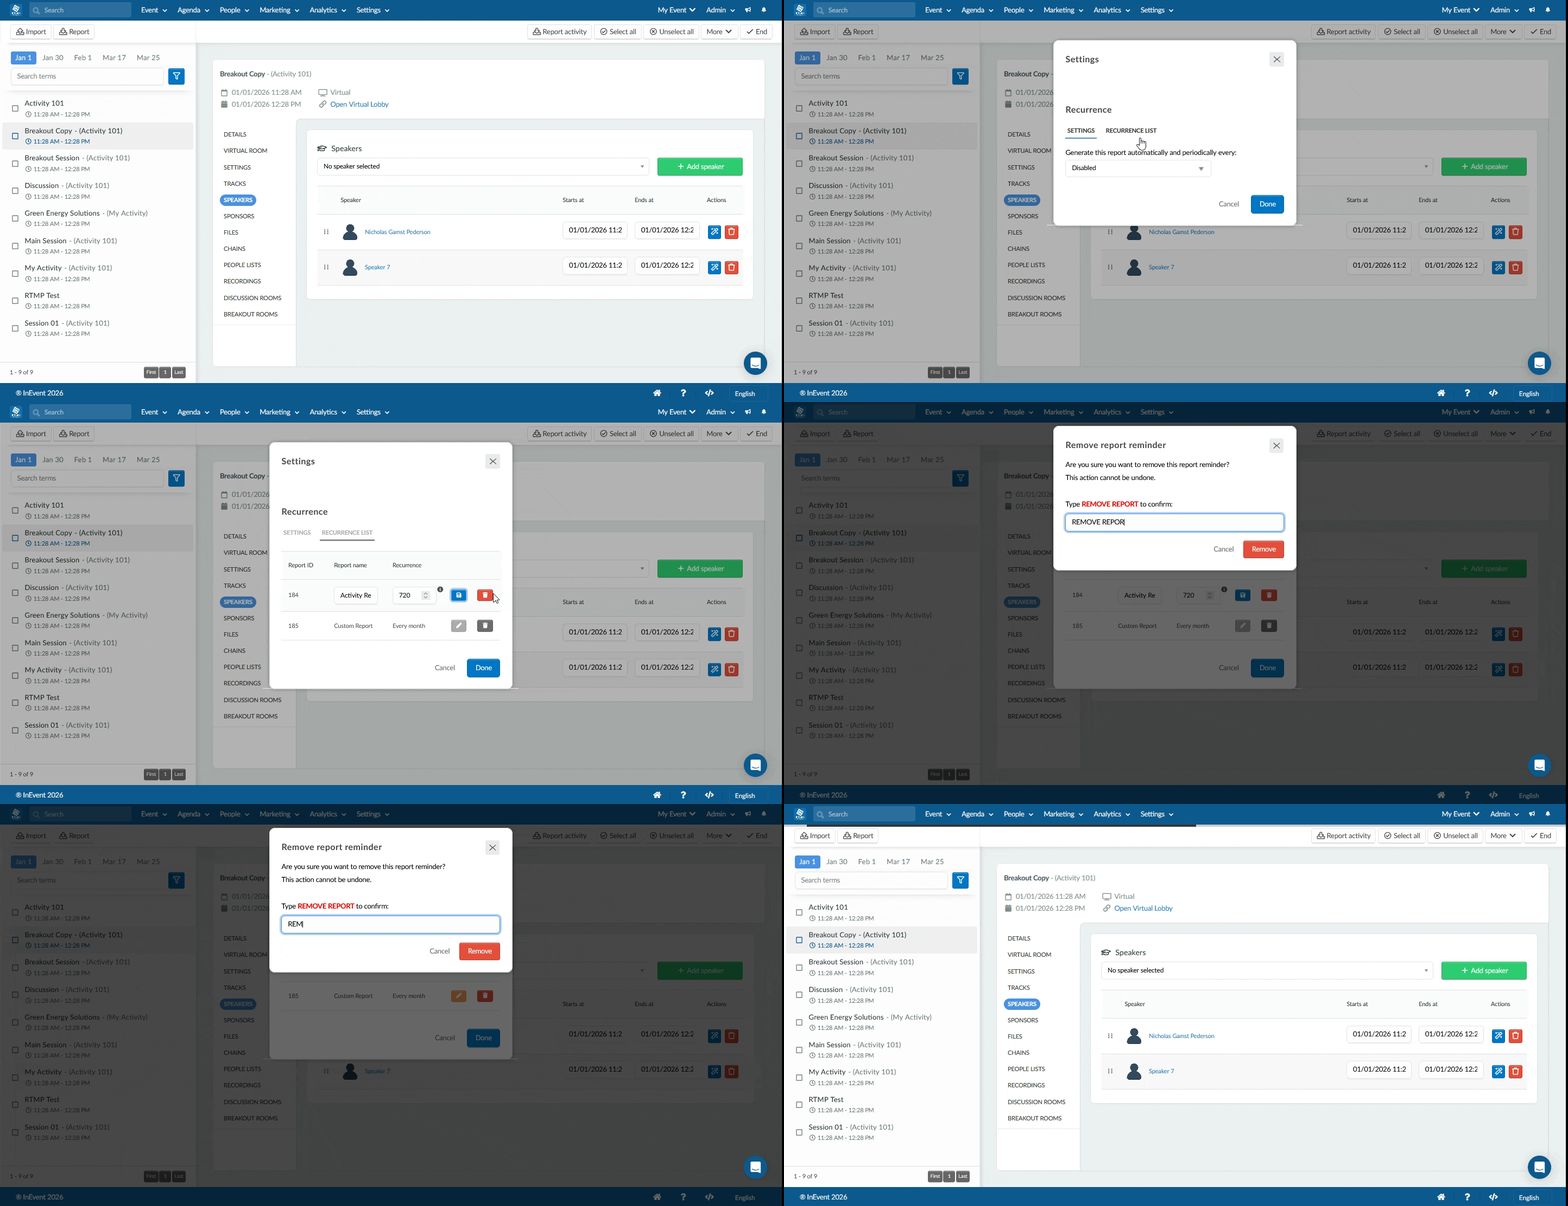
You can edit the settings of recurring reports you have created, this allows you to edit the name and recurring time of your reports. To do so, follow the steps below:
Press Edit and click on Report in the upper left corner. A pop up window will appear.
From the pop up box, Select RECURRENCE LIST.
Click on the corresponding orange icon and edit the Report name and/or Recurrence.
Click on the corresponding blue icon to save the changes made.
Deleting a recurring report
To delete the recurring report:
Click on the red thrash icon beside the report
Enter REMOVE REPORT in the pop-up that appears to confirm the deletion.
Click on Remove to finalize.
Clearing analytics for a specific activity report
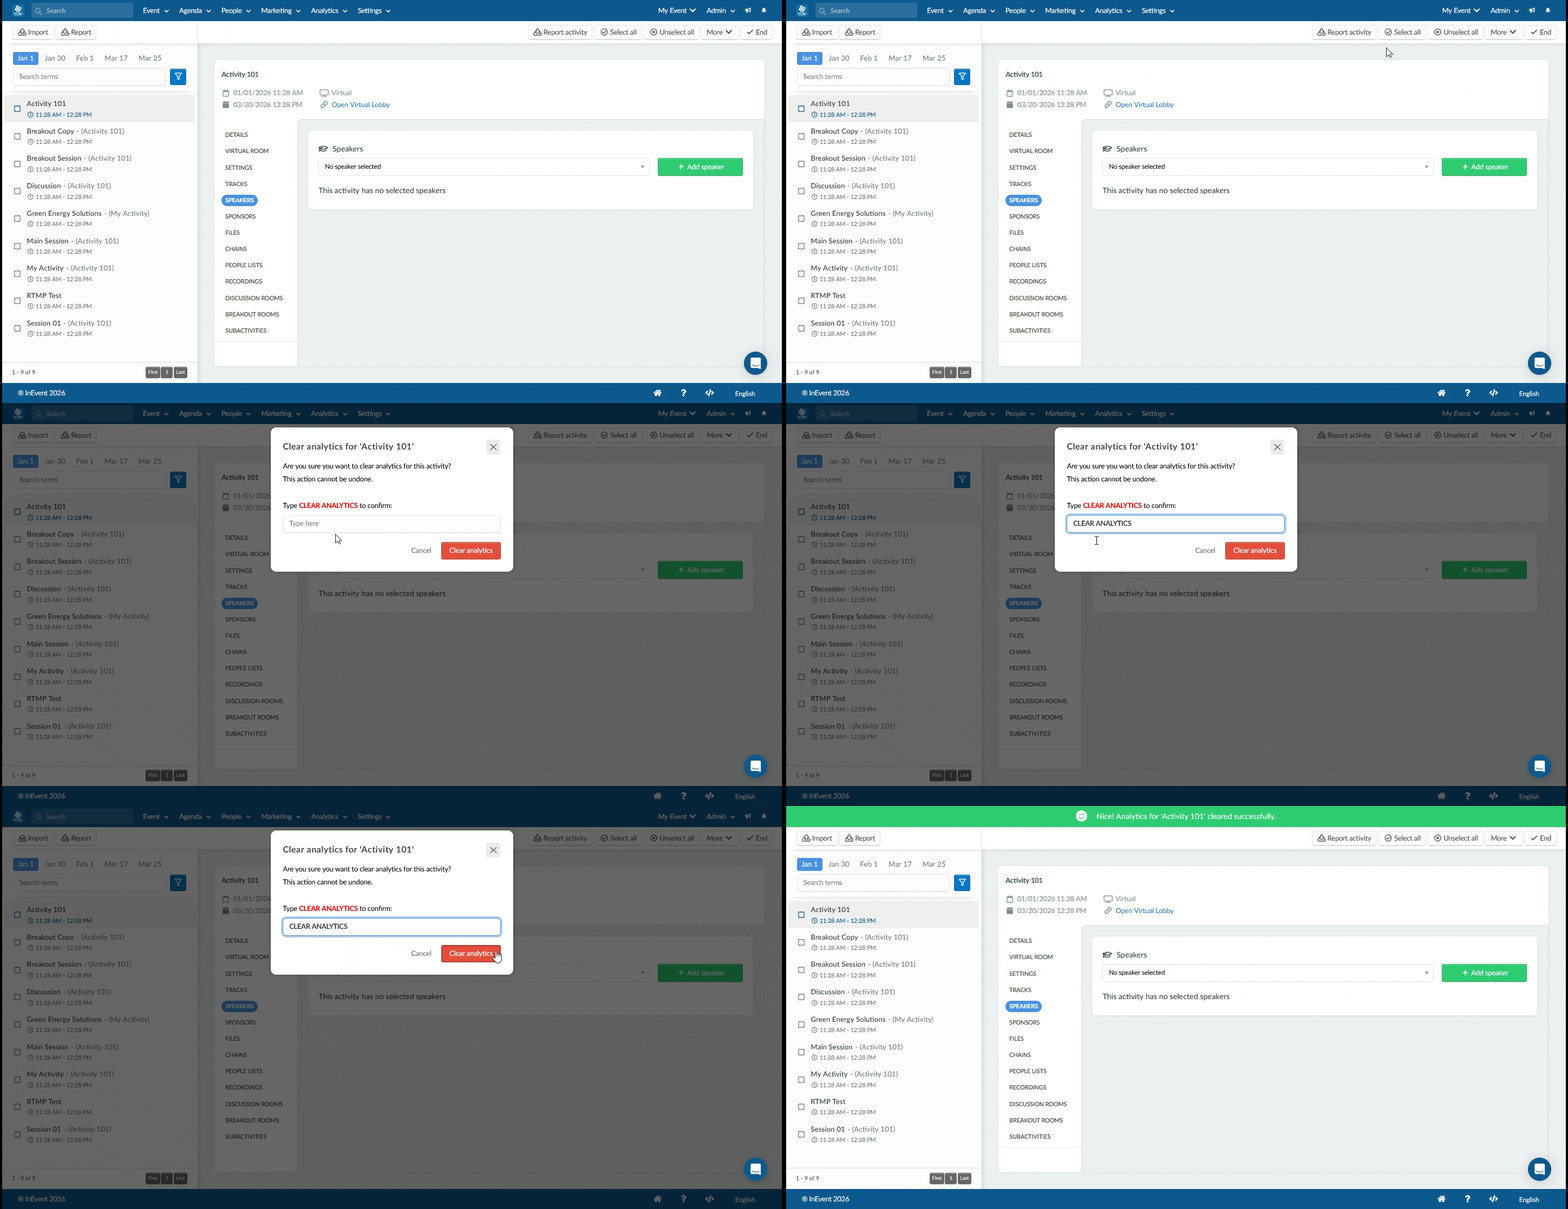
In order to clear and delete all analytics for a specific activity report in an event, follow these steps:
Go to Agenda > Activities and click on the desired activity.
Press Edit and click on Clear analytics.
A new pop-up window will appear where you will need to type in CLEAR ANALYTICS in the field provided and then click on the red button.
Finally, click on Report activity and view your activity report, which will now clear all analytics in the report such as: avgTimeSpent, totalViews, uniqueViews, avgTimeSpent, Reactions, etc.
 Updated 1 hour ago
by
Faisal Durrani
Updated 1 hour ago
by
Faisal Durrani